1
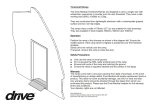
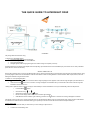
THE QUICK GUIDE TO HYNDSIGHT CRUZ
CHARGING
Fully charge both devices before using.
To Charge Your Hyndsight System
Connect the USB cable to the Wall Charger.
Insert the straight jack into the Camera/Monitor.
Plug in the Wall Charger.
Red light appears when charging. Red light turns off when charge is complete (3-4 hours).
Hyndsight Systems are equipped with multiple functions depending upon if Multi-Camera mode is Disabled (only one camera can be used) or Enabled
(more than one camera can be used).
SINGLE CAMERA SET-UP
Remove the protective screen cover from the Monitor before using. HVS recommends pairing Cameras before mounting them to desired surfaces. Using
your best judgment, attach Camera and Monitor Antennas either before or after mounting Devices to desired surfaces. Note: Unpair, Select, and Scan
settings are disabled in Single Camera mode.
To Power On* Your Hyndsight System
Hold Monitor Power
button for 3 seconds until the orange Hyndsight screen appears. Green Indicator Light will light up to show Monitor is
on.
Hold Camera Power
button for 2-3 seconds. An image will appear on the Monitor after you release the Power button. Indicator Light will
illuminate to show Camera is on.
*Always power up Monitor before Camera to help sync automatically. If Camera and Monitor do not sync automatically, follow the steps below:
Press the Menu
Scroll to Pair using
Select Pair by hitting the Enter
button.
Monitor screen will go white and the Green Indicator Light will flash.
While Monitor's Green Indicator Light is flashing, press the Pair
button.
or
.
button on Camera and an image will appear on Monitor.
After Single Camera is paired, the viewing perspective may be changed between Mirror-image or Forward-facing views. Single Camera mode defaults
to a Mirrored view. Mirrored view is ideal when backing up to provide you with an accurate view of the locations of objects behind you.
Forward-facing View
Displays a view consistent with what you would see if you were viewing an object head-on.
To Switch to Forward-facing View
Press the Menu
Scroll to Mirror using
Select Mirror by hitting the Enter
Toggle using
Select F by hitting the Enter
button.
or
or
.
button.
to highlight F in red.
button.
To revert back to the Mirror-image view, repeat above steps but select M instead of F.
Brightness
The brightness of the unit can easily be decreased or increased.
To Adjust Brightness
Press
to decrease brightness.
Press
to increase brightness.
To Power Off your Hyndsight System
Hold Camera Power button
along the top of the screen.
Hold Monitor Power button
for 2-3 seconds until image disappears from Monitor. Monitor screen will be white and will display Signal Lost
for 3 seconds until screen goes black.
Note: To place Monitor in power save mode at any time, press Monitor Power button for 1 second to display a dim image. Press the Monitor Power
button again for 1 second to restore full color display. Your Monitor is not fully Powered Off until both the Monitor Green Indicator Light is off and the
screen is dark black. Power save mode is ideal for conserving Monitor battery life without having to fully turn off the system when not in immediate use.
FLUSH BRACKET MOUNTING
To attach the Camera or Monitor to the desired smooth, clean, flat, non-porous surface, follow the instructions below. Note: The mounting surface and
the Suction Cup should be clean and dry. Wipe with a clean, damp cloth and let dry completely. The Flush Mount should be installed at room
temperature (avoid extreme heat or cold). Do not moisten the Suction Cup.
Thoroughly clean the smooth, flat, non-porous surface, making sure the surface is dry and free of scratches.
Twist the Camera or Monitor onto the flush mount's threaded mounting stud. Do not remove the Rubber Washer.
Hold the Camera in place and firmly tighten the Lock Ring.
Position the Suction Cup Lever in the "down" position.
Position the Suction Cup on your mounting area. In order to remove the Flush mount easily, HVS recommends that the Suction cup Release
Tab be at the bottom of the installation area.
Push the Suction Cup firmly against the mounting surface (the Suction Cup Lever should be in the "down" position). Press the Suction Cup
Button and pull the Suction Cup Lever up and over the Button. You will feel the Button move out during this procedure; this action locks the
Suction Cup into place.
Loosen the Flush Mount Adjusting Knob, position the Camera or Monitor, and then retighten the Adjusting Knob.
Check the Camera's position as necessary by loosening the Adjusting Knob. Tighten securely when in position.
To release the Suction Cup, move the Suction Cup Lever back into its "down" position. Lift the Suction Cup Release Tab to help break the
hold.
INTENDED USE
Hyndsight Vision Systems wireless cameras and monitors are to be used as an aid for visualizing blind spot conditions or for monitoring locations not always in clear sight. Use of your own common sense
and judgment is always indicated before and during use of this product. Hyndsight is not responsible for accidents of actions that result under use of this product.
IMPORTANT SAFETY NOTICE
Program you settings before you operate any vehicle.
Do not program product while driving or while in motion. When adjusting settings, stop in a safe and legal manner before doing such operations.
Hyndsight Vision Systems, Inc. products are designed for use in outdoor activities. While using your Hyndsight product, safety rules must be followed to prevent accidents that can result in injury or death
to yourself and/or others.
Distractions can be dangerous and result in an accident in which you or others could be injured. Please do not solely rely on screen image alone. No technology is a replacement for your attentiveness.
Do not disassemble the Camera or Monitor.
Do not attempt to remove the internal, non-replaceable battery in the Camera or the Monitor. Do not expose the product to abnormal conditions such as extreme heat or humidity or prolonged sun
exposure.
When disposing of the unit, have the batteries removed and recycled by a professional waste electronics treatment provider.
Do not use paint thinner or rubbing alcohol to clean unit.
Do not subject unit to strong impact. Do prevent the Camera and Monitor from falling.
Do not submerge the Camera or Monitor in water. Do not subject unit to prolonged exposure to rain, snow, and other outside environments.
Sunglasses with polarized lenses may impair the visibility of the display.
Do charge the units indoors in dry conditions. Do not charge the units around water or during rain when unit is installed outdoors. Doing so may cause electrical shock and/or injury to you or the device.
CAUTION
In order to prevent improper operation of the AC Adaptor, please read the user manual carefully. For your safety, please use only the AC Adaptor provided. The manufacturer will not be responsible for
any losses caused by converters and chargers not provided by the manufacturer. IMPORTANT Please use only the socket match with the AC Adaptor. Use of improper socket may cause electrical and
fire damage. Only charge the Camera and Monitor in dry environments. Charging the Camera and/or Monitor in the rain or in a wet environment may cause electrical shock, fire, personal injury and/or
product destruction. Improper use of the Camera and/or Monitor and accessories will void the warranty.