1
Barcode Tagger 600
Barcoded Tray and Sack Label
Computer
User’s Guide
Copyright © 1998 Whittier Mailing Products. Whittier Ca. All rights reserved.
Barcode Tagger 600
Users Manual
User’s Guide ...............................................................................................................................................1
Introduction................................................................................................................................................4
Features
4
Installing the Barcode Tagger 600 Computer .........................................................................................5
UNPACKING AND INSPECTION
5
Inspect the contents of the box. If any items are missing or damaged, notify Whittier
Mailing Products at once. (562) 464-3000 / FAX (562) 464-3007
5
List Barcode Tagger 600 Packing .......................................................................................................5
INSTALLING THE CABLES
5
INSTALLING THE PRINTER
5
Operation....................................................................................................................................................6
THE UTILITIES MENU
6
System Functions .................................................................................................................................7
Mode
7
ACT Settings
7
Edit ACT list
8
Device Settings
9
Update System ...................................................................................................................................10
Routine data updates by diskette
10
Making an update diskette
10
Updating by diskette when the currently installed version won’t start
11
JOB MODE
12
Create/Modify job ..............................................................................................................................13
The Job Name editor
13
Category
14
Origin
14
Standard Origin Line
14
Custom Origin Line
14
Routing Tags
15
Act Tags
15
Saving a job
16
Importing & Exporting Jobs ..............................................................................................................16
Printing Jobs......................................................................................................................................16
New Job
16
Non-new Job
17
The menu section
17
The tag section
18
Printing a job as is (without making any changes)
18
Adding and deleting tags
18
ON DEMAND MODE
19
Tag screen..........................................................................................................................................20
Individual carrier-route tags (entire sack or tray is the same carrier-route) ....................................20
5 Digit tags ........................................................................................................................................21
3 Digit tags ........................................................................................................................................21
Mixed ADC tags / Mixed AADC tags.................................................................................................22
Blank tags ..........................................................................................................................................22
Repeat previous tag ...........................................................................................................................22
ACT ONLY MODE
22
Barcode Format.................................................................................................................................23
Print ACT Tags ..................................................................................................................................23
RAW DATA MODE
23
FILE FORMAT CONVERSION
24
Appendix ‘A’ ............................................................................................................................................25
Tagger Job File Programming Format
25
TJF Overview.....................................................................................................................................25
Copyright © 1998 Whittier Mailing Products. Whittier Ca. All rights reserved.
2
Barcode Tagger 600
Users Manual
Command Format and Syntax ...........................................................................................................25
TJF file sections .................................................................................................................................25
Appendix ‘B’ ............................................................................................................................................29
Tagger Data Stream Programming Format
29
TDS Overview ....................................................................................................................................29
Hardware Standard ...........................................................................................................................29
Software Standard .............................................................................................................................29
TDS command strings
30
Appendix ‘C’ ............................................................................................................................................31
Class, Type, Sortation, Subtype codes
31
Copyright © 1998 Whittier Mailing Products. Whittier Ca. All rights reserved.
3
Barcode Tagger 600
Users Manual
Introduction
The Barcode Tagger 600 tray and sack label computer barcoder is the next
evolutionary step beyond the popular Barcode Tagger 500. The 600 combines
the features of the BagTagger II with the most-often-asked-for enhancements,
along with brand-new and powerful capabilities.
Like all Tagger computers, the Barcode Tagger 600 is built around the
Tagger Engine.
Using a 3 Digit or 5 Digit ZIP code for input, the Tagger Engine references the
U.S. Postal Service’s most recently published labeling lists to look up the correct
destination line and Content Identifier Number (CIN) for any class and category
of domestic mail for any valid ZIP code in the United States.
This data, along with a bar code and other information, is formatted for the
correct text size, graphic image position, etc. as specified by the U. S. P. S.
Domestic Mail Manual and output to a printer for printing on special WMP tag
stock that is produced to exact DMM specifications.
Features
! Prints accurate, correct tray and sack tags instantly for every class and
category of Domestic mail, for every ZIP code in the United States
! Fast data lookup
! Creates, prints and saves groups of tags as batch jobs
! Stores up to nine jobs internally, available any time for instant recall
! Unlimited job storage on 3 1/2” floppy disks
! Entire jobs can be created on another computer and transferred to the
Tagger
600 by floppy disk or serial data link.
! Automated batch printing of jobs from floppy disk
! Manual mode for “On Demand” tag printing using keypad input
! Data updates via floppy disk- Internet or US Mail
! Makes backup copies of data updates
! Bright, easy-to-read backlit display
! No diskette needed for normal operation- program and update data is
stored
in permanent flash memory
Copyright © 1998 Whittier Mailing Products. Whittier Ca. All rights reserved.
4
Barcode Tagger 600
Users Manual
Installing the Barcode Tagger 600
Computer
UNPACKING AND INSPECTION
Carefully remove all items from the shipping carton. Save the rigid packing foams
and outside shipping carton. If your Barcode Tagger 600 ever requires service you
may be asked to ship the unit to Whittier Mailing Products in the original carton.
Inspect the contents of the box. If any items are missing or damaged, notify
Whittier Mailing Products at once. (562) 464-3000 / FAX (562) 464-3007
List Barcode Tagger 600 Packing
(1) Barcode Tagger 600 computer
(1) Table top power supply with AC power cord
(1) Barcode Tagger 600 User’s Manual (this manual)
INSTALLING THE CABLES
1) Remove the Barcode Tagger 600 computer, power supply and AC power cord.
2) Attach the printer cable to the 9-pin serial connector on the back of the computer
marked “Printer” or “Serial printer”, locking down with the two finger screws.
3) The power supply consists of a black tabletop power supply with a 5 pin DIN style
connector and a standard equipment AC power cable. The switch on the power
supply has the markings “0” (off) and “1” (on).’ Insert the power connector into the
round socket on the back of the Barcode Tagger 600 computer.
4) Turn the power supply off, and plug the AC power cord into a grounded AC power
socket. Although the computer and the printer have their own power switches it is
preferable to use a power strip with a separate power switch so that the printer can
be turned on and off at the same time.
5) If you are going to be printing tags directly from a host computer, connect one end of
the Serial Data Link cable to the serial port labeled “Serial Data Link” on the back of
the Barcode Tagger 600, and connect the other end of the cable to the appropriate
serial port on the host computer.
INSTALLING THE PRINTER
Refer to the instructions that come with the printer for printer installation details.
Before attempting to use the Barcode Tagger 600, make sure the printer has tag stock
properly loaded into it, the power is on, the printer data cable is properly connected
between the Barcode Tagger 600 and the printer, and that the printer is on line.
Copyright © 1998 Whittier Mailing Products. Whittier Ca. All rights reserved.
5
Barcode Tagger 600
Users Manual
Operation
THE UTILITIES MENU
When all cables are properly installed, turn on the power switch on the Barcode
Tagger 600 power supply. After a few seconds the Whittier Mailing Products copyright
screen will come up, and after approximately 15 seconds the Job to execute screen
appears.
Job to execute
0) << not currently assigned >>
1) << not currently assigned >>
2) << not currently assigned >>
3) << not currently assigned >>
4) << not currently assigned >>
5) << not currently assigned >>
6) << not currently assigned >>
7) << not currently assigned >>
8) << not currently assigned >>
9) << not currently assigned >>
PREV) Utilities Menu
The Job to execute menu allows you to execute jobs you have created. We will get
back to this later. First we need to become familiar with the Utilities menu. Press ‘P’
to enter this menu.
The Utilities menu will look like the picture below. This is not how it always looks
though. If we change modes this menu changes to support the mode you are in. The
only two options that are always there are System Functions and Update System.
Job Utilities
1)
2)
3)
4)
Execute job
Create/Modify job
Import job from diskette
Export job to diskette
9) System Functions
0) Update System
Copyright © 1998 Whittier Mailing Products. Whittier Ca. All rights reserved.
6
Barcode Tagger 600
Users Manual
System Functions
System Functions is choice 9 under the Utilities menu. From this menu you can
change modes, print & edit the ACT list, select your printers and paper, change the
print buffering default and backup & restore your configuration.
System Functions
1)
2)
3)
4)
Mode
ACT Settings
Device Settings
Print Buffering
(Job)
(NO)
Mode
The mode you are in will determine how the Barcode Tagger 600 functions. By
pressing ‘1’ you can see the possible modes. There are four modes: Job, On Demand,
Act Only and Serial Data. Job mode is used when you want to print tags using jobs you
have created. On Demand is used to print tags without making a job first. ACT Only is
if you are only printing ACT tags. Serial Data is for reading information from another
computer to print tags.
If you change modes you will notice that your options change to fit with the selected
mode.
ACT Settings
Act Settings allows you to print the ACT list, edit the ACT list, import and export the
ACT list. Press ‘2’ to enter ACT Settings. If you want to print the ACT list press ‘1’. It
will print to your ACT printer. Pressing ‘2’ allows you to edit the ACT list which is
explained in further detail below. Option 4 allows you to import an ACT list from a
diskette and option 5 allows you to export an ACT list to a diskette. This is useful if you
have another 600 or a 2000 so that you only have to edit the table once. Then using a
diskette you can copy the ACT list to the other computer.
Copyright © 1998 Whittier Mailing Products. Whittier Ca. All rights reserved.
7
Barcode Tagger 600
Users Manual
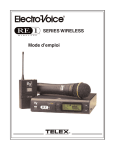
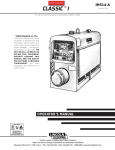
Edit ACT list
You can edit the ACT list by pressing ‘2’ from the ACT Settings menu.
000
010
020
030
040
050
060
070
080
090
0 1
2
3
4
5
6
7 8
9
XXX XXX XXX XXX LGA LGA SJU SJU SJU SJU
BDL BDL BDL BDL BOS BOS BOS BOS BOS BOS
BOS BOS BOS BOS BOS BOS BOS BOS BOS BOS
BOS BOS BOS BOS BOS BOS BOS BOS BOS BOS
BOS BOS BOS BOS BOS BOS BOS BOS BOS BOS
BOS BOS BOS BOS BOS BOS BOS BOS BOS BOS
BDL BDL BDL BDL BDL BDL BDL BDL LGA LGA
EWR EWR EWR EWR EWR EWR EWR EWR EWR EWR
PHL PHL PHL PHL PHL PHL PHL PHL EWR EWR
JFK JFK JFK JFK JFK JFK JFK JFK JFK XXX
Airport: XXX
ZIP to View: _
N) Edit airport
--) to change
On the left hand column you will see 3 Digit ZIP Codes and along the top is the third
digit of the 3 Digit ZIP Code. For example if you look at row 020 and column 6 you will
see the airport for ZIP Code 026. To view another ZIP Code enter the 3 Digits in and
press ENTER. In the Airport field you will see the 3 letter abbreviation for that airport.
Also the table of airports will change to the table that ZIP Code is in. If the Airport field
has XXX it means that there is no Airport code for that ZIP Code.
To change one of the airports press the hyphen key (-). When the option next to the
hyphen says “to change”, pressing it allows you to change and airport. When the
option next to the hyphen says “to view”, pressing it only allows you to view airports and
not change them. You can also tell if you are on view or change by what the entry line
says. If it says “ZIP to View”, you can only view. If it says “ZIP to CHANGE”, you are in
the change mode. Now that your entry line says “ZIP to CHANGE”, press ‘N’ to edit the
airport.
You can see the current name selected under Airport. By typing ‘88’ and ENTER, the 3
Letter airport will be cleared. Now you can enter in the new 3 Letter airport by using the
table. First you enter the number of the row and then the column and press ENTER.
When you are finished type ‘99’ and ENTER. You will return back to the previous
screen. If you want more explanation on how to use this table refer to the Job Name
Editor. In the airport field you should see the 3 Letter airport you made. Type in the 3
Digit ZIP Code you would like to change to that airport and ENTER. You will see the
table change with the airport code you entered at the location of the ZIP Code you
specified. If you would like to change more ZIP Codes to that airport enter those in
also. If you simply want to view other ZIP Codes make sure you press the hyphen key
to change back to view or the ZIP Code you enter will be changed. When you are
finished press ‘P’ and you will be asked if you want to save the changes.
Copyright © 1998 Whittier Mailing Products. Whittier Ca. All rights reserved.
8
Barcode Tagger 600
Users Manual
Device Settings
Device Settings is where you set up all the devices that connect to your 600 such as
your printers, scanner, and computer. Enter Device Settings by pressing ‘3’ from the
System Function menu.
Device Settings
1) Tray Printer
2) Sack Printer
3) Pink Tray Printer
4) Pink Sack Printer
5) ACT Printer
Eltron 2122, LT
198
Eltron 2122, LT
Eltron 2122, LT
198
Eltron 2122, LT
095
Eltron 2642, LT5
LT5
7) Scanner
8) Computer
Symbol LS
Serial Data
COM2
095
COM2
COM2
COM2
COM1
COM2
COM1
ENTER) Accept Configuration
On the left side of the screen is all of the possible devices that can be connected to
your Barcode Tagger 600. In the middle-left column is the kind of device selected for
each possibility. In the middle-right column (only on choices 1-5) is the media type
(paper type) you are using in the printer. On the right side is the port that device
connects to. To change any of these settings press the number which corresponds to
the device you want to change.
The following screen will show two or three choices: Driver, Port and Media Type (If
you selected a printer). Also next to each choice you will see what you currently have
selected. The driver is the type of device and is the what appears in the middle column
of the previous screen. Media type is the type of paper and only appears if you are
changing the settings for a printer. Port is the port on the back of the Barcode Tagger
600 that the device is connected to and also appears on the right column of the
previous screen.
To change any of the settings press the number corresponding to the choice you want
to change. On the next screen you will see the list of possible choices and also one
which says “Current” indicating the one you currently have selected. Once you have
made your selection you will be returned to the previous screen. You can make more
changes or press ENTER to save the changes and return to the Device Settings
menu.
If you have problems when printing and the Barcode Tagger 600 tells you that it can’t
find your printer you probably have the wrong port selected. This is where you would
change it to the correct port.
setting or not.
Copyright © 1998 Whittier Mailing Products. Whittier Ca. All rights reserved.
9
Barcode Tagger 600
Users Manual
Update System
An essential ingredient for the production of accurate tray and sack routing labels is the
ability to keep abreast of the latest labeling changes published by the U. S. Postal
Service.
Whittier Mailing Products offers data update subscriptions to ensure the accuracy of
labels produced by the Barcode Tagger 600. Subscribers can update either by
diskette.
The latest updates are available 24-hours-a day for direct download from WMP’s
Internet site for downloading onto diskette. Subscribers who do not have on-line
access will receive update diskettes by U.S. Mail. Diskettes are mailed a minimum of
four times per year, and as often as important changes warrant. Our Internet address
is: http://www.traytag.com
Update procedures
All updates begin by selecting “Update system” from the Utilities menu, and making a
selection from the Update system menu.
1) Update from diskette
2) Create update diskette
Routine data updates by diskette
1) From the Update system menu, select “Update from diskette”. The screen will
display the message, “Locating update on diskette . . . done”. When the update
program is identified and begins loading, the display shows the message, “Loading
nnnn-nnn (the version #) . . .”
When the new update is loaded (after approx. one minute or so) the screen displays
“done”, then “Validating update . . . done” The screen shows the message, “Restarting
system”, and about one second later there is a short beep. About 10 seconds later the
copyright screen will appear and the system will restart as usual, with all the previous
settings transferred to the new update.
Making an update diskette
Making a backup copy of each new data update is strongly recommended. After
updating the data by disk you can make a backup copy on floppy disk directly from the
Barcode Tagger 600. A backup copy of an update disk can also be made on a
standard PC, but it may not copy or load reliably due to differences between the disk
drives.
The first backup you make should be of the version that came already installed.
1) Prepare a blank IBM or MS-DOS formatted high-density (1.44M) diskette. Make
sure the write-protect notch is closed.
2) Select “Utilities” from the main menu.
3) From the Utilities menu select “Update System”.
4) From the Update System menu select “Create update diskette”. This brings up the
Update diskette screen.
Copyright © 1998 Whittier Mailing Products. Whittier Ca. All rights reserved.
10
Barcode Tagger 600
Users Manual
5) Insert the disk into the disk drive and press ENTER. The message ”Creating nnnnnnn update diskette” will be displayed while the update disk is being made. You will
then be returned to the Update System menu.
6) Press ‘P’ to return to the Utilities menu. Press ‘P’ again to get back to the Main
menu.
Updating by diskette when the currently installed version won’t start
If the currently installed update won’t start or doesn’t work correctly (if the update disk
was damaged in the mail, for example) you can still load in a new update without
accessing the Update system menu as long as you have a working diskette copy of
a recent update. This is why you make backup copies of your updates.
1) Turn the computer off. Wait a few seconds, then turn it back on. After a short wait
the Copyright screen will appear, and the message “Press NEW to enter Setup” will
show at the bottom of the screen for about one second.
2) Press the “NEW” key before the message disappears. If the diskette installation
screen doesn’t come up, re-start the computer and try again.
Tagger/600, release 9804-002
1) Complete reinstall, losing current settings (jobs, etc)
2) Update software from diskette
3) Insert an update diskette into the disk drive.
4) To keep the internally stored jobs and settings, select “Update software from
diskette”. This is the same as updating from the “Update system” menu.
5) Choose “Complete reinstall” to load the update and delete all previous jobs and
settings. The rest of the installation is identical to routine diskette updating from
the
Update system menu.
Copyright © 1998 Whittier Mailing Products. Whittier Ca. All rights reserved.
11
Barcode Tagger 600
Users Manual
JOB MODE
Job Mode allows you to print tags using jobs that you create. To enter job mode, go
into System Functions from the Utilities menu. Choose ‘1’ for Mode and then ‘1’ for
Job Mode.
After entering job mode the Job to execute screen will appear. It will show a list of
your jobs. If you have a job created that you would like to use press the number that
corresponds to that job. To see you other options for job mode, press ‘P’ to go to
Utilities.
“Execute job” returns you back to the Job to execute screen. “Create/Modify job”
allows you to create a new job or modify a job you have already created. “Import job
from diskette” allows you to import a job from a diskette you made on a PC or one that
you have stored on another 600 or on a 2000. “Export job to diskette” allows you to
export a job to a diskette you have created on the 600 to use on another 600 or 2000.
Copyright © 1998 Whittier Mailing Products. Whittier Ca. All rights reserved.
12
Barcode Tagger 600
Users Manual
Create/Modify job
By pressing ‘2’ from the Utilities menu you will enter the Job to MODIFY/CREATE
menu. This menu looks similar to the Job to execute menu. If you want to modify a
job you have press the number corresponding to the job you want to modify. If you
want to create a new job press a number which corresponds with “<< not currently
assigned >>”.
1) Name
Tags in job
2) Category
3) Origin
()
(0)
(First Class)
(Letters)
(Automated)
(01 WHITTIER CA 90605)
4) Routing Tags
5) Act Tags
6) Print buffering
Current default
(NONE)
(NO)
(Use Default)
(NO)
9) Exit WITHOUT saving
0) Save and exit
This is the next screen under Create/Modify job. If you are modifying a job, the job’s
name will appear in the parenthesis on the same line as “Name”. If this is a new job,
press ‘1’ to enter the name of the job.
If at any time you want to leave a menu without the changes being saved press ‘NEW’.
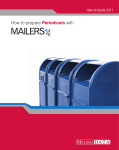
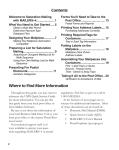
The Job Name editor
The Job Name editor may appear somewhat confusing at first, but it is really just four
simple tables sharing one screen. Three of these tables contain all of the available
alphanumeric characters, and the fourth consists of some simple editing commands. In
the alphanumeric tables, each character is represented by a unique two-digit code
number derived from the row #s and column #s of the tables. The code number for
each character is row # : column #.
0123456789
0123456789
0 ABCDEFGHI
1 JKLMNOPQRS
3 0123456789
4 !"#$%
6 :;<=>?
77) del
88) clear
Job Name:
0123456789
2 TUVWXYZ
5 *+,-./_
99) done
Enter Code:
Copyright © 1998 Whittier Mailing Products. Whittier Ca. All rights reserved.
13
Barcode Tagger 600
Users Manual
1) Begin entering the job name by entering the two-digit code number of the first
character, then press ENTER. The first character will appear in the lower left
corner of the screen.
2) Enter the code # for the next character, followed by ENTER.
3) Continue in this manner until the full job name is entered. If you make a mistake,
press “77” < ENTER > to delete the last character or press “88” ENTER to clear the
entire line.
4) When you are finished press “99” ENTER to save the job name and exit from the
Job Name editor.
“Tags in job” tells you how many tags are in the job you have selected. If this is a new
job it will be zero. Otherwise it will be the number of tags that are printed from the job.
Category
“Category” shows the type of mail sortation for the job. The default settings are: First
Class, Letters, Automated. To change any of these settings, press ‘2’. The first menu
is a list of possible classes of mail. The second menu gives a list of types based on the
class of mail you chose. If at any time you wish to back up to the previous menu, press
‘P’. After you make your selection for the type of mail, a list of possible sortations
appear based on the class and type of mail you are doing.
Origin
In order to generate the correct destination information, the Barcode Tagger 600 needs
to know the Post Office of Origin (What ZIP code the job is being mailed from). This
information is also used to generate a correct Origin Line (third line) on each tag.
Standard Origin Line
The quickest and simplest way to input the Origin information is to choose Standard
Origin Line from the Origin Line menu. You will then be asked to input the ZIP Code
of Entry Post Office. Enter the 5 Digit ZIP code of the post office you are mailing from,
then press ENTER.
If an origin ZIP code was entered previously, you can use it by pressing the hyphen key
instead of entering a new ZIP code.
Next, you will be asked to enter your Mailer Code. The Mailer Code is a two-digit ID
number that local post offices assign to certain large-volume mailers (such as utility
companies). If you don’t have a Mailer Code or don’t know if you have one, just press
ENTER.
If a Mailer Code has already been entered from a previous job, you can use this
number by pressing the hyphen key instead of entering a new number.
With this information an origin line will be printed on each tag containing the Mailer
Code (if used) and the City, State and ZIP code of the Post Office of Mailing.
Custom Origin Line
Many mailers prefer to use a Custom Origin Line, instead. The text of a Custom Origin
Line can be anything you want (such as your Company Name.) Selecting the Custom
Origin Line option brings up the Custom Origin Line menu.
Copyright © 1998 Whittier Mailing Products. Whittier Ca. All rights reserved.
14
Barcode Tagger 600
Users Manual
Custom Origin
1) << No Change >>
2) ACME ROCKET SKATE CO. BURBANK CA 91501
3) ACME TORNADO SEED CO. BURBANK CA 91501
4)
5)
6)
7)
8)
Re-loading the most recently selected Custom Origin Line:
1) Select “<< no change >>“ If you wish to use the same Custom Origin Line that was
used in the previous job. Note that the display will now show the previously
selected 3 Digit Point of Entry.
2) Press the hyphen (-) key to use the previous Point of Entry, or enter a new 3 Digit
Point of Entry and press ENTER.
Using a previously saved Custom Origin Line as is:
1) Press key #2 - 8 to select a previously saved Custom Origin Line. This launches
the Custom Originator Line editor. Enter “99” and press ENTER.
3) Press the hyphen key to use the displayed Point of Entry, or enter a new 3 Digit
Point of Entry and press ENTER.
Clearing (deleting) a previously saved Custom Origin Line:
1) Select the Custom Origin Line you want to delete by pressing key #2 - 8. This
brings up the Custom Originator Line editor.
2) Press “88” and ENTER.
Routing Tags
Routing tags allows you to choose between Tray, Sack, Tray Fill In, Sack Fill In or
None. Tray labels are printed on 1 15/16 x 3 ¼ inch paper and are formatted as
required for mailing trays. Sack Labels are printed on 15/16 x 3 5/16 inch paper and
are formatted as required for mail sacks. Fill In tags only prints out the Content and
Origin lines. This type of tag is not acceptable for automated mail. If you do not want
to print one of these type of tags because you are only doing ACT tags, choose “<<
None >>”.
Act Tags
ACT (air contract transportation) tag is a printed tag that bears barcoded information
for routing mail containers to be transported by contract air carriers. By pressing ‘5’
you can toggle between “YES” or “NO” for printing ACT tags.
Copyright © 1998 Whittier Mailing Products. Whittier Ca. All rights reserved.
15
Barcode Tagger 600
Users Manual
Saving a job
Choose “Save and exit” to save the job. The job will not save if you have not entered a
name for it. The Job to MODIFY/CREATE screen will appear and your job name
should be there. You can now modify or create another job or press ‘P’ to enter the
Utilities menu.
Importing & Exporting Jobs
You can import jobs you have made on another machine or from your PC. You can
also export jobs you have made on the 600 to a disk to use on another machine. To do
either one of these, go to the Utilities menu.
To import a job, make sure the diskette is in the floppy drive and press ‘3’. You will be
asked which job you would like to import and then which location on your list of jobs
you want this job to be placed (1-9).
To export a job, make sure the diskette is in the floppy drive and press ‘4’. You will be
asked which job on your list of jobs you want to export.
Printing Jobs
Select the job you want to use from the Job to execute menu. One of two screens will
appear depending on if you have used the job before.
New Job
Tag: _
MXD LONG BEACH CA
FCM LTRS BC WKG
01 WHITTIER CA 90605
907
This is where you enter the ZIP Code of the destination. If you are doing a mixed tag
leave this field blank and press ENTER. To print Carrier Route tags enter you 5 Digit
ZIP Code and then press the hyphen key. A screen will appear with different options
such as Carrier Route and Rural Route. When you make your selection you will return
to the tag screen where you will need to enter the route number. After you have the
ZIP Code you want entered in, press ENTER. A screen of possible tags to print will
appear based on the ZIP Code you entered. If you want to print more than one of this
type of tag press the hyphen key to change the quantity. Make your selection of the
type of tag you want. The tags should be printed and you will be returned to the tag
screen. The format of the tag you just printed will also appear on this screen. Do this
for all of the tags you want in this job.
When you are done press NEW and you will be asked if you want to save the job,
discard changes or continue current job. To save the job press ‘1’ and the next time
you use it you will see the screen for a non-new job appear. For more information on
printing different types of tags refer to the On Demand section of this manual.
Copyright © 1998 Whittier Mailing Products. Whittier Ca. All rights reserved.
16
Barcode Tagger 600
Users Manual
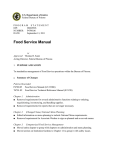
Non-new Job
<JOBNAME> (1 of 4)
P)rev tag
N)ext tag
-) Quantity = 1
PALATINE IL
FCM LTRS 3D UPGR
01 WHITTIER CA 90605
ENTER) Print this tag
1) Print rest
2) Enter manually
600
Once you have loaded in a job file, you can print it out from the Job Print screen. The
Job Print screen may look a bit confusing, but it becomes easy to understand if you
think of it as two separate screens combined into one. The Job Print screen consists of
the tag section and the menu section.
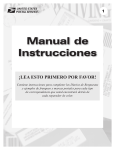
The menu section
The menu section displays four items of information:
The name of the job as it was listed on the Job menu (“JOBNAME”).
The total number of data entries in the job file “(1 of 4)”.
The sequential number of the next tag to be printed “(1 of 4)”.
How many of the currently displayed tag are to be printed (“Quantity = 1)”.
JOBNAME (1 of 4)
P)rev tag
N)ext tag
-) Quantity = 1
ENTER) Print this tag
1) Print rest
2) Enter manually
The menu section also provides five functions:
P) rev tag: Press the “P” key to display the previous tag in the job file.
N) ext tag: Press the “N” key to display the next tag in the job file.
ENTER): Press the “ENTER” key to print the currently displayed tag.
1) Print rest: Press the “1” key to print the rest of the job, starting with the
currently displayed tag and printing each subsequent tag until the last tag in the job
file has been printed.
2) Enter manually: To manually enter and print tags that are not in the job file
press ‘2’. This brings up the Tag screen. When you are finished manually entering
tags, press “P” to return to the Job Print screen.
Copyright © 1998 Whittier Mailing Products. Whittier Ca. All rights reserved.
17
Barcode Tagger 600
Users Manual
The tag section
The tag section displays the next tag to be printed. Initially this is the first tag in the job
file.
PALATINE IL
FCM LTRS 3D UPGR
01 WHITTIER CA 90605
600
Printing a job as is (without making any changes)
1) After the job is loaded and the Job Print screen comes up, press ‘1’ to print out the
job.
2) After all tags have printed, press NEW. This brings up the Save Changes menu.
3) Select “Discard changes”. You will be returned to the Job to execute menu.
Adding and deleting tags
Adding tags to the end of a job:
1) After the job is loaded, at the Job Print screen press “1” to print out the job.
2) After all tags have printed, press “2” to manually enter and print additional tags.
3) Press “P” to return to the Job Print screen.
4) Press “NEW”
5) If you don’t want the manually printed tags to be a permanent part of the job file,
select “Discard changes” from the Save changes menu. You will be returned to the
Job menu, and the original version of the job will remain unchanged.
6) To make the additions to the job permanent, select “Save job” from the Save
changes menu. You will be returned to the Job menu, and the modified version of
the job will replace the original job in the Barcode Tagger 600’s memory. The new
version of the job will consist of the original tags plus the additional tags added on
at the end.
7) If you decide to add more tags to the job before quitting, select “Continue current
job” from the Save changes menu. You will be returned to the Job Print screen.
Press ‘2’ to manually enter and print additional tags. Go back to step #2.
Adding tags in the middle of a job:
1) With the job loaded, at the Job Print screen press ENTER to print the first tag.
2) Continue to press ENTER until all the tags have been printed up to the point where
you want to insert additional tags.
3) Press ‘2’ to manually enter and print additional tags.
4) Press ‘P’ to return to the Job Print screen.
5) Press ‘1’ to print the remainder of the job.
6) After all tags have been printed, press NEW.
7) From the Save changes menu, select “Save Job” to keep the changes, “Discard
changes” if you don’t want the original job file changed, or “Continue current job” to
escape back to the Job Print menu.
Copyright © 1998 Whittier Mailing Products. Whittier Ca. All rights reserved.
18
Barcode Tagger 600
Users Manual
Deleting tags from the middle of a job:
1) With the job loaded, at the Job Print screen press ENTER to print the first tag.
2) Continue to press ENTER until all the tags have been printed up to the point where
you want to delete tags.
3) Press ‘N’ repeatedly until you come to the next tag you want to keep.
4) Press ‘1’ to print the remainder of the job.
5) After all tags have been printed, press NEW.
6) From the Save changes menu, select “Save Job” to keep the changes, “Discard
changes” if you don’t want the original job file changed, or “Continue current job” to
escape back to the Job Print menu.
ON DEMAND MODE
On Demand mode allows you to print tags on demand without creating a job. To
change to on demand go into System Functions from the Utilities menu. Select ‘1’
for “Mode” then select ‘2’ for “On demand”. You will be sent to the On Demand screen
which looks similar to the Create/Modify job screen with a few less options.
1) Print Tags
2) Category
3) Origin
4) Routing Tags
5) Act Tags
6) Print buffering
Current default
(First Class)
(Letters)
(Automated)
(01 WHITTIER CA 90605)
(Tray)
(NO)
(Use Default)
(NO)
PREV) Utilities Menu
For more information on what these settings mean and how to change them refer to
Job Mode earlier in this manual. To begin printing On Demand tags press ‘1’ from this
menu. This will take you to the tag screen.
Copyright © 1998 Whittier Mailing Products. Whittier Ca. All rights reserved.
19
Barcode Tagger 600
Users Manual
Tag screen
At the Tag prompt, ZIP code data is inputted to the Barcode Tagger 600 in one of four
slightly different ways, depending on what kind of tag is needed:
1. Carrier-route tag (entire tray or sack is one carrier-route)
2. 5 Digit tag
3. 3 Digit tag
4. Mixed ADC / Mixed AADC, repeat last tag, print blank tag
An essential point to bear in mind is that the Barcode Tagger 600 figures out the
correct destination ZIP codes and label information for you. Do not enter what you
think the ZIP code on the tag should be! Instead, enter the 3 or 5 Digit ZIP code of a
mailing piece that would go in the 3 Digit, 5 Digit or carrier-route tray or sack. For
Mixed ADC or Mixed AADC tags, press ENTER without entering a ZIP code first.
Individual carrier-route tags (entire sack or tray is the same carrier-route)
1) Enter a valid 5 Digit ZIP code that might be on a mailing piece in that tray or sack,
then press the hyphen (-) key. This brings up the route delivery type menu.
1)
2)
3)
4)
5)
Carrier Route
Rural Route
Highway Contract Route
Post Office Box Sections
General Delivery Units
2) Select the route delivery type. The Tag screen will re-appear, displaying the 5 Digit
ZIP code and the route delivery type.
Tag:
92621-C_
STD LTRS NON OCR WKG
01 WHITTIER CA 90605
3) Input the 1, 2 or 3 Digit route number, then press ENTER. This brings up the
Sortation Level menu.
1)
2)
3)
--)
Basic Carrier Route
High Density Walk Sequence
Saturation Walk Sequence
Quantity = 1
4) If you only need one tag, select the route sequence type from the menu, and the
tag will be printed.(Note: High Density and Saturation walk sequences are nonautomated only)
Copyright © 1998 Whittier Mailing Products. Whittier Ca. All rights reserved.
20
Barcode Tagger 600
Users Manual
5) If you need more than one tag, press the hyphen key, then input the number of tags
to print, followed by ENTER. You will be returned back to the route sequence type
menu screen. Now select the route sequence type from the menu, and the tag will be
printed.
Tag:_
BREA CA
STD LTRS ECRWSH C023
01 WHITTIER CA 90605
92621
5 Digit tags
1) Enter a valid 5 Digit ZIP code that might be on a mailing piece in that tray or sack,
then press ENTER. This brings up the 5 Digit sortation type menu.
1) 5 Digit
2) 5 Digit / scheme
5) 5 Digit carrier routes
- ) Quantity = 1
2) If you only need one tag, select the 5 Digit sortation type from the menu, and the
tag will be printed.
3) If you need more than one tag, press the hyphen key, then input the number of tags
to print, followed by ENTER. You will be returned back to the 5 Digit sortation type
menu screen. Now select the sortation type from the menu, and
the specified
number of tags will be printed.
3 Digit tags
1) Enter the first three digits of a valid ZIP code that might be on a mailing piece in
that tray or sack, then press ENTER. This will bring up the 3 Digit sortation type
menu.
1) 3 Digit
2) 3 Digit Scheme
3) AADC
5) 3 Digit Carrier Routes
- ) Quantity = 1
2) If you only need one tag, select the 3 Digit sortation type from the menu, and the
tag will be printed.
3) If you need more than one tag, press the hyphen key, then input the number of tags
to print, followed by ENTER. You will be returned back to the 3 Digit sortation type
menu screen. Now select the sortation type from the menu, and the specified
number of tags will be printed.
Copyright © 1998 Whittier Mailing Products. Whittier Ca. All rights reserved.
21
Barcode Tagger 600
Users Manual
Mixed ADC tags / Mixed AADC tags
1) Without entering a ZIP code, simply press ENTER to access the ENTER menu.
2) If you only need one tag, select the appropriate tag from the menu, and the tag will
be printed.
3) If you need more than one tag, press the hyphen key, then input the number of tags
to print, followed by ENTER. You will be returned back to the ENTER menu
screen. Now select the appropriate tag from the menu, and the specified number
of tags will be printed.
Blank tags
1) Without entering a ZIP code, press ENTER to bring up the ENTER menu.
2) If you only need one tag, select Blank from the menu, and a blank tag will be
ejected.
3) If you need more than one blank tag, press the hyphen key, then input the number
of blank tags you want, followed by ENTER. You will be returned back to the
ENTER menu screen. Now select Blank from the menu, and the specified number
of blank tags will be ejected.
Repeat previous tag
1) Without entering a ZIP code, press ENTER to bring up the ENTER menu.
2) To make one tag that is identical to the tag just printed, select Repeat from the
ENTER menu.
3) To make several tags that are identical to the tag just printed, press the hyphen
key, then input the number of tags you want (up to 1,000), followed by ENTER.
You will be returned back to the ENTER menu screen. Now select Repeat from the
menu, and the specified number of tags will be printed.
ACT ONLY MODE
Act Only mode is used if you only want to print ACT tags. To enter ACT Only mode
select System Functions from the Utilities menu. Press ‘1’ for “Mode”. Press ‘3’ for
“ACT Only”.
ACT Utilities
1) Print ACT Tags
2) Class
3) Barcode Format
(First Class)
(Ignore)
0) System Functions
0) Update System
Class is the class of mail you’re doing. The different options are First Class, Priority
and Express. To change the class that is selected, press ‘2’.
Copyright © 1998 Whittier Mailing Products. Whittier Ca. All rights reserved.
22
Barcode Tagger 600
Users Manual
Barcode Format
Barcode Format is how to interpret the barcode. It can be a choice of Ignore or dates
where the format changed such as January 97. Ignore uses the class of mail that was
entered from the keypad regardless of what the barcode says the class is. If you
picked one of the dates it uses the CIN in the barcode to determine class according to
the CIN codes defined as of the date selected.
Print ACT Tags
Once your settings are correct press ‘1’ to print ACT tags. You can either enter the 3
Digit ZIP Code or use a scanner to read a ZIP Code off a tag.
RAW DATA MODE
Tags can be printed directly from data sent from another computer via Serial Data Link.
Tags are printed in real time from raw tag format and ZIP code information downloaded
from a host computer in TDS (Tagger Data Stream) format. Refer to Appendix B for
more information about TDS format.
To download and print tags via Serial Data Link and Tagger Data Stream:
1) Make sure the Serial Data Link cable is connected between the Barcode Tagger
600 and the host computer.
2) Go into System Functions from the Utilities menu.
3) Select “Mode” by pressing ‘1’, then “Raw Data” by pressing ‘4’. This brings up the
Raw Data Utilities menu.
Raw Data Utilities
1) Enter Serial Data Mode
2) Print WMP Raw Tagfile
3) Routing Tag Format
4) Act Tags
(NONE)
(NO)
9) System Functions
0) Update System
4) Select the Routing Tag Format & If you want to print Act Tags. This information
can also be sent through the serial data stream.
5) From the host computer, initiate data transfer. The Barcode Tagger 600 will begin
processing the data and generating the correct tags. During this time the message
“Processing serial input. Press NEW to exit.” will be displayed. Once data transfer
is initiated, no file control or modification is possible from the Barcode Tagger 600
except to exit.
6) After all tags have been printed, or to interrupt tag printing, press “NEW” to display
the Confirm exit men
Copyright © 1998 Whittier Mailing Products. Whittier Ca. All rights reserved.
23
Barcode Tagger 600
Users Manual
FILE FORMAT CONVERSION
Tag files can be translated from other software to be printed through the Barcode
Tagger 600. Tags are translated to WMP Raw tag format in a host computer and then
printed from the Raw Data Utilities on the Barcode Tagger 600.
To download and print tags for Group1 software
1) Generate a .BAR file from GROUP1 software .
2) From a DOS prompt, translate .BAR file to Raw tag format.
For example: if the file created from GROUP1 is named job1.BAR
then the command line would be:
tagcnvt job1 job1.tag /fi:group1
3) Transfer .tag file to a 3½ inch floppy and put disk into the Barcode Tagger 600.
4) Go into System Functions from the Utilities menu.
5) Select “Mode” by pressing ‘1’, then “Raw Data” by pressing ‘4’. This brings up the
Raw Data Utilities menu.
6) Select Print WMP Raw Tagfile from Raw Data Utilities
Copyright © 1998 Whittier Mailing Products. Whittier Ca. All rights reserved.
24
Barcode Tagger 600
Users Manual
Appendix ‘A’
Tagger Job File Programming Format
The Tagger Job File (TJF) and Tagger Data Stream (TDS) are the standard protocols for transferring data
between a host computer system to a Tagger/600 control unit.
TJF Overview
TJF files are created either by a host computer or by the Barcode Tagger 600 and
stored on IBM formatted 3-1/2” floppy diskettes. The files can be loaded into the
Tagger /600 at a later date for tag printing, either as a batch or one-at-a-time as
needed. When the tags are printed as needed the operator can add or delete tags as
needed while a job is being processed.
Command Format and Syntax
TJF files are ASCII text files. They may be created by any means from a simple text
editor to custom programming. The Barcode Tagger 600 interprets each line of the file
terminated with a CR/LF as a command.
TJF files may contain comments preceded with a pound (#) sign. Improperly formatted
commands are ignored. Improper or impossible tag request will cause the printing of
an error message tag (not usable as a USPS tag) stating the error detected.
Examples of TJF files are included in this section.
Tip: If you have trouble de-bugging your TJF files, create a new job using the
Barcode Tagger 600 keypad as a sample. Save it, export it to diskette, and then
load it into your DOS text editor to examine.
TJF file sections
The TJF file is broken into three sections. Each section is terminated by a line
containing one or more equal signs (=).
The first section identifies the file as a job file and the name of the job. The first line
must read “WMP Tagger Job File Format July97” terminated by a CR/LF. The second
line contains the name of the job file. The name may be as long as 40 characters, and
is terminated by a CR/LF. The third line consists of one or more equal signs
terminated by a CR/LF, and ends the first section.
The second section pre-programs the Barcode Tagger 600 for the type of job to be
printed. Seven parameters must be set in this section. Each parameter must be set on
a separate line terminated by a CR/LF. The exact order of the parameters is not
important. Each parameters is set by a command line formatted as follows:
parameter = setting CR/LF. The number of spaces between the parameter, equal
sign and setting are not important.
Copyright © 1998 Whittier Mailing Products. Whittier Ca. All rights reserved.
25
Barcode Tagger 600
Users Manual
The following parameters must be set in the second section of the TJF:
Format
Tag Printer
Act Printer
Origin Line
Point of Entry
Mailer Code
Category
= Tray
Tray w/Extra 39
Tray w/Extra Text
Sack
Tray Fill In
Sack Fill In
= Yes
No
= Yes
No
= text (user created custom origin text)
<Standard> (for standard origin line)
= ### (3 digit for custom origin)
##### (5 digit for <Standard>)
= (1 to 10 digits)
Ignored if Origin not <Standard>
= @#### (one alpha character class code, two digit process
category, two digit sortation code. (See Appendix C)
The second section is terminated by one or more equal signs terminated with a CR/LF.
The third section of the TJF file is the Tag section. This is where the individual tags are
requested. This section is currently limited to 1000 entries. Each line contains 3 to 5
fields delimited by a comma. The format of each line is: Subtype, ZIP, Quantity,
optional tray data type, optional tray data text. Spaces are ignored.
subtype
Three digit subtype code. The first digit is the length of ZIP (0,3,5 or 9).
ZIP
The number of digits of ZIP that will be looked at is based on the first
digit of subtype. When ZIP length is 0, no lookup is required. ZIP length
of 3 looks up a three digit ZIP. 5 is a five-digit ZIP, and 9 is a five-digit
ZIP code plus a route type (C for carrier route, R for rural route, etc), and
a three-digit route number. Route numbers may be padded with leading
zeros.
Quantity
Number of labels to be printed, up to 999.
optional tray
data text
literal text to be printed.
Copyright © 1998 Whittier Mailing Products. Whittier Ca. All rights reserved.
26
Barcode Tagger 600
Users Manual
TJF Sample one:
WMP Tagger Job File Format July97
Lightblue Smuff
=================================================
# no comments may appear before this point
# the top three lines of the file identify it
# as a job file and the name of the job
#
Format
= Tray
Tag Printer = Yes
# Format = {Tray, Tray Fill In, Sack, Sack Fill In }
# Printer = {Yes, No }
#
Act Printer = Yes
# designates this as an ACT job
# optional
#
Origin Line = Whittier Mailing Service
# text or "<Standard>"
# required
#
Point of Entry = 906
# ##### if Origin line is <Standard>, otherwise ###
# required
#
Mailer Code =
# text
# optional, ignored if Origin Line is not <Standard>
#
Category
= A0101
# @####, must be a valid category consisting of a single letter
# class code, a two digit process category code, and a two digit
# sortation code
# required
=================================================
# <subtype>, <ZIP>, <quantity>
# <subtype> consists of a single digit number describing the length
# of <ZIP> followed by a two digit tray type code, optionally
# followed by one more digit to indicate the specific choice of
# address where there are choices, such as APO or APO/FPO.
# the number of digits of <ZIP> that will be looked at is
# based on <subtype>, extra digits on the end MUST be zeros
# and will be ignored. For example, 90600 and 4350000 are
# valid 3 Digit ZIP codes.
# this list currently limited to 1000 entries
004, 0,
1
333, 342,
1
550, 90632, 1
333, 982,
2
333, 966,
1
=================================================
Copyright © 1998 Whittier Mailing Products. Whittier Ca. All rights reserved.
27
Barcode Tagger 600
Users Manual
TJF Sample two:
WMP Tagger Job File Format July97
STDA/LTRS/ECR
==================================================
Format
= Tray
Tag Printer
= Yes
Act Printer
= No
Origin Line
= <Standard>
Point of Entry
= 90605
Mailer Code
=
Category
= C0101
==================================================
962, 90502B023, 1
561, 90605,
1
561, 23421,
1
561, 23423,
3
==================================================
TJF Sample three:
WMP Tagger Job File Format July97
ACT
==================================================
Format
= Tray
Tag Printer
= Yes
Act Printer
= Yes
Origin Line
= <Standard>
Point of Entry
= 90605
Mailer Code
=
Category
= C0102
==================================================
334, 234,
1
550, 00000,
1
334, 234,
1
==================================================
Copyright © 1998 Whittier Mailing Products. Whittier Ca. All rights reserved.
28
Barcode Tagger 600
Users Manual
Appendix ‘B’
Tagger Data Stream Programming Format
TDS Overview
TDS sets a standard for transferring data via RS-232 serial data link directly to the
Barcode Tagger 600, similar to sending data to a printer. TDS simplifies and formats
the data into a command set that ‘tells’ the Barcode Tagger 600 how the host sorted
the data and grouped it into sack or trays. The Barcode Tagger 600 then looks up all
the necessary data, formats the data according to USPS standards and prints the
tag(s) in real time.
The TDS standard defines a data stream feed to the Tagger/600. This standard
breaks down into two specific standards: the hardware connection and the data
structure necessary for communicating with the Barcode Tagger 600.
Hardware Standard
The Barcode Tagger 600 communicates with a host PC through a 9 pin PC/AT serial
port with a null modem cable. Null modem cables are commonly available as “LapLink”
cables that have both 9 and 25 pin RS-232 connectors on each end of the cable. The
communication settings for the host RS-232 port are ASCII, 9600 BPS, 8 bits, no
parity, 1 stop bit, xon-xoff flow control.
Software Standard
TDS consists of a command group of characters transmitted to the Tagger/600 and a
response acknowledgment transmitted from the Tagger/600 to the host. Each
command begins with an open bracket ‘[‘ and ends with a closed bracket ‘]’.
Characters transmitted outside brackets are ignored.
After a command is sent to the Tagger/600 a response is transmitted back to the host.
The response is a verbose string describing the state of the command. ‘Command
Valid’ transmitted from the Tagger/600 to the host indicates that the command was
correctly formatted and will be executed immediately. Other responses (i.e.,
‘Command Invalid’, ‘Printer failure’, etc.) indicate that no tag will be printed.
Subsequent to any response the Tagger/600 is ready for the next command.
Command Structure:
Unlike some portions of the TJF Standard, the order of parameters within a TDS
command is critical. Each parameter of the command is separated by commas.
Format of the TDS command string:
Use Print Tag format if you want the Barcode Tagger 600 to figure out the information
to print on the tag.
[Print Tag,July97,<Origin_Text>,<Origin_ZIP>,<Catagory_string>,<Subtype_string>,<Tag_ZIP>,<Tag_qty>,<Optional_data_text>]
Copyright © 1998 Whittier Mailing Products. Whittier Ca. All rights reserved.
29
Barcode Tagger 600
Users Manual
TDS command strings
Origin_Text
Exact text of origin line (upper case)
Origin_ZIP
### - three digit point of origin
Catagory_string
@#### - single letter category code, two digit process code,
two digit sortation code (see Appendix C)
Subtype_string
### - three digit subtype code (see Appendix C)
Tag_ZIP
The number of digits of ZIP that will be looked at is based on
the first digit of subtype. When ZIP length is 0, no lookup is
required. ZIP length of 3 looks up a three digit ZIP. 5 is a fivedigit ZIP, and 9 is a five-digit ZIP code plus a route type (C for
carrier route, R for rural route, etc), and a three-digit route
number. Route numbers may be padded with leading zeros.
Tag_qty
Number of tags to be printed
Optional_data_text
Actual text to be printed in Optional data area on tray tag, eight
characters (will be padded with trailing spaces if needed).
If you want to send specific information to the Barcode Tagger 600 of what is to be
printed on the tag or to specify certain settings use the following commands:
[Format Tag,<format>]
format in one of:
Tray
Tray Fill In
Sack
Sack Fill In
None
[Clear Buffer]
[Format Act,<format>]
format is one of:
None
Standard
[Set,<field>,<value>]
field is one of:
ActAirport
(3 letter airport code)
ActBarcode
(8 character)
ActClass
(1 character)
Barcode
(8 or 10 digit)
CityState
Contents
Extra
Extra39
Origin
Zebra
(logical, 1 or 0)
Zipcode (3 or 5 digits)
Ziptag
Right adjusted portion of the
content line
[Print Buffer [,<quantity>]]
Copyright © 1998 Whittier Mailing Products. Whittier Ca. All rights reserved.
30
Barcode Tagger 600
Users Manual
Appendix ‘C’
Class, Type, Sortation, Subtype codes
CLASS
A First Class
B Periodicals
C Standard
D Package Services
F News
TYPE
01
03
04
05
07
08
13
Letters
Flats
Machinable
Irregular
Commingled Irregular
Parcels
Drop Shipment
SORTATION
01 Nonautomated
02 Automated
03 Regular
14 DBMC Rate
15 Bound Printed Matter
16 Media Mail
17 Machinable
18 Presorted
20 Priority Drop Shipment
21 Manual
22 Express Drop Shipment
23 Merged
24 Barcoded
SUBTYPE
000 Fill-In
002 Mixed AADC
004 Mixed ADC
010 Mixed BMC
012 Mixed AADC at BMC
014 Mixed ADC at BMC
320 3-Digit
321 3-Digit / 3-Digit Scheme
330 SCF
333 ADC
334 AADC
338 Destination ASF
339 Destination BMC
366 3-Digit Carrier Routes
550 5-Digit
555 5-Digit Mach and Irreg
556 5-Digit Scheme
561 5-Digit Carrier Routes
567 5-Digit Scheme Carrier Routes
568 Merged 5-Digit
569 Merged 5-Digit Scheme
960 Carrier Route
962 Basic Carrier Route
963 High Density Walk Sequence
964 Saturation Walk Sequence
NOTE: This equipment has been tested and found to comply with the
limits for a Class A digital device, pursuant to Part 15 of the FCC
Rules. These limits are designed to provide reasonable protection
against harmful interference when the equipment is operated in a
commercial environment. This equipment generates, uses, and can
radiate radio frequency energy and, if not installed and used in
accordance with the instruction manual, may cause harmful interference
to radio communications. Operation of this equipment in a residential
area is likely to cause harmful interference in which case the user
will be required to correct the interference at his own expense.
Copyright © 1998 Whittier Mailing Products. Whittier Ca. All rights reserved.
31