1
GSS User Manual (v1.2.605)
I. Preparing GSS
1. Copy gss.exe to any directory you want
2. You have one of sqlserver supported by zeoslib:
Oracle, PostgreSQL, MySQL, Firebird, Interbase, mssql, sqllite, sybase
3. If you use PostgreSQL or MySQL, copy all appropriate files in \lib directory to
system directory ( Ex. \winnt\system32\ or \windows\system\ )
4. You have any table in your database to access
II. 15 Minutes Tutorial
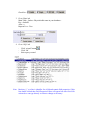
1. Execute GSS.exe
2. ‘Choose project’ window will appear.
- Click new
- Fill name of your new project
- Specify home directory, we can leave it blank, this mean that we want to put
the project directory same as GSS.exe
- If we want to load this new project when gss.exe running, set this project as
default.
- Select the project in yellow list-box and click ‘Ok’ button
3. Blank window will appear
4. Click Heart button
at left-top window to go to Project Properties, this button
will unavailable when project is locked.
Hotkey: ^F9
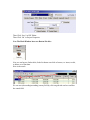
5. Go to ‘Data Connection’ tab to setup database connection
Fill the Hostname, protocol, database, username, and password for your database
server, and then click ‘Test Connection’, if you fill correct data then ‘Succeed’
message will display.
6. Go to ‘Menu Structure’ tab to Define Menu Structure
- Click ‘Add brother’
- Set Caption : ‘Master’ <press enter>
- Click ‘Add Child’
- Set Caption : Order List <or any appropriate table name you have>
Set SQL File : Order List.gsf ( See GSF Editor Section Below )
- Big Icon : <fill 32x32 bmp file name or use (…) button to explore>
- Small Icon : * <or fill 16x16 bmp file>
Note: Please don’t put GSF file on root menu.
GSF Editor
button to go to GSF Editor
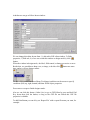
1. Click
2. In ‘window’ tab
Form Name : FrmOrderList
Check list :
3. Go to ‘Data’ tab
Main Table : Orders <Physical table name in your database>
Key : OrderID
Alias : o
Request Live : True
4. Go to ‘SQL’ tab
-
Click ‘wizard’ button
Click ‘Ok’
Select query created
Note: Brackets ‘{}’ at a line is identifier for a field and contain field properties, if this
line double-clicked then Field Properties Editor will appear but when Free-Edit
activated we can type directly to editor to change as necessary.
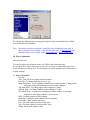
-
-
A field properties can edit by double-click a field, field properties editor is
shown below.
For now leave it by default
We can use Free edit, to edit field properties manually or to add join table or any
SQL filter.
Note: If you joined 2 tables or more, to get data grid editable, ‘Update Object’
property in data-tab in GSF editor must set to true.
Then Click ‘Save’ in GSF Editor
Then Click ‘Ok’ in Project Properties
Now The Main Window have new Button like this :
Now we can browse Order table, Order list button can click to browse, to insert, to edit,
to delete or to filter data.
Here is the result:
We can sort (descending/ascending) on any field by click on grid-title and we can filter
the sorted field.
And then we can go to Edit or Insert window:
We can change this editor layout from : 1) edit-tab in GSF editor window, 2) fields
properties, 3) field rule, 4) or we can switch this window to design mode by click
button.
When the window in design-mode, the label, field control, or button can resize or move.
Beside that, we can add new shape, text, or image, to do this click
time, and we will see designer menu :
button one more
To add a Object, click on menu (Shape/Text/Image) and then use the mouse to specify
coordinate (left, top, right, bottom) and then fill the object properties.
Press enter or escape to finish designer mode.
Also we can click this button ( Order List ) to go to GSF Editor by press and hold Ctrl
Key down then click the button, as long as the GSF file not locked this GSF file
properties is editable.
To add Print Button you can do by set ‘Report File’ with a report file name you want, for
example :
An then when ‘Order List” button clicked in Main Window, print button will appear.
Press and hold down shift key then click print button to go to Report Designer.
Click ‘Insert DB Fields’
Select fields you want to print, and set include bands true and then click ‘Ok’.
We can put any additional text or setup report layout before save button click to finish.
Now print button will available.
Note: One dataset can have more then 1 report file, just put additional name with ‘#’
char as separator. For example : if the default report name is Order List.frf so the
additional report can be named: Order List#Simple.frf or Order List#Other.frf
III. More Explanation
Directory Structure
To know how directory structure works, see GSS.ini and related directory.
We can put GSP or home directory in server, so every time we update the project, each
client will get up-to-date project. To reload project at client computer go to system menu
in main window.
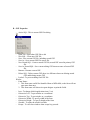
A. Project Properties
- General
Title : This will be set caption on main window
Icon File : To change application icon (*.ico)
Main Wall Paper : To set wallpaper on MDI form or main window (*.bmp), when
wall-paper changed application need exit to load wallpaper.
Top Panel Wall : To Change upper panel wallpaper (*.bmp)
Outlook Wall : To Change Outlook menu wallpaper (*.bmp)
Def. Editor Wall : To generalize wall paper on editor window, so assigned
wallpaper to each editor window is not necessary.
MDI : Set main window to MDI support.
Maximized : Initialize main window state to maximize.
Resizeable : Main window can resize
Left : Put main window position at this value
Top : Put main window y position at this value
Width : Reset main window width
Height : Reset main window height
Outlook Button : Open default outlook button when project open.
Short Date Format : Change appearance of date
Help File : Specify help file (*.hlp)
Global SQL : Global data to open while project active
Environment SQL : SQL will open while project active and this dataset will be a
default master of GSF file to open on main-menu defined in ‘Menu
Structure’ tab.
Display Env. Field : A field of Environment SQL to show on main window.
Splash Image : The image shown at first time when project loaded.
Welcome SQL : The GSF file to open at first time when project loaded.
We must provide a green.bmp or green.jpg in \images directory, it’s will
load into welcome window.
Bevel Width : Bevel width to show splash-image.
Lock Project : Prevent project from editing.
-
Menu Structure
Add Brother : To add item at same level with current selection.
Add Child : To add item as child of selected item.
Delete Node : Delete selected item.
Up
: Move item up
Down
: Move item down
Caption : To show as menu item or button caption
Hint : Additional information for current menu item
SQL File : GSF file to open when menu item click.
Big Icon : 32x32 bmp file
Small Icon : 16x16 bmp file or set ‘*’ to get image from Big con
Manual Tag : (not use)
Create Short-Cut : to put button on top panel in main-window, so use can click
easily.
Startup : To open the menu automatically when application up.
Visible : To grant the menu visibility to any user-group.
Enabled : To set enabled to any user-group.
Full Access : To grant insert, edit, and delete data to any user-group.
-
Data Connection
Host Name : computer or or ip address sql server
Protocol : supported protocol with ZeosLib651
(ado, firebird-1.0, firebird-1.5, interbase-5, interbase-6, mssql, mysql, mysql-3.20, mysql-3.23,
mysql-4.0, mysql-4.1, oracle, oracle-9i, postgresql, postgresql-7.3, postgresql-7.4, postgresql8.x, sqlite, sqlite-2.8, Sybase )
Database : Existing database name in sql server to access.
User Name : user name to use ( if you leave this blank, user name/password
dialog box will appear when GSS trying to connect to server)
Password : The user names password.
Test Connection : To test server connectivity, username and password is required.
History Table Access : History table button will appear to some user-levels.
-
Users
Enabled : To activate user management.
Activate Standard Table : To activate standard user table in sql server, users table
must created with this structure:
CREATE TABLE users (
uname char(30) NOT NULL,
uid char(4) NOT NULL,
ulevel char(10),
ugroup char(10),
ro char(2),
passwd char(10),
envfilter varchar(50),
PRIMARY KEY( uname )
)
To edit this table there is standard user.gsf available do download or you can
create your own, put user.gsf in project home directory.
: User-groups privilege to access users manager menu.
User Name : User full name
User ID : user id
Lavel : Specify user level
Group : Specify user groups
Password : if this is empty, user can’t login.
Read Only : To set read-only access to all dataset
Environment Filter : if environment query set, this is will filter the environment
dataset. For example if we have env data structure : RegionID,
RegionName; so the filter could be: RegionID=’001’, this coused the user
just edit data to specify region in every GSF file.
-
Other
Hide Main Menu: To hide main menu
Hide Top Panel : To hide top panel in main window
Hide Recent Menu : To hide recent menu on main-window.
Hide Outlook Button : To hide outllok button
Hide Status Bar : To hide status bar
Environment Text : To set environment description in main-window if
‘Environment SQL’ and ‘Display Env. Field’ are defined.
-
Profile
You can put your customer and your company information here.
-
License
If GSS usefull for you please visit shareit for us.
B. GSF Properties
-
Active SQL : This is current GSF file editing.
-
Open File : Open other GSF file to edit
New SQL : Create new GSF file
Save : Save current GSF file, including nested GSF.
Save As : Save current GSF file as new file.
New Nested SQL : Create a nested GSF file, nested GSF stored in primary GSF
file.
- Save As Nested SQL : Save current editing GSF into new name of nested GSF
file.
- Rename : Rename current GSF.
- Delete SQL : Delete current GSF, there is a difference between deleting nested
GSF and deleting master GSF.
- Locked : To prevent editing final GSF file.
Window
- Form Name :
1. This form name usefull for identified form as MDI child, so the form will not
open more then once.
2. This form name will shown in report designer to print the fields.
-
Icon : To change default applications icon (*.ico)
Dimension Left : To put window at x coordinate
Dimension Top : To put window at y coordinate
Dimension Width : To specify width of the form
Dimension Height : To specify height of the form
Sizeable : To make the window sizeable
Escape : To call close window when escape key pressed.
-
MDI Child : To set form as MDI child, works if Application set MDI form (see
project properties)
- Maximized : To set window state start as maximized.
- Caption Main Window : To set form caption
- Caption Editor : To set form caption in editor mode
- Caption Grid : To add additional caption in grid mode
- Caption Find Window : To display caption in select mode.
- Help ID : To set help ID when projects help file assigned.
- Help Type : To identify help ID type.
Layout
- Type :
Grid – Layout is grid (default)
Editor – Layout is editor
Left – Layout is editor at left and grid at right
Top – Layout is editor at top and grid at bottom
Right – Layout is grid at left ant editor at right
Bottom – Layout is grid at top and editor at bottom
Report – Tell to GSS that the GSF is to print
Update – Tell to GSS that GSF is update SQL
-
Insert : If the layout is ‘Editor’ and ‘Insert’ checkbox is checked then the form
will set to insert mode only.
Size : if the layout have editor and grid, this size can specify the size of grid, for
example: “400” or in percent format : “70%”.
Update Message : if layout is ‘Update’ then when sql ready to execute this
message will appear.
Refresh table : To refresh other opened GSF file.
Data
- Main Table : Specify of main table or procedure to access.
- Procedure : Identity if the main table is a procedure name in database.
- Key : key of the table
- Alias : alias of the table
- Request Live : To add : edit, insert, and update capability.
- Self Edit : To make a grid as editor.
- Cached Updates : To prevent data posting to server automatically, posting to
server right after update button click.
- Update Object : To create update SQL (automatically) so the complex SQL is
editable. Table to edit is main table with key and alias specified.
- Summary SQL : To show footer summary field at grids column.
- History Table : To show log table when available.
- Auto Refresh : To watch changing of table, this is will automatically refresh rows
from server.
- Prevent Edit/Delete : To prevent edit/delete to any user groups when condition is
true.
- Where : The expression to calculate to prevent Edit/Delete condition.
For example: %aprove%=’Y’
‘+’ at right-bottom the editor (
) that’s mean we can press insert on
keyboard to get a field or substitution variable.
Grid
Style : to change grid color.
( gsNormal, gsCustom, gsPriceList, gsMSMoney, gsBrick, gsDesert, gsEggplant, gsLilac, gsMaple, gsMarine,
gsRose, gsSpruce, gsWheat, gsSoftWheat, gsSoftRose, gsAquaBlue, gsSoftMaple, gsSoftLilac, gsSoftDesert,
gsSoftEggPlant, gsSoftBrick, gsSoftSpruce, gsSoftYellowGreen, gsSoftGray)
-
Filter : to show/hide filter capability.
Row Select : To change column select to row select instead.
Always Show Selection : To make selection always visible.
Title : To show/hide grid title
Indicator : To show/hide grid indicator
Col Lines : To show/hide grid column lines
Row Lines : To show/hide grid row lines
Font : To set grid font and background color
Title Font : To set grid title columns and background color
Bands Font : To set bands font.
Report File : To specify report file in grid. If the report file is new file, press and
hold down shift key when click print button in grid data form.
- Export Excell : To show/hide export button in grid data form.
- Export-Import Type : To enable/disable export-import capability and set data
format.
Data format : Slim = Only send data
SQL = Send data in standard SQL format
- Encrypted: To set export/import text file encrypted.
- Clean key: To set filters key to clean dataset when importing data.
- Show Caption : To show/hide grid caption
- Font : To set grids caption font and background color
- Hilight
• Font : Hilight font and color
• Field : if this field is blank, hilight will affect to all columns.
• Expression : Condition to calculate, for example : %amount%>100000
Press insert to add a field.
Editor
- Form Name : this form name will usefull to print data in editor window.
- Flat : To set all control as flat.
- Sizeable : To set editor form can resize.
- Label-On-Top : To set label at top of the data control.
- Insert Once : To close the form when data posted in insert process.
- Right Justify Label : To set label justification.
- Wall Paper : To set editor forms wallpaper, this is will replace default wallpaper
specified in project properties.
- Dimension Left : To put editor window at x coordinate
- Dimension Top : To put editor window at y coordinate
- Dimension Width : To specify width of the editor form
- Dimension Height : To specify height of the editor form
-
Button Position : To set save/close button position
Margin Left : Left space
Margin Top : Top space
Margin Right : Right space
Margin Bottom : Bottom space
Column Count : to set editors column count.
Font : Default editor font
Report File : To print a row in editor.
-
Objects: to add object in editor forms.
Type : ( image, Rect, text )
- Active : to activate/deactivate current object.
(type : Image)
- Source : ( file, field )
- Use Web Browser : Set image or object viewer to web browser component so
can view any file extention such as: *.html, *.jpg, *.pdf, *.doc, etc.
- Image File : We can set still image file or image from field value, use (…)
button to explore.
- Directory : To hold files
- Dimension Left : To put object at x coordinate
- Dimension Top : To put object at y coordinate
- Dimension Width : To specify width of the object
- Dimension Height : To specify height of the object
- Framed : To add frame around of the object window
- Shadow Color : To add shadow of object window
- Read Only : To set data as view only.
- Hide Navigator : To hide/show navigator.
(type : Rect)
- Dimension Left : To put rectangle at x coordinate
- Dimension Top : To put rectangle at y coordinate
- Dimension Width : To specify width of the rectangle
- Dimension Height : To specify height of the rectangle
- Rounded : to set rounded at cornet of rectangle
- Frame Color : to specify frame color
- Fill Color : to specify rectangle color
(type : Text)
- Position Left : x coordinate text position
- Position Top : y coordinate text position
- Font : text font
- Caption : text objects caption
Attach : to attach other (nested) GSF file in opened GSF
- Place : ( grid, print, sub, detail )
Grid: The attach file will accessed from grids popup menu
Print: The attach file will accessed from print button in grid window
Sub: The attach file will accessed from new button at grid window
Detail: The attach file will show in grid window
To setup relation ship between attached file we can add “:rel-field” in SQL, for
example if we have master query structure (EmployeeID, EmployeeName ) then
attached SQL should have expression like this:
Where EmployeeID=:EmployeeID
For more explanation see section “IV. Relationship Between GSF File”
-
Active : to activate/deactivate attachment
SQL File : to specify GSF file
Set Fields : to specify fields to set from master datasource when inserting a row.
Column : If the attachment will shown at a specify column not whole of grids.
Value : the value to condition the attachment visibility.
Hint : Attachment hint text.
Format: <Short Hint>|<Long Hint>
Size : Button width or window size (accept window size in percent)
Position :If attachment is detail, where the control should place.
( left, right, top, bottom ) default is bottom.
On Editor : Show attachment in editor window instead.
Refresh Caller : if attachment data is updated, then caller data will refresh.
Default : If ‘default’ is checked and the attachment placed in grid or print then
where grid is double click then the attachment will execute.
Flat Button : To set button style as flat
Wallpaper : To change panel wallpaper/background
Color : To set panel background color when wallpaper is unset.
Graphics
- Type : ( pie, line, bar )
- Active : activate/deactivate graphics
- Data : ( row, col )
- Embed : Show in main GSF window
- Field Label : Specify field label where data source is col
- Data Fields : specify data fields
- Height : specify control height (accept in percent format ) when graphics is in
embed mode.
- Caption : Caption text
- Hint : Hint text
- Title : Graphics Title, accept substitution (see V. Substitution)
- Sub Title : Graphics sub title, accept substitution (see V. Substitution)
- Wall : Graphics wall paper (image file)
- Background : Graphics background color
- Font : Graphics font
- Title Font : Graphic title font
SQL
-
Free Edit : To edit SQL as free text editor
Wizard : To collect fields from some table
Filtering : To add data filter and filter dialog box
Caption : Filter dialog box caption
Embed : Set filter control in main GSF window
Window Left : To put dialog window at x coordinate
Window Top : To put dialog window at y coordinate
Window Width : To specify width of the dialog window
Window Height : To specify height of the dialog window
Skip Dialog : To apply default value of filter without showing dialog window
Wall Paper : Change default input window wall paper
Font : Dialog window global font.
Input Dialogs Properties:
Name : Specify a name
Caption : Specify a caption (optional)
Type :
SQL File : Specify lookup GSF file (only if fialog type is lookup)
Update : to update other input field when lookup data set selected
Example: CustomerID,Customer=CustomerName
Set Field : Field to set when new record created
Width : Specify width the edit control
Height : Specify height the edit control
Pull : Pull-up position of edit control
Hide : Hide edit control
Disabled : Disabled edit control
Read Only : Set control as read only
Tab Stop : To get or release tab stop
Char Case : (Normal, Upper, Lower )
Default : Default value
Label Font : Specify label font
Editor Font : Specify editor font
Domain : Set domain ( see section VI. Domain)
Col Count : Set column count
-
Field Rule
Field : Field name to add the rule
Procedure : database procedure/SQL
Ex.: rule_calc_total %price%, %qry%
Special substitution ID are : %-action-%, %old-value%, %new-value%
%-action-% : insert or edit
See section V. Substitution
There is 3 kinds result set of rules procedure: ( abort, set, msg )
Rule procedure/SQL result must have field named “_” to hold action
information , for example :
1. Rule SQL to abort
Select ‘type=abort;msg=”The value is not acceptable!!” ’ as _
Note: msg is optional
2. Rule SQL to show message
Select ‘type=msg;msg=”Please remember the date !!”’ as _
3. Rule SQL to set any fields
a) Set Field Value
Select ‘type=set’ as _,
1997 as Year,
5000 as Amount
-- set year field value with 1997
-- set amount field value with 5000
Or,
Select ‘type=set;set=Year;amount’ as _,
1997 as Year,
-- set year field value with 1997
5000 as Amount
-- set amount field value with 5000
b) Set Field Disabled
Rule SQL to set any fields value and disabled any field controls
Select ‘type=set;dis=”OrderDate,Discount”’ as _,
0 as Price -- set price field value to 0
c) Set Field Enabled
Rule SQL to set any fields value and enabled any field controls
Select ‘type=set;en=”OrderDate,Discount”’ as _,
0 as Price -- set price field value to 0
- GSF Rules (Project properties)
( rule format, see field rule above )
a. Before Insert
b. Before Edit
c. Before Delete
d. Before Close
C. Field Properties
- Field : field name (in physical table or procedure)
- More Field : Indicate that the field is last field or not.
- Caption : Field grid caption
- Band : Some field with same band will display as a group in grid.
- Hide : Hide field in grid but in editor can display if editor specified.
- Width : Field display width.
- Footer Field : Field name in summary SQL
- Center : Set field justify as center
- Detail : To add display detail button to execute a GSF file
- Lookup : To add Lookup button to execute a GSF file
- Update : Field to be updated when lookup SGF file execute an a row selected.
Example: CompanyID,Company=CompanyName
CompanyID=CompanyID same as CompanyID
-
Auto Number : To create auto number when new record created
Example: select coalesce( max(OrderID),0)+1 from orders
-
Cal : To add calendar button
Exclusive : To make control read only.
Font : Editor font
Password : To display password char so original text will shown as ‘*’ charanter.
Display Format : Field display format
Edit Mask : Editor mask edit
Valid Chars : To validate key stroke to some valid character,
for example: “AFDafd”
Default : Default value
Editor : (edit, check, radio, combo, text, memo, image, list, none )
-
Set editor to ‘none’ to hide field in editor but shown in grid.
If the editor specified the field will show event the field is invisible in grid.
-
Width : Editor width (character length)
Height : Editor height
Col : Radio button column count
Tail : To display additional text following editor control
Upper-Case : Set value to upper-case
Required : To set field as mandatory field.
Tab Stop : To set/skip tab on control.
Enabled : To enabled/disabled control
Read Only : To set control as read-only
Pull : Pull-up the editor to previous field position.
Help ID : Specify help id when help file project assigned.
Help Type : Help ID type
Duplicate Table : To check duplicate value automatically
Example: orders
-
Dup. Filter : Duplicate table filter, leave it blank if duplicate table key same as the
current field.
Example: RegionID=’%RegionID%’
Domain : See section VI. Domain
Calc. Field : See section VI. Domain
Field Owner : The field can be edit to same of user-levels
Rule Procedure : See previous rule explanation.
IV. Relationship Between GSF File
Relationship between two GSF file condition is:
1. Master datasource is set
Top level datasource is environment GSF, every main GSF called in main
window will set the mastersource to Environment GSF.
2. Relation field in SQL is defined
Relation syntax is: ForeignKey=:PrimaryKey
ForeignKey is a field name in current GSF file
PrimaryKey is a field in master datasource
Example: RegionID=:RegionID
RegionID=:RegionID AND Order=:OrderID
V. Substitution
Substitution ID is some text/name between two ‘%’ characters.
Example: %user.uid%, %user.name%
So we can add Substitution ID in SQL or Expression.
Example: Where CompanyName like ‘%cust.fullname%’
Where CompanyName like ‘\%%my.shortname%\%’
Substitution ID can be use in :
1. Environment GSF field ( env.<field-name> )
2. Global GSF field ( global.<field-name> )
3. Local Data ( local.<field-name> )
4. User Properties ( user.UID, user.Name, user.group, user.level )
5. Customer Properties ( cust.FullName, cust.ShortName, cust.Address, cust.city,
cust.Phone, cust.Email, cust.Website )
6. Company Properties ( My.FullName, My.Address, My.Phone, My.Email,
My.Website )
7. GSF Input Dialog ( input.<name> )
8. Default Constants ( defa.#Year, defa.#Month, defa.#Day, defa.#Date, defa.#Time,
defa.#DateTime, defa.#Day1, defa.#Month1, defa.Year, defa.Month, defa.Day,
defa.Date, defa.Time, defa.DateTime, defa.Day1, defa.Month1)
# sign is to retrieve data from sql server
Day1 = starting date in a month, Ex: 2007/9/1
Month1 = starting date in a year, Ex: 2007/1/1
9. Master datasource/dataset
We can put Substitution ID in :
1. SQL Statement in GSF
2. Rule SQL
3. Welcome SQL
4. Auto Number Field
5. Set Field on New Record from attachment
6. Graphics Caption and subtitle
7. Where conditional in GSF editor
8. Default value (don’t need ‘%’)
9. Report designer, Example: [my.FullName]
VI. Domain
a. Standard Format: Key1[=Value1]|Key2[=Value2]|…
Example: 1=Sunday|2=Monday|3=Tuesday
One|Two|Three|Four|Five=5
b. From SQL Format: !Select Key, Value From AnyTable
Example: !Select DayID, DayName From DayList
!Select MonthName From MonthList
Note: We can retrieve domain value using this format:
- %(fieldname)%
- %input.(name)%
VII. Startup, Scheduling, Run Once
When GSS run, there is three initialization files will execute:
1. GSS.ini,
- Contain GSS project information
- When this gss.ini file not found in project directory, GSS will create this
file automatically, this mean you don’t have any project created.
- When a project was created, there is new section with your project name
as a section name.
-
If <home-directory> not specify, GSS will assume that <project-dir> same
as <home-dir>
Hostname, protocol, database, user, password will ignore when this
connection parameter specify in GSS project.
Here is the example of GSS.ini :
-------------------------------------------------------------------------------------------------[project]
Open=<project-name>.gsp
; to open a project automatically when GSS start
[<project-name>]
; a project section
Home=<home-directory>
Hostname=
Protocol=
Database=
User=
Password=
-------------------------------------------------------------------------------------------------2. Startup.ini
To run some gss file(s) at startup affect to all user.
There are five section types:
[always]
; to execute some gss files every time gss up
[daily]
; to execute some gss files every day
[1]
; to execute some gss files every 1st day in each month
[1/5]
; to execute some gss files every 1st day and 5th month
in each years
[1/1/2007]
; to execute some gss files in a specify date
Here is the example, we want to execute “Summary Report.gsf”, “Save
Order.gsf” every time GSS up:
-------------------------------------------------------------------------------------------------[always]
Summary Report.gsf
Save Order.gsf
3. Startup#<user-group>.ini
To run some gss file(s) at startup affect to a group specified. (See Start.ini)
4. *.gsf stored in <homedir>\once directory
Every file(s) stored in \once directory will execute and delete when GSS run.
VIII. Sample Northwind Project
To show more about how GSS works you can activate sample application northwind.zip
( Using standard northwind Database from mssql )
To activate, just place the files and the directory into same directory.
- GSS.exe
- Gss.ini
- Northwind.gsp
- Northwind\
- Execute: sp_categories.sql
- User.gsf
- Create directory c:\images
Any question please post to greensolution yahoo group.
Become a member: [email protected]
Technical Support: [email protected]
Website: greensolutionsoftware.com
“Database programming must be simply” that’s our concern.
( GSS Team )