1
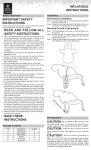
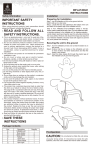
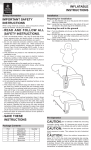
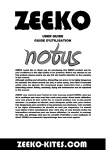
USER GUIDE
GUIDE D’UTILISATION
WARNING/ATTENTION
TAKOON would like to thank you for purchasing this TAKOON
product, and for your confidence in the high quality of our products. Before any attempt to use this product, please ensure
you pay full and careful attention to the contents of this manual. Although exciting and attractive, kitesurfing can prove
to be highly dangerous for yourself, the others around you
and, in some cases, even fatal if essential safety rules are
ignored. We recommend proper instruction from a certified
kitesurfing school. Safety, assembly, flying and maintenance
are all explained in this manual.
TAKOON vous remercie pour l’achat de votre nouveau produit TAKOON, ainsi que de la confiance que vous avez bien
voulu nous porter. Avant toute utilisation, nous vous prions de
bien vouloir lire ce manuel pratique avec la plus grande attention. La pratique du kitesurf, aussi attrayante qu’elle soit,
peut s’avérer très dangereuse pour soi-même et les personnes aux alentours, voire mortelle si les règles élémentaires
de sécurité ne sont pas respectées. Ce manuel vous aidera
à faire connaissance avec votre aile, et vous fournira toutes
les informations nécessaires pour une bonne utilisation. La
sécurité, le montage de l’aile, son pilotage ainsi que les conseils d’entretien y sont expliqués en détail. Takoon recommande l’apprentissage dans une école agréée.
credit photo: S. Fournet
Introduction
ENGLISH VERSION
You must read and understand the entire contents of this manual before any attempt to fly your kite. The manual has
been written to help you operate your new kite, but nothing replaces proper instruction.
You must be fully aware of the risks that go with this sport, and know that you are exposing yourself to real danger.
Inappropriate use of traction kite devices can result in (serious) accidents or even lead to the death of the user or third
parties. It is strongly recommended to undergo an initial training in a recognized kitesurf school.
As defined by this user manual, the distributors of our products are under no circumstances liable for material or bodily
damage sustained as a result of inappropriate use of this product.
Safety
Essential rules
• Never forget that you are responsible for any material or bodily damage sustained while using this product. Check that
you are appropriately insured against possible damages resulting from the sport of kitesurfing.
• Use your common sense at all times.
• NEVER kitesurf ALONE. An assistant is a considerable safety asset, on land as well as at sea.
• NEVER attach yourself permanently to your kite by any means (e.g. tying the lines onto your harness).
It is imperative that you are able to disconnect yourself from the kite quickly if you are experiencing difficulties.
• You must not dismantle or modify the quick releases built into your control bar.
• Respect local regulations pertaining specifically to this sport.
• Kitesurfing is an exhausting sport, especially for beginners who will tire more quickly. Learn to recognize the early signs
of fatigue and come in to rest.
• It is essential to know how to swim.
• You must be fully comfortable with procedures for launching, landing, and returning to the beach in case of difficulties.
• Never operate your kite while you are attached to a fixed object such as a car or a tree.
• This kite is designed specifically to be used as a traction device for kitesurfing, and must never be used for paragliding
or any other forms of unassisted flight. Never jump on the beach.
• Never touch the bridles or flying lines while they are under tension.
• If your kite is not in use but is inflated, it must be secured in the neutral position using sand or heavy objects. It must be
secured and the control bar disconnected from the kite.
• Never lend a kite to anyone who is unfamiliar with the power developed by serious traction devices.
• For your safety and that of others around you, never accept assistance from a person who might not be competent in
landing or launching procedures.
• Check and try the quick release before each ride.
Operating space
On the ground
• You must check that your chosen operating space is free of any obstacles, people or animals. To manoeuvre your kite,
you need AT LEAST 100 METERS DISTANCE on either side of your kite, as well as DOWNWIND (the area in front of
you when your kite is air-borne). Be especially careful of obstacles downwind of you.
• Before launching, be sure to have identified a safe landing area further downwind, in the event you are not able to return
to your departure point.
• Never use your kite near people, animals, posts, trees, buildings, cars, power lines, airports, roads, etc…
On the water
• Your operating space must be completely free of boats, buoys, rocks, pontoons, piers, jetties, etc… Stay as far away
as possible from swimmers, and don’t sail in shipping lanes. Respect no-fly/ride zones.
• Avoid vertical areas bounded by rocks or cliffs where the wind might be extremely turbulent.
Weather
• Never underestimate the wind and sea conditions.
• Consult the local forecast before setting out.
* Never attempt to kitesurf in changing or stormy weather conditions.
* Never attempt to kitesurf if the wind is strong and gusty.
* Never attempt to kitesurf if the wind is off shore, blowing you away from land.
* Never ride in or near electrical storms as the flying lines will massively increase your risk of electrocution.
• Find out about tides and areas with strong currents.
• Beginners must sail in calm sea conditions.
• Take time to gauge the wind speed once you have reached your chosen sailing area.
• If you are not confident in evaluating the forecast, speak to someone who is competent in forecast interpretation.
• Wear suitable equipment to avoid hypothermia-related accidents (wetsuits and drysuits).
* Safety helmets and impact vests are strongly recommended.
Beginners
• TAKOON kites are high performance kites which are not suitable for beginners.
• We highly recommend practicing on a small traction kite before attending a kitesurf school as you will find this dramatically reduces the time it takes you to learn the basics.
• Learn how to fly the kite on land in wide open spaces before venturing onto the water.
• Always choose the size of kite that corresponds to your weight and level of skill/competence.
Good conduct
• Be respectful of other people out on the water: swimmers, surfers, windsurfers, jet skis, pleasure craft etc…
• Follow the rules of priority on the water.
• Make sure your flying lines are not laid out in an area used by pedestrians. Wind up your lines when not in use.
• Do not let anyone walk/stand between you and your kite.
• Help other kitesurfers with launches and landings. You’ll appreciate their help when it’s your turn!
• If necessary, explain the essential safety rules to other kitesurfers.
• Don’t touch other kitesurfers’ equipment unless specifically asked.
Usually check and test your quick releases
Appropriate clothing
The following is a list of indispensable kitesurfing
gear:
Never forget: it’s easier to kitesurf if you’re alive !
Wind: Basic principles
Wind strength
Wind strength can be measured with the Beaufort
scale, miles/kilometres per hour, or knots.
Important: the wind scale supplied here is merely for
guidance and should not be your only criterion for gauging wind strength: you should also take into account
its ‘density’ and how gusty it is.
Never use your kite in extremely gusty conditions :
even if you manage to escape injury you won’t enjoy
the experience anyway!
1 knot = 1,852 km/h
Choosing which size kite to use
YOU MUST ALWAYS USE THE RIGHT KITE SIZE FOR THE
GIVEN CONDITIONS.
The weight of the rider is a major factor in choosing the surface area of kite .
Wind direction
Make sure the wind direction is suited to the spot you have
chosen for sailing.
The ideal wind is a side shore wind that is blowing parallel
to the beach.
NEVER launch your kite with an off shore or side off shore
wind.
On shore wind can be good for the competent kitesurfer but is
dangerous because of possible objects on land down wind.
Turbulences
Obstacles situated upwind of you can create turbulent air-pockets, which often lead to your kite
stalling & de-powering abruptly, falling from the sky,
and suddenly, dangerously powering up again.
Turbulence is present for a down-wind distance
equivalent to approximately 7 times the height of
the obstacle and for an upwind distance equivalent
to 1 times the height of the obstacle.
Warning: wind is always stronger at altitude than it is at ground level, be sure not to let this catch you out.
The ‘wind-window’
This is a theoretical concept which you must have clear in your mind
before using your kite. The wind-window is the region of 3-dimensional space in which your kite will operate, and resembles one quarter
of a sphere.
IMPORTANT: The power generated by your kite will vary according
to which part of the window it is flying in.
Minimum power is at the ‘zenith’(directly above you),this is called the
neutral zone. Maximum power is generated when the kite is located
at the centre and towards the bottom of the window, which is in effect
dead downwind of you. Never fly your kite in this power zone.
On the extreme right and left-hand edges of the window, the power
generated is moderate. These are the zones you will mostly fly your
kite in while sailing.
For your safety and those of the others around you, NEVER stand on the beach with the kite at
the zenith. You must place your kite on an extreme right or left-hand edges at approximately 3m
height. That way the kite can’t lift you into the air (during a gust for example).
Contents of this product pack
The pack is composed of a completed kite with a control system with a safety leash.
The drawing below shows the connection way to a TAKOON kite with bridles.
Your TAKOON kite comes with a 4-lines
control system, which is designed for more
refined, accurate flying and better power
control thanks to the de-power mechanism.
The result is more comfortable and controlled sailing in irregular winds, and the
option to spill excess power in severe
gusts.
Bridles
Warning: never forget that 4 lines flying is more
complicated than 2 lines flying.
This kite is not intended for beginners, and you
must have fully mastered traction-kite flying before attempting to launch this power wing.
Front flying lines
Never over-estimate your own ability.
back flying lines
Safety line
Quick releases
Assembly and adjustment
Before assembling your kite, make sure the operating space you have chosen is suitably free of obstacles and measures
at least 100m by 100m.
The control bar is supplied with lines attached. You simply have to connect the lines to the kite before launching.
Check that all the lines are equal length before connecting. For that, refer to the ‘‘check your Takoon lines
length’’ section.
Setting up the kite
Your kite takes its shape from several vertical inflatable batten struts, and one large horizontal inflatable strut called the
leading edge.
Unroll your kite with its outer surface on the ground, and the leading edge towards the wind. You should stand with your
back facing the wind as close to the leading edge as possible, especially in high winds.
Before using the pump on the kite, pump it a few times to eject any sand left in the tube. This will prevent any sand from
entering the kite’s inner tubes, thus increasing the life of the tubes. Lubricating the pump regularly protects against wear
of the seals and moving parts.
Inflating the struts and leading edge:
Connect the pump to the kite using the pump leash (see drawing
on the left).
Your Takoon kite is available with a one pump system (Furia and
Nova3).
Inflate struts and leading edge at the same time as using the leading
edge valve.
Stop to inflate the kite when the leading edge feels hard.
You can inflate the struts more than the leading edge using the
struts valves with air lock. TThis allows to have a more efficient kite
and an easier relauching.
Important: Do not over-inflate the struts. If they feel rigid to the touch,
they are sufficiently inflated. Over-inflation can lead to burst inner tubes, especially if the struts are left exposed to the sun for a long period.
Equally, you should not under-inflate the struts as the kite will not hold
its correct shape. This can lead to poor flight characteristics and, more
importantly, difficult re-launching from water.
Once the kite is correctly inflated, flip it over so that it’s face down, the
leading edge is on the ground and perpendicular to the wind. The fabric
of the kite (canopy) should be down wind and the kite should not be catching the wind. Weight it down with sand if necessary.
Deflate the struts using the stick stitched together with the valve velcro when it’s available (E-Nova2). Don’t forget to remove it from the valve when folding the kite (risk of
kite damage).
When the kite is inflated and stands on the beach, undo bridles: red bridles for the left side and grey or black bridles for
the right side of the kite (except the bridle going thru the pulley: black bridle for the right side )
Before connecting the flying lines to the bridles
connectors, check the bridles going thru the pulley
(see example on the left for the E-Nova2 5.0).
Connecting the lines to the kite
Your bar is supplied with red (or yellow) and grey rear control lines and white front lines. Connect your rear lines to the
rear loop connector of your kite using a Lark’s Head knot (grey to grey for the right side and red to red or yellow to yellow
for the left side). The front lines have to be connected to the front knot connector of the kite using the colour coded attachment loops (grey to grey, red to red).
Your bar is made to avoid accidentally switching rear lines and front lines or right side and left side connections. Be sure
you have correctly attached them.
Incorrect line attachment is a major cause of accidents.
2
1
3
a
4
a
b
b
1
2
3
4
a and b trimming to control
the power of the kite:
a) less power
b) more power
a
b
Trim the behavior of the kite
1 and 2:
If you move forward the bridle (position #1): More
depower
If you move backward the bridle (position #2): More
Power
3 and 4
If you move forward the rear bridle (location #3):
More bar pressure/ More efficiency of depower rate,
perfect for unhooked tricks.
If you move backward the rear bridle (location #4):
Better relaunching/smaller turning radius. Perfect for
waves.
1
2
3
4
Quick releases and rules for lauching
Read carefully and store the userguide for later reading.
Quick releases
DO NOT, UNDER ANY CIRCUMSTANCES, OPERATE YOUR KITE WITHOUT THE KITE LEASH AND THE QUICK RELEASES . TRY AND CHECK THEM BEFORE EACH SESSION. USING A QUICK RELEASE INSTINCTIVELY NEEDS
LOTS OF PRACTICE. THE QUICK RELEASE REQUIRES A MINIMUM OF STRENGTH TO ACTION.
Notes : many riders have the instinct to hang on desperately to the bar if they get into difficulties. This is wrong. You
should not hesitate to dump the bar and retain the kite via the leash. Operating safety device and relaunching a kite is
easy but needs some practice.
Warning: You must learn how to use the quick release before you need it in a critical situation. Many riders have the bad
habit of trying their quick releases for the first time when they are in dangerous conditions, unaware of how it should
function.
The quick releases of the bar are designed to work for 35Kg-100Kg total rider weights following the NF S 52-503 French
standard.
You must check all the components (lines, bridles, safety devices, etc...) before each ride. A used component can be
dangerous for you and people around if it breaks. If you notice a used component go to your local dealer to change it.
IMPORTANT:
Before launching your kite, you must have understood the
purpose and operation of the quick releases fitted to your
control bar:
A quick release is located on the chicken loop
A secondary quick release is located on the safety line
To connect the chicken loop to the harness hook please
refer to the diagrams.
Releasing the control bar using the quick release on the chicken loop (de-power loop) will automatically de-power the
kite which will then land safely by itself. Make sure you have enough safe room down wind before releasing when
testing.
The Quick Release on the safety line also allows you to kill the power developed by the kite. This Quick Release should
only be operated if you want to release the control bar (e.g. if the situation is dangerous for any other reason) because
it can be dangerous for people around you to have the kite flying alone in the air without any control.
Try the quick release of the chicken loop on your harness spreader bar. The chicken loop should slide freely
inside the spreader bar buckle.
Chicken loop quick release: Pull the handle
Re-loading the chicken loop quick release.
Assembling the finger locker to the chicken loop:
Connect the safety line.
Connect the safety line to the harness as described below (left diagram). You can connect the safety line to a metal ring
on the harness but you should be able to grab the safety handle in all critical situations.
Connect the safety line to your bar as explained on the right side. When you rotate always in the same way (ex: front
loops), you should untwist the lines using the swivel.
2 twists on flying lines is a maximum to have full
safety.
Safety leash quick release: pull the handle as explained below.
Use only in critical situation, a kite flying alone can be extremely dangerous for people around you.
Re-load the safety line quick release (see below)
Pre-flight checks
Before launching your kite, check all the equipment one last time. Fol- Points to remember:
lowing is a check-list of the main points:
• Always make sure you are fully equip• flying lines the correct length, not crossed and free of knots ped before launching: harness, personal
• general condition of the kite
floatation device, helmet, etc…
• pressure in the struts
• Always wear some kind of foot protec• lines connected to the correct sides of the kite
tion when launching, as you risk injuring
• kite leash in good condition
your feet if you slide a few yards while the
• quick releases in good condition
kite gains altitude.
• Depower line, bridles and pulleys in good condition (check
pulleys on kite or pulleys on bridles)
Basic rules for launching
YOUR KITE MUST ALWAYS BE LAUNCHED FROM THE EDGE OF THE WIND WINDOW, NEVER FROM THE CENTRE DOWN WIND.
The power would be far too great for you to control. You would endanger your own life and those of others around you.
This is still true in light winds.
Get into the habit of checking the connecting of the leash to the chicken loop before even picking up the control bar.
YOUR CHICKEN LOOP (DE-POWER LOOP) ON YOUR CONTROL BAR MUST ALWAYS BE HOOKED INTO THE
HARNESS HOOK FOR LAUNCHING.
This will allow you to reduce power during launching by FULLY de-powering (pushing the control
bar away from you).
How to relaunch the kite with bridles?
How to use the bar bumper.
When you want to let go the bar without killing the power of the kite: activate the bar bumper.
Use it carefully. It’s preconized not to activate the bar bumper riding close to obstacles, landing and taking off the kite.
Adjusting the power of the kite
The control bar setup includes a cleat located on the chicken loop. This cleat allows to trim the power of the kite in function of the wind strength during the ride. See how it works on the next page.
More Power (see below):
Less Power (See below):
Use elastic rope to hold the depowe line. It prevents tangling with safety line
(pics 5 and 6).
Tuning your TAKOON kite
You can control the power of your kite using the depower system. Depending on your riding style, tune the length of your
rear lines by moving the lark’s head knot on the pre-line.
Less power and less response.
Perfect for learning tricks, light
riders and strong wind
standard tuning
more power and response
Trim the bar size
The bar supplied has a trimmable bar length. Spreading the rear line attachments allows a better turning speed, perfect
for bigger sizes of kite. Don’t forget to trim both sides, right and left!!
+++Turning speed
55cm bar size
--- Turning speed
47cm bar size
Check your TAKOON lines length
Before the first ride, you must check the line length of the TAKOON bar. For that, connect your flying lines to a fixed point,
take the bar in your hands (depower line at the maximum length and chicken loop touching the bar). All lines need to be
equally stretched.
If not, adjust the lines length using the mutiple trimming knots on the bar.
To adjust the line lengths, use one of the following attachment points:
To adjust one front line
length, check the connection on the bottom
of the V lines.
To adjust the back line
length, check the back
pre-lines.
To adjust the global
front line length, check
the connection on the
top of the depower
line.
Common mistakes
• Not understanding how or when to operate the quick releases
• Forgetting to attach the kite leash
• Seeking assistance from inexperienced people
• Flying in insufficient space
• Choosing an unsuitable spot for kitesurfing
• Failing to check the state of your equipment before launching
• Not launching from the edge of the wind window
• Underestimating the wind strength
• Failing to hook in to the de-power loop during launching
• Flying the kite through the centre of the wind window
• Flying the kite violently into the ground
Troubleshooting :
The kite is flying badly or is deformed:
• The struts are under-inflated
• A strut is deflating due to a puncture
• The wind is too light
The kite is not responding properly to steering inputs:
• The lines are tangled
• You have confused the rear lines with the front lines when
setting up for 4 line flying
• You are holding the control bar upside down.
Maintenance
Avoid exposing your kite to direct sunlight for extended periods of time, as this may damage the colours and integrity of
the sail fabric.
Do not leave your kite fully inflated on the beach for extended periods when you are not using it.
Do not leave your struts fully inflated in a confined hot space such as a car.
Take extreme care to avoid letting any sand or water into the inner tubes.
Rinse your kite (especially the small pulleys located on tips), flying lines and control bar with fresh (tap) water after each
session, as sand and salt will drastically reduce the lifespan of your equipment.
Never leave your kite damp. Dry it off properly after rinsing.
Wind your flying lines onto the control bar in a figure of 7 to prevent damage, twists and tangles.
Repairs
Ripped fabric
If the kite has a major tear, consult your local dealer for details of your nearest official repair centre.
The same goes for any damage sustained to a strut.
Repair any minor tears using the following recommendations:
• rinse and thoroughly dry the kite, and lay it out on a clean and flat surface,
• cut out two identically sized strips of adhesive mylar/repair tape large enough to cover the tear with an extra centimetre
all around.
• stick one piece carefully over the tear, rubbing it down in order to eliminate any air bubbles,
• stick the other piece on the other side of the sail in the same way.
Inner tubes
You should choose a clean and sheltered spot out of the wind for any repairs on inner tubes. You will need the repair kit
supplied with this kite and two flying lines.
• Disconnect single inflation device,
• Undo the velcro strap at the base of the damaged strut in order to access the inner tube,
• Open the valve and remove the velcro strap from around the valve,
• Tie one end of the flying line to the valve using a lark’s head knot, this will help you to re-insert the inner tube following
repairs,
• Push the valve into the strut to free it, then gently pull the inner tube out of the end of the strut ensuring the flying line
stays connected.
• Clean any sand and salt from the inner tube, inflate it and immerse it in water in order to locate the puncture,
• Use a marker pen to identify the puncture. Now dry and clean the inner tube
using a soft cloth and deflate it again,
• If the hole is on a seam just use glue and allow drying for about 20 minutes,
• If the hole is on a flat surface of the inner tube use a patch cut from the clear plastic supplied to repair the puncture,
and allow to dry for about 20 minutes,
• Check the repair by inflating the inner tube and leaving it for a few minutes,
• Using the flying line you attach to the valve, pull the inner tube gently back into the strut making sure it is not twisted
in any way,
• Pass the valve back through the hole in the strut, detach the flying line and fit the valve cap back on,
• Fit the velcro strap back onto the valve and close the end of the strut.
• Reconnect single inflation devices and use necklaces to hold the valves.,
Nb: Inflate slowly and tap on the batten pocket to help the inner tube re-position itself correctly.
Leading edge
The same technique is used to repair the leading edge, with a few minor differences:
• You must attach a flying line to both ends of the inner tube
• The inner tube is removed via an access zip in the centre of the leading edge.
Repair the puncture in exactly the same way. When reintroducing the inner tube, be extremely careful not to twist it, as
this will lead to problems when inflating the leading edge. It is a good idea to coat the inner tube with talcum powder
before reintroducing it into the leading edge pocket to help it slide in smoothly.
Note: if the puncture is too large to repair or the repaired tube is not holding air, you will need to order a new inner tube
from your local dealer.
Rights of way and courtesy
Launching
• A kitesurfer setting out or changing direction should be careful not to get in anybody else’s way.
• A kitesurfer with his kite at it’s zenith, while maneuvering or at a stand still, has right of way over everyone else. Any
kitesurfer moving towards him must steer clear.
• A kitesurfer should, whenever possible, sail downwind from all other craft (windsurfers, boats, swimmers…) using the
same sailing area.
A kitesurfer going onto the water has right of way over a kitesurfer coming into the beach.
Crossing other kitesurfers
• A kitesurfer who sails with the wind on the starboard tack (wind over the right side of the board) has right of way over a
kitesurfer who’s wind direction is port (left).The starboard kitesurfer should, as much as possible, go straight ahead and
the port kitesurfer should maneuver to keep clear.
• An experienced kitesurfer should anticipate and not hinder a beginner’s movements. The experienced kitesurfer should
sail up-wind of the beginner to keep out of his way.
• A kitesurfer must keep out of the way of all other craft (sailboards, boats…).
• When two kitesurfers cross or overtake, the up-wind kitesurfer (the one who is closest to the wind source) must progressively raise his kite in order to reduce his speed, to avoid being hurled towards the person he is overtaking or crossing.
The down-wind kitesurfer must, on the other hand, lower his kite to avoid crossing lines in case he underestimates the
distance.
Sailing on the same tack
• An overtaking kitesurfer must keep clear of the kitesurfer being overtaken.
Jumps and transitions
• While getting ready for a jump or transition, the kitesurfer must first of all determine wind stability (avoid jumping during
a gust of wind) as well as the sailing area down-wind and up-wind. This area should be free and clear at least 100m
down-wind and 20m up-wind. Before attempting any jumps or transitions, the kitesurfer should be certain not to hinder
any other craft all the way through the move.
Sailing in waves
• In waves the previous «starboard» rule doesn’t apply, the kitesurfer going out facing the waves has right of way over
the one who is surfing in.
• While surfing, the kitesurfer closest to the wave’s peak has right of way. Surfers have right of way over everyone else
because they are less maneuverable.
Glossary
Inflatable kite: a kite which has inflatable struts which allow it to re-launch from water. Can be flown on 2 or 4 lines.
Strut: tube of material which houses the inner tube.
Inner tube: an airtight rubber tube fitted with a valve, found in each vertical strut and the leading edge.
Leading edge: the front section of the kite, which contains the largest inner tube, it leads into the wind.
Trailing edge: the rear section of the kite, where the wind spills off the kite sail.
Body dragging: using the power of the kite to pull you through the water without your board. Kitesurf or kiteboard or flysurf: The
name given to the water sport which combines a traction kite and a surfboard.
Control bar: used to steer the kite.
De-power: the system which allows the operator to control the amount of power developed by the kite, by pushing or pulling on
the control bar.
Front lines: on a four line setup, these are the two flying lines which lead from the centre of the control bar and attach to the wing
tips on the leading edge.
Rear lines: on a four line setup, these are the two flying lines which lead from the ends of the control bar to the wing tips on the
trailing edge. Also known as “brake lines”.
Harness: attaches around your waist and is equipped with a hook. Used to attach to the control bar via the de-power or harness
loop in order to use your body weight to hold the kite.
Line cutter: specialist blade which must be easily accessible and is used to cut the flying lines in an emergency.
Overpowered: using a kite that is too big for your body weight or the prevailing wind conditions or your level.
Underpowered: using a kite that is too small for your body weight or the prevailing wind conditions.
Cross-shore: wind blowing parallel to the beach.
Offshore: wind blowing from the land out to sea.
Onshore: wind blowing from the sea onto the land.
Cross-off: a combination of offshore and cross-shore wind
Cross-on: a combination of onshore and cross-shore wind
Upwind: the region where the wind is coming from
Downwind: the region where the wind is traveling to
Beaufort scale: scale used to measure wind speeds, ranging from 0 to 12.
TAKOON WARRANTY POLICY
CONDITIONS DE GARANTIE
Notwithstanding legal warranty conditions of the product’s defects (French civil code, art. 1642 and followings), TAKOON PRODUCTS ARE WARRANTIED to be free
of defects from manufacture in material and or workmanship to the original owner for 6 months, starting from the date of purchase, on condition the warranty registration
card available in the present product pack is filled, signed and sent back within 7 days of purchase date.
French law applies to all disputes concerning this product
The warranty subscriber declares to have read and understood the terms and conditions of use set out in the user or instruction manual and to abide by these.
I.
Warranty extent
1.
This warranty is valid only when this product is used for normal recreational activities. Teaching and renting are not included.
2.
This warranty doesn’t cover damage caused by misuse or abuse, damage due to over-inflation in the sun, damage caused by improper handling and
storage, damage caused by use in shore break or on a rocky spot, damage resulting from improper maintenance, from normal wear and tear or caused by anything other
than defects in material and workmanship.
3.
This warranty is null and void if any unauthorized repair, change or modification has been made to any part of the equipment.
II.
Warranty procedure
If you are faced with any problem which come within the framework of the warranty, you should bring the defective product back to your TAKOON retailer with the
following documents and information:
A copy of the kite/board user’s invoice which indicates the purchase date (if it does not clearly figure on the invoice, the sale date to the retailer will be
chosen as the beginning of the warranty)
The type of the board/kite and the serial number (located on a tip for the kites and on the deck of the boards)
A precise description of the defect
A good picture of the defect (no POLAROID)
Your name and address
Your retailer will communicate you claim to BIC SPORT (exclusive TAKOON distributor) and, if necessary will send the product to an official TAKOON repair centre. You
will have to pay the carriage costs. Only BIC SPORT is entitled to take the final decision about the warranty. If a product is deemed to be defective by TAKOON, it will be
repaired or replaced by the official TAKOON repair centre in the shortest possible time and will be sent back to your TAKOON dealer at your costs.
Warning!
It is the user’s responsibility to careful read this user’s guide and instruct all users on the safe operation of this product.
Nonobstant les conditions légales de garantie des vices inhérents au produit (art. 1642 s. Code civil), LES PRODUITS TAKOON SONT GARANTIS contre tout défaut
de fabrication et/ou de matériaux pour une durée de 6mois à compter de la date d’achat sous réserve du renvoi de la partie détachable de la carte d’enregistrement de
garantie inclue dans le sac de l’aile dûment remplie et signée dans un délai de 7 jours.
La loi applicable à tout litige concernant le produit en question est la loi française.
Le souscripteur de la garantie déclare avoir pris connaissance des conditions d’utilisation prescrites par le guide d’utilisation et s’y conformer.
I. Etendue de la garantie :
1- Elle couvre une utilisation normale du produit, excepté dans le cadre de la location ou de l’enseignement.
2- Elle ne couvre pas les dommages résultant d’une mauvaise utilisation ou d’une utilisation abusive du produit au regard de ce manuel, ni les dommages résultant d’une
exposition excessive au soleil, ni ceux résultant d’un stockage inadapté du produit.
3- Aussi, la garantie ne couvre pas les dommages résultant d’une utilisation dans un lieu inadapté à la pratique du kiteboard (shorebreak ou zone rocheuse par exemple), ni ceux résultant d’une maintenance incorrecte du produit et, d’une manière générale, tous les dommages n’ayant pour cause un défaut de fabrication et/ou de
matériaux.
4- Elle ne peut être applicable si une modification ou une réparation non conventionnelle a été apportée à quelque partie que ce soit du produit.
5- Aucune extension de cette garantie conventionnelle n’est possible.
II. Procédure de mise en œuvre de la garantie :
Si vous rencontrez un problème qui entre dans le cadre de la garantie, ramenez le produit défectueux à votre revendeur TAKOON, accompagné des documents et
informations suivants :
- Une copie de la facture du produit indiquant la date d’achat (à défaut, c’est la date de vente du produit au distributeur qui sera prise en compte comme point de départ
de la garantie),
- Le nom du modèle de kite, et le numéro de série du produit (pour les kites, il se situe sur une oreille),
- Un descriptif précis du défaut ou problème rencontré,
- Une photo permettant d’identifier facilement le défaut (pas de Polaroid),
- Votre nom et vos coordonnées.
Votre revendeur se chargera de communiquer votre demande à TAKOON, et, le cas échéant de retourner à vos frais le produit défectueux.
Seule la société TAKOON est en mesure de prendre la décision finale de prise en garantie du produit et donnera ou non son approbation après expertise.
Tout produit jugé défectueux sera réparé ou remplacé dans les plus brefs délais par un centre agréé TAKOON, puis retourné à vos frais à votre revendeur TAKOON.
ATTENTION
Il est indispensable de lire attentivement le guide d’utilisation avant toute utilisation de votre aile TAKOON.
- Votre nom et vos coordonnées.
Votre revendeur TAKOON se chargera, à vos frais, de retourner le produit défectueux.
Seule la société TAKOON est en mesure de prendre la décision finale de prise en garantie du produit et donnera ou non son approbation après expertise.
Tout produit jugé défectueux sera réparé ou remplacé dans les plus brefs délais par un centre agréé TAKOON, puis retourné à vos frais à votre revendeur TAKOON.
BIC SPORT - SECTION KITESURF, Z.I. du Prat 56037 VANNES Cedex - France
WARNING/ATTENTION
It is the user’s responsibility to carefully read this user’s guide and instruct all users on the safe operation of this product.
Il est indispensable de lire attentivement ce manuel avant toute utilisation de votre aile TAKOON.
© This document is copyright to TAKOON/BIC SPORT and cannot be used without the author’s permission.
© 2006 TAKOON/BIC SPORT. Ce document ne peut être utilisé sans l’autorisation de son auteur.