1
ENTERPRISE SERVER
Infolab RXM Portal – Application Development
INFOLAB RXM WEB PORTAL - DEVELOPMENT
Before you read this Document, you should have seen the OVERVIEW.
Purpose of this Manual
The purpose of this User Manual is to provide you with an easy ‘entrance’
example of how to design Portal Application Services with INFOLABrxm and IES.
Once you get going, you may study more technical detail and examples on the
FAQS Pages at www.infolab.cc
Development Example
When you design Portal Services, there are marked differences in the design flow
as compared with standard Application Design Methods. The Internet was not
invented for Application Services, but as things developed, we now strive to use it
for that as well, and guess what, it is here to stay. Nevertheless, things are
different.
The huge advantage that we have with the Internet and Browser connections is
that the Client Connection needs no special software installed other than the
Browser. The downside is that the Client Connection has only the Browser, and
lacks the structural strengths and advantages of traditional Application Client
Software.
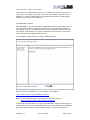
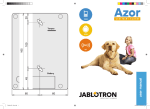
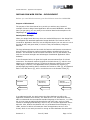
In the illustration below, we glean the logical communications flow of a Portal
Connection. The Browser sends a Request to the Web Server [1], which in turn
passes it to an Application Server [2](unless the Request relates only to static
HTML pages, of course). The Application Server processes the request [3],
perhaps applying Business Rules, translates the results to HTML [4], and passes it
back to the Web Server [5], who in turn delivers it to the Browser Client [6].
1
2
BROWSER
INFOLABrxm
(Web Server)
6
5
3
INFOLAB
Enterprise Server
4
In a traditional model, we might expect the Client Software to talk to the
Application Software more directly. The Web Server in our illustration above is
able to understand the international standard language of the Internet, i.e. HTML,
but it is not great at applying Business Rules and other logic, and it is totally
useless for managing Data Storage, which is why we need the Application Server
behind it. Also, because the Browser will only understand Internet Speak, e.g.
HTML, we have to deliver all interaction from the Application Server in this
format, which is not nearly as useful or strong as Client Software that we would
Revision 3.1
June 05, 2006
Page 1 of 10
ENTERPRISE SERVER
Infolab RXM Portal – Application Development
otherwise use for Application Services. For example, one issue that we have to
overcome in our design, is the fact that a User can normally backtrack with a
Browser, i.e. click the BACK button, and resend a Page that is 3 Pages behind
what has been done in the meantime.
The INFOLABrxm solution –
With INFOLABrxm, we have designed an Application Model for Portal Services, i.e.
non-persistent Browser Connections, that allows you considerable freedom in
your design, and yet transparently takes care of connections, protocol flow and
conversions, and shields you from the complexities so commonly encountered
with creating and managing Portal Services.
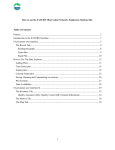
a) Transparent merging with your native Website is easy.
Note: The link for ‘INFOLABrxm’ in our example is encoded as :http://www.infolab.cc:9465/infolabrxm/request
Note: To use the Secure Server, the above link may look like this –
https://www.infolab.cc:8843/infolabrxm/request
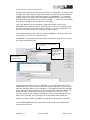
In the page illustrated above, it is clear that INFOLABrxm Portal services may be
offered either on it’s own or embedded within your usual Website. An INFOLABrxm
page may either occupy the entire Browser page, or be processed within a
Revision 3.1
June 05, 2006
Page 2 of 10
ENTERPRISE SERVER
Infolab RXM Portal – Application Development
defined Frame, leaving the other Site Links intact. If ‘INFOLABrxm’ is clicked in this
example, it produces another Page that occupies the same frame. Any selection
of links in any of the other frames will produce non-INFOLABrxm, i.e. standard
Website results (e.g. ‘static web’ as opposed to Application Services). The Page
illustrated above should be seen only as an example, i.e. there are no constraints
as to how you design or do the layout for such Pages.
Hint: Your Website may be hosted with a Service Provider, and yet your
INFOLABrxm Portal Services may be hosted by your D3 Server in another part of
the world, not connected to your Service Provider, i.e. simply connected to the
Internet. And still these 2 may be merged as shown above.
Hint: Standard Web Services ‘talk’ on port 80. INFOLABrxm can do the same, but
can also be set to ‘listen’ on a different port.
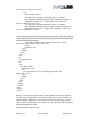
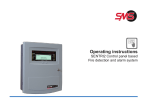
b) INFOLABrxm Page Objects provide an easy yet powerful design flow to provide
any required Portal Services.
Each Page object has a unique Key
of your choice.
The system links
transparently to
the specified
Datamart before
executing your
logic.
Projects and Functions
are specified for
grouping purposes.
A Page Object provides the link for INFOLABrxm to call your subroutine for Tag
replacement with runtime Values, and once a Page is submitted by the User, the
Page Key indicator passed via the ‘Navigator’ name again provides the necessary
link to determine which Subroutine to call to process the submitted Values. The
Subroutine that is called also returns the next Page Key to serve, i.e. if the
previous Values did not Validate satisfactorily, the next Page might be an error
Page, if they were OK, the next Page may be something entirely different.
And now we may consider a complete, though small, Portal Services example :In the ‘OPERATIONS’ Manual we had a look at the Portal Control Parameters.
Have another look at it.
Revision 3.1
June 05, 2006
Page 3 of 10
ENTERPRISE SERVER
Infolab RXM Portal – Application Development
There are 2 Subroutine Calls specified. The ‘Startup’ Call is used whenever a new
Session Connection occurs, and it returns a result that tells INFOLABrxm which
Page to serve. In our example, this routine does the following –
subroutine portal.startup(nexpage)
*
nexpage = 'main'
*
return
Very simple. In this example, we merely pass INFOLABrxm the Key of the 1st Page
to serve to a new Connection (although we could do a whole lot more if we
wanted to).
The 2nd Subroutine on our Portal Control Parameters is the ‘Default’ call. This
Routine is called whenever a User Page is submitted without the ‘navigator’ name
to indicate which Page is going to process the Values that have been submitted,
or if the Page Key is invalid, or whenever any of your Routines return a ‘nexpage-key’ that is not valid. In our example, it looks like this –
subroutine portal.default(nexpage)
*
nexpage = 'defpage'
*
return
Once again, our Default Call simply returns a Page Key, in this case a Default
page that displays an appropriate message. However, you may perform any
amount of logic here, process the Values that have been submitted, interrogate
the SID (Session ID), etc.
Now that we have the minimum requirements for control purposes, we can have
a look at Page Key = ‘main’, which is our startup Page, and consider what
happens with it.
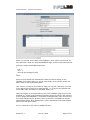
When the Page is served, it may look like this :
Revision 3.1
June 05, 2006
Page 4 of 10
ENTERPRISE SERVER
Infolab RXM Portal – Application Development
The page includes a graphic, as well as 2 Input Fields, the 2nd being a Password
Field where input is masked. And of course there is a SUBMIT Button.
The HTML for this page looks like this –
<html>
<head>
<meta http-equiv="Content-Language" content="en-us">
<meta http-equiv="Content-Type" content="text/html; charset=windows-1252">
<meta name="GENERATOR" content="Microsoft FrontPage 4.0">
<meta name="ProgId" content="FrontPage.Editor.Document">
<title>Welcome to INFOLABrxm</title>
</head>
<body bgcolor="#FFFFFF" link="#000000" vlink="#000000" alink="#000000">
<div align="center">
<center>
<table border="0" width="700" bgcolor="#FFFFFF">
<tr>
<td><font face="Verdana" size="2" color="#0000FF">Welcome to
INFOLABrxm,
the non-persistent Portal to be used with your INFOLAB Enterprise
Server.</font></td>
</tr>
<tr>
<td> </td>
</tr>
<tr>
<td><font face="Verdana" size="1">This page is served purely for
demonstration purposes, and allows you to use your IES Logon Code to
see whether it works ...</font></td>
</tr>
<tr>
<td> </td>
</tr>
<tr>
<td>
<div align="center">
<table border="0">
<tr>
Revision 3.1
June 05, 2006
Page 5 of 10
ENTERPRISE SERVER
Infolab RXM Portal – Application Development
<td>
<form method="POST">
<p><font face="Verdana">UserCode </font><!--webbot
bot="Validation" B-Value-Required="TRUE" I-Minimum-Length="2"
I-Maximum-Length="12" --><input type="text" name="T1"
size="20" maxlength="12"></p>
<p><font face="Verdana">Password </font><!--webbot
bot="Validation" B-Value-Required="TRUE" I-Minimum-Length="3"
I-Maximum-Length="12" --><input type="password" name="T2"
size="20" maxlength="12"></p>
<p>  
; &n
bsp;
<input type="submit" value="Submit" name="B1"><input
type="reset" value="Reset" name="B2"></p>
</form>
<p> </td>
</tr>
</table>
</div>
</td>
</tr>
<tr>
<td> </td>
</tr>
<tr>
<td>
<div align="right">
<table border="0">
<tr>
<td><img border="0" src="/pics/logo.jpg" width="306"
height="46"></td>
</tr>
</table>
</div>
</td>
</tr>
</table>
</center>
</div>
</body>
</html>
Actually, if you are not an HTML fundi, it doesn’t matter all that much, because
you may use any HTML Editor to generate the Page Layout. In this example, we
used Microsoft’s FrontPage 4.0. You are free to code your own HTML, or use the
HTML Generator / Editor of your choice. Once you have done the page, simply
view the HTML equivalent with your chosen tool, copy the HTML Code and paste it
into the IES Window for HTML.
Our page definition looks like this –
Revision 3.1
June 05, 2006
Page 6 of 10
ENTERPRISE SERVER
Infolab RXM Portal – Application Development
In the above picture, note the following :-
-
-
-
Our Page Key = “Main”
The processing for this Page takes place in the ‘Infolab’ Datamart
‘Auto Navigate’ is on. This Means IES will, before serving your HTML,
include a value ‘navigator=main’ in the HTML so that when the Page is
submitted, this value will be present and INFOLABrxm will know that it
should return to Page ‘Main’ to find the Subroutine to call for
processing the Submitted Values.
‘Blank When Submitted’ is also on. Users tend to keep clicking a
Submit when they do not get an immediate response, not realizing that
this causes the Page to be submitted again and again. When you allow
IES to do so, it will include Java Script with your Page HTML (before
serving the Page), that causes the Screen to Blank as soon as Submit
is clicked the 1st time. The User then cannot keep clicking the Submit
Button.
We have not included any Tags to Replace with Values for this Page,
because there are no default values for ‘User Code’ and ‘Password’.
Since we have no Default Values, we have not specified a Tags Call,
which would normally have the task to determine what the Default
Values should be, before IES replaces Tags in the HTML with the
supplied Values (from the Tags Subroutine Call), and before serving
the Page.
We have specified ‘wnpp.main’ as the Subroutine responsible for
handling post Submit logic, i.e. when the User Clicks Submit, and the
results include ‘navigator=main’, i.e. our Page, and which logic is
automatically included for us because we chose ‘Auto Navigate=ON’.
Our Subroutine ‘wnpp.main’ looks like this –
subroutine wnpp.main(nexpage)
*
equate z to char(13)
nexpage = 'main-feedback'
Revision 3.1
June 05, 2006
Page 7 of 10
ENTERPRISE SERVER
Infolab RXM Portal – Application Development
* which parameters did we get
params = ''
call wnp.get.params(params)
mes = 'The following Data was Submitted :' : z
mes = mes : ' ' : z
locate('t1',params,1;yeah) then
mes = mes : 'UserCode=':params<2,yeah>:z
end else
mes = mes : 'UserCode=NULL':z
end
locate('t2',params,1;yeah) then
mes = mes : 'Password=':params<2,yeah>:z
end else
mes = mes : 'Password=NULL':z
end
idx = 1
call wnp.put.storage(idx,mes)
*
return
One of the tasks of this Subroutine is to advise what the next Page Key will be,
and we can see that we set this variable = ‘main-feedback’.
The next task is to process the Values, and validate them if necessary. In this
case, we are merely going to serve a Feedback Page that shows you what was
captured and submitted. In order to know which values were submitted, we use
the standard call ‘wnp.get.params’. (When you are in the IES Program Writing
options, you may view PORTAL CODE for examples of the standard Routines
available to you.)
Our Parameter list should include values for the following names :SID, Navigator, T1, T2 (also the Buttons, but this is irrelevant now);
When you look at the code for this Subroutine, consider that the Parameters are
delivered to you as a dynamic array where Attribute 1 includes a Multi-Vaued List
of Variable Names, and Attribute 2 has the corresponding Values.
Therefore, if params<1,3> = ‘T1’, which is the UserCode Field (you should be
able to see this in the HTML code higher up), then whatever the User captured for
this Field (if at all), can be found at params<2,3>. Simple as that.
The final action we need to note in the Subroutine is the call we make before
concluding, i.e. ‘wnp.put.storage’. We have 10 ‘storage’ areas, each of which can
accommodate a dynamic array, and each of which has ‘life’ between receiving a
Submit and until serving the next Page. Therefore, when our Subroutine releases
control, it returns to IES with the value of the next Page Key. IES will perform
some logic, and then, before it serves the next Page, in this case ‘main-feedback’,
it may call a Tags Subroutine to determine default Values for the new Page it is
about to serve. ‘Storage’, then, is the method whereby you can pass Values from
the Previous Page to the Next. In other words, when processing ‘main’, you use
‘wnp.put.storage’ to preserve the values, and when the Tags Call is executed on
‘main-feedback’, you can retrieve these values with ‘wnp.get.storage’. Let’s have
a look.
Revision 3.1
June 05, 2006
Page 8 of 10
ENTERPRISE SERVER
Infolab RXM Portal – Application Development
Above, we see that for the Page ‘main-feedback’, which will be served next, we
have specified a Tags call ‘wnpp.mainfeedback.tags’, and the code looks like this:
subroutine wnpp.mainfeedback.tags(vals)
*
vals = ''
idx = 1
call wnp.get.storage(idx,vals)
*
return
Since we have already pre-formatted the Data we wish to display on the
Feedback form before storing it, we can now simply retrieve these values and
pass it back as the Replacement Data.
Hint: There is no limit to the number of Tags you may use, and there is no limit
to the Values that a Tag may be replaced with, i.e. a Tag can be replaced with
more HTML Code, including pre-formatted Tables, etc.
Now notice again on the specification of the ‘main-feedback’ page that we have
specified for ‘%tag1’ that formatting should be preserved. What is the meaning
of this? Simply that INFOLABrxm will protect the Replacement Value from having
it’s format changed by the Browser, which under other circumstances may do
unpredictable things when displaying the value, depending on the host Browser
Screen size and other factors.
It is our intention for this value to display like this :
Revision 3.1
June 05, 2006
Page 9 of 10
ENTERPRISE SERVER
Infolab RXM Portal – Application Development
UserCode=what_was_captured
Password=what_was_captured
If we do not protect formatting, it may come out like this :
UserCode=what_was_captured Password=what_was_captured
And below is what our Page actually serves back –
This then concludes the example of how to define INFOLABrxm Portal Services.
Please submit any Questions you may have to [email protected], that we may
include these with FAQS @ www.infolab.cc
Note: INFOLABrxm reserves only the following two names, which you may not use
for any other purpose in your Pages:
Service
Navigator
[do not use]
[use with HyperLinks or include with Pages when you did not
choose ‘auto navigate’]
© Infolab, 2006
This Documentation is copyrighted by Infolab (Pty) Ltd. [ www.infolab.cc ] All rights are reserved.
Licensed INFOLAB Users are granted permission, for internal use ONLY, to reproduce the
Documentation, and to include amendments dealing with specific instructions local to your installation.
Revision 3.1
June 05, 2006
Page 10 of 10