1
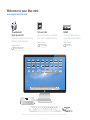
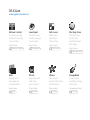
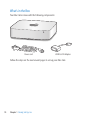
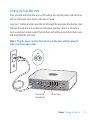
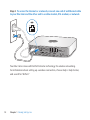
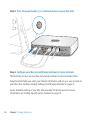
Congratulations, you and your Mac mini were made for each other. Welcome to your Mac mini. www.apple.com/macmini Thunderbolt high-speed I/O Connect high-performance devices and displays. Help Center thunderbolt SD card slot Import photos and videos from your digital camera. HDMI Connect Mac mini to your big-screen HDTV. Help Center SD card Help Center HDMI Mac mini shown with Thunderbolt Display, Apple Wireless Keyboard, and Magic Mouse. OS X Lion www.apple.com/macosx Launchpad Instant access to all your apps in one place. Full screen Make apps full screen with a click. Help Center mission control Help Center launchpad Help Center full screen Mail Group your messages by conversations. iPhoto Organize, edit, and share your photos. iMovie Turn home videos into home blockbusters. GarageBand Create greatsounding songs with ease. Help Center mail iPhoto Help photos iMovie Help movie GarageBand Help record Help Center mac app store LO F R O C A EL UP Mac App Store The best way to discover and download Mac apps. M H Mission Control A bird’s-eye view of what’s running on your Mac. E R T I N O, C Contents Chapter 1: Ready, Set Up, Go 10 11 20 23 24 24 What’s in the Box Setting Up Your Mac mini Setting Up DVD or CD Sharing Migrating Information to Your Mac mini Getting Additional Information onto Your Mac mini Putting Your Mac mini to Sleep or Shutting It Down 30 32 34 36 36 41 Installing Memory Chapter 2: Life with Your Mac mini What’s on the Front of Your Mac mini What’s on the Back of Your Mac mini Using the Apple Remote Using SD Cards Getting Answers Chapter 3: Boost Your Memory Contents 5 Chapter 4: Problem, Meet Solution 49 49 52 57 58 60 61 62 64 An Ounce of Prevention Problems That Prevent You from Using Your Mac mini Repairing, Restoring, or Reinstalling Mac OS X Software Checking for a Hardware Problem Problems with Your Internet Connection Problems with Wireless Communication Keeping Your Software Up to Date Learning More, Service, and Support Locating Your Product Serial Number 66 68 70 72 73 Important Safety Information Important Handling Information Understanding Ergonomics Apple and the Environment Regulatory Compliance Information Chapter 5: Last, but Not Least Looking for Something? 80 Index 6 Contents 1 Ready, Set Up, Go www.apple.com/macmini Help Center Migration Assistant Your Mac mini is designed so that you can easily set it up and start using it right away. If you’ve never used a Mac mini or are new to Mac computers, read this section for instructions about getting started. Important: Before you plug your Mac mini into a power outlet, read all the installation instructions and the safety information in Chapter 5, “Important Safety Information” on page 66. If you’re an experienced user, you may already know enough to get started. Make sure you look over the information in Chapter 2, “Life with Your Mac mini” on page 27 to find out about the features of your Mac mini. ÂÂ If you know you won’t be migrating information from another Mac, and you’d like to get started using your Mac mini right away, you can use Setup Assistant to set up your Mac mini quickly. For more information, see “Setting Up with Setup Assistant” on page 17. ÂÂ If you want to migrate information from another Mac to your Mac mini, you can use Setup Assistant to specify the computer whose information you want to transfer. For more information, see “Setting Up with Setup Assistant” on page 17. ÂÂ After you set up your Mac mini, if you want to get content from DVDs or CDs onto your Mac mini, you can set up one or more Mac or Windows computers to partner with your Mac mini. For more information, see “Setting Up DVD or CD Sharing” on page 20. 8 Chapter 1 Ready, Set Up, Go ÂÂ If you’re using your Mac mini with Mac OS X Lion Server, it’s ready to host all of the services provided by Lion Server. You can use Server Assistant to set up your server and migrate information from another Mac server. For information about using your Mac server or using Lion Server, open the Server application and choose Server Help in the Help menu. To learn more about Mac OS X Lion Server software, see the Lion Server website at www.apple.com/macosx/server. Answers to many questions can be found on your Mac mini in Help Center. For information about Help Center, see “Getting Answers” on page 36. Apple may release new versions and updates of its software, so the images in this book may be slightly different from what you see onscreen. Chapter 1 Ready, Set Up, Go 9 What’s in the Box Your Mac mini comes with the following components: Power cord HDMI to DVI Adapter Follow the steps on the next several pages to set up your Mac mini. 10 Chapter 1 Ready, Set Up, Go Setting Up Your Mac mini Place your Mac mini right side up on a firm surface. Use only the power cord that came with your Mac mini; other power cords may not work. Important: Cooling air enters your Mac mini through the gap around the bottom cover and exits through the vent on the back. Don’t place your Mac mini on a soft surface (such as a blanket or deep carpet) that interferes with airflow around the bottom cover, and don’t block the back vent. Step 1: Plug the power cord into the back of your Mac mini, and then plug the other end into a power outlet. ® HDMI Cool air inlet (around foot) Exhaust vent Chapter 1 Ready, Set Up, Go 11 Step 2: To access the Internet or a network, connect one end of an Ethernet cable to your Mac mini and the other end to a cable modem, DSL modem, or network. ® HDMI Your Mac mini comes with AirPort Extreme technology for wireless networking. For information about setting up a wireless connection, choose Help > Help Center, and search for “AirPort.” 12 Chapter 1 Ready, Set Up, Go Step 3: Connect the USB cable from your keyboard and mouse. ® HDMI Your Mac mini doesn’t come with a keyboard or a mouse, but you can use almost any USB keyboard and mouse. If your keyboard has a USB port (d), plug your mouse into the USB port on the keyboard. If it doesn’t, plug the mouse into a USB port (d) on the back of your Mac mini. Note: If you have Mac OS X Lion Server, you can set it up remotely from another computer. For information, open the Server application and choose Server Help from the Help menu. Chapter 1 Ready, Set Up, Go 13 You can use Keyboard preferences to change the behavior of the Caps Lock, Control, Option, and Command (x) modifier keys. To open Keyboard preferences, choose Apple () > System Preferences, click Keyboard, then click Modifier Keys and follow the onscreen instructions. If you use a USB keyboard that isn’t specifically designed for the Mac OS, it may not have a Command (x) or Option modifier key, which are standard on Apple keyboards. If you have a keyboard from another manufacturer: ÂÂ The Windows key (the icon on the key looks like a Windows logo) is equivalent to the Command (x) modifier key on an Apple keyboard. ÂÂ The Alt key is equivalent to the Option modifier key on an Apple keyboard. Using a USB mouse or keyboard from another manufacturer may require software drivers. Check the manufacturer’s website for the latest software drivers. Using a Wireless Keyboard, Magic Mouse, or Magic Trackpad If you purchased an Apple Wireless Keyboard, Magic Mouse, or Magic Trackpad with your Mac mini, follow the instructions that came with the device to set them up with your Mac mini. 14 Chapter 1 Ready, Set Up, Go Step 4: Connect a display cable to the HDMI port or Thunderbolt port. Your Mac mini doesn’t come with a display, but you can connect a display that has: ÂÂ A Mini DisplayPort or Thunderbolt connector. Connect directly to the Thunderbolt port. ÂÂ An HDMI connector. Connect directly to the HDMI port. ÂÂ A DVI connector. Use the HDMI to DVI Adapter that came with your Mac mini to connect to the HDMI port. ÂÂ A VGA connector. Use a Mini DisplayPort to VGA Adapter to connect to the Thunderbolt port. Adapters are available at www.apple.com/store or your local Apple Retail Store. HDMI port ® HDMI Thunderbolt port HDMI Chapter 1 Ready, Set Up, Go 15 Step 5: Press the power button (®) on the back to turn on your Mac mini. ® ® HDMI Step 6: Configure your Mac mini with Setup Assistant or Server Assistant. The first time you turn on your Mac mini, Setup Assistant or Server Assistant starts. Setup Assistant helps you enter your Internet information and set up a user account on your Mac mini. Continue reading “Setting Up with Setup Assistant” on page 17. Server Assistant starts up if your Mac mini uses Mac OS X Lion Server. For more information, see “Setting Up with Server Assistant” on page 19. 16 Chapter 1 Ready, Set Up, Go Setting Up with Setup Assistant You can transfer information from another Mac or PC during setup. You can also use Setup Assistant to transfer information from a Time Machine backup or other disk. You may have to update software if the other Mac doesn’t have Mac OS X version 10.5.3 or later installed. To migrate from a PC, you need to download Migration Assistant for Windows from http://apple.com/migrate-to-mac. After you start Setup Assistant on your Mac mini, you can leave it midprocess without quitting, move to the other computer if you need to update its software, and then return to your Mac mini to complete the setup. If you don’t use Setup Assistant to transfer information when you first start up your Mac mini, you can do it later using Migration Assistant. Open Migration Assistant in the Utilities folder in Launchpad. For help using Migration Assistant, open Help Center and search for “Migration Assistant.” To set up your Mac mini: 1 In Setup Assistant, follow the onscreen instructions until you get to the “Transfer Information to This Mac” screen. 2 Do a basic setup, a setup with migration, or transfer information from a Time Machine backup or other disk: ÂÂ To do a basic setup, select “Don’t transfer now” and click Continue. Follow the remaining prompts to select your wireless network, set up an account, and exit Setup Assistant. Chapter 1 Ready, Set Up, Go 17 ÂÂ To do a setup with migration, select “From another Mac or PC” and click Continue. Follow the onscreen instructions to select the Mac or PC you want to migrate information from. Your Mac or PC must be on the same wired or wireless network. You can also connect another Mac by using a FireWire cable and then restarting it in target disk mode. To restart a Mac in target disk mode, restart the computer while holding down the T key. After selecting your Mac or PC, follow the onscreen directions for migrating information. ÂÂ To transfer information from a Time Machine backup or another disk, select “From a Time Machine backup or other disk” and click Continue. Select the backup or the other disk that you want to migrate information from and click Continue. Follow the onscreen directions for transferring the information. If you don’t intend to keep or use your other computer, it’s best to deauthorize it from playing music, videos, or audiobooks that you’ve purchased from the iTunes Store. Deauthorizing a computer prevents any songs, videos, or audiobooks you’ve purchased from being played by someone else, and frees up another authorization for use. For information about deauthorizing, choose iTunes Help from the Help menu in iTunes. After you set up your Mac mini, check for updated software. Choose Apple () > Software Update from the menu bar and follow the onscreen instructions. 18 Chapter 1 Ready, Set Up, Go Setting Up with Server Assistant The first time you turn on your Mac mini with Mac OS X Lion Server installed, Server Assistant asks for some basic information that Lion Server needs in order to start up and connect to the network. Be ready to provide the following information the first time you turn on your Mac mini: ÂÂ An account name and password ÂÂ An organizational name that’s unique in your company ÂÂ A host name, which can be for your local network only, for your local network and VPN access from the Internet, or an Internet host name you purchased from a domain name registrar. ÂÂ Detailed network settings, including IP address, subnet mask, and DNS servers. The network settings may be provided by your Internet router or a server on your network. If so, it should be configured to provide your server the same IP address all the time (static mapping or DHCP reservation). For help with Server Assistant, click the Help button in any pane. For help setting up Mac OS X Lion Server remotely on a Mac mini without a keyboard, mouse, or display, open the Server application and choose Server Help in the Help menu. If you already have a Mac with Mac OS X Server version 10.5 or later, Server Assistant can help you automatically transfer system settings, service settings, user accounts, files, applications, and other information from your previous Mac server (any model) to your Mac mini. Use an Ethernet, FireWire, or wireless connection to transfer information. For information about working with the services in Mac OS X Lion Server, open the Server application and choose Server Help in the Help menu. For more information about Mac OS X Lion Server, see the Lion Server website at www.apple.com/macosx/server. Chapter 1 Ready, Set Up, Go 19 Step 7: Customize your desktop and set your preferences. You can quickly customize the desktop using System Preferences. Choose Apple () > System Preferences from the menu bar, or click the System Preferences icon in the Dock. For more information, open Help Center and search for “System Preferences” or for the specific preference you want to change. Important: You can set an option in Users & Groups preferences to help you reset your login password if you forget it. You should set your password preferences soon after setup. Setting Up DVD or CD Sharing For direct access to CDs and DVDs, you can attach an external optical drive to a USB port on your Mac mini. You can also partner your Mac mini with another Mac or Windows computer that has an optical disc drive and is on the same wired or wireless network. The computer with the optical drive can be a Mac with Mac OS X v10.4.10 or later, or a Windows 7, Windows XP, or Windows Vista computer. If the Mac has Mac OS X v10.5.3 or later, DVD or CD Sharing is already installed. You can partner with more than one other computer, but you can use only one partner computer at a time. 20 Chapter 1 Ready, Set Up, Go Mac or Windows computer Wireless base station Mac mini ÂÂ If the other computer is a Windows computer or a Mac with a Mac OS X version earlier than 10.5.3, download the DVD or CD Sharing Setup software for your partner computer: • If the other computer is a Windows computer, go to http://support.apple.com/kb/DL112 and download the DVD or CD Sharing Setup For Windows Installer. • If the other computer is a Mac with Mac OS X v10.4.10–10.5.2, go to http://support.apple.com/kb/DL113 and download the DVD or CD sharing Setup for Mac Installer. Important: After you install the DVD or CD Sharing Setup package on your other Mac, make sure you have the latest software by choosing Apple () > Software Update. Install any available Mac OS X updates. Chapter 1 Ready, Set Up, Go 21 You can enable DVD or CD Sharing on a Mac or Windows computer and then use the Remote Disc feature of Mac mini. Remote Disc allows you to share the discs you insert in the optical disc drive of the other computer. Some discs, such as DVD movies and game discs, may be copy-protected and therefore unusable through DVD or CD Sharing. Note: Instructions for enabling DVD or CD Sharing are also available at: http://support.apple.com/kb/HT177 To enable DVD or CD Sharing, if your other computer is a Mac: 1 Make sure your Mac mini and the other Mac are on the same wireless network. Check the AirPort status icon (Z) in the menu bar to see what network you’re connected to. 2 On the other Mac, choose Apple () > System Preferences and then open Sharing. 3 In the Sharing pane, select “DVD or CD Sharing” in the Service list. If you want other users to request permission to share a DVD or CD, select “Ask me before allowing others to use my DVD drive.” To enable DVD or CD Sharing, if your other computer is a Windows computer: 1 Make sure your Mac mini and the Windows computer are on the same wireless network. 2 On the Windows computer, open the DVD or CD Sharing control panel. 3 Select “Enable Remote DVD or CD.” If you want other users to request permission to share a DVD or CD, select “Ask me before allowing others to use my DVD drive.” 22 Chapter 1 Ready, Set Up, Go To use a shared DVD or CD: 1 On the other computer, insert a DVD or CD in the optical disc drive. 2 On your Mac mini, select the remote disc when it appears under Devices in the Finder sidebar. If you see the “Ask to use” button, click it. 3 On the other computer, when prompted, click Accept to allow your Mac mini to use the DVD or CD. 4 On your Mac mini, use the disc as you normally would, once it becomes available. If you try to shut down the other computer or eject the shared DVD or CD while your Mac mini is using it, you see a message telling you that the disc is in use. To proceed, click Continue. Migrating Information to Your Mac mini If you didn’t transfer your information to your Mac mini when you first set it up, you can use Migration Assistant to transfer your information at any time. For example, using Migration Assistant, you can transfer your user account—including all your photos, music, and files—from a Mac or PC to your new Mac mini. You can also transfer information to a Mac mini from a disk or Time Machine backup. Important: To migrate information from a Mac server, you must do it during server setup. Migration Assistant doesn’t transfer server information after setup. To migrate information from a Mac or PC, the other computer must be on the same wired or wireless network. You can also migrate information from a Mac that’s connected via a FireWire cable and started up in target disk mode. For help migrating information, open Help Center and search for “Migration Assistant.” Chapter 1 Ready, Set Up, Go 23 Getting Additional Information onto Your Mac mini Your Mac mini comes with several applications installed, including the iLife suite. Many other applications can be downloaded from the Internet. If you want to install third-party applications, you can: ÂÂ Open the Mac App Store to purchase and download applications, and even download some applications for free. ÂÂ Install applications on your Mac mini using the optical disc drive on another Mac or Windows computer (if DVD or CD Sharing is set up and enabled). For more information, see “Setting Up DVD or CD Sharing” on page 20. ÂÂ Attach an external USB optical disc drive to the USB port on your Mac mini and insert your installation disc. Putting Your Mac mini to Sleep or Shutting It Down When you finish working with your Mac mini, you can put it to sleep or shut it down. Putting Your Mac mini to Sleep If you’ll be away from your Mac mini for less than a few days, put it to sleep instead of shutting it down. When your Mac mini is in sleep, you can quickly wake it and bypass the startup process. Note: Sleep isn’t recommended for Mac mini server, because the server can’t provide services while it’s in sleep. 24 Chapter 1 Ready, Set Up, Go To put your Mac mini to sleep, do one of the following: ÂÂ Choose Apple () > Sleep from the menu bar. ÂÂ Press the power button (®) on the back of your Mac mini. ÂÂ Choose Apple () > System Preferences, click Energy Saver, and set a sleep timer. ÂÂ Hold down the Play/Pause button (’) on the optional Apple Remote for 3 seconds. To wake your Mac mini, press any key on the keyboard or any button on the optional Apple Remote. When your Mac mini wakes from sleep, your applications, documents, and computer settings are exactly as you left them. Shutting Down Your Mac mini If you won’t be using your Mac mini for more than a few days, shut it down. Choose Apple () > Shut Down. To turn your Mac mini on again, press the power button (®). NOTICE: Shut down your Mac mini before moving it. Moving your Mac mini while the hard disk is spinning can damage the hard disk, causing loss of data or an inability to start up from the hard disk. Chapter 1 Ready, Set Up, Go 25 2 Life with Your Mac mini www.apple.com/macosx Help Center Mac OS X Read on for an overview of the features and ports of your Mac mini. The Apple website at www.apple.com has links to the latest Apple news, free downloads, and online catalogs of software and hardware for your Mac mini. You can also find the manuals for many Apple products, and technical support for all Apple products, on the Apple Support website at www.apple.com/support. Chapter 2 Life with Your Mac mini 29 What’s on the Front of Your Mac mini Built-in infrared (IR) receiver Memory access cover 30 Chapter 2 Life with Your Mac mini Power indicator light Built-in infrared (IR) receiver Use an optional Apple Remote (available separately) with the IR receiver to control system volume, play music from your iTunes library, watch photo slideshows in iPhoto, and control Keynote presentations on your Mac mini—all from up to 30 feet (9.1 meters) away. Power indicator light A steady white light indicates your Mac mini is on; a pulsing light indicates it’s in sleep. Memory access cover (on bottom) The removable foot provides easy access to the memory module slots. Z ◊ AirPort Extreme wireless technology (inside) Connect to a wireless network using built-in AirPort Extreme technology. Bluetooth® wireless technology (inside) Connect wireless devices, such as Bluetooth printers, wireless headsets, or input devices such as the Apple Wireless Keyboard, Magic Mouse, or Magic Trackpad (you can purchase the Apple Wireless Keyboard, Magic Mouse, or Magic Trackpad at www.apple.com/store or your local Apple Retail Store). Note: Display adapters and other accessories for your Mac mini are sold separately at www.apple.com/store or your local Apple Retail Store. Chapter 2 Life with Your Mac mini 31 What’s on the Back of Your Mac mini Power port Power button HDMI HDMI Thunderbolt port port Cool air inlet (around foot) FireWire 800 port 32 SD card slot HDMI ® Gigabit Ethernet port (10/100/1000 Base-T) USB 2.0 ports (4) Chapter 2 Life with Your Mac mini Audio in port Exhaust vent Audio out port ~ HDMI Power port Connect the power cord that came with your Mac mini. HDMI port Connect a TV or other device that uses an HDMI connector. Thunderbolt port (high-speed data, video, and audio) Connect Thunderbolt-compatible devices for high-speed data transfer, or connect an external display that uses Mini DisplayPort. You can purchase adapters to connect displays that use DVI or VGA. d Four high-speed USB (Universal Serial Bus) 2.0 ports Connect an iPod, iPhone, iPad, mouse, keyboard, printer, disk drive, digital camera, joystick, external USB modem, and more. You can also connect USB 1.1 devices. SD card slot Insert a standard Secure Digital (SD) card from a digital camera or other device. For more information, see “Using SD Cards” on page 36. f Audio out port Connect headphones, external powered speakers, or digital audio equipment. This port also supports input and mics on devices such as headsets with microphones. , Audio in port Connect a line-level microphone or digital audio equipment. H FireWire 800 port Connect high-speed external devices, such as digital video cameras and storage devices. G Ethernet port Connect to a high-speed 10/100/1000Base-T Ethernet network, a DSL or cable modem, or another computer. The Ethernet port automatically detects Ethernet devices and doesn’t require an Ethernet crossover cable. ® Power button Press to turn your Mac mini on or off, or put it to sleep. Chapter 2 Life with Your Mac mini 33 Using the Apple Remote With the optional Apple Remote, you can control system volume, play music from your iTunes library, watch photo slideshows in iPhoto, and control Keynote presentations on your Mac mini—all from up to 30 feet (9.1 meters) away. The Apple Remote can: ÂÂ Navigate in iTunes, iPhoto, and DVD player. ÂÂ Put your Mac mini to sleep or wake it up. To use the Apple Remote: ÂÂ Press the Play/Pause button (’) to play or pause a song, slideshow, or movie. ÂÂ Press Right or Left to skip to the next or previous song in your iTunes library or the next or previous chapter in a DVD movie. ÂÂ Hold down Right or Left to fast-forward or rewind a song or a movie. ÂÂ Press Up or Down to adjust the volume. Up Select Left Right Down Menu 34 Play/Pause Chapter 2 Life with Your Mac mini Pairing Your Apple Remote To make sure that your Mac mini can be controlled by only your Apple Remote, you can “pair” them. This is helpful if you use your Mac mini where there are other Mac computers, televisions, audio equipment, or other devices that use an infrared remote. To pair an Apple Remote and your Mac mini: 1 Point the remote at the IR receiver on the front of your Mac mini from a distance of 3 to 4 inches (8 to 10 cm). 2 Hold down the Right button and Menu button (») simultaneously for 5 seconds. After pairing, a chainlink symbol ( ) appears onscreen. To unpair an Apple Remote and your Mac mini: 1 Choose Apple () > System Preferences from the menu bar. 2 Click Security, and then click Unpair. For more information about using an Apple Remote or changing the battery, see the documentation that came with your optional Apple Remote. Turning Off IR Reception If you want to prevent your Mac mini from being controlled by any remote, you can use Security preferences to turn off IR reception. To turn off IR reception: 1 Choose Apple () > System Preferences from the menu bar, and then click Security. 2 Select the “Disable remote control infrared receiver” checkbox. Chapter 2 Life with Your Mac mini 35 Using SD Cards The SD card slot on the back of your Mac mini accepts most standard SD (Secure Digital), SDHC (SD High-Capacity), and SDXC (SD Extended Capacity) cards from digital cameras and other devices. You can also use MiniSD, MicroSD, and other smaller cards in a passive adapter. For more information about card sizes, speeds, and capacities, search for “SD” on the Apple Support website at www.apple.com/support. To insert an SD card: mm Hold the card with the metal contacts facing down and toward the computer, and slide the card into the slot. NOTICE: Don’t try to insert any card that exceeds standard SD card dimensions, and don’t force any SD card into the slot. Doing so could damage your Mac mini. Getting Answers More information about using your Mac mini is available in Help Center on your computer, and on the Internet at www.apple.com/support/macmini. To open Help Center: 1 Click the Finder icon in the Dock (the bar of icons along the edge of the screen). 2 Click the Help menu in the menu bar, and then do one of the following: ÂÂ Type a question or term in the Search field, and then choose a topic from the list of results or choose Show All Results to see all topics. ÂÂ Choose Help > Help Center to open the Help Center window, where you can browse or search topics. 36 Chapter 2 Life with Your Mac mini More Information For more information about using your Mac mini, see the following: To learn about See Troubleshooting your Mac mini if you have a problem Chapter 4, “Problem, Meet Solution” on page 47. Finding service and support for your Mac mini “Learning More, Service, and Support” on page 62, or go to the Mac mini Support site at www.apple.com/support/macmini. Using Mac OS X Lion or Mac OS X Lion Server The Mac OS X Lion site at www.apple.com/macosx. Or search for “Mac OS X” in Help Center. The Lion Server website at www.apple.com/macosx/server. Or open the Server application and then choose Server Help from the Help menu. Moving from a PC to a Mac “Why you’ll love a Mac” at www.apple.com/getamac/whymac. Using iLife applications The iLife website at www.apple.com/ilife. Or open an iLife application, open Help for the application, and then type a question or term in the search field. Changing System Preferences System Preferences by choosing Apple (K) > System Preferences. Or search for “system preferences” in Help Center. Using SD cards The Apple support page at www.apple.com/support and search for “sd.” Using AirPort Extreme wireless technology The AirPort Support page at www.apple.com/support/airport. Or open Help Center and search for “AirPort.” Using Bluetooth wireless technology The Bluetooth Support page at www.apple.com/support/ bluetooth. Or open Help Center and search for “Bluetooth.” Connecting a printer Help Center and search for “printing.” Chapter 2 Life with Your Mac mini 37 38 To learn about See FireWire and USB connections Help Center and search for “FireWire” or “USB.” Connecting to the Internet Help Center and search for “Internet.” Using a display Help Center and search for “display.” Using the Thunderbolt port Help Center and search for “Thunderbolt.” Connecting a TV The Mac mini site at www.apple.com/support/macmini. Apple Remote Help Center and search for “remote.” Specifications The Specifications page at www.apple.com/support/specs. Or open System Information (in the Utilities folder in Launchpad) and then clicking More Info. Apple news, free downloads, and online catalogs of software and hardware The Apple site at www.apple.com. Instructions, technical support, and manuals for Apple products The Apple Support site at www.apple.com/support. Chapter 2 Life with Your Mac mini 3 Boost Your Memory www.apple.com/store Help Center RAM Your Mac mini came with at least 2 gigabytes (GB) of memory on a pair of 1 GB memory modules. You can replace these with a pair of 2 GB or 4 GB memory modules, for a maximum of 8 GB of memory. The following pages show you how to install memory modules in your Mac mini. WARNING: Apple recommends that you have an Apple-certified technician install memory. To arrange for installation, contact an Apple Authorized Service Provider or an Apple Retail Store. Damage you cause to your equipment while installing memory isn’t covered by the limited warranty on your Mac mini. 40 Chapter 3 Boost Your Memory Installing Memory Your Mac mini has two memory slots in which you can install a pair of 1 GB, 2 GB, or 4 GB memory modules, for a maximum of 8 GB of memory. For best performance, don’t mix modules of different sizes; always install two identical memory modules. Memory modules for your Mac mini must meet the following specifications: ÂÂ Small Outline Dual Inline Memory Module (SO-DIMM) format ÂÂ 1333 MHz, PC3-10600E, DDR3 compliant (also called DDR3 1333) ÂÂ Unbuffered and unregistered You can purchase Apple memory from an Apple Authorized Reseller, the online Apple Store at www.apple.com/store, or your local Apple Retail Store. WARNING: Always shut down your Mac mini and remove the power cord before installing memory. Do not install memory while your Mac mini is plugged in. Step 1: Turn off your Mac mini. Choose Apple () > Shut Down. Step 2: Disconnect all cables. Disconnect the power cord and all other cables from your Mac mini. Chapter 3 Boost Your Memory 41 Step 3: Remove the bottom cover. Lay your Mac mini upside down on a soft cloth or towel, and then rotate the bottom cover counterclockwise to the unlocked position. Unlocked Press on the cover to pop up the opposite side, and then remove the cover. Press here Lift here 42 Chapter 3 Boost Your Memory Step 4: Remove the original memory modules. Gently spread the clips at the ends of the top memory module just enough to let the free edge pop up. Retainer clips Pull the module out of the slot. Repeat to remove the second, bottom module. Chapter 3 Boost Your Memory 43 Step 5: Install the new modules. Carefully press the notched edge of the new memory module into the bottom slot while keeping the opposite edge slightly raised. Notch Press down on the raised edge until the clips snap into place. Repeat to install the top memory module. 44 Chapter 3 Boost Your Memory Step 6: Replace the bottom cover. Replace the bottom cover, using the alignment dots to place it in the unlocked position. Align the dots Rotate the cover clockwise to lock it in place. Locked WARNING: Don’t connect the power cord or turn on your Mac mini until you replace the bottom cover. Never operate your Mac mini without the cover in place. Chapter 3 Boost Your Memory 45 Step 7: Reconnect the cables. Reconnect the power cord and any other cables you disconnected. Step 8: Check the new memory. Press the power button to turn on your Mac mini. When you see the Mac OS X desktop, choose Apple () > About This Mac and check that the reported amount of memory is correct. If the reported memory size isn’t correct, or if your Mac mini repeatedly sounds three tones, it’s having trouble recognizing a memory module. If this happens, shut down your Mac mini, verify the module specifications against the requirements listed on page 41, and then repeat the memory installation instructions to make sure the modules are installed correctly. If you still have problems, remove the memory and consult the support information that came with the memory, or contact the vendor who provided the memory. 46 Chapter 3 Boost Your Memory 4 Problem, Meet Solution www.apple.com/support Help Center help Occasionally, you may have a problem while working with your Mac mini. Read on for troubleshooting tips to try when you have a problem. You can also find more troubleshooting information in Help Center, or on the Mac mini Service & Support website at www.apple.com/support/macmini. When you have a problem with your Mac mini, there’s usually a simple and quick solution. Think about the conditions that led up to the problem. Making a note of things you did before the problem occurred will help you narrow down possible causes and find the answers you need. Things to note include: ÂÂ The applications you were using when the problem occurred. Problems that occur only with a specific application may indicate that the application is incompatible with the version of Mac OS installed on your computer. ÂÂ Any new software that you installed, especially software that added items to the System folder. ÂÂ Any new hardware that you installed, such as additional memory or a peripheral. WARNING: Do not attempt to open your Mac mini, except to install memory. If your Mac mini needs service, see “Learning More, Service, and Support” on page 62 for information about how to contact an Apple Authorized Service Provider or Apple for service. Your Mac mini doesn’t have any user-serviceable parts, except the memory. 48 Chapter 4 Problem, Meet Solution An Ounce of Prevention If you have a problem with your computer or software, having kept up-to-date Time Machine backups ensures that your data won’t be lost. If you make regular Time Machine backups, you can restore your software and all your data to exactly the way it was at the time of the backup. Even serious issues are of less concern when you safeguard your information with Time Machine. Problems That Prevent You from Using Your Mac mini If your Mac mini won’t respond or the pointer won’t move ÂÂ Make sure the mouse and keyboard are connected. Unplug and then plug in the connectors, making sure they’re secure. If you have wireless input devices, check that the device batteries are charged. Try turning off and on any wireless device. ÂÂ Try to force problem applications to quit. On an Apple keyboard, hold down the Option key and Command key (x) and then press the Esc key. On other keyboards, hold down the Windows key and Alt key and then press the Esc key. If a dialog appears, select the frozen application and click Force Quit. Then restart your Mac mini to be sure the problem is entirely cleared up. ÂÂ Hold down the power button (®) on the back of your Mac mini for five seconds to shut it down. ÂÂ Unplug the power cord from your Mac mini. Then plug the power cord back in and press the power button (®) to turn your Mac mini on. Chapter 4 Problem, Meet Solution 49 If the problem reoccurs when you use a particular application, check with the application’s manufacturer to see if the application is compatible with the version of Mac OS X installed on your Mac mini. For support and contact information about the software that came with your Mac mini, go to www.apple.com/downloads or to the manufacturer’s website. If the problem occurs frequently, try repairing your disk, restoring your software from a backup, or reinstalling your system software using the Mac OS X Utilities application (see “Repairing, Restoring, or Reinstalling Mac OS X Software” on page 52). If your Mac mini freezes during startup or you see a flashing question mark ÂÂ Wait a few seconds. If your Mac mini doesn’t start up, shut it down by holding down the power button (®) for 8 to 10 seconds. Then hold down the Option key and press the power button (®) again to start up your Mac mini. Keep holding down the Option key until your Mac mini starts up, then click the arrow under the icon of the hard disk you want to use as your startup disk. After your Mac mini starts up, open System Preferences and click Startup Disk. Select a local Mac OS X system folder. ÂÂ If the problem occurs frequently, you may need to reinstall your system software (see “Repairing, Restoring, or Reinstalling Mac OS X Software” on page 52). If your Mac mini doesn’t turn on or start up ÂÂ Make sure the power cord is plugged into your Mac mini and into a functioning power outlet. 50 Chapter 4 Problem, Meet Solution ÂÂ Restart your computer while holding down the Command key (x) and R key, until the computer restarts. When the Mac OS X Utilities application appears, select an option to repair your disk, restore your software, or reinstall Mac OS X and Apple applications from the Mac OS X Utilities pane. For more information, see “Repairing, Restoring, or Reinstalling Mac OS X Software” on page 52. ÂÂ Press the power button (®) and immediately hold down the Command (x), Option, P, and R keys on an Apple keyboard until you hear the startup sound a second time. This resets the parameter RAM (PRAM). On other keyboards, press the power button (®) and immediately hold down the Windows, Alt, P, and R keys. ÂÂ Unplug the power cord and wait at least 30 seconds. Plug the power cord back in and press the power button (®) again to start up your Mac mini. ÂÂ If you still can’t start up your Mac mini, see “Learning More, Service, and Support” on page 62 for information about contacting Apple for service. If your Mac mini can’t connect to another computer’s optical disc drive To use services such as Migration Assistant, DVD or CD Sharing, and iTunes music sharing, both your Mac mini and the other computer must be connected to the same network. If your Mac mini is connected wirelessly and the other computer is connected to a third-party router by Ethernet, check your router documentation to make sure it supports bridging a wireless to wired connection. If your date and time settings get lost repeatedly ÂÂ You may need to have the internal backup battery replaced. For information about contacting Apple for service, see “Learning More, Service, and Support” on page 62. Chapter 4 Problem, Meet Solution 51 Repairing, Restoring, or Reinstalling Mac OS X Software If you have a problem with your Mac software or hardware, Mac OS X provides repair and restore utilities that may eliminate problems and can even restore your software to its original factory settings. You can access these utilities from the Mac OS X Utilities application, even if your computer isn’t starting up correctly. Use the Mac OS X Utilities application to: ÂÂ Restore your software and data from a Time Machine backup. ÂÂ Reinstall Mac OS X Lion and Apple applications. ÂÂ Repair your computer’s disk using Disk Utility. 52 Chapter 4 Problem, Meet Solution ÂÂ Restore your computer to its factory settings by erasing its disk and reinstalling Mac OS X Lion and your Apple applications. If your computer detects a problem, it opens the Mac OS X Utilities application automatically. You can also open it manually by restarting your computer. To open the Mac OS X Utilities application: mm Restart your computer while holding down the Command key (x) and R key. Important: If the Mac OS X Utilities application doesn’t appear after restarting, hold down Command (x)-Option-R and restart the computer to access the Mac OS X Utilities software from the Internet. Your computer must be connected to a network that has access to the Internet. Some utilities in the Mac OS X Utilities pane require access to the Internet and the Mac App Store. You may need to make sure your computer is connected to the Internet via your Ethernet or Wi-Fi network. To connect via a Wi-Fi network: 1 Choose a network from the Wi-Fi status menu in the upper-right corner of the screen. 2 If necessary, type the network password. To join a closed network, choose Join Other Network. Enter the network’s name and password. Chapter 4 Problem, Meet Solution 53 Repairing a Disk with Disk Utility If you have a problem with your computer, or if you start your computer and see the Mac OS X Utilities pane, you may need to repair your computer’s disk. 1 Select Disk Utility in the Mac OS X Utilities pane and click Continue. 2 Select the disk or partition in the list on the left, and then click the First Aid tab. 3 Click Repair Disk. If Disk Utility can’t repair the disk, back up as much of your information as possible, and then follow the instructions in “Reinstalling Mac OS X and Apple Applications” on page 55. For information about Disk Utility and its options, see Help Center, or open Disk Utility (in the Utilities folder in Lauchpad) and choose Help > Disk Utility Help. Restoring Information Using a Time Machine Backup If you previously created a Time Machine backup, use the Restore utility to restore everything on your computer to its previous state. Use your Time Machine backup only to restore information to the computer that was the source of the backup. If you want to transfer information to a new computer, use Migration Assistant. 1 If your backup is on a Time Capsule, make sure your Mac mini is connected to an Ethernet or Wi-Fi network. (To connect to a Wi-Fi network, follow the instructions on page 53.) 2 In the Mac OS X Utilities pane, select Restore From Time Machine Backup and click Continue. 3 Select the disk that contains the Time Machine backup, and then follow the onscreen instructions. 54 Chapter 4 Problem, Meet Solution Reinstalling Mac OS X and Apple Applications Under some circumstances, you may need to reinstall Mac OS X and Apple applications. You can reinstall while keeping your files and user settings intact. Important: The Mac OS X Utilities application also reinstalls and restores Mac OS X Lion Server software, if you have it installed on your Mac mini. 1 Make sure the Mac mini is connected to the Internet via an Ethernet or Wi-Fi network. (To connect to a Wi-Fi network, follow the instructions on page 53.) 2 In the Mac OS X Utilities pane, select Reinstall Mac OS X and click Continue. 3 When you’re asked to select a disk, select your current Mac OS X disk (in most cases, it’s the only one available). 4 To install optional software, click Customize. 5 Click Install. You can install Mac OS X without erasing the disk, which saves your existing files and settings, or you can erase the disk first, which erases all your data and leaves the computer ready for you to reinstall Mac OS X and Apple applications. After reinstalling Mac OS X, you can then go to the Mac App Store and re-download the applications that came with your Mac mini and other apps you purchased from the Mac App Store. Important: Apple recommends that you back up the data on the disk before restoring software. Apple is not responsible for any lost data. Chapter 4 Problem, Meet Solution 55 Restoring Your Computer to Its Factory Settings When you restore your computer to its factory settings, everything on your computer (your user accounts, network settings, and all of your files and folders) is deleted. Before you restore, back up any files you want to keep by copying them to another disk. Write down your network settings from Network preferences to make it easier to get connected again after reinstalling Mac OS X. 1 Make sure you’re connected to the Internet via an Ethernet or Wi-Fi network. (To connect to a Wi-Fi network, follow the instructions on page 53.) 2 In the Mac OS X Utilities pane, select Disk Utility and click Continue. 3 Select the disk in the list on the left, and then click the Erase tab. 4 Choose Mac OS Extended (Journaled) from the Format pop-up menu, type a name for the disk, and then click Erase. 5 After the disk is erased, choose Disk Utility > Quit Disk Utility. 6 In the Mac OS X Utilities pane, select Reinstall Mac OS X and click Continue. 7 To reinstall Mac OS X and Apple applications, follow the instructions in the Mac OS X Installer. After restoring Mac OS X and Apple applications, you can selectively restore your other data and applications from a Time Machine backup. 56 Chapter 4 Problem, Meet Solution Checking for a Hardware Problem If you suspect a hardware problem, use the Apple Hardware Test application to help determine if there’s a problem with one of the Mac mini components. To use Apple Hardware Test: 1 Disconnect all external devices from your Mac mini, except the keyboard, mouse, and display. If you have an Ethernet cable connected, disconnect it. 2 Restart your Mac mini while holding down the D key. 3 When the Apple Hardware Test chooser screen appears, select the language you want to use. 4 Press the Return key or click the right arrow button. 5 When the Apple Hardware Test main screen appears (after about 45 seconds), follow the onscreen instructions. 6 If Apple Hardware Test detects a problem, it displays an error code. Make a note of the error code before pursuing support options. If Apple Hardware Test doesn’t detect a hardware failure, the problem may be software-related. Important: If Apple Hardware Test doesn’t appear after restarting, hold down Command (x)-Option-D and restart the computer to access Apple Hardware Test from the Internet. Your computer must be connected to a network that has access to the Internet. Chapter 4 Problem, Meet Solution 57 Problems with Your Internet Connection Your Mac mini has the Network Setup Assistant application to help you set up an Internet connection. Open System Preferences and click Network. Click the “Assist me” button to open Network Setup Assistant. If you have trouble with your Internet connection, try using Network Diagnostics. To use Network Diagnostics: 1 Choose Apple () > System Preferences. 2 Click Network and then click “Assist me.” 3 Click Diagnostics to open Network Diagnostics. 4 Follow the onscreen instructions. If Network Diagnostics can’t resolve the problem, there may be a problem with the Internet service provider (ISP) you’re trying to connect to, with an external device you’re using to connect to your ISP, or with the server you’re trying to access. You can try the steps in the following sections. Cable Modem, DSL Modem, and LAN Internet Connections Make sure all modem cables are firmly plugged in, including the modem power cord, the cable from the modem to the computer, and the cable from the modem to the wall jack. Also check the cables and power supplies to any Ethernet hubs or routers. Turn off your DSL or cable modem for a few minutes, and then turn it back on. Some ISPs recommend that you unplug the modem’s power cord. If your modem has a reset button, you can press it either before or after you turn the power off and on. 58 Chapter 4 Problem, Meet Solution Important: Instructions that refer to modems do not apply to LAN users. LAN users might have hubs, switches, routers, or connection pods that cable and DSL modem users don’t have. LAN users should contact their network administrator, rather than an ISP. PPPoE Connections If you’re unable to connect to your ISP using PPPoE (Point to Point Protocol over Ethernet), make sure you have entered the correct information in Network preferences. To enter PPPoE settings: 1 Choose Apple () > System Preferences. 2 Click Network. 3 Click Add (+) at the bottom of the network connection services list, and choose PPPoE from the Interface pop-up menu. 4 Choose an interface for the PPPoE service from the Ethernet pop-up menu. Choose Ethernet if you’re connecting to a wired network, or Wi-Fi if you’re connecting to a wireless network. 5 Click Create. 6 Enter the information you received from your service provider, such as the account name, password, and PPPoE service name (if your service provider requires it). 7 Click Apply to make the settings active. Chapter 4 Problem, Meet Solution 59 Network Connections Make sure the Ethernet cable is plugged into your Mac mini and into the network. Check the cables and power supplies to your Ethernet hubs and routers. If you have two or more computers sharing an Internet connection, make sure your network is set up properly. You need to know whether your ISP provides only one IP address, or a different IP address for each computer. If your ISP provides only one IP address, then you must have a router capable of sharing the connection, also known as network address translation (NAT) or “IP masquerading.” For setup information, see the documentation provided with your router or ask the person who set up your network. You can use an AirPort base station to share one IP address among multiple computers. For information about using an AirPort base station, see Help Center or visit the AirPort Support website at www.apple.com/support/airport. If you can’t resolve the issue using these steps, contact your ISP or network administrator. Problems with Wireless Communication If you have trouble using wireless communication: ÂÂ Make sure the computer or network you’re trying to connect to is running and has a wireless access point. ÂÂ Make sure you’ve properly configured the software according to the instructions that came with your base station or access point. 60 Chapter 4 Problem, Meet Solution ÂÂ Make sure your Mac mini is within antenna range of the other computer or the network’s access point. Nearby electronic devices or metal structures can interfere with wireless communication and reduce this range. Repositioning or rotating your Mac mini or the other computer might improve reception. ÂÂ Check the Wi-Fi status menu (Z) in the menu bar. Up to four bars appear, indicating signal strength. If the signal strength is weak, try changing your location. ÂÂ Choose Help > Help Center, and then search for “Airport.” Also see the instructions that came with the wireless device. Keeping Your Software Up to Date You can connect to the Internet and automatically download and install the latest versions of free software, drivers, and other enhancements from Apple. When your Mac mini is connected to the Internet, Software Update checks to see if any updates are available for your computer. You can set your Mac mini to check for updates periodically, and then you can download and install updated software. To check for updated software: 1 Choose Apple () > System Preferences. 2 Click the Software Update icon and follow the instructions on the screen. For more information, search for “Software Update” in Help Center. For the latest server troubleshooting information and software updates, go to the Lion Server website at www.apple.com/macosx/server. Chapter 4 Problem, Meet Solution 61 Learning More, Service, and Support Your Mac mini doesn’t have any user-serviceable parts, except the memory. If you need service, take your Mac mini to an Apple Authorized Service Provider or contact Apple for service. You can find more information about your Mac mini through online resources, onscreen help, System Information, or Apple Hardware Test. If you want a certified technician to install additional memory, contact an Apple Authorized Service Provider or an Apple Retail Store. Online Resources For online service and support information, go to www.apple.com/support. Choose your country from the pop-up menu. You can search the AppleCare Knowledge Base, check for software updates, or get help from Apple’s discussion forums. Onscreen Help You can find answers to many of your questions, as well as instructions and troubleshooting information, in Help Center. In the Finder, choose Help > Help Center. System Information To get information about your Mac mini, use System Information. It shows you what hardware and software is installed, the serial number and operating system version, how much memory is installed, and more. Open System Information (in the Utilities folder in Launchpad). 62 Chapter 4 Problem, Meet Solution AppleCare Service and Support Your Mac mini comes with 90 days of technical support and one year of hardware repair warranty coverage at an Apple Retail Store or an Apple-authorized repair center, such as an Apple Authorized Service Provider (AASP). You can extend your coverage by purchasing the AppleCare Protection Plan. For information, visit www.apple.com/support/products or visit the website address for your country listed in the table. If you need assistance, AppleCare telephone support representatives can help you with installing and opening applications, and basic troubleshooting. Call the support center number nearest you (the first 90 days are complimentary). Have the purchase date and your Mac mini serial number ready when you call. Note: Your 90 days of complimentary telephone support begins on the date of purchase and telephone fees may apply. Apple also offers expert support for Mac OS X Server. Beyond the scope of the complimentary 90-day support, these products offer assistance with in-depth technical issues for one full year. AppleCare OS Support delivers consultative telephone and email support for networking and workflow issues in Mac OS X Lion Server environments. AppleCare Help Desk Support provides graphical user interface–level assistance with Mac OS X Server network configuration and server administration. AppleCare OS Support plans also include support for command-line tools and mixed platform integration. Choose from three levels of AppleCare OS Support—Select, Preferred, or Alliance. For more information, visit www.apple.com/support/products/enterprise or visit the website for your country listed in the table. Chapter 4 Problem, Meet Solution 63 Country Phone Website United States 1-800-275-2273 www.apple.com/support Australia (61) 1-300-321-456 www.apple.com/au/support Canada (English) (French) 1-800-263-3394 www.apple.com/ca/support www.apple.com/ca/fr/support Ireland (353) 1850 946 191 www.apple.com/ie/support New Zealand 00800-7666-7666 www.apple.com/nz/support United Kingdom (44) 0844 209 0611 www.apple.com/uk/support Telephone numbers are subject to change, and local and national telephone rates may apply. A complete list is available on the web: www.apple.com/support/contact/phone_contacts.html Locating Your Product Serial Number Use any of these methods to find your Mac mini serial number: ÂÂ Look on the bottom of your Mac mini. ÂÂ Choose Apple () from the menu bar, and choose About This Mac. Click the version number beneath the words “Mac OS X” to cycle through the Mac OS X version number, the build version, and the serial number. ÂÂ Open System Information (in the Utilities folder in Launchpad) and click Hardware. 64 Chapter 4 Problem, Meet Solution 5 Last, but Not Least www.apple.com/environment Help Center ergonomics For your safety and that of your equipment, follow these rules for handling and cleaning your Mac mini and for working more comfortably. Keep these instructions handy for reference by you and others. NOTICE: Incorrect storage or use of your computer may void the manufacturer’s warranty. Important Safety Information WARNING: Failure to follow these safety instructions could result in fire, electric shock, or other injury or damage. Proper handling Set up your Mac mini on a stable work surface that allows for adequate air circulation under and around the computer. Do not operate your Mac mini on a pillow or other soft material, as the material can block the airflow vents. Never push objects into the ventilation openings. Water and wet locations Keep your Mac mini away from sources of liquid, such as drinks, washbasins, bathtubs, shower stalls, and so on. Protect your Mac mini from dampness or wet weather, such as rain, snow, and fog. Hearing damage Permanent hearing loss may occur if earbuds or headphones are used at high volume. You can adapt over time to a higher volume of sound that may sound normal but can be damaging to your hearing. If you experience ringing in your ears or muffled speech, stop listening and have your hearing checked. The louder the volume, the less time is required before your hearing could be affected. Hearing experts suggest that to protect your hearing: 66 Chapter 5 Last, but Not Least ÂÂ Limit the amount of time you use earbuds or headphones at high volume. ÂÂ Avoid turning up the volume to block out noisy surroundings. ÂÂ Turn the volume down if you can’t hear people speaking near you. High-risk activities This computer system is not intended for use in the operation of nuclear facilities, aircraft navigation or communications systems, air traffic control systems, or for any other uses where the failure of the computer system could lead to death, personal injury, or severe environmental damage. Important: Electrical equipment may be hazardous if misused. Operation of this product, or similar products, must always be supervised by an adult. Do not allow children access to the interior of any electrical product and do not permit them to handle any cables. Do Not Make Repairs Yourself Your Mac mini doesn’t have any user-serviceable parts, except for memory. To install memory, follow the instructions in Chapter 3. Except for memory, do not attempt to replace or repair any components inside your Mac mini. If your Mac mini needs service, consult an Apple Authorized Service Provider or Apple. See “Learning More, Service, and Support” on page 62. WARNING: Making adjustments or performing procedures other than those specified in your equipment’s manual may result in hazardous radiation exposure. Chapter 5 Last, but Not Least 67 If you install items other than memory, you risk damaging your equipment, and such damage isn’t covered by the limited warranty on your Mac mini. WARNING: Never push objects of any kind into this product through the ventilation openings in the case. Doing so may be dangerous and damage your computer. Important Handling Information NOTICE: Failure to follow these handling instructions could result in damage to your Mac mini or other property. Operating environment Operating your Mac mini outside these ranges may affect performance: ÂÂ Operating temperature: 50° to 95° F (10° to 35° C) ÂÂ Storage temperature: -40° to 116° F (-40° to 47° C) ÂÂ Relative humidity: 5% to 95% (noncondensing) ÂÂ Maximum operating altitude: 10,000 feet (3048 meters) Turning on your Mac mini Never turn on your Mac mini unless all of its internal and external parts are in place. Operating your Mac mini when parts are missing may be dangerous and may damage your Mac mini. 68 Chapter 5 Last, but Not Least Carrying your Mac mini Before you lift or reposition your Mac mini, shut it down and disconnect all cables and cords connected to it. If you carry your Mac mini in a bag or briefcase, make sure that there are no loose items (such as paper clips or coins) that could accidentally get inside the computer through vent openings or get stuck inside a port. Using connectors and ports Never force a connector into a port. When connecting a device, make sure the port is free of debris, that the connector matches the port, and that you have positioned the connector correctly in relation to the port. Storing your Mac mini If you are going to store your Mac mini for an extended period of time, keep it in a cool location (ideally, 71° F or 22° C). Cleaning your Mac mini When cleaning the outside of your Mac mini, first shut down your Mac mini and unplug the power cord. Then use a damp, soft, lint-free cloth to clean the computer’s exterior. Avoid getting moisture in any openings. Do not spray liquid directly on the computer. Do not use aerosol sprays, solvents, or abrasives that might damage the finish. Chapter 5 Last, but Not Least 69 Understanding Ergonomics Here are some tips for setting up a healthy work environment. Keyboard When you use the keyboard, your shoulders should be relaxed. Your upper arm and forearm should form an approximate right angle, with your wrist and hand in roughly a straight line. Change hand positions often to avoid fatigue. Some computer users might develop discomfort in their hands, wrists, or arms after intensive work without breaks. If you begin to develop chronic pain or discomfort in your hands, wrists, or arms, consult a qualified health specialist. Mouse Position the mouse at the same height as the keyboard and within a comfortable reach. Chair An adjustable chair that provides firm, comfortable support is best. Adjust the height of the chair so your thighs are horizontal and your feet are flat on the floor. The back of the chair should support your lower back (lumbar region). Follow the manufacturer’s instructions for adjusting the backrest to fit your body properly. You might have to raise your chair so that your forearms and hands are at the proper angle to the keyboard. If this makes it impossible to rest your feet flat on the floor, use a footrest with adjustable height and tilt to make up for any gap between the floor and your feet. Or you can lower the desktop to eliminate the need for a footrest. Another option is to use a desk with a keyboard tray that’s lower than the regular work surface. 70 Chapter 5 Last, but Not Least Display Arrange the display so that the top of the screen is slightly below eye level when you’re sitting at the keyboard. The best distance from your eyes to the screen is up to you, although most people seem to prefer 18 to 28 inches (45 to 70 cm). Position the display to minimize glare and reflections on the screen from overhead lights and nearby windows. If possible, use a tiltable display stand. The stand lets you set the display at the best angle for viewing, helping to reduce or eliminate glare from lighting sources you can’t move. Shoulders relaxed 18–28 in. (45–70 cm) Forearms and hands in a straight line Top of the screen at or slightly below eye level (You may need to adjust the height of your display by raising or lowering your work surface.) Forearms level or tilted slightly Screen positioned to avoid reflected glare Lower back supported Clearance under work surface Thighs tilted slightly Feet flat on the floor or on a footrest More information about ergonomics is available on the web: www.apple.com/about/ergonomics Chapter 5 Last, but Not Least 71 Apple and the Environment Apple Inc. recognizes its responsibility to minimize the environmental impact of its operations and products. More information is available on the web: www.apple.com/environment 72 Chapter 5 Last, but Not Least Regulatory Compliance Information FCC Compliance Statement This device complies with part 15 of the FCC rules. Operation is subject to the following two conditions: (1) This device may not cause harmful interference, and (2) this device must accept any interference received, including interference that may cause undesired operation. See instructions if interference to radio or television reception is suspected. Radio and Television Interference This computer equipment generates, uses, and can radiate radiofrequency energy. If it is not installed and used properly—that is, in strict accordance with Apple’s instructions—it may cause interference with radio and television reception. This equipment has been tested and found to comply with the limits for a Class B digital device in accordance with the specifications in Part 15 of FCC rules. These specifications are designed to provide reasonable protection against such interference in a residential installation. However, there is no guarantee that interference will not occur in a particular installation. You can determine whether your computer system is causing interference by turning it off. If the interference stops, it was probably caused by the computer or one of the peripheral devices. Important: Changes or modifications to this product not authorized by Apple Inc. could void the EMC compliance and negate your authority to operate the product. This product has demonstrated EMC compliance under conditions that included the use of compliant peripheral devices and shielded cables (including Ethernet network cables) between system components. It is important that you use compliant peripheral devices and shielded cables between system components to reduce the possibility of causing interference to radios, television sets, and other electronic devices. Responsible party (contact for FCC matters only): Apple Inc. Corporate Compliance 1 Infinite Loop, MS 26-A Cupertino, CA 95014 Location of EMC Number To view the EMC number for this device, remove the bottom cover and look next to the memory installation illustrations. For help removing the cover, see Chapter 3. Wireless Radio Use This device is restricted to indoor use when operating in the 5.15 to 5.25 GHz frequency band. If your computer system does cause interference to radio or television reception, try to correct the interference by using one or more of the following measures: • Turn the television or radio antenna until the interference stops. • Move the computer to one side or the other of the television or radio. • Move the computer farther away from the television or radio. • Plug the computer into an outlet that is on a different circuit from the television or radio. (That is, make certain the computer and the television or radio are on circuits controlled by different circuit breakers or fuses.) Cet appareil doit être utilisé à l’intérieur. If necessary, consult an Apple Authorized Service Provider or Apple. See the service and support information that came with your Apple product. Or consult an experienced radio/television technician for additional suggestions. FCC Bluetooth Wireless Compliance Exposure to Radio Frequency Energy The radiated output power of this device is well below the FCC and EU radio frequency exposure limits. However, this device should be operated with a minimum distance of at least 20 cm between the AirPort Card antennas and a person’s body, and must not be colocated or operated in conjunction with any other antenna or transmitter subject to the conditions of the FCC Grant. The antenna used with this transmitter must not be colocated or operated in conjunction with any other antenna or transmitter subject to the conditions of the FCC Grant. 73 Canadian Compliance Statement This device complies with Industry Canada license-exempt RSS standard(s). Operation is subject to the following two conditions: (1) this device may not cause interference, and (2) this device must accept any interference, including interference that may cause undesired operation of the device. Cet appareil est conforme aux normes CNR exemptes de licence d’Industrie Canada. Le fonctionnement est soumis aux deux conditions suivantes : (1) cet appareil ne doit pas provoquer d’interférences et (2) cet appareil doit accepter toute interférence, y compris celles susceptibles de provoquer un fonctionnement non souhaité de l’appareil. Bluetooth Industry Canada Statement This Class B device meets all requirements of the Canadian interference-causing equipment regulations. Cet appareil numérique de la Class B respecte toutes les exigences du Règlement sur le matériel brouilleur du Canada. Industry Canada Statement Complies with the Canadian ICES-003 Class B specifications. Cet appareil numérique de la classe B est conforme à la norme NMB-003 du Canada. This device complies with RSS 210 of Industry Canada. Bluetooth Europe—EU Declaration of Conformity This wireless device complies with the R&TTE Directive. Europe—EU Declaration of Conformity See www.apple.com/euro/compliance. Deutsch Hiermit erklärt Apple Inc., dass sich das Mac mini in Übereinstimmung mit den grundlegenden Anforderungen und den übrigen einschlägigen Bestimmungen der Richtlinie 1999/5/EG befinden. Eesti Käesolevaga kinnitab Apple Inc., et see Mac mini vastab direktiivi 1999/5/EÜ põhinõuetele ja nimetatud direktiivist tulenevatele teistele asjakohastele sätetele. English Hereby, Apple Inc. declares that this Mac mini is in compliance with the essential requirements and other relevant provisions of Directive 1999/5/EC. Español Por medio de la presente Apple Inc. declara que este Mac mini cumple con los requisitos esenciales y cualesquiera otras disposiciones aplicables o exigibles de la Directiva 1999/5/CE. Ελληνικά Mε την παρούσα, η Apple Inc. δηλώνει ότι αυτή η συσκευή Mac mini συμμορφώνεται προς τις βασικές απαιτήσεις και τις λοιπές σχετικές διατάξεις της Οδηγίας 1999/5/ΕΚ. Français Par la présente Apple Inc. déclare que l’appareil Mac mini est conforme aux exigences essentielles et aux autres dispositions pertinentes de la directive 1999/5/CE. Islenska Apple Inc. lýsir því hér með yfir að þetta tæki Mac mini fullnægir lágmarkskröfum og öðrum viðeigandi ákvæðum Evróputilskipunar 1999/5/EC. Italiano Con la presente Apple Inc. dichiara che questo dispositivo Mac mini è conforme ai requisiti essenziali ed alle altre disposizioni pertinenti stabilite dalla direttiva 1999/5/CE. Latviski Ar šo Apple Inc. deklarē, ka Mac mini ierīce atbilst Direktīvas 1999/5/EK būtiskajām prasībām un citiem ar to saistītajiem noteikumiem. Български Apple Inc. декларира, че това Mac mini е в съответствие със съществените изисквания и другите приложими правила на Директива 1999/5/ЕС. Česky Společnost Apple Inc. tímto prohlašuje, že tento Mac mini je ve shodě se základními požadavky a dalšími příslušnými ustanoveními směrnice 1999/5/ES. Dansk Undertegnede Apple Inc. erklærer herved, at følgende udstyr Mac mini overholder de væsentlige krav og øvrige relevante krav i direktiv 1999/5/EF. 74 Lietuvių Šiuo „Apple Inc.“ deklaruoja, kad šis Mac mini atitinka esminius reikalavimus ir kitas 1999/5/EB Direktyvos nuostatas. Magyar Alulírott, Apple Inc. nyilatkozom, hogy a Mac mini megfelel a vonatkozó alapvetõ követelményeknek és az 1999/5/EC irányelv egyéb elõírásainak. Malti Hawnhekk, Apple Inc., jiddikjara li dan Mac mini jikkonforma mal-ħtiġijiet essenzjali u ma provvedimenti oħrajn relevanti li hemm fid-Dirrettiva 1999/5/EC. Nederlands Hierbij verklaart Apple Inc. dat het toestel Mac mini in overeenstemming is met de essentiële eisen en de andere bepalingen van richtlijn 1999/5/EG. Norsk Apple Inc. erklærer herved at dette Mac mini-apparatet er i samsvar med de grunnleggende kravene og øvrige relevante krav i EU-direktivet 1999/5/EF. Polski Niniejszym Apple Inc. oświadcza, że ten Mac mini są zgodne z zasadniczymi wymogami oraz pozostałymi stosownymi postanowieniami Dyrektywy 1999/5/EC. Português Apple Inc. declara que este dispositivo Mac mini está em conformidade com os requisitos essenciais e outras disposições da Directiva 1999/5/CE. Română Prin prezenta, Apple Inc. declară că acest aparat Mac mini este în conformitate cu cerinţele esenţiale şi cu celelalte prevederi relevante ale Directivei 1999/5/CE. Slovensko Apple Inc. izjavlja, da je ta Mac mini skladne z bistvenimi zahtevami in ostalimi ustreznimi določili direktive 1999/5/ES. Korea Warning Statements ఝዽූ૬ႜෟა༘ ෮ቛ၁ધགྷಋ൏ધხຫጃ ጄఙඳ໓໕๗௴ဪဧთ႖ኒጯཅਜ਼ໜၦၰၗ ၦૺૺ௴ၨྦ႖શഏౘ๗༺ຫဧዾ༘࿖ཀఁఋ Bૺૺ(ਜ਼ႜဧ෮ቛཅૺၴႁ) ၦૺૺ௴ਜ਼ႜဧ(B) ႖ၴኒ႕ጁૺૺചച ਜ਼ႜຫဧዻ௴ઇၕඛ႕ၒചዻඑ, ක౷ხ ຫဧዾ༘ၰཀఁఋ. Singapore Wireless Certification Taiwan Wireless Statements Slovensky Apple Inc. týmto vyhlasuje, že toto Mac mini spĺňa základné požiadavky a všetky príslušné ustanovenia Smernice 1999/5/ES. Suomi Apple Inc. vakuuttaa täten, että tämä Mac mini tyyppinen laite on direktiivin 1999/5/EY oleellisten vaatimusten ja sitä koskevien direktiivin muiden ehtojen mukainen. Svenska Härmed intygar Apple Inc. att denna Mac mini står i överensstämmelse med de väsentliga egenskapskrav och övriga relevanta bestämmelser som framgår av direktiv 1999/5/EG. A copy of the EU Declaration of Conformity is available at: www.apple.com/euro/compliance This equipment can be used in the following countries: Taiwan Class B Statement 警告 本電池如果更換不正確會有爆炸的危險 請依製造商說明書處理用過之電池 75 Japan VCCI Class B Statement Disposal and Recycling Information This symbol indicates that your product must be disposed of properly according to local laws and regulations. When your product reaches its end of life, contact Apple or your local authorities to learn about recycling options. Russia For information about Apple’s recycling program, go to www.apple.com/recycling. European Union: Disposal Information ENERGY STAR® Compliance As an ENERGY STAR® partner, Apple has determined that standard configurations of this product meet the ENERGY STAR® guidelines for energy efficiency. The ENERGY STAR® program is a partnership with electronic equipment manufacturers to promote energy-efficient products. Reducing energy consumption of products saves money and helps conserve valuable resources. This computer is shipped with power management enabled with the computer set to sleep after 10 minutes of user inactivity. To wake your computer, click the mouse or trackpad button or press any key on the keyboard. For more information about ENERGY STAR®, visit: www.energystar.gov 76 The symbol above means that according to local laws and regulations your product should be disposed of separately from household waste. When this product reaches its end of life, take it to a collection point designated by local authorities. Some collection points accept products for free. The separate collection and recycling of your product at the time of disposal will help conserve natural resources and ensure that it is recycled in a manner that protects human health and the environment. Türkiye EEE yönetmeliğine (Elektrikli ve Elektronik Eşyalarda Bazı Zararlı Maddelerin Kullanımının Sınırlandırılmasına Dair Yönetmelik) uygundur. Brasil: Informações sobre descarte e reciclagem O símbolo acima indica que este produto e/ou sua bateria não devem ser descartadas no lixo doméstico. Quando decidir descartar este produto e/ou sua bateria, faça-o de acordo com as leis e diretrizes ambientais locais. Para informações sobre o programa de reciclagem da Apple, pontos de coleta e telefone de informações, visite www.apple.com/br/environment. Battery Disposal Information Dispose of batteries according to your local environmental laws and guidelines. Deutschland: Dieses Gerät enthält Batterien. Bitte nicht in den Hausmüll werfen. Entsorgen Sie dieses Gerät am Ende seines Lebenszyklus entsprechend der maßgeblichen gesetzlichen Regelungen. Nederlands: Gebruikte batterijen kunnen worden ingeleverd bij de chemokar of in een speciale batterijcontainer voor klein chemisch afval (kca) worden gedeponeerd. Taiwan Battery Statement Chinese Battery Statement 77 Looking for Something? Index A AirPort base station 60 AirPort Extreme 37 Alt key Mac equivalent 14 AppleCare 63 Apple Hardware Test 57 Apple Remote pairing 35 using 34 Apple Wireless Keyboard 14 applications forcing quit 49 iLife 37 installing 24 Migration Assistant 17 Audio in port 33 Audio out port 33 B D data transfer 33 Disk Utility 54 display, external 33 See also screen DVD or CD Sharing installing software 21 with Windows computer 22 E environment 72 ergonomics 70 Ethernet port 33 exhaust vent 11 F FireWire port 33 battery disposal 77 internal backup 51 Bluetooth 37 H C I cleaning 69 80 connection problems with another computer 51 Looking for Something? HDMI port 33 Help Center 36 high-speed data transfer 33 iLife applications 37 infrared receiver disabling 35 location 31 installing DVD or CD Sharing Setup 21 iTunes Store 18 K keyboard PC equivalent keys 14 L Lion Server 9 M Mac OS X updates 61 using 37 Mac OS X Lion Server 37 Mac OS X Utilities application 52 Magic Mouse 14, 31 Magic Trackpad 14, 31 memory maximum 40 type to use 41 Mini DisplayPort 33 P partner computer connection problems 51 DVD or CD Sharing Setup software 20 power button 33 power indicator light 31 power port 33 R reinstalling Mac OS X 55 Remote Disc 22, 23 repairing a disk 54 restoring information 54 restoring your computer 56 S SD cards 36, 37 SD card slot 33 serial number 64 Server Assistant 19 service and support 62 Setup Assistant 17 shared optical disc 22 sharing files 22 shutting down your computer controlled 25 forced 49 sleep 24 software installing DVD or CD sharing 21 specifications 38 System Information 38 System Preferences 37 T Thunderbolt port 33 troubleshooting AirPort Extreme 60 Apple Hardware Test 57 can’t start up 50 connecting to partner computer 51 date and time lost 51 flashing question mark 50 freeze during startup 50 Internet connection 58 Network Diagnostics 58 pointer won’t move 49 U updating software 61 USB ports 33 V video adapters 15 video port 33 W waking your computer 25 Windows key Mac equivalent 14 Looking for Something? 81 KKApple Inc. © 2011 Apple Inc. All rights reserved. Under the copyright laws, this manual may not be copied, in whole or in part, without the written consent of Apple. Every effort has been made to ensure that the information in this manual is accurate. Apple is not responsible for printing or clerical errors. Apple 1 Infinite Loop Cupertino, CA 95014 408-996-1010 www.apple.com The Apple logo is a trademark of Apple Inc., registered in the U.S. and other countries. Use of the “keyboard” Apple logo (OptionShift-K) for commercial purposes without the prior written consent of Apple may constitute trademark infringement and unfair competition in violation of federal and state laws. Apple, the Apple logo, AirPort, AirPort Extreme, Finder, FireWire, GarageBand, iLife, iMovie, iPhone, iPhoto, iPod, iTunes, Keynote, Mac, Mac OS, QuickTime, Safari, Time Capsule, and Time Machine are trademarks of Apple Inc., registered in the U.S. and other countries. The FireWire logo and iPad are trademarks of Apple Inc. AppleCare, Apple Store, and iTunes Store are service marks of Apple Inc., registered in the U.S. and other countries. App Store is a service mark of Apple, Inc. ENERGY STAR® is a U.S. registered trademark. The Bluetooth® word mark and logos are registered trademarks owned by Bluetooth SIG, Inc. and any use of such marks by Apple is under license. Thunderbolt and the Thunderbolt logo are trademarks of Intel Corporation in the United States and other countries. Other company and product names mentioned herein may be trademarks of their respective companies. Mention of third-party products is for informational purposes only and constitutes neither an endorsement nor a recommendation. Apple assumes no responsibility with regard to the performance or use of these products. Manufactured under license from Dolby Laboratories. “Dolby,” “Pro Logic,” and the double-D symbol are trademarks of Dolby Laboratories. Confidential Unpublished Works, © 1992–1997 Dolby Laboratories, Inc. All rights reserved. Simultaneously published in the United States and Canada.