1
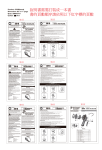
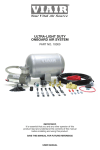
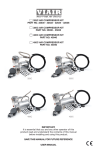
PART NO. 91025
It is essential that you and any other operator of this product read and understand
contents of this manual before installing and using this product.
Your air tank comes with six NPT port openings to allow installation in many positions
on your vehicle. To insure safe and trouble-free use of your air tank, we strongly
recommend that you install a drain cock and a safety pressure relief valve on your air
tank. We recommend use of our Tank Port Fittings Kit (Part No. 90005), which comes
with a drain cock, a 175psi safety valve, and three plugs.
IMPORTANT:
a. Tank is rated for 150 PSI maximum working pressure. Do not overfill. Overfilling
may result in death or serious injury.
b. Tank is not to be used as a breathing device.
c. Always wear ANSI approved safety glasses when operating air tank.
d. Bleed pressure from tank after each use, and before servicing or adding
attachments.
e. Use only attachments or tools rated for 150 PSI working pressure or less.
CAUTION! DO NOT PRESSURIZE YOUR TANK UNTIL YOU HAVE INTALLED ALL
NECESSARY PORT FITTINGS AND ACCESSORIES.
a. Apply sealant to threads of fittings prior to assembly and tighten each part with a
wrench.
b. Do not over tighten if your port fittings are made from brass, since brass threads
can be stripped. The fittings need to be only air tight.
c. Always release air from tank before servicing or repairs.
WARNING: DRAIN TANK AFTER EACH USE. FAILURE TO DRAIN TANK AND REMOVE
CONDENSATION WILL CAUSE TANK TO RUST PREMATURELY.
a. To remove any accumulated condensation inside the tank, bleed pressure from
tank until pressure is approximately 5psi to 20 psi.
b. Drain water from tank by opening the drain cock drain valve.
c. If drain cock valve is plugged, release all air pressure from tank, remove drain valve
and clean, then reinstall.
d. After water has been drained, close the drain cock.
IMPORTANT:
Please observe air tank’s Date of Manufacture (stamped on tank leg).
Replace air tank 2 to 5 years from date air tank was first used, or use the date of
manufacture as reference. Your adherence to air tank draining guidelines will determine
the replacement date of your air tank. RUSTED TANKS CAN FAIL CAUSING EXPLOSIONS
OR FATAL INJURIES. Discard tank immediately if tank is rusted.
NOTE:
When using a safety pressure relief valve, point the safety pressure relief valve
away from your body when releasing air. Use the pull ring on the safety relief valve; open
the relief valve to vent any pressure inside the tank before attempting to service tank.
USER MANUAL
RECOMMENDED TANK INSTALLATION
FOR 2.5 GA. TANK OWNERS:
We have included 6 pcs. of rubber bushings in your tank
mounting hardware. You have the option of using two
layers of rubber bushings on one of your tank lags to
slightly tilt tank toward drain hole to improve drainage
when using a drain cock.
TROUBLESHOOTING CHART
PROBLEM
POSSIBLE CAUSE(S)
Tank loses air
pressure
Air leaks from fittings
Tank leaks
Can’t get air
from tank
Pinhole from internal
rusting of tank
CORRECTION
Locate leak by applying soap &
water solution. Tighten as needed
Replace tank immediately
Tank pressure must exceed tire
pressure, increase tank pressure
Low tank pressure
WARRANTY
VIAIR Corporation warrants this product, when properly installed and under normal conditions of use, to
be free from defects in workmanship and materials for a period of one year from provided date of
purchase. To receive a replacement, please return the complete unit to retailer from whom it was
purchased along with proof of purchase. Returns should be made within the time period of the retailer’s
policy for exchanges (usually 30 to 90 days after the sale). If you are unable to contact your dealer,
contact VIAIR directly for repairs or replacement at our option. This warranty covers product defects
only; it does not cover incidental or consequential damages.