1
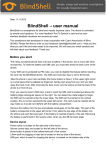
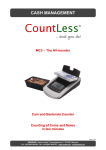
ZIP MDB: INSTALLATION AND QUICK SETUP PROGRAMMING GUIDE
ZIP MDB
INSTALLATION AND
QUICK SETUP PROGRAMMING GUIDE
Release 1.3 - October 2007
1/10
Software Version Z262T2
ZIP MDB: INSTALLATION AND QUICK SETUP PROGRAMMING GUIDE
INSTALLING YOUR ZIP MDB UNIT (code 959883 or 959884)
Important Note: ALWAYS power off your machine before installing Zip or connecting the
coin mech or note loader.
1). Locate the Zip power harness included with two MDB plugs on one side and two plugs on the
other end. Plug the multi color 4-wire and red wire power harness into the Zip CPU.
2). Mount the reader onto the front of the machine. A 1 3/8” and two small holes for the mounting
studs will need to be drilled to mount the reader (If are using the key/card reader, use supplied
template to cut opening). Position the reader with room to spare away from any electronics,
harnesses or note loader.
3). Plug the reader harness into the Zip CPU.
4). Locate the machines MDB harness and disconnect the coin mech/note loader harness from the
machines MDB harness.
2/10
Software Version Z262T2
ZIP MDB: INSTALLATION AND QUICK SETUP PROGRAMMING GUIDE
5). Plug coin mech/note loader “Y” harness to Zip CPU harness. Then plug the Zip MDB plug into
the machine MDB harness.
6). Your Zip hardware is installed and ready to program.
Configuring Crane National Vendors Machines:
1). Enter into the National “Machine Configuration” and turn “Card Reader” to MDB Card.
2). Go to “Revalue” and turn setting to “On” if you want to revalue keys in the machine.
3). If machine has “Sure Vend” turn “Failed Vend” to cash. This allows the failed vend credit to get
written back to the key/card.
Follow the Zip “MDB Quick Setup Guide” to program your Zip unit. If are using advanced features
refer to the Zip Owner’s Manual.
Important Note: When programming is complete, make sure you shut the machine off then
back on before using it.
3/10
Software Version Z262T2
ZIP MDB: INSTALLATION AND QUICK SETUP PROGRAMMING GUIDE
INSTALLING YOUR ZIP MDB UNIT (code 959883 or 959884) WITH THE MDB PLUS
MODULE (code 959886)
Important Note: ALWAYS power off your machine before installing Zip or connecting the
coin mech or note loader.
1). Install the RAM expansion (code 958934) on the special plinth, located on the Zip CPU module,
following the instructions provided with the article.
2). Mount the Zip CPU module and the MDB Plus module together. Once connected together, they
will look like the photo below.
3). Locate the Zip power harness included with two MDB plugs on one side and two plugs on the
other end. Plug the multi color 4-wire into the Zip CPU. DO NOT plug in the red wire.
4). Plug the power harness that came with the MDB Plus module into the Plus module.
5). Plug the reader harness into the Zip CPU
6). Locate the machine MDB harness and disconnect the coin mech/note loader harness from the
machine MDB harness. Remove the “Y” harness that connects the coin mech and the note loader
together. You will not be using this harness.
4/10
Software Version Z262T2
ZIP MDB: INSTALLATION AND QUICK SETUP PROGRAMMING GUIDE
7). Plug the harness from the MDB Plus module to the Zip CPU harness. Then plug the Zip MDB
plug into the machines MDB harness.
8). Plug your coin mech and note loader into the MDB Plus module. Either plug can be used; they
are universal and can be reversed.
9). Your Zip hardware is installed and ready to program.
Follow the Zip “MDB Quick Setup Guide” to program your Zip unit. If using advanced features,
refer to the Zip User Manual.
Important Note: When programming is complete, make sure you shut the machine off then
back on before using it.
5/10
Software Version Z262T2
ZIP MDB: INSTALLATION AND QUICK SETUP PROGRAMMING GUIDE
ZIP “MDB QUICK SETUP” PROGRAMMING GUIDE
While there are many features of the Zip, most applications only need a few changes to the Zip
programming to get your new system up and running. By following these quick and easy steps you
can have your system running in a few short minutes. Using the programmer is quite easy.
Important Note: The programmer must always be connected and disconnected with the
machine turned on.
There are three buttons on the programmer you use to navigate through the menus:
- Use this button to enter (move FORWARD) into the programming function.
- This button takes you BACK one step every time you press it.
- This button takes you DOWN through the programming menu.
When you first plug the programmer in you will see a screen that shows the Zip software version
installed in the module for a few seconds, then it displays “Programming” on the screen. This is
always your Starting position. Whenever you make a change by pressing ENT the system will ask
you to confirm your choice. Pressing ENT a second time confirms your choice. If you decide not to
make the change you can press CLR to discard your change.
In the directions below whenever you see a button within a box ENT simply press that button on
the programmer.
If you are installing the RAM (code 958934) into the Zip module or removing the RAM (code
958934) from the Zip module or have updated the Zip software, you must initialize the
system and collect data using the Maxi Key or other devices.
If you have not installed/removed the ram, or not just completed a software update, these
steps are not necessary. Start at Step 1 if you installed/removed Ram or updated the system
software. If you are not using the Ram, or did not just update the software, skip to step 10.
Important Note: With the Initialization, all parameters of the ZIP are initialized to the default
values; However, language, customer code, department code, user groups, machine code,
reader code and coin mech code will remain programmed as before.
If these codes are “out of range” (when you update an old software or for other reasons)
these codes are inizialised to the default values: language = italian, customer code = 00001,
department code = 001, user groups = 01, machine code = ZIP001, reader code = 000000 and
coin mech code = 000000.
The operator code is always inizialized to the default value (00000001), therefore, do not
forget to program this code as before.
1). ENT then press F4 until you see the “Other Parameters” screen.
2). ENT then F4 to “Initialization”.
3). ENT once to enter, and ENT again to confirm. If you are not using Z252T5, but you are using a
previous software versions, the system defaults to Italian language. The next steps will walk you
through setting the system to English UK. If you are using Z252T5, skip to step 7.
6/10
Software Version Z262T2
ZIP MDB: INSTALLATION AND QUICK SETUP PROGRAMMING GUIDE
4). CLR several times to get back to the menu that shows “Programming”.
5). F4 to “Language”
6). ENT then F4 to “English UK”. ENT ENT to enter and confirm.
7). F4 to “Ram Setup”.
8). ENT ENT Set the date and time for your area.
9). CLR all the way back to where the display shows the Zip software version (Z252T5) then
displays “Programming”
If you have not installed the RAM, this is where you begin programming your Zip system.
10). ENT to enter programming.
11). At Sale Prices ENT Note: The next changes do not change prices in the machine, but allow
the machine to take up to the amount entered in coins for cash sales. If you skip these steps,
your machine may stop taking pennies once it has reached £0.50.
12). ENT to “Cash”
13). F4 to Price Line 10
14). ENT Change price from default of 50 to 300 (£3.00) ENT ENT to enter and confirm. (Note:
Set this amount to at least £3.00. If selling items higher than £3, set this amount to £1 above
highest cost item).
15). CLR to Cash
16). F4 to Key ENT
17). F4 to Price Line 10
18). ENT Change price from default of 50 to 300 (£3.00) ENT ENT to enter and confirm. (Note:
Set this amount to at least £3.00. If selling items higher than £3, set this amount to £1 above
highest cost item).
19). CLR to Sale Prices
If you are using different key prices for the same item (key discount levels) or you want to
collect sales info by price line, go to step 20. If not, then skip to step 32.
20). ENT to “Cash”.
21). ENT to “Price Line 1”. ENT and set the price for Price Line 1. Note: display shows values
without decimal point. (£1.00 reads on the display as 100). ) ENT ENT to enter and confirm.
22). F4 to “Price Line 2”. Continue as above for each price line.
23). CLR back to “Cash”, then F4 to “Key”.
7/10
Software Version Z262T2
ZIP MDB: INSTALLATION AND QUICK SETUP PROGRAMMING GUIDE
24). ENT to “Price Line 1”. ENT and set the price for Price Line 1. Note: display shows values
without decimal point. (£1.00 reads on the display as 100). ) ENT ENT to enter and confirm.
25). F4 to “Price Line 2”. Continue as above for each price line.
26). CLR back to “Key”, then F4 to “Discount Level 1”.
27). ENT ENT and then F4 to turn the discount level 1 “On”. ENT ENT to enter and confirm.
28). F4 to “Price Line 1”. ENT and set the price for Price Line 1. Note: display shows values
without decimal point. (£1.00 reads on the display as 100). ) ENT ENT to enter and confirm.
29). F4 to “Price Line 2”. Continue as above for each price line.
30). CLR back to “Dicount Level 1”.
31). F4 to “Discount Level 2”. Continue as above for each discount level.
Important Note: Do not forget to program the keys with the discount levels using the PC
Interface! If the keys are not programmed with the discount levels, the reader will NOT
accept the keys.
If you are using the MDB Plus module (code 959886), go to step 32. If not, then skip to step
48.
32). CLR then F4 to “Coins” (F4 to “Coins” if you skipped step 20). Here you will tell the system
what coins you accept, and how many tubes the coin mech has.
33). ENT to “Validator” ENT then F4 to “Recharge and Sale”. ENT ENT to enter and confirm.
34). F4 to “Validator Type”. ENT then F4 to “Coin Mech MDB”. ENT ENT to enter and confirm.
35). F4 to “Coins Enabled”. Next you set how many tubes the mech has. Coins 1, 2 and 3 for a
three tubes mech, 1, 2, 3, & 4 for a four tubes and 1 through 5 for a five tubes. (Tip: If you are
currently using a 3 tube mech but may replace it with a 4 or 5 tube mech in the future, you can turn
all 5 tubes on now so that you will not have to reprogram the Zip system if you exchange the mech)
36). ENT then ENT to “Coin 1”. F4 to turn it “On” then ENT ENT to enter and confirm. F4 to “Coin
2” and continue this process for however many tubes you have. Once all your tubes are turned on
CLR once back to “Coins Enabled”.
37). F4 to “Escrow Lever”. ENT and then F4 to turn this “On”. ENT ENT to enter and confirm.
38). F4 to “Maximum Change”. ENT and set this amount to the highest denomination banknote
you take. 500 for a £5 banknote to 2000 if you take £20 banknote. ENT ENT to enter and confirm.
39). CLR back to “Coins”, then F4 to “Banknotes”
40). ENT at “Note Loader”. ENT then F4 to “Recharge and Sale”. ENT ENT to enter and confirm.
41). F4 to “Note Loader Type”. ENT then F4 to “MDB”. ENT ENT to enter and confirm.
42). F4 to “Banknotes Enabled”. ENT to set how many different banknotes your note loader
accepts. Banknote 1 is for £1, 5 is for £5, etc.
8/10
Software Version Z262T2
ZIP MDB: INSTALLATION AND QUICK SETUP PROGRAMMING GUIDE
43). ENT at “Banknote 1”. ENT then F4 to turn on. ENT ENT to enter and confirm.
44). F4 to “Banknote 2”. Continue as above for each banknote you accept.
45). CLR and F4 to “Security Level”. This section is for the note loader’s security level of accepting
banknotes. In most locations you will want this level set to “Low”, but this is your choice. Your note
loader will accept more banknotes in the “Low” setting.
46). Once you are at “Security Level” ENT at “Banknote 1”. ENT then F4 to turn this to “Low”. ENT
ENT to enter and confirm. F4 to “Banknote 2” and continue as above for each banknote you
accept.
47). CLR to “Banknotes”.
You have now completed the MDB Plus module settings that control the coin mech and
note loader. You will now proceed to the Zip module setup.
48). F4 to “Machines”.
49). ENT to “System Type”. ENT and F4 to “MDB New”. DO NOT use “MDB”; you must select
“MDB New”. ENT ENT to enter and confirm.
50). F4 to “Vend Type”. ENT then F4 to “Single Vend” or “Multi Vend” . ENT ENT to enter and
confirm.
51). F4 to “Country Code”. ENT and type in 0044 for UK. ENT ENT to enter and confirm.
52). CLR to “Machines” and F4 to “Codes”.
Important Note: These codes must match the codes you entered in the PC Interface and
used to program your keys! If these codes do not match your keys, the reader will NOT
accept the keys.
53). ENT to “Department Code”. (OPTIONAL) Here you can enter a 3 digit code (Max 255). ENT
Enter your code. ENT ENT to enter and confirm. Optional but if set, this code must match your
keys!
54). ENT then F4 to “Customer Code”. (OPTIONAL) Here you can enter a 5 digit code (Max
65535) for this location. ENT Enter your code. ENT ENT to enter and confirm. Optional but if set,
this code must match your keys!
55). F4 to “Operator Code”. You MUST enter your companies 8 digit code here. ENT Enter
your code. ENT ENT to enter and confirm.
56). F4 to “Machine Code”. (OPTIONAL) Here you can enter a 6 digit code for each machine to
identify this machine in your reports. (Normally an asset number or part of the serial number is
used here) ENT Enter your first digit F4 to second character enter second digit and continue until
your 6 digit code is entered. ENT ENT to enter and confirm.
57). CLR and F4 to “Other Parameters”.
58). ENT to “Max Charge Credit”. ENT and type in the maximum amount of credit your users can
store on their key. Note: display shows values without decimal point. (£100.00 reads on the
display as 10000). ENT ENT to enter and confirm.
9/10
Software Version Z262T2
ZIP MDB: INSTALLATION AND QUICK SETUP PROGRAMMING GUIDE
59). F4 to “Maximum Credit”. ENT and type in the same amount entered above. ENT ENT to enter
and confirm. Note: display shows values without decimal point. (£100.00 reads on the
display as 10000).
60). F4 to “Failed Vend Ref”. If your machine has a guaranteed delivery system, you will want this
turned “On”. ENT and then F4 to “On”. ENT ENT to enter and confirm.
61). F4 to “Audit mode”. ENT then ENT then F4 to Maxi Key if you want the historical data and the
coin mech data in your reports. ENT ENT to enter and confirm. CLR once to Audit Mode.
62). F4 to “Maxi Box”. If you want the payment system to continue recording transactions even
after 4.000 have been stored, turn this to “On” by pressing ENT and F4 to “On”. ENT ENT to enter
and confirm.
63). F4 to “Charge Key”. If using the Red Charge Key, turn this to “On” by pressing ENT and F4 to
“On”. ENT ENT to enter and confirm.
64). F4 to “Free Sales Key”. If using a sale key as a “Free Vend” key turn this on by pressing ENT
then F4 to “On” and ENT ENT to enter and confirm.
65). F4 to “High Security”. This feature prevents a key user from inserting, removing and
reinserting their key right immediately in order to “try” to confuse the machine. Turning High
Security to the ON position means that after a key is removed the customer has to wait 2 or 3
seconds before the next key will be registered in the machine. It is recommended that this be set
to “On” . To turn on, ENT then F4 to “On”. ENT ENT to enter and confirm.
66). CLR button several times to exit completely out of the programming. Always press the CLR
button until you see the display that shows the Zip software version.
The programmer should now be disconnected, and the machine turned off, then back on.
Congratulations. Your Zip system is now programmed and ready to go!!
10/10
Software Version Z262T2