1
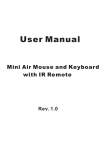
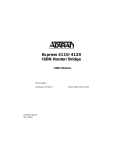
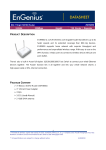
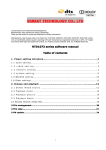
User Guide High Power Wireless Outdoor CPE 5GHz N Thank you for choosing our High Power Wireless Outdoor CPE. This CPE is dedicated to outdoor wireless network solutions. It will allow you to connect your networking with other wireless devices wirelessly, and sharing internet access easily and securely. This high power design will enable you to build a more stable link and coverage distance. This user guide will help you to setup the outdoor CPE in a convenient and simple way. Package Contents: The following items should be found in your package: 1. One CPE 2. One Power Adapter 3. Two Mounting Kits 4. Quick Installation Guide Note! Make sure that the package contains the above items. If any of the listed items are damaged or missing, please contact your local distributor. Features: - Complies with IEEE80211a/n ,IEEE802.3, IEEE802.3u standards. - Wireless Data transfer rates up to 300Mbps for 2T2R. - Supports Station, WDS Station and AP mode. - Output transmission power adjustable. - Supports PPPOE, Dynamic IP, And Static IP Internet Access. - Built-in firewall supporting IP address filtering, Domain Name filtering, and MAC address filtering. - Supports QoS, DMZ and DDNS functions. - Supports configuration backup/restore and firmware upgrade. Quick Setup Guide Step 1: Hardware Installation Interfaces and button: Please use DC12V POE power supply through the LAN port Reset: There are two ways to reset the AP to factory default settings: - Use the Restore Factory Default function on System ManagementSave/Reload settings page in the AP’s web-based utility. - Use the Reset button on the rear panel. Press and hold the Reset button for at least 15 seconds, and then the AP reboots and restore to factory defaults. Figure 1 CPE Rear panel Note: Ensure the AP is powered on before it restarts completely, and don’t power off it during this process, or else it may cause damage to the device. Connection method (Figure 2): Figure 2 Device and POE connection Note: Improper connection or use other power adapter or POE adapter instead of the factory standard one may cause permanent damage to the device. Step 2: Login the Web Utility 1) Connect the CPE and the PC properly according to Figure 2) Configure PC local IP address as 192.168.0.X (X is a figure 2~254), which is within the same IP range with the CPE, the subnet mask is 255.255.255.0. See Figure 3, 4. Figure 3 Set PC IP address Figure 4 Set PC IP address 3) Open your web browser and enter the IP address of the CPE (here is 192.168.0.1 as an example) and press enter, a login screen as below will display. Input the user name and password “admin”. Click Login or press Enter, and the web management utility will display. Figure 5 Login Step 3: Station Mode Settings Station mode: The LAN ports and wireless ports are bridged together. The CPE will broadcast one SSID, the user(PC) will connect the CPE through LAN port or wireless, and the user will obtain an IP address from WLAN station or AP. Note: The CPE works in station mode by default. Under this mode the two RJ45 ports all act as LAN port and support POE power supply. Below shows the reference network topology: Figure 6 Station mode network topology Configurations steps: ① Connect to AP or WLAN station Login the Web management page, choose “Wireless” →“Basic Settings” →“Station mode”→“Scan AP” Figure 7 Configure CPE working mode Click “Scan AP”, you will see a popup AP scanning tools window as below Figure 8. Choose the WLAN station or AP SSID you would like to connect. Figure 8 Wireless AP scanning tools Note: If you can’t find the target SSID: (You can try any of these options) Scan several times. Check whether the CPE support the present working channel of the WLAN station or AP, (e.g. AP is working at channel 14, but the CPE can only support 13 channels). Check whether the CPE’s wireless protocol is in compliance with the AP. Reset the CPE to factory default and try again. Figure 9 Connect with AP -Click “Apply”, the system will restart automatically to finish the setting. This process will take around 1 minute. -Internet Access Type choose “Bridge”, click “Apply”, the system will restart automatically to finish the setting. -When the station is connected to a AP and then enable repeater AP to continue to enlarge the wireless signal. Note: If the user choose to connect Internet through WISP or other wireless device, please refer to below settings. Figure 10 Internet access type 1. DHCP mode: When this device is connected to a DHCP server or WISP which provide DHCP service, please choose this mode. The CPE will obtain IP address from DHCP server or WISP automatically. After the wireless connection is successful, the network connection is successful. 2. PPPoE – If your WISP provides PPPOE service, please choose this mode. Please input the user name and password from the WISP in place shown in Figure 11 below. Figure 11 PPPoE configure ② Check CPE connection status Check whether the connection is successful. Choose “Wireless”→ “Wireless Status”, see Figure 12 below. Figure 12 CPE connection status When the CPE is connected with the WLAN station or AP, the repeating status will show “connect”,and show the SSID、 MAC and repeating signal strength. Note: The suggested repeating signal strength is no less than -75dBm, if the repeating signal strength is too low, the repeating result will become poor. The CPE repeating result will become relatively poor for non-line-of-sight situation. Please try to adjust the direction of the CPE to get the best signal strength and throughput performance. ③ LAN port settings Choose “TCP/IP” “LAN Setting”, see Figure 13 as below. Figure 13 LAN port setting ﹡IP Address: It is the device management IP address. At bridge mode, the CPE LAN port address has no relate with the user(PC) IP address range. Pls modify it according to actual situation. ﹡DHCP server choose “Disabled” . ④ Wireless Advanced Settings Choose “Wireless” “Advanced Settings”, see Figure 14 below: Figure 14 Wirelss advanced settings ﹡Country Region: choose your country region ﹡Mode/Band: choose according to your actual requirement ﹡ RF Output Power: you can choose from 100%, 50%, 25%, 12.5%, 6% -For the other advanced settings it is recommended to keep it as default for common users. -Please click “Apply Changes” after you finish the settings. Note: The settings here is only effective to the CPE broadcasting wireless signal, and it needs to be in compliance with the corresponding WLAN station or AP. ⑤ User PC configuration User PC TCP/IP set as obtain an IP automatically, the PC will obtain an assigned IP from the AP or WALN station. Figure 15 Set PC IP address After finish the above settings, you can check whether the network connection is success by using ping command. ⑥ AP+WDS mode Choose “Wireless” “Wireless Basic Settings”, choose mode “AP+WDS”, see Figure 16 as below. Figure 16 Set AP+WDS mode Note: AP+WDS is for some users who need the CPE to connect with a wired switch, and convert it to wireless AP coverage ⑦ WDS station mode Choose “Wireless” “Wireless Basic Settings”, choose mode “WDS station”, see Figure 17 as below. Figure 17 WDS station mode Note: WDS station is for some users who need the CPE to connect with an AP with WDS enabled. 2 System Management Choose “Management/System” to enter into the system management page as Figure 18 below. Figure 18 System management Time Zone Setting: You can set the time zone and time shown in the system Log: You can set the system log settings or view the system log here. Upgrade Firmware: You can upgrade the firmware here Save/Reload Settings: Here you can save settings,upload settings, reset settings to default and system reboot. User/Password: Here you can set the system login user name and password. 3 Troubles Shooting Item Ways to solve the problem SYS LED doesn’t lighting up Please check whether the POE power adapter ports are correctly connected. The “POE” port should connect to the CPE, and “LAN” port connect to the PC. Can’t connect To the configuration web utility CPE can’t connect to the corresponding AP (the status shows disconnected) CPE shows connected with the corresponding AP, but the PC can’t connect to internet Reset to factory default Please check whether the PC IP address is within the same IP range as the CPE. You can check whether the devices are connected properly by using ping command at the PC startupruncmd window. Reset the CPE to factory default and try again. Pls make sure there is no other device is using the IP address 192.168.0.1 in the same network. Make sure the PC and all the network cables are connected properly. Use arp-d command to clear the arp binding at the at the PC startupruncmd window. Clear up the historical and temporary files in the IE browser. Please try “Scan AP” again. Check the wireless mode of the CPE is properly set. Check CPE encryption method and password is in compliance with the AP. The AP wireless signal is too low, the recommended signal strength is no less -75dBm. Please check the PC IP address and DNS settings. They should be in compliance with the actual connection and working mode. Press and hold the Reset button for at least 15 seconds, and then the AP reboots and restore to factory defaults