1
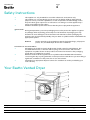
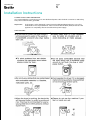
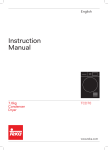
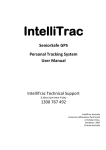
User Manual:
Model
Code/s:
EVD6
Product:
Page:Document:
Vented Dryer 1 User Manual
Dear Customer,
Congratulations on purchasing your vented dryer.
The Esatto brand is proudly distributed within
Australia by Residentia Group Pty Ltd.
Please refer to the warranty card at the rear of this
manual for information regarding your product’s
parts and labour warranty, or visit us online at
www.residentiagroup.com.au.
At Residentia Group, we are customer obsessed
and our Support Team are there to ensure you get
the most out of your appliance. Should you want
to learn more about your vented dryer such as
the various drying modes or importantly taking care
of the dryer, our Support Team are here to help.
You can use our online Support Centre at anytime
by visiting http://support.residentiagroup.com.au,
or you can contact us via phone by dialling:
1300 11 HELP (4357).
It is important that you read through the following
use and care manual thoroughly to familiarise
yourself with the installation and operation
requirements of your appliance to ensure optimum
performance.
Again, thank you for choosing an Esatto appliance
and we look forward to being of service to you.
Kind Regards,
The Residentia Team
T 1300 11 4357
E [email protected]
W residentiagroup.com.au
ACN 600 546 656
Residentia Group
PO Box 581
Stanhope Gardens
NSW Australia 2768
User Manual:
Page:
3
Contents:Page:
Safety instructions4
Your Esatto Vented Dryer4
Installation Instructions
5
Operating your Vented Dryer8
Cleaning and maintenance10
Troubleshooting
10
Warranty information 12
Notes
14
User Manual:
Page:
4
Safety Instructions
→This appliance is only intended for use within a domestic environment only.
→This appliance is not intended for use by persons (including children) with reduced
physical, sensory or mental capabilities, or lack of experience and knowledge, unless
they have been given supervision or instruction concerning use of the appliance by a
person responsible for their safety.
→Children should be supervised to ensure that they do not play with the appliance.
UNPACKING
→During transportation, protective packaging was used to protect the appliance against
any damage. After unpacking, please dispose of all elements of packaging in a way
that will not cause damage to the environment. All materials used for packaging the
appliance are environmentally friendly; they are 100% recyclable and are marked with the
appropriate symbol.
Caution!During unpacking, the packaging materials (polythene bags, polystyrene
pieces, etc.) should be kept out of reach of children.
DISPOSAL OF THE APPLIANCE
→Old appliances should not simply be disposed of with normal household waste, but
should be delivered to a collection and recycling centre for electric and electronic
equipment. A symbol shown on the product, the instruction manual or the packaging
shows that it is suitable for recycling.
→Materials used inside the appliance are recyclable and are labelled with information
concerning this. By recycling materials or other parts from used devices you are making a
significant contribution to the protection of our environment.
→Information on appropriate disposal centres for used devices can be provided by your
local authority.
Your Esatto Vented Dryer
1. Topboard
2. Control Panel
3. Door
4. Cabinet
5. Filter
6. Power Lead
7. Door Lock
8. Tumbling Drum
9. Reset Button
10. Wall Mounting Brackets
User Manual:
Page:
5
Installation Instructions
POWER SOURCE AND GROUNDING
It’s recommended to use the dryer on it’s own dedicated power outlet for both convenience and safety.
The power outlet must be grounded.
Important!If the power cord is damaged, it must be replaced by Residentia Group or one of it’s
authorised service representatives. Please contact 1300 11 HELP (4357) and ensure the
appliance is completely disconnected from the power supply.
PRECAUTIONS:
User Manual:
Page:
6
PRECAUTIONS (Continued):
User Manual:
Page:
7
SIMPLE INSTALLATION:
→
Step 1:
Your Esatto vented dryer should be placed in a well ventilated area with no less than
10cm distance from the wall. If placed in a room such as a bathroom, it is recommended
that there are no obstacles within 1.5m of the dryer to allow ventilation.
→
Step 2:
Use a spirit level to ensure that the dryer is level, either when sitting on the ground,
bench or wall mounted. It is critical that the dryer is level during operation, otherwise
damage can be done to the dryer internals.
Important!
Please ensure that the dyer is only ever installed in an internal
environment only (and not outside), or an environment where the dryer
could become wet. Never place the dryer near combustible surfaces
(such as curtains) and ensure the dryer isn’t operating near gas or other
flammable materials.
INSTALLATION UPSIDE DOWN (WALL MOUNTED):
→
Step 1:Fix the two metal wall brackets onto the wall to align eith the mounting
slots on the dryer. Ensure that the wall is of sufficient strength to support
the dryer weight.
→
Step 2:Turn the dryer upside down and insert the plastic supports into their slots,
turning them 90 degrees to lock into position.
→
Step 3:Carefully raise the dryer and hang it on to the wall brackets. This is a 2–3
person job, as the dryer weighs 33kg.
→
Step 4:Replace the panel sticker with the inverted option (supplied).
User Manual:
Page:
8
Operating Your Vented Dryer
1. PREPARATION BEFORE DRYER
→
Clothes should be washed before use within the dryer.
→
Always ensure the same types of clothes are dried together.
→Try to sort your clothes to be dried into load that take a similar time to dry (for example
heavier items separate from light items).
→Make sure any decorations or buttons on your clothing items are safe for high
temperatures and well protected.
→
It is recommended to turn your clothes inside-out.
→Please ensure that the power cord is in perfect condition before use. Should there be any
damage to the power cord or plug, please immediately isolate the dryer from power and
contact Residentia Group on 1300 11 HELP (4357).
2. CHECK THE FILTER
→
Make sure that the filter is always clean and in the correct position.
→
The filter must be cleaned regularly.
3. LOAD THE DRYER
→For faster drying results, load the dryer to 1/2 -> 2/3 capacity of the drum. This will allow
the clothes and air to circulate evenly.
→When drying a small load of clothes or even expensive clothes, it’s best to add some
towels that won’t lose fibres, as this will help the wet clothes to dry more evenly.
→To avoid creases or static charges on your clothes, it’s important to ensure you don’t
over-dry your items.
REFERENCE WEIGHTS OF CLOTHING (WHEN DRY):
4. CLOSE THE DRYER DOOR
5. SET YOUR DESIRED DRYER PROGRAM
1. Power
2. Start/Pause
3. Program (Maximum Dry, Standard Dry, Light Dry)
4. Heat Mode (Full, Half, Airing)
5. Crease Guard
Note: To use the child safety lock, press the Program and Heat Mode buttons at the same time.
User Manual:
Page:
9
PROGRAM FUNCTIONS:
Note:At the completion of a drying program, the clothes dryer will circulate cold air for 10
minutes. This ensures that your clothing is left at a temperature and that your clothes
aren’t damaged. The Crease Guard function adds a further 30 seconds after the program
to shake the clothes and reduce creasing.
Warning! Always follow the care instructions on each of your garments.
6. END OF THE DRYING PROGRAM
→At the completion of the program, an audible tone will sound to remind you to remove
the clothes from the dryer.
7. TAKE OUT THE PLUG
→
Just to be safe, always unplug the dryer after each use.
8. CLEAN THE FILTER AND INNER DRUM
→Accumulated dust and fibres will effect the air circulation inside the dryer and will cause
longer drying times.
→Always ensure the dryer is switched off and unplugged before cleaning.
User Manual:
Page:
10
Cleaning and Maintenance
By ensuring proper cleaning and maintenance of your Esatto Vented Dryer, you can ensure that it will
have a long and fault free operation.
Warning! To avoid an electric shock, always unplug your dryer before cleaning.
CLEANING THE FILTER
→
Remove the lint filter, located within the door opening.
→Clean the filter by wiping it with a damp cloth.
→Once dry, re-fit the lint filter into the door opening.
Important!
Clean the filter after each use.
CLEANING THE INNER DRUM
→
→
→
→
Use a soft damp cloth to wipe the inner drum and cabinet.
Ensure that the cloth is only slightly damp and never use excessive amounts of water.
Do not use scouring pads or other abrasives as these will cause damage to your dryer.
Do not use alcohol wipes or harsh cleaning chemicals.
Troubleshooting
OPERATION IN CASE OF EMERGENCY
In the event of an emergency you should:
→Switch off all oven controls (i.e. Cooking Function and Temperature)
→Switch the oven off at the isolation switch or at the fuse box.
→Call the Residentia Support Team on 1300 11 HELP (4357).
Some minor faults can be fixed by referring to the instructions given in the Troubleshooting section
below. There is also a self-help section online at http://www.residentiagroup.com.au.
User Manual:
Page:
11
Troubleshooting
Further problem solving
User Manual:
Page:
12
Warranty
WARRANTY TERMS AND CONDITIONS
LAUNDRY APPLIANCES
→This document sets out the terms and conditions of the product warranties for Residentia
Group Appliances. It is an important document. Please keep it with your proof of
purchase documents in a safe place for future reference should you require service for
your Appliance.
1.
In this warranty
(a) ‘acceptable quality’ as referred to in clause 10 of this warranty has the same meaning
referred to in the ACL;
(b) ‘ACL’ means Trade Practices Amendment (Australian Consumer Law) Act (No.2)
2010;
(c) ‘Appliance’ means any Residentia Group product purchased by you accompanied by
this document;
(d) ‘ASR’ means Residentia Group authorised service representative;
(e) ‘Residentia Group’ means Residentia Group Pty Ltd of 20 Yaltara Avenue, Bundoora
Victoria 3083, ACN 600 546 656 in respect of Appliances purchased in Australia;
(f) ‘major failure’ as referred to in clause 10 of this warranty has the same meaning
referred to in the ACL and includes a situation when an Appliance cannot be
repaired or it is uneconomic for Residentia Group, at its discretion, to repair an
Appliance during the Warranty Period;
(g) ‘Warranty Period’ means:
(i)where the Appliance is used for personal, domestic or household use
(i.e. normal single family use) as set out in the instruction manual, the
Appliance is warranted against manufacturing defects in Australia for 12
months following the date of original purchase of the Appliance;
(h) ‘you’ means the purchaser of the Appliance not having purchased the Appliance for
re-sale, and ‘your’ has a corresponding meaning.
2.This warranty only applies to Appliances purchased and used in Australia and is in addition to (and does
not exclude, restrict, or modify in any way) any non-excludable statutory warranties in Australia.
3.During the Warranty Period Residentia Group or its ASR will, at no extra charge if your Appliance is
readily accessible for service, without special equipment and subject to these terms and conditions,
repair or replace any parts which it considers to be defective. Residentia Group or its ASR may use
remanufactured parts to repair your Appliance. You agree that any replaced Appliances or parts become
the property of Residentia Group. This warranty does not apply to light globes, batteries, filters or
similar perishable parts.
4.
Parts and Appliances not supplied by Residentia Group are not covered by this warranty.
5.You will bear the cost of transportation, travel and delivery of the Appliance to and from Residentia
Group or its ASR. If you reside outside of the service area, you will bear the cost of:
(a) travel of an authorised representative;
(b)transportation and delivery of the Appliance to and from Residentia Group or its
ASR, in all instances, unless the Appliance is transported by Residentia Group or its
ASR, the Appliance is transported at the owner’s cost and risk while in transit to and
from Residentia Group or its ASR.
6.
Proof of purchase is required before you can make a claim under this warranty.
Continued over page →
User Manual:
Page:
13
Warranty continued
7.You may not make a claim under this warranty unless the defect claimed is due to faulty or defective
parts or workmanship. Residentia Group is not liable in the following situations (which are not
exhaustive):
(a) the Appliance is damaged by:
(i)
accident
(ii)
misuse or abuse, including failure to properly maintain or service
(iii)
normal wear and tear
(iv)
power surges, electrical storm damage or incorrect power supply
(v)
incomplete or improper installation
(vi)
incorrect, improper or inappropriate operation
(vii)
insect or vermin infestation
(viii)failure to comply with any additional instructions supplied with the
Appliance;
(b) the Appliance is modified without authority from Residentia Group in writing;
(c) the Appliance’s serial number or warranty seal has been removed or defaced;
(d)the Appliance was serviced or repaired by anyone other than Residentia Group, an
authorised repairer or ASR.
8.This warranty, the contract to which it relates and the relationship between you and Residentia Group
are governed by the law applicable where the Appliance was purchased.
9.To the extent permitted by law, Residentia Group excludes all warranties and liabilities (other than as
contained in this document) including liability for any loss or damage whether direct or indirect arising
from your purchase, use or non use of the Appliance.
10.For Appliances and services provided by Residentia Group in Australia, the Appliances come with a
guarantee by Residentia Group that cannot be excluded under the Australian Consumer Law. You are
entitled to a replacement or refund for a major failure and for compensation for any other reasonably
foreseeable loss or damage. You are also entitled to have the Appliance repaired or replaced if the
Appliance fails to be of acceptable quality and the failure does not amount to a major failure. The
benefits to you given by this warranty are in addition to your other rights and remedies under a law in
relation to the Appliances or services to which the warranty relates.
11.At all times during the Warranty Period, Residentia Group shall, at its discretion, determine whether
repair, replacement or refund will apply if an Appliance has a valid warranty claim applicable to it.
12.
To enquire about claiming under this warranty, please follow these steps:
(a)carefully check the operating instructions, user manual and the terms of this
warranty;
(b) have the model and serial number of the Appliance available;
(c) have the proof of purchase (e.g. an invoice) available;
(d) telephone the numbers shown below.
13.You accept that if you make a warranty claim, Residentia Group and its ASR may
exchange information in relation to you to enable Residentia Group to meet its
obligations under this warranty.
IMPORTANTBefore calling for service, please ensure that the steps in point 12 have been followed.
Service:
Please call 1300 11 HELP (4357)
Spare Parts: Please call 1300 11 SPARE (7727)
The Australian Consumer
Law requires the inclusion
of the following statement
with this warranty:
Our goods come with guarantees that cannot be excluded under the Australian Consumer Law. You are entitled
to a replacement or refund for a major failure and for compensation for any other reasonably foreseeable loss or
damage. You are also entitled to have the goods repaired or replaced if the goods fail to be of acceptable quality
and the failure does not amount to a major failure.
User Manual:
Notes
Page:
14
User Manual:
Page:
15
User
Model
Manual:
Code/s:
EVD6
Page:
16