1
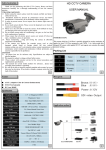
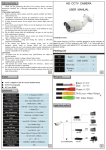
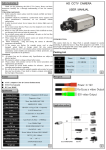
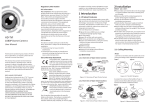
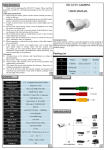
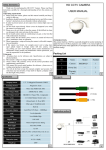
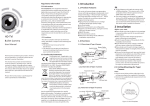
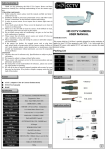
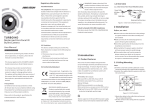
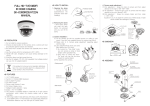
Safety Instruction HD CCTV CAMERA Thank you for purchasing this HD CCTV Camera. Please read these instructions carefully for a thorough understanding of how the cameras operates. 1.Operating requirements 1.1 Before using the camera ,please read this manual carefully and keep it safely for later use. 1.2 Installation should be proceed by professional service and follow manufacturer’s instructions, do not dismantle without authorization. 1.3 In order to prevent sensor ,do not expose lens to intense light source in long time. 1.4 Do not touch sensor directly. Please covers the dustproof cover when the camera is not being used. 1.5 Please use a dry soft cloth to clean the camera. If dirt difficult to clean, use detergent with water and wipe dry the camera. 1.6 Do not install camera under air conditioning’s air gate ,or else lens blur with condensation of moisture. 1.7 Please ensure that all electric power sources are turned off when not open , installation ,clean, etc operation. 1.8 Please transporting , using and storing the camera in allowable temperature and humidity. 1.9 If the camera was broken, for example power cord or plug damaged ,splash liquid or foreign matter fall into camera, raining ,wetting ,etc can’t work situation ,please contact manufacturer or maintenance center (modify and maintenance without permission ,you must be responsible for the problems) 2.Statement 2.1 All photos here are for reference only .Specifications are subject to physical product. 2.2 This manual is subject to change without further notice. 2.3 Please contact with customer service for the newest procedures and supplementary specification. 2.4 This manual list several model numbers for reference , please user according actual product to operating. 2.5 We will do the best to keep this manual complete and accurate, but some data may has deviation. If any doubt or dispute ,company retain the final right of the product. USER MANUAL INTRODUCTION: This camera which has 2.1M Pixes is specially designed for security monitoring. It applies the latest 2.1M Pixes progressive scan CMOS. It is a heavyweight newdesigned HD camera which applied DC12V and support user customize the output parameter settings. Packing List NO. Name Model Number 1 Camera LIED90SNHD 1 2 Power line — 1 3 Warranty Card — 1 1 Feature ■ ■ ■ 2 Wire ports ACCE ( Adaptive Color & Contrast Enhancement) NTSC/PAL Selectable DC Lens Specification Imaging Sensor 1/3" 2.1Megapixel CMOS Scanning System Progressive Scan S/N Ratio More than 50dB (AGC Off) Video Output Mode 1080P(1920 X 1080) Video Output Level HD-SDI /1.0 Vp-p (75Ω,Composite) Lens 2.8-12mm Manual Zoom Lens Min. Illumination 1.0Lux(Color),0.5Lux(BW) IR Distance 60M(with ¢5X72PCS LED) OSD Built-in Electronic Shutter Auto/FLK/1/25,30sec ~ 1/50000sec AGC Low/Middle/High 2D/3D-NR 2DNR/3DNR/SMART NR Digital Zoom/PIP On/Off(x2 ~ x64) D-DFFECT Freeze/Mirror/D-Zoom/NEG.IMAGE Voltage/Current DC12V+10% / 210mA(850mA Application method with IR on) Operating temperature -10°~ +50°C Dimension (mm) 315(W) X 125(H) X 120(D) Weight (g) 2000 3 4 Function Menu OSD MENU LENS ■DC ■VIDEO ■MANUAL EXPOSURE ■SHUTTER ■ACCE ■AGC ■DEFOG ■SENS-UP ■BACKLIGHT WHITE BAL ■ATW ■INDOOR ■AWC→SET ■OUTDOOR ■MANUAL DAY&NIGHT ■COLOR ■AUTO ■EXT NR ■2DNR ■3DNR ■SMART NR SPECIAL ■CAM TITLE ■LANGUAGE ■D-EFFECT ■DEFECT ■MOTION ■RS485 ■PRIVACY ADJUST ■SHARPNESS ■NTSC/PAL ■MONITOR ■OSD ■LSC RESET ■FACTORY ■BRIGHTNESS ■B/W EXIT How to use the camera LENS 1.When the SETUP menu screen is displayed, select LENS by using the UP and Down buttons so that the arrow indicates LENS ► DC/VIDEO/MANUAL: Select Auto Iris Lens. EXPOSURE 1.Using this function, you can control screen brightness. ► SHUTTER: MANUAL/AUTO. * MANUAL NTSC: 1/30 ~ 1/50000, X2 ~ X30. PAL: 1/25 ~ 1/50000, X2 ~ X30. * FLK: Select this when you picture flicker. * AUTO: Select this mode to control the shutter speed automatically. Shutter speed is automatically controlled depending on the brightness of the screen. ► AGC: You can adjust it LOW,MIDDLE and HIGH level. The higher the gain level, the brighter the screen but the higher the noise. ► SENSE-UP: When it is night, the camera automatically detects the light level and maintains a clear picture. ► BRIGHTNESS: You can control the brightness . ► ACCE: If there are bright area and dark area on the screen at the same time, this function makes both areas to be in clear image - OFF, LOW, MIDDLE, HIGH 4step. ► DEFOG: Carry out defog function. - OFF,LOW,MIDDLE,HIGH 4step. ► BACKLIGHT: This function allows you to get a clear pictures of objects even the objects in strong backlight. * BLC : GAIN: LOW,MIDDLE,HIGH AREA: Area set (size & position). * HSBLC: To inhibit strong light and compensate brightness of the area around it. *SELECT: AREA 1~AREA 4 *DISPLAY: select area ON/OFF *LEVEL: Masking level set *MODE: ALL DAY and NIGHT *BLACK MASK: Mask ON/OFF WHITE BAL. ► ATW: Select this when the color temperature is between 2400°K and 11,000°K. ► AWC→SET: To find the optimal setting for the current luminance environment in this mode, set the point the camera towards a sheet of white paper and press the SET button. If the environment changes, readjust it. ► OUTDOOR: Select this when color temperature is around 5,100°K. 5 ► INDOOR: Select this when the color temperature is around 3,100°K. 6 * SENSITIVITY: When the number is high, the detection is ► MANUAL: Select this to fine-tune White Balance manually. increased to recognize even small movement. DAY & NIGHT * MOTION VIEW: ON/OFF. You can display pictures in Color or Black and White. ► PRIVACY: Hide an area you want to hide on the screen. ► AUTO: Switched Color and B/W automatically. * SELECT: AREA1~8 * DISPLAY: Select AREA ON/OFF - EXT: You can select the external equipment about changing * COLOR: 1~16 color step * DEFAULT: Factory Reset the day/night mode. ► COLOR: The picture is always displayed in color. ► LANGUAGE: ENGLISH/CHN1/CHN2/JPN. ► B/W: The picture is always displayed in B/W. ► DEFECT: CMOS correction to compensate for defects that can be occur at the low light conditions. NR *LIVE DPC: Auto defect. *LEVEL: Level of Auto defect. This function reduces the background noise in a low luminance *STATIC DPC: Manual defect. *LEVEL: Manual defect value. environment. *START: Start defect.(Close the lens to shield the light, Select *2DNR(noise reduction) *3DNR the START ). * SMART NR (3DNR+ motion detection) *SENS-UP: Sense up value. ► RS485: This function sets up the camera communication SPECIAL status when controlling the camera through an external device. Select a desired mode using the UP and DOWN buttons. ► VERSION: Version of camera. ► CAM TITLE: If you enter a title, the title will be appear on the monitor. ADJUST ► D-EFFECT ► SHARPNESS: Adjust the sharpness of the image. * FREEZE: You can stop the image or reactive it. ► MONITOR: CRT monitor and LCD monitor. * MIRROR * LCD: Set GAMMA,BLUE GAIN,RED GAIN. - MIRROR: you can flip the image horizontally. ► OSD: TEXT COLOR & OUT LINE A adjustable. - V-FLIP: you can flip the image vertically. ► LSC: Lens shading compensation. - ROTATE: you can rotate the image on the screen. ► NTSC/PAL: Select NTSC/PAL. * D-ZOOM - PIP: PIP display ON/OFF - D-ZOOM: X2.0~X64 RESET - PAN&TILT: Set to change PIP position. ► FACTORY: Resets the camera setting to the factory defaults. * NEG.IMAGE: ON/OFF Language and LENS status is not initialized. ► MOTION * SELECT: Select AREA1~AREA3. EXIT * DISPLAY: Select AREA ON/OFF. Press the ENTER button in the EXIT menu to save the current settings and exit the MAIN SETUP menu. 7 8