1
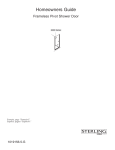
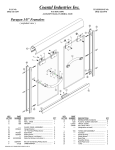
Installation Guide
Bypass Shower Doors
SP5900 Series
1034034-2-A
Tools and Materials
Silicone
Sealant
Center
Punch
Masking
Tape
File
Assorted
Screwdrivers
Knife
Tape
Measure
Drill
Plus:
Level
Pencil & Felt
Tip Marker
Claw
Hammer
Miter Saw or Hack Saw
With 32 Teeth Per Inch
• Drop Cloth
Safety Glasses
Caulk Gun
Pliers
Thank You For Choosing Kohler Company
We appreciate your commitment to Sterling quality. Please take a few minutes to review this manual before
you start installation. If you encounter any installation or performance problems, please don’t hesitate to
contact us. Our phone numbers and website are listed on the back cover. Thanks again for choosing
Sterling.
Before You Begin
CAUTION: Risk of injury. Always wear safety glasses when cutting or drilling.
CAUTION: Risk of injury or product damage. Tempered glass cannot be cut.
IMPORTANT! This shower door is designed to be specifically paired with a Sterling shower module. Do
not install this shower door if you do not have a Sterling shower module installed.
IMPORTANT! Pay special attention to the section titled ″Very Important Instructions″. Failure to follow
the directions could result in product damage.
IMPORTANT! Some of the models in this series of door have two sets of wall jambs enclosed, tapered
style and non-tapered style. Match the proper style to your installation and discard the extra set. If you
receive only one set of wall jambs, follow the tapered wall jamb directions when cutting.
NOTE: When using a retractable case tape measure, make sure you add the length of the case to the
measurement or measure in a manner that excludes the case.
Before starting the installation, lay out and identify the parts. Inspect them for damage.
Once inspected, return the glass panels to their packaging and place them in a safe area until they
are needed.
The bath/shower or receptor should be installed/prepared at this time, including finished wall
materials.
1034034-2-A
2
Sterling
Wall Jamb Mounting Screw
#8-18 x 1-1/2" Panhead
Screw
Cover
Top Track
Wall
Jamb
Roller
Roller
Screw
Towel Bar
Bracket
Screw #818 x 3/4"
Panhead
Bumper
Towel
Bar
Towel Bar
Bracket
Roller
Roller
Screw
Wall Jamb
Mounting Screw
#8-18 x 1-1/2"
Panhead
Anchor
Screw
Cover
Outside
Panel
Anchor
Wall
Jamb
Tap
Screw
Cover
Outside
Panel
Bushing
Inside
Panel
Inside Panel
Guide
Bumper
Inside Guide
Bushing
Screw
Cover
Pile Seal
Bottom
Track
#8-18 x 3/8"
Panhead Screw
Parts Identification
Sterling
3
1034034-2-A
CAUTION!
Most Common Installation Mistake
Do not cut the top and bottom track the same
length for this installation.
Please read these installation instructions
carefully before cutting the top and bottom
track.
If uncertain about cutting tracks, please contact
a customer service representative at
1-888-783-7546
for help.
Very Important Instructions
1034034-2-A
4
Sterling
Measure
Here
Measure distance
"D" above curves in
the corners.
Measure
Here
D
Curved
Base
Angled
Base
Measure carefully. If your walls are curved or angled,
measure above the curve or angle. Failure to do so can result in
an improperly cut bottom track and can void the warranty.
1. Measure and Cut the Bottom Track
CAUTION: Risk of product damage. If your shower has a curve in the corners where they meet the
sidewalls, be sure to measure from wall to wall above the curves. Failure to measure above the curve
or angle could result in the bottom track being cut too short.
CAUTION: Risk of personal injury. Always wear safety glasses when cutting materials.
IMPORTANT! This model of shower door may have both a tapered and straight style of wall jamb
enclosed. Follow the directions for the proper wall jambs.
Measure from wall to wall at the flattest part of the shower ledge (dimension D).
If you are using the straight wall jambs, subtract 1/8″ (3 mm) from dimension ″D″ and cut the
bottom track to this dimension. For best results, use a 32-tooth hacksaw blade and a miter box.
If you are using the tapered wall jambs, subtract 2-1/2″ (6.4 cm) from dimension ″D″ and cut the
bottom track to this dimension. For best results, use a 32-tooth hacksaw blade and a miter box.
File the rough edges smooth where the bottom track was cut taking care not to mar the finished
surface.
NOTE: If there are curves where the sidewalls meet the threshold, contour the bottom track edges to
match the curves.
Sterling
5
1034034-2-A
Bottom Track Leg Toward
Outside of Shower
Space to Be
Same on
Each End
Bottom Track
2. Locate the Bottom Track
NOTE: The track must sit flat. If the ledge has a curve in the corners or is constructed of fiberglass, it may
be necessary to shape the ends of the track with a file.
Place the bottom track on the flattest part of the ledge with the leg toward the outside of the
shower.
Situate the bottom track so there is an equal gap between each wall and the ends of the track and
temporarily fasten the track to the ledge with masking tape.
Mark the ledge along the front edge of the track with a soft pencil.
1034034-2-A
6
Sterling
If Necessary Shape
Bottom End of Wall
Jamb
Bottom
Track
Anchor
Level
Pencil
Wall Jamb Fully
Engaged with
Bottom Track
Wall
Jamb
3. Mark the Wall Jamb Locations
Position a wall jamb against the wall directly over the bottom track. The wall jamb should sit flat
against the wall.
Slide the wall jamb down over the bottom track until the wall jamb and bottom track are fully
engaged.
NOTE: The wall jamb must sit flat on the bottom ledge. If your ledge has a curve in the corners at the side
wall, it may be necessary to shape the bottom end of the wall jamb with a file.
Use a level to align the wall jamb vertically and mark the hole locations on the wall.
Repeat the procedure with the other wall jamb.
Remove the bottom track and wall jambs.
NOTE: When installing on ceramic tile, use a center punch to nick the surface of the glaze. Tap the center
punch lightly with a hammer to avoid cracking the tile.
Lightly center punch the hole locations.
Drill a 3/16″ hole at each mark. Use a masonry bit for ceramic tile.
Thoroughly clean the shower floor ledge and wall.
Insert plastic anchors in each hole.
Sterling
7
1034034-2-A
Caulk
Here
Groove
Bottom
Track
4. Caulk the Bottom Track
Remove the bottom track from the shower ledge.
Apply a bead of caulk in the groove on the underside of the bottom track.
Apply a second, smaller bead of caulk to the other edge on the underside of the bottom track.
Install the bottom track on the ledge at the marked location.
1034034-2-A
8
Sterling
Measure Here
Top Track
Screw
Cover
Bumper
#8-18 x 1-1/2"
Panhead Screw
5. Install the Wall Jambs
Place a wall jamb over the bottom track. Align the holes in the wall jamb with the holes in the wall.
Secure the wall jamb to the wall with three #8-18 x 1-1/2″ panhead screws.
Repeat with the second wall jamb.
Install screw covers over the top and bottom screws in each wall jamb.
6. Install the Top Track
NOTE: The top track is designed so either side may be positioned facing outward according to your
preference.
Measure the distance from wall to wall at the top of the wall jambs. This is the length to cut the top
track.
Mark the top track at the determined cutting dimension.
NOTE: For best results use a miter box and 32-tooth per inch hacksaw to make the cut.
NOTE: Cut the top track on the inside edge of the mark (1/32″ (1 mm)) to allow space for the top track to
slide into place easily.
Cut the top track.
File the rough edges smooth where the top track was cut, taking care to avoid damaging finished
surfaces.
Position the top track over the wall jambs and gently push down.
Sterling
9
1034034-2-A
#8-32 x 3/8" Hex
Washer Head
Screw
Top Frame
Flange
Outside Panel
Bottom Frame
Leg
#8-32 x 3/8"
Hex Washer
Head Screw
Tap
Bushing
Tab
Roller
Tab
Groove
Handle Side
of Door
Panel Side
Frame
Inside
Panel
Bushing Installed
into the Bottom
Fame
7. Install the Rollers - Outside Panel
NOTE: The steel side of the roller must be installed against the top frame flange.
Place the rollers on the top frame flange. The roller should face the bottom frame leg.
Secure the rollers to the top frame flange with #8-32 x 3/8″ hex washer head screws.
Lay the outside door panel on a flat surface taking care to protect the glass.
Cut two 7/8″ (2.2 cm) long pieces of the provided adhesive tape.
Remove the protective paper from the adhesive side of the tape and attach the tape to the bushings.
With the bushing tab toward the bottom frame groove, pinch the bushing legs together and push
down until the bushing tab snaps into the bottom frame groove.
Locate the bushings 1/4″ (6 mm) from each end on the bottom frame of the outside panel.
8. Install the Rollers - Inside Panel
NOTE: The steel side of the roller must be installed against the top flange frame.
Place the rollers on the top frame flange, facing the handle side of the door panel side frame.
Secure the rollers with #8-32 x 3/8″ hex washer head screws.
1034034-2-A
10
Sterling
Outside Rail
Inside Rail
Outside Panel
Handle Side of
Inside Panel
Toward Inside
of Shower.
Bottom
Track Leg
9. Install the Inside Door Panel
NOTE: Perform these installation steps from outside the shower. Install the inside panel first.
NOTE: When installing the inside panel, lift the panel with the handle side toward the inside of the
shower and slide the rollers into the top track.
Lift the door panel.
Hang the rollers on the appropriate rail on the top track. Make sure the bottom of the door panel
sits inside of the bottom track.
Check the panel for proper alignment and smooth operation.
If adjustment is needed, remove the panel.
Loosen the roller screw(s) and move the roller(s) in the slot to align the panel.
Tighten the screws and reinstall the panel.
Repeat the procedures with the outside door panel.
Align the inside panel with the wall jamb on the showerhead side of the shower.
Sterling
11
1034034-2-A
Inside Panel
Guide Bushing
Installed
Inside
Panel
Bushing
Inside
Panel
Guide
Panel
Frame
Screw
No. 8-18 x 3/8"
Panhead
Screw
Screw
Cover
Pile
Seal
Inside
Panel
Guide
Screw
Cover
Screw
Cover
Bushing
Screw
Cover
Crimp Here on
Each End
10. Install the Seal
Install a bushing into one end of the inside panel guide.
Measure the length of the panel guide, subtract 1″ (2.5 cm), and cut the seal to the resulting length.
Slide the seal into the panel guide.
Install a bushing into the other end of the panel guide.
Use a pliers to crimp each end of the panel guide to keep the bushings from sliding off.
11. Install the Panel Guide
NOTE: Perform these installation steps from inside the shower.
Install the panel guide in the opening in the bottom track.
Align the slots on the panel guide with the holes in the inside bottom frame.
Loosely thread two #8-18 x 3/8″ panhead screws through the guide and into frame. Do not tighten
at this time.
Push the guide all the way into the bottom track.
Lower the guide slightly for clearance and tighten the screws.
Move the panel back and forth along the full width of the opening.
If the panel sticks, loosen the screws and adjust the guide.
Repeat until the door operates smoothly.
Install screw covers over the panel guide screws.
Install screw covers over the four frame screws at the bottom of the panels.
1034034-2-A
12
Sterling
Towel Bar
Install Towel Bar
on Room Side of
Panel
A.
Outside
Panel
Towel Bar
Bracket
Frame
Cover
B.
Inside of
Shower
C.
Inside of shower
#8-18 x 3/4"
Panhead Screw
12. Install the Towel Bar
NOTE: The towel bar is designed for either side to face out.
Determine which side of the towel bar will face out.
Insert a towel bar bracket into each end of the towel bar.
Align the towel bar and brackets on the room side of the outside panel.
Secure the towel bar to the panel with two #8-18 x 3/4″ panhead screws.
Install screw covers over the screws.
13. Final Caulking
NOTE: Thoroughly clean and dry all dust, dirt, and grease from the bottom track and shower ledge
surfaces where caulk will be applied.
Carefully caulk where:
(A) the wall jambs and wall meet inside the shower.
(B) the bottom track and wall jamb join.
(C) the inside of the frame where the wall jambs and bottom track meet.
Allow the sealant to cure following the sealant manufacturer’s instructions before using the shower.
Sterling
13
1034034-2-A
1034034-2-A
1034034-2-A
Phone: 1-888-STERLING (1-888-783-7546)
SterlingPlumbing.com
©2004 Sterling
1034034-2-A