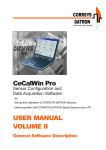
1
Before You Start
1. This guide is for v2.0.1.35 of the iTwin software for Mac Platform. The
Release
Notes
are
available
on
our
website
here
http://www.itwin.com/whatisnew/securebox_release_v2.0.1.35/
2. This guide will show you how to use iTwin on OS X (Snow Leopard,
Lion & Mountain Lion). For Windows user guide, visit our User Manual
page at http://www.itwin.com/userguide.
3.
iTwin requires a fast broadband Internet connection for a good
experience during large file transfers.
Table of Contents
Chapter 1. Your iTwin Device ..................................................................................... 3 Chapter 2. Key Icons of the iTwin Interface .......................................................... 4 Chapter 3. Install iTwin on OS X ................................................................................ 9 Chapter 4. Secure your Files in the Cloud............................................................ 15 Chapter 5. Access your Secured Files from the Cloud .................................... 17 Chapter 6. Share Files for Remote Access............................................................ 20 Chapter 7. Remotely Access the Shared Files .................................................... 21 Chapter 8. Remotely Upload Files .......................................................................... 22 Chapter 9. Prevent Unauthorized Access ............................................................ 24 Chapter 10. Share Files with Groups Using iTwin Multi ................................. 26 Chapter 11. Set File Permissions ............................................................................. 29 Chapter 12. Troubleshooting ................................................................................... 31 2
Chapter 1. Your iTwin Device
Your iTwin device has two identical halves. The two halves can be
connected together via their special connector to form a pair, as shown.
A. iTwin connector
B. USB port connector
C. iTwin activity indicator (LED)
3
Chapter 2. Key Icons of the iTwin Interface
1. iTwin Icon
2. SecureBox Files Icon
3. Local Files Icon
4. Remote Files Icon
4
1. iTwin Icon
In the top right corner of your desktop, locate the iTwin icon in the Menu
Bar. Click on the iTwin icon to activate the iTwin Menu.
From the iTwin Menu you
can access the folders for
SecureBox
Files, Local
Files and Remote Files.
5
2. SecureBox Files Icon
SecureBox Files are files that are encrypted and obfuscated by iTwin
SecureBox (See Chapter 4).
To open this folder at
any time, locate the
iTwin
icon
on
your
Menu Bar in the top
right corner of your
desktop.
Click on iTwin icon to see the iTwin Menu and select the ‘Open
SecureBox Files’ option. This will open the ‘iTwin SecureBox’ folder
below.
6
3. Local Files Icon
Local Files are the files that you are sharing, for access from a remote
computer (See Chapter 6).
To share/unshare a file
or folder, locate the
iTwin icon on your
Menu Bar in the top
right corner of your
desktop.
Click on the iTwin icon to see the iTwin Menu and select the ‘Open
Local Files’ option. This will open the ‘Local Files’ folder below.
7
4. Remote Files Icon
Remote Files are the files that the remote computer is sharing with you
(See Chapter 7).
To access files from the
remote computer or
upload files to it, locate
the iTwin icon on your
Menu Bar in the top
right corner of your
desktop.
Click on the iTwin icon to see the iTwin Menu. and select the ‘Open
Remote Files’ option. This will open the ‘Remote Files’ folder below.
8
Chapter 3. Install iTwin on OS X
NOTE: iTwin SecureBox works as an
add-on to the DropboxTM desktop
application. Install DropboxTM on your
computer and login to your account,
to use iTwin SecureBox. If you want
to use only Remote File Access, there
is no need to install DropboxTM.
1. Join together the two halves of your iTwin device, to form a pair, and
then insert the paired device into a USB port on your computer. Open
your Finder window. In ‘Devices’, click the ’iTwin’ CD-ROM device.
Click ‘LaunchiTwinMac’ Icon to begin the installation.
NOTE: If you do not see ‘LaunchiTwinMac’ the installation process is
slightly different. Please visit our Mac Installer page for more details
http://www.itwin.com/mac/installer/installation_guide
9
An iTwin splash screen will appear.
2. During the time that the splash screen is visible, iTwin downloads the
latest version of the iTwin software suitable for your computer. Press
‘Accept and Install’ to accept iTwin’s End User License Agreement and
install the software on your computer.
10
You iTwin software installation will complete in a short time. Unplug
and re-plug the device to start using iTwin.
Follow the on-screen instructions to initialize your iTwin device and
associate it with your DropboxTM account. The association with
Dropbox TM is only for using iTwin SecureBox. Without the
DropboxTM association, you can continue to use iTwin for Remote File
Access.
3. Name your iTwin device. This helps you to identify the device,
especially when more than one device is plugged into your computer
(See Chapter 10).
11
4. Set a password for the iTwin device if you wish to use 2-factor
authentication for extra security. This step is optional and is available
only when the iTwin device pair is being initialized.
5. Associate your iTwin device with your DropboxTM account if you would
like to use iTwin SecureBox. Else, skip this step.
12
6. Note the Disable Code for your iTwin device. In case you lose one half
or both halves of your iTwin device, you can prevent unauthorized
access to your files by disabling the iTwin device by entering this
Disable Code in the iTwin Remote Disable Web-Centre.
7. The installation of iTwin and the initialization of your iTwin device is
now complete - your iTwin device is ready for use, for SecureBox
and/or Remote File Access!
13
8. If you intend to use iTwin only for SecureBox and not for Remote File
Access, then unplug the paired iTwin device and separate the two
halves. These two halves will now act as your iTwin SecureBox keys. We
suggest keeping one key in a safe place. Carry the other key with you.
9. If you intend to use iTwin for Remote File Access too, then unplug only
one half from the computer - carry that half with you - and leave the
other one plugged in.
14
Chapter 4. Secure your Files in the Cloud
Insert your iTwin SecureBox key into a computer on which your DropboxTM
account is in use. The iTwin SecureBox folder will pop up.
1. Drag or copy files/folders into the iTwin SecureBox folder.
• These will be auto-encrypted and their filenames will be obfuscated.
• The encrypted version will be auto-added to the local DropboxTM
folder, in a folder named ‘iTwin SecureBox - <your device name>’,
which was created during the association of iTwin with your
DropboxTM account. Do not manipulate this folder in any way,
You can see the contents of an iTwin SecureBox folder below. All files
have a file overlay with a lock symbol . This indicates that the file is
encrypted and intact. Files can be edited, deleted and renamed in this
folder.
15
2. DropboxTM will, as usual, automatically sync the newly added
encrypted files to your account’s cloud storage.
3. The encrypted files will also, as usual, sync downwards to all other Mac
or PC clients using your DropboxTM account.
16
Chapter 5. Access your Secured Files from the Cloud
1. To access your SecureBox files,
insert your iTwin SecureBox key into
a
computer
on
which
your
DropboxTM account is in use.
2. If iTwin is not installed on the
computer,
install
iTwin
(See
Chapter3). The iTwin SecureBox folder will open and you will see the
decrypted files.
3. When you unplug the iTwin SecureBox key, the SecureBox folder will
close and only the encrypted files will remain in your local DropboxTM
folder. No decrypted copies will remain on your computer, after the
iTwin SecureBox key has been unplugged.
Sometimes you will see that a file’s overlay is a red cross
17
instead of
the black lock . The red cross indicates that either DropboxTM has not
finished syncing that file completely or that the file was not encrypted
using iTwin SecureBox.
If the latter case, it could be that the file was added directly to the
‘iTwin SecureBox - <your device name>’ folder (within your DropboxTM
folder) instead of being added through the iTwin SecureBox folder.
This means the file was not encrypted using an iTwin and so, it cannot
be decrypted or read or deleted using iTwin. This causes the
symbol.
If the ‘iTwin SecureBox - <your device name>’ folder was not directly
manipulated, then a
over a file indicates that the file is busy being
synchronized. Simply wait until DropboxTM completes the file sync and
when the file is synced, the file overlay will be a black lock .
4. You can copy a file from the iTwin SecureBox folder to your computer
by dragging and dropping it into a location of your choice. iTwin will
decrypt the file using your iTwin SecureBox key before copying it on to
your computer. Any file in iTwin SecureBox folder can also be directly
edited, deleted, renamed, opened and saved using the appropriate
application for the file.
18
Final Notes on iTwin SecureBox (Chapters 4-5):
1. The full paired device is intended to be plugged in only to do the
association with DropboxTM, during which the two halves generate and
share crypto information, making them a ‘paired’ set of SecureBox keys.
2. We strongly suggest keeping one of the iTwin SecureBox keys in a safe
place, as a backup key (but if intending to use Remote File Access too,
ensure that the computer in which one key is left plugged in is in a safe
place). PLEASE NOTE THAT IF BOTH KEYS ARE LOST, THERE IS
NO WAY TO RECOVER YOUR SECUREBOX DATA.
3. iTwin SecureBox creates a special folder in your local DropboxTM folder,
to store the encrypted data. If you look in your DropboxTM folder via a
browser or the DropboxTM desktop application, you will see the
encrypted files/folders, with obfuscated names, within a folder named
‘iTwin SecureBox - <your device name>’. Do not modify, delete or
in any way manipulate the folders/files within this folder.
The contents of this folder are to be managed exclusively via the iTwin
SecureBox folder (only visible when a ITwin SecureBox key is plugged
in). Any unauthorized modifications to this folder via a browser or the
DropboxTM desktop application will be detected and flagged.
19
Chapter 6. Share Files for Remote Access
1)
Plug in one half of an iTwin into a computer (let’s refer to it as
computer ONE) and open ‘Local Files’ folder via the iTwin icon in Menu
Bar.
2)
To share, drag & drop your files & folders into the iTwin ‘Local
Files’ folder. You can drag and drop entire drives if you wish to
remotely access them. All files dropped here will be accessible from
‘Remote Files’ folder on the computer (let’s refer to it as computer
TWO) into which the other half of the iTwin is plugged.
3)
Leave the half plugged into computer ONE.
4)
Leave computer ONE powered on & connected to the Internet.
5)
Use the other half to access the files from any remote computer
(that is, computer TWO).
To unshare a file or folder, right click on the relevant file or folder within
‘Local Files’ folder right click on the file or folder and select iTwin ->
Unshare OR select the file or folder and drop it in Trash.
20
Chapter 7. Remotely Access the Shared Files
1) With one half of iTwin plugged into computer ONE (from which files
have been shared), plug the other half into another online
computer (computer TWO). Open the ‘Remote Files’ folder via the
iTwin icon in Menu Bar. It will show the files shared from computer
ONE.
2) Access and/or edit the files or folders, as usual, by clicking on them
directly.
3) To copy over the shared files & folders onto computer TWO, drag &
drop them from the ‘Remote Files’ folder onto the desktop or any
other folderon computer TWO. The files will be copied to that
location.
21
Chapter 8. Remotely Upload Files
You can also upload or transfer files to an online computer on which iTwin
software is installed and to which the other half of the iTwin key is
attached (that is, computer ONE).
1) With one half of iTwin plugged into computer ONE, plug the other
half into another online computer (computer TWO). Open the
‘Remote Files’ folder via the iTwin icon in Menu Bar.
2) Drag & drop the files & folders you want to upload into any of the
folders in the iTwin ‘Remote Files’ folder. The files will now be
securely uploaded to the corresponding folder on computer ONE.
3) If you drag and drop files into the top level of the ‘Remote Files’
folder, they will be copied and deposited on the computer ONE’s
desktop. Use this feature with care.
22
Final Notes on Remote File Access (Chapters 6-8):
1. The computer from which files are initially shared is referred to here as
‘computer ONE’.
2. The computer from which the shared files are initially accessed is
referred to here as ‘computer TWO’.
3. The steps above show you how to share from computer ONE, remotely
access the shared files from computer TWO and how to upload files
from computer TWO to computer ONE.
4. These steps can be applied both ways. That is, you can,
simultaneously , share files from computer TWO, to be accessed
remotely from computer ONE. That is, iTwin provides Bi-directional
remote file access .
5. Both halves of iTwin are identical and thus, the functionality is identical
too.
23
Chapter 9. Prevent Unauthorized Access
In case of loss of one or both halves of your iTwin, disable your iTwin
device to prevent unauthorized access to your data. During the install
process explained in Chapter 3, you saw some of the safeguards available.
Below is a detailed explanation of each.
1) Remote Disable
Click the iTwin icon in the Menu Bar and select ‘Set Security Options’
followed by ‘Show iTwin Disable Code’.
So, if you have lost one half, you can prevent unauthorized remote
access to your files by entering the Disable Code in the iTwin
Remote Disable Web-Centre and the iTwin backend will block
(within 90 sec) the lost half from being used to remotely access your
files. If you have files in SecureBox copy them over to your computer
before you disable the device if necessary. You will not be able to
access them once the device is disabled.
We recommend that you note the Disable Code and save it in a safe
place or send a copy of the code to your email account for later use.
24
2) Password
When you plug in the paired iTwin device, you will be provided with
the option to set a password for an additional layer of security. Once
set, the password will be required to use your iTwin. Please note that
we do not store your password in any server or your computer. The
password is stored in the two halves of the iTwin device only and is not
recoverable if forgotten. To change the password or reset it, you will
have to pair the two halves again and re-initialize the device.
You will lose access to any data you have saved in the
cloud using iTwin SecureBox when you re-initialize the
device pair.
3) Manual Disconnect
If you are sharing files for remote access and lose one half, unshare all
the shared files and then unplug the other half from your computer.
Your files can no longer be remotely accessed through the
compromised half of the device.
You can buy a new iTwin half and pair it with the one you have.
Initializing this new pair dissolves the keys in the old pair and allows
you to safely use the device again.
25
Chapter 10.
Share Files with Groups Using iTwin
Multi
Multiple iTwins can be used on a computer, to simultaneously share files
with multiple people. We call this the ‘iTwin Multi’ feature.
To share files with a group of people you will need multiple iTwin devices,
one for each person and a central computer from
where files will be shared.
1. Install iTwin and initialize iTwin pairs one after
another on the central computer. Set a different
name for every iTwin device you use to help you
identify it later. For e.g. If John wants to share a
folder with Alice and Bob, he can name them
‘John-Alice’ and ‘John-Bob’ .
2. Separate one half of each pair after the initialization and distribute the
corresponding halves to each member of the group. e.g. John gives
one half of ‘John-Alice’ iTwin device to Alice, and keeps the other half
26
plugged into the central computer. The same
way he gives one half of ‘John-Bob’ to Bob and
keeps the other half plugged in.
3. Leave the central computer powered on and
connected to the Internet.
4. Drag and Drop, the files/folders you wish to
share with each person, into the corresponding
iTwin device’s ‘Local Files‘.
• Share the same folder will all the members
if you want them all to have access to the
same folder. You could also share different
files with different persons, as required.
• With iTwin file permissions (See Chapter
11) you can restrict permissions of some members to ‘Read Only’
even if you are sharing the same folder with all members.
5. When a group member plugs her half of iTwin into her computer she
will see the ‘Remote Files’ folder.
• She will then be able to access files or folders shared from the
central computer.
• She will also be able to upload files to the central computer if she
has not been denied the permission to do so.
e.g. If John shares the same folder called ‘Accounts’ with Alice and Bob,
both Alice and Bob can access all the contents of the folder and upload
files to this folder. Files uploaded by Alice can be accessed by John and
Bob as well.
6. Access options for the different devices via the iTwin Menu.
27
7. You will find a ‘Blink Red’ menu item when you use iTwin Multi to help
identify each iTwin device. This is a useful feature when you want to
pull out a specific device and leave the rest in. The LED on the named
iTwin will flash a red light for easy identification.
Note:
“iTwin Multi” was a free up-grade released in Dec 2011.
The limit on number of devices simultaneously plugged into a computer is 20.
28
Chapter 11.
Set File Permissions
This section describes how to set file permissions for shared files.
• A Read-Only file cannot be renamed, edited or deleted by a user
from a remote computer.
• Making a folder Read-Only makes all files and folders inside the
folder Read-Only.
• A remote user cannot rename, delete, edit or create new files
inside a Read-Only Folder.
Right-click on any file/folder within the iTwin ‘Local Files’ folder and
select ‘Get Info ‘.
To allow Read-Only access to that file/folder, click the ‘Read-Only’check
box.
29
Note:
The default setting is to allow the remote user full editing rights (rename/read/write/delete).
To change back from Read-Only to full editing rights, uncheck the “Read-Only” check box.
30
Chapter 12.
Troubleshooting
If you encounter any problems using iTwin, please do the following:
1. Check your Internet connection.
2. Unplug iTwin and re-plug into your computer.
3. For more support, email [email protected].
4. You can also visit help.iTwin.com
31
iTwin Pte. Ltd.
© 2012 iTwin Pte. Ltd. All rights reserved.
This manual may not be copied, in whole or
in part, without the written consent of iTwin.
The iTwin logo is a trademark of iTwin
Pte Ltd., registered in Singapore. Use of
ITwin logo for commercial purposes without
the prior written consent of iTwin may
constitute trademark infringement and
unfair competition in violation the law.
Every effort has been made to ensure
that the information in this manual is
accurate. iTwin is not responsible for
printing or clerical errors.
Other company and product names
mentioned herein are trademarks of their
respective companies. Mention of thirdparty products is for informational purposes
only
and
constitutes
neither
an
endorsement nor a recommendation. iTwin
assumes no responsibility with regard to the
performance or use of these products.