1
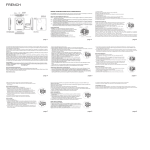
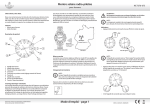
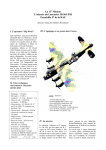
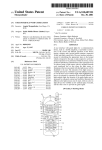
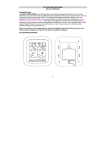
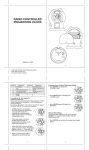
MULTIBAND
TRAVEL CLOCK
WITH
INDOOR-THERMOMETER
TRAXEL-X
USER'S MANUAL
IROX RC305EL MANUAL (English)
SIZE: W65 X H105 (mm)
BY EMILY TSOI 15/05/06
TABLE OF CONTENTS
INTRODUCTION
PRODUCT OVERVIEW
ALL SEGMENTS DISPLAY OVERVIEW
GETTING STARTED
BATTERY INSTALLATION
ATOMIC TIME RECEPTION
CALENDAR AND CLOCK
DISPLAY MODES
MANUAL SETTINGS
TIME ZONE
DST (Daylight Savings Time) MODE
RF RECEPTION MODE
RADIO SIGNAL RECEPTION ICON ( )
INTERFERENCE
ALARMS
SNOOZE/LIGHT
INDOOR TEMPERATURE
LOCK KEY SWITCH
PRECAUTIONS
SPECIFICATIONS
2
3
3
7
7
7
7
8
8
9
10
10
11
12
12
13
13
14
14
15
INTRODUCTION
Thank you for selecting the TRAVEL-X International
Travel Clock. This device includes precise time keeping,
temperature monitoring and other neat features that you
can use from the comfort of your home or on the road
while traveling.
The travel clock is capable of setting its time and date
to the precise radio controlled time in any of the three
world regions – North America, Europe and Japan.
In this package you will find:
• One Multi-Band Atomic Time Travel Clock
• One Travel Pouch
• One User Manual
Please keep this manual handy as you use your new
item. It contains practical step-by-step instructions,
as well as technical specifications and precautions
you should know.
PRODUCT OVERVIEW
FEATURES
* Precise time and date set via RF signals from any
of three different world’s regions – North America,
Europe and Japan
* Ability to receive the atomic time signal from
WWVB, DCF, MSF, HBG, JJY40 and JJY60
frequency bands
* Auto scan of the radio controlled time frequency
bands
3
* Major country band pre-set
* Calendar displaying date with month
* User-selectable calendar format
* Indoor Temperature display in Celsius or Fahrenheit
* User-selectable 12 or 24 hour time format
* Day of the week display in English, German, French,
Italian, Spanish or Dutch
* Dual crescendo alarm with snooze
* Daylight Savings Time manual adjustment
* Enhanced Backlight
* Low Battery Indicator
* Keyboard interlock
* Folded travel size or opened for desktop view
REAR VIEW
C
D
E
F
FRONT VIEW
A. MULTI-BAND RADIO CONTROLLED TIME
CLOCK WITH INDOOR TEMPERATURE
A
AUTO
USA
UK
EUR
SWISS
JP E
JP W
B
MULTIBAND
ALARM
B. ALARM BUTTON
* Allows toggling between CLOCK and ALARM
display modes
* Enables or disables WEEKLY or SINGLE alarm
C. MODE BUTTON
* Allows toggling between different display modes
(TIME, DST SETUP, TIME ZONE
ADJUSTMENT, RECEPTION MODE
SELECTION)
D. C°/F° BUTTON
* Selects the Indoor temperature display format in
Celsius or Fahrenheit.
E. BATTERY COMPARTMENT
*Accommodates one (1) CR2032 button battery.
F. UNFOLDING TABLE STAND SUPPORT
* Keeps the unit in an upright position on a flat surface.
5
4
ALL SEGMENTS DISPLAY OVERVIEW
TOP VIEW
J
H
SNOOZE
•
h
G
ig e
f
b
LIGHT
I
G. UP (+) BUTTON
* Increases all function parameters
* Selects the date display format (date-month or
month-date)
* Activates Single or Weekly Alarm in ALARM
mode
H. DOWN (–) BUTTON
* Decreases all function parameters
* Sets the language for the day of the week
* Activates the radio controlled time receiver
* Enables or disables any of the alarms
I. LOCK SWITCH
* Locks all operation buttons while traveling
preventing the battery drain
J. SNOOZE/LIGHT BUTTON
* Activates snooze function and EL backlight
6
c
a
d
a. Time with seconds
b. Date in month/date or date/month format
c. Indoor temperature in °C or °F
d. RF reception type icon
e. Single Alarm icon
f. Weekly Alarm icon
g. Key lock indicator
h. RF reception strength indicator
i. Low battery indicator icon
GETTING STARTED
BATTERY INSTALLATION
* Open the battery compartment door.
* Install one CR2032 (3V) button battery matching the
polarity as shown in the battery compartment.
* Replace the battery compartment door.
ATOMIC TIME RECEPTION
Immediately after the battery installation, the clock will
beep once and display all available segments. Then the
unit’s receiver will start to automatically scan for any
available radio controlled time signal.
If the synchronization is successful, the relevant world
region will be underlined and stay visible on the display.
7
Once the atomic time signal is received, the date and time
will be set automatically, and the [ ] icon appear above
the second digits, on the upper right corner of the display.
If the time signal has not been received in 15 minutes,
refer to the directions for setting the time and date manually.
CALENDAR AND CLOCK DISPLAY MODES
The International Travel Clock has four different display
modes which may be accessed by pressing the MODE button:
* TIME mode (HOUR/MINUTES/SECONDS)
* TIME ZONE SETTING mode
* DST (Daylight Savings Time)
* RF RECEPTION mode
MANUAL SETTINGS
If you choose to disable the atomic time signal reception,
please follow the steps below to set the clock manually.
TIME
* Select the TIME (Hour/Minutes/Seconds) display
mode by pressing the MODE button
* Press and hold the MODE button
for 3 seconds until M (month) and
D (date) begin to flash.
* Press UP (+) or DOWN (–) to select the desired
calendar format – MM/DD or DD/MM.
* After the calendar format is
selected, press the MODE
button to move to the next
parameter. The PM abbreviation
will flash in the top left corner
right under the DST icon.
* Press UP (+) or DOWN (–) to select 12 or 24 hour time format.
* Press the MODE button to enter
into the day of the week selection
mode – the abbreviation “EN”
will flash on the lower right
corner of the display.
* Press UP (+) or DOWN (–) to select the language for
day of the week – English, German, French, Italian,
Spanish or Dutch.
* Press MODE button to enter into
the programming mode of the
time display format – the seconds
digits will flash.
* Press UP (+) or DOWN (–) to adjust seconds, minutes,
hour, year, month and day
* Press the MODE button for the last time to confirm the
settings after the last parameter is set.
TIME ZONE
PROGRAMMING THE TIME ZONE
* Select the Time Zone display
mode by pressing the MODE
button – “ZONE” abbreviation
will be displayed on the lower
left corner next to “DST” and “-8h”
* Press and hold the MODE
button until “-8h” flashes.
* Use the UP (+) or DOWN (-)
buttons to change the TIME
ZONE hour in +/- 12 hour range
Example: If the atomic time received from the Atomic
Clock located in Japan (JJY60) is 3:00pm (Japan time)
and the TIME ZONE is set to +8 hours (Hong Kong
Time Zone), then the local time display will be 2:00pm
If “ON” or “AUTO” is selected, the clock will
automatically synchronize with the Daylight Savings
Time in spring and fall. If Daylight Savings Time
does not apply to your geographic area, an “OFF”
setting has to be selected.
* Press the MODE button to confirm the settings and
return to the default LOCAL TIME display.
8
9
DST (Daylight Savings Time) MODE
Daylight Savings Time mode control gives the opportunity
to adjust the clock’s time to Daylight Savings automatically,
manually, or turn off this feature completely.
SINGLE COUNTRY RF BAND RECEPTION (SEL)
* Once the SEL (Single Country
Band reception) is selected, the
abbreviation SEL will flash
with AUTO and all countries
abbreviations underlined.
* Press UP (+) or DOWN (-) selecting the desired single
reception band – WWVB-60(US), MSF-60(UK),
DCF-77.5(EUR), HBG-75(SWISS), JJY40(JPE)
or JJY60 (JPW).
* Once the desired band is selected, press the MODE
button to confirm. The relevant country abbreviation
will be underlined and will remain on the display.
* Press the MODE button to select
the Daylight Savings Time (DST)
mode. The mode is selected
correctly if the abbreviation “DST”
is displayed on the top left corner of the display and the
word “Auto” is on the top right one.
* Press and hold the MODE button until the “DST” and
“Auto” will flash
* Press UP (+) or DOWN (-) buttons selecting the setting
for Daylight Savings Time – ON, OFF or Auto.
* After the desired setting is selected press the MODE
button to confirm the selection.
If the “ON” or “AUTO” is selected, the clock will
automatically synchronize with the Daylight Savings
Time in spring and fall. If Daylight Savings Time does
not apply to your geographic area, an “OFF” setting
has to be selected.
RF RECEPTION MODE
RECEPTION MODE SELECTION
You can choose between the auto-scan, single-band
reception and RF reception OFF modes.
* Enter the RF RECEPTION mode
by pressing the MODE button until
the abbreviation “SEL” is displayed.
* Press and hold the MODE button
for 2 seconds – the reception icon [ ] will start to flash
along with the line above AUTO.
* Press UP (+) to select the auto-scan (AUTO), singleband (SEL) or reception OFF (OFF).
* Press MODE to confirm the selected reception type.
10
MANUAL ACTIVATION OF THE RADIO
CONTROLLED TIME SIGNAL SEARCH
Press and hold the UP (+) button in any mode - the unit
will beep once and the reception bars will appear above
the reception icon.
DISABLING THE ATOMIC RADIO
CONTROLLED TIME SIGNAL SEARCH
Press and hold the DOWN (–) button in any display mode –
the unit will beep once and the reception bars will disappear
from the left corner, leaving just a dot reception icon.
RADIO SIGNAL RECEPTION ICON ( )
Once the reception mode is activated, the radio reception
[ ] icon will start flashing. The wave above the dot icon
shows the radio signal reception strength. The strength
of the reception is shown in the range from zero (weakest)
to six (strongest) bars.
Once the reception mode is activated, the International
Travel Clock will search for the atomic time signal for
about 15 minutes.
An auto activation takes place twice a day at 1:05AM and
3:05AM, the manual activation may occur at any time
after pressing and holding the UP (+) button until the
reception icon appears.
11
INTERFERENCE
The radio signal reception can be affected by a number of
different factors - from surrounding building materials
to the weather conditions.
For the optimum reception please consider that:
* During the night-time hours atmospheric disturbances
are typically less severe and radio signal reception may
improve. A single daily reception is sufficient enough to
keep the clock accuracy within 1 second.
* Make sure the unit is positioned at least 8 feet (2 meters)
away from any interfering source such as a TV, computer
monitor, microwave, etc.
* Within concrete wall rooms such as basements or office
buildings, the received signal may be weakened. Always
place the Clock near the window for better reception.
ALARMS
The International Travel Clock has two alarms –
Weekly [
] and Single [
]. If either of the alarms
is activated, it will sound at the set time and the alarm
icon will flash Mondays through Fridays.
SETTING THE ALARM
To set any alarm,
* Press the ALARM button to
select the ALARM mode. The
default setting is the Weekly
Alarm. If the Weekly Alarm is off,
the icon
along with “OFF” will be displayed.
* Press the UP (+) button to select
“7:00”, entering into the alarm
time setting mode.
* Press and hold the ALARM
button for two seconds.
The hour digit will flash.
12
LOCK SWITCH
Slide the LOCK switch to the direction shown on the unit the lock symbol [ ] will appear on the display meaning
that all of the unit’s operation keys are locked.
PRECAUTIONS
This product is engineered to give you years of satisfactory
service if handled carefully. Here are a few precautions:
* Do not immerse the unit in water.
* Do not clean the unit with abrasive or corrosive materials.
They may scratch the plastic parts and corrode the
electronic circuits.
* Do not subject the product to excessive force, shock,
dust, temperature, or humidity, which may result in
malfunctions, shorter lifespan, damaged batteries, and
damaged parts.
* Do not tamper with the unit’s internal components.
Doing so will invalidate the warranty and may cause
damage. The unit contains no user-serviceable parts.
* Use only fresh batteries.
* Read the user's manual thoroughly before operating
the unit.
14
* Adjust the hour by pressing the DOWN (-) or UP (+)
buttons. Press and hold (-) or (+) buttons for faster
digits adjustment.
* Press the ALARM button to confirm the Alarm time.
* Press the DOWN (-) button to activate the Alarm: an
icon [
] will appear on the display above the alarm
time with the word “ON” below the alarm time
* Repeat the same procedure to set a Single Alarm,
selecting it by pressing the UP (+) button. If the Single
Alarm is off, the default alarm time “8:00 OFF”
with
will be displayed.
DISABLING THE ALARM
* Press the ALARM button to enter into the desired
ALARM mode
* Press the DOWN (–) button to disable the selected alarm.
The icon [W or S] will disappear from the unit’s display.
SNOOZE/LIGHT
When the alarm sounds, press the SNOOZE/LIGHT
button to temporarily stop the alarm and activate the
backlight for 5 seconds. After the SNOOZE/LIGHT
button is depressed, the alarm sound will resume in five
(5) minutes.
NOTE: If the battery power is low, the backlight cannot
be activated. So, the battery needs replacement.
INDOOR TEMPERATURE
The indoor temperature shares the same display’s line with
time. The temperature reading is updated every minute.
NOTE: If the indoor temperature goes above or below
the operating range stated in the specifications, the
display will show “HH” or “LL” respectively.
Press the °C/°F button to select the temperature in
Celsius or Fahrenheit.
13
SPECIFICATIONS
Calendar and Clock
Auto and manual selection of frequency bands for major
countries – US, UK, EUR, SWISS, JPE, JPW
Daylight Savings Time (DST) control
12/24 hour display in HH/MM/SS format
User-selectable date format: month/day or day/month
Dual 2 minute crescendo alarm with 5 minutes snooze
23 World Time Zones control
Enhanced Orange Backlight duration: 5 seconds
Keyboard lock
Indoor Temperature
Mesure range: -5°C to +50°C/23°F to 122°F
Temperature resolution: 0.1°C/0.2°F
User-selectable (F° or C°) temperature display
Power
1 CR2032 size 3V battery (included)
Battery life – 1 year
Dimensions
3.78(L) x 2.08(H) x 0.24(D) inches
15