1
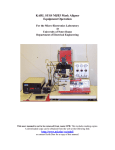
Thursday January 30, 2003
Home : Matdev » Lab » Dox » AET-RTP »
AET THERMAL RTA
SYSTEM OPERATION
MANUAL FOR
ANNEALING OF THIN
FILMS
By Paul Keir
Sept. 26, 1996
and revised by Jeff Bender
July 4, 2001
(Reference Persons: Jeff
Bender, Randy Hoffman)
Department of Electrical
and Computer
Engineering
Oregon State University
1 INTRODUCTION
The AET THERMAL RX SERIES Rapid Thermal Annealing (RTA) system is a
modern, computer controlled annealing system. The RTA system is used to
anneal thin films and devices at high temperatures for relatively short periods of
time. The maximum temperature that this system is capable of annealing at is
1200 C. The system is water-cooled to quickly bring the system down from
elevated temperatures to room temperature. Presently, the system is set up to run
forming gas (10 % H2 / 90 % N2 mixture), O2, Ar, N, or an O2/Ar mixture during
the annealing cycle. Additional non-toxic gases may be procured and used with
the system, if necessary.
2 OPERATION
2.1 Preliminaries
The RTA system does not allow the user to open the door to the chamber until
several preliminary steps have been performed. The preliminaries are as follows:
1.
Turn on the computer monitor.
•
The monitor on/off switch is on the rear right hand side of the
monitor screen.
2.
If the computer is not turned on or is at the MS-DOS prompt, perform
the following actions:
(a)
Turn the computer on by hitting the round blue switch on the CPU case.
(b)
Press the
(c)
CAPS LOCK
button on the computer keyboard.
Type ``RTP'' at the C: DOS prompt to activate the system control
software.
3.
Login to the system by entering your user name and password.
•
•
If you do not have a user name and password, you are not
authorized to use this system.
To obtain a password, inform an RTA system guru that you need
to be trained on its use. These are currently Randy Hoffman and
Jeff Bender.
4.
Select the ``RUNS'' option (number 2) from the main menu.
5.
Select the ``ADD A NEW RUN'' option from the submenu.
6.
The system will ask for a ``WAFER #'' to identify the process run. This
can be any text but must be unique. Some hints for entry of the data are:
•
If 0 or
main menu.
•
If ? is entered, the software will provide a list of all wafer
numbers currently on record.
If you do not plan to store the run to the hard drive, you may
simply enter a dummy wafer ID.
•
BLANK
is entered, the system will exit to the
7.
The system will now ask for a ``RECIPE'' to tell it which process
sequence to run.
•
If 0 or
main menu.
•
If ? is entered, the system will display a list of available
recipes.
If the recipe that you seek is not currently available, consult an
RTA system guru to create the required recipe.
•
BLANK
is entered, the system will exit to the
8.
Press
ENTER
several times to accept the default options.
9.
The system will now display the ideal temperature and gas cycles versus
process time for the selected recipe.
•
Press ENTER to proceed.
10.
A schematic of the RTA system should now be displayed.
•
•
•
There should be several options displayed in the lower left corner
of the screen.
``SYSTEM READY'' should be displayed in the lower right-hand
corner of the screen
If this recipe is incorrect, the
to the main menu.
0
key should be pressed to exit
11.
Turn on the RTA by pressing the large green start button on the front
face of the system.
12.
Turn on the cooling water RETURN valve located behind the RTA
system.
13.
Turn on the cooling water SUPPLY valve located behind the RTA
system.
14.
Check that the compressed air supply valve is open.
15.
Connect the desired process gas to the gas inlet on the back left of the
RTA system.
•
•
•
Use a wrench to tighten the Swagelok fittings just slightly past
finger tight.
Turn on the main valve of the gas tank. The pressure on the low
pressure side of the regulator should be no more than 30 psi.
Note: the mass flow controller which should adjust the gas flow
rate is not currently operating properly. Until the problem is
fixed, the gas flow needs to be set by adjusting - carefully! - the
regulator on the gas tank. The flow rate will be displayed on the
screen after the process has been started.
2.2 Operation
Now, the system should be ready to operate. The procedure for loading the
sample and running the experiment are as follows:
1.
Slowly open the door to the chamber by gently lifting the handle and
pulling outwards.
•
It is important to gently open the chamber door because the
sample holding wafer is not affixed to the chamber and could
easily fall out of place.
2.
Place the sample on the silicon wafer resting on the RTA sample tray.
•
•
It is very important to make sure that the two thermocouples are
properly situated. The left thermocouple should be in contact
with the 4'' silicon wafer; the right thermocouple should be in
contact with the top of the sample you are annealing. If this is not
the case, the system will not be able to properly read the
temperature inside the chamber; this may even lead to
overheating severe enough to melt your sample.
It is also important to NEVER RTA SAMPLES WITH
ORGANIC MATERIAL (e.g. PHOTORESIST).
3.
Gently close the door to the chamber, remembering to pull up on the
handle while closing the door.
4.
Press the number corresponding to the
START
the lower right hand corner of the screen) and hit
the process.
button (displayed in
ENTER
to begin
5.
Press
followed by
ENTER
to cancel the process.
6.
The screen should display the ideal recipe screen seen previously.
7.
The process should now begin its cycle.
•
•
•
The measured process data will be displayed as the process runs
its course.
An RTA system guru should be notified if any major deviations
( 25%) from the ideal process occur.
RECORD THE TIME, USER NAME, RECIPE AND GAS
USED, AND MOST IMPORTANTLY THE MATERIAL
BEING RTAed (chemical formula!) IN THE RTA USAGE LOG
(located on the computer stand).
2.3 System Shutdown
Following completion of the process, it is necessary to shut down the RTA and
remove the annealed sample from the RTA chamber.
1.
When the system has finished with its cycle, the system schematic screen
should be displayed.
•
The actual temperature inside of the RTA chamber should be
displayed inside the bow representing the RTA chamber.
2.
When the chamber has cooled below 100 C, the sample should be
removed.
•
•
Press 0 to stop the compressed air and unlock the chamber
door.
Remember to GENTLY open and close the RTA door while
removing your sample.
3.
The software will ask if you wish to save your run. Normally, answer
N .
4.
The software will ask if you want to start again.
•
If you want to run the same recipe again, press Y . The
computer returns to the wafer identification screen. Load a new
sample, and proceed as above.
•
If you want to run a different recipe, press N . The computer
returns to the ``RUNS'' menu. Load a new sample, and proceed as
above.
•
If you are done using the tool, press N . The computer
returns to the ``RUNS'' menu. Proceed with the shutdown
procedure below.
5.
Press
0
to return to the main menu.
Press
X
to return to DOS or
6.
0
to return to the User ID screen.
7.
Turn off the computer monitor (leaving the computer on).
8.
Turn off the cooling water SUPPLY valve.
9.
Turn off the cooling water RETURN valve.
10.
Turn off the gas cylinder.
11.
Leave the air on.
12.
Turn off the RTA system by pressing the round red ``STOP'' button on
the front of the system.
About this document ...
This document was generated using the LaTeX2HTML translator Version 97.1
(release) (July 13th, 1997)
Copyright © 1993, 1994, 1995, 1996, 1997, Nikos Drakos, Computer Based
Learning Unit, University of Leeds.
The command line arguments were:
latex2html -t AET THERMAL RTP User Manual -split 0 show_section_numbers -no_navigation AET-RTP.tex.
The translation was initiated by bossman bossman on 7/4/2001
bossman bossman
7/4/2001
Copyright © 2003 OSU College of Engineering. Comments: [email protected]
Page last modified: 02/13/02. Oregon State University - Web Disclaimer
Committed to Diversity