1
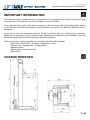
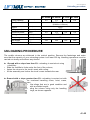
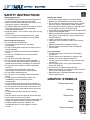
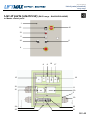
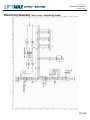
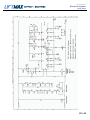
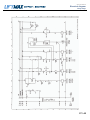
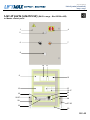
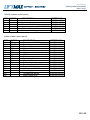
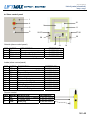
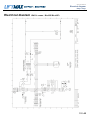
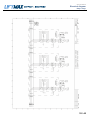
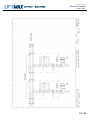
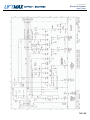
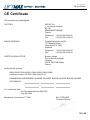
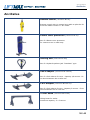
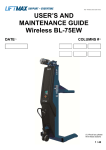
AUS - Users Guide v0 USER’S AND MAINTENANCE GUIDE DATE (1) COLUMNS N° (1) (1) Would you please fill in these sections 1 / 40 AUS - Users Guide v0 Contents CONTENTS EASY EASY+ Important information Characteristics Unloading procedure Safety instructions Graphic symbols page 3 page 3 page 4 page 5 page 5 page 3 page 3 page 4 page 5 page 5 Setting up Description Lifting procedure page 6 page 7 page 8 page 6 page 11 page 12 Trouble shooting Maintenance page 10 page 16 page 14 page 16 List of parts (mechanical) List of parts (electrical) Electrical diagram page 18 page 20 page 23 page 18 page 28 page 31 CE certificate Warranty Ancillaries Contact us page 36 page 37 page 38 page 40 page 36 page 37 page 38 page 40 2 / 40 AUS - Users Guide v0 Important information - Characteristics IMPORTANT INFORMATION This manual must be considered as an integral part of the equipment and must be red before using the equipment. Therefore do not lose it and keep it in good condition. Read carefully all the safety instructions contained in this manual as well as the safety labels applied on the columns. Maintain these labels in good condition and replace any label that become loose or damaged. Learn how to use your equipment correctly. Do not let anyone else use it without prior instruction. Maintain your equipment in good working order. Unauthorised modifications are forbidden. they may shorten its working life and immediately terminate the guarantee. Static and dynamic tests are carried out according to the EN 1493 standard: - Static test: overload 50% - duration of application: 1 hour; - Dynamic test: overload 15% - 3 lifting cycles; - Operating tests; - Measurement of load intensities; - Safety tests. CHARACTERISTICS 3 / 40 AUS - Users Guide v0 Unloading procedure BL 455NE BL 465NE BL x55E BL x65E Lifting capacity (tonnes) 5.5 Tyre characteristics 6.5 5.5 6.5 8.25-20 to 13.00 – 22.5 (Ø 962 to 1154 mm) Stroke (mm) 1670 Lifting speed (mm/min) Electrical power (kW) Voltage (Volts) 230 or 400 Frequency (Hertz) 50 Net weight (kg per column) Noise level (dB) 500 2,2 335 2,5 355 2,2 2,5 335 355 < 70 UNLOADING PROCEDURE The mobile columns are delivered in the vertical position. Remove the fastenings and make sure that the capacity of your unloading system is at least 500 kg. Handling operations must be carried out slowly and without any shocks. ► Ground with a slope less than 5%: unloading is carried out using a forklifter: ▪ Slide the forklifter’s forks under the foot of the column; ▪ fasten the column to the truck’s mast with a sling; ▪ lift the assembly and incline the truck’s mast towards the rear. ► Ground with a slope greater than 5%: unloading is carried out with an overhead travelling crane, hoist, crane, aso; ▪ Use slings that are in good condition and with a suitable length; ▪ sling the column using only the handling rings, as shown opposite. 4 / 40 AUS - Users Guide v0 Safety instructions SAFETY INSTRUCTIONS Concerning the user • LIFTMAX lift users should not use their equipment for any purpose other than those specified. • Make sure that nobody stands under, inside, or on the vehicle, while it is being lifted. • LIFTMAX mobile lifts should not be used for access to the lifted vehicle or to reach mechanical components/assemblies. • Keep feet, hands, or any clothes away from moving components. • Prior to carrying out a maintenance work, make sure that power to the equipment is turned OFF. Concerning the lifting hoist • Do not overload LIFTMAX lifts. • Do not bypass or short-circuit any safety components. • Do not reverse phase sequences inside motors or electrical panels. • Repair your equipment as soon as a breakdown occurs. • Do not use LIFTMAX lifts to move the vehicle horizontally. • Do not drive over cables and plugs. • Do not connect more than 6 columns together. • Do not use lifts with different lifting capacities and speeds as a set without consulting our engineers. • Do not pull control cables in order to disconnect columns. • Do not open electrical panels without the authorization of supervisors or shop foremen. • Do not modify electrical boxes. • Do not store or put anything inside the electrical panels. • Do not expose LIFTMAX lifts to water, rain, sandblasting, paint or explosion prone environments. • Do not forget to lower the base of the column by means of the jack at the rear when the lift is stored. • Do not forget to lower the base of the column and free the rear castor wheel that should not bear any load. • LIFTMAX lifts should be stored in a standing position. • Use the tow bar to move columns around the load. • Each column must rest on the floor. • Assure that power plug has sufficient amperage and voltage to support electrical requirements of lifts. • Position the lifts around the vehicle in the configuration shown in the diagram on the lift column. Raising the vehicle • Do not start engine while the vehicle is raised. • Release the vehicle brake before lifting vehicle. • Do not raise any vehicle higher than 50cm (19”5/8) from floor level by individual or paired operation. • Do not use any accessory that is not manufactured by LIFTMAX. Use only LIFTMAX stands • Load shall be equally distributed when using the lifts. • Center wheel between forks. • Make sure that load is properly secured and that the lifting points of the load are in good condition and enough resistant. • Check connections between columns. • Check the size of the tires to make sure it fits the carriage. • Make sure that tires are properly inflated. • Use synchronous operation mode for lifting the entire vehicle. The environment • LIFTMAX lifts must not be used if floor grading exceeds 2%. • The lifts must not be displaced by means of the drawbar if the floor grading exceeds 2%. • The lifts must not be stored on a floor whose slope exceeds 2%. • Use a support plate, if the ground resistance is lower than 3400 psi. • Use the lift on a horizontal plane surface. • Make sure that there is no obstacle under the forks and over the vehicle to be lifted. • Make sure that no obstacle interferes during the column displacement. GRAPHIC SYMBOLS Trained users only Warning Wheels free Watch Electrical hazard 5 / 40 AUS - Users Guide v0 Setting up Setting up ► Moving the column Lift the rear of the column by keeping the handle of the palette jack upwards and by pumping the handle up and to down Move the column Release the handle of the palette jack to replace the column on the ground ► Place the lifting fork under the tyre Fully engage the fork of each column under the tyres of the vehicle Centre the column to the tyres Check that the vehicle’s wheels are moving freely 6 / 40 AUS - Users Guide v0 Description EASY range DESCRIPTION (EASY range : BL455NE-BL465NE) ► Master control panel ► Slave control panel 1 2 3 4 4 5 5 6 7 7 1. “Power on” indicator light 2. Main switch 3. “Malfunction” indicator light 4. “Up” push button 5. “Down” push button 6. Switch “Individual” / “All” lifting mode 7. Emergency stop push button Connecting the columns (EASY range : BL455NE – BL465NE) Connect the slave columns 2, 3 and 4 to the master column 1. Plug the main electrical supply to the wall socket 7 / 40 AUS - Users Guide v0 Lifting procedure Easy range Lifting procedure (EASY range : BL455NE – BL465NE) ► Switch on the lift Turn the main circuit breaker switch to the right The white “power on” indicator light and the red “Malfunction” lights come on Simultaneously press and hold the “Up” and “Down” push buttons for 3 seconds The red “Malfunction” light goes out Switch the selector to the right in the “all” position (↕↕↕↕) The master control box controls all the columns Press the “up” button on the master column All of the columns lift up simultaneously Switch the selector to the right in the “all” position (↕↕↕↕) The master control box controls all the columns ► Put the lift into service ► Lifting cycle ► Lowering cycle 8 / 40 AUS - Users Guide v0 Lifting procedure Easy range Press the “Down” button on the master column The columns descend simultaneously until each column reaches its low limit switch ► Using the “individual” lifting mode Switch the selector to the left in the “ind” position (↕) Each column can be controlled individually through their own control panel Press the “Up” or “Down” button on the column you want to operate The column is lifting up or down ► Important notice ▪ The switching from “all” to “individual” mode can be carried out at any time within the lifting cycle; ▪ “up” or “Down” push buttons are of the “dead man” type; ▪ A motion control system guarantees that the maximum difference between two columns lifting heights (in “all” mode) will always be less than 5 cm; ▪ A safety system stops the lift during descent when an obstacle is found under the lifting fork; 9 / 40 AUS - Users Guide v0 Trouble shooting Easy range Trouble shooting (EASY range : BL455NE-BL465NE) Status of light Cause Solution Light off Phase inversion (the yellow indicator light on the power relay is off). Swap two wires in the supply plug. The red indicator light bulb is defective. Change the bulb The lift has not been put into service Simultaneously press and hold the “Up” and “Down” push buttons for 3 seconds: the red “Malfunction” light goes out An emergency stop has been pushed Release any emergency stop push buttons A plug has been disconnected Check the connection of all the linking cables A magneto-thermal circuit breaker has been triggered In the electrical control box, check that the black button is pushed on Fault caused by an obstacle Simultaneously press and hold the “Up” and “Down” push buttons for 3 seconds to reset the fault: the red “Malfunction” light goes out Light on continuously Slow flashing Press the “up” push button for 3 seconds to clear the obstacle. Remove the obstacle. Continue the normal lifting cycle Very rapid flashing Level fault between lifting forks greater than 5 cm. Simultaneously press and hold the “Up” and “Down” push buttons for 3 seconds to reset the fault: the red “Malfunction” light goes out Go into individual mode to correct the level differences column by column then go back to simultaneous mode Continue the normal lifting cycle 10 / 40 AUS - Users Guide v0 Description Easy+ range DESCRIPTION (EASY+ range : BLx55E-BLx65E) ► Master control panel ► Slave control panel & remote control 1 6 4 2 5 3 4 5 7 8 1. Main switch 2. Power on” indicator light 3. Switch “Individual” / “Pair” / “All” lifting mode 4. Column selection 5. Remote control plug 6. Emergency stop push button 7. “Up” push button 8. “Down” push button Connecting the columns (EASY+ range : BLx55E-BLx65E) Connect the columns all together (closed loop) (1) Plug the main electrical supply to the wall socket (1) 400 V / 4 columns: 32 Amps plug - 400 V / 6 columns: 63 Amps plug 230 V / 4 or 6 columns: 63 Amps plug. 11 / 40 AUS - Users Guide v0 Lifting procedure Easy+ range Lifting procedure (EASY+ range : BLx55E-BLx65E) ► Switch on the lift Turn the main circuit breaker switch to the right The white “power on” indicator light comes on ► Plug the remote control Plug the remote control on one of the control panel (slave or master) ► Lifting cycle in “all” mode Switch the selector to the left in the “all” position (↕↕↕↕) The master control box controls all the columns You can operate the lift from any column by plugging the remote control Press the “up” or “down” push button of the remote control All of the columns lift up or down simultaneously ► Lifting cycle in “pair” mode Switch the selector to the right in the “pair” position (↕↕) The orange pair selector in the left position blink and those in the right position comes on. 12 / 40 AUS - Users Guide v0 Lifting procedure Easy+ range Switch the orange pair selector to the right to indicate to the lift that you want to operate this column. The orange pair selectors of the column you choose (right position) are on. Repeat this operation with all the columns you want to operate. Those in the left position are blinking (the column will not move) Plug the remote on one of the selected column (orange light on) The columns with the orange light on are moving And press the “Up” or “Down” button ► Lifting cycle in “ind” mode Switch the selector to the middle in the “ind” position (↕) Each column can be controlled individually through their own control panel Plug the remote control on one of the column to operate this column only The column is lifting up or down ► Important notice ▪ The switching from “all” to “individual” or “pair” mode can be carried out at any time within the lifting cycle; ▪ “up” or “Down” push buttons are of the “dead man” type; ▪ A motion control system guarantees that the maximum difference between two columns lifting heights (in “all” mode) will always be less than 5 cm; ▪ A safety system stops the lift during descent when an obstacle is found under the lifting fork; 13 / 40 AUS - Users Guide v0 Trouble shooting Easy+ range Trouble shooting (EASY+ range : BLx55E-BLx65E) I Can not switch on the lift (the main switch can not be put on the “ON” position) At least one phase is not connected to the main switch Check the connection of: the power supply the supply’s plug the cable inside the main panel the cable (short-circuit or phase cut) At least one emergency stop button is pushed Release the emergency stop push button A link cable plug is not correctly connected Check all the plug One fuse is burned (6FU1, 6FU2, 6FU3) Check the fuses The fuses are OK but the light of the PLC and the Check the transformer safety relay are off. The self of the main switch is burned Check the self The self of the safety relay is burned Check the self One magneto thermal relay is off Check the status (black switch on) One thermal relay is on Check the relay I can switch on the lift but it switch off after 2 or 3 seconds The light of the phase relay is off Invert 2 phases in the supply plug of the lift. The main switch is on but no movement is possible in “all” or “ind” mode. The data from the remote control cannot go to the PLC Check the remote control and the connection between the remote control and the PLC I can not lift up in “ind” mode (one column only) The high limit switch is activated Check the position of the finger of the sensor Check if the cable of the sensor is not cuted 14 / 40 AUS - Users Guide v0 Trouble shooting Easy+ range I can not lift down in “all” mode (group of 4 or 6 columns) One of the lifting fork is blocked and the lifting nut is not in contact with the lifting carriage anymore Check the fork and the lifting carriage position I can not lift down in “ind” mode (one column only) The low limit switch is activated Check the position of the finger of the sensor Check if the cable of the sensor is not cuted The lifting forks stop after 1 or 2 seconds in any configuration At least one motion control system is defective At least one dissipation resistor is burned Check if the red light of the inductive sensor is blinking Check the cable of the sensor Check that the belt is correctly positioned around the pulleys Check the spring of the belt Check the connection of the resistor and the passivity (Ohm) In all mode, the fork of the master column only is moving and stops after 1 or 2 seconds One fuse is burned (6Q2 or/and 6Q3) Check the fuses 15 / 40 AUS - Users Guide v0 Maintenance Maintenance ► Inspection schedule Points to check Operations Frequency Means of checking Lifting screw Status of the acme thread 1 year Visual / cloth for surface smoothness check Bronze nut Check the thickness gauge through the inspection slot 1 year Visual Bronze nut greasing Refuel with a grease pump using an appropriate bearing grease 6 months(1) Grease pump Upper bearing Refuel with a grease pump using an appropriate bearing grease 1 year Grease pump Cables Check appearance for visible damages 1 year Visual Plugs Check appearance for visible damage 1 year Visual End limit switch Check functioning 1 year Triggering (1) for normal operation: 2 lifting cycles per day. 16 / 40 AUS - Users Guide v0 Maintenance ► Checking wear on the bronze load-bearing nut Unscrew the 10 mm nut of the inspection window. Check the wearing of the bronze nut The bronze nut is new The bronze nut is worn and must to be changed 17 / 40 AUS - Users Guide v0 List of parts (mechanical) List of parts (mechanical) 18 / 40 AUS - Users Guide v0 List of parts (mechanical) N° 1 2 3 4 5 6-7 8-9 10-11-12 13-14 15 16 17 18-19-20 Motor reducer Top bearing Motor reducer support plate Up limit switch Low limit switch Mechanical drawbar Hydraulic palette jack (a) Axle and wheel assembly Lifting screw assembly Protection band assembly Bronze nut / safety nut assembly Roller Motion control assembly 5,5 tonnes BL55EM001 BL55EM002 BL55EM003 BL55EM004 BL55EM005 BL55EM006 BL55EM008 BL55EM010 BL55EM013 BL55EM015 BL55EM016 BL55EM017 BL55EM018 6,5 tonnes BL65EM001 BL65EM002 BL65EM003 BL65EM004 BL65EM005 BL65EM006 BL65EM008 BL65EM010 BL65EM013 BL65EM015 BL65EM016 BL65EM017 BL65EM018 (a) option for Easy series 19 / 40 AUS - Users Guide v0 List of parts (electrical) Easy range List of parts (electrical) (EASY range : BL455NE-BL465NE) ► Master control panel 1 16 12 13 5 14 6 4 8 15 9 16 17 18 19 11 10 20 3 23 24 25 22 21 20 / 40 AUS - Users Guide v0 List of parts (electrical) Easy range 21 / 40 AUS - Users Guide v0 List of parts (electrical) Easy range ► Slave control panel 1 10 7 11 8 6 12 13 14 15 16 22 / 40 AUS - Users Guide v0 Electrical diagram Easy range Electrical diagram (EASY range : BL455NE-BL465NE) 23 / 40 AUS - Users Guide v0 Electrical diagram Easy range 24 / 40 AUS - Users Guide v0 Electrical diagram Easy range 25 / 40 AUS - Users Guide v0 Electrical diagram Easy range 26 / 40 AUS - Users Guide v0 Electrical diagram Easy range 27 / 40 AUS - Users Guide v0 List of parts (electrical) Easy+ range List of parts (electrical) (EASY+ range : BLx55E-BLx65E) ► Master control panel 1 4 5 6 7 8 10 9 11 12 13 15 16-17 18 20 26-27 21 29 28 27-30 19 25 28 / 40 AUS - Users Guide v0 List of parts (electrical) Easy+ range Outside (master control panel) REP 1 4 5 6 7 8 MNEMO CP - DESCRIPTION Master panel Main switch “Power on” white lamp 3-position selector (ALL/IND/PAIR) “Pair mode” selection switch Remote control plug REFERENCE E-93703-022-01 E-93703-022-04 E-93703-022-05 E-93703-022-06 E-93703-022-07 E-93703-022-08 Inside (master control panel) REP 9 10 11 12 13 15 16-17 18 19 20 21 25 26 27 28 29 30 MNEMO 6T1 9KM/D1 6KA0 6IG1 API 6Q1 6Q3-6Q2 6FUXC 9R1 9K1 1AL - DESCRIPTION Transformer 230/400 V Reversing contactor UP/DOWN Phase relay Main switch PLC Magneto thermal circuit breaker 32A fuses 2A fuses Connecting block 4W resistor PLC safety relay Power supply cable 10 meters Female outside plug Linking cable 10 meters Male plug (panel) Female plug (panel) Male outside plug REFERENCE E-93703-022-09 E-93703-022-10 E-93703-022-11 E-93703-022-12 E-93703-022-13 E-93703-022-15 E-93703-022-16 E-93703-022-18 E-93703-022-19 E-93703-022-20 E-93703-022-21 E-93703-022-25 E-93703-022-26 E-93703-022-27 E-93703-022-28 E-93703-022-29 E-93703-022-30 29 / 40 AUS - Users Guide v0 List of parts (electrical) Easy+ range ► Slave control panel 1 10 4 9 5 6 11 27-30 26-27 29 28 Outside (slave control panel) REP 1 4 5 8 MNEMO CSAU10C2-10H2 SIG1 12 DESCRIPTION Slave panel Emergency stop push button “Pair mode” selection switch Remote control plug 13 14 REFERENCE E-93703-029-01 E-93703-029-04 E-93703-029-05 E-93703-022-08 Inside (slave control panel) REP 9 10 11 12 13 14 26 27 28 29 30 MNEMO API -KM-/D-FU-RXC-K1 - Remote control REP MNEMO 1 BB2 1BB3 XBB- DESCRITION PLC Reversing contactor UP/DOWN Thermal relay 4W resistor Connecting block PLC safety relay Female outside plug Linking cable 10 meters Male plug (panel) Female plug (panel) Male outside plug DESCRITION Remote control + magnet 3 meters cable Male plug REFERENCE E-93703-029-09 E-93703-029-10 E-93703-029-11 E-93703-029-12 E-93703-029-13 E-93703-029-14 E-93703-022-26 E-93703-022-27 E-93703-022-28 E-93703-022-29 E-93703-022-30 REFERENCE E-93703-029-09 E-93703-029-10 E-93703-029-11 30 / 40 AUS - Users Guide v0 Electrical diagram Easy+ range Electrical diagram (EASY+ range : BLx55E-BLx65E) 31 / 40 AUS - Users Guide v0 Electrical diagram Easy+ range 32 / 40 AUS - Users Guide v0 Electrical diagram Easy+ range 33 / 40 AUS - Users Guide v0 Electrical diagram Easy+ range 34 / 40 AUS - Users Guide v0 Electrical diagram Easy+ range 35 / 40 AUS - Users Guide v0 CE Certificate CE Certificate The manufacturer undersigned: FACTORY SEFAC S.A 1, rue André Compain BP 101 08800 MONTHERME France Telephone: +33 (0)3.24.53.01.82 Fax: +33 (0)3.24.53.20.24 SALES COMPANY Garage Equipment Ltd Pty 17 Canberra Street Hemmant 4174 QLD Australia Telephone: +33 (0)3.24.53.01.82 Fax: +33 (0)3.24.53.20.24 CERTIFICATION OFFICE Bureau Veritas Parc d’Activité Actipolis Canéjan 33612 CESTAS Cedex France certify that the product: PMX412055, PMX412065, PMX612055, PMX612065 certificate number CE 0062.150X.0440.01.06 COMMERCIAL REFERENCE: BL455NE, BL465NE, BL455E, BL655E, BL465E, BL665E COLUMNS N°: Is in conformity with: - the European directive 98/37/CE - and EN 1493 Monthermé, January the 1st 2006 Eric LETELLIER Technical Director 36 / 40 AUS - Users Guide v0 Warranty WARRANTY ► Warranty terms Our equipment is guaranteed against any faulty operation originated from a material, manufacturing or design defect under the conditions indicated below. The faulty operation must appear within a period of 12 months after commissioning and at the latest 15 months after delivery. The guarantee is excluded when: - the defective material or design originates with the purchaser; the faulty operation results from repair or maintenance work carried out on our equipment without our prior consent; the parts used by the purchaser have not been provided by LIFTMAX, the defective operation is caused by normal wear of the merchandise item, a negligence or errors of maintenance on the part of the purchaser; the use of our equipment does not comply with the recommendations indicated in our User Manual; the defective operation is due to a case of force majeure. For fear of forfeiting the right to guarantee, the purchaser is bound to inform of cases of noncompliance within a maximum period of 30 days after becoming aware of them by registered letter, which will be sent to: LIFTMAX. No claim will be receivable beyond this deadline. Any repair or maintenance work carried out on this equipment without our agreement will result in loss of the right to guarantee. Under the guarantee, we will replace free of charge the parts or material/equipment acknowledged by LIFTMAX to be defective and returned to our production plant for expertise. The repairing or replacement of the parts during the guarantee period can in no way give rise to an extension of the guarantee. Warranty of our materials and/or equipment can only be ensured under the conditions listed above provided that all amounts due have been received by LIFTMAX. The warranty starts from the date of commissioning by means of filling and returning the appropriate form to LiftMax. This document is to be returned to our Sales Office within 15 days after commissioning. No claim relating to the performance of the products can be used by the purchaser to obtain additional warranty or suspension whatsoever of - or deduction in - the payments due. The purchaser admits that he/she is perfectly aware of the performance and capacity of the products. 37 / 40 AUS - Users Guide v0 Ancillaries Ancillaries Remote control (reference BL RC) Remote control with 10 meters long-cable to pilot the lift from the master column in "all" mode. Plastic cover protection (reference BL PC) Set of 4 Plastic cover protection for intensive use in wash bays Jacking unit (reference BL HD) Set of 4 hydraulic palette jack "Deadman" type Van's adaptor (reference BL FRV 01) Set of 4 fork reducer for vans - Capacity 4,8 tonnes - Fit to wheel diameter 600 to 930 mm Car's adaptor (reference BL FRC 01) Set of 4 fork reducer for cars - Capacity 2 tonnes - Fit to wheel diameter 500 to 730 mm Trailer beam (reference BL LB 02) Lifting beam for trailer maximum capacity: 3 x 5 tonnes 38 / 40 AUS - Users Guide v0 Ancillaries Lifting beam (reference BL LB 01) Lifting beam for bus & coach maximum capacity: 2 x 6 tonnes Transmission jack (reference BL TJ 15) 1,5 tonnes transmission jack with a multi-position swivel head Capacity : Minimum height : Maximum height 2 speeds 4 wheels Ø 200 mm Net weight : Dimensions (Lxl) 1,5 tonnes 1000 mm 2020 mm 175 kg 850 x 480 mm 14 t small axle stand (reference BL 140) Mini - maxi: 300 – 445 mm / 5 positions (reference BL 141) Mini - maxi: 450 – 730 mm / 8 positions (reference BL 142) Mini - maxi: 685 – 1125 mm / 12 positions tall axle stand (reference BL 060) 6 t / Mini-maxi: 1130 – 1840 mm / 10 positions (reference BL 100) 10 t / Mini - maxi: 1380 – 2100 mm / 10 positions (reference BL 150) 15 t / Mini - maxi: 1385 – 2025 mm / 10 positions Spring loaded / with screw at the top 39 / 40 AUS - Users Guide v0 Contact us CONTACT US Distributed by 40 / 40