1
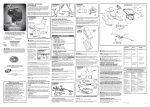
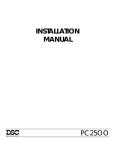
Table of Contents
TIP!
Page
Features.................................................................................1
Installation..................................................................................2
LED Indicator..............................................................................................2
Power Operation.........................................................................................2
Eye Operation.............................................................................................3
Low Battery Indicator..................................................................................3
Eye Malfunction..........................................................................................3
Dip Switch 1 - 15bps Cap............................................................................3
Dip Switch 2 - Tournament Lock.................................................................3
Programming Mode Colors & Settings......................................................4
Factory Default Reset..............................................................................4
Firing Modes..............................................................................................5
Firing Modes Continued............................................................................6
Debounce....................................................................................7
Dwell....................................................................................7
Ramp Activation Speed..............................................................................7
Ramp Percentage.......................................................................................8
Ramp/Burst Initiation Shot Count ..............................................................8
Post Breakout Mode...................................................................................8
Burst Shots.................................................................................................9
Max Rate of Fire Balls Per Second...........................................................9
Max Rate of Fire Balls Per Tenth of a Second............................................9
Eye Malfunction Rate of Fire.....................................................................10
Anti Mechanical Bounce...........................................................................10
Anti Bolt Stick............................................................................................10
Eye Delay..................................................................................................11
Eye External Light Sensitivity....................................................................11
Ringtone Playback Options......................................................................12
Ringtone Selection...................................................................................12
Eye Mode..................................................................................................13
Troubleshooting..................................................................................13
Troubleshooting continued.......................................................................14
http://www.virtuepaintball.com || Virtue Paintball, LLC
#1
Some Russian Legion Board Features At A Glance
•The official board of the 2006 World Champions, Russian Legion.
•Audible speaker w/ programmable ringtones.
• Includes custom Russian Legion .45 Grip with dedicated power and eye
buttons.
• 13 Adjustable Modes of fire - Semi Auto, PSP, RL NXL, Ramp, Auto
Response, Full Auto, Breakout, Millennium , Smart Ramp Low, Smart
Ramp High, Burst, Select-A-Mode, and Training.
• 17 easy to use and fully adjustable settings.
• Breakbeam and reflective eye settings work with all Shockers & Nerves.
• 15BPS Ready - instant 15bps dip switch.
• All Firing Modes have adjustable rates of fire from 8bps to 25.9bps (or to
unlimited) in intervals of 1/10 of a second.
• Adjustable Debounce, Ramp Activation Speed, Ramp Percentage, Dwell,
Eye Delay, Anti-Mechanical Bounce, Anti-Bolt Stick, Max Rate of Fire BPS
and Max Rate of Fire 1/10 BPS, Burst Mode, Ramp Shot Count, Ringtone
Selection, Audio Options, Eye Mode, Post Breakout Mode, Eye
Malfunction Rate of Fire, Eye External Light Sensitivity.
• Advanced microprocessor allows up to 8 MIPS (million instructions per
second) performance.
• Virtue Trigger Logic constantly monitors the trigger and eyes to ensure
every trigger pull is recognized, giving you the fastest responding gun, and
highest possible rates of fire.
• Pulse Ready no soldering – Added 2 pin solenoid connector for easy plug
and play with the Pulse RF Chip, and Virtue Pulse Adapter wire.
• Program settings are stored in non-volatile memory so they will not be
lost when the battery dies or is removed.
• 10 minute idle auto-shutdown saves battery life.
• Fully Adjustable Breakout Mode
• Low battery indicator software flashes yellow on power-up.
• Forced Shot allows the marker to be fired when the eyes are enabled,
but no object is in the breech (hold down the trigger for 1 full second).
• Instant On allows the marker to be fired immediately upon turn on.
• Tournament Lock/Unlock allows the marker to be programmed through
the trigger without having to constantly open the grip.
• Lifetime Warranty & Lifetime Free Software Upgrades
• Patent Pending
#2
#2
Installing Your Russian Legion Shocker Board:
1. Remove your grips and disconnect battery. Push or unscrew the
two pins that are holding your existing board into place.
2. Remove the battery from the wiring harness.
3. Carefully remove your existing board from the marker and
disconnect the 10 pin wire harness from the back of the board.
4. Connect the wire harness to the Russian Legion Shocker Board.
5. Place the Russian Legion Shocker board back into the grip frame
making sure the bottom of the board is in the slot of the grip frame.
6. Line up the two pins you removed in step 1, and push or screw
them back into place.
7. Reconnect battery and screw in the included RL grips & screws.
LED Indicator
The LED at the bottom of your grip tells you the status of your gun.
Solid Yellow.......................(During startup) Low battery
Solid Blue........................Eye Enabled / Ball in Breech
Solid Red....................Eye Enabled / No Ball in Breech
Flashing Red..........................................Eyes Disabled
Flashing Blue.......................................Eye Malfunction
In addition, the power button on the back of the marker also has a small
blue LED, which will also tell you the status of your marker:
Solid Blue......................... Eye Enabled / Ball in Breech
Flickering Blue................. Eye Enabled / No Ball in Breech
Fast Flashing Blue........... Eye Disabled
Slow Flashing Blue.......... Eye Malfunction
Power Operation
The RL Shocker Board uses Instant On technology. Tap the stock
power button on the back of the grip frame or the top button on the
Destroyka Grip, and the marker instantly turns on.
To prevent you from accidently shutting off your gun, Virtue has
several safeguards. To turn the marker off at any time, you must
press and hold the rear mounted power button for 2 seconds. Or to
turn the gun off with the power button on the Destroyka grip panels
(top button) press and hold the power (top) button on the Destroyka
grip for 3 seconds. Additionally the Destroyka grip power button will
not work for a period of 4 seconds while the trigger is being pulled to
prevent the gun from being accidentally shut off during play.
Default settings play Ringtones when the gun is turned on. To stop the ringtone from playing
simply tap the stock power button on the back of the grip frame. See page 12 for more info.
#4
#3
Programming Mode Colors & Settings
Eye Operation
When the marker is turned on the eyes are automatically enabled.
The eyes can then be turned off by pressing the eye button (bottom
button on the Destroyka grip) for 3 seconds or by holding rear
mounted grip frame power button for 1 second. To turn the eyes back
on just tap the bottomDestroyka grip button or turn the gun off and
turn it back on again. The grip panel eye button will not work for a
period of 4 seconds while the trigger is being pulled to prevent the
eyes from being accidentally shut off during play.
To program the Virtue RL Shocker Board, with the tounament lock off,
hold down the trigger and turn the gun on. Release the trigger as the
LED flashes a rainbow of colors. The LED will stop on purple for the
first programming setting; Firing mode. Tapping the trigger will toggle
through the different programming settings. Also the power (top)
button on Destroyka grip will take you to previous setting in
programming menu and the eye (bottom) button on Destoryka grip will
take you to next setting in programming menu. (see table below)
When the LED is lit for the setting you wish to adjust, pull and hold the
trigger until the LED Begins to flash, and then let go. The LED will flash
the number of times the current value is set to. When the LED stops
flashing you then have 3 seconds to enter in the new value by tapping
the trigger the amount of times you want the new value to be set to.
After you have set the new value, the LED will flash the number of times
you have entered, and then flash the rainbow of colors, returning to the
color you have adjusted, indicating that the new value has been saved.
To exit programming mode at any time, shut the marker off.
Low Battery Indicator - Yellow LED at Start Up
If your battery is low, the LED will be yellow for 1 second when you
turn the marker on. Change the battery as soon as possible.
Eye Malfunction - Flashing Blue LED
If the LED flashes blue indicating an eye malfunction, the marker will
shoot in a reduced rate of fire to prevent further breaking of paint.
You can adjust the eye malfunction rate of fire in the programming
menu, and when the object blocking the eyes is removed the eye will
automatically return to working mode (solid red or blue LED). Please
Firing Mode.…………...............................…..Purple
Debounce.…………..................................…..Green
Dwell.……………………………………….......Red
Ramp Activation Speed.……………..………..Blue
Ramp Percentage.………………………..…...White
Ramp/Burst Initiation Shot Count …….....….Teal
Post Breakout Mode…………………………..Yellow
Burst Shots.…………........................………..Flickering Green
Max Rate of Fire Balls Per Second.……….......Flickering Red
Max Rate of Fire Balls Per Tenth of a Second……Flickering Blue
Eye Malfunction Rate of Fire.....……………..Flickering White
AMB (Anti-Mechanical Bounce).……………..Flickering Teal
ABS (Anti-Bolt Stick).....………………………Flashing Purple
Eye Delay.……………………………………...Flashing Green
Eye External Light Sensitivity.........…………..Flashing Red
Ringtone Playback Options....…………….....Flashing White
Eye Mode.………………………………….…..Flashing Yellow
also note, the eye logic also differentiates between a ball being fired, and something
continually blocking the eye (like broken paint, or your finger).
Dip Switch 1 - 15bps Cap
Dip Switch 1 is the Max Rate of Fire/15bps Cap lock. If Dip Switch 1
is in the on position, your max rate of fire is set to your “Max Rate of
Fire” settings. If Dip Switch 1 is in the off position, the Max Rate of
Fire of all modes is capped at 15bps. After changing this setting, you
must turn the marker off before it takes effect.
Please note the actual bps may vary slightly from gun to gun. If the
desired bps is too high or too low with Dip Switch 1 off, then leave Dip
Switch 1 in the on position, and adjust the max rate of fire settings
through the programming menu.
Dip Switch 2 - Tournament Lock
Note: you do not have to wait for the LED to finishing flashing the number of times the current
value is set to. For instance if the Dwell is set to 25, and you want to set it to 18 you can start
pulling the trigger 18 times right away before waiting for it to flash 25 times.
Toggle the tournament lock on and off by adjusting dip switch 2. With
dip switch 2 in the on position (unlocked), your Shocker can be
programmed. Flip dip switch 2 to the off position (locked) to put your
gun in tournament lock.
Factory Default Reset
1. Hold the trigger, turn the gun on, and then release the trigger.
2. The LED will cycle through a rainbow of colors and stop on purple.
3. Hold down the trigger for 10 seconds until the LED turns white.
4. To exit programming mode, shut the marker off
http://www.virtuepaintball.com || Virtue Paintball, LLC
#5
Firing Mode: Purple - Values 1 - 13 (default 3)
First determine the number of the firing mode you want to change to:
1. Semi Auto: 1 trigger pull equals 1 shot.
2. PSP Ramping: First 3 shots are Semi Auto. The 4th shot shoots 3
shots per pull at your “Max Rate of Fire”. Let go of the trigger for 1
second and the 3 shot Semi Auto count restarts.
3. Russian Legion NXL: First 3 shots are Semi Auto. The 4th shot you
hold down the trigger and the marker shoots full auto at your “Max Rate
of Fire” or if you tap the trigger the marker will shoot 3 shot bursts at
your “Max Rate of Fire”. Let go of the trigger for 1 second and the 3 shot
Semi Auto count restarts.
4. Ramp Mode: When you reach the “Ramp Activation Speed” the
marker will ramp to the rate of fire by your “Ramp Percentage” setting, up
to your “Max Rate of Fire”. The default is when your trigger speed
reaches 5bps, the marker will ramp up to the maximum speed your loader
can feed. Now you can also set the exact shot (1st -10th shot) when the
ramping is activated through the Ramp/Burst Shot Count Setting.
5. Auto Response: 1 shot per pull and 1 shot per release of the trigger.
6. Full Auto: Hold down the trigger and fire at your “Max Rate of Fire”.
7. Breakout Mode: Full auto on the first shot and until you release the
trigger for more then 2 seconds. Then the firing mode will default to the
mode selected in the Post Breakout Mode menu. The default Post
Breakout Mode is Firing Mode 1, Semi Auto.
8. Millennium: At 7.5 bps, ramps 100% capped at 15bps. If you want
this mode to shoot any differently, then set the gun to mode 4, Ramp
Mode, and adjust the ramping parameters as necessary.
9. Smart Ramp Low: Smart Ramp analyzes your rate of fire and
predicts if you want to shoot fast or slow, then ramps the rate of fire
accordingly. Smart Ramp will track your rate of fire and go up and down
based on how fast you shoot, conserving paint when you slow down and
shooting faster when you speed up. There are 2 Smart Ramp Modes: low
and high which defines how much the Smart Ramp accelerates based on
your present and predicted rate of fire. You can also cap the max rate of
fire of Smart Ramp using the Max Rate of Fire setting.
10. Smart Ramp High: See #9 for description.
11. Burst Mode: Fire in bursts for every pull. Adjustable in 2-5 shot
bursts through the “Burst Shots” setting (flickering green). You may also
set after which shot the gun starts to burst through the Ramp/Burst Shot
Count Setting in the programming menu. Burst mode never shoots
more then your burst shot setting after the final trigger pull.
#6
#6
FiringtmMode: Purple
- Values 1 - 13 (default 3)
tm
tm
12. Select-A-Mode: When in Select-A-Mode you can use the Destroyka
grip buttons to cycle through firing modes. When you turn the gun on
and first tap either grip button, the LED will flash the number of times of
the mode you are in. Then tap the bottom Destroyka grip button to
advance to the next firing mode, or tap the top Destroyka grip button to
return to the previous firing mode. The LED will blink purple the number
tm
of times as the current mode you are in. By default, Select-A-Mode
starts out in Semi Auto when you turn the gun on. Use the buttons on
the grips to instantly cycle forward and backwards through all of Virtue’s
firing modes (training
mode excluded). When you restart the marker
tm
Select-A-Mode remembers the previous mode and will automatically
start in that mode. Ringtones must stop playing before you change your
mode, either through pressing the stock rear grip frame button or just
leading the ringtone play until it stops.
13. Training Mode: The Training mode is to train to improve your rate
of fire. Eyes are disabled, the firing mode is set to semi auto, and the
dwell is set to 4 ms to reduce noise and air usage. Practice tapping
the trigger as fast as possible. Once you stop pulling the trigger for 1
second, the software will calculate your peak rate of fire for the string.
The LED indicator will display you your peak rate of fire by flashing
teal and purple. Teal indicates the 10’s column, and purple indicates
the 1’s column. Ex) 15bps is 1 flash teal and 5 flashes purple; 9bps
would be 0 teal flashes and 9 purple flashes. The LED will not flash
until you shoot again. Reach 20bps or higher and the board will play
you the Charge! ringtone.
Programming
Programming
Example Example
1. Hold the trigger, turn the gun on, and then release the trigger.
2. The LED will flash a rainbow of colors and stop on purple. Pull and
hold the trigger until the LED flashes (default is NXL, so the LED will
flash 3 times if you are in mode 3).
3. When the LED stops flashing, tap the trigger the number of times
of the desired mode (semi is 1 tap, psp is 2 taps, nxl is 3 taps, etc).
4. The LED will flash the number of taps you entered, then flash the
rainbow of colors, and stop on purple, indicating the new value has
been set and you are now in the new firing mode.
5. To exit programming mode, shut the marker off.
Note: you do not have to wait for the LED to finishing flashing the
number of times the current value is set to. For instance if the Dwell is
set to 25, and you want to set it to 18 you can start pulling the trigger
18 times right away before waiting for it to flash 25 times.
#8
#7
Debounce: Green - Values 1 - 30 (default 5)
Ramp Percentage: White - Values 1 - 21 (default 1)
Debounce is the amount of time the trigger has to be released before
the next trigger pull is registered. Virtue’s debounce algorithm, ensures
every pull is registered giving the highest possible rate of fire. Values
range from 1-30 (milliseconds) with the default set to 5.
Ramp Percentage affects Firing Mode 4 (Ramp Mode). Default is 1,
which shoots unlimited once you reach the Ramp Activation Speed.
Percentage
Percentage
Percentage
Value
Value
Value
15
1
8
75%
Unlimited
40%
16
2
9
80%
10%
45%
17
3
10
85%
15%
50%
18
4
11
90%
20%
55%
19
5
12
95%
25%
60%
20
6
13
100%
30%
65%
21
7
14
200%
35%
70%
1. Hold the trigger, turn the gun on, and then release the trigger.
2. The LED will flash a rainbow of colors and stop on purple. Tap the
trigger until it stops on White for Ramp Percentage.
3. Hold the trigger, the LED will flash what the Ramp % is set to.
4. Tap the trigger the number of times of the desired Ramp % (1-21).
5. The LED will flash the number of taps you entered, then flash the
rainbow of colors, and stop on white. The new value has been set.
6. To exit programming mode, shut the marker off.
Ramp/Burst Initiation Shot Count: Teal - Values 1 - 10 (default 1)
The Ramp/Burst Initiation Shot Count affects Ramp & Burst Mode. The
Ramp/Burst Shot Count sets how many shots must be fired before the
Ramp or Burst Mode kicks in; all trigger pulls must be within 1 second of
each other. A value of 2 means 2 shots must be fired before Bursts start
or Ramping starts based on your Ramp Activation Speed and Ramp
Percentage.
1. Hold the trigger, turn the gun on, and then release the trigger.
2. The LED will flash a rainbow of colors and stop on purple. Tap the
trigger until it stops on green for Debounce.
3. Hold the trigger, the LED will flash what the Debounce is set to.
4. Tap the trigger the number of times of the desired debounce (1-30).
5. The LED will flash the number of taps you entered, then flash the
rainbow of colors, and stop on green. The new value has been set.
6. To exit programming mode, shut the marker off.
Dwell: Red - Values 5 - 30 (default 12)
Dwell is the amount of time that the solenoid will be activated. The
default is 12 milliseconds (ms), and the values range from 5 – 30 ms.
1. Hold the trigger, turn the gun on, and then release the trigger.
2. The LED will flash a rainbow of colors and stop on purple. Tap the
trigger until it stops on red for Dwell.
3. Hold the trigger, the LED will flash what the Dwell is set to.
4. Tap the trigger the number of times of the desired Dwell (5-30).
5. The LED will flash the number of taps you entered, then flash the
rainbow of colors, and stop on red. The new value has been set.
6. To exit programming mode, shut the marker off.
Ramp Activation Speed: Blue - Values 5 - 15 (default 5)
Post Breakout Mode: Yellow - Values 1 - 9 (default 1)
Ramp Activation Speed affects Firing Mode 4 (Ramp Mode). The default
setting is 5: pull the trigger at 5bps to activate ramping, which is
determined by the “Ramp Percentage” setting. Values are equivalent to
balls per second. For example, 5 = 5bps; 10 = 10bps, etc.
The Post Breakout Mode sets what firing mode the marker will shoot if you are
in “Breakout Mode” after the breakout mode’s Full Auto bursts are finished.
Value
Post Breakout Mode
1
Semi Auto
2
PSP Ramp
3
Russian Legion NXL
4
Ramp
5
Auto Response
6
Millennium
7
Smart Ramp Low
8
Smart Ramp High
9
Burst Mode
1. Hold the trigger, turn the gun on, and then release the trigger.
2. The LED will flash a rainbow of colors and stop on purple. Tap the
trigger until it stops on Blue for Ramp Activation Speed (RAS).
3. Hold the trigger, the LED will flash what the RAS is set to.
4. Tap the trigger the number of times of the desired RAS (5-15).
5. The LED will flash the number of taps you entered, then flash the
rainbow of colors, and stop on blue. The new value has been set.
6. To exit programming mode, shut the marker off.
#9
Percentage
#10
#10
Burst Shots: Flickering Green - Values 2 - 5 (default 3)
Eye Malfunction ROF: Flickering White - Values 8 - 15 (default 8)
1. Hold the trigger, turn the gun on, and then release the trigger.
2. The LED will flash a rainbow of colors and stop on purple. Tap the
trigger until it stops on flickering green for Burst Shots.
3. Hold the trigger, the LED will flash what the Burst Shots is set to.
4. Tap the trigger the number of times of the desired Burst Shots (2-5).
5. The LED will flash the number of taps you entered, then flash the
rainbow of colors, and stop on flickering green. The new value is set.
6. To exit programming mode, shut the marker off.
1. Hold the trigger, turn the gun on, and then release the trigger.
2. The LED will flash a rainbow of colors and stop on purple. Tap the
trigger until it stops on flickering white for Eye Malfunction ROF.
3. Hold the trigger, the LED will flash the Eye Malfunction ROF value.
4. Tap the trigger the number of times of the desired Malfunction ROF (8-15).
5. The LED will flash the number of taps you entered, then flash the
rainbow of colors, and stop on flickering white. The new value is set.
6. To exit programming mode, shut the marker off.
Burst shots set how many times the gun fires for each trigger pull when
you are in Burst Mode (mode 11). Default is 3, meaning 3 shots for
every trigger pull. Burst mode never shoots more then "X" shots after
the final trigger pull where X = number of shots the gun is set to burst.
Max Rate of Fire Balls Per Second: Flickering Red - Values 7 - 25 (default 7)
The Max Rate of Fire BPS applies to all modes* of fire and is adjustable
from 8 to 25bps (or unlimited). The default value is 7, for unlimited, 8 is
8bps, 9 is 9bps, etc. Use the “Max ROF Balls per 10th of a Second” (below) to
precisely set the rate of fire in 10th of a second increments. i.e. set this setting to 12, and the
“Max ROF Balls per 10th of a Second” to 3, to have a rate of fire of 12.3 balls per second.
For a step by step guide, see the list at the bottom of the page.
Max Rate of Fire Balls Per 10th of a Second:
Flickering Blue - Values 1 - 10 (default 10)
The Max ROF Balls per 10th of a Second applies to all modes* of fire
and is adjustable from 1 to 9 (balls per 10th of a second). Use the “Max
ROF Balls per 10th of a Second” to precisely set the rate of fire in 10th
of a second increments. i.e. set the “Max Rate of Fire Balls Per Second” (above)
setting to 12, and this setting to 3, to have a rate of fire of 12.3 balls per second. The default
value is 10, which adjusts the additional balls per 10th second equal to 0 (a “Max ROF BPS”
of 15, and a “Max ROF balls per 10th of a Second” of 10, would yield 15bps, not 16bps).
*Millennium Mode Permanently Capped at 15bps.
1. Hold the trigger, turn the gun on, and then release the trigger.
2. The LED will flash a rainbow of colors and stop on purple. Tap the trigger until it
stops on flickering red for Max rate of Fire.
3. Hold the trigger, the LED will flash what the Max Rate of Fire is set to.
4. Tap the trigger the number of times of the desired MROF (7-25).
5. The LED will flash the number of taps you entered, then flash the rainbow of colors,
and stop on flickering red. The new value for Max ROF balls per second is set.
6. Tap the trigger once for Flickering Blue, Max Rate of Fire Balls Per 10th of a Second.
7. Hold the trigger until the LED flashes the Max ROF Balls per 10th Second value.
8. Tap the trigger the number of times of the desired balls per 1/10th second (1-9 for .1
through .9bps, 10 is equal to 0)
5. The LED will flash the number of taps you entered, then flash the rainbow of colors,
and stop on flickering blue. The new value for Max ROF balls per 10th second is set.
6. To exit programming mode, shut the marker off.
Eye Malfunction Max Rate of Fire sets the rate of fire if the eyes are
blocked or damaged. Default is 8 for 8 balls per second. Changing this
value to 9 sets the Eye Malfunction Rate of Fire to 9bps, 10, to 10bps,
11 to 11bps, etc.
Anti Mechanical Bounce: Flickering Teal - Values 1-10 (default 3)
Anti-Mechanical Bounce reduces mechanical bounce from causing the
gun to fire extra shots. Default is 3. Settings range from 1-10 with 1
being AMB off (most bounce) and 10 being least bounce.
1. Hold the trigger, turn the gun on, and then release the trigger.
2. The LED will flash a rainbow of colors and stop on purple. Tap the
trigger until it stops on flickering teal for AMB.
3. Hold the trigger, the LED will flash the AMB value.
4. Tap the trigger the number of times of the desired AMB (1-10).
5. The LED will flash the number of taps you entered, then flash the
rainbow of colors, and stop on flickering teal. The new value is set.
6. To exit programming mode, shut the marker off.
Anti Bolt Stick: Flashing Purple - Values 1-20 (default 10)
Anti-Bolt Stick (ABS) is the dwell time added to overcome first shot drop
off. Provides for an extra 1 – 20 milliseconds of dwell. Default is 10.
1. Hold the trigger, turn the gun on, and then release the trigger.
2. The LED will flash a rainbow of colors and stop on purple. Tap the
trigger until it stops on flashing purple for ABS.
3. Hold the trigger, the LED will flash the ABS value.
4. Tap the trigger the number of times of the desired ABS (1-20).
5. The LED will flash the number of taps you entered, then flash the
rainbow of colors, and stop on flashing purple. The new value is set.
6. To exit programming mode, shut the marker off.
#11
#12
Ringtone Playback Options: Flashing White - Values 1 - 4 (default 1)
Eye Delay: Flashing Green - Values 1 - 50 (default 5)
Ringtone Playback Options sets when sounds on your board will play.
Sounds will always play if you press the power and eye buttons on the
grip at the same time.
Eye Delay adds a delay after the eye has seen a ball before it allows the
marker to shoot. Guns without force fed loaders need to raise the delay.
The default setting is 5, with 1 being the fastest (No delay).
1. Hold the trigger, turn the gun on, and then release the trigger.
2. The LED will flash a rainbow of colors and stop on purple. Tap the
trigger until it stops on flashing green for Eye Delay.
3. Hold the trigger, the LED will flash the Eye Delay value.
4. Tap the trigger the number of times of the desired Eye Delay (1-50).
5. The LED will flash the number of taps you entered, then flash the
rainbow of colors, and stop on flashing green. The new value is set.
6. To exit programming mode, shut the marker off.
1. Plays Sounds on Start Up Only.
2. Plays Sounds on Shutdown Only.
3. Plays Sounds on Start Up and Shutdown
4. Mute, no sounds.
1. Hold the trigger, turn the gun on, and then release the trigger.
2. The LED will flash a rainbow of colors and stop on purple. Tap the
trigger until it stops on flashing white for Audio Options.
3. Hold the trigger, the LED will flash the Audio Option value.
4. Tap the trigger the number of times of the desired Audio Option (1-4).
5. The LED will flash the number of taps you entered, then flash the
rainbow of colors, and stop on flashing white. The new value is set.
6. To exit programming mode, shut the marker off.
Eye External Light Sensitivity: Flashing Red - Values 1 - 25 (default 8)
Eye External Light Sensi sets how sensitive the eyes are to light. Higher
values mean less sensitivity to light. Too high or too low a value, and the
eyes will not work. If eyes don’t work properly because of excessive
sunlight, raise this value a little at a time until the eyes can see a ball, then
increase it by 2. Make adjustments in bright light or in real lightning conditions.
Values are from 1 - 25 and default is 8.
1. Hold the trigger, turn the gun on, and then release the trigger.
2. The LED will flash a rainbow of colors and stop on purple. Tap the
trigger until it stops on flashing red for Eye External Light Sensi .
3. Hold the trigger, the LED will flash the Eye Light Intensity value.
4. Tap the trigger the number of times of the desired Eye Light Intensity (1-25).
5. The LED will flash the number of taps you entered, then flash the
rainbow of colors, and stop on flashing red. The new value is set.
6. To exit programming mode, shut the marker off.
Ringtone Selection: Changing the Default Ringtone
Depending on your playback setting, your gun’s ringtone will play on
start up or shutdown. To change the default song, press the eye
(bottom) button on the Destroyka grip while a song is playing and you
will skip you to the next song or press the power (top) button on the
Destroyka grip while a song is playing to skip to the previous song.
Using this method you can cycle forward and backwards through the
ringtones. The ringtone you stop on will be saved and used as the
default until changed again. Pressing the grip frame power button at
anytime will stop the ringtone playback. To play ringtones at any time
press both Destroyka grip buttons at the same time. The default
ringtone will change to whatever ringtone you leave it set to.
Virtue Shocker Breakbeam Laser Eyes - NOW AVAILABLE!
Breakbeam Eye Shockers Only
Dual Spectrum Technology - Infrared & Visible Light
Instantly confirm the eyes are on and working
#13
Eye Mode: Flashing Yellow- Values 1 - 2 (default 2)
All 07 (NXT) Shockers and newer currently use a breakbeam eye
system. All 03 – 06 (SFT) Shockers use a reflective eye system. You
need to set the Eye Mode setting of the Russian Legion Shocker Board
to match the eye system in your Shocker.
1. Reflective Eye Logic
2. Breakbeam Eye Logic
1. Hold the trigger, turn the gun on, and then release the trigger.
2. The LED will flash a rainbow of colors and stop on purple. Tap the
trigger until it stops on flashing yellow for Eye Mode.
3. Hold the trigger, the LED will flash the Eye Mode value.
4. Tap the trigger the number of times of the desired Eye Mode (1-2).
5. The LED will flash the number of taps you entered, then flash the
rainbow of colors, and stop on flashing yellow. The new value is set.
6. To exit programming mode, shut the marker off.
Troubleshooting
The Virtue Russian Legion Board is backed by a lifetime warranty and
guaranteed to be free of any defects for life. If you encounter any problems
with your Shocker please consult your Shocker user manual first, as the
problem may not be related to the Virtue Russian Legion Board.
Tip #1 When in doubt, replace the battery! Your marker will behave
erratically if your battery is low. ALWAYS USE HIGH QUALITY
BATTERIES!
Gun won’t turn on:
Check to make sure battery connected securely.
OR
Replace the battery.
Won’t go into programming mode:
Make sure tournament lock is unlocked [dip switch 2 “on”]
Rate of fire is slow:
Make sure you are using a fast hopper such as a HALO or VLocity with
fresh batteries.
OR
Reset your boards settings to factory default.
OR
Eyes may be dirty, damaged or blocked. Turn off eyes and dry fire with
no paint. If marker shoots fast, your eyes are dirty or damaged, or the eye
wiring harness needs to be replaced.
#12
1. Russian National Anthem
2. Star-Spangled Banner (USA Anthem)
3. Charge! (William Tell)
4. Air Calvary Attack (Wagner)
5. Classical (Beethoven)
6. Beep
#14
#14
Troubleshooting continued...
Gun will not fire (solenoid may or may not click):
Make sure you are using a new 9 volt battery.
OR
Make sure the trigger is making contact with the microswitch.
OR
Reset your boards settings to factory default.
OR
Increase the Dwell.
Poor air efficiency:
Decrease the Dwell.
Eyes are not working:
Make sure you are in the correct eye mode and that the eyes are on.
OR
Check the eye wire harness for broken or pinched wires
OR
Clean and realign eyes.
Breaking too much paint:
Note: Is it cold out? Paint gets brittle and breaks easily in the cold.
OR
If not using a force feed hopper, increase the Eye Delay.
OR
Verify that the eyes are turned on (pg 5).
Drop off:
Replace the battery.
OR
Lube the gun lightly. Make sure it is clean and fresh lube is present.
OR
Increase the Anti Bolt Stick.
OR
Increase Dwell.
Virtue Russian Legion Shocker Board specifications subject to change
without notice
http://www.virtuepaintball.com || Virtue Paintball, LLC