1
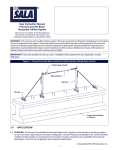
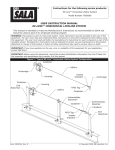
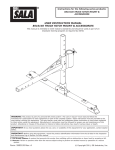
1 Prepare Workspace
Alternate Surface
tools needed
6.67 in.
(169 mm)
(For applications without a Baxter pedestal)
6.67 in.
(169 mm)
Drill
OR
Drill bit to fit M10 Screw
Tape measure
Level
If you purchased a pedestal, open and
assemble pedestal using the instructions
included in the pedestal crate.
To install Baxter on an alternate surface, use a
solid bench with a flat, level surface, and four
sturdy legs. Anchor the bench securely to the
floor.
6.67 in.
(169 mm)
Power requirement: 120 VAC 60 Hz 6A max.
Pneumatic line requirement: 60-90 psi
Air must be filtered and oil free
6.67 in.
(169 mm)
Baxter weighs 165 lbs. (75 kg)
Baxter faces
this way
1
Consider power outlet location, pneumatic line
location and workspace requirements. (See
Pre-Delivery Documentation or User Manual for
details of workspace requirements.)
2
Select mounting position on bench carefully so that
robot does not tip.
3
Using diagram as reference, drill 4 holes to fit
enclosed Hex Head Cap Screws. (If longer screws
are needed, use M10 screws.)
2 Place Baxter - See other side
3 Add Grippers - Open Gripper Box for instructions
www.RethinkRobotics.com Rethink Robotics and Baxter are trademarks of Rethink Robotics, Inc.
P/N: 25184
12/2012
1 Prepare Workspace - See other side
2
Place Baxter
tools needed
2
4 Hex Head Cap Screws (enclosed)
2 Carabiner Hooks (enclosed)
17mm Wrench
1/2˝ Wrench
5
Tape Measure
Flat Head Screwdriver
Hoist/lift rated for at least 250 lbs.
For Pedstal
1 Leave
stretch
wrap
around
arms
and arm
supports
in place
1
Remove outer plastic bag, and foam around head and
shoulders. Leave stretch wrap around arms and arm
supports in place until robot is mounted securely.
2
Attach 2 enclosed carabiners to shoulder bolts on the robot,
marked with blue tabs. Remove blue tabs after use.
3
Attach chain hooks from lift to carabiners and secure other
ends to lift.
4
Using 1/2” wrench, remove 4 bolts and washers from crate at
robot base. Throw away bolts with packaging.
5
For Alternate Placement
Power requirement: 120 VAC 60 Hz 6A max
Pneumatic line requirement: 60-90 psi
6
Insert 4 enclosed Hex Head Cap Screws into 4 holes at base
of robot. (If alternate surface requires longer screws, use M10
screws.) Tighten screws finger tight until flush. Using 17mm
wrench, TIGHTEN A HALF TURN MORE.
7
Once robot is secured, release chain hooks from carabiners.
Remove carabiners from shoulder bolts, and save in “Start
Here” box. Remove stretch wrap and arm supports.
8
Once in workspace, be sure robot is level. Use 4 leveling feet
on pedestal base. (See built-in round level near connectors).
9
Plug E-Stop into connector on robot waist. Use flat head
screwdriver to fasten. E-Stop must be plugged into robot for
robot to work. Then plug Baxter into 120V outlet. Manage
cords using cable channel and snap cable cover in place.
Air must be filtered and oil free
Baxter weighs 165 lbs (75 kg)
5
Shape of robot base
matches shape at top of
pedestal.
3 Add Grippers - Open Gripper Box for instructions
Match drilled holes in surface
to bolt holes in robot base.
Using black metal handles to guide robot, lift robot to
pedestal or alternate surface. Align robot base to bolt holes.
Note: It is normal for the robot to tilt forward while hanging on
a lift.
10
Press the “Power” button. Step back from robot’s reach.
Baxter will wake up to “Ready” position.