1
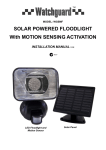
Set Time / Date
In the first 60 seconds after power up press the set and more buttons together once
Press the mode button twice
The hour section will begin to flash
Press the set button to set the appropriate hour then press the mode button
The minute section will begin to flash
Press the set button to set the appropriate minutes then press the mode button
The time will now be set and the display will now show the date.
The date is in MM: DD: YY format
The month section will be flashing first. To change the month press the set button the appropriate amounts of times
then press mode to move on to the day section.
Press the set button the appropriate amount of times to change the day then press the mode button to move to the
year section
Press the set button the appropriate amount of times to change the year then press the mode button
The word ESC will be flashing, press the set button to save and exit back to test mode
Press the set and mode button together once to exit back to normal mode
Set Record Mode
Hold down the mode button and continually press the set button to enter the setup menu
To begin with there will be a flashing picture of a camera. This signifies that a single picture will be there upon PIR
activation
Press the mode button to cycle to the next mode which is a flashing picture of a camera with the number 2 next to it.
This signifies that the unit will take a burst of 2 pictures upon PIR activation.
Press the mode button to cycle to the next mode which is a picture of a video camera. This signifies that the unit will
take a 10 second video clip upon activation.
Once you have found the necessary mode. Press the set button the word done will flash on the screen and the menu
will go to the next section (Resolution setup)
Set Resolution
The resolution set up is for still image capture if the unit is set for still image capture the two resolution options are 2.0
MP 0r 1.3 MP.
Once in the resolution set up screen the two resolutions are signified by stars. Three stars are 2 MP while one star is
1.3 MP. Press the mode button to cycle between the two. Once the correct resolution is chosen, press the set button
to go the next section (image capture interval).
Image Capture Interval
The unit can take pictures continuously on PIR activation or wait for a set amount of time between 1 minute and 60
minutes before taking another picture or recording video.
As default, the caption TO-00 will be displayed on the capture interval screen. This means that there is no interval and
images will be recorded any time the PIR detects motion.
If you would like the unit to wait for a set amount of time before recording new images, press the Set button to change
the number to the amount of minutes you need the unit to wait for before recording again. E.g. TO-01 will wait 1
minute before recording again or TO-59 will wait 59 minutes before recording again.
This option can save disk space but will reduce the amount of images taken for any 1 incident.
Once this option is set to the correct amount of minutes, press the mode button to move on to the next section
(Floodlight Activation Setup)
Floodlight Activation Setup
The floodlight can either be activated by the camera LUX sensor which will leave the floodlight switched on for the
entire amount of time that the LUX is below a certain level or it can be activated by the PIR and LUX sensor so that
the floodlight is only switched on when the LUX is below a certain level AND the PIR is activated.
If you would like the light to be on all the time the LUX is below a certain level, press the mode button until the work
Auto is flashing on the screen then press the set button to save.
If you would like the light to only be activated when the LUX is below a certain level AND the PIR detects motion,
press the mode button until the word Off is flashing on the screen then press the set button to save.
The word ESC will then be flashing on the screen. This is the end of the menu. If you are happy with the settings,
press the set button to save them and exit the menu. If you would like to go back through the menu to change any
settings, press the mode button to go back to the start.
Time Dial
The time dial on the left denotes how long the floodlight will stay on for after activation. When the dial is turned all the
way to the minus symbol, the light will stay on for 1 minute after activation whereas if the dial is turned all the way to
the plus symbol, the light will stay on for 5 minutes after activation. Any time between 1 and 5 minutes can be chosen
by turning the dial anywhere between the + and – symbols.
LUX Dial
The LUX dial on the right controls how dark it should be before the floodlight is activated. When the dial is turned all
the way to the sun symbol, the light will come on only when the LUX level is 0 LUX (pitch black).
When the dial is turned all the way to the moon symbol, the light will be activated when the LUX level is very high
(daylight).
Usually, the dial will need to be somewhere in the middle of the two but proper walk testing is recommended to get the
level right.
For more detailed instructions, please refer to the user manual or call or premium technical support line on
0906 505 0248 (calls are charged at £1.50 per minute, maximum call duration is 20 minutes).