Download CE0124 Flexible Cryo Probes
Transcript
ERBE
Check the product (including connection hose, probe coupling and
O-rings) for damage every time before it is used.
If damaged, do not use this product!
In particular, do not use a product with an application element that
is kinked, crimped or has surface damage.
30416-170
Check the product function and seal before each use.
Sheet 1 / 2
USA
Manufacturer:
ERBE Elektromedizin GmbH
Waldhörnlestr. 17
72072 Tübingen, Germany
Tel. +49 7071 755 0
Fax +49 7071 755 179
EMail: [email protected]
www.erbe-med.com
Distributed by (USA Territory):
ERBE USA, Inc.
2225 Northwest Parkway
Marietta, GA 30067
Customer Support: 800 778 ERBE (3723)
Tel. (770) 955 4400
Fax (777) 955 2577
EMail: [email protected]
www.erbe-usa.com
CE0124
04.13
20416-031
20416-036
Never lay this product on the patient or in his/her direct vicinity.
Flexible Cryo Probes
The probe coupling must be closed with the protective cap in transport, storage and sterilization.
IMPORTANT!
Protect this product from any form of mechanical damage! Do not
throw! Do not use force!
Please read all information carefully.
These notes on use do not replace the user manual of the cryosurgical unit used! Read the user manual of the cryosurgical unit and
ask ERBE or your distributor in case of doubt!
This Cryo Probe may only be used by trained medical staff that has
been instructed on its use based upon these notes on use.
Only roll up the application element loosely; do not kink or crimp it.
Only roll up the connection hose loosely; do not kink or crimp it.
Only transport and store the product in the original packaging or in
packaging that offers equivalent protection.
Caution! Federal law (USA) restricts this device to sale by or on the
order of a physician!
ERBE Elektromedizin expressly warns against modifying the product.
Any modification exempts ERBE Elektromedizin from any and all liability.
1 Normal Use
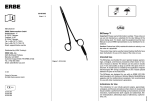
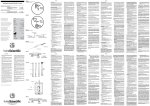
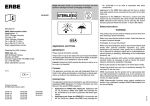
3 Product Overview
The ERBE Flexible Cryo Probe used with the ERBE ERBOKRYO CA
Cryosurgical Unit is intended for devitalization (destruction) of tissue
during surgical procedures by the application of extreme cold and
for removal of foreign bodies, mucous plugs, necrotic tissue, and tissue biopsy by cryoadhesion. Also see Clinical Indications in the
ERBOKRYO CA User Manual.
4
3
5
The Cryo Probe is attached via a Connecting Adapter (P/N 20416035) to the ERBOKRYO CA.
2 Safety Instructions
WARNING!
Printed in Germany
© ERBE Elektromedizin GmbH
Never use a product that is not leak-tight or a product with inadequate freezing capacity. There is a risk that a gas embolism could develop if an application element is used that is not leak-tight.
Pacemakers can be impaired or damaged by exposure to cold. If the
operating site is in the direct vicinity of a pacemaker, it is absolutely
essential to consult a cardiologist prior to performing an operation
with a Cryo Probe!
Check gas pressure on the unit. The Cryo Probe can be operated in
a pressure range from 580 to 870 PSI (40 to 60 bar). Do not expose
the Cryo Probe to pressure above 870 PSI (60 bar) (red zone on the
pressure gauge).
2
1
2
3
4
5
1
Probe coupling (with protective cap screwed on)
Connection hose
Handle
Application element
Cryotip
4 How to Use
Clean/disinfect and sterilize this product before using it for the first
time and before every subsequent use.
Prior to use, let the Cryo Probe cool to room temperature.
4.1
Checking the Product
3. When the tissue has frozen, deactivate the freeze function of the
ERBOKRYO CA and wait until the cryotip has thawed completely.
5 Cleaning, Disinfection, Sterilization
Note: When the cryotip has thawed completely, it can be removed
from the tissue with minimal effort. Do not remove the cryotip by
rotating or pulling.
May be cleaned in an ultrasonic bath.
5.1
Safety Instructions
On no account use sharp or abrasive objects for cleaning purposes.
The probe coupling must remain sealed during the entire preparation process with the protective cap. Moisture penetrating into the
tubing system causes malfunctioning.
If damaged, do not use this product!
4. Carefully remove the cryotip from the tissue.
5. Remove the instrument from the endoscope. Make sure that the
angle of the endoscope is not too severe and the probe is not
crimped.
In particular, do not use a product with an application element that
is kinked, crimped or has surface damage.
Extracting tissue samples, removing foreign bodies, recanalization (through tissue extraction)
Only roll up the connection hose loosely; do not kink or crimp it.
4.2
Avoid unintentional contact between healthy tissue and the freeze
zone of the activated Cryo Probe, e.g. by using a tube.
Maximum air pressure during drying: 29 psi (2 bar).
1. Insert the instrument through the working channel of the endoscope.
2. Place the cryotip on the target tissue or foreign body while applying light pressure, and activate the freeze function of the
ERBOKRYO CA.
3. For removal, perform the following steps:
– Remove the tissue or the foreign body by withdrawing the
instrument together with the endoscope from the operating
field. Do not rotate the cryo instrument.
– Withdraw the endoscope together with the instrument.
4. To transfer the sample, deactivate the freeze function of the
ERBOKRYO CA and allow the instrument to thaw completely
(e.g. immersed in a collection tube filled with liquid).
5. Remove the instrument from the endoscope. Make sure that the
angle of the endoscope is not too severe and the probe is not
crimped.
During machine cleaning and disinfection, do not exceed 203 °F
(95 °C).
1. Check the product (including connection hose, probe coupling
and O-rings) for damage.
Connecting the Product
1. Unscrew the protective cap from the probe coupling.
2. Screw the Cryo Probe to the connecting adapter (art. no. 20416035) fitted on the ERBOKRYO CA.
4.3
Checking Function and Seal
Perform the check in a well-lit location.
1. Immerse the cryotip to a depth of at least 2.0" (5 cm) in sterile
warm water (alternatively: isotonic NaCl solution) at a temperature of approx. 68 °F (20 °C).
2. If small bubbles develop during immersion: Diffuse the bubbles
by briskly moving the cryotip back and forth in the water.
3. Activate the freeze function of the ERBOKRYO CA for approx.
5 seconds.
A clearly visible, homogenous ball of ice must form at the cryotip
when freezing capacity is sufficient. Gas bubbles must not escape
under any circumstances.
Never use a product that is not leak-tight or a product with inadequate
freezing capacity. There is a risk that a gas embolism could develop if
an application element is used that is not leak-tight.
4.4
Using the Product
Note: To prevent the cryotip from freezing to the inside of the endoscope, the metal cryotip should be fully extended outside of the
working channel of the endoscope throughout use. The first black
ring must be visible.
Devitalizing tissue, recanalization (as a result of tissue necrosis)
1. Insert the instrument through the working channel of the endoscope.
2. Place the cryotip on the target tissue while applying light pressure, and activate the freeze function of the ERBOKRYO CA.
4.5
Disconnecting the Product from the Unit
1. Unscrew the Cryo Probe from the connecting adapter (Art. No.
20416-035).
2. Screw the protective cap onto the probe coupling.
4.6
Precleaning the Product in the Procedure Room
1. Use a soft disposable cloth to remove any obvious contamination immediately after use and/or place the product in deionized
water.
Only roll up the application element loosely; do not kink or crimp it.
Disinfectants must be rinsed off thoroughly after use.
Maximum water pressure during rinsing: 29 psi (2 bar).
It is essential to follow the cleaning agent and disinfectant manufacturers’ instructions.
During sterilization, do not exceed 280 °F (138 °C).
Do not sterilize in hot air oven.
5.2
Reconditioning Limitation
The Cryo Probe 30416-031 must be tested in each case after
100 uses/sterilizations, but at least once per year.
The Cryo Probe 30416-036 must be tested in each case after
30 uses/sterilizations, but at least once per year.
Please contact ERBE USA for the test.
5.3
Recommended Processing Agents/Equipment
The listed cleaning/disinfection agents and sterilization equipment
have been validated with the following processing procedures.
• Manual cleaning/disinfection with the detergent Cidezyme ®
LF/Enzol and disinfectant Cidex ® OPA (Johnson & Johnson
Medical Limited, Gargrave, Skipton).
• Cleaning/disinfection by machine in a disinfector G 7836 CD
(Miele & Cie. KG, Gütersloh/Germany) using neodisher ® mediclean forte detergent (Dr. Weigert GmbH & Co. KG, Hamburg/
Germany) in accordance with the recommended washing program.
• Autoclave.
ERBE
5.4
30416-170
Sheet 2 / 2
Recommended Methods
ERBE recommends the preparation procedures described below.
Equivalent different procedures are possible if not explicitly excluded. It is incumbent on the user to ensure the suitability of the actual
procedures used by means of suitable measures (e.g. validation, routine monitoring, check of material compatibility).
5.5
Required Aids
Reprocessing
step
Manufacturer:
ERBE Elektromedizin GmbH
Waldhörnlestr. 17
72072 Tübingen, Germany
Tel. +49 7071 755 0
Fax +49 7071 755 179
EMail: [email protected]
www.erbe-med.com
Items Needed
5.8
Precleaning
Soft plastic brush/soft disposable cloth
Manual cleaning/
disinfection
Soft plastic brush/soft disposable cloth
(low particle)
Compressed air gun (29 psi/2 bar maximum)
Sterilization
Recommendation: Cleaning and sterilization container with filter (e.g. art. no.
P651830M)
Distributed by (USA Territory):
ERBE USA, Inc.
2225 Northwest Parkway
Marietta, GA 30067
Customer Support: 800 778 ERBE (3723)
Tel. (770) 955 4400
Fax (777) 955 2577
EMail: [email protected]
www.erbe-usa.com
5.6
Precleaning
Use water for precleaning, a non-fixing disinfectant if necessary.
1. Make sure that the probe coupling is securely closed using the
protective cap.
2. Remove surface contaminants with a soft brush/cloth while
holding the product in a water bath and/or rinsing the product
under running water.
5.7
Manual Cleaning and Disinfection
Use a liquid detergent suitable for soaking.
CE0124
04.13
Printed in Germany
© ERBE Elektromedizin GmbH
20416-031
20416-036
4. Rinse the surfaces with sterile, deionized water (at least
1 minute).
5. Repeat the preceding cleaning steps if the product or used rinse
water still contains visible contamination.
6. Immerse the product completely in the disinfectant bath, without the product touching other parts in the bath. Observe the
recommended immersion time.
7. Rinse the surfaces with sterile, deionized water (at least
1 minute).
8. Dry the product with filtered compressed air.
Use a disinfectant compatible with the detergent suitable for soaking.
The detergent and disinfectant must be suitable for medical devices
made of plastic and metal and have a pH value between 5.5 and 11.
Prohibited ingredients: organic solvents, oxidizing agents, halogens,
aromatic/halogenated hydrocarbons.
It is essential to follow the cleaning agent and disinfectant manufacturers’ instructions.
1. Prepare a cleaning bath and a separate disinfecting bath according to the manufacturer's instructions.
2. Immerse the product completely in the cleaning bath, without
the product touching other parts in the bath. Observe the recommended immersion time.
3. Thoroughly clean the surfaces with a soft brush/soft disposable
cloth.
Cleaning and Disinfection by Machine
The washer/disinfector must have fundamentally certified effectiveness (e.g. CE marking according to DIN EN ISO 15883).
The detergent and disinfectant must be suitable for medical devices
made of plastic and metal and have a pH value between 5.5 and 11.
Prohibited ingredients: organic solvents, oxidizing agents, halogens,
aromatic/halogenated hydrocarbons.
It is essential to follow the cleaning agent and disinfectant manufacturers’ instructions.
1. Place the product in a suitable rinsing basket carefully. In doing
so make sure the product is not touching other instruments or
parts of instruments.
2. Start a tested program with the following properties:
– Thermal disinfection (5 to 10 minutes at 194 to 199 °F [90
to 93 °C] – with a tolerance in accordance with DIN EN
ISO 17665, A0 ≥ 3000).
– Final rinse with distilled or deionized water.
– Sufficient product drying.
3. If contaminants are still visible on the product after the end of
the routine, repeat precleaning and machine cleaning and disinfection.
5.9
Checking
1. Check the product for visible damage and wear:
– Damage to the product, e.g. cracks, rough surface, splintering.
– Damage to the product insulation and/or cable/connector
insulation, e.g. cracks and breaks.
– Damage to the coating of the cryotip.
– Kinking and crimping of the application element.
If damaged, do not use this product!
5.10 Packaging
The product must be protected against damage during sterilization.
1. Pack the product in disposable sterilization packaging (single or
double packaging) made from paper/polyethylene and/or in a
sterilization container.
5.11 Sterilization
Only sterilize products that have been cleaned and disinfected.
ERBE Elektromedizin recommends steam sterilization with the method described below. If other sterilization methods are used, ERBE
Elektromedizin shall bear no responsibility.
Steam sterilization
• Pre-vacuum method with adequate product drying
• Holding time 3 to 18 minutes at 270 to 275 °F (132 to 135 °C)
– with a tolerance in accordance with DIN EN ISO 176655
• Sterilizers in accordance with applicable national standards and
regulations (e.g. DIN EN 13060 or DIN EN 285)
• Sterilization process validated according to DIN EN ISO 17665
Please follow the recommendations issued by the sterilizer manufacturer concerning loading, handling, etc.


