1
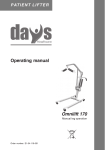
USER MANUAL
Days Healthcare Link Wheelchair
Warranty
Information
User Manual
Days Healthcare Link manual wheelchairs are warranted for 24 months from the date of
purchase on frame and crossbars.
• During the warranty period any parts that have become defective due to faulty
•
•
•
•
•
workmanship or material will be repaired or replaced without charge by Days
Healthcare supplier/dealer
The warranty excludes tyres, punctures and items that become worn due to normal
wear and tear such as upholstery and armrest pads
The warranty excludes all items that have been subject to undue wear and tear and
misuse
Unauthorised changes or modifications will forfeit your warranty
If a defect or fault is discovered, the Days Healthcare supplier/dealer from whom the
Wheelchair was purchased should be notified immediately
The maximum user weight is 130kg (20 stone)
Link
Limitation of liability
The warranty does not extend to the consequential costs resulting from fault clearance,
in particular freight and travel costs, loss of earnings, expenses, etc.
The manufacturer will not accept responsibility for any damage or injury caused by
misuse or non-observance of the instructions set out in this user manual.
Dealer Stamp
Days Healthcare Ltd • North Rd • Bridgend Industrial Estate • Bridgend • CF31 3TP
Tel: +44 (0) 1656 664700 • Fax: +44 (0) 1656 664750 • Email: [email protected]
www.dayshealthcare.com
Days Healthcare Ltd reserves the right to change the specifications without prior notice.
D/N: W1-053-01
Link TR
Link SP
Aluminium Manual Wheelchairs
Days Healthcare Link Wheelchair
User Manual
Days Healthcare Link Wheelchair
User Manual
Technical Specifications
Table of Contents
Transit
Introduction
4
Manual Brake
9
Intended Use
4
Folding Back
9
Technical Description
4
Folding the Chair
9
Feature Guide
5
Unfolding the Chair
10
Safety Guidelines
6
Removal of Rear Wheels
10
Safe Operation
7
Fitting Rear Wheels
10
Self propelled
Seat Width
36 - 48 cm (14” - 19”)
36 - 48 cm (14” - 19”)
Seat Depth
43 cm (17”)
43 cm (17”)
Seat Height (front)
50 cm (20”)
50 cm (20”)
Seat Height (rear)
47cm (18½”)
47cm (18½”)
Backrest Height (min)
41cm (16”)
41 cm (16”)
Backrest Height (max)
45 cm (18”)
45 cm (18”)
Adjustment Procedures
8
Basic Propulsion
10
Footrest Length (min)
40 cm (16 ”)
40 cm (16 ”)
Footrest Adjustments
8
Transferring to and from the Chair
11
Footrest Length (max)
49 cm (19½”)
49 cm (19½”)
Heel and Calf Straps
8
Tyres
11
Armrest Height
25 cm (10”)
25 cm (10”)
Backrest Height
8
Slopes & Gradients
11
Overall Length - W Footrests
101cm (40”)
101cm (40”)
Seat Belt
8
Transportation
12
Overall Length - W/O footrests
79cm (31”)
79cm (31”)
Anti-tippers
8
Maintenance Inspection
13
Overall Width (open)
62cm (24½”)
62cm (24½”)
Operations of Use
9
Cleaning
13
Overall Width (folded)
30cm(12”)
30cm(12”)
Footrests
9
Technical Specifications
14
Overall Height
92cm (36”)
93-98cm(36½ - 38½”)
Overall Height - Back folded
76cm(30”)
75 - 80cm(29½ - 31½”)
Armrests
9
Folding Handle Length
20cm(10”)
20cm(10”)
15.5kg
17.5kg
N/A
14kg
130kg (20stone)
130kg (20stone)
Chair Weight
Chair Weight without Wheels
Maximum User Weight
- 14 -
-3-
Days Healthcare Link Wheelchair
User Manual
Introduction
Maintenance & Inspection
Welcome to the Days Healthcare Link manual wheelchair and thank you for choosing our product. This latest model has been designed with specific practical user
needs in mind. It combines solid, rugged construction, safety and performance. We
are confident that it will prove a reliable companion in your home as well as outdoors.
We recommend that your wheelchair is serviced by your local dealer every
twelve months. It is in your best interests, not only to ensure your personal safety
but also to ensure long life and reliability. Regular service will identify early
damage and worn components avoiding unnecessary faults occurring.
This manual contains some useful tips and information on safety, operation and
maintenance. Please read it carefully to ensure that you get maximum enjoyment and
benefit from your new independence and mobility.
Whenever you require special advice and attention do not hesitate to contact your
local Days Healthcare dealer. He has all the equipment and know-how to provide an
expert service and assistance on technical and clinical applications to suit your particular need.
Weekly check that:
• Manual brakes do not rub the tyres and secure the wheel when locked
• Castor bolts are tight and all fasteners are secure
• Arms operate and lock securely in front of rear sockets
• The drive wheels axles are secure and there is no excessive side movement or
binding when spun
• Tyres do not show excessive wear or damage
• Castors for proper tension, i.e. spinning castors should come to gradual stop
Intended Use
The Link manual wheelchairs are intended to assist and improve mobility for those
individuals who are less able or have walking difficulties who wish to maintain their
independence and freedom.
Your day to day activities will depend on your physical capabilities and your own
specific circumstances. If in doubt seek medical advice first.
The information is this booklet provides a general guide on how to use your chair
safely and correctly. Do not use the chair without reading this manual first.
Technical Description
The Days Healthcare Escape manual wheelchair has a maximum carrying capacity
of 130kg (20stone) which must never be exceeded. It is classified as an ‘Invalid Carriage’ for use indoors, on pavements, footpaths, pedestrian zones and areas free from
motor traffic. Use on the road or highway is not allowed except for the purpose of
crossing.
-4-
Monthly check that:
• Tyres are not excessively worn
• Handrims do not have sharp edges or any abrasion
• The chair rolls straight (no excessive drag or pull to one side)
• Pivot points are free of wear or looseness
• Seat and backrest upholstery is not for ripped or sagging
• Frames are not worn or bent
Cleaning
Paintwork and plastic mouldings can be cleaned with a damp soft cloth of warm
soapy water. Do not use any harsh abrasive cleaners, bleach base fluids or
solvents.
Seat and back upholstery can be cleaned with a general purpose upholstery
cleaner or sponged with warm soapy water.
- 13 -
Days Healthcare Link Wheelchair
User Manual
Transportation
Feature Guide
We recommend that you do not sit on your Wheelchair when in a vehicle, but
transfer to a vehicle seat. A Wheelchair secured in a vehicle will not provide the
equivalent safety level and security as the vehicle’s seating systems.
However, when transfer is not practical or impossible, ensure the following:
1) Check that the vehicle is suitably designed, insured and equipped to transport
a passenger seated in a Wheelchair
2) Remove any part of the Wheelchair (accessories, etc.) that can be easily detached
and store it in the vehicle’s luggage hold
3) Make sure the Wheelchair is transported in a forward facing direction. Rearward
facing is only acceptable if the passenger’s head and back can be supported by a
suitable bulkhead
4) Use the buckle seat belt (if fitted) with your chair as additional restraint
Link TR
Folding Back
Armrest
Manual Brake
Footrest
Footplate
Transit Wheel
Front Castor
Link SP
Folding Back
Armrest
Self-propelled Wheel
We recommend that the wheelchair is secured within the vehicle using the 4point webbing tie-down system with Karibiner, model no WWR/ATF/K/R
(available from Unwin Safety Systems based in Yeovil, U.K.)
Note: Although safety during transportation largely depends upon the diligence
of the person securing the tie-downs and passenger restraints it is the user’s responsibility to ensure that the wheelchair has been safely secured.
Footrest
Hand rim
Footplate
Front Castor
- 12 -
-5-
Days Healthcare Link Wheelchair
User Manual
Safety Guidelines
Do not use on the road, except when crossing between pavements. When
crossing the carriageway of a public road always take extra care and observe
the Highway code
Do not ride over deep, soft terrain (soft dirt, loose gravel, deep grass)
Do not attempt to mount a kerb without assistance
Do not carry passengers
We recommend that you do not sit on your wheelchair when in a vehicle, but
transfer to a vehicle seat
Always engage a slow speed when going down gradients
Do not ride in reverse down a slope or kerb
Always keep your feet on the footplate when moving
Do not stand on the footplate when getting in or out of the chair
We recommend the use of safety belt
Always keep your pneumatic tyres to the correct pressures
Do not use parts, accessories or adapters other then those authorised by Days
Healthcare Ltd
Keep the wheelchair away from children. It is not intended to be used as a toy
The manual parking brakes are not designed for slowing-down
Rear Wheel Setup
This product is supplied as standard with the rear axle bracket in the forward
position giving a more active driving position. If the user needs to have a more
stable position the rear axle fixing plate can be re-located to give a longer
wheelbase and provide a more stable driving position.
To Change Axle Position on Rear Wheel Setup
1.Remove wheels TR versions are bolted, For the SP please refer to page 10
2. Unbolt axle brackets and re-locate to the required position. Repeat the process
for the opposite side ensuring both axles are correctly located and all fixings are
secure.
3. Refit wheels ensuring that the two inner ball bearings lock the wheels in place.
4. Slacken off the brake fixing bolts and re-align brakes to approximately 20mm
from the tyre in the unlocked position. Tighten bolts and check function of
brakes.
-6-
Transferring to and from the Chair
Circumstances and individual needs will vary from person to person, but if there
are difficulties we advise you to consult your therapeutic advisor who will help
you to develop your skill for appropriate transfer method that suits you.
During transfer always make sure that the brakes are in a locked position and the
wheelchair is manoeuvred as close as possible to the transfer seat
Tyres
Regularly check the condition of front & rear tyres for wear and tear. Contact
your supplier for replacements.
If you have pneumatic tyres fitted, the pressure indicated on the side of the tyre
wall should not be exceeded.
Slopes and Gradients
Do not attempt to climb or descend beyond your limitations
to avoid tipping over.
Climbing Upwards
Lean the upper body forward and move the wheelchair forwards with short quick pushes on the Handrims.
Downward Travel
BE CAREFUL
Lean backwards in the chair and let the handrim slide gently
through your hands to control downward speed and direction.
Note: - When travelling down or up a slope, avoid sharp
turns, zigzag movements or moving across the slope
- 11 -
Days Healthcare Link Wheelchair
User Manual
Unfolding the Chair
When both wheels have been secured (SP version), grasp both side frames of the
wheelchair and pull apart as far as possible or at least until there is sufficient
room to push down on the sides of the seat canvas.
The chair is fully open when the seat canvas is taut and flat.
Safe Operation
When using indoors beware of narrow doors, steps, high surfaces, protruding
wall fittings and everyday household items such as children’s toys, electrical
appliances etc. Take extra care in kitchen environments.
To ensure stability and safe control you must maintain proper balance at all
times. The wheelchair is designed to remain stable during normal use as long as
you do not move you centre of gravity outside the normal seating position.
When reaching/bending forward do not lean your body out of the wheelchair further
than the length of the armrests. Do not attempt to reach objects by sliding forwards to
the edge of the seat.
When reaching/bending backwards do not reach any further than your arm will
extend without changing your seating position.
Never attempt to use an escalator or stairway, always use a lift.
Removal of Rear Wheels SP (Self-propelled Model)
Occasionally check that the adjustments of the footrests, armrests and controller
are secure and are set in the most comfortable position for use.
The rear wheels are removed by depressing the rubber cover at the centre of the
wheel hub and withdrawing the wheel.
Fitting Rear Wheels (Self-propelled Model)
The Link SP wheelchair is fitted with quick release rear
wheels. It is important to ensure that wheels are correctly
fitted to avoid accidents.
To fit rear wheels depress rubber cover at the centre of the
wheel hub and push the wheel spindle firmly into the axle
bush, ensuring that both ball bearings are fully exposed
beyond the axle bush.
Once located, test the wheel for security by pulling the wheel firmly in an attempt
to remove it without depressing the rubber cover.
Basic Propulsion
To move forwards or backwards, the user should release the brakes, grasp the
handrims (attached to rear wheels) and with a pushing action rotate them
forwards or pull them backwards respectively.
To move to the right, hold the right handrim steady and push forward with the
left handrim. To move to the left, hold the left handrim steady and push forward
the right handrim.
- 10 -
-7-
Days Healthcare Link Wheelchair
User Manual
Adjustment Procedures
Operations of Use
Footrest Adjustments
Footrests
Using the hexagon key provided, unscrew the screws located on the rear of the footrest support tube (arrowed).
Your footrests are capable of being rotating inwards and outwards. To achieve this pull the release lever (arrowed right) upwards and rotate footrest in the required direction. The footrest
may be removed whilst in either position but not whilst in the
normal central position (as pictured).
Slide the footrest inner tube up or down to the required
position and secure in using both screws.
Armrests
Heel and Calf Straps
Your wheelchair is equipped with heel straps which are secured to the footplates
Backrest Height
a
Both armrests are swing-back and removable. To operate, push the release
lever (a) and lift arm out of front socket.
Rotate arm through 90° to rear of chair.
The backrest tubes slide into the rear tube of each side frame through which each
has a screw and hand wheel to secure.
To remove armrest pull plunger (b) and
hold whilst simultaneously pulling the
arm from the rear socket.
To adjust the backrest, remove both screws and adjust to the required height and
refit screws to secure.
Refit in the reverse order.
b
c
Illustration shows TR model
Manual Brake
Seat Belt (if fitted)
Hold the bayonet end in one hand, and pull on the webbing to increase or
decrease belt length with the other. When length is correct, adjust slide buckle to
suit.
Adjustable anti-tippers
These are fitted at the rear of the chair, adjacent to the rear wheels
Days recommends that these are fitted and correctly adjusted to the individuals
needs, especially when climbing kerbs and gradients.
To adjust, using forefinger and thumb ease the steel washer (arrowed) until the
tube can be moved to the desired position, release the washer to
lock the tube. To ensure the tube is secure try to move the tube, if
it is not locked it will move until it automatically locks with an
audible click.
The parking brake (c) which is applied manually to the tyres whilst the chair is
parked or stationary. To apply the brake, move the lever until the locking bar is
locked firmly onto the tyre.
Folding Back
This is available to reduce the overall height of the chair to
allow easier transportation. Whilst at the rear of the chair,
grip the small lever (arrowed opposite) and pull away from
the chair to release the pin allowing the handle section to be
folded down.
Folding the Chair
Remove the seat cushion (if fitted). The wheelchair is folded by grasping the seat
canvas at the front centre with one hand and at the rear with the other. A simple
lifting action will draw both sides of the chair together into the folded position.
-8-
-9-