1
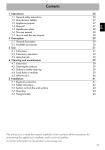
Operating Instructions
Easy Line, Basic Line
Boiling pan
DOC. NO. ST0 9168-60
EDITIoN 1 2014.01
9
fig.5
fig.5
1.
2.
3.
4.
5.
6.
7.
8.
9.
10.
11.
12.
13.
14.
4
Pilot lamp
Power control
Tilt
Hot water connection, DN15 (G1/2")
Cold water connection, DN15 (G1/2")
Electrical junction box. Connection from front.
Tap for hot and cold water.
Left pillar. Only supplied on special order.
Steam trap
Safety valve
Vacuum valve
Floor drain. Only supplied on special order.
Flange for test gauge
Gauge
14
10
11 13
General description of product
Before taking the pan into use
These directions for use apply to Boiling pan Easy Line/Basic
Line. Additional information is given in our manual entitled
‘Cooking’*.
IMPORTANT. Pressure Pans are covered by the requirements
of the Factories. Act through the Health and Safety
Executive. Additional special insurance cover is required. For
insurance purposes a copy of the Appliance Test Certificate
must be available prior to appliance insurance inspection
clearance and held at all times. Inspection via the Insurance
Company will be required 26 months after commisioning and
every 12 months thereafter.
A plate on the rear of the pan gives the values.
*
Not supplied. Can be ordered from the supplier or the supplier’s
representative.
General instructions
If the instructions given in this and other documents are not
followed, the safety of the product may well be jeopardised,
and the supplier’s warranty commitment and product liability
will no longer be valid.
•
Read the instructions in this document carefully as they
contain important safety information relating to installation,
operational reliability, use, and maintenance of the product.
Keep the document in a place where it is available for all
users.
All service, maintenance, and repair of this product must be
performed by a specially trained technician. Only genuine
parts may be used when replacing parts. Refer to the
Service instructions* and Parts catalogue*.
Handling and maintenance of this product must be
performed only by a specially trained operator.
When the cooking vessel is in operation, only the operator
should be in the immediate vicinity of the vessel.
•
•
•
*
Not supplied. Can be ordered from the supplier or the supplier’s
representative.
Range of application
The Boiling pan is designed for cooking and shall on no
condition be used in any other way or for any purpose other
than what is described in these directions for use.
Boiling pans Easy Line/Basic Line can be used for cooking,
heating and mixing food products.
CE - Direktiv
The Easy Line/Basic Line is manufactured in accordance with
the directive MD 2006/42/EG, LVD 2006/95/EG, EMC 2004/108/
EG and are CE-marked. (fig 1)
WEEE
The symbol on the product indicates that this product should
not be treated as domestic waste, but must be correctly
disposed of in order to prevent possible negative consequences
for the environment and the human health.
Regarding the recycling of this product, please contact the sales
agent or dealer of your product, your after-sales service or the
appropriate waste disposal service.
22
Filling the pressure vessel with water
Must be carried out by trained personnel.
Before the cooking vessel is taken into service, the pressure
vessel must be filled with water.
Pan with automatic water filling of vessel
See fig.5
NB! Water must be connected in before the pan is energized.
• When the boiling pan is energized the vessel fills
automatically with water to the right level.
Pan without automatic water filling of vessel
See fig.5
• Turn "Tilting" and set the boiling pan at approximately a 45°
incline.The lid must be up before the boiling pan is tipped.
• Unscrew the plug at the back of the cooking vessel.
• Fill with water through the nipple, up to the hole.
• Turn “Stop tilting” and reset the boiling pan to work
position. The excess water will run out until the correct
water level is reached in the cooking vessel.
• Using the appropriate tool, replace the plug.
Ensure that the sealing washer is still in place on the plug.
Neither steam nor water should leak out when the cooking
vessel reaches its operating pressure.
The water level in the vessel should be checked at least once
in a month.
Safety instructions
Switch off the current supply before remedying any faults or
operational disruption.
• Adjust the ”Operating switch” (2) to pos. 0.The signal lamp
will go out.
• Switch off the ‘Isolating switch’ (Not on the boiling pan).
Warning!
Electricity!
The warning sign shown in fig. 2 identifies the electrical control
unit of the machine. The cover plate for the electrical cabinet
and other cover plates may be opened only by specially trained
technicians.
Warning!
Hot
The warning sign shown in fig. 3 warns of heat and steam.
Care should be exercised as high temperatures can come into
question.
Warning!
Do not aim a jet of water directly at the pillar or the outer
side of the boiling pan.
- If water comes into contact with ‘live’ parts of the boiling
pan, this would be extremely dangerous.You should always
be very careful when cleaning close to electric parts.
- Use a slightly moist rag when cleaning.
Safety valve
Vacuum valve
Vacuumvalve fig. 7 pos. E opens at fast cooling down of hot
boiling pan.
Operator information
Before working on the product, the operator should:
- acquire sufficiently good knowledge of handling and
maintenance;
- locate every warning plate and clarify their purpose;
- read through the safety instructions and warning texts very
carefully.
- read the General instructions.
Automatic water filling See fig.5
The water level for the heating elements in the steam jacket
must be inspected regularly.
Pan with automatic water filling of the steam jacket adjusts the
water level automatically.
The water level in the steam jacket for the pan without
automatic water filling is inspected manually.
A properly functioning safety valve is a vital part of the boiling
pan´s safety system.
The safety valve opens, fig. 7; A, when the pressure exceeds
0,5 bar.
• Switch off the cooking vessel immediately and call in a
trained technician.
• Continuing to flow out water through the safety valve, shut
off the incoming water at the shutoff valve and contact
qualified technician.
Warning!
If the safety valve opens, fig. 7 pos. A, hot steam will blow out
from the valve.
Regular checks of the safety valve must be carried out by
trained personnel.
SAQ recommends: once per week.
Checking the safety valve
• Lift the handle so that the steam has a free passage through
the safety valve, fig. 7A; A:1 and 7A; A:2.
If the valve cannot be made to “blow” it should be replaced
immediately. Call in a trained technician.
Pressure gauge
Pressure gauge fig. 7 pos. B, for the steam pressure. Must not
exceed 0,5 bar.
If the pointer is entering the red field
• Interrupt the operation and call for a trained technician.
Steam trap
The steam trap, fig. 7 pos.C, releases the cold air from the steam
generator when the boiling pan is started. When the water
in the steam generator begins to boil and hot steam starts to
stream out, close the steam trap.
23
Cleaning
Supplementary equipment and accessories
After use and for daily cleaning of the boiling pan
• Use a neutral washing-up agent + warm water.
- Empty the vessel, wash out and rinse thoroughly.
• Be extra thorough during cleaning and rinsing if salt has
been used during cooking in the pan. Salt which is allowed
to become dried on can damage the cooking receptacle
surface.
• The cooking vessel’s external stainless steel surfaces
should also be cleaned with warm water, where necessary
combined with a neutral washing up/cleaning agent and a
soft brush or sponge.
• The panel and knobs should be wiped with a damp cloth.
• Do not use steel wool or abrasive cleaning agents when
cleaning stainless steel surfaces.
• Do not use cleaning agents containing chlorine (e.g. chlorine
bleach). Chlorine and chlorine compounds which come into
contact with stainless steel can damage the surface.
Equipment
Dipstick
For hard (calcium rich) water
Dry the boiling pan on the inside after use each day with a soft
cloth or paper dampened with vinegar.
When the equipment is not in use
Follow the instructions given below when the boiling pan is not
used for a longer period of time.
• Clean the boiling pan.
• Switch off the boiling pan at the main switch
• Adjust the ”Operating switch” (2) to pos. 0.The signal lamp
will go out.
• Switch off the ‘Isolating switch’. (Not on the boiling pan).
• Open the lid to allow air to circulate and thus prevent
mould and bad smell developing in a closed space.
• Switch off the water supply. Call in trained personnel.
Fig 1
24
Fig 2
Accessories Strainer plate
Insert baskets
Lift hooks
Bottom cross-piece
Cooling coil
Technical data
Data plate (fig. 4)
The product number of the boiling pan is given on the data
plate, which is located on the side of the boiling pan pillar and in
the junction room, and also on the manufacturer´s declaration
enclosed with the product on delivery.
Sound level:
<70 dB
Other documents
Manufacturer´s declaration
Installation instructions
Service instructions*
Spare parts catalogue*
Cooking manual*
*
Not supplied. Can be ordered from the supplier or the supplier’s
representative.
Fig 3
Fig 4
SWITCH ON/OFF
Adjust the ”Operating switch for
heating” (2) to position 0.
Signal lamp (1) will go out.
When signal lamp is out the heating of
the boiling pan is disconnected.
➥
➥
Adjust the ”Operating switch for heating”
(2) to position for desired heating level.
Signal lamp (1) lights up.
When signal lamp is light the heating
of the boiling pan is connected up when
the boiling is in working position.
TILTING OF PAN
➥
Adjust the ”Tilting” in counter
clockwise direction towards
the symbol for tilting.
The boiling pan stops in its position
when the knob is let or by max. tilting
position.
The knob will automatically go back to
normal position when let go.
A. Safety valve
B. Pressure gauge
C. Steam trap
D. Measuring tap (for HSE or other accredited body
when inspecting)
E. Vacuum valve
C
Adjust the ”Tilting return” clockwise
towards the symbol for working
position.
The boiling pan stops in its position
when the knob is let, or when it reach
it’s working postion.
The knob will automatically go back to
normal position when let go.
1.
2.
3.
4.
5.
➥
Signal lamp
Operating switch heating
Position/symbol for tilting
Position/symbol for tilting return
Knob for tilt/-return
B AE D
1
2
3
Fig. 7
4
5
A:1.
A:2.
Fig. 6
Fig. 7A
25