1
BEI Device Interface
User Manual
© 2015 Birger Engineering, Inc.
Manual Rev 1.0
3/20/15
Birger Engineering, Inc.
38 Chauncy St #1101
Boston, MA 02111
http://www.birger.com
2
1
Table of Contents
1 Table of Contents .................................................................................... 3
2 Installation ............................................................................................... 4
2.1
2.2
2.3
System Requirements .......................................................................................... 4
Installation – Mac ................................................................................................ 4
Installation – PC................................................................................................... 4
3 Overview .................................................................................................. 5
3.1 Main Window, Mac ............................................................................................. 5
3.2 Main Window, PC................................................................................................ 6
3.3 Main Window Controls ....................................................................................... 7
3.4 Menus .................................................................................................................. 12
3.4.1 Main Menu .................................................................................................... 12
3.4.2 Help Menu .................................................................................................... 13
3.5 Preferences – PC ................................................................................................ 14
3.6 Preferences – Mac .............................................................................................. 16
3.6.1 Mac Preferences – Main ............................................................................... 16
3.6.2 Mac Preferences – Keyboard Assignments .................................................. 17
3.6.3 Mac Preferences – Lens ................................................................................ 17
3.6.4 Mac Preferences – Ports................................................................................ 18
3.6.5 Mac Preferences – Reporting ........................................................................ 18
3.7 Status Window ................................................................................................... 19
3.8 Reports ................................................................................................................ 20
4 Theory of Operation ............................................................................. 22
4.1
4.2
4.3
4.4
Lens Controller Detection ................................................................................. 22
Status Updates .................................................................................................... 23
Focus Control ..................................................................................................... 23
Aperture Control ............................................................................................... 24
3
2
2.1
Installation
System Requirements
Microsoft Windows XP, 2000, 7, 8
Mac OS X 10.6 - 10.9.5
Bluetooth or serial port connection to lens module
Internet connection for software updates
2.2
Installation – Mac
The application is supplied as a zipped disk image (.dmg.zip). The
application can be downloaded from the Birger Engineering website. Doubleclick to uncompress the disk image. Then double-click to mount the disk image.
The application can then be dragged to your applications folder.
2.3
Installation – PC
The application is supplied as zipped self-installer. The application can be
downloaded from the Birger Engineering website. Unzip the setup files into a
folder. You should have the files setup.exe, BEIDeviceInterfaceSetup.msi and
the folder vcredist_x86. Double-click setup.exe to begin the installation
process.
4
3
3.1
Overview
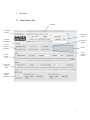
Main Window, Mac
1. Title Bar
2. Connection
Control
3. Connection
Status
4. Section
Hide/Unhide
6. Set Focus
Preset
5. Device
Updates /
Functions
7. Status
8. Set
Aperture
Preset
9. Focus
Control
Area
10. Aperture
Control
Area
11. Shutter
GPIO /
Master Set
5
3.2
Main Window, PC
12. Menus
1. Title Bar
2. Connection
Control
3. Connection
Status
4. Section
Hide/Unhide
6. Set Focus
Preset
5. Device
Updates /
Functions
7. Status
8. Set
Aperture
Preset
9. Focus
Control
Area
10. Aperture
Control
Area
11. Shutter
GPIO /
Master Set
6
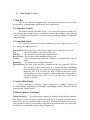
3.3
Main Window Controls
1. Title Bar
The title bar contains the program name, the serial number of the device to which
the program is communicating, and the name of the attached lens.
2. Connection Control
This button, labeled “Find BEI Device,” will cause the program to search for a
lens controller that is connected over a serial port within the host computer; the serial port
can be a real physical connection or a virtual serial port enabling Ethernet or Bluetooth
communications.
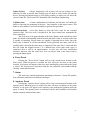
3. Connection Status
The connection status area contains information for the connected device and
lens, along with connection errors.
Detected Unit : Shows the name of the software library that is loaded into the device.
S/N
: The serial number of the connected device.
HW Rev
: The hardware revision of the connected device.
Boot SW Rev : The revision of the bootloader on the device.
On Port
: The serial port over which the computer is communicating with the
device.
Baud Rate : The speed of the serial port connection.
Detected Lens: The name of the lens that is connected to the lens controller. The lens
does not have a name itself; rather it is constructed from information
learned from the lens. All of the lenses that might match are listed in this
drop-down box. You can select the name of the lens that most closely
matches the lens you have connected. Many settings that are preserved are
associated with the name of the lens, so you will want to have this as
accurate as possible.
4. Section Hide/Unhide
Each section has a disclosure control shaped like a triangle. Clicking the
disclosure triangle will collapse or expand the corresponding section. This can be used to
show only the controls desired.
5. Device Updates / Functions
Update Firmware : Press this button to update the firmware inside the lens controller.
This button can also be used to update the firmware in an Impero controller that is
connected to the lens controller (Mac version only). Pressing the button brings up a file
dialog window in which you will make a selection on the firmware that you wish to load.
The firmware is obtainable only from Birger Engineering.
7
Update License
: Birger Engineering will at times roll out test features in new
firmware. In order to activate these features you will need to load a license file into the
device. Pressing this button brings up a file dialog window in which you will select the
correct license file. The license file is obtainable only from Birger Engineering.
Collimate Lens
: Certain combinations of hardware and software will enable the
ability to fine-tune the mounting of the lens / lens controller to the target camera. This
button is only enabled if you have the ability to perform this procedure.
Learn Focus Scale : Press this button to learn the focus scale for the currently
connected lens. The focus scale is displayed in the focus control area underneath the
focus control bar.
The focus scale is an approximation of the focus distance at the current lens focus
point. It is based on information learned from the lens and is only as accurate as the lens
is capable of reporting. Not all lenses are capable of reporting focus scales. Once the
focus scale is learned, it will be remembered for the particular lens name, and will be
recalled when a lens with the same name is connected. If the same lens is connected then
this will retain the original accuracy. If a different lens of the same name (type) is
connected, then it will be an approximation, as each lens will have construction
tolerances that may alter the focus scale. You can always learn a new focus scale by
pressing the button again.
6. Focus Preset
Pressing the “Focus Preset” button will save the current focus location as the
focus preset. When the preset is recalled, the lens will move its focus to the preset
location. A red arrow will appear in the focus scale marking the position where the preset
is stored. The focus preset is associated with the lens controller serial number and the
currently connected lens name.
7. Status
The status area contains information pertaining to firmware / license file updates,
lens collimation, and other miscellaneous messages.
8. Aperture Preset
Pressing the “Aperture Preset” button will save the current aperture location as the
aperture preset. When the preset is recalled, the lens will move its aperture to the preset
location. A red arrow will appear in the aperture scale marking the position where the
preset is stored. The aperture preset is associated with the lens controller serial number
and the currently connected lens name.
8
9. Focus Control Area
(Mac version shown, PC version is similar)
A. Enable
G. Focus Slider
B. Learn Focus
C. Pointer
H. Focus Scale
D. Focus Step
I. Preset Marker
E. Distance Readout
F. Preset
J. Infinity Range
A. Enable
: The “Allow Control” checkbox is used to enable control of the lens focus
by dragging the focus pointer (C) along the focus slider bar (G). If the box is not checked
then the focus area functions as readout only.
B. Learn Focus: Press this button to learn the limits of the lens; the limits are the zero
focus stop and the infinity focus stop. It is necessary to learn the limits, and thus the
range of the lens, in order for the focus control to work properly. Some lenses will drift
after repeated focusing commands (e.g. repeatedly dragging the pointer back and forth),
and this button is then used to re-learn the limits and restore correct mapping to the
focusing controls.
C. Pointer
: The focus pointer shows the current focus location, and can be clicked
and dragged to re-position the lens focus to any point along the focus bar, as long as the
enable box (A) is checked.
D. Focus Step : The focus step value controls how far the pointer is moved for each fine
focus change via the keyboard hotkeys. This value has no effect on the focus slider
control functionality. Edit the text box to input the desired step size. The step is unitless.
A value of one is the smallest possible step. A course focus step via the keyboard uses ten
times the value of this setting.
E. Distance Readout: The distance readout contains the focus distance of the lens,
approximated by the lens’ current focal position and the information learned for the focus
scale. This is an approximation only.
F. Preset
: Press the “Recall Preset” button to move the lens focus to the stored
preset position. The stored position is shown by the red preset marker (I). If there is no
stored focus preset then this button will not be enabled and no red marker will be shown.
G. Focus Slider: The focus slider represents the focus range of the lens from zero to
infinity. The focus pointer (C) is moved within this range to change the focus of the lens.
H. Focus Scale: The focus scale represents the focus distance of the lens mapped into the
focusable range using information learned from the lens with the “Learn Focus Scale”
button. These are approximate values.
I. Preset Marker: The preset marker is a small red arrow that marks the position of the
focus preset, if it is stored for this particular lens and device combination.
J. Infinity Range: Some lenses will focus past optical infinity to compensate for
9
temperature effects. The infinity range represents the part of the lens focal range from
where the infinity position was first reported to the mechanical infinity.
10. Aperture Control Area
(Mac version shown, PC version is similar)
A. Enable
E. Aperture Slider
B. Initialize
F. Aperture Scale
C. Focal Length
G. Pointer
D. Preset
H. Preset Marker
A. Enable
: The “Allow Control” checkbox is used to enable control of the lens
aperture by dragging the aperture pointer (G) along the aperture slider bar (E). If the box
is not checked then the aperture area functions as readout only.
B. Initialize : Press this button to zero the lens aperture mechanism. This is absolutely
necessary as the position of the lens aperture is relative to the zero position, and no
aperture commands will work if the zero position is not known.
C. Focal Length: This is the readout of the current lens focal length, as learned directly
from the lens. This value will update live as the lens focal length is adjusted on zoom
lenses.
D. Preset
: Press the “Recall Preset” button to move the lens aperture to the stored
preset position. The stored position is shown by the red preset marker (H). If there is no
stored aperture preset then this button will not be enabled and no red marker will be
shown.
E. Aperture Slider: The aperture slider represents the aperture range of the lens from
fully open to fully closed, within the lenses capabilities. The aperture pointer (G) is
moved within this range to change the aperture of the lens.
F. Aperture Scale: The aperture scale displays the lens’ f-stop in ¼ stop increments. The
aperture to which the lens is currently set is marked with larger type.
G. Pointer
: The aperture pointer shows the current lens aperture, and can be clicked
and dragged to re-position the lens aperture to any point along the aperture bar, as long as
the enable box (A) is checked. The aperture can only be changed in discrete steps as
marked by the aperture scale (F).
H. Preset Marker: The preset marker is a small red arrow that marks the position of the
aperture preset, if it is stored for this particular lens and device combination.
10
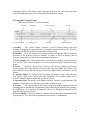
11. Shutter GPIO / Master Set
(Mac version shown, PC version is similar)
B. GPIO RA0
A. Master Enable
D. Output Control
C. GPIO RA1
E. Set Input
F. State Readout
A. Master Enable: The “Master Unit” checkbox is used to mark this application and lens
controller instance as the master controller in a master/slave pair. The slave lens
controller will follow the focus and aperture settings of the master. The master/slave
functionality is unlocked with a special license file from Birger Engineering.
B. GPIO RA0 : General-Purpose Input/Output RA0. This control signal will be wired to
the shutter close signal if the shutter adapter is in use.
C. GPIO RA1: General-Purpose Input/Output RA1. This control signal will be wired to
the shutter open signal if the shutter adapter is in use.
D. Output Control: The output control consists of two radio-buttons, “Low” and “High”
which will set the GPIO in question to output a low (0V) or high (5V) signal.
E. Set Input : Setting the “Input” radio button will convert the GPIO to an input whose
state is displayed in (F).
F. State Readout: This text is “Low” or “High” and corresponds to the current state of
the GPIO in question, whether it is an output or input.
12. Menus (PC)
The “File” and “Help” selections are additional menus for setting preferences,
filing reports, and other functions. Consult the menus section for more detail. The Mac
menus can be found on the screen’s menu bar as usual.
11
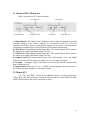
3.4
3.4.1
Menus
Main Menu
The main menu is accessed by clicking the “File” menu in the Windows
version and the “BEI Device Interface” menu in the Mac version. The options available
from the main menu are the same between the two versions, except that the Mac version
has additional standard Mac items, which will not be described here.
Main Menu, PC:
Main Menu, Mac:
About BEI Device Interface (Mac) – Select this item to see the software version of the
interface program.
Preferences – Select this to open up the preferences window.
Configure Device – Select this to write specific configurations to the device.
Show Large Status Window – Select this to open a window with lens status (focus
distance, focal length, aperture) in large type for viewing from a distance.
Exit (PC), Quit BEI Device Interface (Mac) – Exits the program.
12
3.4.2
Help Menu
The help menu is accessed by clicking the “Help” menu in either the
Windows or Mac version of the program.
Help Menu, PC:
Help Menu, Mac:
About (PC) – Select this item to see the software version of the interface program.
Check For Updates – Select this to check the website for updates to the interface
program or device firmware. This will also check for an update to an Impero controller if
it is connected (Mac version only).
Submit A Feature Request – Please select this item to fill out a form along with your
request for a feature you would like to see implemented.
Submit A Bug Report – Select this item to report a problem you have discovered with
either the interface software or lens controller.
Submit A Lens Report – Select this item to report satisfaction or problems with a
particular lens. If you have a lens that is not currently supported with a proper name, you
will need to submit a lens report for support to be added.
13
Submit An Impero Bug Report (Mac Only) – Select this to a report a problem with an
Impero controller. This selection is only for problems with Impero controllers.
Birger Engineering Website – Opens up your default browser to the Birger Engineering
website.
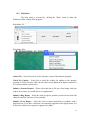
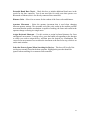
3.5
Preferences – PC
The Preferences window is activated by selecting “Preferences…” from the file
menu in the main window.
Remember Main Window Position – Check this box to remember the placement of the
main window. When the program is launched it will appear in the place that it last was.
Automatically Search for Devices When Program Starts – Check this box to cause
automatic device detection, as if the “Find BEI Device” button were pressed, when the
program in launched.
14
Extended Baud Rate Check – Check this box to include additional baud rates in the
search for the lens controller. You do not need this for serial ports that operate over
Bluetooth or Ethernet; this is for directly connected lens controllers.
Distance Units – Select feet or meters for the readout of the focus scale and distance.
Aperture Movement – Select the aperture increment that is used when changing
between aperture settings. The smoother end of the scale results in the smallest possible
movement that the aperture mechanism is capable of making; the faster end results in the
aperture change occurring in a single move.
Assign Keyboard Shortcuts – Use this section to assign keyboard shortcuts for focus
and aperture movements. To assign a key, press the button corresponding to the function
to which you wish to assign the key, and then press the desired key combination. The
course focus movement moves ten times the increment as the fine focus step, which is set
on the main window.
Select the Ports to Ignore When Searching for Devices – This box will list all of the
serial ports currently found in the host computer. Highlight the ports that should be
ignored when searching for a connected lens controller.
15
3.6
Preferences – Mac
The preferences window is activated by selecting “Preferences…” from the BEI
Device Interface application menu. The Mac preferences are split up among several
panels as part of a tabbed control.
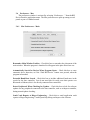
3.6.1
Mac Preferences – Main
Remember Main Window Position – Check this box to remember the placement of the
main window. When the program is launched it will appear in the place that it last was.
Automatically Search for Devices When Program Starts – Check this box to cause
automatic device detection, as if the “Find BEI Device” button were pressed, when the
program in launched.
Extended Baud Rate Search – Check this box to include additional baud rates in the
search for the lens controller. You do not need this for serial ports that operate over
Bluetooth or Ethernet; this is for directly connected lens controllers.
Detect Peripherals When Checking for Updates – Check this box to look for software
updates for any peripherals connected to the lens controller, such as an Impero controller,
during normal update checking.
Send Crash Reports to Birger Engineering – Check this to email application crash
reports to Birger Engineering. Crash reports help debug and improve the software.
16
3.6.2
Mac Preferences – Keyboard Assignments
The keyboard preferences tab is used to set the keyboard shortcuts for focus and
aperture control. To assign a key, press the button corresponding to the function to which
you wish to assign the key, and then press the desired key combination. The course focus
movement moves ten times the increment as the fine focus step, which is set on the main
window.
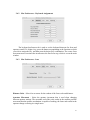
3.6.3
Mac Preferences – Lens
Distance Units – Select feet or meters for the readout of the focus scale and distance.
Aperture Movement – Select the aperture increment that is used when changing
between aperture settings. The smoother end of the scale results in the smallest possible
movement that the aperture mechanism is capable of making; the faster end results in the
aperture change occurring in a single move.
17
3.6.4
Mac Preferences – Ports
This box will list all of the serial ports currently found in the host computer.
Highlight the ports that should be ignored when searching for a connected lens controller.
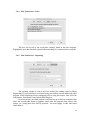
3.6.5
Mac Preferences – Reporting
The reporting window is used to select the method for sending reports to Birger
Engineering. If you would like to send email using your default account and default email
program, which should have been configured prior to using this feature, then select the
radio button “Send Email Using Default Mail Program”.
If you do not have an email program or account set up on the host computer, then
select the second radio button to transmit email from the program (bug reports, lens
reports, etc.) using brute-force SMTP protocols. You must supply a name and return
email address.
18
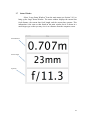
3.7
Status Window
Select “Large Status Window” from the main menu (see Section 3.4.1) to
bring up the Large Status Window. The status window displays the current lens
focal distance, the current lens focal length, and the current lens aperture. This
information is the same as that found on the main window but it is shown in a
much larger type so that you may view it at a distance from the computer screen.
Focal Distance
Focal Length
Aperture
19
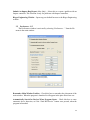
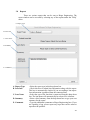
3.8
Reports
There are various reports that can be sent to Birger Engineering. The
report window can be accessed by selecting any of the reports under the “Help”
menu.
A. Report Type
B. Lens Info
C. Lens Name
D. Summary
E. Comments
A. Report Type
B. Lens Info
C. Lens Name
D. Summary
E. Comments
: Select the report type in this drop-down box.
: Check this box to submit lens information along with the report.
This box is automatically checked if you are sending a lens report.
Lens information is gathered from the connected lens.
: Select the type of the lens that is connected from this drop-down
box. The lens name will automatically be selected if it is known.
: Select a brief summary from the drop-down box or type your own
summary for the report.
: Type any additional comments to Birger Engineering here. If you
are reporting a bug, please report any steps that can be taken to
reproduce the problem.
20
Click “Cancel” to dismiss the window without sending any information. Click
“Send” to send the report to Birger Engineering. If you are using your default email
program then you will be able to see all of the information that will be sent to Birger
Engineering. If you are using the brute-force SMTP method then you will be shown a
summary of all of the information that will be sent to Birger Engineering and you can
then confirm or cancel whether or not you want to send the information.
21
4
Theory of Operation
The application communicates with the lens controller using the ASCII
protocol outlined in the document Canon EF-232 Library User Manual,
available from Birger Engineering.
4.1
Lens Controller Detection
The application looks for possible lens controllers by polling the available
serial ports in the host computer. It does this by opening a serial port and
configuring it for communications, and then issuing a few basic commands to
see if a lens controller responds. The baud rate of a lens controller can be
programmed but is 115200 by default. The lens controller requires 8 data bits, 1
stop bit, and no parity.
The application first attempts to put the lens controller in its normal state by
issuing two commands:
routeesc,0
rm0,1
The first command cancels any port routing that may have been set up on the
lens controller, so that the application is talking directly to the connected
controller. The second command configures the communications mode to be
terse and to use the new protocol method.
The application then issues a version query command:
vs
If there is a lens controller connected to that serial port and configured for the
baud rate, it will respond with a brief string that resembles:
s:C2v17
The ‘s:’ response appears always, followed by a two-character library
identifier. In this case ‘C2’ indicates it is the Canon EF-232 library. The library
version then follows.
22
4.2
Status Updates
The application stays in sync with the lens controller by requesting status
updates. There are two forms of status updates – a regular periodic polling and
event-generated updates.
The application first tells the lens controller to stay in sync with the lens by
turning on background querying. The application also puts the aperture
movement into servo mode. These settings are accomplished by issuing the
command:
sm12
The application is then able to query the library for basic lens information by
issuing:
lc
This command is issued once per second. If there is no response to the
command for several seconds then the lens controller is considered to have
been disconnected. Otherwise basic lens status is reported from the library.
The application gathers the initial status by issuing:
gs
The application also configures the library to report status changes
spontaneously. This is accomplished by issuing:
sr1
Once configured this way, the library will emit all status changes, even if they
were caused outside of the application. The statuses are decoded as they come
in to the application. The status strings are given in Section 3.9 of the Canon
EF-232 Library User Manual.
4.3
Focus Control
In order for focus control to work properly, the mapping between the control
and the lens must be established. This is accomplished inside of the lens
controller. The lens controller learns the position of the zero-stop and the
mechanical infinity-stop and maps that range to an absolute value of 0 to 16383
(0 to 3FFF hex).
The application will issue the command:
la
when it needs to instruct the library to re-learn the lens range, or in response to
23
the user pressing the ‘Learn Limits’ (Mac) or ‘Re-Learn Stops’ (PC) button.
The application maps the range 0 to 16383 to the focus bar. Focus is
controlled using the servo focus command ‘eh’, which is constructed using the
focus value from the pointer location on the focus bar plus a checksum.
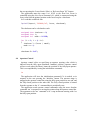
In C-code this would look like:
fprintf(ioport, "eh%04x,%x", focus, checksum);
The checksum can be calculated as such:
unsigned char checksum = 0;
unsigned char i;
unsigned int mask = 0x1000;
for (i = 0; i < 4; i++)
{
checksum ^= (focus / mask);
mask >>= 4;
}
checksum &= 0x0F;
4.4
Aperture Control
Aperture control relies on specifying an aperture opening value which is
indexed from the fully open (minimum f-number) position. Aperture control
will not work unless the library learns the position of the fully-open aperture.
This is accomplished by issuing the initialization command:
in
The application will issue the initialization command if it is needed, or in
response to the user pressing the ‘Initialize’ button. The aperture range is
mapped to the aperture control bar using the fully-open position as one end, and
the fully-closed position at the other end. The fully closed position is learned
from the response to the ‘lc’ command that is periodically sent.
The application sends aperture control commands using the move absolute
command ‘ma’ in response to moving the pointer along the aperture control bar.
The argument to the ‘ma’ command is in ¼ stop increments starting with 0 as
the fully-open position.
24