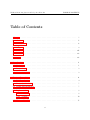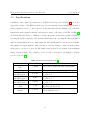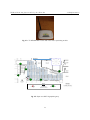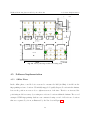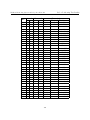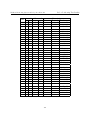
1
University of Manitoba Department of Electrical & Computer Engineering ECE 4600 Group Design Project Final Project Report Design and Implementation of a Wellness Monitoring System via Body Area Networks by Group 01 Cassandra Aldaba Yang Su Jeff Winkler Tianqi Liang Haiyue Wang Final report submitted in partial satisfaction of the requirements for the degree of Bachelor of Science in Electrical and Computer Engineering in the Faculty of Engineering of the University of Manitoba Academic Supervisor Dr. Jun Cai Department of Electrical and Computer Engineering Industry Supervisor Mr. Michael Zhang Wellness Institute of Seven Oaks General Hospital Date of Submission March 4, 2015 Copyright © 2015 Cassandra Aldaba, Tianqi Liang, Yang Su,Haiyue Wang, Jeff Winkler Wellness Monitoring System via Body Area Networks Abstract The ever-increasing demands placed upon today’s healthcare staff and systems lead to the requirement for an efficient and effective means of connecting healthcare professionals to their many patients. Current in-hospital care methods force healthcare professionals to look after patients on an as-needed basis, and are often ineffective since physicians must make healthcare decisions based upon limited observations and short-term physiological measurements. The basis of this project was to create a set of wearable devices that when combined, offer healthcare professionals continuous, real-time monitoring of four indications of wellness for patients/users wearing the device: posture recognition, electrocardiography (ECG) measurements, indoor positioning as well as step detection that estimates the users physical activity regime. The non-invasive devices send their data wirelessly to a local, Android mobile device such that wellness monitoring can be achieved simply by virtue of being near to the user. Healthcare professionals control and view the measurements of individual sensors on our intuitive, dedicated Android application. Measurements are displayed within the application, in which each module has a devoted display screen. In addition to viewing the data of each sensor in real time, measurements can be recorded and transferred to a PC environment for further analysis at a later time. Alternatively, long term or distant monitoring can be achieved by storing patient information in a database on a remote server that can be easily accessed by healthcare professionals. The prototype devices were realized using a combination of hardware design infused with computer software programming to achieve a simple, reliable, and robust overall product. i Wellness Monitoring System via Body Area Networks CONTRIBUTIONS Contributions The four modules of our project: posture recognition, ECG signal acquisition, indoor positioning, and step detection were broken down and divided among smaller teams consisting of two members each. The use of this structure format allowed for members to collaborate together which facilitated the efficient and timely completion of the project. As well, this structure provided a layer of relief in that no one member would be accountable for an entire module on their own. The division of labor among teams was assigned to specific members, as is shown in the contributions table provided on the following page: Legend: • Lead task ◦ Contributed ii Literature Review Final Report Indoor Positioning Module WiFi fingerprinting offline database implementation WiFi fingerprinting positioning algorithm WiFi fingerprinting indoor positioning testings Step Detection Module Algorithm development Algorithm tests Posture Recognition Module Angular threshold algorithm Fuzzy logic subset function development Fuzzy logic algorithm Fuzzy logic algorithm tests ECG Module Hardware circuit design Data acquisition and wireless transmission Circuit construction and enclosure design Hardware tests Wireless Transmission Protocols BLE protocol implementation Bluetooth protocol Android Application Development Aesthetic design Modular integration Application testing and debugging Server Integration Server implementation and maintenance Website implementation iii Jeff Winkler Haiyue Wang Yang Su Tianqi Liang Cassandra Aldaba Wellness Monitoring System via Body Area Networks ◦ ◦ ◦ ◦ ◦ ◦ ◦ ◦ ◦ • ◦ • ◦ ◦ ◦ ◦ ◦ ◦ ◦ ◦ ◦ • • ◦ ◦ • ◦ ◦ ◦ ◦ ◦ ◦ ◦ • • ◦ ◦ • • ◦ • • • • ◦ ◦ ◦ ◦ ◦ ◦ ◦ ◦ ◦ ◦ • • ◦ ◦ ◦ ◦ Wellness Monitoring System via Body Area Networks ACKNOWLEDGEMENTS Acknowledgements We like to kindly acknowledge everyone that provided to us the mental and emotional support we required to reach the end of this long but enjoyable journey. We would especially like to thank the following people who contributed to our overall success in the development and creation of this project: Dr. Behzad Kordi, thank you for organizing the capstone (final year) project. As well, thank you for giving us the opportunity to showcase our engineering knowledge that we have acquired during our academic years in the Electrical Engineering Department of the Faculty of Engineering at the University of Manitoba. Mr. Sinisa Janjic, thank you for supplying to us the various components from the ECE technical shop and as well for ordering the various components we required for this project. Without your efforts, we would not been able to reach our project’s achievements and accomplishments. We especially want to thank Dr. Jun Cai as our absolutely wonderful supervisor of this project. We cannot thank you enough for your continued advice and encouragement that drove the development, refinement, and eventual completion of this project. Your kindness and sincerity in your suggestions always made us feel proud of our work, we truly could not have done it without you! iv Wellness Monitoring System via Body Area Networks Mr. Michael Zhang, thank you for providing to us a unique and captivating capstone project as well as providing to us industry insights in regards to our project. Thank you Mr. Daniel Card for providing to us your technical insights when we were faced with difficult decisions and issues regarding our design. We like to thank Mr. Travis Rogozinski of OKW Enclosures Inc. for timely providing us with multiple wearable enclosures suitable for our ECG module. Thank you Ms. Aidan Topping for providing to us the technical writing advice that allowed us to successfully communicate our project’s achievements and accomplishments. Thank you Ms. Clara Lee for guiding us through the basics of database structures and implementation. Thank you Ms. Jennifer Winkler for helping us in the revision of this document. Lastly, we like to thank all our loved-ones, family members, friends and fellow colleagues. Even though we started to go a little crazy after all these years, you still stuck beside us and continued to provide your support. We could not have survived without you! v Wellness Monitoring System via Body Area Networks TABLE OF CONTENTS Table of Contents Abstract . . . . . . . . . . . . . . . . . . . . . . . . . . . . . . . . . . . . . . . . . . . . . . i Contributions . . . . . . . . . . . . . . . . . . . . . . . . . . . . . . . . . . . . . . . . . . . ii Acknowledgements . . . . . . . . . . . . . . . . . . . . . . . . . . . . . . . . . . . . . . . . iv List of Figures . . . . . . . . . . . . . . . . . . . . . . . . . . . . . . . . . . . . . . . . . . x List of Tables . . . . . . . . . . . . . . . . . . . . . . . . . . . . . . . . . . . . . . . . . . . xiii Nomenclature . . . . . . . . . . . . . . . . . . . . . . . . . . . . . . . . . . . . . . . . . . . xiv Acronyms . . . . . . . . . . . . . . . . . . . . . . . . . . . . . . . . . . . . . . . . . . . . . xvi 1 Introduction . . . . . . . . . . . . . . . . . . . . . . . . . . . . . . . . . . . . . . . . . . 1 1.1 Motivation . . . . . . . . . . . . . . . . . . . . . . . . . . . . . . . . . . . . . . . . . 1 1.2 Project Scope . . . . . . . . . . . . . . . . . . . . . . . . . . . . . . . . . . . . . . . . 2 1.3 System Overview . . . . . . . . . . . . . . . . . . . . . . . . . . . . . . . . . . . . . . 2 2 Posture Recognition . . . . . . . . . . . . . . . . . . . . . . . . . . . . . . . . . . . . . 4 2.1 Brief Introduction . . . . . . . . . . . . . . . . . . . . . . . . . . . . . . . . . . . . . 4 2.2 Design Specifications . . . . . . . . . . . . . . . . . . . . . . . . . . . . . . . . . . . . 5 2.3 Background Information . . . . . . . . . . . . . . . . . . . . . . . . . . . . . . . . . . 5 2.4 Implementation . . . . . . . . . . . . . . . . . . . . . . . . . . . . . . . . . . . . . . . 8 2.4.1 Hardware . . . . . . . . . . . . . . . . . . . . . . . . . . . . . . . . . . . . . . 8 2.4.2 Software . . . . . . . . . . . . . . . . . . . . . . . . . . . . . . . . . . . . . . . 10 2.5 Tests and Results . . . . . . . . . . . . . . . . . . . . . . . . . . . . . . . . . . . . . . 15 vi Wellness Monitoring System via Body Area Networks 3 Electrocardiogram . . . . . . . . . . . . . . . . . . . . . . . . . . . . . . . . . . . . . . . 18 3.1 Brief Introduction . . . . . . . . . . . . . . . . . . . . . . . . . . . . . . . . . . . . . 18 3.2 Background Information . . . . . . . . . . . . . . . . . . . . . . . . . . . . . . . . . . 19 3.3 Specifications . . . . . . . . . . . . . . . . . . . . . . . . . . . . . . . . . . . . . . . . 21 3.4 Implementation . . . . . . . . . . . . . . . . . . . . . . . . . . . . . . . . . . . . . . . 22 3.5 3.4.1 Hardware Implementation . . . . . . . . . . . . . . . . . . . . . . . . . . . . . 22 3.4.2 Software Implementation . . . . . . . . . . . . . . . . . . . . . . . . . . . . . 35 Tests and Results . . . . . . . . . . . . . . . . . . . . . . . . . . . . . . . . . . . . . . 37 4 Indoor Positioning . . . . . . . . . . . . . . . . . . . . . . . . . . . . . . . . . . . . . . . 42 4.1 Brief Introduction . . . . . . . . . . . . . . . . . . . . . . . . . . . . . . . . . . . . . 42 4.2 Background Information . . . . . . . . . . . . . . . . . . . . . . . . . . . . . . . . . . 42 4.2.1 WiFi Triangulation Method . . . . . . . . . . . . . . . . . . . . . . . . . . . . 44 4.2.2 WiFi Fingerprinting Method . . . . . . . . . . . . . . . . . . . . . . . . . . . 46 4.3 Design Specifications . . . . . . . . . . . . . . . . . . . . . . . . . . . . . . . . . . . . 46 4.4 Implementation . . . . . . . . . . . . . . . . . . . . . . . . . . . . . . . . . . . . . . . 47 4.4.1 4.5 4.6 Hardware Implementation . . . . . . . . . . . . . . . . . . . . . . . . . . . . . 47 Software Implementation . . . . . . . . . . . . . . . . . . . . . . . . . . . . . . . . . . 49 4.5.1 Offline Phase . . . . . . . . . . . . . . . . . . . . . . . . . . . . . . . . . . . . 49 4.5.2 Online Phase . . . . . . . . . . . . . . . . . . . . . . . . . . . . . . . . . . . . 51 Tests and Results . . . . . . . . . . . . . . . . . . . . . . . . . . . . . . . . . . . . . . 55 5 Step Detection . . . . . . . . . . . . . . . . . . . . . . . . . . . . . . . . . . . . . . . . . 56 5.1 Brief Introduction . . . . . . . . . . . . . . . . . . . . . . . . . . . . . . . . . . . . . 56 5.2 Design Specifications . . . . . . . . . . . . . . . . . . . . . . . . . . . . . . . . . . . . 57 5.3 Background Information . . . . . . . . . . . . . . . . . . . . . . . . . . . . . . . . . . 57 5.3.1 Mechanical Pedometer . . . . . . . . . . . . . . . . . . . . . . . . . . . . . . . 58 vii Wellness Monitoring System via Body Area Networks 5.3.2 5.4 5.5 Accelerometer based Pedometer . . . . . . . . . . . . . . . . . . . . . . . . . . 58 Implementation . . . . . . . . . . . . . . . . . . . . . . . . . . . . . . . . . . . . . . . 59 5.4.1 Hardware Implementation . . . . . . . . . . . . . . . . . . . . . . . . . . . . . 59 5.4.2 Software Implementation . . . . . . . . . . . . . . . . . . . . . . . . . . . . . 60 Tests and Results . . . . . . . . . . . . . . . . . . . . . . . . . . . . . . . . . . . . . . 65 6 System Integration . . . . . . . . . . . . . . . . . . . . . . . . . . . . . . . . . . . . . . 70 6.1 Wireless Data Transmission . . . . . . . . . . . . . . . . . . . . . . . . . . . . . . . . 70 6.1.1 Bluetooth . . . . . . . . . . . . . . . . . . . . . . . . . . . . . . . . . . . . . . 70 6.2 Mobile Application . . . . . . . . . . . . . . . . . . . . . . . . . . . . . . . . . . . . . 76 6.3 Server Integration . . . . . . . . . . . . . . . . . . . . . . . . . . . . . . . . . . . . . 79 6.3.1 Server Integration Introduction . . . . . . . . . . . . . . . . . . . . . . . . . . 79 6.3.2 Server Background Information . . . . . . . . . . . . . . . . . . . . . . . . . . 79 6.3.3 Server Implementation . . . . . . . . . . . . . . . . . . . . . . . . . . . . . . . 81 6.3.4 Database Structure . . . . . . . . . . . . . . . . . . . . . . . . . . . . . . . . . 82 6.3.5 Client-Server Data Flow . . . . . . . . . . . . . . . . . . . . . . . . . . . . . . 84 7 Conclusions . . . . . . . . . . . . . . . . . . . . . . . . . . . . . . . . . . . . . . . . . . . 88 7.1 Future Work . . . . . . . . . . . . . . . . . . . . . . . . . . . . . . . . . . . . . . . . 89 References . . . . . . . . . . . . . . . . . . . . . . . . . . . . . . . . . . . . . . . . . . . . . . 92 Appendix A Budget . . . . . . . . . . . . . . . . . . . . . . . . . . . . . . . . . . . . . . . 93 Appendix B ECG Circuit Schematics . . . . . . . . . . . . . . . . . . . . . . . . . . . . 95 Appendix C Indoor Positioning Test Results . . . . . . . . . . . . . . . . . . . . . . . 99 Appendix D User Manual . . . . . . . . . . . . . . . . . . . . . . . . . . . . . . . . . . . 103 viii Wellness Monitoring System via Body Area Networks TABLE OF CONTENTS Appendix E Software Repository . . . . . . . . . . . . . . . . . . . . . . . . . . . . . . . 115 Appendix F Curriculum Vitae . . . . . . . . . . . . . . . . . . . . . . . . . . . . . . . . 116 ix Wellness Monitoring System via Body Area Networks LIST OF FIGURES List of Figures 1.1 wellNode system modular overview . . . . . . . . . . . . . . . . . . . . . . . . . . . 3 2.1 Defined 3 dimensional axes with Euler angles . . . . . . . . . . . . . . . . . . . . . . 6 2.2 Texas Instruments SensorTag . . . . . . . . . . . . . . . . . . . . . . . . . . . . . . . 9 2.3 Posture recognition’s hardware system diagram . . . . . . . . . . . . . . . . . . . . . 10 2.4 Posture SensorTags placement . . . . . . . . . . . . . . . . . . . . . . . . . . . . . . . 10 2.5 Posture fuzzy logic subset Functions . . . . . . . . . . . . . . . . . . . . . . . . . . . 14 2.6 Posture recognition flowchart . . . . . . . . . . . . . . . . . . . . . . . . . . . . . . . 15 2.7 SensorTag customized Velcro strap . . . . . . . . . . . . . . . . . . . . . . . . . . . . 16 3.1 Electrode placement . . . . . . . . . . . . . . . . . . . . . . . . . . . . . . . . . . . . 20 3.2 Ideal ECG waveform . . . . . . . . . . . . . . . . . . . . . . . . . . . . . . . . . . . . 20 3.3 ECG module internal layout . . . . . . . . . . . . . . . . . . . . . . . . . . . . . . . . 22 3.4 ECG data acquisition and transmission circuit . . . . . . . . . . . . . . . . . . . . . 28 3.5 ECG battery implementation . . . . . . . . . . . . . . . . . . . . . . . . . . . . . . . 29 3.6 ECG main power switch . . . . . . . . . . . . . . . . . . . . . . . . . . . . . . . . . . 30 3.7 3M Red Dot Ag/AgCl single use electrode . . . . . . . . . . . . . . . . . . . . . . . . 31 3.8 3.5 mm stereo plug and jack electrode lead connection . . . . . . . . . . . . . . . . . 32 3.9 ECG module electrode leads . . . . . . . . . . . . . . . . . . . . . . . . . . . . . . . . 33 3.10 ECG module enclosure with lid affixed . . . . . . . . . . . . . . . . . . . . . . . . . . 34 3.11 ECG module internal backing plate structure . . . . . . . . . . . . . . . . . . . . . . 35 3.12 RFduino data acquisition and transmission flowchart . . . . . . . . . . . . . . . . . . 37 x Wellness Monitoring System via Body Area Networks LIST OF FIGURES 3.13 Oscilloscope capture of ECG Bluetooth transmission test . . . . . . . . . . . . . . . 39 3.14 ECG filter frequency response . . . . . . . . . . . . . . . . . . . . . . . . . . . . . . . 40 4.1 Position estimation for triangulation method . . . . . . . . . . . . . . . . . . . . . . 45 4.2 Indoor positioning module open area testing . . . . . . . . . . . . . . . . . . . . . . . 48 4.3 Open area WiFi fingerprinting map . . . . . . . . . . . . . . . . . . . . . . . . . . . . 48 4.4 Indoor positioning module room testing setup . . . . . . . . . . . . . . . . . . . . . . 49 4.5 Online phase flowchart . . . . . . . . . . . . . . . . . . . . . . . . . . . . . . . . . . . 54 5.1 Pedometer SensorTag placement . . . . . . . . . . . . . . . . . . . . . . . . . . . . . 60 5.2 Step detection algorithm . . . . . . . . . . . . . . . . . . . . . . . . . . . . . . . . . . 62 5.3 Step detection flowchart . . . . . . . . . . . . . . . . . . . . . . . . . . . . . . . . . . 64 6.1 BLE initialization . . . . . . . . . . . . . . . . . . . . . . . . . . . . . . . . . . . . . . 73 6.2 SensorTag accelerometer data polling . . . . . . . . . . . . . . . . . . . . . . . . . . . 74 6.3 Asynchronous accelerometer characteristic read . . . . . . . . . . . . . . . . . . . . . 74 6.4 Bluetooth Mate Silver flowchart . . . . . . . . . . . . . . . . . . . . . . . . . . . . . . 76 6.5 Android application hierarchy flow . . . . . . . . . . . . . . . . . . . . . . . . . . . . 78 6.6 Server integration functionality . . . . . . . . . . . . . . . . . . . . . . . . . . . . . . 80 6.7 User identification information table structure . . . . . . . . . . . . . . . . . . . . . . 83 6.8 User identification information table . . . . . . . . . . . . . . . . . . . . . . . . . . . 83 6.9 User posture information table structure . . . . . . . . . . . . . . . . . . . . . . . . . 84 6.10 User posture information table . . . . . . . . . . . . . . . . . . . . . . . . . . . . . . 84 6.11 wellNode Server Integration Overview . . . . . . . . . . . . . . . . . . . . . . . . . . 86 B.1 Electrode Placement . . . . . . . . . . . . . . . . . . . . . . . . . . . . . . . . . . . . 95 B.2 ECG Differential Amplifier . . . . . . . . . . . . . . . . . . . . . . . . . . . . . . . . 96 B.3 ECG high pass filter . . . . . . . . . . . . . . . . . . . . . . . . . . . . . . . . . . . . 97 B.4 ECG low pass filter . . . . . . . . . . . . . . . . . . . . . . . . . . . . . . . . . . . . . 97 B.5 ECG notch filter . . . . . . . . . . . . . . . . . . . . . . . . . . . . . . . . . . . . . . 98 xi Wellness Monitoring System via Body Area Networks LIST OF FIGURES B.6 ECG final stage amplification . . . . . . . . . . . . . . . . . . . . . . . . . . . . . . . 98 xii Wellness Monitoring System via Body Area Networks LIST OF TABLES List of Tables 2.1 Posture Recognition Specifications [4] . . . . . . . . . . . . . . . . . . . . . . . . . . 5 2.2 Angular Threshold Determination of Postures . . . . . . . . . . . . . . . . . . . . . . 11 2.3 Posture Recognition Experimental Results . . . . . . . . . . . . . . . . . . . . . . . . 16 2.4 Posture Recognition Specifications Comparison . . . . . . . . . . . . . . . . . . . . . 17 3.1 ECG Proposed Specifications [4] . . . . . . . . . . . . . . . . . . . . . . . . . . . . . 21 3.2 ECG Specifications Comparison . . . . . . . . . . . . . . . . . . . . . . . . . . . . . . 38 4.1 Indoor Positioning Specifications [4] . . . . . . . . . . . . . . . . . . . . . . . . . . . 47 4.2 Indoor Positioning’s Database Format . . . . . . . . . . . . . . . . . . . . . . . . . . 50 4.3 RSS at Position (1, 10) . . . . . . . . . . . . . . . . . . . . . . . . . . . . . . . . . . . 53 4.4 RSS at Position (2, 5) . . . . . . . . . . . . . . . . . . . . . . . . . . . . . . . . . . . 53 4.5 Indoor Positioning Specifications Comparison . . . . . . . . . . . . . . . . . . . . . . 55 5.1 Step Detection Specifications [4] . . . . . . . . . . . . . . . . . . . . . . . . . . . . . 57 5.2 Step Detection Experiment Results . . . . . . . . . . . . . . . . . . . . . . . . . . . . 66 5.3 Speed Detection Experiment Results . . . . . . . . . . . . . . . . . . . . . . . . . . . 68 5.4 Step Detection Specifications Comparison . . . . . . . . . . . . . . . . . . . . . . . . 68 6.1 SensorTag Specific Accelerometer UUIDs [34] . . . . . . . . . . . . . . . . . . . . . . 72 6.2 SensorTags’ MAC Addresses . . . . . . . . . . . . . . . . . . . . . . . . . . . . . . . . 73 A.1 Project Budget . . . . . . . . . . . . . . . . . . . . . . . . . . . . . . . . . . . . . . . 94 C.1 Indoor Positioning Module Experimental Data and Results . . . . . . . . . . . . . . 99 xiii Wellness Monitoring System via Body Area Networks NOMENCLATURE Nomenclature Symbol Description Ax X-axis accelerometer measurement [g] Ay Y-axis accelerometer measurement [g] Az Z-axis accelerometer measurement [g] φ Euler roll angle (rotation about z-axis) [◦ ] θ Euler pitch angle (rotation about x-axis) [◦ ] ϕ Euler yaw angle (rotation about y-axis) [◦ ] Sposture A Fuzzy logic posture score Magnitude of 3-axis accelerometer [g] Acx Chest SensorTag x-axis accelerometer measurement [g] Acy Chest SensorTag y-axis accelerometer measurement [g] Acz Chest SensorTag z-axis accelerometer measurement [g] Atx Thigh SensorTag x-axis accelerometer measurement [g] Aty Thigh SensorTag y-axis accelerometer measurement [g] Atz Thigh SensorTag z-axis accelerometer measurement [g] FcPosture (·) Specific posture fuzzy subset function for the chest SensorTag FtPosture (·) Specific posture fuzzy subset function for the thigh SensorTag n Number of access points EuDi Euclidean distance [m] RSSi RSS database values [dBm] RSS’i RSS value measurement [dBm] x Most probable x-coordinate position xi Closest x-coordinate reference location to sample point from KNN xiv Wellness Monitoring System via Body Area Networks Symbol NOMENCLATURE Description y Most probable y-coordinate position y0i Closest y-coordinate reference location to sample point from KNN K Number of nearest reference positions Xk Discrete Fourier Transform of accelerometer measurements N Sample size m Frequency index mmax Frequency index at which the maximum peak occurs for the step frequency fF F T Step frequency [Hz] fs Step detection accelerometer sampling frequency [Hz] v Walking speed [m/s] xv Wellness Monitoring System via Body Area Networks Acronyms Symbol Description ABS Acrylonitrile Butadiene Styrene ADC Analog to Digital Converter AP Access Point API Application Program Interface ARM Advanced RISC Machine BLE Bluetooth Low Energy BTREE Binary Tree ECG Electrocardiogram FFT Fast Fourier Transform GATT Generic Attribute Profile GPS Global Positioning System GUI Graphical User Interface JSON JavaScript Object Notation KNN K-Nearest Neighbor LAN Local Area Network MAC Media Access Control MySQL PHP RF RFID My Structured Query Language Hypertext Preprocessor Radio Frequency Radio-Frequency Identification xvi ACRONYMS Wellness Monitoring System via Body Area Networks Symbol Description RSS Received Signal Strength RSSI Received Signal Strength Indicator SPP Serial Port Profile ToA Time of Arrival UART USB Universal Asynchronous Receiver/Transmitter Universal Serial Bus UUID Universally Unique Identifier WAN Wide Area Network WBAN Wireless Body Area Network WiFi Wireless Fidelity WWW World Wide Web xvii ACRONYMS Wellness Monitoring System via Body Area Networks Chapter 1 Introduction 1.1 Motivation In Canada, there is a compelling need for a wellness monitoring system that can provide sufficient and easy access of wellness information to healthcare professionals. There is a decreased level of physical activities and an increased in cases of obesity among the population ranging from young children to older adults. In fact, there is a financial burden on the Canadian economy due to the lack of physical activity costing $5.3 billion and the cost associated with obesity is $4.3 billion [1]. The lack of physical activities in the individuals daily lives can lead to various chronic diseases such as cancer, type II diabetes and heart diseases [2]. In conclusion, wellness monitoring can be utilized in the prevention of chronic diseases. Currently there is an emphasis in our society for individuals to take responsibility of monitoring their own health to maintain a healthy lifestyle or efficiently recover within a wellness rehabilitation program. Such sufficient wellness information includes information about their physical activities, sleep patterns and cardiac activities that can describe their overall health aspects. Many companies are providing personal wellness electronic devices for health conscious users ; however, few devices 1 Wellness Monitoring System via Body Area Networks 1.2 Project Scope provide the connection between these individual users and health professionals. The health professionals can analyze the individual’s health information and provide the necessary health advice. Therefore the designed project provides the means to connect individuals with health professionals to achieve optimal health advice to increase physical activity and prevent obesity and chronic diseases. 1.2 Project Scope The primary focus of this project is to design and implement a wellness monitoring system by creating a Wireless Body Area Network (WBAN) of sensors and mobile devices. In our project, we display three important wellness information, which include posture recognition, ECG signals and step detection that aid in the monitoring of a user’s wellness and early signs of possible chronic diseases. Also, the monitoring of a user’s location within a wellness facility is another important aspect in order to find a missing user or find an injured user that requires further assistant. All the sensors’ information is collected in one central node by an Android application, called “wellNode”, on a compatible mobile device. The sensor information is then processed and the results are displayed on the application or the data can be saved for later analyses within the device’s internal memory or within our constructed server. 1.3 System Overview The system we developed, called wellNode, is a wellness monitoring system that collects the user’s wellness information via wireless body sensors and then transmits the data to a central node where the data is processed and stored locally or to a remote server that is accessible to health care professionals. More specifically, our wellness monitoring system is divided into four different modules (Figure 1.1). The modular system includes posture recognition, ECG acquisition, indoor positioning and step detection. The posture recognition module determines when a user is not 2 Wellness Monitoring System via Body Area Networks 1.3 System Overview moving and if he or she is either standing, bending, sitting or lying down. The ECG module displays and records the electrical signal of the heart that could describe the physiological wellness of a user. The indoor positioning module determines a user’s location within a wellness facility where the popular Global Positioning System (GPS) is unable to function. Lastly, the step detection module counts the user’s steps at relatively low speed, even shuffling can be detected. All the modules transmit their data to our central wellNode Android application processing node on a compatible mobile device. Wireless Body Area Network Android Device Posture Recognition Module Indoor Positioning Module Hardware Hardware -Android device - SensorTag placed on thigh and chest (sampling at 10 Hz) -Android device - Wireless Routers placed at the location of interest Software( Android Application) Software( Android Application) -SensorTag pairing and transmission at 10Hz -Data storage - Fingerprinting database - Location display - Data storage Algorithm Algorithm - Fuzzy logic sets to determine sitting, standing, bending or lying down postures - WiFi fingerprinting methods Pedometer Module Hardware -Android device - SensorTag placed on thigh (sampling at 50Hz) Software( Android Application) -SensorTag pairing and transmission at 50Hz -Data storage Algorithm - Fast Fourier Transform to determine strides / sec - Low speed step detection Algorithm Electrocardiogram Module Hardware - ECG circuit - RFduino - Bluetooth transmitter Software( Android Application) -Bluetooth pairing and data transmission of 300 samples/ sec -ECG data storage and display Fig. 1.1: wellNode system modular overview 1 The Android robot is reproduced or modified from work created and shared by Google and used according to terms described in the Creative Commons 3.0 Attribution License. 3 Wellness Monitoring System via Body Area Networks Chapter 2 Posture Recognition 2.1 Brief Introduction The purpose of our posture recognition module is to monitor a user’s posture over a set duration of time. This information is useful for healthcare professionals in that they can use such information to infer the wellness conditions of the user. Specifically, data that indicates extended periods of siting or lying down may indicate an increased risk of developing a chronic disease [3]. Hence, we selected a subset of specific postures to recognize which were: standing, sitting, bending, as well as various lying down positions. The hardware we selected to determine a users posture was the Texas Instruments SensorTag due to its light weight, small size, and overall versatile nature. The SensorTag is worn by the user, and collects and simultaneously transmits its accelerometers measurements to our Android application via Bluetooth Low Energy (BLE). The posture recognition algorithm utilizes fuzzy logic systems to provide continuous determination of the user’s posture and timely transmits the user information to an online database. Within this chapter, the posture recognition modules specifications, background information, hardware selection, software algorithm development, implementation, as well as tests and accompanying results are discussed in more detail. 4 Wellness Monitoring System via Body Area Networks 2.2 2.2 Design Specifications Design Specifications The posture recognition module’s proposed specifications are summarized in Table 2.1 below. The posture recognition module has to be able to recognize at least three different postures, which include: standing, sitting and lying down with an accuracy of 80% or greater. The accelerometer sampling rate should be no less than 10 Hz to accurately measure the user’s posture and adequately determine a new users posture in at most 2 seconds. Table 2.1: Posture Recognition Specifications [4] 2.3 Feature Sampling rate Value or Range 10 Hz Average update delay ≤2s Accuracy ≥ 80 % Number of static postures ≥ 3 (sitting, standing and lying down) Measurement Explanations The sampling rate of the SensorTag The average time the system uses to determine a users posture once they become static The accuracy of the posture recognition algorithm The number and types of postures the system should recognize Background Information There are many different ways of determining a user’s posture utilizing various hardware or software techniques. Within the hardware selection, some studies used vision dedicated cameras or multiple accelerometers placed across the user’s body. In the vision dedicated camera method, various cameras are placed throughout an area focusing on a user within its vicinity; then, the user’s posture is determined by applying image signal process techniques [5]. However, using multiple cameras can be problematic when distinguishing between different users and the cost of implementation increases with the number of cameras needed. Also, the user’s posture can only be determined within the field of view of the cameras. Another alternative uses multiple 3-axis accelerometers placed on specific body parts of the user. The accelerometers are electronic devices that can measure accelerations relative to their orientation. These can be placed on both the chest and thigh or on the head as well. Differentiating between various users can easily be determined by monitoring 5 Wellness Monitoring System via Body Area Networks 2.3 Background Information the user’s specific accelerometer measurements. Contrarily, accelerometers are more susceptible to vibration and motion noise that can affect the overall performance of the posture recognition algorithm. Since our module should be able to monitor a single user regardless of his or her location, the accelerometer device was the best option for our implementation. The accelerometer data can be processed in various ways to determine a user’s posture. Such methods include angular thresholding [6] and fuzzy logic systems [7]. Within the angular threshold method, the accelerometers are placed on the user’s chest and thigh and individual accelerometer orientations can be calculated based on axial measurements. If the accelerometer’s 3-dimensional axes are defined as in Figure 2.1, the two Euler angles, φ (roll) and θ (pitch) can be calculated as follows [6, 8]: tan φ = Ax Ay Az tan θ = q Ax 2 + Ay 2 (2.1) (2.2) Fig. 2.1: Defined 3 dimensional axes with Euler angles where Ax , Ay and Az are the accelerometer measurements of the x-axis, y-axis and z-axis re6 Wellness Monitoring System via Body Area Networks 2.3 Background Information spectively. The third Euler yaw angle (ϕ) equation is not displayed because the accelerometer is insensitive to accelerations along the gravitational vector and cannot calculate the yaw angle [8]. For example, if a user is initially standing with their chest and thigh having a pitch angle of 0◦ , then the user must be in a bending posture when his or her chest pitch angle is 30◦ while the thigh pitch angle remains at 0◦ . The other method is based on fuzzy logic system that consist of combining imprecise inputs to fuzzy subsets to classify the users most likely posture. Generally, the fuzzy logic systems are defined in four stages [5]: 1. Fuzzier: Maps numerical data into fuzzy sets, in which the number of fuzzy sets describe the number of possibilities called membership functions. 2. Rules: Connects the previous membership function to the next membership function. 3. Interference system: Determines the final membership function commonly by an aggregation operator and finds the max value. 4. Defuzzier: Converts the fuzzy sets into a numerical value. When comparing the accuracies of the two different methods, each method depends on the relative environment, user, hardware, and experiments executed. Since the angular thresholding and fuzzy logic system methods are not too difficult to implement, we decided to investigate both methods. We began by selecting a suitable 3-axis accelerometer device and then implemented an angular thresholding method, and later a fuzzy logic method to classify different defined postures. We discovered that combining the two methods resulted in difficulties determining certain postures. Therefore, the finalized algorithm is based on fuzzy logic systems only. 7 Wellness Monitoring System via Body Area Networks 2.4 2.4.1 2.4 Implementation Implementation Hardware Overall, the general hardware selection requires a microcontroller, BLE module, and a 3-axis accelerometer. We initially decided to use various Arduino microcontrollers such as Arduino Minis or Arduino Unos to eliminate the additional prototyping time if we were to design our own microcontroller component. However, the BLE modules are typically a surface mount device that is difficult to prototype and wire together. In addition, if we used a readily made Arduino microcontroller board, the size of the overall device with an accelerometer and BLE transmitter would be large and ultimately cause the user some discomfort. Thus, we decided to look into hardware alternatives that are currently in the market and contain the following desirable parameters: • Small size • Easy to program and implement • Contains a 3-axis accelerometer and a BLE module Currently there are two hardware devices, the iBeacon and SensorTag that contain all our desired parameters. The iBeacon requires an Apple developer license to integrate the device with our project; therefore we selected the SensorTag since Android development does not require a license. The hardware that we selected was the small Texas Instruments SensorTag (shown in Figure 2.2) which contains a 3-axis accelerometer and a BLE module. The KXTJ9 accelerometer communicates at a maximum rate of 3.4 MHz via I2 C with the SensorTag microcontroller [9]. In addition, the BLE module can transmit at maximum of 236.7 kbps [10]. This implies that if we take 10 samples per second of each axis, with each sample taking up 3 bytes, the total transmission would be 90 bps (10 samples/s × 3 axes × 3 bytes/sample) plus the overhead bytes in BLE packet transmission. Therefore, the transmission rate is more than sufficient to meet our desired sampling rate of 10 8 Wellness Monitoring System via Body Area Networks 2.4 Implementation Hz. Lastly, the SensorTag can be easily implemented on most Android mobile devices with a BLE v4.0 or greater, which will be discussed in further detail within Section 6.1.1 under Bluetooth Low Energy. Overall, the SensorTag allowed for quick software development without the need to design our own customized BLE accelerometer device. Fig. 2.2: Texas Instruments SensorTag The overall system hardware diagram is shown in Figure 2.3, where the accelerometer data is transmitted to an Android device with an embedded Bluetooth module. The two SensorTags are placed on the user’s chest and thigh (encircled in red in Figure 2.4). By computing the Euler angles (Equations 2.1 and 2.2) or implementing fuzzy logic systems, the 3-axis accelerometer values can provide sufficient information to determine the desired postures from the orientation of a static SensorTag in 3-dimensional space. In conclusion, the orientation of the specific body part with an attached SensorTag can be determined through the accelerometer measurements that can be used further to determine the user’s posture. 9 Wellness Monitoring System via Body Area Networks 2.4 Implementation Fig. 2.3: Posture recognition’s hardware system diagram Fig. 2.4: Posture SensorTags placement 2.4.2 Software The posture of the user can be determined by the orientation of specific body parts by many methods such as angular thresholding and fuzzy logic based systems. The initial method we implemented 10 Wellness Monitoring System via Body Area Networks 2.4 Implementation was using an angular threshold, which determines a users posture based on the Euler angles that describe the devices orientation in three dimensional space (shown in Table 2.2). The pitch angles (Equation 2.2) of both chest and thigh accelerometers within a particular range determines specific postures including standing, bending, sitting and lying down. However, when we incorporated the fuzzy logic system to determine different lying down positions (on one’s back, front left or right side), the algorithm was not able to determine some postures because specific postures had the same determinant conditions. Therefore, we required to increase the complexity of the angular threshold by including all of the three possible Euler angles to determine the postures with a high level of accuracy. Since the accelerometers cannot measure the yaw angle (the accelerometer is insensitive to any changes about the gravitational vector), we were required to incorporate a gyroscope into our implementation, which is another motion sensor that measures angular velocity [8]. Table 2.2: Angular Threshold Determination of Postures θchest θthigh Posture <30◦ < 30◦ Standing >30◦ < 30◦ Bending <30◦ > 30◦ Sitting >30◦ < 30◦ Lying down on back side The finalized method was based on the fuzzy logic system. It was implemented by first creating fuzzy logic functions for each posture to create the fuzzy subsets, then we created the classifier algorithm based on the previously determined functions to classify the most likely posture. Given an accelerometer measurement, the most likely posture was determined by the largest sum of the fuzzy subsets’ output. By analyzing the measured range of each accelerometer axis, we created fuzzy subsets for each posture, and for each SensorTag (thigh and chest), as shown in Figure 2.5. The defined fuzzy subsets are then used to describe the likelihood of the user being in a specific 11 Wellness Monitoring System via Body Area Networks 2.4 Implementation posture. The wide range of each fuzzy logic function accounted for the different users that would execute each posture uniquely. For each posture, a score (Equation 2.3) was calculated from the sum of the fuzzy subsets’ output. Afterwards, a user’s posture was determined by the highest posture score. SP osture = FcP osturex (Acx ) + FcP osturey (Acy ) + FcP osturez (Acz ) + (2.3) FtP osturex (Atx ) + FtP osturey (Aty ) + FtP osturez (Atz ) where Sposture is the specific posture’s score, FcPosture is the specific posture fuzzy subset for the chest accelerometer for each x-,y- and z- axis, FtPosture is the specific posture fuzzy subset for the thigh accelerometer for each x-,y- and z- axis, and Ac and At are the axis accelerometer measurements for the chest and thigh respectively. Therefore, our finalized design implemented a fuzzy logic method to determine each different posture, hence eliminating the Euler angle complexity. The posture recognition implementation on the Android application is described in Figure 2.6. The application receives both SensorTag accelerometer measurements by requesting for the data at a rate of 10 Hz. Therefore the algorithm will have semi synchronous data to determine a user’s posture due to the latency of retrieving one SensorTag’s accelerometer measurements after the other. However, a BLE module typically transmits data faster than our desired 10 Hz [11]. We determined the average latency time between retrieving both SensorTags’ measurements by recording the times that the data is received from a specific SensorTag. The received measurements’ timestamps were logged and displayed on the Android development environment, Eclipse. The latency times were calculated by the difference between the two SensorTag data timestamps and all were less than 0.03 s. Therefore, the latency time between receiving data from both devices was less than our sampling period of 0.1 s and we can consider the received data as being semi synchronous. Since a user can not transition into a new posture within the 0.1 sampling period, the semi synchronization of data 12 Wellness Monitoring System via Body Area Networks 2.4 Implementation will not have a great affect on the algorithm’s performance. Also, in order to ensure that the user was not transitioning to a new posture, the algorithm removed any acceleration magnitude vector greater than 1.6 m/s2 or less than 0.5 m/s2 , which would indicate that a user was jumping, running or falling, by the following equation: |A| = q Ax 2 + Ay 2 + Az 2 13 (2.4) Wellness Monitoring System via Body Area Networks 2.4 Implementation Chest Accelerometer X-Axis 1 0.5 0 -1 1 0.5 0 -1 1 0.5 0 -1 Thigh Accelerometer X-Axis -0.5 0 0.5 Chest Accelerometer Y-Axis -0.5 0 0.5 Chest Accelerometer Z-Axis -0.5 0 0.5 1 1 0.5 0 -1 1 1 0.5 0 -1 1 1 0.5 0 -1 -0.5 0 0.5 Thigh Accelerometer Y-Axis 1 -0.5 0 0.5 Thigh Accelerometer Z-Axis 1 -0.5 0 0.5 1 a) Standing Chest Accelerometer X-Axis 1 0.5 0 -1 1 0.5 0 -1 1 0.5 0 -1 Thigh Acceleromter X-Axis -0.5 0 0.5 Chest Accelerometer Y-Axis 1 1 0.5 0 -1 -0.5 0 0.5 Chest Accelerometer Z-Axis -0.5 0 1 0.5 0 -1 0.5 1 1 0.5 0 -1 -0.5 0 0.5 Thigh Accelerometer Y-Axis 1 -0.5 0 0.5 Thigh Accelerometer Z-Axis 1 -0.5 0 0.5 1 b) Bending Chest Accelerometer X-Axis 1 0.5 0 -1 1 0.5 0 -1 1 0.5 0 -1 -0.5 0 0.5 Chest Accelerometer Y-Axis -0.5 0 0.5 Chest Accelerometer Z-Axis -0.5 0 0.5 Thigh Accelerometer X-Axis 1 1 0.5 0 -1 1 1 0.5 0 -1 1 1 0.5 0 -1 -0.5 0 0.5 Thigh Accelerometer Y-Axis 1 -0.5 0 0.5 Thigh Accelerometer Z-Axis 1 -0.5 0 0.5 1 c) Sitting Chest Accelerometer X-Axis 1 0.5 0 -1 1 0.5 0 -1 1 0.5 0 -1 -0.5 0 0.5 Chest Accelerometer Y-Axis -0.5 0 0.5 Chest Accelerometer Z-Axis -0.5 0 0.5 Thigh Accelerometer X-Axis 1 1 0.5 0 -1 1 1 0.5 0 -1 1 1 0.5 0 -1 -0.5 0 0.5 Thigh Accelereomter Y-Axis 1 -0.5 0 0.5 Thigh Accelerometer Z-Axis 1 -0.5 0 0.5 1 d) Lying down (on back side) Chest Accelerometer X-Axis 1 0.5 0 -1 1 0.5 0 -1 1 0.5 0 -1 Thigh Accelerometer X-Axis 1 0.5 0 -1 -0.5 0 0.5 Chest Accelerometer Y-Axis -0.5 0 0.5 Chest Accelerometer Z-Axis -0.5 0 0.5 1 1 0.5 0 -1 1 1 0.5 0 -1 -0.5 0 0.5 Thigh Accelerometer Y-Axis -0.5 0 0.5 Thigh Accelerometer Z-Axis -0.5 0 0.5 1 1 e) Lying down (on front side) Chest Accelerometer X-Axis 1 0.5 0 -1 1 0.5 0 -1 1 0.5 0 -1 -0.5 0 0.5 Chest Accelerometer Y-Axis -0.5 0 0.5 Chest Accelerometer Z-Axis -0.5 0 0.5 Thigh Accelerometer X-Axis 1 1 0.5 0 -1 1 1 0.5 0 -1 1 1 0.5 0 -1 -0.5 0 Thigh Y-Axis 0.5 -0.5 0 0.5 Thigh Accelerometer Z-Axis -0.5 0 0.5 1 1 1 f) Lying down (on left side) Chest Accelerometer X-Axis 1 0.5 0 -1 1 0.5 0 -1 1 0.5 0 -1 -0.5 0 0.5 Chest Accelerometer Y-Axis -0.5 0 0.5 Chest Accelerometer Z-Axis -0.5 0 0.5 Thigh Accelerometer X-Axis 1 1 0.5 0 -1 1 1 0.5 0 -1 1 1 0.5 0 -1 -0.5 0 0.5 Thigh Accelerometer Y-Axis -0.5 0 0.5 Thigh Accelerometer Z-Axis -0.5 0 0.5 1 1 g) Lying down (on right side) Fig. 2.5: Posture fuzzy logic subset functions, where the x-axes are the accelerometer measurements and the y-axes are the likelihood values 14 Wellness Monitoring System via Body Area Networks 2.5 Tests and Results Fig. 2.6: Posture recognition flowchart 2.5 Tests and Results The SensorTags were adhered to the user’s thigh and chest by a customized Velcro belt with a pocket that holds the device (Figure 2.7). This belt can be lengthened by adding more Velcro belt segments, hence the belt ensures that the SensorTag is tightly strapped against various body sizes. The algorithm was tested to determine the accuracy and average determination time by using the 15 Wellness Monitoring System via Body Area Networks 2.5 Tests and Results project’s Android application to determine and display the user’s posture. All five group members performed a series of 35 uniformly distributed random postures and the determination time was manually measured by a stopwatch. The results of the tests are summarized in Table 2.3. Fig. 2.7: SensorTag customized Velcro strap Table 2.3: Posture Recognition Experimental Results Subject Accuracy Average Determination time Cassandra 100 % 1.49 s Tianqi 100 % 1.51 s Haiyue 97% 1.54 s Yang 100% 1.11 s Jeff 100% 1.02 s Total 99% 1.334 s The determination time was measured from the moment the subject settled in their specific static posture to when the application determined the exact posture. The comparison between the proposal and resulting specifications are shown in Table 2.4. The sampling frequency was programmed within the SensorTag and was obtained by BLE protocols without any latency, hence, the data was received at a synchronous rate. The accuracy was ∼99 % but was due to one subject not fully going into a bending position. Also, the average algorithm determination time was 1.334 s. Therefore, 16 Wellness Monitoring System via Body Area Networks 2.5 Tests and Results the experimental results showed that the posture recognition module was able to meet our proposed specifications. By being able to adequately monitor a user’s posture, healthcare professionals can obtain sufficient wellness information. An entire daily posture summary can be related to the amount of time a user spends doing physical activities in comparison to being sedentary. Furthermore, the rate that a user transitions from one posture to another posture can suggest that a user is doing some form of physical exercise. Also, a transition between a standing and lying down posture could signify that a user has fallen down and requires immediate assistance. Therefore, the recording of a user’s posture provides compelling wellness information. Table 2.4: Posture Recognition Specifications Comparison Feature Sampling rate Average update delay Accuracy Proposed Specifications 10 Hz ≤2s ≥80 % Number of static postures ≥3 (standing, sitting and lying down) 17 Results 10 Hz 1.344 s ∼99 % 7: sitting, standing, bending and 4 lying down positions (on back, front, left or right side) Wellness Monitoring System via Body Area Networks Chapter 3 Electrocardiogram 3.1 Brief Introduction The overall purpose of the ECG module is to measure and display the electrical signals controlling an individual’s heart. In a clinical environment, viewing the waveform produced by the heart’s conduction system can be utilized to examine patterns among heartbeats, where abnormalities in the rhythm can indicate various heart conditions. [12]. For many years, the electrical hardware required to measure and display ECG waveforms has been both large and immovable, essentially confining users to a chair or bed next to the equipment. The goal of our ECG module was to design a portable enclosure to be worn by the user, housing a set of hardware that can extract the ECG signal from user-worn electrodes. The hardware would then transmit the ECG signal to a local mobile device through wireless communications. Due to the very specific nature of our requirements, we decided to construct our own ECG module by utilizing simple and reliable off-the-shelf components. Within this chapter, the ECG module’s background information, specifications, hardware selection, software development, implementation, as well as performance tests and accompanying results are discussed in more detail. 18 Wellness Monitoring System via Body Area Networks 3.2 3.2 Background Information Background Information In the most basic sense, the human heart is an electrochemical generator that is suspended in a conductive medium [13]. The potentials generated by the heart’s conduction system are used to open and close valves within the heart which permit the flow of blood into successive chambers. The heart’s conduction system, as any insulated electrical conductor, is not perfect and it is known that electrical potentials generated within the heart leak into local tissues surrounding the heart. Since the internal tissues of the body (being comprised mainly of ion-rich fluids) act as a good conductor, we can hence measure the sum of electrical activity at the surface of the user’s skin. An ECG is a waveform displaying the sum of variations in electrical potential generated by the heart as a function of time. Electrical potentials are generated at the sinoatrial (SA) node, located inside the upper-right chamber of the heart, and pass down the heart’s conduction system until they reach the apex (bottom-left region) of the heart a finite time later. By placing two electrodes on the surface of the skin, in parallel with the path of the heart’s conduction system (see Figure 3.1), the electrical potentials passing down the heart’s conduction system can be visualized as a function of time. In specific, the difference in potential measured between electrodes one and two are used in conjunction with a third, reference electrode to produce an ECG waveform. The third electrode is required to be placed on the body such that it is not between electrodes 1 and 2, so as to act as a reference for measuring potential difference. 19 Wellness Monitoring System via Body Area Networks 3.2 Background Information Fig. 3.1: Electrode placement Each valley and peak in an ECG waveform represents a critical event taking place within the heart. As is the case, an ECG waveform should follow an extremely specific form. The ideal form for a single period of an ECG waveform is displayed in Figure 3.2 provided below. Fig. 3.2: Ideal ECG waveform The above waveform depicting the sequence of events taking place within the heart is repeated once for every heartbeat. Any deviations to the above shown waveform in regards to peak amplitude, interval times between events, and a host of many other distortions can be linked to specific heart conditions. Therefore, a healthcare professional may be able to diagnose patients with a possible heart condition by studying the measured ECG waveforms produced by a patient’s heart. 20 Wellness Monitoring System via Body Area Networks 3.3 3.3 Specifications Specifications A summary of the required specifications for our ECG module is provided in Table 3.1 below. For appropriate viewing of the ECG waveform, the detection hardware should amplify the measured (analog) signal by a factor of 200 or greater. A hardware filter should eliminate noise and stray signals in the analog signal by filtering out frequencies outside of the range of 0.05 Hz - 150 Hz [14]. As well, the filter should try to eliminate power-line interference in the analog measured signal by removing the 60 Hz component of the measured ECG signal. In converting the analog measured signal to a digital signal, the device must sample the analog ECG signal at a rate in excess of 300 Hz, and quantize the signal amplitude with a resolution of 10 bits. Lastly, to ensure adequate patient safety and for our device to meet the IEC 60601-1 2005 medical device standard, the maximum leakage current from the device (either by electrode leads or enclosure) to the human body must not exceed 10 µA [15]. Table 3.1: ECG Proposed Specifications [4] Feature: Sampling Rate Resolution High-Pass Filter Cut-Off Frequency Notch Filter Cut-Off Frequency Low-Pass Filter Cut-Off Frequency Amplifier Gain Leakage Current Value or Range: > 300 Hz 10 bits 0.05 Hz 60 Hz 150 Hz ≥ 200 ≤ 10 µA Measurement Explanations: How often to sample the analog ECG signal The quantization steps of the digitized signal Frequency components below this value should be removed Frequency components at this value should be removed Frequency components above this value should be removed The amount of voltage amplification that the hardware should provide The amount of current feedback to the patient when using this device 21 Wellness Monitoring System via Body Area Networks 3.4 3.4.1 3.4 Implementation Implementation Hardware Implementation Contained within the ECG wearable enclosure are two circuit boards, two 9 V batteries, one switch, and one 3.5mm female stereo jack (Figure 3.3). The larger circuit board (Model: BPS BR1 - 7.05” x 1.85”) forms the detection and filtering circuit, as it holds all of the electronic components required for amplifying and filtering the electrical signals measured from the electrodes. The smaller circuit board (Model: BPS SB400 - 3.00” x 1.90”) holds an Arduino-based RFduino microcontroller, as well as a Bluetooth Mate Silver wireless transmitter used in combination to process and then transmit the output of the detection and filtering circuit. All aspects of the hardware were designed to be focused around user ease of use, as well as product reliability. Detailed schematics for each circuit can be found in Appendix B. Fig. 3.3: ECG module internal layout 22 Wellness Monitoring System via Body Area Networks 3.4 Implementation Filter and Detection Circuit The larger of the two circuit boards housed within the wearable ECG enclosure contains all of the components required to both amplify and filter the electrical signals measured at the surface of the patients skin. The electrodes apply the measured signal firstly to a differential amplifier stage, then to sequential stages as depicted in the figure below. From the differential amplifier, the signal is passed through a high-pass filter, a low-pass filter, a 60 Hz centered notch filter, and finally through a final stage of amplification with a DC bias added to the measured signal. Differential Amplification Stage: We chose to use the INA118 differential amplifier for its remarkably high input impedance (100 MΩ) to match a user’s high skin impedance for better signal acquisition [16]. To set the gain of the differential amplifier, the following equation is known: G=1+ 50 kΩ Rg (3.1) We decided to use a 10 kΩ potentiometer for Rg . With this design, we were able to adjust the gain of the ECG waveform at any time if specific patients require a little more, or little less gain such that the ECG waveform remains within the RFduino’s analog range of 0 V - 3.3 V. High-Pass Filtering Stage: The high-pass filter stage utilized a second order Sallen-Key topology design (Appendix B) to remove frequency components of the measured ECG signal below the desired cut off frequency of approximately 0.05 Hz. We chose a quality factor of 0.5 for the filter so as to balance the roll-off and flatness characteristics of the filter. 23 Wellness Monitoring System via Body Area Networks 3.4 Implementation With Q = 0.5, we were able to choose resistor and capacitor values so as to set the cut off frequency of the high-pass filter to be 0.05 Hz. Specifically, we used the equation provided below to determine values of R and C. fc = 1 2πRC (3.2) We thus chose R = 16kΩ and C = 200µF . Low-Pass Filtering Stage: The low-pass filter stage utilized a second order Sallen-Key topology design (Appendix B) to remove frequency components of the measured ECG signal above the desired cut off frequency of approximately 150 Hz with the same quality factor of 0.5. With Q = 0.5, we were able to choose resistor and capacitor values so as to set the cut off frequency of the low-pass filter to be 150 Hz. Specifically, the cut-off frequency is the same as Equation 3.12. Hence, we chose R = 7kΩ and C = 0.15 µF. Band-Reject Filtering Stage: It is known that 60 Hz power-line interference overlaps with the frequency range containing useful information for ECG signal acquisition and analysis. As such, we decided early on that we wanted a notch filter with a very high quality factor to precisely reject the 60 Hz frequency component. We required a high quality factor to reject a narrow frequency band. To achieve a high quality factor, we decided to use the active twin-t style notch filter as shown in the Appendix B. The active twin-t notch filter also has the added benefit that the quality factor of the filter may be adjusted by configuring resistors R4 and R5 , which adjust the voltage seen at the non-inverting input of the lower operational amplifier (U3 in Appendix B). We chose Q = 5 so as to balance a very narrow 24 Wellness Monitoring System via Body Area Networks 3.4 Implementation width, but also a considerable depth of the notch. Since the cut-off frequency is: fc = 1 2πRC (3.3) where R and C correspond to R1 = R2 and C1 = C2 respectively in Appendix B. By convention of the active twin t-notch filter: C3 = 2 C1 = 2 C2 R3 = R2 R1 = 2 2 (3.4) (3.5) To determine R4 and R5 , we first have to determine K given that weve already chosen a value for Q: Q= 1 4 (1 − K) 1 4Q (3.7) 1 1 =1− = 0.95 4Q 20 (3.8) 1−K = K =1− (3.6) Then: R4 = (1 − K) R (3.9) R5 = K R (3.10) Final Amplification Stage (with Added DC Bias): To achieve our target amplification factor specification of 200 V/V or greater, we implemented a final amplification stage using a 741 operational amplifier set up in an inverting configuration (Appendix B). It is known that for the inverting configuration, the gain of the amplifier is set by 25 Wellness Monitoring System via Body Area Networks 3.4 Implementation the combination of resistors R13 and R14 as seen in Appendix B. Specifically, the gain is set by the following equation: G=− R13 R14 (3.11) As we had already established a gain of by the initial differential amplifier, we chose R13 and R14 such that the amplifier would supply a gain of 25. Specifically, we chose R13 = 25 kΩ and R14 = 1 kΩ. In addition to amplifying the ECG signal prior to the input to the RFduino microcontroller, the ECG signal also required the addition of a DC bias voltage due to the fact that the RFduino microcontroller cannot accept input voltages below 0V on any of its input pins. To bring the baseline of the ECG signal above 0 V, we used a 25 kΩ in combination with a 10 kΩ potentiometer to create a voltage divider and applied the bias voltage to the non-inverting input of the 741 operational amplifier. By using the 10 kΩ potentiometer, we were able to adjust the DC bias applied to the ECG waveform at any time if specific patients require a little more, or little less bias to have the ECG waveform centered within the RFduino’s analog range of 0 V - 3.3V. We required the use of two capacitors, C10 and C11 , as seen in Appendix B, for the purposes of AC coupling of this stage of the circuit. Essentially, the capacitors act to configure this stage of the circuit so that it only amplifies signals that change with time. We encountered difficulties in choosing the value of C10 and C11 . We knew that the combination of R and C components would have an effect on the filtering characteristics of our circuit overall. We also knew that with the specified circuit used for DC biasing, it would have a cut off frequency described by the following equation: 26 Wellness Monitoring System via Body Area Networks fc = 3.4 Implementation 1 2πR1 C (3.12) We initially set fc = 150 Hz to match the upper cut off frequency we desired and found C to be 100 uF. When testing the entire circuit using C = 100 uF, the lower cut off frequency was as desired at approximately 0.05 Hz, but the upper cut off frequency had been shifted up to 226 Hz. Examining the output of the circuit just prior to the final amplification stage, the filtering characteristics were exactly as desired, so we knew that the addition of the DC biasing network was causing the discrepancy. We experimented with different values of C and found that when C = 10 uF, the upper cut off frequency was as desired at approximately 150 Hz. At the same time however, we realized the lower cut off frequency had now shifted up to approximately 16 Hz from the desired 0.05 Hz. Nearing the end of the project, not wanting to redesign the DC biasing network and risk damaging the circuit board or adjacent components we came to the conclusion that we had a trade off between meeting the specifications for the upper cut off frequency or meeting the specification for the lower cut off frequency. Before making a decision, we examined which case would be the most detrimental to the ECG waveform output from the filtering and detection circuit. We wanted to remove frequencies between 0 Hz - 0.05 Hz because frequencies in this range cause baseline wander of the ECG signal. Frequencies in the range of 0.05 Hz - 16Hz would contain useful ECG information, but for heart rates that were very slow. Frequencies in the range of 150 Hz - 226 Hz would most be comprised completely of high frequency noise. For this reason, we chose to lose some of the ECG information from 0.05 Hz - 16 Hz, but remove all high frequency noise components above 150 Hz. Data Processing and Transmission Circuit The analog output signal of the ECG filtering and detection circuit is acquired by the RFduino’s General Purpose Input/Output (GPIO) 6 and the measurement is transmitted wirelessly by the Bluetooth Mate Silver module (Figure 3.4). The RFduino was selected because of its Arduino27 Wellness Monitoring System via Body Area Networks 3.4 Implementation based Advanced RISC Machine (ARM) M0 Microcontroller (16 MHz clock frequency) with a 10 bit analog to digital converter that sufficiently quantizes the signal within an adequate range of values. Afterwards, the microcontroller sends the data to the Bluetooth Mate Silver module via UART communication to be transmitted by Bluetooth protocols to our Android application, discussed further in Section 6.1.1. Fig. 3.4: ECG data acquisition and transmission circuit Power To power all of the hardware components of the ECG module, we decided to implement two 9 V batteries connected in a series configuration. We selected this configuration since the input to the differential amplifier swings to a minimum voltage below zero volts, specifically at the Q and S peaks of the ECG waveform. To therefore adequately filter and amplify the ECG signal, the op-amps require a voltage supply range between symmetrical positive and negative voltages. To accomplish this task, we connected the negative terminal of the first battery to the positive terminal of the second battery (Figure 3.5). This connection between the two batteries is used as ground throughout the electrical hardware components. The positive terminal of the first battery is then utilized to provide the positive potential, and the negative terminal of the second battery utilized to provide the negative potential. 28 Wellness Monitoring System via Body Area Networks 3.4 Implementation Fig. 3.5: ECG battery implementation In determining what type of battery to implement, key considerations included a compact size, availability of replacements at local retailers, and a voltage rating between 6 V - 15 V. For these reasons, we decided to use two standard 9 V style batteries. Both the RFduino microcontroller and Bluetooth transmitter require a power supply no greater than 3.6 V. We incorporated a voltage regulator (MC33269t-33) that converts our 9 V battery power supply to a steady 3.3 V power supply. The voltage regulator is placed on the data processing and transmission circuit board, and powers both the RFduino microcontrolller and Bluetooth transmitter simultaneously. A dual-pole single-throw rocker switch was mounted on the top left of the ECG enclosure and is used to power off/on all electrical circuits housed within the enclosure (Figure 3.6). Referring to Figure 3.5, one pole of the switch was used to break/establish the connection to +9 V, whilst the second pole was used to break/establish the connection to -9 V. 29 Wellness Monitoring System via Body Area Networks 3.4 Implementation Fig. 3.6: ECG main power switch Protection Circuitry The ECG device circuitry was designed to include two types of protection circuits, specifically input over-voltage protection for the electrical components, as well as current limiting circuitry to protect users from harmful levels of feedback current from the hardware components. To limit the current provided to the user through the electrodes in contact with their skin, we used 10 kΩ resistors in line with each electrode lead. For input over-voltage protection of the circuit components, we utilized simple diode circuits that will provide a path to ground when input voltages are large enough to damage sensitive components. For example, the RFduino GPIO pin 6, which accepts input from the filtering and amplifying circuit has a upper voltage limit of 3.6 V. The filtering and amplifying circuit output can reach values above 3.6 V, so we implemented a Zener diode which conducts at a breakdown voltage of 3.3 V and placed it between the GPIO 6 pin of the RFduino and ground. Similar diode circuits were implemented for the positive and negative inputs to the differential amplifier. The reference pin of the differential amplifier did not require a protection circuit as it maintains in contact with the floating ground of the system. 30 Wellness Monitoring System via Body Area Networks 3.4 Implementation Patient connection Three electrode attachment cables (leads) were provided to us by the ECE technical staff. The electrode leads were essentially insulated wires with button-style snaps molded onto one end of the cable, and an exposed conductor at the opposite, free end. The button-style snaps are designed to work with the stick-on style 3M Red Dot Ag/AgCl single use electrodes (Figure 3.7). Fig. 3.7: 3M Red Dot Ag/AgCl single use electrode The product’s reliability decreases during user motion as tension and flexion of the electrode lead cables cause stress on the connections to the circuit board. Instead, we decided to use a stereo style, 3.5 mm headphone plug and accompanying jack to allow the three separate electrode leads to be easily removed together from the enclosure at any given time (Figure 3.8). A hole was drilled in the right-most, top side of the enclosure, and the female jack affixed to the enclosure. We connected the three pins of the female jack to the detection and filtering circuit board, effectively connecting the female jack to the positive, negative, and reference pins of the INA118 differential amplifier. 31 Wellness Monitoring System via Body Area Networks 3.4 Implementation Fig. 3.8: 3.5 mm stereo plug and jack electrode lead connection We modified the obtained ECG leads by shortening the leads to approximately 18”. The shortened leads decreases the amount of induced current that could be created within a lead loop, which could contribute additional noise to the ECG signal. The electrode leads are grouped together by shrink tubing and a right angle 3.5 mm male plug (Neutrik NTP3RC-B) is attached to the free ends of the three electrode leads (Figure 3.9). In all, the electrode leads that connect to the wearable enclosure resemble closely and function like a pair of in-ear headphones that have become popular with today’s mobile electronic devices. 32 Wellness Monitoring System via Body Area Networks 3.4 Implementation Fig. 3.9: ECG module electrode leads Enclosure The desire to maintain the shortest electrode leads necessitated that the ECG module be placed near to the user’s heart. We decided that the enclosure for the ECG module would be worn on the user’s lower chest area, across the user’s abdomen. In an effort to ensure user comfort, several specifications were decided upon for the enclosure design. Specifically, the enclosure should not have sharp corners or protrusions that would push into the user’s chest. As well, the enclosure should follow the natural form of the user’s chest, not having the ability to shift or rock on the user’s chest. We chose to implement the Ergo-Case style Acrylonitrile Butadiene Styrene (ABS) plastic container manufactured by OKW enclosures (Figure 3.10). OKW enclosures offers their Ergo-Case container line in several size options as well as colors, and includes such features as a convex design for comfortable wearing, internal screw pillars for mounting circuit boards, integrated loops for waist belt strap attachment, all of which were desirable and would meet our design specifications. 33 Wellness Monitoring System via Body Area Networks 3.4 Implementation Fig. 3.10: ECG module enclosure with lid affixed The enclosure lid is affixed to the base with the use of four Philips-head screws which can be accessed on the backside of the base of the enclosure. No components were affixed to the lid of the enclosure. In this way, the front lid may be removed easily at any time, without the worry of damaging components when pulling the halves of the enclosure apart. For the internal layout of the enclosure, all of the electronic hardware was first mounted to a flat, ABS plastic backing plate which was then affixed to the base of the Ergo-Case enclosure (Figure 3.3). All electrical components were secured to the backing plate by the use of stainless steel, socket cap bolts. For each circuit board mounted to the backing plate, a rubber spacer was placed in-between the circuit board and the backing plate at each fastening position to alleviate mechanical stresses on the circuit board caused by jarring movements of the enclosure as a whole (Figure 3.11). To keep the appearance of the backing plate neat, all interconnect wires linking major components were routed underneath the backing plate. For the interconnecting wires to 34 Wellness Monitoring System via Body Area Networks 3.4 Implementation pass through the enclosure, holes were drilled in the backing plate at various locations. A rubber grommet was placed within each hole in an effort to prevent the edges of the backing plate cutting into the insulation of the interconnecting wires. Fig. 3.11: ECG module internal backing plate structure 3.4.2 Software Implementation Our project description outlined that the detected ECG waveform should be transmitted wirelessly to a mobile device so as to be viewed within a dedicated Android application. Typical ECG signals have a frequency range between 0.05 Hz and 150 Hz [14], therefore, by Nyquist’s theorem, the ECG data should be acquired at a sampling rate more than 300 Hz to have enough information to reproduce the original signal and avoid the effects of aliasing. The RFduino was initially selected because it had a BLE module with a 16 MHz ARM M0 Microcontroller and a 10-bit Analog-toDigital Converter (ADC). We measured the average time it takes for the microcontroller to execute an analog read value to be 0.787 µs per measurement. Therefore, it was concluded that the M0 microcontroller was capable of acquiring the ECG data at a rate larger than 300 Hz as desired. 35 Wellness Monitoring System via Body Area Networks 3.4 Implementation Unfortunately, upon testing the BLE module of the RFduino, it was discovered that BLE wireless communications would not be suitable for our implementation due to asynchronicity. Specifically, durations between the transmission of data packets by the BLE module were inconsistent. Further information regarding this issue can be found in the following Tests and Results section. There were several alternative options to achieving wireless communications between our ECG wearable device and our Android application, namely standard Bluetooth, ZigBee and Wireless Fidelity (WiFi). Further research indicated that standard Bluetooth transmission technology would be the most successful for continuous data transmission implementations, whereas BLE technology was more suited for infrequent data transmission applications such as relaying temperature, humidity or pressure readings [17]. Thus, the Bluetooth Mate Silver by Sparkfun was selected to achieve transmission of the measured ECG data at a rate of at least of 300 Hz. This Bluetooth module was easy to integrate with our RFduino via Universal Asynchronous Receiver/Transmitter (UART) communications, and functioned seamlessly with the Android application by using the Serial Port Profile (SPP). The SPP transmits data via the serial port, just like a Universal Serial Bus (USB) connection. Hence, the Bluetooth Mate Silver is capable of transmitting data at rate of 2400 up to 115200 bits per second (bps). Additional information regarding the implementation of the SPP profile is discussed in Section 6.1.1. The RFduino’s functional flowchart is shown in Figure 3.12. Initially, the RFduino waits until the Bluetooth Silver Mate is connected to the Android application and has received a command byte. If the command byte is 0x00, this signifies the ‘START’ command and the RFduino will start sending the measured ECG values. In sending data, the RFduino sends firstly an indicator signifying the start of a new measurement (byte 0x0A), then sends the measured value in its two-byte, little endian format. After such, the RFduino is paused for a period of 2.62 ms which corresponds to being less than a sampling period of 1/360 s ∼= 2.78 ms. We decided to sample at a frequency 36 Wellness Monitoring System via Body Area Networks 3.5 Tests and Results of 360 Hz to eliminate aliasing issues. This delay allows for a sufficient overhead such that the RFduino may check for any received command bytes. If the RFduino receives the byte 0xFF, this signifies a ‘STOP’ command and the RFduino should stop sending ECG measurements to the Android application. Fig. 3.12: RFduino data acquisition and transmission flowchart 3.5 Tests and Results Following the completion of the ECG module hardware, the circuitry was analyzed for compliance utilizing several testing methods. Below is a summary table of the desired specifications and test 37 Wellness Monitoring System via Body Area Networks 3.5 Tests and Results results of several key features of the ECG wearable device. Table 3.2: ECG Specifications Comparison Feature: Sampling Rate Resolution High-Pass Filter Cut-off Frequency Notch Filter Center Frequency Low-Pass Filter Cut-off Frequency Proposed Specification: ≥ 300 Hz 10 bits Results 300 Hz 10 bits 0.05 Hz 16 Hz 60 Hz 61 Hz 150 Hz 149 Hz Amplifier Gain ≥ 200 Leakage Current < 10 µA Adjustable: Max = 543.1 V/V N/A Initial tests were done with the BLE and the Android application to determine the wireless data transmission rate. The Android application had problems synchronizing with the RFduino BLE; consequently, the application would miss bytes from a continuous stream of data being transmitted from the RFduino. The solution was to create a handshaking protocol between the RFduino and the Android application. The application would send a ’Ready’ signal to the RFduino to signal the microcontroller to send the next available ECG value. However, the times between each received value were not constant, and ranged between 3 ms to 43 ms. Next, we had the RFduino send data in its maximum packet size of 20 bytes (10, 2-bit ECG values), but when we expected it to take 10 ms the time measured between received packets were approximately 20 ms. The RFduino was tested to determine the maximum frequency at which it could transmit its data to the Android application via handshaking. It took on average 2929.4 ms to transmit 900 samples with a packet size of 10, 2-bit integer data type ECG values. These results showed that the RFduino’s BLE module was able to meet our design specification, however the inconsistent transmission time suggests that the ECG ADC value was not acquired at the desired sampling frequency. Therefore, the RFduino’s BLE module was not used to transmit wirelessly the ECG data to our Android application. 38 Wellness Monitoring System via Body Area Networks 3.5 Tests and Results The Bluetooth Mate Silvers wireless data transmission rate was tested by sending 900 consecutive analog read values. At the same time a digital output was set to logic high (5V) to signify the start of the data transmission, then set to logic low (0 V) to signify the end of data transmission. As seen in the oscilloscope screen capture (Figure 3.13), the entire data transmission took 2.5 seconds, thus this meant that the data was sent at a rate of 360 Hz. In conclusion, the testing results showed that the Bluetooth Mate Silver with the RFduino as its microcontroller is capable of sending the ECG data to the Android application at a sufficient rate larger than 300 Hz. Fig. 3.13: Oscilloscope capture of ECG Bluetooth transmission test Signal amplification as well as filtering characteristics were analyzed by connecting the ECG module to a signal generator and examining the output characteristics by visualization on an oscilloscope. Specifically, an Agilent 33220A signal generator was connected to the electrode leads of the ECG device and the final output of the ECG circuitry was monitored on a Tektronix TBS 1052B digitial oscilloscope. An input waveform of amplitude 24.8 mVpp and varying frequency was used to test the frequency response of the ECG circuitry. To ensure the filtering hardware was removing the desired frequencies, we measured the peak-to-peak amplitude of the output signal at frequencies 39 Wellness Monitoring System via Body Area Networks 3.5 Tests and Results ranging from 0.05 Hz to 165.0 Hz. The measured amplitudes were then plotted as a function of frequency, the result of which is shown in the graph below (Figure 3.14). Fig. 3.14: ECG filter frequency response In determining the frequency response of the ECG hardware, the gain of the ECG circuitry was set to a moderate level to not be near the saturation voltage of the amplification circuits. Maximal signal amplitudes at this gain level are 6.12 Vpp and 5.12 Vpp occurring at the frequencies 40 Hz and 80 Hz respectively. By Figure 3.14, the removal of frequencies components near 60 Hz is immediately apparent. The center frequency of the notch filter was determined experimentally to be 61.0 Hz. The lower and upper half-power bandwidth frequencies of the notch filter were determined experimentally using the maximal amplitudes on opposite sides of the notch, and were found to be 57 Hz and 66 Hz respectively. The implementation of our notch filter matches nearly identically 40 Wellness Monitoring System via Body Area Networks 3.5 Tests and Results the desired specification for this filter. In examining the frequency response of the high-pass filter, the cut-off frequency was found experimentally to be 16 Hz. Our desired cut-off frequency for the high-pass filter was 0.05 Hz. This discrepancy is due to a trade off as described in the implementation section. Looking lastly to the frequency response of the low-pass filter, the desired cut-off frequency was specified to be 150 Hz. In examining the data presented above, the cut-off frequency of the low-pass filter was found experimentally to be 149.0 Hz. The implementation of our low-pass filter matches nearly identically the desired specification for this filter. Amplification of the ECG circuitry was tested in the pass bands of the combined three filters, namely at 40 Hz and 80 Hz. With the gain of the circuitry set to a maximum, just below a level at which clipping of the output signal was observed, the gain was found to be 543.1 V/V and 520.2 V/V at 40 Hz and 80 Hz respectively. Our implementation exceeds our specification by a factor greater than two-fold, and in addition can be adjusted and fine-tuned to be work with a wide range of individuals. In researching further about the techniques for measuring device leakage current, we made a critical realization in that our device would not pose any risk in this regard. Leakage currents are only applicable to medical devices that are physically connected to ground, either by a 120 V, 60 Hz wall outlet or other means. If the physical path to ground were to be broken, the current that would normally flow to ground (the leakage current), would pose a risk for the user as the current must now pass through the human body to reach ground. In the case of our ECG wearable device, all components are supplied power by batteries which employ a floating point ground design. As is the case, the idea of harmful leakage current does not apply to our device. 41 Wellness Monitoring System via Body Area Networks Chapter 4 Indoor Positioning 4.1 Brief Introduction The purpose of our indoor positioning module is to determine a user’s position in an indoor facility where GPS produces inaccurate results or is simply unable to work. Our indoor positioning module consists of the fingerprinting method, which utilizes signal coverage from ubiquitous WiFi access points inside of a modern facility to determine the position of the user. Typically, the fingerprinting method results in an error within three meters 70% of the time [18]. Our indoor positioning module is able to obtain slightly higher accuracy due to the consideration of the user’s orientation within a facility. Within this chapter, the module specifications, background information, software algorithm development, implementation, and test results will be discussed in more detail. 4.2 Background Information For many years, accurate indoor positioning has been sought after by large public facilities such as wellness facilities, hospitals, and even airports. Although the position of the user has no apparent relevance to their wellness, wellness facility staff can greatly benefit from monitoring the user’s position for two major reasons. Firstly, the user’s position can be used to increase the efficiency of the facility, and secondly, knowing the user’s position is vital for a quick response when harmful 42 Wellness Monitoring System via Body Area Networks 4.2 Background Information accidents occur within the wellness facility. It is also possible to use the signal propagation time to accurately determine the distance between transmitters and receivers before applying the triangulation method to determine the user’s position, which is similar to how GPS works. However, the propagation time for indoor positioning is very short; thus the transmitter and the receiver must be highly synchronized in order to accurately determine the distance between the transmitters and receivers. The cost associated with synchronization of this system makes the implementation of this methodology unfeasible for our project [19]. Other researchers have investigated economical and relatively accurate indoor positioning systems via visual determination, floor sensors, RadioFrequency Identification (RFID) tags, proximity sensors, and motion sensors. However, the method that provides the best results involves the use of the Relative Signal Strength (RSS) of electromagnetic waves from transmitters operating in the radio frequencies (RF) [19]. RFID and WiFi are two important technologies that operate within the RF range and can be used for an indoor positioning module. RFID operates just below 1 GHz, within a frequency band that has less interference from other devices, and can effectively propagate through walls. Unfortunately, RFID is a costly expense, as one RFID reader costs well above the $500 budget allocated for this project. Also, an RFID tag cannot be read when it does not align well with the reader, therefore decreasing the ability to produce accurate positioning results [20]. In contrast, WiFi operates at 2.4 GHz and is ubiquitous in the modern society, as almost every individual owns a smartphone that has a WiFi connection and almost every public facility has at least one WiFi router installed. Since WiFi technologies are readily integrated with most public facilities, the user’s mobile device would receive the transmitted WiFi router signals that would be the basis infrastructure for a WiFi-based indoor positioning system. Therefore, WiFi was the ideal solution for a cost-effective indoor positioning module. WiFi-based indoor positioning system can utilize RSS in two different ways, one being the trian- 43 Wellness Monitoring System via Body Area Networks 4.2 Background Information gulation method and the other being the fingerprinting method. 4.2.1 WiFi Triangulation Method The Triangulation algorithm is based on the lateration process [19]. Assuming that a WiFi router is omnidirectional, the RSS would be constant at a fixed distance away from the transmitter on the omnidirectional plane. This can be pictured as a circle with the center being the transmitter and the radius being a function of the RSS. Furthermore, when we measure the RSS values from three different routers with the aforementioned relationship between the RSS and distance, we can use the formulas below to calculate the intersection of the three circles, which would indicate the user’s position: (xa − x1 )2 + (ya − y1 )2 = d21 (4.1) (xa − x2 )2 + (ya − y2 )2 = d22 (4.2) (xa − x3 )2 + (ya − y3 )2 = d23 (4.3) x1 , x2 and x3 represent the known WiFi access point (AP) locations, while d1 , d2 and d3 are the distances between the AP locations. Then, (xa , ya ) is the unknown coordinate that will be computed for a 2-D situation. For example, in Figure 4.1 the three access points are located at (-2, 2), (-1, 2) and (2, 1). With the d1 , d2 , and d3 distances known, the unknown point (1, 1) will be calculated as the user’s possible position. 44 Wellness Monitoring System via Body Area Networks 4.2 Background Information Fig. 4.1: Position estimation for triangulation method The distance of each APs to the unknown location can be estimated by the signal propagation equation [21]. P (d) = P (d0 ) − 10nlog d d0 (4.4) In this equation, n is the path loss rate relative to a specific distance, P (d) is the signal strength value measured at a reference position P (d0 ) and d is the unknown distance to be calculated. In practice, it is not easy to accurately convert the signal strength to distance, since varying factors such as antenna gains, interference from objects within the signal’s path, signal reflections, and the dielectric properties of various entities need to be taken into consideration. On the other hand, varying radio conditions at a site, caused by environmental factors such as changes in time and humidity, may also alter the effectiveness of the signal propagation model. In fact it is shown in literature that RSS is a poor indicator of distance [22]. 45 Wellness Monitoring System via Body Area Networks 4.3 Design Specifications In addition, the triangulation algorithm, due to poor distance estimation, could lead to nondeterministic results produced from non-intersecting circle solutions. We tried to resolve and eliminate the possibility of nondeterministic results by transforming the systems of equations into an optimization problem that allows the x and y coordinates to produce the smallest error. However, optimizing the system of equations resulted in poor location determination, with errors in the range of 10 m – 20 m. As a result, it would not be feasible to implement the triangulation method in our indoor positioning module. 4.2.2 WiFi Fingerprinting Method The alternative approach is to use the WiFi fingerprinting method, which records the RSS values of different predefined reference areas within the indoor area of interest. The RSS values are used as unique area identifiers, as it is assumed that different areas would have different RSS characteristics. Also, when we utilize this method, we do not need to consider the antenna gains and interference from objects. This approach typically consists of an offline phase and an online phase. Firstly, in the offline phase, which is also called the calibration phase, a fingerprinting database is created, containing all of the RSS values associated with all of the predefined reference areas. Afterwards, the online phase is implemented on an Android application, which compares a sample of the RSS values at the user’s position and the RSS values stored within the fingerprinting database to determine the user’s most likely position. 4.3 Design Specifications The indoor positioning module specifications proposed in our project, namely requiring the module to be able to determine the users indoor position within eight meters 70% of the time, are summarized in Table 4.1. 46 Wellness Monitoring System via Body Area Networks 4.4 Implementation Table 4.1: Indoor Positioning Specifications [4] Feature Accuracy 4.4 4.4.1 Proposed Specification ±8 meters, 70% of all the measurements Implementation Hardware Implementation The main advantage of using WiFi technology is the existence of WiFi infrastructure in most facilities. However, during our initial testing in the University of Manitobas EITC Atrium, we observed that the universitys WiFi router would decrease the accuracy and increase the complexity of the fingerprinting method. The fingerprinting accuracy would decrease because the signals vary depending on the time of the day. In addition, the complexity would increase because each router had multiple Media Access Control (MAC) addresses, multiple Aps, and two different operating frequencies (2.4 GHz and 5 GHz). Therefore, the offline database acquisition and data analysis would be much more complicated. As a result, we purchased six TP-LINK routers, model TLWR740N (Figure 4.2), which all operated at a frequency of 2.4 GHz and had a total cost of $120. These routers are ideal for the indoor positioning module because they operate using a 5 dBi omnidirectional antenna, which allows for better signal coverage to acquire a sufficient database. The WiFi routers are set up and used in two different applications, one of which is open area testing in order to determine the position of the user in the Atrium’s open space, which is shown in Figure 4.3. The other experiment will be carried out in a small, closed space on the first floor of the EITC building in order to identify the specific room that the user is in, as shown in Figure 4.4. If we consider the total cost of implementation for our project, $120 for an open area of approximately 400 square meters, we have an average cost of $0.3 per square meter. Alternatively, if we choose to identify the room in which the user is in, the hardware implementation cost averages to $20 per room. 47 Wellness Monitoring System via Body Area Networks 4.4 Implementation Fig. 4.2: TL-WR740N WiFi router used in the indoor positioning module 1.2m 1.2m Origin (x=1, y=1) Legend Origin (1,1) Finger Printing Reference Locations Router Location Fig. 4.3: Open area WiFi fingerprinting map 48 Wellness Monitoring System via Body Area Networks 4.5 Software Implementation Legend Fig. 4.4: Indoor positioning module room testing setup Router Location 4.5 4.5.1 Testing Location Software Implementation Offline Phase In the offline phase, a mobile device was used to measure the RSS (in dBm) of six APs at the fingerprinting reference locations. We initially mapped 27 equally dispersed locations in the Atrium, however the position errors were above eight meters most of the time. Therefore we increased the positioning module’s accuracy by creating more reference locations within the Atrium. The second attempted WiFi fingerprinting database was constructed using a total of 270 reference locations that were separated by 1.2 m, as illustrated by the blue dots in Figure 4.3. 49 Wellness Monitoring System via Body Area Networks 4.5 Software Implementation Database Construction The database was constructed by acquiring the RSS measurements and then storing the measurements in a concise format. At each reference location, represented by an x- and y- coordinate, we measured the RSS values and stored the measurements in a .dbs format specified for database storage. The finalized constructed database was implemented as a table using the MySQL database in our Android application. The database is built in the form shown in Table 4.3, which contains the coordinates and the RSS values for each of the APs. Table 4.2: Indoor Positioning’s Database Format Coordinate X Y RSS (dBm) AP1 AP2 AP3 AP4 AP5 AP6 The database’s construction is integral for our algorithm. We initially constructed a database that sorted using simple numerical tags, such as location 1 through location 27. Then we had a look-up table to translate the 1 to 27 locations into a relative location system using a red cross (the origin). At the origin and north of that point is the positive y-axis, while east of the red cross is the positive x-axis. Thus, all of the locations will be described as how far they are away from the red cross, or the origin. However the look-up table is not feasible, as it is not intuitive and each determined location does not contain information about its spatial relationship, which could provide more beneficial user information. Next, we looked into another system that utilizes a 2-D index system similar to the index of a matrix. The origin is still defined at the same location, but instead of having the origin at the (0, 0) point, the origin is located at (1, 1). The location 1 unit north of the origin would therefore be (1, 2). Since we have chosen to map the Atrium in a grid format with uniform grid length and width, it is easily seen that an index location can be translated to the relative location without a look-up table. In fact, we only need to multiply the index by the length of the grid to find the relative location. 50 Wellness Monitoring System via Body Area Networks 4.5 Software Implementation In addition to the benefit of the direct mapping of the index to the relative location of the user, there is a huge benefit to using 2-D indexing. We were concerned that our fingerprinting database could become excessively large as we expand the WiFi fingerprinting area. Thus, the simple look-up table’s performance time would increase because we have to scan all locations to get a valid position result. However, by using 2-D indexing within a definitive initial location of the user, we can scan the area around the initial user’s location. By incorporating the initial location, the number of calculations that need to be done is vastly reduced. However, the error will eventually accumulate and the algorithm might fail to find the right position, as it could scan at a location that does not contain the actual location. If we could utilize a RFID proximity sensor along with the WiFi fingerprinting method, we would be given an accurate initial location, via the proximity sensor, and we can then run our algorithm based on that. In the end, we did not implement the idea of combining the fingerprinting method with RFID technology because we could not gain access to a RFID system. However, our database is structured in such a way that it will allow the eventual incorporation of RFID. 4.5.2 Online Phase To determine the most likely location of the user, we use the simple Euclidean distance method to calculate the difference between the sample and the fingerprinting reference locations within the database. During the online phase, the Euclidean distance 4.5 between the sampled RSS value and each database value is computed and then sorted from highest to lowest. The coordinate that yields the smallest Euclidean distance is selected as the optimal estimate of the user’s position. v u n uX 0 2 RSSi − RSSi EuDi = t i=1 51 (4.5) Wellness Monitoring System via Body Area Networks 4.5 Software Implementation In this equation, n represents the number of APs, RSSi is the RSS value from the database, and 0 RSSi is the RSS value measured during the online phase. However, when using the Euclidean distance method, it is possible to produce inaccurate results, as the WiFi signal varies with many factors, such as attenuation and reflections. Therefore, we applied an enhancement algorithm to produce a more accurate result regardless of the varying WiFi signals. The K-nearest neighbour (KNN) algorithm selects K nearest results, found using the Euclidean method, and then averages them to get an enhanced estimation of the users position [23]: x= 1 X 0 xi K (4.6) y= 1 X 0 yi K (4.7) Here, K is the number of nearest reference locations chosen. Through experimentation, we decided to use five, as it gave us more accurate results. During our next tests, we found that the orientation of the user within the Atrium makes a significant contribution to the accuracy of determining that user’s position. The two sets of RSS values shown in Table 4.3 and Table 4.4 were randomly selected from the database for two different positions, (1, 10) and (2, 5) with four different predefined directions. According to the map 4.3, 0◦ is south of the point at the red cross, 90◦ is north of the point at the red cross, 180◦ is west of the point at the red cross, and 270◦ is east of the point at the red cross. 52 Wellness Monitoring System via Body Area Networks 4.5 Software Implementation Table 4.3: RSS at Position (1, 10) Orientation AP1 [dBm] AP2 [dBm] AP3 [dBm] AP4 [dBm] AP5 [dBm] AP6 [dBm] 0◦ -56 -55 -71 -51 -61 -51 90◦ -55 -55 -71 -49 -64 -50 180◦ -61 -50 -73 -51 -62 -48 270◦ -58 -50 -65 -54 -65 -48 Table 4.4: RSS at Position (2, 5) Orientation AP1 [dBm] AP2 [dBm] AP3 [dBm] AP4 [dBm] AP5 [dBm] AP6 [dBm] 0◦ -53 -53 -69 -57 -53 -49 90◦ -62 -61 -68 -56 -56 -42 180◦ -60 -56 -66 -60 -44 -46 270◦ -52 -49 -66 -56 -62 -51 From each column of both tables, the RSS values for the same AP clearly vary for different orientations. As an example, for AP5 at position (2, 5), the RSS was –44 dBm at 180◦ and –62 dBm at 270◦ ; hence the RSS difference of -20 dBm corresponded to a power attenuation factor of 100. This variation in the RSS values is due to a user’s own body shielding some of the APs’ signals and the orientations having different reflected signals. Therefore, when we tested the fingerprinting method in a different orientation than the orientation of the recorded database, the determined position error increased. These results indicate that a user’s orientation within the indoor positioning area is important to incorporate within the indoor positioning module in order to obtain a minimal error. The different orientations were incorporated into our original database by collecting and saving the RSS values for four different directions, each with their own database. The orientation of the user was determined by using the magnetometer sensor built into the mobile device that runs our 53 Wellness Monitoring System via Body Area Networks 4.5 Software Implementation Android application. Once the orientation was determined, the offset was removed to align the user to the 0◦ , 90◦ , 180◦ , and 270◦ direction, which is shown in Figure 4.3. Then, the corresponding orientation database was loaded to determine the user’s position. A flow chart showing the overall online phase algorithm is given in Figure 4.5. Fig. 4.5: Online phase flowchart 54 Wellness Monitoring System via Body Area Networks 4.6 4.6 Tests and Results Tests and Results We conducted our open area testing in the University of Manitoba’s EITC Atrium. To begin, 100 different locations were randomly chosen by Matlabs randi function. The tester walked to the randomly generated locations and then used the wellNode Android application to determine their current location. The results were compared with the actual location via the error equation shown below. All of the experimental data is shown in Appendix C. q error = (1.2 [xa − x])2 + (1.2 [ya − y])2 (4.8) where (xa , ya ) were the actual randomly selected position coordinates and (x, y) were the most likely determined position coordinates. For the room testing, we conducted our experiment on the first floor of the EITC building, as shown in Figure 4.4. The tester randomly picked a room before walking to each green-starred location. The Android application was used to test the users room location at those starred positions. The results were definitively accurate with absolutely no error in room detection. To summarize, Table 4.5 shows the final indoor positioning module specifications compared to the proposed features. Table 4.5: Indoor Positioning Specifications Comparison Feature Proposed Specification Accuracy ±8 m, 70% of all the measurements Update Delay Not defined Results Average error within the Atrium is 3.02 m Room accuracy = 100% <3 seconds In summary, the results show that the average error in the open area test is 3.02 m, while the room testing results were 100% accurate. By comparing these results with our proposed specifications, we achieved and superseded all requirements. In addition, the cost of the hardware implementation was very low; only $0.3/m2 is required for a desired coverage. In conclusion, our final indoor positioning algorithm shows great feasibility in patient monitoring. 55 Wellness Monitoring System via Body Area Networks Chapter 5 Step Detection 5.1 Brief Introduction People today are more concerned about maintaining a healthy lifestyle than they have been in the past. In rehabilitation centers and medical fitness facilities, patients are required to participate in certain physical activities to reduce their recovery time [24] or to reach their fitness goals. The most common way to achieve these objectives is to increase the amount of time spent doing exercises, especially walking and running. Therefore, the implementation of a pedometer, which is a step detection counter, is useful in monitoring the user’s time spent doing a physical activity. The pedometer is typically worn as an external piece of hardware on a belt; however, modern mobile devices have evolved to include motion sensors that can combine with a step detection algorithm. The commercial pedometers that are currently available on the market are designed to monitor the steps for daily fitness. Most of the pedometers work quite well for users that walk with a normal walking speed. However, users that walk slowly or shuffle make it difficult for pedometers to detect their steps. Thus, we attempt to resolve this problem by focusing on developing a pedometer specifically for users with slow walking speeds or a shuffle walking style. In this chapter, the step detection’s specifications, background information, hardware selection, software development, and performance tests will be discussed in detail. 56 Wellness Monitoring System via Body Area Networks 5.2 5.2 Design Specifications Design Specifications The overall goal of the step detection module is to record the number of steps taken by a user with an impaired walking ability. The pedometer module specifically caters to users that walk at a slower than average speed, which is considered to be within the range of 0.7 m/s to 1.8 m/s [24]. As listed in Table 5.1 provided below, it is necessary for the accelerometer data to be collected at a sampling frequency of no less than 50 Hz [25, 26]. At this benchmark for the sampling frequency, the pedometer should have a step detection accuracy of at least 70 %. Table 5.1: Step Detection Specifications [4] Feature Value or Range Sampling Rate ≥ 50 Hz Detectable Walking Speed 0.7 m/s – 1.8 m/s Accuracy ≥ 70 % 5.3 Measurement Explanation The sampling rate of the SensorTag The walking speed of the user that the step detection algorithm can detect steps with at least 70 % accuracy The accuracy of the step detection algorithm in the pedometer module Background Information The pedometer is a step detection module, which is a device that can count the number of steps that a user takes by sensing the impact of the user’s foot with the ground. Currently, the pedometer uses one of two different types of technologies, namely mechanical threshold-based or electrical motion sensor-based. The mechanical threshold pedometer has a pendulum or a swing-arm system with moving parts inside the device. When a user takes a step, the pendulum arm in the mechanical threshold-based pedometer will swing in attempt to reach a certain predefined threshold. Once the threshold is reached, either a mechanical or electrical counter is incremented. An alternative method to the mechanical threshold pedometer is the electrical motion sensor pedometer, which utilizes motion sensing accelerometers to determine the number of steps taken by the user by 57 Wellness Monitoring System via Body Area Networks 5.3 Background Information pattern matching or peak detection methods. 5.3.1 Mechanical Pedometer The mechanical threshold-based pedometer is power efficient and accurate when the user wears the step detection device on the waist or when it is securely placed in the users pocket. However, when the device is placed on a different location on the body or simply put inside a bag, the result will be inaccurate due to the inability to reach the threshold. Since the mechanical pedometer contains a rod inside, the rod can swing within a specific angular range that detects one step once it connects to the circuit inside the pedometer and creates induced current and voltage in the circuit. For arbitrary placement of the pedometer, the rod may not be able to connect to the circuit inside and register that one step has been taken. Also, it is difficult to design the algorithm with threshold detection and step patterns because the mechanical pedometer implements the hardware circuit with a moving rod inside the box. As time goes by, the rod inside the mechanical pedometer will wear down and the swing angle of the rod may change. These changes in the hardware will affect the detection process of one step, leading to inaccurate step detection and difficulty detecting steps from slow walking speeds and shuffles. Therefore, the calibration of the mechanical pedometer will be hard to implement, since we cannot replace and adjust the pendulum rod that is inside of the box. Despite the low power consumption, the mechanical threshold-based pedometer was not selected due to the deterioration of the rod that would lead to an unreliable and inaccurate step detection module. 5.3.2 Accelerometer based Pedometer The accelerometer-based pedometer is generally accurate regardless of where the user wears the device [26]. The user can wear the pedometer on the waist or on any other location on the body to detect a single step. Since the accelerometer measurements provide an indication of how the part of the body is accelerating, we can analyze these measurements to detect and count a user’s 58 Wellness Monitoring System via Body Area Networks 5.4 Implementation step based on peak detection, pattern matching, and Fast Fourier Transform (FFT) methods. The algorithm that we developed utilizes a combination of threshold and pattern matching algorithms. With the proper step detection algorithm of the accelerometer sensor, we do not need to do the calibration of threshold for each individual [27]. Moreover, the algorithm of the accelerometer can remove some false steps caused by noise or unnecessary vibration of the pedometer itself [26]. For our project, we used the accelerometer-based pedometer because the accelerometer can be placed anywhere on the body and measures the way the body accelerates in time. Furthermore, it can capture the motion of a step regardless of how tiny the step is. By implementing a well-designed algorithm, the step can be detected, whereas in the mechanical system, the threshold algorithm only provides you with a value of 1 or 0, regardless of what we do. We cannot exploit the data to get more information. 5.4 5.4.1 Implementation Hardware Implementation The hardware that we selected was the Texas Instruments SensorTag, which contains a 3-axis accelerometer and a BLE module, for reasons similar to those explained in Chapter 3. For the step detections specific sampling frequency of 50 Hz, the SensorTag can be customized by manually changing the initial configuration of the hardware device. Theoretically, the accelerometer-based pedometer can be placed arbitrarily on the users body. After a few experiments, we found that placing the SensorTag just above the knee on a user’s thigh provides a better result than a SensorTag placed on a user’s ankle (Figure 5.1). If the users place the accelerometer on the ankle while they walk, the sensor will undergo a larger range of motion and measure a larger magnitude of accelerations than the SensorTag placed above the knee. Therefore the ankle accelerometer measurements will have more noise that will affect the overall step detec- 59 Wellness Monitoring System via Body Area Networks 5.4 Implementation tion performance. Also, individual users have unique stride lengths that increase the variability of the magnitude of the ankle accelerometers measurements, furthermore increasing the variability of accuracy among individual users. We therefore selected to wear the SensorTag just above the knee on the thigh to have optimal accelerometer measurements with minimal noise for the step detection’s algorithm. Fig. 5.1: Pedometer SensorTag placement 5.4.2 Software Implementation The step detection algorithm is based on a combination of three conditions, namely slope detection, static threshold, and time interval comparisons. Slope detection can determine the slope between two data points as being either positive or negative. The static threshold is a constant value that acts as a minimum limitation of the peak value in the step signals. The time interval comparison method will determine the time difference between the previous step and the current possible step in comparison to a minimum time required for slow walkers to take one step. Overall, all three conditions should be satisfied in order to validate and detect a single step. We defined a one-step cycle as a user planting one foot on the ground, lifting the same foot to move forward, and then planting the foot on the ground again in the step detection module. Before the 60 Wellness Monitoring System via Body Area Networks 5.4 Implementation step detection starts, the algorithm will determine the orientation of the SensorTag for accurate data acquisition. The algorithm will compare the accelerometer values of each x-, y, and z- axis every 10 seconds (every 500 samples). This calibration period was selected because we assumed that the orientation of the SensorTag will not change frequently and that 10 seconds will be fast enough for the algorithm to make the corresponding modifications. The accelerometer measurement that has the largest magnitude signifies that its axis will align with the gravitational vector when it is parallel to this vector; hence, the axis determines the SensorTag’s orientation. Once the SensorTag’s spatial orientation is determined, the step detection algorithm uses the axis that could align with the gravitational vector as the accelerometer measurement input to the step detection algorithm. The first stage of the step detection algorithm is the slope detection to determine a possible step. The slope is determined by comparing the value of two consecutive measurements. We have a positive slope when the current measurement has a larger value than the previous data point and a negative slope is when the value of the current measurement is smaller than the value of the previous data point. One possible step is defined when the slope of the measurement becomes positive and then changes to negative. In other words, we define one possible step with three piecewise components with a positive slope and two piecewise components with a negative slope, as shown in Figure 5.2. The red dots are the accelerometer measurements and one possible step is represented by the total five measurements having a positive then negative slope. The five points were selected because we assume that a possible single step would take approximately 0.1 s. After a possible step is detected, the algorithm will validate the step by using a predetermined threshold. 61 Wellness Monitoring System via Body Area Networks 5.4 Implementation Local Maximum Steps peak Signal from Accelerometer Predetermined Threshold -‐ Data Sample Time difference Fig. 5.2: Step detection algorithm Once a possible step detection peak is detected, the local maximum and the current accelerometer measurement will be compared to a predetermined threshold. The finalized predetermined threshold was 0.2 g, which was found by analyzing the recorded accelerometer measurements of a past walk. The threshold requirement is satisfied by comparing the difference between the local maximum and the current measurement value to the predetermined threshold. As seen in Figure 5.2, if the difference between the local maximum and current measurement is larger than the predetermined threshold, then the possible step satisfies the threshold requirement. On the other hand, when the difference is smaller than the threshold, the possible step is invalid and ignored. Next, the step detection algorithm will check the time difference between the current possible step with the previous validated step. The time interval comparison technique is used to get rid of frequent bouncing noise which produces small fluctuations in the signal that could be counted as valid steps. Our algorithm will only count a step if the time difference between the current possible step and the previous validated step is large enough. This time difference is required to be greater than 0.1 seconds, which approximately represents the slow walking period for each detection of one peak. Otherwise, if the time difference is not larger than 0.1 seconds, the possible step will be 62 Wellness Monitoring System via Body Area Networks 5.4 Implementation treated as bouncing noise and ignored. A clear flow of the step detection algorithm will be shown by the flowchart in in Figure 5.3. Another way to estimate the number of steps that a user has taken is to determine the rate at which the user takes steps and then multiply that by the time interval during which the user is walking. To do this, we utilized FFT for a set of samples and determined where the peak occurred. The frequency at which the highest peak occurs is the rate at which steps are taken. During step detection, we can determine the cadence, which is the walking speed of the user, by using the FFT algorithm. In order to implement the FFT algorithm, we need to choose a larger data set for better evaluation of the FFT data points. For the data array, the number of samples is 256 and the sampling frequency is 50 Hz. We chose a sample number of 256 because the number of data points for the FFT array can only be a power of 2 and we want to evaluate and update the speed about every 5 seconds. We determine the FFT of the data array and find the maximum peak within the 256 samples by using the following equation: Xm = N −1 X xn · e−j2πmn/N m∈Z (5.1) n=0 In this equation, N represents the sample size, which was chosen to be 256 in our algorithm, while m is the frequency index that corresponds to the sample number, which ranges from 0 to N-1. We determine the power spectrum of the signal and find the frequency index at which maximum power occurs, excluding the spectra at a frequency of 0, which is the DC component. The corresponding frequency index defines the frequency of one step that has been taken inside the data array of Equation 5.2. fF F T = mmax · f s N 63 (5.2) Wellness Monitoring System via Body Area Networks Fig. 5.3: Step detection flowchart 64 5.4 Implementation Wellness Monitoring System via Body Area Networks 5.5 Tests and Results In this equation, fF F T is the step frequency determined from fs that represents the sampling frequency , which is 50 Hz, N is the sample size, and mmax is the frequency index at which the maximum peak occurs other than DC component. We use the step size entered by the user and the step frequency obtained from the FFT computation to figure out the speed during a period of time, in terms of miles per hour. The walking speed of the user will be determined after every 5 seconds by the following equation: v = step size · fF F T (5.3) Since we conducted our tests using the walking speed displays on the treadmill, we must convert the speeds determined by the FFT algorithm into miles per hour instead of kilometers per hour. 5.5 Tests and Results The SensorTag was placed just above the knee, on the user’s thigh, by the exact same customized Velcro strap with a pocket, shown in Chapter 2 Figure 2.7. The SensorTag was configured to have a sample frequency of 50 Hz to acquire the accelerometer measurements. The data was transmitted by BLE to the developed mobile application for Android devices, which processes the accelerometer measurements to determine the number of steps that a user takes. We tested the step detection algorithm based on the results of the step counter and the speed indicator shown on the mobile device. As we specified in the design criteria of section 5.2, the step detection algorithm should be able to detect steps from walking speeds ranging between 0.7 m/s and 1.8 m/s. In order to test our algorithm with a well-defined speed, we used the PRECOR treadmill (Model C966i), which is an American model that has set speeds in mph, in the Active Living Centre at the University of Manitoba. We (five individuals) tested the accuracy of the algorithm for three different walking 65 Wellness Monitoring System via Body Area Networks 5.5 Tests and Results speeds, which were 0.67 m/s (1.5 mph), 1.34 m/s (3 mph), and 1.79 m/s (4 mph), by counting out 50 steps for each speed. The results of the experiment in terms of each individual are shown in Table 5.2 below. Table 5.2: Step Detection Experiment Results Test #1 Walking Speed Average Steps Detected Person 1: Haiyue Wang 0.67 m/s (1.5 mph) 1.34 m/s (3 mph) 1.79 m/s (4 mph) 43.67 42.67 43.33 Accuracy (%) 50 87.33 50 85.33 86.67 Average Accuracy (%) 86.44 Test #2 Person 2: Cassandra Aldaba Walking Speed Average Steps Detected 0.67 m/s (1.5 mph) 1.34 m/s (3 mph) 1.79 m/s (4 mph) 48.67 44.33 43 Accuracy (%) 50 97.33 50 88.67 90.67 Test #3 Person 3: TianQi Liang Average Steps Detected Accuracy (%) 50 86 Average Accuracy (%) Walking Speed 50 0.67 m/s (1.5 mph) 1.34 m/s (3 mph) 1.79 m/s (4 mph) 44 42.33 42.33 50 88 50 84.67 Average Accuracy (%) 85.78 66 50 84.67 Wellness Monitoring System via Body Area Networks 5.5 Tests and Results Test #4 Walking Speed Average Steps Detected Person 4: Yang Su 0.67 m/s (1.5 mph) 1.34 m/s (3 mph) 1.79 m/s (4 mph) 43.33 44.33 42.33 Accuracy (%) 50 86.67 50 88.67 84.67 Average Accuracy (%) 86.67 Test #5 Person 5: Jeff Winkler Walking Speed Average Steps Detected Accuracy (%) 50 0.67 m/s (1.5 mph) 1.34 m/s (3 mph) 1.79 m/s (4 mph) 44.67 44.67 46 50 89.33 50 89.33 Average Accuracy (%) 50 92 90.22 The results showed that the accuracies for each walking speed varied between 85% – 97%, while the average accuracies varied between 85.8% – 90.7%. Based on all of the samples that we tested, the average accuracy of the step detection algorithm was approximately 88%. Compared to the accuracy we proposed in the proposal, the accuracy of 88%, which is much higher than the design specification of 70%. For the speed detection, we performed ten tests for three different speeds, which were 0.67 m/s (1.5 mph), 1.34 m/s (3 mph), and 1.79 m/s (4 mph). This experiment used the same SensorTag worn just above the knee, on the thigh of the user, as shown in Figure 5.1. The total average accuracy and the accuracy for each speed are listed in Table 5.3 below. 67 Wellness Monitoring System via Body Area Networks 5.5 Tests and Results Table 5.3: Speed Detection Experiment Results Speed 0.67 m/s (1.5 mph) 1.34 m/s (3 mph) 1.79 m/s (4 mph) Accuracy (%) 98.67 58.27 69.83 Average Accuracy (%) 75.59 According to the experimental results shown in the Table 5.3, the accuracy of speed detection for the slow walking speed of 1.5 mph was very accurate. However, the accuracy decreases for faster walking speeds. Overall, the average accuracy of the speed detection algorithm by using the FFT method was approximately 75%, which is acceptable, as we are only interested in capturing the speed of users with slow walking speeds [28]. The reason why the speed detection did not perform very well for the faster speeds is that the FFT method mainly focuses on slow walking speeds as opposed to fast walking speeds. Also, the manner in which a person walks on a treadmill differs from the way in which they walk otherwise [29]. Table 5.4: Step Detection Specifications Comparison Feature Proposed Specification Results Sampling Rate 50 Hz 50 Hz Detectable Walking Speed 0.7m/s – 1.8m/s 0.67 m/s – 1.8m/s Step Detection Accuracy 70% ≥88% Speed Detection Accuracy Not Defined ≥75% In conclusion, the step detection module meets all of the design specifications that we suggested in our proposal. The comparison of our final results and the proposed specifications are listed above in Table 5.4. The step detection module was able to count the steps of users with walking speeds ranging from 0.67 m/s – 1.79 m/s with the SensorTag sampling rate of 50 Hz. Based on these results, the accuracy of the pedometer module varies with the user’s walking speed, walking style, 68 Wellness Monitoring System via Body Area Networks 5.5 Tests and Results and step size. The test results show that the step detection module can determine the number of steps taken by the user with an average accuracy of 88%. In addition, the FFT algorithm of the speed detection can measure the average walking speed of the user with an average accuracy of 75%. The FFT algorithm can determine the speed of slow walking users with extremely high accuracy. However, the results also indicate that the FFT algorithm should not be used for normal or fast walking speeds. Thus, our developed step detection algorithm is optimal for general walking speeds; however our FFT algorithm has better accuracy with slower walking speeds. 69 Wellness Monitoring System via Body Area Networks Chapter 6 System Integration All measurement devices worn by the user should have the ability to transmit data from the worn device to a server that can store the information for later analysis and examination by healthcare professionals. Our wellness monitoring system achieves overall data synchronization by implementing specific wireless data transmission techniques which transmit their measurements to the developed Android mobile application, which then in turn uploads the information to an online server. 6.1 Wireless Data Transmission We selected Bluetooth technology to accomplish wireless communications among our devices due to its widespread popularity and reliability. However, BLE is adequate for the slow transmission rates such as used with the step detection and posture recognition modules, while standard Bluetooth protocols are required to achieve the fast transmission rate needed for the ECG module. 6.1.1 Bluetooth Bluetooth technology is a viable wireless data transmission method for our application due to its popularity and reliability in regards to data transmissions. Most of today’s modern mobile devices 70 Wellness Monitoring System via Body Area Networks 6.1 Wireless Data Transmission have a BLE v4.0 or greater integrated module within their hardware architecture. These mobile devices include popular Android devices such as the Samsung Galaxy series and Google Nexus series cellular phones [30]. Therefore, we selected to utilize Bluetooth technology as a wireless data transmission protocol to make our device accessible to the many individuals who have an Android mobile device. Not only is Bluetooth technology readily accessible to many individuals, this protocol has error correction and error detection as well as frequency hopping to ensure the reliability of transmitted data. Error correction and detection is important in poor RF environments. Bluetooth provides solutions throughout its generic data transport layers via the baseband layer that does forward error correction by the receiver and detects any error after corrections. Also, the logical link control and adaption protocol (L2CAP) layer checks for undetected errors by the baseband layer [31]. As developers, we did not need to implement our own customized error detection and correction protocols and could readily process and analyze the data received from any Bluetooth device. Lastly, the ability of Bluetooth to perform frequency hopping is a key feature in the situation when there are many other devices that are wirelessly transmitting data within the same frequency band. The Bluetooth frequency hopping ability of the transceiver acts to prevent interference and fading of the wireless communication between devices [32]. In conclusion, Bluetooth was selected in our project due to its popularity and data transmission reliability, but BLE and standard Bluetooth protocols perform differently. It is thus important that one choose the appropriate protocol, either standard Bluetooth, or BLE depending upon their desired intentions. Bluetooth Low Energy (BLE) BLE is used for the SensorTag in our step detection and posture recognition modules due to its compatibility with low data transmission rates and ease of implementation. BLE technology is ideal for these modules as its low sampling frequency of 10 Hz for the posture recognition and 40 Hz for the step detection are adequate to meet our desired specifications. When the accelerometer data is polled at a set sampling period, any delays due to data correction, detection and retransmissions 71 Wellness Monitoring System via Body Area Networks 6.1 Wireless Data Transmission are negligible. Therefore, the data is retrieved at a nearly consistent sampling period. Furthermore, we selected BLE communications not simply for its compatibility with low transmission rates, but also due to its ease of implementation. BLE communication uses a generic attribute profile (GATT) that encapsulates requests, commands and protocols [33]. This structured framework has a collection of data within a service where each value within a service is called a characteristic. These services and characteristics are labeled with a universally unique identifier (UUID). Related SensorTag accelerometer UUIDs are shown in Table 6.1. The basic initialization of the BLE SensorTag is shown in Figure 6.1. First, the Android device discovers and connects to the SensorTag by its unique MAC address (Table 6.2). Once the SensorTag is connected, the Android device discovers the SensorTag’s available services. Afterwards, the accelerometer of the SensorTag is enabled by retrieving the accelerometer service and configuration characteristic. After the byte 0x01 is written to the configuration characteristic, the accelerometer is ready to be polled for data. In the posture recognition module, the second SensorTag will be connected to after connecting to the first, following which the second SensorTag will have its accelerometer enabled before polling of both accelerometers commences. Table 6.1: SensorTag Specific Accelerometer UUIDs [34] Type UUID Service F000AA10-0451-4000-B000-000000000000 Data F000AA11-0451-4000-B000-000000000000 Configuration F000AA12-0451-4000-B000-000000000000 72 Wellness Monitoring System via Body Area Networks 6.1 Wireless Data Transmission Fig. 6.1: BLE initialization Table 6.2: SensorTags’ MAC Addresses SensorTag MAC Address Chest 90:59:AF:0B:82:F4 Thigh 90:59:AF:0B:82:D9 Pedometer BC:6A:29:AB:61:CF The SensorTag accelerometer values are polled as shown in Figure 6.2. The polling loop will read any stored data in an array and process the data with its corresponding module algorithm. Next, the Android application will retrieve the accelerometer service and data characteristics and then request to read the data. Afterwards, the application will wait until the sampling period time has passed. An asynchronous function (Figure 6.3) is called once the accelerometer data is retrieved, this function simply stores the accelerometer data in an array so that the polling loop can process 73 Wellness Monitoring System via Body Area Networks 6.1 Wireless Data Transmission the data further. Fig. 6.2: SensorTag accelerometer data polling Fig. 6.3: Asynchronous accelerometer characteristic read Standard Bluetooth Standard Bluetooth is necessary for high data rates such as our ECG module that requires the signal to be acquired at a frequency above 300 Hz. As explained in Chapter 3, the RFduino’s BLE could not handle the high data rate because of the issue of synchronizing the data transfer between the RFduino and Android application, and inconsistent data transmission times. Thus, we selected the Bluetooth Mate Silver with its standard protocols to handle the ECG data transmissions from the RFduino to the Android application for viewing and file saving. This standard protocol allows 74 Wellness Monitoring System via Body Area Networks 6.1 Wireless Data Transmission the two devices to communicate through the Serial Port Profile (SPP) with a UUID of 000011010000-1000-8000-00805f9b34fb. The SPP creates a virtual connection that allows the data transfers between devices be transmitted and received instantaneously. The SPP communication Android implementation is shown in Figure 6.4. In contrast to the BLE protocols, the standard Bluetooth is connected by matching the devices name (“G01ECG”) and a entering a pin combination, which is “1234”. The communication implementation has to read a single byte at a time. We had the Bluetooth Mate Silver label the start of each new ECG data with the byte value 0x0A, afterwards the Android application reads the incoming integer data type value in little endian format. Finally the received ECG data can be placed in buffers for viewing the data on a graphical plot or saving the data in a .csv file for later analyses. 75 Wellness Monitoring System via Body Area Networks 6.2 Mobile Application Fig. 6.4: Bluetooth Mate Silver flowchart 6.2 Mobile Application At the initial stage of project development, the entire group agreed to display the wellness modules’ information on a mobile application because a large variety of people have these devices. In the current market, there are many operating systems that include Apple’s IOS, Windows Phone, Blackberry and Android. The Android platform surpasses all other mobile operating systems for a few reasons. Firstly, the platform does not require us to obtain a developer’s license that could be a considerable expenditure. As well, the application development process could be a long process 76 Wellness Monitoring System via Body Area Networks 6.2 Mobile Application for there are many aspects with the IOS firmware does not permit. Also, the Android platform is heavily supported by the open-source community. Since our group had limited mobile programming development experience, we felt the Android platform to best the best match to our project. Once the Android platform was selected, the user interface had to be designed to fit within the context of our wellness monitor. The main objective of our application is to behave as a central node to collect the user’s health information and transmit the information to our online server. The application overall hierarchy is shown in Figure 6.5. The development of the entire application allows the user to easily navigate through each individual module (explained further in Appendix D. For the positioning system, the user’s position is monitored and displayed on a visual map. The ECG module allows a user to view his or her ECG signal that can be recorded for later analyses. The posture recognition module summarizes the user’s daily posture activities in a visual pie chart and time line plot. Lastly, within the step detection module users can set a step counter goal and track the number of steps they take. Overall, the application encompasses all the user’s wellness information in a visual graphical form. 77 Wellness Monitoring System via Body Area Networks 6.2 Mobile Application Fig. 6.5: Android application hierarchy flow Some of the module’s procedures occur within the current screen or within a background service. Any updates to the current visual screen that a user looks at may only occur when a user is on that particular screen. This ensures these high prioritized modules’ programmed functions occur before any other lower prioritized modules. However, today’s mobile microprocessors allow applications to perform many background functions, which are called services in Android development. They can execute without interfering with the user’s interaction with the application. If there are no services, the application functions will execute in a linear path that only one function can be executed at a time. Therefore, we decided to execute all the Bluetooth protocols, posture recognition and step detection algorithms within their own individual background services. The services allow the user to continuously interact with our application without the application having any noticeable delayed reactions. Furthermore, without the users’ knowledge, their wellness information can be transmitted to an online server to be viewed and analyzed by a health professional. 78 Wellness Monitoring System via Body Area Networks 6.3 6.3.1 6.3 Server Integration Server Integration Server Integration Introduction The wellNode system was initially designed to operate locally, only configured to operate with the WBAN of sensors transmitting their data to a central Android device that processes, displays and internally stores the data. However, a WBAN on its own was not sufficient and feasible to provide adequate user wellness monitoring. In order to perform a user’s health analysis based on their wellness information, the healthcare professional would have to manually transfer the user’s wellness information to the healthcare professional’s own computational device. In addition, the information stored only within the Android application would not be easily interpreted or analyzed by a healthcare professional. Therefore, we solved these two major issues by integrating our WBAN into a remote server located on the World Wide Web (WWW). Our server contains a centralized database managed by My Structured Query Language (MySQL), an easy to use and popular database management system. The integration process is accomplished by adding a new background service to our wellNode Android application that wirelessly transmits the user’s data through WiFi on a periodic basis to our integrated server. The server integration allows the health care professional to examine the user’s wellness information regardless of their time and location. 6.3.2 Server Background Information The main objective of the server would result in the ease of access of the information on the patient. In addition there are also some other benefits that is associated with storing the user’s information on a database within the server. For example, as described from Figure 6.11 below, the healthcare professional can run queries on either an individual user or a group to identify any wellness patterns. After anaylzing the wellness patterns,the healthcare professional can provide any necessary beneficial wellness advice for the user. When they see that a user is mostly inactive, they can advise the user to become more active by setting a goal for the user to walk more via a 79 Wellness Monitoring System via Body Area Networks 6.3 Server Integration milestone set on the pedometer. Then, the user will receive the advice and have their pedometer target step number set to that specific goal number to achieve. All of the events can be documented through the usage of database. Ultimately, the healthcare professional can gain great insight to the well-being of the patient through the server integration as well as providing adequate wellness advice. User User viewing recommendation from health care professional User viewing their own activity wellNode MySQL Database – Table USER SENSOR VALUES Health Care Professional Query of All users Simple Query of Individual User Subgroup of Users (by sex, age, etc..) Investigate the amount of times certain event occurred Investigate events occurred at particular time of the day Investigate time of which a particular event has occurred Investigate pattern for each sub group Investigate what is every user doing at particular time of the day Investigate what event occurred most often for all users Significant Pattern Changes Changes to be made? Fig. 6.6: Server integration functionality However, the ease of accessing the user’s wellness information has some disadvantages. First of all, 80 Wellness Monitoring System via Body Area Networks 6.3 Server Integration there is a possibility for a breach of privacy that becomes the biggest concern with any sorts of people monitoring and data storage systems. Secondly, the incorporation of a server would increase the initial cost during the implementation due to maintenance, protection and associated database expenses. We analyzed the advantages and disadvantages of the server integration and assumed that our wellNode system is only for demonstration purposes to show the feasibility and benefits of wellness monitoring. Thus, we assume that there are no cost concerns and that the users have no privacy concerns and willingly allow their wellness information to be stored and analyzed. 6.3.3 Server Implementation The server has three main functions to transfer the user’s wellness information to the server. The server authenticates user access to the database by validating the user’s log information. Once the user has acesss to the server, the server gathers and stores the users’ identification information from the user’s Android device to the MySQL database. The users’ identification information includes their user name, password and personal information such as weight, sex, date of birth, phone number, address . Then, health care professionals are able to run queries on the database to obtain specific wellness information that they desire. The server needs to be accessible anytime to all the users, which means that the server could either reside on the wellness facility’s Local Area Netowrk (LAN) or on a Wide Area Network (WAN) such as the WWW. In our project, the server is hosted on the WWW to demonstrate the large accessible range of our system irregardless of location and the ease of accessing the information for healthcare professionals as long as they are connected to the internet. The server is currently located at www.wellnode.ca and contains a simple webpage, a discussion forum as well as a centralized MySQL database for user identification information as well as the user’s wellness information (posture, step detection and position). Due to the importance of the high ECG sampling rate, normal wireless server protocols are not recommended and the topic on its own is beyond the scope of our project. 81 Wellness Monitoring System via Body Area Networks 6.3.4 6.3 Server Integration Database Structure The server database stores all the information of every registered user. The database management system we picked for our project is MySQL due to wide adaptation and easy implementation. It is not the best database for health related information storage because its performance suffers when the database has a high concurrency level, which means the database slows down when data are stored or read very frequently. The structure of the database should be simple and efficient, and scalable. First, the database should be simple to allow an ease of data storage and retrieval by implementing separate tables for user identification information and the user’s wellness information. However, there are two ways to store the wellness information. One way is to create separate tables for each individual user with their wellness information. The second possibility is to create tables for each type of sensor measurements. We realized that the scalability criteria is satisfied by the second method but not the first because the amount of tables allowed within the database is limited, while the size of the table itself is virtually unlimited. Additionally, the second method would allow healthcare professionals to study the complex relationship that might exist between groups of users and their wellness. For example a healthcare professional can look at either the user’s activity at a particular time of the day or the statistical information of a group in regards to their overall activity . Therefore, we adapted the second method and created separate tables for user identification information and for the wellness posture information of the user. The table for the user identification information (Figure 6.7) includes separate columns for the creation date, first name, last name, date of birth, sex, phone number, weight, address, username and password. The ID column has an data type of int that allows for a sufficient number, 1011 -1, of registered user to store their specific identification and wellness information. The indexes we used for the user identification table has the type Binary Tree (BTREE) because BTREE is an ordered key-value map that can retrieve data in a range or in particular order. For example, we can easily retrieve all the users that has the same birthday, or retrieve the users with similar last names. 82 Wellness Monitoring System via Body Area Networks 6.3 Server Integration Fig. 6.7: User identification information table structure Fig. 6.8: User identification information table with a user’s specific information The posture storage table (Figure 6.9) also has simple structure, which contains separate timetag, posture, and username columns. The username column identifies the user that performed that specific action. Similarly to the user identification information table, the posture storage table’s id column can account for a large number ( 1011 -1) of the current number of posture recordings. The posture column shows the posture with data type varchar for easy user interpretation to 83 Wellness Monitoring System via Body Area Networks 6.3 Server Integration eliminate the ambiguity of a numerical value representation of the recorded postures. Even though a numerical value representation allows the application of mathematical operators such as greater than , equal to or less than, each posture is not related to other posture in a tangible way; therefore, using math operators to sort these posture values show no immediate benefit. An example of a user’s posture information stored within our database is shown in Figure 6.10. Fig. 6.9: User posture information table structure Fig. 6.10: User posture information table 6.3.5 Client-Server Data Flow The data flow to and from the server can be classified as two different pathways even though the mechanism of data transfer is the same. One pathway is for user identification information re84 Wellness Monitoring System via Body Area Networks 6.3 Server Integration trieval, storage and authentication. The second pathway is for wellness sensor value storage. Both of the pathways start on the client side wellNode Android application running on the user’s mobile device. In the wellNode Android application we utilize an Application Program Interface (API) called Shared Preferences which allows simple storage and retrieval of key value pairs within the mobile device’s internal memory. The user information and sensor information are both stored inside separate Shared Preferences. Therefore, the Shared Preferences is an integral part of our wellNode client-server data flow. As shown in Figure 6.11, the Android Shared Preference holds two different Preference profiles. One of the preference profile is for user identification information which is displayed on the user profile activity, while the other preference holds the wellness sensor information of the latest update. The pathway for user identification starts at the log in activity screen that allows the user to either access the application or register a new account. If the user attempts to log in, the application will take the username and password and parse both pieces of data into a formatted command, called JavaScript Object Notation (JSON). The parsed JSON data will then pass through a PHP script that takes the JSON data and manipulate it into a MySQL query command. Once the MySQL query completes and returns the value of the user and password, the Personal Home Page (PHP) script then confirms the validity of a user name and password by returning a JSON message back to the Android application. In addition, the rest of user identification information will also be returned to the Android device in the JSON format. The returned JSON message will then be parsed by a JSON parser class and stored as key-value pairs in the Preference Profile of the Shared Preference. After a successful log in, the user is led to his or her wellness profile containing their identification information from the server. In contrast, when the user is registering a new account on the application, the data is parsed into JSON and then sent to the PHP script. The PHP script first verifies is there are no pre-existing username of the desired registrant. If there are no pre-existing usernames, the script will store the new user identification information into the 85 Wellness Monitoring System via Body Area Networks 6.3 Server Integration MySQL database. Android Preference Manager User Profile Activity User Information Preference Sensor Services (pedometer, posture, position) Sensor Information Preference Sensor Buffer Data Login Activity Legend: Activity Container Service Requests Translated to JSON Server Communication Service (runs periodically) Buffer Database PHP SCRIPT FOR LOGIN/ REGISTRATION Requests Translated to JSON HTML/Scripts Direction of dataflow PHP SCRIPT FOR INSERT DATA INTO DATABASE USER IDENTIFICATION INFORMATION Table USER SENSOR VALUES Table wellNode MySQL Database Fig. 6.11: wellNode Server Integration Overview The second pathway of data flow is the transferring of sensor information from the user’s mobile device to the MySQL database. The sensor data flow follows the same basic pattern as the user identification information flow. However, the user identification preference will only be updated once after logging in, while the sensor values within the sensor preference are updated after every changed value. This makes the data flow for the sensor information a little bit more difficult because the information for the sensor values can be updated and erased if the data is not stored onto the server beforehand. There are a couple of solutions to resolve this issue. The first solution 86 Wellness Monitoring System via Body Area Networks 6.3 Server Integration is to change the storage rate of the data onto the server, while the second approach is to create a buffer to store the values and then the buffer is stored onto the server at a specific rate . It is obvious that the first approach is unreliable when the WiFi connection is disrupted. Therefore, we created a sensor data buffer within the senor preference. However, we were were faced with the issue determining the update rate to store the buffer to the server at a timely interval or use a counter to flag when the buffer contains a specific number of samples and send the data altogether to the server. The first choice is favoured because the update rate for the sensor values from each module are different, hence attempting to synchronize the same amount of samples from each sensor would be disastrous. On the other hand, if we only store the sensor values when the buffer reaches a specific size, then there is a possibility that particular sensor values does not change for a prolonged period of time, while other sensor values are changing but not able to update to the server. Thus, the periodic update of sensor value is selected and preferred. Once the server communication service is constructed, the sensor information are parsed into JSON periodically, and transmitted to another PHP script that stores the data to the database with the username as a label. 87 Wellness Monitoring System via Body Area Networks Chapter 7 Conclusions We have successfully designed, built and implemented our wellness monitoring system, wellNode, within the proposed specification as well as surpassing the specification in certain aspects.More specifically, the posture recognition module can detect three basic postures (standing, bending and sitting) and four additional postures that describe the different lying down positions (on his or her back, front, left or right side).The ECG samples data at 360 Hz with a resolution of 10 bits and an adjustable gain of greater than 200. The indoor positioning module can detect the user’s location within 2-3 m of error 80% of the time. Lastly, the step detection module utilizes two algorithms ( FFT and slow walk speed detection algorithm ) to determine the steps taken by the user to an accuracy of 90% with a slow walking speed of 1.67 m/s. The Android application can record, process and display the data in a user friendly manner. In addition to the proposed work, we also integrated a server that allows the data to be collected by the Android mobile device and transmits the data to a remote location. The stored data is a accessible to healthcare professionals that have the right qualifications. 88 Wellness Monitoring System via Body Area Networks 7.1 7.1 Future Work Future Work The wellNode demonstrates the feasibility of a wellness monitoring system at a low cost. However, the system can improve in its functionality and desirability. Specifically for the posture recognition module, we like to implement a calibration and machine learning algorithm to better assess the user’s static posture and dynamic exercises. In addition, we would like to implement a fall detection algorithm. The positioning system also requires work in the future to better implement a system to collect the finger printing map to reduce the resource cost for generating the fingering printing map initially. For pedometer we would like to incorporate machine learning algorithm so the step detection is tailored towards the specific user. The ECG module needs algorithms implemented to detect heart beat and signal irregularity monitoring. The system as a whole can be improved if we can smartly integrate different sensor information together. For example if the user is walking, we could use location system to point out where they are and use pedometer to show the speed of which they are walking and the direction they are heading towards. Lastly the server integration requires database management and perhaps specialized database structures to increase the scalability and accessibility. 89 Wellness Monitoring System via Body Area Networks REFERENCES References [1] P.T. Katzmarzyk and I. Janssen. “The economic costs associated with physical inactivity and obesity in Canada: An Update”. Canadian Journal of Applied Physiology, vol. 29(1), pp. 90-115, 2004. [2] Public Health Agency of Canada. “Benefits of Physical Activity”. Internet: http://www.phacaspc.gc.ca/hp-ps/hl-mvs/pa-ap/02paap-eng.php, Jan. 20, 2011 [Feb. 21, 2015]. [3] K. I. Proper, A. S. Singh, W. van Mechelen and M. J.M. Chinapaw, “Sedentary behaviors and health outcomes among adults: A systematic Review of Prospective studies”. American Journal of Preventive Medicine, vol. 40(2), pp. 174-182, 2011. [4] C. Aldaba, T. Liang, Y. Su, H. Wang and J. Winkler, “Design and Implementation of a Pervasive Health Monitoring System via Body Area Networks,” September 2014, project Proposal for ECE4600. [5] D. Brulin, Y. Benezeth and E. Courtial, “Posture recognition based on fuzzy logic for monitoring of the elderly.” IEEE Transactions on Information Technology in Biomedicine, vol. 16, no. 5, 2012. [6] Q.L. John et al, “Accurate, fall fast detection using gyroscopes and accelerometer-derived posture information,” in 2009 Sixth International Workshop on Wearable and Implantable Body Sensor Networks, pp.138-143, 2009. [7] M. Aloqlah, R. R. Lahiji, K. A. Loparo and M. Mehregany, “A headband for classifying human postures,”in 32nd Annual Internation Conference of the IEEE EMBS [online], Buenos Aires, Argentina , 2010, vol. 2010, pp. 382-385. [8] M. Pedley, “Tilt sensing using a three-axis accelerometer,”Freescale Semiconductor Inc., Document Number AN3461, 2013. [9] Kionix, “ 2g / 4g / 8g Tri-axis Digital Accelerometer Specifications,” Rev. 4. Ithaca, NY, 2012. [10] C. Gomez, J. Oller and J. Paradells, “Overview and Evaluation of Bluetooth Low Energy: An Emerging Low-Power Wireless Technology,” Sensors, vol. 12, pp. 11734-11753, 2012. 90 Wellness Monitoring System via Body Area Networks REFERENCES [11] Digi-Key Corporation. (Aug. 15, 2014) Moving forward with Bluetooth Low Energy. [Online]. Available: http://www.digikey.com/en/articles/techzone/2014/aug/moving-forwardwith-bluetooth-low-energy (Feb. 24, 2015). [12] Mayo Clinic Staff. (Oct. 24, 2012). Tests and Procedures - Electrocardiogram (ECG or EKG). [Online] Available: http://www.mayoclinic.org/testsprocedures/electrocardiogram/basics/definition/prc-20014152 (March 1, 2015). [13] P. E. Paulev and G. Zubieta-Calleja. New Human Physiology, Paulev-Zubieta 2nd Edition, Chapter 11: Cardiac Action Potencials and Arrhythmias. [Online] Available: http://www.zuniv.net/physiology/book/chapter11.html (March 1, 2015). [14] K. Soundarapandian and M. Bereaducci. “Analog Front-End Design for ECG Systems Using Delta-Sigma ADCs”, Texas Instruments, Dallas, TX , Rev. Apr. 2010. [15] W. Olson. “Electrical Safety”, in Medical Instrumentation: Application and Design, 4th ed., J. Webster ,Ed. New Jersey: John Wiley & Sons Inc., 2010, p. 659. [16] A. Bharadwaj and U. Kamath, “ Techniques for accurate ECG signal processing .” ( Feb. 14, 2011). [Online] Available: http://www.eetimes.com/document.asp?doc id=1278571 (March 4, 2015). [17] R. Nilsson and B. Saltzstein. “Bluetooth Low Energy vs. Classic Bluetooth: Choose the Best Wireless Technology For Your Application.” (June 8, 2012). [Online] Available: http://www.medicalelectronicsdesign.com/article/bluetoothlow-energy-vs-classic-bluetooth-choose-best-wireless-technology-your-application, (March 1, 2015). [18] Rafael Saraiva Campos and Lisandro Lovisolo. “RF FINGERPRINTING LOCATION TECHNIQUES”.Handbook of Position Location: Theory, Practice, and Advances, chapter. 15, SEP, 2011 [19] Zahid Farid, Rosdiadee Nordin, andMahamod Ismail. “Recent Advances in Wireless Indoor Localization Techniques and System ”. Journal of Computer Networks and Communications, vol 2013. 17,August, 2013. [20] M.A. Hussian and K. S. Kwak. “Positioning in Wireless Body Area Network using GSM”. International Journal of Digital Content Technology and its Applications , vol. 3, pp. 3-4, 2014. [21] Jiuqiang Xu, Wei Liu, Fenggao Lang, Yuanyuan Zhang, Chenglong Wang. “Distance Measurement Model Based on RSSI in WSN”. Wireless Sensor Network, 2010, 2, 606-611 [22] Benkic, K. and Malajner, M. and Planinsic, P. and Cucej, Z.“Using RSSI value for distance estimation in wireless sensor networks based on ZigBee” 15th International Conference on Systems, Signals and Image Processing, pp. 303-306, June, 2008. 91 Wellness Monitoring System via Body Area Networks REFERENCES [23] V. Honkavirta. “Location fingerprinting methods in wireless local area networks”. Master of Science Thesis, vol. 1, pp. 22, Sep, 2008. [24] J. E. Graham, G. V. Ostir, S. R. Fisher and K. J. Ottenbacher, “ Assessing walking speed in clinical research: a systematic review,” Journal of Evaluation in Clinical Practice, vol. 14, issue 4, pp. 552-562, 2008. [25] S. Yang and M. Gerla, “Energery-efficient accelerometer data transfer for human body movement studies,” Sensor Networks, Ubiquitous, and Trustworthy Computing (SUTC), 2010 IEEE International Conference , pp.304,311, 7-9 June 2010 [26] N. Zhao, “Full-Featured Pedometer Design Realized with 3-Axis Digital Accelerometer, ” Analog Dialogue, 44-06, 2010. [27] G. Thüer and T. Verwimp, “Step detection algorithms for accelerometers,” E-Lab M.S thesis,Dept. Applied Engineering, Artesis University College of Antwerp, Antwerp, Belgium, 20082009 [28] N. Ichinoseki-Sekine et al, “Improving the Accuracy of Pedometer Used by the Elderly with the FFT Algorithm,” Medicine and Science in Sports and Exercise , vol. 38, no. 9, pp.1674-1681, 2006 [29] L. H. Sloot, M. M. Van der Krogt and J. Harlaar, “Self-paced versus fixed speed treadmill walking,” Gait & Posture, vol. 39, no. 1, pp. 478-484, 2014. [30] Bluetooth Developer Portal. Bluetooth Smart Ready products. [Online] Available: http://www.bluetooth.com/Pages/Bluetooth-Smart-Devices-List.aspx (March 1, 2015). [31] Bluetooth Developer Portal. Data Transport Architecture. [Online] https://developer.bluetooth.org/TechnologyOverview/Pages/DataTransport.aspx 2015). Available: (Feb. 25, [32] Bluetooth Developer Portal. Architecture - Overview of Operations. [Online] Available: https://developer.bluetooth.org/TechnologyOverview/Pages/O [33] Bluetooth Developer Portal. Generic Attribute Profile (GATT). [Online] Available: https://developer.bluetooth.org/TechnologyOverview/Pages/GATT.aspx (March 3, 2015). [34] Texas Instruments. (May 27, 2014). SensorTag UserGuide. [Online] Available: http://processors.wiki.ti.com/index.php/SensorTag User Guide#Accelerometer 2 (Feb. 24, 2015). 92 Wellness Monitoring System via Body Area Networks Appendix A Budget A complete list of components that were purchased and received are listed in Table A.1. The project’s budget provided by the Electrical and Computer Engineering Department was $500.00. The total project cost was $412.23 and below the provided budget. Also, throughout the entire development of the project we did not use the estimated machine time of 1.5 hours for enclosure modifications. 93 Budget Wellness Monitoring System via Body Area Networks Table A.1: Project Budget System All Item Part Number Supplier Quantity Unit Cost Subtotal Cr2032 Coin Cell Battery Enclosure Domain Name* Customized Velcro Straps* P189-ND Ergo-Case NA NA Digikey OKW Enclosures, Inc. www.namescheap.com China 30 3 2 NA $ 0.35 $ 20.00 $ 35.00 $ 9.00 $ 10.50 - RTL-12578 Abra Electronics 1 $ 48.32 $ 48.32 30-454 Abra Electronics 6 $ 2.24 $ 13.44 FH-3 Abra Electronics 1 $ 0.58 $ 0.58 P143-ND - Digikey ECE Tech Shop ECE Tech Shop ECE Tech Shop 10 - $ 3.94 - $ 39.58 - - ECE Tech Shop - - - 975-RFD90101 975-RFD90101 975-RFD22128 854-SB400 595-INA118P 595-OPA2604AP Mouser Mouser Mouser Mouser Mouser Mouser 1 1 1 2 3 2 $ 51.43 $ 51.43 $ 19.95 $ 5.86 $ 15.20 $ 6.48 $ 51.43 $ 11.72 $ 45.60 $ 12.96 296-35645-ND Digikey 2 $ 31.66 - 296-28079-ND Digikey 1 $ 120.89 - TL-WR740N FutureShop 6 $ 18.78 $ 127.35 296-35645-ND Digikey 1 $ 31.66 Shipping Costs $ 31.66 $ 19.09 Grand Total $ 412.23 ECG RTL-12578 Bluetooth Mate Silver Retail 30-454 9 V Panasonic Heavy Duty Battery Pkg Right Angle Female Header Receptacle Br-2325/2HAN 6V Coin Cell Battery Male Headers & Female Socket ECG Cables ECG Electrodes Miscellaneous electronic components (activie and passive) rfDuino rfDuino* rfDuino Coin Cell Breakout* PCB INA118 Amplifier OPA2604 Amplifier Posture Recognition Texas Instruments SensorTag* Texas Instruments SensorTag Developer Kit* Patient Positioning Wiresless Wifi Router Step Detection Texas Instruments SensorTag Note:* - These items were personal purchases 94 Wellness Monitoring System via Body Area Networks Appendix B ECG Circuit Schematics The following figures are the ECG signal amplification and filtration that occurs in a specific stage order, which are as follows: differential amplifier, high pass filter, low pass filter, notch filter and final amplifier. The electrode placement described in Figure B.1 corresponds to the inputs and reference nodes in Figure B.2, electrode 1 connected to Vin-, electrode 2 is connected to Vin+ and electrode 3 is connected to Ref. Fig. B.1: Electrode Placement 95 Wellness Monitoring System via Body Area Networks ECG Circuit Schematics Fig. B.2: Differential amplifier with a gain of an adjustable gain as well as patient and circuit protection 96 Wellness Monitoring System via Body Area Networks ECG Circuit Schematics Fig. B.3: Sallen-Key high pass filter with cut-off frequency of 16 Hz Fig. B.4: Sallen-Key low pass filter with cut-off frequency of 149 Hz 97 Wellness Monitoring System via Body Area Networks ECG Circuit Schematics Fig. B.5: Notch filter with center frequency of 61 Hz Fig. B.6: Final stage amplifier with a gain of 25 V/V and an adjustable DC bias 98 Wellness Monitoring System via Body Area Networks Appendix C Indoor Positioning Test Results These results are from the indoor positioning tests that compares the actual to the measured x and y coordinates, which is discussed in Chapter 4. Table C.1: Indoor Positioning Module Experimental Data and Results No. 1 2 3 4 5 6 7 8 9 10 11 12 13 14 15 16 17 18 19 20 21 22 Actual x y 15 2 23 3 18 2 21 4 11 2 16 6 14 4 25 3 12 7 19 4 20 3 12 2 10 7 14 3 12 2 26 4 18 4 25 3 11 6 17 4 15 6 13 5 Measured x y 14.4 3.6 22.8 3 17.2 4.8 22 4.2 13.4 3.8 15 4.8 13.6 3.2 25.4 4 15 5.8 15.2 3.4 19.4 4 14 4.2 13.2 6.4 14.2 4 13.6 3.6 25.4 4.2 17.6 2.8 25 3.8 18.2 5 15.6 6.2 18.8 4.6 15.4 4.2 Error x 0.72 0.24 0.96 1.2 2.88 1.2 0.48 0.48 3.6 4.56 0.72 2.4 3.84 0.24 1.92 0.72 0.48 0 8.64 1.68 4.56 2.88 99 Error (m) Error y Total error 1.92 2.050560899 0 0.24 3.36 4.193343296 0.24 1.46851762 2.16 4.32 1.44 2.249351907 0.96 1.287975155 1.2 1.550927464 1.44 4.652782393 0.72 5.53979061 1.2 1.679314146 2.64 4.281427799 0.72 4.688300332 1.2 1.46851762 1.92 3.258348048 0.24 0.910735966 1.44 1.821471932 0.96 1.152 1.2 10.46752234 2.64 3.755060585 1.68 5.831555539 0.96 3.642943865 Wellness Monitoring System via Body Area Networks No. 23 24 25 26 27 28 29 30 31 32 33 34 35 36 37 38 39 40 41 42 43 44 45 46 47 48 49 50 51 52 53 54 55 56 57 58 Actual x y 20 1 13 3 11 7 23 4 17 4 15 4 18 5 23 4 16 6 19 3 25 7 19 5 15 4 13 6 13 2 12 2 17 3 25 4 13 7 26 4 11 2 16 5 14 5 22 2 11 3 15 3 18 1 14 6 10 7 5 10 7 12 3 11 6 3 2 8 9 6 6 4 Measured x y 19.8 1.6 13.2 3.6 13 6.8 24.4 4 17.4 3 17.2 5.2 18.8 3.8 25 3.8 18 3.4 19.2 2.6 25.4 5.4 18.2 3.4 18.4 2.6 15 7 14 4.2 15 4 16 4.2 25 4.8 13.2 3 25.2 6 13 3 13.6 5 14 5.8 24.2 3 11.8 4.4 14 3.8 15.2 1.8 14.6 6 13.8 5.8 7 11 9 12.3 3 8.75 6 4.5 4.2 7.75 6.75 6.7 6.74 5.7 Error x 0.24 0.24 2.4 1.68 0.48 2.64 0.96 2.4 2.4 0.24 0.48 0.96 4.08 2.4 1.2 3.6 1.2 0 0.24 0.96 2.4 2.88 0 2.64 0.96 1.2 3.36 0.72 4.56 2.4 2.4 0 0 2.64 2.7 0.888 100 Indoor Positioning Test Results Error (m) Error y Total error 0.72 0.910735966 0.72 0.910735966 0.24 2.894364179 0 2.016 1.2 1.550927464 1.44 3.608629657 1.44 2.076797535 0.24 2.894364179 3.12 4.723551206 0.48 0.643987578 1.92 2.37490884 1.92 2.57595031 1.68 5.294815578 1.2 3.219937888 2.64 3.47991724 2.4 5.191993837 1.44 2.249351907 0.96 1.152 4.8 5.767195506 2.4 3.101854929 1.2 3.219937888 0 3.456 0.96 1.152 1.2 3.47991724 1.68 2.321930232 0.96 1.84409978 0.96 4.193343296 0 0.864 1.44 5.738359347 1.2 2.683281573 0.36 2.42684981 2.7 2.7 1.8 1.8 0.3 2.656990779 0.84 2.8276492 2.04 2.224891907 Wellness Monitoring System via Body Area Networks No. 59 60 61 62 63 64 65 66 67 68 69 70 71 72 73 74 75 76 77 78 79 80 81 82 83 84 85 86 87 88 89 90 91 92 93 Actual x y 7 4 5 11 9 15 5 3 2 4 8 4 9 6 2 4 6 8 4 13 6 9 9 5 7 12 4 9 1 1 5 12 9 2 6 8 1 6 2 12 3 8 2 10 3 10 7 12 5 2 3 14 2 13 5 15 1 7 1 15 1 12 8 14 1 6 3 13 2 4 Measured x y 6.75 5.5 6.7 13.96 10.5 16.2 5.25 4.7 4.2 5.5 7.5 3.75 12 8.2 5.75 4.25 7.9 9.45 3.5 12.25 5.25 8 9.25 6.9 8.75 13.49 6.5 7.5 3 4 7.49 13.23 10.76 4.75 10 7 4 8 4 9.6 5.36 10.14 4.8 12.6 3.73 6.98 7.5 10.9 5 2.75 4.76 13.76 4.25 12.45 0.5 13.5 4.25 8 4 15 5 13 5.5 14.9 5 10 4.9 12.25 5 4 Error x 0.3 2.04 1.8 0.3 2.64 0.6 3.6 4.5 2.28 0.6 0.9 0.3 2.1 3 2.4 2.988 2.112 4.8 3.6 2.4 2.832 3.36 0.876 0.6 0 2.112 2.7 5.4 3.9 3.6 4.8 3 4.8 2.28 3.6 101 Indoor Positioning Test Results Error (m) Error y Total error 1.8 1.824828759 3.552 4.09613281 1.44 2.305124725 2.04 2.061940833 1.8 3.195246469 0.3 0.670820393 2.64 4.464258057 0.3 4.509988914 1.74 2.868100417 0.9 1.081665383 1.2 1.5 2.28 2.299652148 1.788 2.75806889 1.8 3.498571137 3.6 4.326661531 1.476 3.332674602 3.3 3.917977029 1.2 4.947726751 2.4 4.326661531 2.88 3.748919844 2.568 3.822937091 3.12 4.585193562 3.624 3.728371226 1.32 1.449965517 0.9 0.9 0.288 2.131545918 0.66 2.779496357 1.8 5.692099788 1.2 4.080441153 0 3.6 1.2 4.947726751 1.08 3.188479261 4.8 6.788225099 0.9 2.451203786 0 3.6 Wellness Monitoring System via Body Area Networks No. 94 95 96 97 98 99 100 Actual x y 2 3 8 9 5 3 8 10 4 8 4 2 3 2 Measured x y 5 3.15 8.25 6.99 5 4 9.49 8.7 5.9 8.75 5.49 3.25 3.5 3 Error x 3.6 0.3 0 1.788 2.28 1.788 0.6 102 Indoor Positioning Test Results Error (m) Error y Total error 0.18 3.604497191 2.412 2.430585115 1.2 1.2 1.56 2.372876735 0.9 2.451203786 1.5 2.333868891 1.2 1.341640786 Wellness Monitoring System via Body Area Networks Appendix D User Manual The wellNode Android application is a centralized wellness node that receives and processes the module’s information and then displays the results within a graphical user interface. In the following pages, the application’s user manual is shown that guides users throughout the application.2 103 Wellness Monitoring System via Body Area Networks User Manual Starting the Application • Navigate to the application menu on the Android mobile device and locate the application titled “wellNode”. Start the Android application by tapping once on the wellNode icon, depicted as shown below: The welcome screen should immediately appear and should resemble Figure C.1 as provided below: Fig. C.1: Welcome screen • 2 Tap once on the “Start” button at the bottom of the welcome screen to continue into the user login screen. Your screen should now resemble Figure C.2, and have blank fields for entering your username and password. Fig. C.2: Login Screen The Android robot is reproduced or modified from work created and shared by Google and used according to terms described in the Creative Commons 3.0 Attribution License. 104 Wellness Monitoring System via Body Area Networks • • • User Manual If you are a returning user, please skip to the next step. If you are a first time user of the wellNode application, tap once on the “Register” button to lead you into the registration screen (Figure C.3). To register a new account, input your personal information into the required fields. Once you have completed all of the text entry fields, tap once on the “Register” button located at the bottom of the registration page, you will now be taken back to the login screen (Figure C.2). Fig. C.3: Registration screen Enter your username and password into the corresponding fields and click the “Login” button to continue to the module selection screen as shown in Figure C.4. Fig. C.4: Module Selection Screen 105 Wellness Monitoring System via Body Area Networks User Manual Navigating Through the Application • • • • • Tap once on the “Posture” button to go directly into the posture monitoring screen as shown in Figure C.6. Tap once on the “Pedometer” button to go directly into the step monitoring screen as shown in Figure C.7. Tap once on the “Location” button to go directly into the location monitoring screen as shown in Figure C.8. Tap once on the “Electrocardiogram” button to go directly into the electrocardiogram monitoring screen as shown in Figure C.9. To enable the Bluetooth connectivity between your mobile device and a specific module sensor, select the “Module Manager” option by tapping once on the three dots located in the top right of the module selection screen. The module manager screen is shown in Figure C.5. Managing Bluetooth Settings • • • Before connecting to the Bluetooth transmitter of the ECG wearable device or the BLE transmitter of a Texas Instruments SensorTag, turn on the Bluetooth service of your Android mobile device by tapping once the “Turn On” button found under the “Bluetooth Settings” heading of the module manager screen. You may turn off the Bluetooth service of your Android mobile device when you are finished monitoring data by tapping once the “Turn Off” button also found under the “Bluetooth Settings” heading of the module manager screen. Tap once on the “Main Menu” button to go back to the module selection screen as displayed in Figure C.4. Connecting to the Module’s Sensors • • • Posture Recognition: For posture recognition, you should first power on the two SensorTag devices by depressing once their central on/off switches (Figure C.6). Once both devices are powered on, tap once on the “Posture” button to enable the connection with the two SensorTag devices, the status of posture will change from OFF to ON. Pedometer: For step recognition, you should first power on one SensorTag device by depressing once it’s central on/off switch (Figure C.6). Once the SensorTag device is powered on, tap once on the “Pedometer” button to enable the connection with the SensorTag device, the status of pedometer will change from OFF to ON. ECG: Power on the ECG wearable device by changing the position of its rocker switch from off to on (Figure C.7). Once the ECG device is powered on, tap once on the “ECG” button to enable the connection with the ECG device, the status of ECG will change from OFF to ON. 106 Wellness Monitoring System via Body Area Networks Fig. C.5: Module Manager Screen Fig. C.6: SensorTag ON/OFF switch encircled in red Fig. C.7: ECG ON/OFF Switch 107 User Manual Wellness Monitoring System via Body Area Networks Note: If it is your first time connecting to the ECG module: • • • Enter your Android mobile device’s settings Enter the Bluetooth settings to see all the paired and unpaired devices (Figure C.8). Select “G01ECG” under “Available devices” and enter the pin “1234” (Figure C.9) Fig. C.8: Android device paired devices Fig. C.9: ECG module pairing request pin 108 User Manual Wellness Monitoring System via Body Area Networks User Manual Posture Recognition Module • • • • • With the two SensorTags of the posture recognition connected, the posture screen starts to update the pie chart and display past postures as shown in Figure C.10. Tap once the “Clear” button to clear the previous pie chart data and posture summary information. Return to the module selection screen as shown in Figure C.4 by tapping once the “Return” button. Enter the timeline to graphically display your past postures by tapping once the “Timeline” button. The timeline display screen is shown in the Figure C.10b for reference. Tap once the “Right arrow (<)” or “Left arrow (>)” to navigate through previous to present posture recordings. Return to the posture screen by tapping once the “Return” button at bottom right of the screen. a) Posture recognition main screen b) Posture recognition timeline Fig. C.10: Posture and timeline screens 109 Wellness Monitoring System via Body Area Networks User Manual Step Detection Module • • • Prior to commencing the step detection process, tap once on the “Option Menu” located on the top right of the pedometer screen as shown in Figure C.11. Tap once on the “Settings” button to enter the target setting screen as shown in Figure C.9 below. Enter values for the number of target steps and step size (in metres), then tap once on the “Save Changes” button to save the settings. If you do not wish to overwrite previously input values, tap once on the “Cancel” button to go back to pedometer screen. Note: If any of the fields in the target settings screen are left blank, a message will prompt the user to enter the values again. • • • • Tap once on the “Start” button to start the step detection process of the pedometer. The steps taken and walking speed of the user will be updated on the pedometer screen. Tap once on the “Stop” button to stop the step detection process of the pedometer. Tap once on the “Reset” button to clear the progress and records of the pedometer. Tap once on “Return” button to return to the module selection screen as shown in Figure C.4. Fig. C.11: Pedometer and target setting screens 110 Wellness Monitoring System via Body Area Networks User Manual Indoor Positioning Module • • • • • • • • Choose an environment to start determining the user’s position in the location screen as displayed in Figure C.12. To determine the location within a specific room, tap once on the “Room” button, the button will change its status to show “Room True”. To monitor the location in an open space (i.e. The Engineering Atrium), tap once more on the “Room” button, the button will now change its status to show “Room False”. Tap once on the “Load” button to detect the user’s orientation and load the corresponding database. Tap once on the “Start” button to start the positioning process. The location will update and display the determined user’s coordinates. To record the location of the user, tap once on the “Record” button. The button will turn green in color indicating that the application has begun recording. The location information with a time stamp will be continuously recorded into a .csv file located in the path wellnode\Location. By tapping on the “Record” button once again, the button will turn back to red in color indicating the recording process has ended. View the position on a map by tapping once on the “Map” button. The corresponding location will be shown in the map as indicated in Figure C.8. Go back to the module selection screen (as displayed in Figure C.4) by tapping once on the “Return” button. Fig. C.12: Location and map screens 111 Wellness Monitoring System via Body Area Networks User Manual Electrocardiogram Module • • • • • Ensure the hardware of the electrocardiogram wearable device is properly connected and affixed to the user. To begin displaying the electrocardiogram signal on the screen tap once on the “Start” button located on the bottom left of the electrocardiogram display screen (Figure C.13). To pause the waveform on the display, tap once on the “Stop” button. To record the electrocardiogram waveform measurements, tap once on the “Record” button. The button will change to green in color indicating that the recording process has begun. To stop the recording process, tap once on the green “Record” button once more. The button will change to red in color indicating that the recording process has now been stopped. Return to the module selection screen (as displayed in Figure C.4) by tapping once on the “Return” button located at the bottom right of the electrocardiogram display screen. Fig. C.13: Electrocardiogram Display Screen 112 Wellness Monitoring System via Body Area Networks User Manual Navigating Through the Website • • Enter the wellNode website at www.wellNode.ca Click the “Log in” button to access your personal wellness information profile (Figure C.14). Fig. C. 14: wellNode website • If you have not registered a wellNode account yet, click the “Register” button that will lead you to the registration page (Figure C.15): o Fill in all the required fields that include your username, password and personal information (first name, last name, phone number, date of birth, sex, weight and address). o After click the “Register” button that should lead you to… Fig. C.15: wellNode registration page on the website 113 Wellness Monitoring System via Body Area Networks • User Manual If you have an account, enter in your username and password and click the “Log in” Button, you should arrive to your personal wellness information profile (Figure C.16). Fig. C. 16 wellNode’s personal wellness information profile 114 Wellness Monitoring System via Body Area Networks Appendix E Software Repository All the Android and Arduino software files can be found at: https://github.com/ECE4600G1 115 Wellness Monitoring System via Body Area Networks Appendix F Curriculum Vitae Cassandra Aldaba PLACE OF BIRTH: YEAR OF BIRTH: SECONDARY EDUCATION: HONOUR AND AWARDS: Winnipeg, Manitoba 1992 Garden City Collegiate (2006-2010) NSERC Undergraduate Student Researcher Award 2014 & 2015 UMSU Scholarship 2014 Financial Aid & Awards Merit Scholarship 2014 Dean’s Honor List 2011-2014 University of Manitoba’s Undergraduate Research Award 2013 UM Queen Elizabeth Scholarship - Engineering 2011 University of Manitoba Entrance Award 2010 Tianqi Liang PLACE OF BIRTH: YEAR OF BIRTH: SECONDARY EDUCATION: HONOUR AND AWARDS: HeBei, People’s Republic of China 1991 BaoDing No.1 High School (2009-2012) Dean’s Honor List, 2013-2014 116 Wellness Monitoring System via Body Area Networks Curriculum Vitae Yang Su PLACE OF BIRTH: YEAR OF BIRTH: SECONDARY EDUCATION: TERTIARY EDUCATION: HONOUR AND AWARDS: Winnipeg, Manitoba 1987 Fort Richmond Collegiate(2002-2005) University of Manitoba B.Sc Microbiology Graduated with Distinction(2005-2010) Deans’ Honor List 2011, 2012 & 2014 Thomas H. Gillman Electrical Engineering Award 2013 Esther R. Steele Award 2012 Provincial Chess Competition 4th Place (2004) Haiyue Wang PLACE OF BIRTH: YEAR OF BIRTH: SECONDARY EDUCATION: HONOUR AND AWARDS: Sichuan, People’s Republic of China 1992 Deyang NO.1 High School (2007-2010) APEGM 3rd Year Scholarship, 2013-2014 UMSU Scholarship, 2013-2014 Financial Aid & Awards Merit Scholarship, 2013-2014 Dean’s Honor List, 2012-2014 International Undergraduate Student Scholarship, 2012-2014 117 Wellness Monitoring System via Body Area Networks Curriculum Vitae Jeff Winkler PLACE OF BIRTH: YEAR OF BIRTH: SECONDARY EDUCATION: HONOUR AND AWARDS: Winnipeg, Manitoba 1991 Murdoch MacKay Collegiate Institute (2005-2009) Dean’s Honor List, 2011-2013 University of Manitoba Merit Award, 2010 Stella Wujek (nee Shandruk) Scholarship, 2009 University of Manitoba Preliminary Entrance Scholarship, 2009 Royal Canadian Legion (Branch No. 90) Scholarship, 2009 118