1
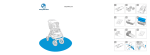
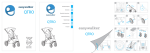
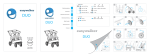
Gebrauchsanweisung
EN
Istruzioni per l’uso
IT
Инструкции
RU
DUO
Mode d’emploi
1
max 2x 15 kg
89cm
max 2x 2 kg
110cm x 76cm x 86-116cm
max 2x 5 kg
1.4 bar
total max 44 kg
17 kg
2
x 76cm x 50cm
click
click
carrycot
4
4,9 kg
80cm x 34cm x 56cm
max 9 kg
2
sh
pu
1
8
9
1
!
2
2
DUO
33
10
11
S I/
rr
lke
e
co
mm
f2
0P
1
E as yWa
2
1.4 bar
approved
Dutch Design
Made in China
6
5
1
EN1888
!
click
7
BS 7409: 1996
BS EN 1888
3
ES
DUO
Manual de instrucciones
DE
Instructions
FR
Gebruiksaanwijzing
NL
DUO base
ents
a tyr e pr es
s ur
eo
12
13
14
25
15
26
37
27
38
2
2
1
The Netherlands / Head office
Belgium / Luxemburg
EasyWalker bv
P. O. Box 138
1380 AC WEESP
+31-294-230351
www.easywalker.nl
www.easywalker.be
[email protected]
39
1
2
1
UK / Ireland
Bibs and Stuff
+44-1293774924
www.bibsandstuff.com
[email protected]
16
28
18
17
40
30
29
1
click
!
!
41
2
20
19
2
21
32
31
43
33
1
4
2
1
3
4+5
!
2
1
2
1
22
23
24
2
34
35
36
3
2
1
1
5
2
1
46
1
1
soft -
+ har d
42
1
1
click
2
1
2
Spain / Portugal
Nikidom
+34-933003072
ww w.nikidom.com
[email protected]
Germany / Switzerland / Austria
Pamper24
+49-7664403274-17
www.pamper24.de
[email protected]
2
44
45
France
Loumilie sarl freekidds
+ 467359594
www.freekidds.com
[email protected]
EasyWalker DUO Instructions
17
Assembling the EasyWalker DUO
17
17
17
17
18
19
19
20
20
Contents of the box
Frame
Opening out
Wheels
Seat
5-point harness
Sun canopy
Bumper bar
Storage basket
20
Using the EasyWalker DUO
20
20
22
21
21
21
21
22
22
Parking brake
Collapsing and opening out
Raising the height of the push-bar
Setting the suspension
Alter position of swivel wheels
Repairing/replacing tires
5-point harness
Seat and sun canopy
Rain cover
23
Assembling the EasyWalker DUO carrycot
23
24
24
Contents of the box
Attaching the carrycot to the frame
Removing the carrycot from the frame
24
Using the EasyWalker DUO carrycot
25
25
Rain cover
Mosquito net
25
Maintaining and cleaning the EasyWalker DUO and
the EasyWalker DUO carrycot
26
Accessories
26
Guarantee conditions
EN
16
EN-15
EN
EasyWalker DUO Instructions
Congratulations on the purchase of your EasyWalker DUO. The EasyWalker DUO has been
carefully created with comfort, safety, ease of use and design in mind. The EasyWalker
DUO meets all the European standards for child pushchairs EN1888. The EasyWalker DUO
carrycot meets the European standard EN1466. Do not forget to complete the guarantee
on the website and send it to us. You can then be sure of the best service and guarantee
from EasyWalker.
We wish you a great deal of enjoyment with your EasyWalker DUO.
IMPORTANT: Read these instructions carefully before use and keep them for future
reference. Your child’s safety may be affected if you do not follow these instructions.
IMPORTANT: The EasyWalker DUO is intended to be used for children from the age of 6
months, up to a weight of 15 kg. The EasyWalker DUO carrycot is intended to be used for
children from birth to the age of 6 months or 9 kg.
IMPORTANT: A maximum of 10 kilos worth of goods can be carried in the storage basket.
IMPORTANT: The EasyWalker DUO should only be used with the accompanying seat and
accessories. Only use the EasyWalker DUO carrycot or accessories approved for use by
EasyWalker on the EasyWalker DUO.
IMPORTANT: Ensure that the parking brake is engaged when you place your children in or
remove them from the EasyWalker DUO.
IMPORTANT: The EasyWalker DUO is only intended to be used to transport two children.
IMPORTANT: Only use original EasyWalker DUO accessories. When replacing parts, only
use original parts that are supplied and/or approved by EasyWalker B.V. The guarantee is
nvalidated if the EasyWalker DUO is damaged due to overloading, incorrect use or use of
inon-original accessories or parts.
! WARNING: Keep plastic covers away from babies and children to avoid suffocation.
! WARNING: Never leave your child unattended in the EasyWalker DUO. Never allow
children to play with the EasyWalker DUO, they could hurt themselves.
! WARNING: Always use the 5-point harness when carrying your child in the seat.
! WARNING: Always use the crotch strap in combination with the waist strap if you place
your child in the 5-point harness.
! WARNING: The seat is not suitable for children under 6 months.
! WARNING: Do not use a mattress thicker than 50 mm in the carrycot.
! WARNING: Ensure that all the locking devices are engaged before use.
! WARNING: Check that the seats or carrycots are properly attached to the supporting
frame and that they are securely fixed, before you use the EasyWalker DUO.
! WARNING: Any load attached to the push-bar affects the stability of the EasyWalker
DUO.
EN-16
Assembling the EasyWalker DUO
The following items must be contained in the EasyWalker DUO box:
1 frame with a wristband, the seat comprising a left and right part and the
storage basket.
1 sun canopy.
2 rear wheels and 2 front wheels with inflatable tyres.
1 bumper bar.
1 rain cover for over the seats with the sun canopies.
2 connection tubes for use with two carrycots.
1 instruction leaflet.
If items are missing, immediately contact the shop where you purchased the pushchair.
! WARNING: Keep plastic covers away from babies and children to avoid suffocation.
Be aware of environmental considerations. When disposing of packaging, carefully
separate rubbish for recycling.
Frame
IMPORTANT: The EasyWalker DUO should only be used with the accompanying seat and
accessories. Only use the EasyWalker DUO carrycot or accessories approved for use by
EasyWalker on the EasyWalker DUO.
IMPORTANT: When assembling the EasyWalker DUO a child should not be in the seat or
cot.
TIP: If the instructions say left or right, this is always meant when looking from behind
the EasyWalker DUO push-bar.
TIP: All components are designed to fit together so you do not need to use force. If
something is not working, read the instructions again and try once more. If it still does
not work then ask for help in the shop where you purchased the pushchair or go to www.
easywalker.nl
TIP: Use the cardboard packaging as a mat whilst assembling the item.
The EasyWalker DUO is easy to assemble. The EasyWalker DUO is supplied with the seat
and the storage basket already fitted.
Opening out
! WARNING: Ensure that all the locking devices are engaged before use.
Take the frame out of the box and place it on the ground in front of you. You can use the
cardboard packaging as a mat whilst assembling the item. If it is still secured, loosen
the locking hook on the rear axle and pick up the EasyWalker DUO using the push-bar
(image 1). The EasyWalker DUO will unfold by itself. If you hear a double click, then the
EasyWalker DUO has unfolded correctly (image 2). Check whether the red safety catch
on the right-hand side of the EasyWalker DUO is in the locked position (image 3).
Wheels
Flip the parking brake upwards (image 4). Insert the rear wheel into the rear axle of the
frame while you press the button in the middle of the rear wheel. Release the button
and check whether the wheel is secured by pulling it (image 5). Repeat this process
on the opposite side with the other rear wheel (image 6).
EN-17
EN
Contents of the box
To remove the rear wheel, press the button in the middle of the rear wheel while
pulling the wheel off the frame.
EN
IMPORTANT: The rear wheels cannot be fitted to the frame if the parking brake of the
EasyWalker DUO is engaged.
The front wheel is mounted, as standard, on the front fork. You can secure this by fully
sliding out the black sliding button of the swivelling wheel underneath the footplate
and then positioning the fork in the opening intended for this (image 7). Now release
the sliding button and press this in properly (image 8). Check that the fork is properly
secured. Repeat this process with the other front wheel.
To remove the front fork and wheel, slide the black sliding button (underneath the
footplate) out completely while pulling the front fork out of its mounting (image 9).
Inflate the tyres of your EasyWalker DUO with a pump used for car tyres. The maximum
pressure for the tyres is 1.4 Bar (20 psi) (image 10).
TIP: You can buy a tapering converter at a bike shop so that you can use a bicycle pump
to inflate the EasyWalker DUO’s tyres.
IMPORTANT: The maximum pressure for the tyres is 1.4 Bar (20 psi).
IMPORTANT: Ensure that all of the EasyWalker DUO’s tyres are inflated equally. Unequal
tyre pressure can lead to instability of the EasyWalker DUO and can impact upon the
safety and comfort of your children.
IMPORTANT: If the tyres have been over-inflated, they may explode in hot weather. Make
sure you consider raised temperatures in the boot of your car or in a conservatory, for
example.
IMPORTANT: There may be grease on the axle; be careful with clothing and never let
children play with the wheels.
IMPORTANT: Do not leave the caps from the valves lying around. Prevent children putting
them in their mouths.
Seat
! WARNING: Always use the 5-point harness when your child is carried in the seat.
! WARNING: The seats are not suitable for children under 6 months.
The EasyWalker DUO is supplied with the seat and the storage basket already fitted. It
is possible to leave the left-hand seat in place on the frame and to fit a carrycot or carseat adapter on the right. To remove the right-hand seat, open the poppers on the tapes
to the left and right at the back of the seat. Now open all poppers and Velcro fastenings
on both sides of the seat (image 11+12). If you would like to also remove the left-hand
seat, follow the same process (image 13).
To put the seat back onto the frame, you would always attach the left-hand seat first.
Close the poppers and Velcro fastening on both sides of the seat to the frame. You now
close the straps with Velcro fastening on the left-hand side of the left-hand seat around
the left frame tube. You attach the Velcro fastening on the right-hand side of the lefthand seat to the central tube. Then, underneath the seat near to the footplate, you take
the tape with the Velcro fastening behind the tube, back through the locking hook of the
short tape, and you attach this with the Velcro fastening. Finally, close the poppers on
the tapes at the back of the seat around the frame tubes, just above the rear suspension.
These tapes are part of the harness and provide extra comfort and security for your
children.
EN-18
! WARNING: Check that the seat and the carrycot are properly attached to the supporting
frame and that they are securely fixed, before you use the EasyWalker DUO.
5-point harness
! WARNING: Always use the 5-point harness when carrying your child in the seat.
! WARNING: Always use the crotch strap in combination with the waist strap when putting
your child in the 5-point harness.
The EasyWalker DUO seat is supplied, as standard, with the shoulder straps in the
highest position. You can set the shoulder straps to a lower position, so that smaller
children are seated more comfortably. To do this, click the shoulder straps to release
them from the crotch strap and take the shoulder pads off. Open the zip at the top of the
back support. You can now take the shoulder strap through one of the other openings.
Click the shoulder strap back onto the crotch strap and shut the zip at the top of the back
support (image 14).
The EasyWalker DUO seat is supplied, as standard, with the waist strap in the smallest
position. You can set the waist strap to a larger position so that larger children can be
seated more comfortably. To do this, take the waist strap out of the loop on the base of
the seat (image 15).
You can use the sliding buckles to make the shoulder, hip and waist straps tighter or
looser (image 16).
TIP: The tapes on the rear of the seat that go around the frame, just above the rear
suspension, are part of the harness and provide extra comfort and security for your child.
Ensure that these are always closed around the frame.
Sun canopy
In order to attach the sun canopy place it, with open attachment clips, inside the upper
recesses in the seat fabric, exactly between the two caps on the frame. Click the
attachment clip shut (image 17).
To remove the sun canopy, click and release the attachment clips on the sun canopy on
right-hand side sun canopy the push-bar. You can now remove the sun canopy from the
frame.
You can also remove just one side of the sun canopy if, for example, you want
to place a carrycot on the right-hand side of the EasyWalker DUO. To do this, unlock the
in the central connecting piece of the sun canopy. The right-hand sun canopy will
now be loose (image 18).
TIP: Give yourself enough space. Before assembling or dismantling, release the poppers
around the recess in the seat fabric.
EN-19
EN
To secure the right-hand seat, you close the poppers on the right-hand side of the righthand seat. Then close the Velcro fastening on the right-hand side of the right-hand seat
around the right frame tube. You attach the Velcro fastening on the left-hand side of the
right-hand seat to the central tube, level with the recess in the fabric of the left-hand
seat. Underneath the seat on the right-hand side, near to the footplate, you take the
tape with the Velcro fastening behind the tube, back through the locking hook of the
short tape and you attach this with the Velcro fastening. You then secure the flap on
the left-hand side of the right-hand seat with the Velcro fastening on the left-hand seat.
Close all poppers.
IMPORTANT: After assembly shut all poppers again.
IMPORTANT: A small child has very sensitive skin. Never leave your child in the
EasyWalker DUO in the sun without the sun canopy on.
EN
Bumper bar
Place the bumper bar with opened clips on the frame in the lower recesses in the seat
fabric and shut both clips(image 19+20). To remove the bumper bar, open the clips and
remove the bumper bar from the frame.
TIP: Give yourself enough space. Before assembling or dismantling, release the poppers
around the recess in the seat fabric.
IMPORTANT: Before use always check whether the bumper bar is securely fixed to the
frame.
IMPORTANT: After assembly shut all poppers again.
Storage basket
The EasyWalker DUO is supplied with the seat and the storage basket already fitted.
To remove the storage basket, open all Velcro fastenings and poppers on the front and
rear of the storage basket (image 21). To reattach the storage basket, put the tapes and
Velcro through the buckle around the frame and close the tapes and Velcro fastenings.
The storage basket is accessed easily using the two zip fastenings.
Using the EasyWalker DUO
IMPORTANT: Avoid dangerous situations. Always use the wrist band attached to the pushbar. Take your child out of the EasyWalker DUO if you go up or down stairs, escalators or
steep hills.
IMPORTANT: Do not use the EasyWalker DUO if any part is broken, torn, incomplete or
does not seem to be functioning correctly.
IMPORTANT: The EasyWalker DUO is not designed for use when jogging or roller skating.
IMPORTANT: The rods between the rear wheels are not suitable for standing on. This is
unsafe and can damage the EasyWalker DUO.
Parking brake
IMPORTANT: Ensure that the parking brake is engaged when you place your children in or
remove them from the EasyWalker DUO.
Push the parking brake at the back of the frame gently downwards with the foot. Ensure
that the sides of the brake fall into the designated recesses on the rear wheels so that
the EasyWalker DUO cannot move (image 27). To release the brake on the EasyWalker
DUO, push the brake upwards with the foot (image 4).
Collapsing and opening out
! WARNING: Ensure that all the locking devices are engaged before use.
You can leave the seat and the sun canopy in place on the EasyWalker DUO when
collapsing and folding out. If using the EasyWalker DUO carrycot or a car seat these must
first be removed.
EN-20
To open out the EasyWalker DUO, release the locking hook on the rear axle and pull
the EasyWalker DUO up by the push-bar. The EasyWalker DUO will unfold by itself. If you
hear a double click then the EasyWalker DUO has unfolded correctly. Check whether the
red safety catch on the right hand side of the EasyWalker DUO is in the locked position.
TIP: The four wheels and bumper bar can be removed to make the folded pushchair more
compact.
Raising the height of the push-bar
Release the left and right black clips on the inside of the push bar (located just under the
foam). Move the push-bar to the desired height and lock the clips (image 35).
Setting the suspension
You can modify the EasyWalker DUO’s suspension by tightening or loosening the screw
button under the suspension by the rear wheels (image 36). Ensure that the suspension
settings are the same on both sides of the frame.
Alter position of swivel wheels
Slide the black sliding button of the swivel wheel (under the footplate) out and turn this
a quarter turn. Make sure that the footplate and the front fork click into one another
properly. Check that the sliding button fits back properly into the recess intended for this
purpose (image 37+38. Ensure that both front wheels always have the same setting.
IMPORTANT: There may be grease on the axle; be careful with clothing and never let
children play with the wheels.
Repairing/replacing tires
Repair a punctured tyre in the same way as you would repair a bicycle tyre. It is also
possible to replace the inner tube. Tyre levers must be used to remove the outer tyre.
IMPORTANT: There may be grease on the axle; be careful with clothing and never let
children play with the wheels.
IMPORTANT: Do not leave the caps from the valves lying around. Prevent children putting
them in their mouths.
5-point harness
! WARNING: Always use the 5-point harness when carrying your child in the seat.
! WARNING: Always use the crotch strap in combination with the waist strap when putting
your child in the 5-point harness.
EN-21
EN
Position the front wheels with the wheels swivelled and pull the EasyWalker DUO
backwards slightly so that the front wheels turn forwards. Engage the parking brake and
turn the sun canopy upwards. Click the red safety catch (located on the right hand side
of the frame) upwards. Standing behind the pushchair, squeeze the unlocking handles on
both sides of the push-bar. Move the push-bar downwards while keeping the unlocking
handles pushed in (image 33+34). You can now close the locking hook on the rear axle
around the frame (image 1).
EN
Place your child in the seat. Click the shoulder strap onto the crotch strap and slide both
interlocking parts of the crotch straps into the interlocking part of the waist strap (image
39). The 5-point harness is now closed. To remove your child from the seat, you open the
5-point harness.
IMPORTANT: Ensure that the parking brake is engaged when you place your children in or
remove them from the EasyWalker DUO.
IMPORTANT: It is important, for the comfort and safety of your child, that the shoulder
straps, the crotch strap and the waist strap are fixed in the right position and are not too
tight or loose.
Seat and sun canopy
! WARNING: Check that the seat is properly attached to the supporting frame and it is
securely fixed before you use the EasyWalker DUO.
IMPORTANT: Ensure that the parking brake is engaged when you place your children in or
remove them from the EasyWalker DUO.
IMPORTANT: Before use always check whether the bumper bar is securely fixed to the
frame.
The EasyWalker DUO has four seat settings. Both seats can be adjusted independently.
If you are using the seat for the first time, all zips on the sides of the seat will be closed,
as will the clips above the seat on the back. This is the most vertical position. You can
set the seat position by releasing or closing the clips on both sides above the seat (image
40). You can change the position of the seat further by completely opening or closing the
zips on the sides of the seat (image 41+42).
IMPORTANT: The seats of the EasyWalker DUO can be adjusted independently. Make sure
that the same zip is open on both sides for the same seat.
TIP: For the comfort of your child, support the seat back with your hand when opening or
closing the zips.
TIP: Ensure the zips are always either completely open or completely closed.
TIP: Because the two seats of the EasyWalker DUO are independently adjustable, one
of your children is able to have a sleep while lying down, while your other child can sit
upright.
There is an integrated UV screen with an UPF protection factor 10 under the sun canopy.
This is secured with two buttons under the sun canopy. Release the buttons and fold the
screen outwards in order to protect your child against sunlight (image 43).
Rain cover
The EasyWalker DUO is supplied, as standard, with a rain cover for over the seat with sun
canopy. Place the rain cover so that the stitching rests on the front and rear edge of the
sun canopy and the wide black edge is at the height of the underside of the footplate.
Attach the rain cover with the Velcro (image 44).
TIP: The rain cover has reflective stitching so that you are visible to other road users in
the dark and during bad weather.
IMPORTANT: The rain cover has ventilation holes on the sides. These ensure fresh air can
circulate so do not block them.
EN-22
IMPORTANT: Do not let your child sit under the rain cover unnecessarily. Ensure that your
child does not get too hot.
Assembling the EasyWalker carrycot
Content
!
!
!
!
!
!
!
Contents of the box
Assembling the EasyWalker DUO carrycot
Using the EasyWalker DUO carrycot
Rain cover
Mosquito net
WARNING:
WARNING:
WARNING:
WARNING:
WARNING:
WARNING:
WARNING:
! WARNING:
! WARNING:
! WARNING:
! WARNING:
! WARNING:
! WARNING:
! WARNING:
! WARNING:
! WARNING:
! WARNING:
EN
23
24
24
25
25
Read the instructions carefully before use and keep them for further reference.
Do not leave your child unattended.
Do not let other children play unattended near the carrycot.
Never use the Carrycot on a stand.
Keep plastic covers away from children to avoid suffocation.
Do not add a mattress thicker than 50 mm in the carrycot.
Check that the carrycot body or seat unit attachment devices are correctly
engaged before use.
Use a harness as soon as your child can sit unaided.
This product is only suitable for a child that cannot sit up unaided.
The EasyWalker DUO carrycot is intended to be used for children from birth to
the age of 6 months or 9 kg.
Do not use the carrycot if any part is broken, torn or missing.
Only use the EasyWalker DUO carrycot or accessories approved for use by
EasyWalker on the EasyWalker stroller.
Only use replacement parts and accessories approved by EasyWalker BV.
Ensure that the parking brake is engaged when the EasyWalker stroller is
stationary.
When assembling the EasyWalker DUO carrycot there should not be a child in
the seat or carrycot.
Check regularly for signs of damage and wear of the handles and clips at the
bottom of the carrycot.
Only use the EasyWalker carrycot on a firm, horizontal level and dry surface.
Contents of the box
The following items must be contained in the EasyWalker carrycot box:
• 1 carrycot with sun canopy and cover.
• 1 mattress with fleece and cotton cover.
• 1 rain cover.
• 1 mosquito net.
• 1 sheet cover.
• 2 connection tubes.
• 1 instruction leaflet.
In order to attach two carrycots onto the EasyWalker DUO, you will also need the long
connection tubes, from the EasyWalker DUO box.
EN-23
EN
Assembling the EasyWalker carrycot
The EasyWalker carrycot is simple to assemble. Before using for the first time, take the
carrycot out of the box, take the cover off the carrycot and remove the accessories, the
mattress and the inside covers.
Pull the fastener on the bar (nearest to the head-end) in the direction of the head-end until
it clicks, left and right, into the metal holder (image 22). Pull the fastener on the bar (nearest
to the foot-end) in the direction of the foot-end until it clicks, left and right, into the metal
holder (image 22). Attach the inside covers to the carrycot again with Velcro. Put the mattress
back in the carrycot (image 23). You can now choose whether you want the fleece or cotton
side uppermost.
Turn the sun canopy upwards by pushing the black buttons on both sides of the sun canopy
and simultaneously turning the canopy upwards (image 24). Ensure that the canopy cannot
turn any further and release the buttons (image 26). Reattach the cover over the carrycot
and choos the position of the wind screen (image 25).
Using the EasyWalker DUO carrycot
Attaching the carrycot to the frame
Engage the parking brake of the EasyWalker DUO (image 27). If you want to attach one
carrycot to the EasyWalker DUO, this can only be done on the right-hand side.
Remove the seat, the sun canopy and the bumper bar from the frame. If required, you can
leave the left-hand seat and the left-hand side of the sun
canopy in place. Place the short connection tubes with open clips, on the right-hand side
against the frame.
Position between the two caps and shut the left and right clips of both connection tubes
(image 28+29). Lift up the carrycot using the grips in the sun canopy and under the foot-end.
Slide the hooks (under the head-end) over the tube at the front of the frame, above the
footplate. Now pull the hand grip under the foot-end backwards so that the clips under the
foot-end open and, at the same time, push the clips over the connection tube. Let go of the
hand grip under the foot-end (image 32). The clips shut by themselves around the
connection tube. If required, a second carrycot can be fixed to the frame. In order to do
so, remove the entire seat and sun canopy from the frame. Instead of the short connection
tubes, you would now use the long connection tubes (image 30+31). Connecting the carrycot
to the left-hand side is done in the same way as described above.
WARNING: Check that the carrycot is properly attached to the supporting frame and that it
is securely fixed, before you use the EasyWalker DUO.
WARNING: A small child has very sensitive skin. Never leave your child in the EasyWalker
DUO in the sun without the sun canopy on.
Removing the carrycot from the frame
Engage the parking brake of the EasyWalker DUO. To remove the carrycot from the frame,
hold onto the carrycot by the hand grips in the sun canopy and under the foot-end. Now
pull the hand grip (under the foot-end) backwards so that the clips under the foot-end open
and, at the same time, lift the foot-end away from the connection tube. Slide the carrycot
towards the head-end, away from the tube at the front of the frame, above the footplate.
TIP: The carrycot has four black feet on the underside so that it can be used as a cot
without a supporting frame.
EN-24
TIP: The hand grip in the sun canopy is suitable for lifting the carrycot if it has been lifted
up completely. In the bag, at the foot-end, there is an extra hand grip so that you can safely
carry the carrycot.
The EasyWalker DUO carrycot is supplied, as standard, with a rain cover. Place the rain
cover so that the stitching rests on the front and rear edges of the sun canopy and the
ventilation window is by the opening. Shut the sides by closing the Velcro fastenings and
closing the popper. The elastic on the underside rests on the lower edge of the carrycot
(image 45).
TIP: The rain cover has reflective stitching so that you are visible to other road users in
the dark and during bad weather.
IMPORTANT: The rain cover has a ventilation window at the front that can be closed using
Velcro. You can open and secure the window with the button and the elastic loop.
IMPORTANT: Do not let your child sit under the rain cover unnecessarily. Ensure that your
child does not get too hot.
Mosquito net
The EasyWalker DUO carrycot is supplied, as standard, with a mosquito net. Place the
mosquito net over the carrycot so that it connects properly to the carrycot. (image. 46).
Maintaining and cleaning the EasyWalker DUO and
the EasyWalker DUO carrycot
IMPORTANT: The EasyWalker DUO is intended to transport just two children.
IMPORTANT: Only use original EasyWalker DUO accessories. When replacing parts only
use original parts that are supplied and/or approved by EasyWalker bv. The guarantee is
invalidated if the EasyWalker DUO is damaged due to overloading, incorrect use or use of
non-original accessories or parts.
IMPORTANT: Always be careful with open fires and other heat sources in the vicinity of
the EasyWalker DUO and your child.
The EasyWalker DUO and the EasyWalker DUO carrycot have been carefully created
with comfort, safety, ease of use and design in mind. The EasyWalker DUO and the
EasyWalker DUO carrycot meet European safety standards. Assembly and use are
comprehensively explained in the instructions.
If you follow the directions given in these instructions for use properly, you will have
many years of pleasure with our products. However, you are advised to regularly check
your EasyWalker DUO and EasyWalker DUO carrycot. It is recommended that you have
your EasyWalker DUO serviced at the shop where you bought it once every two years. If
you have any doubts about the state of one or more of the components in the interim,
contact the shop where you purchased the item. They will assess the EasyWalker DUO
and the EasyWalker DUO carrycot and carry out simple repairs. The shop owner will
always contact the manufacturer should there be serious problems.
IMPORTANT: Keep your proof of purchase and the instructions safely.
IMPORTANT: The serial number of the EasyWalker DUO can be found on the inside of the
tube on wich the left rear wheel is attached. The serial number of the covers and other
fabric parts can be found on the fabric labels. The serial number for the EasyWalker DUO
carrycot can be found on the fabric label.
EN-25
EN
Rain cover
EN
Regularly clean the EasyWalker DUO. Use a damp cloth for this and a mild cleaning solution
if necessary. The swivel wheel holder and the rear wheel axles regularly get dirty. Take the
wheels out of the holder or axle on a regular basis and clean with lukewarm water.
Ensure that all parts are dried thoroughly and oil the axles lightly with oil or silicone spray
before replacing the wheels. Protect the foam on the push-bar against friction and sharp
objects. Avoid exposing the EasyWalker DUO to extreme temperatures.
Fabrics used on the EasyWalker DUO and EasyWalker DUO carrycot are removable and
can be washed in the washing machine. Never bleach, dry-clean or wash the fabrics
at over 30 degrees and never dry in the tumble dryer. Before washing always remove
the fastenings, foam and plastic or metal parts. Always refer to the washing label on
each part. The EasyWalker DUO is not resistant to salt water so do not use it in the sea.
During wet weather always use the rain cover supplied for the seat with the sun canopy
or the carrycot. If the EasyWalker DUO and the EasyWalker DUO carrycot are wet due to
cleaning or rain, do not collapse but leave to dry opened out in a well-ventilated room.
This prevents the formation of mould. Parts of the EasyWalker DUO and the EasyWalker
DUO carrycot can slightly discolour or become worn as a result of weather conditions and
usage. This can also occur with normal usage.
TIP: In order to avoid a colour difference, you are advised to wash items of the same
colour together.
Accessories
IMPORTANT: Only use original EasyWalker DUO accessories. When replacing parts, only
use original parts that are supplied and/or approved by EasyWalker B.V. The guarantee is
invalidated if the EasyWalker DUO is damaged due to overloading, incorrect use or use of
non-original accessories or parts.
! WARNING: Any load attached to the push-bar affects the stability of the EasyWalker
DUO.
The EasyWalker DUO and the EasyWalker DUO carrycot have been carefully created
with comfort, safety, ease of use and design in mind. The EasyWalker DUO and the
EasyWalker DUO carrycot are supplied, as standard, with the most important accessories.
In addition to the standard kit, EasyWalker also offers a wide range of accessories. Go to
www.easywalker.nl for the options.
Summary of the available accessories for the EasyWalker DUO:
EasyWalker DUO carrycot
EasyWalker DUO Maxi-Cosi Cabrio adapter
EasyWalker care bag
EasyWalker foot muff
EasyWalker cupholder
EasyWalker parasol
EasyWalker DUO UV-mosquito net
EasyWalker DUO travel bag
EasyWalker mini pump
EasyWalker DUO rain cover for one seat and one carrycot
Guarantee conditions
In its capacity as manufacturer, EasyWalker provides a guarantee for EasyWalker DUO’s
and EasyWalker carrycots produced by them, under the following conditions:
EN-26
you should go back to the shop where you purchased the item. If they cannot help
you with your problem the shop will send the product back to the manufacturer with a
clear description of the problem as well as a copy of the proof of purchase with date.
You cannot demand an exchange or refund. Repairs allow the guarantee period to be
extended. EasyWalker is never liable for damage other than to the product produced by
EasyWalker.
A guarantee is not provided if:
The product is provided to the manufacturer/importer without a copy of the
original purchase receipt.
Defects have been caused by incorrect use or maintenance, deviating from what
is stated in the instructions or what can be expected as reasonable when using
the product.
Repairs to the product have been be carried out by third parties without prior
consent from the manufacturer.
The defect has been caused by neglect.
The defect was caused as a result of an accident.
It involves normal wear and tear that may be expected with daily use.
It concerns the loss of parts.
Damage caused by using accessories of another brand.
Otherwise not conforming with the aforementioned guarantee conditions.
In the latter situation, the ultimate decision as to whether the part falls under the
guarantee will be taken by the manufacturer’s service department. Above guarantee
conditions are supplementary to legal rights. The guarantee only applies to the first
owner and is not transferable.
IMPORTANT: Keep your proof of purchase and the instructions safely.
IMPORTANT: The serial number of the EasyWalker DUO can be found on the inside of the
tube on wich the left rear wheel is attached. The serial number of the covers and other
fabric parts can be found on the fabric labels. The serial number for the EasyWalker carrycot
can be found on the fabric label.
If you have any questions please ask in the shop where you purchased the EasyWalker
DUO and the EasyWalker carrycot. Ensure you have the following details to hand:
Type of EasyWalker and the serial number of the frame and covers.
Purchase receipt
In order to improve the EasyWalker DUO and the EasyWalker carrycot we would love to
hear your opinion. This may concern design, use, materials and instructions. Mail your
ideas to [email protected]
We wish you a great deal of pleasure when using your EasyWalker DUO.
EasyWalker bv
The utmost care was exercised in designing and compiling these instructions. We cannot,
however, offer any guarantees with regard to the completeness and correctness of the
information contained herein.
EN-27
EN
The guarantee commences on the date stated on the proof of purchase and is valid
for two years. This is in accordance with the manufacturer’s (importer’s) specification
concerning correct use of the product or what may be expected as normal when using it.
The guarantee for rims, outer tyres, inner tubes, foam, spokes, covers and accessories
only relates to construction and/or material faults. If you should encounter defects