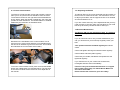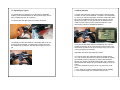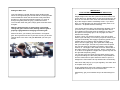
1
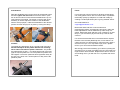
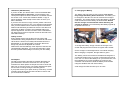
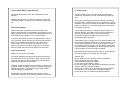
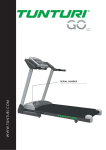
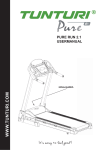
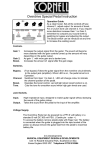
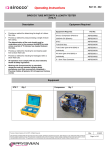
|Woosh Support:
Be sure to check the FAQ section on our website before calling as the answers to the most common queries are there
and you may find that the solution to your problem is already
online. If you do need to get in touch, our contact details are
below.
It can sometimes be useful to see the issue you have, so if
possible, email a couple of photos illustrating the problem
and we’ll normally get back to you within a an hour or two (on
weekdays).
Support staff are not available at the weekends, though if
you send an email, it will normally be read on the following
Monday morning.
If you need support on a bike purchased in Cambridge
please note that you should call our Southend office.
Email: [email protected]
Sirocco CD Manual
Telephone: 01702 435566
Support staff are available 10am to 5pm Monday to Friday.
This may change in the future.
© 2013 Woosh Bikes Limited
Tel. 01702 435566 - E-mail: [email protected]
Thank you for purchasing a Woosh SiroccoCD electric bike.
Please read this manual thoroughly before riding your bike.
Please also read the separate Terms and Conditions leaflet
which also accompanies the bike, all of which will be relevant
to a mail order purchase but only some of which will be
relevant to a purchase made in store.
If you do not have a copy of this leaflet please call us and we
shall arrange to send you one immediately.
You should not ride the bike without reading this leaflet first.
If the bike appears to have suffered damage in transit—for
example, a mudguard or chain guard are broken, a wheel is
buckled or there are deep scratches, chips or dents in the
paintwork, you must inform us within 24 hours of receipt.
Failure to do this will prevent us from claiming compensation
from our insurers and thus from making good to you.
Please note that all our bikes are checked before despatch
for mechanical and electrical functions. We do not ride most
bikes, so a problem may only become evident when you do
so, and we will of course try to resolve this as soon as
possible.
Some bikes are however given a short random test ride (less
than 200 meters) which may be indicated by some dirt to the
tyres. Please be assured that if your bike is one of these it is
still brand new and not second hand. Our second hand and
new stock are kept in separate locations and second hand
bikes do not normally have any bubble wrap to the frame.
Our telephone number is (01702) 435566.
OurSouthend office is open Mondays to Saturdays 10—5.
Our Cambridge office is open Mondays to Fridays 9—5 and
Saturdays 9—1.
These times may change and will vary with holidays and at
certain times of the year.
Riding Distance/Total Distance
To change the display between riding distance and total distance, press the Mode button. The current mode is indicated
by “Trip” for “Current Trip Distance” and by “Odo” for “Total
Distance”.
Control Module Battery
The “control module” itself has a battery. This battery should
last for around 2 years. The battery is a standard type and is
readily available. If you need a battery in the future, contact
us and we can supply one to you or alternatively you can
buy from outlets such as Maplins. Make sure you replace the
battery with the correct type to avoid causing damage to
your module. If you are not sure how to change the battery,
contact us for assistance.
Warning:
The control module comes pre-configured specifically for
your bike. You don’t therefore need to alter the settings. Incorrect settings could cause damage to the bike components
and also result in a bike that is not UK road legal. Any modifications made to the controller configuration will void your
warranty with immediate effect.
Turning Control Module On/Off
To turn on the control module press and hold the middle
(Mode) button. Press and hold the same button to turn off the
module and disable all electric features of the bike.
Turning Backlight On/Off
To turn on the display backlight, press and hold the “Mode &
Up” button, press and hold the same two buttons to turn it
off.
Varying Pedal Assist Level
To alter the level of assistance provided simply press the Up/
Down arrows to cycle through the 5 levels of assistance.
Level 1 offers the least assistance while level 5 offers the
greatest assistance.
Speed Display Mode
There are three different modes for the speed display, these
are current speed, average speed and maximum speed. To
switch between these modes, press and hold the “Up” button
for approx. 1 second to cycle through the modes.
Walking Mode
The bike also supports a walking mode which is basically a
very slow mode allowing you to walk next to the bike at
approx. 6Km/h. This is activated by pressing and holding the
“Down” button. As soon as the button is released, the bike
will stop.
The Woosh SiroccoCD electric bike has a high performance
light-weight lithium battery, and a modern crank-drive motor
making it a sturdy yet light and manoeuvrable bike, while
also offering exceptional value.
To ensure that your bike provides you with the best experience possible, make sure you read and understand this
manual in its entirety before using the bike for the first
time.
Important Safety Notice
Woosh Bikes Ltd checks all bikes before sale for electrical
and mechanical functions.
Our procedures are strict and our checking is thorough.
Omissions or oversights can nevertheless occur.
We strongly advise you to also carry out your own
mechanical checks before riding to ensure the full safety of
your bike. These include:
•
Checking that the brakes are set correctly and work
properly
•
All wheel nuts, major fixings, spokes and cranks are
fully tightened.
•
Wheels are aligned.
•
Pedals, saddle and handlebars are fully tight and
secured after installation.
If you are not experienced with bikes a local bike shop will do
this for you for a small charge.
These checks should be repeated after the first month and
regularly thereafter to ensure your safety.
Please note that failure to carry out these checks to your
complete satisfaction could result in serious injury for which
Woosh Bikes Ltd will not be held liable.
Warning:
Two people are required when lifting/moving the carton.
Woosh Bikes Ltd will not be liable for personal injury caused
through mishandling.
Your Woosh electric cycle will come mostly assembled, but
to make packing easier, some parts of the cycle may require
a small amount of assembly to be completed before use.
This manual assumes you are reasonably competent with
and have your own toolkit.
Disclaimer:
You are responsible for the correct assembly and ongoing
maintenance of your cycle. Woosh Bikes Ltd. accepts no
responsibility for any incidents that may arise as a result of
bikes which have been poorly assembled/maintained by the
end user. All steps in this booklet must be completed to
ensure trouble-free and safe operation.
18-Control Module—Advanced
The control module has many advanced features and
modes, these include back-lit display (for night riding), indicator options for max speed, average speed and current
speed, a digital clock and a battery power indicator. It also
features a walking mode which is used when you want to
wheel/push the bike, this is basically a very low speed mode
which is activated by pressing and holding the button marker
with a ‘down-arrow’.
4.
1.
5.
2.
IMPORTANT MAINTENANCE:
You must check your bike regularly to ensure all fixings are
correctly tightened and have not worked loose over time.
This includes checking and tightening wheel spokes, saddle,
handlebars, cranks and pedals.
You should also regularly check brakes and brake pads
Please read the relevant sections later in this manual.
3.
Failure to carry out essential maintenance on a regular basis
could cause a cycle malfunction and result in safety issues
for which Woosh Bikes Ltd. will not be held responsible.
1.
2.
3.
4.
5.
Battery Level Indicator
Assistance Level (Pedal Assist)
Odometer
Digital Clock
Speed Indicator
17—Spares
1-Unpacking
We keep in stock most parts necessary to maintain your
electric bike—call to order.
Two people are required to unpack the bike.
Stand the carton upright as shown.
Remove the shipping straps, cut the tape seals and then remove all of the polystyrene packaging.
Keep the carton/bike in the upright position, and then lift the
bike out of the carton and engage the stand to keep the bike
upright. DO NOT destroy the carton as it will be required if
the bike needs to be returned for any reason in the future.
Callers are welcome to bring bikes in for repair. These
may not be done on the same day however and please
note that we do not do servicing on Saturdays.
The SiroccoCD comes almost completely assembled straight
out of the box. Apart from charging the battery, there are only
a couple of steps needed to get your bike ready for the first
ride. Remove the remaining bubble-wrap/packaging from the
various parts of the bike and then slide the handlebar stem
into the frame. You will need to release the clamp to allow
the handlebars to be rotated to avoid pulling/stretching the
cables—see below.
2-Handlebars
Faults
Slide the handlebar stem into the frame at the desired height
and then tighten the allen bolt to secure the stem in position as shown below. Ensure that the handlebars line up correctly with the front wheel. The clamp on the top side of the
assembly is used to adjust the rotation of the handlebars with the clamp up/open, rotate the handlebars to the desired
position and then simply lock in place by closing the clamp.
If your bike has a fault on arrival or develops a fault during
use, firstly please call us. We can resolve 90% of problems
reasonably quickly by telephone or email and usually by
sending a small replacement part or giving sensible advice.
Our email address is:
[email protected]
Mechanical wear and tear is not the same as a
manufacturing defect, and things like punctures, chain and
brake adjustments can be dealt with by a bike shop if required. Mechanical wear and tear is not covered by our warranty so you will need to pay the bike shop a fee for their
services.
3-Pedals
The pedals are designed to fit on a specific side of the bike.
Do NOT attempt to fit the pedals without first checking
which side of the bike the pedal is meant for. The pedals
are marked with ‘R’ and ‘L’ to indicate which side of the bike
(right or left) the pedal is for. Fit each pedal into position and
hand tighten. Once each pedal has been tightened nearly all
the way in by hand, use a 15mm spanner to fully secure the
pedals in place.
If a severe electrical fault has occurred and which requires
the bike to be returned (thankfully rare, in less than 2% of
cases currently), we will arrange to collect the bike, repair it
and return it to you. You may need to pay a fee—please
refer to your Terms and Conditions leaflet.
We strongly recommend retaining your carton by folding flat
and storing in a dry area if possible in the rare event that you
might need to return the bike. Replacement cartons are £10
and sending one to you will cost £15—so please bear this in
mind.
16-Returns (UK Mainland)
If you do not like your electric bike or find it unsuitable and
have purchased it by mail order, we will refund the purchase price subject to certain conditions. Full details of these
are shown in our Terms and Conditions leaflet, a copy of
which should be under the flap of the carton in which your
bike is delivered.
If you have not received a copy of these, please call us and
we will arrange to send you one. You should not ride the bike
until you have read this as it contains important information.
Please note that bikes purchased in store are not able to be
returned if not liked or found to be unsuitable without our
express agreement. If a bike is found to have a manufacturing defect and a refund is required it must be returned to the
store within 28 days.
Quality control
Every Woosh electric bike is taken from its carton and
checked before being despatched for mechanical and electrical functions. We do not normally ride the bike before it is
despatched, so you will find after a short time that some
things may need to be adjusted/ fine-tuned.
Please also note that although most aspects of the bike are
checked before despatch, you must also thoroughly check
the bike yourself before riding it to ensure your own safety.
DIY Repairs
We sell to users willing and able to maintain their bike to a
good standard or who have someone who can help with
maintenance. Most repairs are simple and can be done with
help from us over the phone or by email. Replacement parts
are sent free of charge during the warranty period.
If you prefer to have your repair done by a bike shop, contact
us before going ahead as the refund of labour costs is subject to terms and conditions.
4—Charging the Battery
The battery may not leave us fully charged. You should
fully charge the battery before initial use. The battery can
be charged on the bike or it can be removed and charged
separately. The socket used to charge the battery is located
under the left rear of the battery as shown below. Ensure
that the charger is switched OFF before attaching the
charger to the bike. You should keep the battery topped up
to get the best out of it.
To charge the battery, simply connect the charger to the
socket and plug the other end into a regular mains socket.
On the charger is a small light which is red while charging.
When charging is complete, this light will turn green.
The battery can be removed from the bike and charged in a
convenient location such as home or office when the bike is
not in use. To remove the battery from your electric bike, use
the supplied key to unlock the battery by turning it anticlockwise. Once unlocked, slide the battery from the bike
using the handle at the rear of the battery.
A full charge from flat can take up to 10 hours.
15-Warnings
To refit the battery, simply slide it back into place, and then
turn the key clockwise to lock it into position.
On the rear of the battery is an indicator which can be used
to give a rough guide as to how much power remains in the
battery. Press the small button shown below. The more
lights illuminated, the more power remains.
Do not allow anyone under the age of 14 to ride the bike.
Do not ride the bike if you are over the weight limit for the
model you have chosen.
Do not bump the bike up and down kerbs.
Slow down when riding over bumpy/rough surfaces.
Do not use the throttle on full constantly.
It is illegal to use the throttle in mainland Europe.
Always observe the highway code.
Wear appropriate safety pads/helmet.
Always ride more slowly and brake more gently in wet
weather.
Do not ride the bike through deep puddles or in snow.
Always ensure that power is switched off when performing
maintenance on the bike. If you are performing maintenance
on any of the electrical components on the bike, remove the
battery completely before you begin.
Pay special attention to the “Maintenance” section of this
manual. It contains information that will help keep you safe
and prolong the life of your bike. Failure to keep your bike
maintained could result in safety issues for which Woosh
Bikes will not be held liable. You may also void your warranty
if you do not take proper care of your bike.
5. Check the tyre pressure and pump up if necessary.
The recommended psi is 35 to 50.
6. Check that all fixings and major components are
tightened to your satisfaction . Check all nuts, bolts
including the carrier, and make absolutely sure your
saddle, handlebars and pedals are firm.
7. Finally check the brakes. The Sirocco CD has front disk
brakes and rear V Brakes. Refer to section 12 if necessary.
Your bike should be stored in a cool dry location when not in
use. In the winter, you should ensure that the battery is not
exposed to extreme cold as this will shorten the life of the
battery. If necessary keep your battery indoors, and if the
bike is not going to be used for long periods, recharge your
battery for around 20 to 30 minutes every two to three
weeks.
14-The Woosh Electric Bike Warranty
8 – Battery Care
All Woosh electric bikes come with a standard one year
warranty.
The SiroccoCD electric bike comes with a modern lightweight high performance 36 volt 10AH lithium polymer battery.
Details of this are fully covered in our separate Terms and
Conditions leaflet. If you have not received this, please call
us.
Second hand buyers:
Please note that if you sell your bike second hand, the
balance of the warranty is transferable, but all aspects of our
sales conditions (such as weight and height restrictions) and
all warranty terms will apply to your new purchaser.
If you have purchased your bike second hand from one of
our customers, please note that we cannot accept responsibility for the condition of the bike when it is sold to you.
and no refund can be offered to you under any circumstances. We will do our best to support you as a second
hand purchaser but this may be limited at our discretion.
Some care is needed to get the best possible performance
from the battery. Assuming the bike is in regular use, charge
the battery once or twice a week as needed. Do not allow the
battery to regularly run completely down as this will shorten
the lifespan of the unit.
Do not charge the battery in extremely cold conditions i.e.
below 6 degrees. The battery can be easily removed from
the bike and charged indoors if its more convenient.
Remember to allow the battery to warm up to room
temperature before charging.
If the battery is not in regular use, try to keep the battery half
to two thirds charged and keep it in a cool dry location. If you
are not using your bike for a while, give the battery a halfhour charge every two weeks. This will slow the ageing process of the battery. All batteries age, but the above steps will
help the battery to last for as long as possible.
Cleaning and oiling:
Make sure your chain is kept oiled.
We specify stainless steel fixings throughout our bikes but
occasional fixings such as clamps or rings may be chrome
and may rust. Applying rust treatment to these at an early
stage will preserve the life of the bike.
Washing: we advise against ‘heavy’ washing or using a hose
or power washer. As water may enter connector points and
damage the electrics. We suggest simply using a damp
cloth and wiping dry afterwards.
Always take care when cleaning mud or debris from the
underneath of the bike not to dislodge cables or connectors.
When the bike is to be put back into service, charge the battery fully to prepare it for regular use once again.
General care:
Do not attempt to open the outer casing of the battery.
Do not attempt to repair the battery.
Keep the battery away from children.
Do not immerse the battery in water.
Ensure the battery is not exposed to temperatures above 55
degrees Celsius or extreme humidity.
Do not use the bike in an environment where temperatures
are less than –5 or greater than +45 degrees Celsius.
Do not drop, pierce or otherwise damage the battery.
9—Controls and Indicators
12—Adjusting the Brakes
The Sirocco CD electric bike comes with a throttle control to
allow you to vary the amount of assistance from the motor.
The throttle is located on the right side of the handlebars as
shown below. When the throttle is pulled fully, the motor will
provide the most assistance. The throttle feature is enabled/
disabled by the red button as indicated below.
The Woosh Sirocco CD comes equipped with disc brakes on
the front and ‘V’ brakes at the rear . For instructions on how
to adjust your brakes, see the support section of our website
at www.wooshbikes.co.uk
If you are unsure about any of the adjustments that you may
need to make to your bike, take your bike along to your local
bike shop where they should be able to assist you.
13-Essential Maintenance.
The Sirocco CD is a low maintenance bike. It is however
essential to carry out some maintenance regularly and thoroughly.
Mounted on the handlebars is the control module. This is
used to turn the motor on/off and also to increase/decrease
the amount of assistance given from the motor. This module
also indicates the current status of the battery.
If you do not know how to carry out this maintenance yourself, you should have your local shop regularly check your
bike.
Your spokes should be checked regularly as outlined
earlier.
Check and tighten all fixings as outlined earlier regularly.
Check brakes and brake pads regularly.
Check that your saddle, handlebars and pedals are well
tightened regularly.
If you feel that one of your cranks has worked loose,
investigate and take action immediately.
To turn the control module on/off, press and hold the MODE
button (the middle button) as indicated above. The functions
of the control module will be covered in more depth later in
the manual.
Failure to carry out essential maintenance on a regular
basis could cause injury, for which Woosh Bikes Ltd
will not be held liable.
Please ensure this is done for your own safety.
11–Operating the Lights
10-Riding the Bike
To operate the front light and cycle through the available
modes, press the black button on the top of the light, the options available are Off, On, Flashing.
To begin using the bike, press (and hold) the ‘Mode’ button
to switch on the ‘Control Module’. The bike is now effectively
on, and if you ride it in this state, the motor will provide assistance when pedalling and you will also be able to use the
throttle if you wish. To vary the amount of assistance provided from the motor, use the up/down buttons to cycle
through the 5 levels of available assistance.
To operate the rear light, press the button as shown.
The display module also features a back-light which can be
turned on/off as needed. To switch this on press and hold
the “Mode and Up” buttons. Use the same buttons to turn it
off.
There are several other features available on this ‘control
module’ and these will be covered later in the manual. The
information provided so far is just enough to get you up and
running as quickly as possible.
Important note about the maximum speed.
You cannot reach the maximum speed on throttle alone.
You can increase the maximum speed on throttle by setting
the assistance level to high but to achieve the maximum
speed, you need to use pedal assist mode. Your maximum
speed will be then limited by your highest cadence or by the
motor.
The motor assistance will cut out in one of the two conditions:
1. You reach the maximum legal speed of 15mph (26kph).
2. The current through the controller reaches 14A.
Riding the bike cont.
Your bike features 7 speed Shimano index shifting gears
which are changed using the thumb selector on the right side
of the handlebars. When the thumb stick is fully extended,
the bike is in first gear (the easiest to pedal). To move up
through the gears press the grey (+) button as shown.
To move back down the gears, simply push the thumb selector again.
With this particular type of electric bike, you should
change the gears one at a time, waiting until the gear is
properly engaged before changing to another gear.
Most of the time, you will likely use the bike in it’s highest
gear, but to get the most out of your bike on hills, you should
change down to the 3rd or 4th gear BEFORE you start your
ascent.
IMPORTANT:
LOOK AFTER SPOKES, TYRES AND KEYS!!
The motor vibrations on an electric bike cause the light
weight fixings used, and also spokes to become loose more
quickly than on a standard bike. If heavy duty fixings such as
those on a motor bike were used, this would add considerably to the weight of what is essentially a bike. If you leave
them, you will damage your wheel and possibly have an accident too. So please read the following:
Your spokes will have been checked before despatch, but if
you have a look, you will find some less tight than others.
This variation ensures the wheel is straight (or ‘trued’). If all
the spokes were equally tight, or all very tight, the wheel
would not be straight.
In future, check your spokes regularly, every two or three
weeks if you ride daily, or once every couple of months if you
only ride occasionally. We supply a spoke key (small round
metallic device) normally in with the battery charger.
How to check? Lightly ‘ping’ each spoke like a harp string
with your index finger. If it feels very loose insert the spoke
key onto the nipple of the spoke in question, using gauge
number 13. The nipple is the metal connector at the base of
the spoke where it joins the wheel rim. Give it a quarter turn
or so. Don’t over-tighten the nipple as the spoke may then be
too rigid and snap during riding.
You can also give your wheel a quick visual check by spinning it and making sure the brake pads are equal distances
from the wheel when it spins and that it seems to spin in a
straight line. Get someone to help hold the bike if necessary.
Also check and pump up your tyres regularly—the same time
as a spoke check is good.
These maintenance steps aren’t always needed as often on
a standard bike but they are for an electric bike.
Alternatively, get your local bike shop to do these things for
you.