1
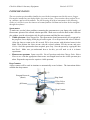
Check-In & Basic Laboratory Equipment Revised: 05/12/15 CHECK-IN & BASIC LABORATORY EQUIPMENT Before Lab Starts ü Read the sections from the lecture text listed on the Assigned Reading document. ü Load Logger Pro onto your laptop. You will be using your own computer as an interface to the probeware and spectrometers in this course. (You’ll need your laptop at this first lab meeting.) Logger Pro can be downloaded for free from the course website (http://unicorn.ps.uci.edu/M3LC/handouts.html). ü Create an account with Sapling Learning (https://www.saplinglearning.com/). The cost will be $30.00. ü On Sapling, complete the Safety and Honesty Agreements and the first assignment before coming to lab. ü When you receive the email from LabArchives, create an account. The cost is $7.50. ü Write your lab procedures in your ELN. This must be done at the beginning all laboratory sessions. The TA will check as you enter the lab - students without prepared notebooks will not be able to perform the experiment and will receive a zero. ü Bring your lab apron and goggles. Dress appropriately – long pants, sturdy closed toed shoes, and no bare stomachs, backs, or shoulders. Check In / Overview Your TA will conduct a safety/information session at the beginning of the lab. Familiarize yourself with the lab layout, location of safety equipment, safety showers, etc. Write down the contact information for your TA. Before leaving lab, show your TA that you completed the Safety Quiz on Sapling (as well as the Safety and Honesty Agreements). This quarter, you will be sharing a storage locker with a set of glassware with another pair in your TA’s other lab section. Your TA will assign the locker to you and provide the combination for its lock. Label your locker with labeling tape as follows: Your name, your section, Quarter 20xx Check the equipment in your drawer against a standard list for missing or cracked items and make needed replacements with the stockroom. Repeat this process at the beginning of each lab section and report any issues to your TA immediately. At the end of the quarter you will be required to demonstrate that all your equipment is accounted for and clean during the check out. Cleaning Glassware Thoroughly clean glassware (especially volumetrics) in your drawer, even if they look clean. • Start the cleaning process by rinsing glassware with tap water several times, then with deionized water (DI water, available at the sink) a couple of times, and finally with nanopure water. (Fill a wash bottle with nanopure water, but use it sparingly – it takes awhile to make.) Now check cleanliness by observing how water drains from the glass surface. Water will drain 1 Check-In & Basic Laboratory Equipment • • • • • Revised: 05/12/15 smoothly from a clean glass. Streaking or forming droplets of water is the sign of a greasy surface. If your glassware does not rinse clean, use the cleaning solution provided by the sink. Then repeat the rinse steps. If the glassware is still dirty, use the Alconox available in dropper bottles. (CAUTION: Alconox is corrosive and toxic. Wear goggles, long sleeves, lab apron, and gloves. Use in the fume hood with a lowered sash. Avoid all skin contact with the solution.) o Coat glass completely with Alconox and let stand for at least 10 minutes. Pour the used, undiluted Alconox into a small beaker for reuse on your other glassware if needed. (Alconox can be reused many times; using it just once is exceptionally wasteful and detrimental to the environment.) When done, pour your used, undiluted Alconox into a glass jar labeled “recycled / used Alconox” in the fume hood designated for neutralization. o Rinse your glassware many times with small quantities of DI water, and catch the rinse water in a beaker. Recheck the cleanliness of the glass by observing the manner in which water drains from the glass surface. If still dirty, exchange the glassware for another piece from the stockroom. Neutralize the rinse water in the beaker with sodium bicarbonate. Before leaving today, ask your TA to examine the cleanliness of the glassware in your locker and the bench and fume hood you have used. You will be graded on this cleanliness check. Use the above cleaning process for all experiments in this course. It is to your advantage to keep this equipment very clean for the duration of the quarter. It is OK for it to be wet – volumetric glassware is designed to be used with water. Some analysts even prefer to keep unused glassware filled with distilled water to prevent surface contamination from dust and organics in the air. Do not use soap or detergent to wash your glassware at any time during the quarter. The lipids in soap coat the glass and change its hydrophilic properties. Fundamentals Demonstration Students frequently make fairly basic mistakes in volumetric glassware use (flasks, pipets, and burets), massing by difference, and sample handling. To minimize the occurrence of these mistakes, your TA will demonstrate these techniques. • Using volumetric pipets: clean, prerinse w/ solution, fill, deliver. o Common mistake: blowing out the residual liquid left in the tip, this liquid has already been taken into account during calibration and must not be discharged into the vessel. o Instructive Video: http://www.youtube.com/watch?v=qorl6rKLmRs • Using volumetric flasks for the dilution of solutions: clean, prerinse w/ solvent, add a desired volume with a pipet, fill to 95%, mix well, then use a disposable pipet to fill slowly to the calibration line. • Using volumetric flasks for dissolution of solid samples: clean, prerinse w/ solvent, add the solid, fill to 50%, mix thoroughly until everything is dissolved, fill to 95%, mix well, and then use a disposable pipet to fill slowly to the calibration line. o Common mistake: adding a solid then filling with liquid to the meniscus before solid has dissolved. Make sure to mix well and dissolve all solids. • Massing solids/liquids by difference: mass the container, add the sample, mass the container again, subtract the two masses. 2 Check-In & Basic Laboratory Equipment • Revised: 05/12/15 o Common mistakes: touching the container without gloves on (fingerprints add mass), forgetting the container lid or stopper. Transferring samples from the container to volumetric glassware: use multiple rinses with small amounts of solvent until everything is transferred. CALIBRATION OF VOLUMETRIC GLASSWARE Repetitive Measurements & Statistical Analysis • Mass an empty, dry small beaker (m1). Record the mass. Fill a 5-mL volumetric pipet to the calibration mark with deionized water. Drain the contents of the pipet into the small beaker and take the mass (m2). Refill the pipet again with water and add to the water already in the beaker, mass (m3). Add another 5 mL portion of water and mass (m4). • Use the density of water to convert the measured mass differences (ma=m2-m1, mb=m3-m2, mc=m4-m3) into volumes (V1, V2, & V3). (Density is temperature dependent. Make sure you measure the temperature of the water and look up the density in your lecture textbook.) • Using sections 5A-3, 6B-3, and 7A-1 in your lecture text as a reference, calculate the following values: o Average volume added, 〈V〉, from V1, V2, and V3. o Sample standard deviation. o 95% confidence interval. Buret Calibration Section 2G&H of the Skoog textbook describes the calibration of volumetric glassware by massing the amount of water the glassware holds with a sensitive balance. Although you will not be doing a full calibration procedure, we want you to get a feel for how it is done by verifying that your buret delivers the correct volume. Balances that read to + 0.001 g are sufficient for the buret’s calibration. Directions for using a buret are given in 2G-6, follow them closely. When using a buret it is important to remove air bubbles from the spout. If bubbles are present, drain the buret some to remove them. Study Fig 2-21 to determine how to read a buret correctly. Read the volume with the eye parallel to the bottom of the meniscus to prevent parallax error. Use a step stool if needed. Procedure: Fill the cleaned buret with water, record the initial volume, transfer exactly 20.00 mL of water to a pre-massed beaker, and re-mass the beaker. Repeat this process 3 times. Record the data in a 3 Check-In & Basic Laboratory Equipment Revised: 05/12/15 properly labeled table in your ELN. A good strategy is to not get rid of the water between mass measurements: mA: mass of the empty flask mB: mass after adding 20 mL mC: mass after adding 20 mL more mD: mass after adding 20 mL more Convert the measured mass differences (m1 = mB-mA, m2 = mC-mB, and m3 = mD-mC) into corresponding volumes (V1, V2, and V3) using the information from Table 2-3 in the textbook. The density of water is very sensitive to temperature, so be sure to measure the water’s temperature and use the density the corresponds to the temperature. Calculate the following in your ELN before leaving lab. • Average volume: V1 + V2 + V3 3 • Standard deviation: σ = • Standard deviation from the mean: 𝜎! = • 95% confidence interval: m C. E. = t0.95 * σm, where t0.95 = 4.3 for N = 3. ! !!! !! ! ! ! !!! , N = # of measurements, 3 in this case. ! ! Evaluate the accuracy of the buret (or you buret skills) using the following table: If… Then… Everything is OK σ = 0 – 0.2 mL and |ΔV| = 0 – 0.2 m L Show your TA how you use the buret to find out σ < 0.2 mL and |ΔV| > 0.2 m L why your volume is off. Perhaps you are making a systematic error because of a leaking tip or parallax error. Increase your precision in delivering the same |ΔV| < 0.2 mL, but σ > 0.2 mL volume each time! Repeat the entire process! σ > 1 mL and/or |ΔV| > 1 m L After you are done, label your buret and keep it in your drawer. You’ve already cleaned and calibrated the buret, so you’ll want to use it this quarter. 4 Check-In & Basic Laboratory Equipment Revised: 05/12/15 INSTRUMENTATION The next sections are intended to familiarize you with the instruments used in this course. Logger Pro must be installed on your laptop before you come to class. These sections show you how to set up, calibrate, and use the instrument. You will be using all of these instruments in the following weeks, so it will be in your best interest to become familiar with them and to know how to navigate through the software. Spectrometer To make sure you don’t have problems connecting the spectrometer to your laptop, take visible and fluorescence spectra of the colored solution provided. Make sure to scale the data so that it fills the plot window, provide a descriptive title for each spectrum, and label the axes correctly. • Visible spectrum: Open Logger Pro. The spectrometer should automatically be recognized by the program, if not, unplug it and plug it back in again. Go to Experiment and select Calibrate. Allow the lamp to warm up for 90 seconds. Fill a clean cuvette with deionized water for the blank. Then prerinse the same cuvette with the colored solution. Fill the cuvette and press Collect. Once the spectrum has been acquired, press Stop. Save the spectra by copying the data into Excel. Make sure you understand how to do this; you will need to do it in future experiments. • Fluorescence spectrum: Open a new file. Go to Experiment and select Change Units. Select Fluorescence with the appropriate fluorescence wavelength based on the visible spectrum just taken. Repeat the steps used to acquire a visible spectrum. Drop Counters A drop counter will be used in titrations to automatically record volume. The instructions below calibrate the drop counter. Reagent Reservoir (Buret) Ring Stand 2-Way Valves (Stopcocks) pH Sensor Drop Counter 5 Check-In & Basic Laboratory Equipment Revised: 05/12/15 Obtain a titration kit from the stockroom, and set it up as shown above. Make sure the tip of the buret is positioned above the photogate sensor). Fill the reservoir with ~11 mL of water and place an empty beaker below its spout. Completely open the bottom 2-way valve; then slowly open the top valve until a drip rate of one drop / two seconds or slower is achieved. Position the drops in the middle of the drop counter opening (the location of the photogate sensor). Now close the bottom valve. Take care not to move the position of the valve or the reservoir after your adjustments have been completed. Connect the drop counter to the DIG1 port on the LabQuest Mini interface. (If the Drop Counter is not automatically recognized, Go to the Experiment menu and under Set Up Sensors, select Show All Interfaces. Select the “DIG1” box and navigate to add Drop Counter. Click Identify, and the interface should ‘beep’ multiple times, signifying recognition of the drop counter.) In the Experiment menu under Calibrate, choose the channel the drop counter is plugged into (“DIG1:Drop Counter”). In the menu that appears select Automatic. Place a 10 mL graduated cylinder below the drop counter and directly underneath the spout of the reagent reservoir. Click Start. Open the bottom 2-way valve. Close when ~9 mL of water are in the graduated cylinder. Enter the precise volume of liquid in the graduated cylinder in the Volume (mL) box on the screen. Click “OK”. You now are ready to perform your titration experiments. pH probes Go to the Experiment menu and under Calibrate choose the channel the pH probe (ex: “CH1:pH”) is plugged into. In the window that appears make sure the Calibration tab is chosen and click on Calibrate Now. Rinse the pH meter with copious amounts of deionized water. Carefully blot dry. Dip the pH meter in less than 10 mL of pH 4 buffer. When the voltage reading stabilizes enter the pH value of the buffer in the field beneath “Enter Value”. Repeat the process with less than 10 mL of pH 10 buffer. To check the calibration, measure the pH of less than 10 mL of pH 7 buffer. If you want to use the calibration for the current session only, click “Done” to complete the calibration process. This new calibration becomes the current calibration for the sensor. Rinse the electrode with deionized water. You are now ready to measure the pH of samples. Please be careful with the pH probes! The round membrane at the bottom is fragile and should never be touched or dried out. Therefore, always make sure to replace the plastic container containing pH 4 / 3 M KCl buffer solution when finishing an experiment. Fragile Round Membrane pH Probe User Manual: http://www.vernier.com/files/manuals/ph-bta.pdf What to turn in At the end of this and all subsequent labs, sign all the pages on your electronic laboratory notebook, with proper dates, headings, data entries, plots, and accompanying calculations. A short formal post lab report is required this week. 6