1
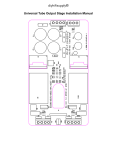
CUSTOMER POLE DISPLAY
PD2025-S and PD2029-S
USER MANUAL
TABLE OF CONTENTS
1. FEATURES
2. CARTON CONTENTS
3. INSTALLATION
4. FUNCTIONAL TEST
5. SOFTWARE COMMANDS
6. SPECIFICATIONS
FEATURES
1. Highly readable Bright Blue Vacuum Fluorescent Display technology.
2. 20 Character by 2 line display with 5mm(PD2025) or 9.5mm(PD2029) character height.
3. Adjustable dual axis viewing angle.
4. Integrated screen-saver scrolling message eliminates character burn-in.
5. Serial Interface with DB9 connector.
6. Host powered via spare floppy cable power cable.
CARTON CONTENTS
1.
2.
3.
4.
5.
6.
7.
Pole Display Head
Pole Stand
Mounting Bracket
Screw Set
Serial interface cable
Power Supply adapter Bracket
This Manual
IMPORTANT LEGAL NOTICE
Baird Technologies (Pty) Ltd makes no representations or warrantees, either expressed or implied, by
or with respect to anything in this manual, and shall not be liable for any implied warrantees of fitness
for a particular purpose or for any direct or indirect, special or consequential damages. Information
provided in this manual is subject to change without notice and does not represent any commitment on
the part of the manufacturer.
FCC NOTICE
This electronic device generates and can radiate radio frequency energy. If not installed and used in
accordance with this instruction manual, it may cause interference to radio communications. It has been
tested and found to comply with the limits for a Class A digital device pertaining to Subpart J of Part
15 of FCC Rules, which are designed to provide reasonable protection against interference when
operated in a commercial environment. Operation of this equipment in a residential environment is
likely to cause interference in which case the user will be required to take appropriate measures at own
expense to correct the interference.
INSTALLATION
1.
2.
3.
4.
5.
6.
7.
8.
Feed Serial Cable through Pole Stand from bottom with RJ45 connector going first.
Insert RJ45 connector into Socket in throat of Pole Display head until a pronounced ‘Click’ is felt.
Push exposed cable back down the stand and slip the Display Head into Pivot using the recessed
slots and raised hinge pins as a guide.
Insert the short countersunk M4 Machine screws into the Pivot and tighten only with mild torque
level.
The PD2025-S may be mounted onto any horizontal surface using the molded lugs and self-tapper
screws supplied. Take care to ensure that the Signal cable exits via the recess provided and does
not become trapped when fixing the base.
Should you prefer to mount the display against a vertical surface, an angled metal fixing bracket
has also been provided. Use the M4 bolts and nuts supplied to fix the Pole Base to the bracket. Use
the self-tapper screws supplied to fix the bracket to the vertical mounting surface.
In order to install the Power supply bracket inside the host PC, please consult your PC supplier’s
manual for the procedure for fitting add-on cards to your system. In any case ensure that all power
has been disconnected from the system! Once you have gained access to the inside of the case
mount the ISA adapter bracket in a spare position in the rear frame of the case. Plug the Floppy
style cable into a spare floppy disk drive power cable. Use an adapter splitter cable approved by
the supplier of your system should it be necessary to provide an additional power lead. Close the
case using your system’s manual as a guide.
Insert the DB9 connector into any available comport featuring a DB9 receptacle.
Plug the DC Power lead from the serial cable assembly into the socket of the Power Adapter
bracket just installed.
NOTE: Never insert or remove this connector whilst the PC is powered.
FUNCTIONAL TEST
This test procedure assumes the pole display is connected to COM1 of the computer. If COM2 is being
used, simply insert COM2 where COM1 is specified.
At the DOS Prompt:
Type “MODE COM1: 9600, N, 8,1” and press the ENTER key.
Type “ECHO ABCDEFGHIJKLMNO > COM1” and press the ENTER key. The display will show
“ABCDEFGHIJKLMNO” on the first line.
To test the download of scrolling messages to the PD2025-S Type:
“ECHO ^E My Message is Hello World > COM1” and press the ENTER key.
(^E is Ctrl + E keys or Alt + 5 on numeric keypad) The message will now scroll alternating between
the top and bottom lines.
SOFTWARE COMMANDS
(Noritake Emulation Mode. The numbers enclosed by brackets < > are hexadecimal)
1) Back Space: <08>
The cursor is moved one position to the left and the character previously at that positionis erased. If the
present position of the cursor is the first character of the first row, it moves to (and erases) the last
character of the second row. If the present position of the cursor is the first characterof the second row,
it moves to (and erases) the last character of the first row.
2) Horizontal Tab: <11> <09>
The cursor is moved one position to the right, cycling in the opposite sense to that for command <08>
above if at the end of row.
3) Vertical Scroll Up: <12> <09>
Moves the cursor one position to the Right. After writing the last character in the second row, all the
characters on the second row will move to the first row, leaving the second row blank with the cursor at
the first position of the second row.
4) Cursor Up/Down: <11> <0A>
Cursor moves up or down to the other row .
5) Line Feed: <12> <0A>
The cursor retains its position.. If the cursor is in the second row, the entire (second) row is
transferred to the first row and the second row is blanked.
6) Carriage Return: <0D>
Cursor move to leftmost position of current row.
7) Form Feed: <0C>
Cursor moves to current row leftmost position.
8)
Digit Select: <1B> <48> <P
Move cursor to position P, where P is a hex number representing the position of the digit.
Example: P = 00; first character in first row. P = 13 (Decimal 19) first character in second row. P = 27
(Decimal 39) last character of second row.
9) Cursor On:
<15>
<16>
Cursor lighted as Pixel . (This is the power on default)
Cursor invisible.
10) Reset: <1B> <49>
Erase all characters and return to power on conditions.
11) Clear: <0E>
Clears display. Cursor position unchanged.
12) Cursor Blinking Rate: <1B> <54> <n>
Where n = <0> to <0f> for example
n = <0>= cursor off
n = <1> = slow blink
n = <8> = normal (default)
n = <0f> = Fast blink
13) Scrolling Messages <05> <M>
Initialize scrolling message where M = <Message String> followed by Carriage return <0D> or NULL
terminator <0>
14) Set Scrolling message timeout: <1B> <06> <S>
Set Display Timeout where S = NR of seconds (max 255 sec’s)
SOFTWARE COMMANDS
(Futaba Emulation Mode. The numbers enclosed by brackets < > are hexadecimal)
1) Back Space: <08>
The cursor is moved one position to the left and the character previously at that positionis erased. If the
present position of the cursor is the first character of the first row, it moves to (and erases) the last
character of the second row. If the present position of the cursor is the first character of the second row,
it moves to (and erases) the last character of the first row.
2) Horizontal Tab: <11> <09>
The cursor is moved one position to the right, cycling in the opposite sense to that for command <08>
above if at the end of row.
3)
Vertical Scroll Up: <12> <09>
Moves the cursor one position to the Right. After writing the last character in the second row, all the
characters on the second row will move to the first row, leaving the second row blank with the cursor at
the first position of the second row.
4) Cursor Up/Down: <11> <0A>
Cursor moves up or down to the other row .
5) Line Feed: <12> <0A>
The cursor retains its position.. If the cursor is in the second row, the entire (second) row is
transferred to the first row and the second row is blanked.
6) Carriage Return: <0D>
Cursor move to leftmost position of current row.
7) Form Feed:
<0C>
Cursor moves to current row leftmost position.
8)
Digit Select: <10> <P
Move cursor to position P, where P is a hex number representing the position of the digit.
Example: P = 00; first character in first row. P = 13 (Decimal 19) first character in second row. P = 27
(Decimal 39) last character of second row.
9) Cursor On:
<13>
Cursor lighted as Pixel . (This is the power on default)
<14>
Cursor invisible.
10) Reset: <1f>
Erase all characters and return to power on conditions.
11) Scrolling Messages <05> <M>
Initialize scrolling message where M = <Message String> followed by Carriage return <0D> or NULL
terminator <0>
SPECIFICATIONS
Functional:
Character positions:
Character type:
Character Height:
Character Width:
Color:
Luminance:
Physical:
Mass:
Display Head:
Overall Height:
Electrical:
Environmental:
Operating Temperature:
Storage Temperature:
Relative Humidity:
Shock:
20 characters/line
2 lines
5 x 7 pixels
PD2025-S = 5.5 mm/PD2029-S 9.5mm
PD2025-S = 3.5 mm/PD2029-S 6.5mm
Blue
750 cd/ m2
1Kg
200mm(W) x 85mm(H) x 42mm(D)
615mm
Power supply 5 Volt @ 400mA(PD2025)
Power supply 12 Volt @ 450mA(PD2029)
0 – 50oC
-20 – 80oC
95% non-condensing
50G