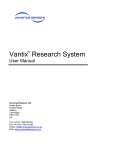
1
MiniSealer
User Manual
AXYGEN SCIENTIFIC, INC. 33170 CENTRAL AVENUE, UNION CITY, CA 94587 USA
tel: 510-494-8900 fax: 510-494-0700 e-mail: [email protected] web: www.axygen.com
distributed by
Table of contents
A – Introduction
page 3
B – Safety
page 3
C – Installation
page 3
D – Operation
page 4
E – Troubleshooting
page 5
F - Hints
page 6
G - Specifications
page 6
H - Technical Data
page 7
2
A Introduction
The ‘MiniSealer’ is a manual heat sealer, used for sealing any kind of microplate to prevent evaporation,
contamination or freezer burn.
It thermally bonds a number of different foils to microtitre, cell culture, PCR or even deep well plates.
The digital temperature and timer control allows user selection of parameters for different foils and
plates.
Because of the inbuilt Pressure Sensing Press (PSP), the system is able to exert the same force (150kg) in
each cycle, transferring heat evenly to the foil whether using shallow PCR plates or deep well plates – a
consistent seal, every time.
B Safety
YOU MUST READ THIS
1 Do not attempt to operate this system until you have read this manual thoroughly.
2 When any service or maintenance is being done, ensure that the power supply is off and power cord
removed.
3 Please be aware that the HEATER head stays HOT for up to one hour after the power supply is
disconnected.
4 Do not modify the system without our prior written approval.
5 Do not use the system for any other purpose than as described in the introduction.
6 Do not exceed 9.9 seconds or 200 °C on the time/temperature controllers.
7 The system weighs 68 lbs or 31 kgs – do not attempt to lift on your own.
C
Installation
1 Unpack the sealer carefully and place on a level stable surface that can withstand its weight. Do not
block ventilation openings.
2 Remove all other parts from the box – See H.
3 The sealing table is taped to the guide rails. Remove the tape and screw in the handle.
4 Fix the guide bracket to the right hand side front with u-shaped mounting bracket down using the
Allen screws provided – check that the sealing table moves freely from side to side.
5 Remove protective plastic film.
6 Plug in the power cord and switch to ‘ON’.
3
D Operation
The user can adjust both temperature and sealing time.
1 SET THE TEMPERATURE by pressing the
up/down arrows to the desired
temperature (SV). Press the SEL button
to store in memory. PV is the heating
plates actual temperature.
2 SET THE SEALING TIME by pressing the buttons relating to the digit you wish to change on the face
of the timer.Values increment only – going beyond 9 leads to a 0 !
When the desired value is shown, press reset (on this display) to store the time in memory.
NOTE Please take care here that the display is showing seconds and that only one decimal place is
showing. If this is not the case, increment the buttons until MODE 1 DOWN and RANGE are showing
on the display. Press the right hand button and cycle through 0 s, 0:00 min/s, 0:00 h/min, 0 hr, 0.000 s
and 0.00 s until reaching 0.0s. Press MODE (DOWN will flash), MODE (KP OFF will flash), and MODE.
You can now increment the time value by pressing the correct column button and press reset on this
display to store that value in memory.
3 Wait for 10 minutes after initial switch-on to allow the temperature to become stable at the set point.
4 Place plate on Sealing Table and position
the required foil (normally shiny side up)
on the microplate on the correct adaptor
on the sealing table.
5 Using the handle, slide the sealing table all
the way to the left to position it correctly
under the heater head.You will notice that
the safety guard door closes automatically.
4
6 Press the large green ‘START’ button.The heater head travels down to
contact and applies heat and pressure to the foil.You will see the time
display decrement to show seal time left.When that reaches zero, the
heater head will lift back to it’s original position.
NOTE: The user can interrupt the sealing cycle at any time by pushing
the large yellow reset button on the main panel.This is intended as a
safety device that lifts the heating head back to its start position should
there be a problem in the seal cycle identified by the user.
7 Move the sealing table to the right (opening
the door) and remove the sealed plate.
NOTE: Take care, as the foil may still be hot
– please allow to stand to cool before
processing/ piercing/ peeling or storing.
8 Apart from normal visual inspection, it is not recommended for users to service this machine –
cleaning should be done using a mild detergent and damp cloth only.
Please do not attempt to touch hot internal surfaces !
E Troubleshooting
Symptom
Possible cause
No lights or temperature display
Power not on
Power cord not plugged in
Blown fuse
No reaction when START pushed
Sealing table not in correct position under heater head
Parameters incorrectly set (see D)
Plate wells melted or damaged
Plate not on adaptor correctly
Temperature too low (see D1)
Seal time too short (see D2)
Plate is sealed too well
Temperature too high (seeD1)
Seal time too long (see D2)
Inconsistent sealing across plate
Plate warped (try increasing seal temperature and/or time)
Call Service Centre
Plate sticks and travels up with heater head
Foil upside down (see D4)
Temperature too high (see D1)
Seal time too long (see D2)
Heater head dirty (see D8)
5
F Hints
In our tests, best results have been found with the following parameters :MF – 100 Easy peel (100/pack) 150-170°C, 2-4 seconds
MF – 200 Durable (100/pack) 160-180°C, 2-5 seconds
MF – 300 Paper backed (100/pack) 125-140°C, 1-4 seconds
Please note that ideal conditions vary dramatically depending on plate type.
G Specifications
Dimensions (whd)
Weight
Power
US
Other
(inches)
(mm)
10 (allow 14) x 17 x 18
25 (allow 36) x 43 x 46
(lbs)
(kg)
68
31
120 VAC/60Hz
230 VAC/50Hz
Temperature
-- Room to 200°C in degree increments --
Time
Plate sizes
-- 0.1 to 10 seconds in 0.1 increments --- 128 x 86 mm base, up to 50 mm high --
Indoor use only
Up to 2000 metres above sea level
Only operate between 5 and 40°C
Only operate with less than 80% RH.
6
H Technical data
Drawing as before with these definitions
2 Timer
– Shows both
countdown
and set
values.
1
3
Start switch
– Push to
operate.
4 Reset switch
– Push to
cancel in
emergency.
Temperature
controller
– Shows both actual
and set values.
5 Adaptor
– PCR and microplate available for
different formats.
6 Power switch
– On/off
(illuminated)
13 Plexiglas safety guard
– Prevents hands from
being inserted into the
operational area.
12 Heater head
– The hot surface
that lowers and
makes contact with
the foil resting on
the microplate.
7 Safety gate
– Auto opening/
closing with
movement of
sealing table.
11 Sealing
plate guide
bracket bolt
– Used in
initial
installation.
10 Sealing
plate guide
bracket
– Used to support
and align sealing
table in operation.
9 Sealing
plate handle
– Used to
move sealing
table.
8 Sealing table
– Slides in and out
of right hand side
to allow transport
of microplate to
sealing position.
At Rear
14 Name/rating plate – Shows serial number etc.
15 Concentric plug – Country specific (S180 type, 15 A minimum)
7