1
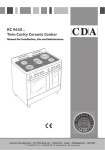
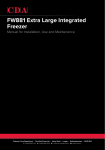
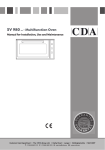
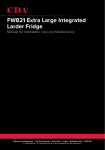
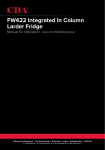
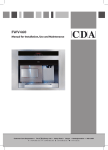
FW320 integrated under counter
larder fridge
Manual for Installation, Use and Maintenance
Passionate about style
Customer Care Department • The
Group Ltd. • Harby Road • Langar • Nottinghamshire • NG13 9HY
T : 01949 862 012 F : 01949 862 003 E : [email protected] W : www.cda.eu
6gb33033.fm Page 3 Thursday, June 10, 2004 2:34 PM
INSTRUCTIONS FOR USE
BEFORE USING THE REFRIGERATOR
PROTECTING THE ENVIRONMENT
PRECAUTIONS AND GENERAL
RECOMMENDATIONS
HOW TO USE THE REFRIGERATOR
COMPARTMENT
HOW TO USE THE LOW TEMPERATURE
COMPARTMENT
HOW TO DEFROST AND CLEAN THE LOW
TEMPERATURE COMPARTMENT
HOW TO CLEAN THE REFRIGERATOR
COMPARTMENT
CLEANING AND MAINTENANCE
ENERGY SAVING TIPS
TROUBLESHOOTING GUIDE
AFTER-SALES SERVICE
INSTALLATION
ELECTRICAL CONNECTION
3
6gb33033.fm Page 4 Thursday, June 10, 2004 2:34 PM
BEFORE USING THE REFRIGERATOR
In order to maximise the performance of your
refrigerator, carefully read the user
instructions and the attached product sheet,
which provide useful food conservation tips
and a description of the appliance. Keep this
booklet for future reference.
• The product you have purchased is an automatic
refrigerator, or a refrigerator with a low
temperature compartment (see attached
product sheet), and is for domestic use only.
The refrigerator compartment defrosts
automatically and is used for the preservation of
fresh foods and drinks.
The
low temperature
compartment, if featured, is used for the
conservation of deep-frozen and frozen foods
and for making ice-cubes; defrosting is manual.
1. After unpacking, check the refrigerator for
damage and make sure the doors close
properly. Any damage must be reported to the
retailer within 24 hrs of delivery.
2. Leave the appliance standing in a vertical
position for at least 2 hours before
connecting it to the power supply (to allow
the refrigerant circuit time to settle).
3. Make sure that the installation and electrical
connection are carried out by a qualified
technician in compliance with the
manufacturer’s instructions and local safety
regulations.
PROTECTING THE ENVIRONMENT
1. Packaging
The packaging material is 100% recyclable, as
confirmed by the recycling symbol. Follow local
regulations for waste disposal.
Keep potentially hazardous packaging (plastic bags,
polystyrene, etc.) out of the reach of children.
Information:
This appliance is free of CFC’s (refrigerant circuit
contains R134a) or free of HFC’s ( refrigerant circuit
contains R600a - Isobutane). For more details,
please refer to the rating plate on the appliance.
2. Product
The refrigerator has been manufactured using
recyclable materials. Follow local waste disposal
regulations when scrapping. Cut off the power
cable to prevent connection to the mains.
Dispose of the appliance at your local recycling
plant for refrigerant gases.
PRECAUTIONS AND GENERAL
RECOMMENDATIONS
• Only use the refrigerator compartment to
store fresh foods only and the low temperature
compartment to store deepfrozen foods and
making ice-cubes.
• Do not cover or close the air vents.
• Do not put glassware containers holding liquids in
the low temperature compartment since they
may explode.
• Do not eat ice-cubes or ice-lollies immediately
after taking them out of the low temperature
compartment, since they may cause cold-burns.
• To prevent the risk of trapping and suffocation,
do not allow children to play or hide inside the
refrigerator.
• Before cleaning or servicing the appliance,
always unplug it or switch off the mains
power supply.
4
• The power cable may only be replaced by
authorized personnel.
Declaration of conformity
• This appliance is designed to store food products
and complies with European Directive
89/109/EEC.
For appliances with Isobutane (R600a)
The refrigerant Isobutane is a natural gas of high
environmental compatibility but which is
inflammable. Therefore, it is essential to ensure that
the ducts of the refrigerant circuit do not get
damaged.
6gb33033.fm Page 5 Thursday, June 10, 2004 2:34 PM
HOW TO USE THE REFRIGERATOR
COMPARTMENT
This is an automatic refrigerator or refrigerator with
star low temperature compartment.
Refrigerator compartment defrosting is fully
automatic.
The refrigerator operates in an ambient temperature ranging
from +16°C to +32°C.
Switching on the refrigerator
Insert the plug in the mains socket. The thermostat allows
you to set the temperature inside the refrigerator
compartment without altering the conditions inside the low
temperature compartment.
Setting the temperature:
1. For correct operation and excellent storage results in
both compartments, set the thermostat between
positions 2 and 3.
2. To set the temperature inside the compartments, turn
the thermostat as follows:
•1-2 for a WARMER TEMPERATURE.
•3-4 for a COLDER TEMPERATURE.
Thermostat set to z: position: the appliance and lighting
switch off.
Note:
Ambient temperature, the frequency with which the doors
are opened and closed and the position of the appliance can
affect the temperature inside the two compartments. Adjust
the thermostat accordingly.
How to store food in the refrigerator
compartment
1. Store the food as shown in the adjacent illustration.
A Cooked food
B Fish and meat
C Fruit and vegetables
D Bottles
E Eggs
F Butter, cheese and other dairy products
Notes:
• Make sure the air circulates freely between the shelves
and the back wall of the refrigerator.
• Do not store food against the back wall of the
compartment.
• Store liquids in sealed containers.
• Vegetables with a high water content (e.g. lettuce) may
cause condensation to form in the bottom drawers and/
or on the middle shelves; this does not affect the correct
operation of the appliance. Nevertheless, it is advisable to
wrap vegetables before storing.
5
6gb33033.fm Page 6 Thursday, June 10, 2004 2:34 PM
HOW TO USE THE LOW TEMPERATURE
COMPARTMENT
If installed, the
star low temperature
compartment may be used to store frozen products for
the time indicated on the packaging.
When purchasing deep-frozen foods, check the
following:
• That the packaging is intact, since the food may have
deteriorated. If the package bulges or is marked by damp
patches, the product has not been correctly stored and
may have partially thawed.
• Purchase deep-frozen foods last and use insulated bags for
transportation.
• Place items in the low temperature compartment as soon
as you get home.
• Consume partially thawed food within 24 hrs.
• Avoid temperature variations as much as possible. Observe
the “best before” date on the packaging.
• Observe the instructions for preserving deepfrozen foods
written on the packaging.
How to make ice-cubes
• Fill the ice-tray 3/4 full of water and place it in the bottom
of the low temperature compartment.
If the ice-tray sticks to the bottom, do not use pointed
or sharp instruments to detach it.
HOW TO DEFROST AND CLEAN THE LOW
TEMPERATURE COMPARTMENT
To maximise performance, defrost the low
temperature compartment at least twice a year, or
when the layer of ice on the walls reaches 3 mm
thickness.
Defrost the compartment when the contents are low.
1. Open the door and take out all food items, wrapping
them in newspaper and placing them together in a cool
place or in an insulated bag.
2. Unplug the appliance from the mains.
3. Leave the door open to allow the frost/ice on the
compartment walls to melt.
4. Remove the defrost water with a sponge.
5. Clean with a sponge soaked in a solution of lukewarm
water and neutral detergent. Do not use abrasive
substances.
6. Rinse and dry thoroughly.
Note: to avoid causing irreparable damage, do not
use pointed or sharp metal instruments to scrape
off ice and do not artificially heat the low
temperature compartment.
6
6gb33033.fm Page 7 Thursday, June 10, 2004 2:34 PM
HOW TO CLEAN THE REFRIGERATOR
COMPARTMENT
Clean the refrigerator compartment regularly.
Refrigerator compartment defrosting is fully
automatic.
The formation of water droplets on the rear internal wall of
the refrigerator compartment indicates that the automatic
defrosting is underway. Defrost water is channelled to a
runoff and collected in a container, where it evaporates.
Clean the run-off channel regularly, using the supplied
instrument, in order to guarantee a continuous outflow of
defrost water.
Before cleaning, unplug the appliance from the mains.
• Use a sponge soaked in lukewarm water and/or neutral
detergent.
• Rinse and dry with a soft cloth. Do not use abrasive
materials.
CLEANING AND MAINTENANCE
• Clean the air vents regularly with a vacuum cleaner or a
brush.
• Clean the exterior with a soft cloth.
Prolonged disuse
1. Empty the refrigerator and low temperature
compartments.
2. Unplug the appliance from the mains.
3. Defrost the low temperature compartment, clean and
dry both compartments.
4. Leave the doors open to prevent the formation
unpleasant odours.
ENERGY SAVING TIPS
• Do not expose the appliance to heat sources,
direct sunlight, etc., since this will increase
energy consumption.
• Do not cover the vents or air outlets.
• When thawing food items, place them in the
refrigerator compartment to make use of the low
temperature.
• Keep the door open as little as possible.
• Do not put food in the refrigerator when still hot.
• Do not leave the low temperature compartment
door open.
7
6gb33033.fm Page 8 Thursday, June 10, 2004 2:34 PM
TROUBLESHOOTING GUIDE
1. The appliance does not work.
•Is there a power failure?
•Is the plug properly inserted in the socket?
•Is the double-pole switch on?
•Has the fuse blown?
•Is the thermostat set to z (Stop)?
2. Temperature inside the compartments is
not cold enough.
•Do the doors close properly?
•Is the appliance installed near a heat source?
•Is the thermostat correctly set?
•Is air circulation inhibited?
3. The temperature inside the refrigerator
compartment is too cold.
•Is the thermostat correctly set?
4. Water collects in the bottom of the
refrigerator compartment.
•Is the defrost water run-off clogged?
5. The internal light does not work.
First refer to point 1, and then:
•Unplug the appliance from the mains power
supply.
•Refer to the instructions and illustration on
the enclosed sheet to access the light-bulb.
•Check the bulb and replace if necessary.
(E14 type, 15W max).
6. Excessive formation of frost/ice in the low
temperature compartment.
•Is the low temperature compartment door
properly closed?
Notes:
• Gurgling or hissing noises inside the
refrigerating circuit are quite normal.
AFTER-SALES SERVICE
Before contacting our After-Sales Service:
1. Try to remedy the problem
(see “Troubleshooting guide”).
2. Restart the appliance to see if the fault repeats.
If the fault persists, switch off the appliance and
switch on again after an hour.
3. If the fault still persists, contact the After-Sale
Service and specify the following:
•the nature of the problem
•the model
•the service number (the number after
SERVICE on the rating plate located on the
side of the fruit and vegetable drawer)
•your full address
•your telephone number plus area code.
Note: changes to the door opening direction
carried out by our Customer Service are not
covered in the terms of the guarantee.
INSTALLATION
• Do not install the appliance near a heat source
(minimum distances: 30 cm from solid fuel or
gasoil stoves, 3 cm from electric ovens and hobs).
• Install the appliance in a dry and wellventilated
place.
• Do not cover the air vents.
• Clean the appliance interior (see relevant
chapters).
• Mount the accessories.
ELECTRICAL CONNECTION
• Electrical connections must be made in
accordance with local regulations.
• Voltage and absorption rates are indicated on the
rating plate.
8
• The appliance must be earthed as
prescribed by law. The manufacturer
declines all liability for personal injury or
damage to property or animals resulting
from failure to comply with the above
requirements.
• If the appliance plug and wall socket are
incompatible, the socket must be replaced by a
qualified electrician.
• Do not use extension leads or multiple adapters.
ELECTRICAL DISCONNECTION
• It must be possible to disconnect the appliance
from the mains by removing the plug or by
disconnecting a two-pole circuit breaker.
6gb33033.fm Page 9 Thursday, June 10, 2004 2:34 PM
ELECTRICAL CONNECTION
For Great Britain only
Warning - this appliance must be earthed
Fuse replacement
If the mains lead of this appliance is fitted with a
BS 1363A 13amp fused plug, to change a fuse in this type
of plug use an A.S.T.A. approved fuse to BS 1362 type and
proceed as follows:
1. Remove the fuse cover (A) and fuse (B).
2. Fit replacement 13A fuse into fuse cover.
3. Refit both into plug.
Important:
The fuse cover must be refitted when changing a fuse and
if the fuse cover is lost the plug must not be used until a
correct replacement is fitted.
Correct replacement are identified by the colour insert or
the colour embossed in words on the base of the plug.
Replacement fuse covers are available from your local
electrical store.
For the Republic of Ireland only
The information given in respect of Great Britain will
frequently apply, but a third type of plug and socket is also
used, the 2-pin, side earth type.
Socket outlet / plug (valid for both countries)
If the fitted plug is not suitable for your socket outlet,
Please contact Whirlpool Service for further instruction.
Please do not attempt to change plug yourself. This
procedure needs to be carried out by a qualified Whirlpool
technician in compliance with the manufactures
instructions and current standard safety regulations.
9
5019_102_00227
21-02-2006
15:01
Pagina 1
UNDER COUNTERS
D
GB
F
NL
E
P
I
GR
S
N
DK
FIN
PL
CZ
SK
H
RUS
BG
RO
Super SETMO SYSTEM
5019_102_00227
21-02-2006
15:01
Pagina 2
P2
min 40 mm
P2
N° 1
N° 2
3 mm
N° 5
N° 12 - Ø 3,5 x 14
5019_102_00227
21-02-2006
15:01
Pagina 3
Max: + 70 mm
5019_102_00227
21-02-2006
15:01
Pagina 4
5019_102_00227
21-02-2006
15:01
Pagina 5
G
1
2
2
G
3
8 x 3,5 x 14
(12)
1
2
5019_102_00227
21-02-2006
15:01
Pagina 6
L
M
1
2
3
R
4
R
R
R
5019_102_00227
21-02-2006
15:01
Pagina 7
S
S
T
T
U
5019_102_00227
21-02-2006
15:01
Pagina 8
2
N°2 Ø 3,5 x 14
1
5019_102_00227
21-02-2006
15:01
Pagina 9
V
V
N°2 Ø 3,5 x 14
Y
Y
X
5019_102_00227
21-02-2006
15:01
Pagina 10
5019_102_00227
21-02-2006
15:01
Pagina 11
X
X = 3 mm
57
116 - X
276
276
5019_102_00227
21-02-2006
15:01
Pagina 12
820
870*
100
150*
5019_102_00227
21-02-2006
15:01
Pagina 13
820
870*
100 ÷ 135*
150 ÷ 185*
b
100 + b
150 + b
5019_102_00227
21-02-2006
15:01
Pagina 14
820
870*
> 136
> 186*
35
600
135
185*
5019_102_00227
21-02-2006
15:01
Pagina 15
Max 30 mm
25
30
78
5019_102_00227
21-02-2006
15:01
Pagina 16
1
2
1
1
3
5
4
N° 5
5
6
5019_102_00227
21-02-2006
15:01
Pagina 17
4
3
2
1
5
6
5019_102_00227
21-02-2006
15:01
Pagina 18
1
3
2
4
6
5
7
5019_102_00227
21-02-2006
15:01
Pagina 19
To contact our Customer Care Department, or for Service,
please contact us on the details below.
Passionate about style
Customer Care Department • The
Group Ltd. • Harby Road • Langar • Nottinghamshire • NG13 9HY
T : 01949 862 012 F : 01949 862 003 E : [email protected] W : www.cda.eu