1
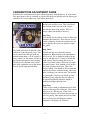
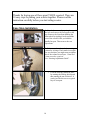
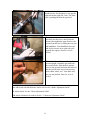
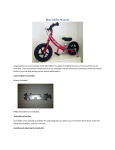
T-REX 601A/W
43CC GAS POWERED SCOOTER
USER MANUAL BOOK
1
Table of content
Important Safety Precautions
Quick Start Guide
Brake Adjustment Guide
Chain Adjustment Guide
Carburetor Adjustment Guide
Steering Column Adjustment
Trouble Shooting
Easy Step Installation
2
Important Safety Precautions
Please operate your scooter with the following safety instructions. This scooter should only be
ridden by persons with excellent vision, balance, coordination, reflex muscle tone, strength, and
the good reaction to sudden incident.
1. Please read the manual and all safety notice carefully, understand its functions,
maintenance and operating procedures completely before using the scooter.
2. Minor shall never operate this scooter without adult supervision.
3. Never operate your scooter on slick or unstable surfaces such as dampness or loss
gravel, etc.
4. Never operate your scooter on public road, street, or highway.
5. Never operate your scooter without wearing proper safety equipments.
6. Never operate your scooter under influence of alcohol, drug or magnet.
7. Never attempt wheelies, jumps, or other stunts.
8. Never operate your scooter on steep hill or inclines.
9. Do not turn at excessive speeds.
10. Always inspect your scooter prior to each use to make sure it is in safe condition. Follow
inspection and maintenance procedures in this manual.
11. Fuel is highly flammable. Keep it safe away from any source of fire.
12. Engine and muffler will get hot while using, don’t touch with hand.
Quick Start Guide:
Make sure that all cables are not binding and have good action. Check gas lines so they are
not too close to any moving parts. Make sure handlebar hinge is secure.
1. Fill fuel tank with premixed two-stroke (cycle) oil in it. We recommend a ratio of 32 to 1.
DO NOT use straight gas; engine will seize and can cause injury.
2. Prime the carburetor by pressing the bulb located on the bottom of the carburetor until
all air bubbles and fuel flow back to the tank through the clear line.
3. Place the choke (the lever located on the side of the air filter) in the "OFF" (up )
position (this does not mean the choke is off, it means the engine is off - the choke is
on in this position)
4. Pull the pull start to get the engine going. If this is your first or second time starting the
scooter, it may take 10-20 pulls to start it. This will get much easier after the scooter is
broken in. Do not yank on pull starter too hard. Short quick pulls will work fine; yanking
too hard will break pull starter.
5. Once the scooter is started, let the engine idle for a minute, and then Flip the choke to
the "ON" (lever down)position before the engine dies.
6. Give the engine a little throttle right after it starts to get it going. You may also have to
give it a little bit of throttle while pulling the pull start, although this often not necessary.
Press the kill button to stop the engine
And now you're good to go! Once your scooter gets broken in, it won't be necessary to turn
the choke on to start the scooter, and it won't take so many pulls to get it started. It does help
to pump the bulb under the carburetor every time just to get the fuel flowing through it, since
it dries up when it sits.
3
BRAKE ADJUSTMENT GUIDE
Often the disc brakes on our gas scooters will require adjusting. Do each step below and
check and see if the brakes are adjusted correctly after each step. There is no need to
complete all the steps if only one or two adjustments fix them. Usually the first
Step One:
This usually fixes any problems.
First turn the smaller hex bolt
circled above using a 2.5mm hex
wrench. There are two hex heads on
this same screw circled above. The
smaller 2.5mm one is hidden deep
beneath the larger 5mm one.
Step Two:
Usually Step One fixes most
problems, the next three steps help
fine tune the brakes. Loosen the
cable holder using a 5mm hex
wrench. Then use some pliers to
hold the cable, then move the arm
towards the engine, and retighten
the 5mm hex screw.
Step Three:
Turn the knob circled by hand as
shown in the picture.
Step Four:
Turn the silver piece circled above
by hand, then lock it in place by
turning the black piece until it is
closest to the hand lever just like in
the picture above.
4
Chain Adjustment Guide
Proper chain adjustment is important for performance and safety. If the chain is adjusted
too tightly it will bind and prematurely wear the chain and cause reduced performance. If
the chain is too loose it may jump teeth or fall off the sprocket.
STEP ONE:
Check the chain. See if there is some play
in the chain or if it feels too tight. Check
the top and bottom lengths and see if either
one deflects 1/4 to 1/2 inch with light
pressure. When you press on the chain it
should deflect about 1/4 to 1/2 of an inch.
Check both lengths of the chain. We have
found that most of the scooters arrive with
the chain too tight.
STEP TWO:
If adjustment is needed, loosen the bolt and
nut securing the band brake to the frame.
Just back it off a bit so it isn't too tight.
STEP THREE:
Loosen the large nuts securing the rear
axle. Loosen both sides just a little--maybe
one or two turns.
STEP FOUR:
Use the chain adjusters to move the wheel
back to tighten or forward to loosen the
chain. To use the adjusters, loosen the outer
nut and then turn the inner nut to the desire
position then tighten the outer nut back up
against the inner nut to lock it in place.
STEP FIVE:
Tighten everything back up and check the
chain again. Don't forget to tighten the axle
and band brake connection to the frame.
5
CARBURETORS ADJUSTMENT GUIDE
Sometimes the carburetors aren't quite adjusted correctly from the factory. If your scooter
isn't quite going as fast as it should, or it won't idle, then you probably need to adjust your
carburetor. It's easy to adjust one. Just follow these steps:
Step One:
Remove the air filter cover. This is the black
box located on the left side of the scooter,
towards the front of the engine. There is a
screw right in the middle to unscrew.
Step Two:
You should now be able to see the air filter and
behind it the carburetor. There are two screws
on the carburetor which you can adjust, the air
screw and the idle screw (see picture to right
for guide).
The small gold screw on the side of the
carburetor is the idle speed screw. This
screw controls the idle speed; the tip
should extend about a 1/8 of an inch (4
mm). Adjust it so the engine will idle at
just fast enough speed to stay running.
The black screw located lower on the
side of the carburetor next to the choke
lever is for the high speed mixture.
Step Three:
Usually the idle screw doesn't need any
adjustment. What usually needs adjustment is
the air screw. We've found screwing it all the
way in, and then out 3 1/2 turns is usually the
right setting. Start by turning this screw in
(clockwise) until it stops. Don't turn it in tight,
just until it stops. Next, turn the screw out two
full turns (counter-clockwise). This is the
factory setting. You should be able to start and
operate the scooter with this setting. Once you
have it running, you can fine tune. You should
try putting the scooter up on a brick or chair,
and then giving it throttle after you adjust it.
It's adjusted optimally when the engine is
making the highest pitched noise.
Step Four:
There is also a main jet adjustment screw dead
center on the top of the carburetor. This is most
always set at 1 full turn out. If this is not
adjusted correctly, your scooter may not run, or
run very poorly. Once again, turn screw all the
way in (clockwise) and then out (counterclockwise) 360 degrees (1 full turn).
6
Steering Column Adjustment:
To tighten:
Loosen small set screw on top nut, take big crescent wrench and turn nut clockwise. Be
careful not to over tighten. Lift the front of the scooter off the ground. Push the handle
bar in one direction or the other. It should swing freely. If it just stops and doesn't swing
in one direction then back again it is too tight.
To see if it is to lose:
Kneel in front of scooter, pick up front end of scooter by the fork with one hand, grab the
steering column below the release post with the other hand and rock back and forth.
You should not feel any play, if you do tighten as instructed above.
Gasoline / Oil Mixture
Tire pressure
Spark Plug Gap
Synthetic oils are the best to use in your scooter, along
with a standard grade octane pump gas.
A word on engine oil: 32: 1 is the recommended
mixture ratio. This ratio is dependant on the quality of
2-cycle premix oil used.
TIP: If using a high-quality synthetic oil such as
Maxima Castor 927 mix at 32:1 ratio for best
performance.
30 to 35 PSI
The rear tire tube valve is a little tricky to get to. The
easiest method is to pull the valve over with a
screwdriver and then thread on a valve extension
(available at any auto parts store). Adjust air pressure
as necessary and then remove valve extension.
024-.028 inches (.60-.70 mm)
7
I'm having trouble starting my
gas powered scooter.
What is the best way to start it?
On my scooter when I'm riding it
a lot of the time the chain just
falls off. How do I fix it?
What's the purpose of the small
plastic tube that says 40ml on it
that comes with the gas powered
scooter?
How do I mix the gas and oil?
How much oil do I put in?
Please read our starting guide first. If it still won't
start, you may need to adjust your carburetor.
Please read the section ‘adjust you carburetor” for
details.
It's usually very easy to fix. There are two reasons
it can happen:
1. If it happened when you were accelerating
it usually happens because the front and
rear sprocket are misaligned. To fix it you
need to remove the engine from the engine
mount, then adjust the engine mount (it can
slide once you loosen the bolts) to get the
sprockets in better alignment. This can be
done by loosening the three bolts on the
bottom of the engine. The idea is to get the
front and rear sprockets aligned in a
straight line.
2. Otherwise you might need to tighten the
chain, but usually the problem is #1. See
“Chain Adjustment Guide”.
40ml is how much two-stroke oil you need to mix
with 1 liter of gas. Please check your scooter's fuel
tank size. This might be how much oil you need
for a full tank. It is usually easier to get a gas tank
that holds a gallon or two and dedicate that to your
two-stroke engine. Then you'll always have gas/oil
mixed and ready.
Most of our scooters come with a 1 liter tank,
which means it's just 40ml (one canister) of 2stroke oil per tank of gas. Regardless of your tank
size, these instructions will work:
You fill a gas tank with one or two gallons and
leave a little room for oil, then dump in the right
amount of oil and slosh it around to mix it. Some
oils don't require as much as others for proper
lubrication. Follow what the oil bottle directions
instruct for mixing. Here is the basic mixing
formula for a gallon.
Here's how you do the math:
There are 128 oz of gas in a gallon. 1/25th of that
would be: 1/25*128 = 5.12 oz of oil needed.
8
The disc is straight but the brake
assembly is not. The front brake
is straight and works. Also the
cable pulls the lever and it hits
the engine. We tried adjusting the
cable with no results.
I filled gas, pressed the bulb.
Then I keep the thing off and pull
start and it does not start. What
is wrong?
When pull to start engine, it pulls
out but engine does not turn over.
Two or three tries and it engage
and engine turns over or starts.
What kind of maintenances
should I perform on my scooter?
What are the two tubes coming
from the gas tank to the
carburetor?
What kind of gas do I need to put
in a gas powered scooter?
Does the gas powered scooter
require any lubrication of the
transmission?
Try using the large adjustment cylinder... it is
silver... should fix the problem.
Please be sure that the two tubes from gas tank
installed to the right nipples under the engine. The
right order is that the black one goes on the curved
nipple and the clear goes on the straight.
If it still does not start, pump the primer bulb 10
times and put the choke in the up position and give
it 5-7 quick short pulls. It should start, if not, give
little throttle while pulling rope.
There is a problem with starter pawl. If your
scooter is still under the warranty, contact the
distributor for the replacement parts.
There is one maintenance check which is very
important. Make sure all of the bolts are
tightened before you go out riding. These
scooters vibrate quite a bit, which causes the bolts
to come loose. Specifically, check the front axel
bots, the engine mounts (located right beneath the
engine), the gas tank screws, the front fender screw
(if your scooter has a front fender), and the deck
screws. Also make sure the handlebar folding
mechanism is good and tight. You should also oil
the chain once in a while (not very often). 3-in-1
oil works great for that.
There are two tubes: one from the tank to the
carburetor and one going the other way.
The clear tube is the fuel return; The black tube is
the fuel supply. The black one goes on the curved
nipple and the clear goes on the straight one.
32 to 1 is the ratio recommended.
Doesn't matter what kinds of unleaded gas but
make sure you use two-stroke oil?
The 90 weight gear oil in the transmission should
not need changing for the life of the gas powered
scooter.
9
Thanks for buying one of these great T-REX scooters! There are
10 easy steps to putting your scooter together. Please read the
instruction carefully before you start riding scooter.
Easy Step Installation
1. Unpack the scooter by opening the top of
the box and remove the loose parts at the
top. Remove the Styrofoam holding the
front wheel by tipping it back toward the
rear of the scooter while you hold the
handle-bar post. Then remove the rear
Styrofoam.
2. Find your tools and attach the steering
column to its hinge. Don't make it too tight
for now but later you might want to tighten
this if the column is too loose. 13mm and
14mm wrenches required.
See “Steering Adjustment Guide”.
3. Lock the steering column in place
by rotating the locking bolt up and
then turning the nut clockwise. It
works just like the one on a typical
bicycle seat post.
10
4. Attach the handlebar ends with the
thumb screws. See the photo so you put the
right end on the right side. Note: The front
axle is pointing backwards as packed.
5. Attach seat post and seat. Insert the seat
post fully into the sleeve until it hits the
bottom, then tighten the strap. Remove the
scooter from the box by lifting the seat post
and handlebars. Turn handlebars forward
and lay the scooter on its right side (side
opposite the engine).5mm hex wrench
needed.
7. Put the kickstand down and bring the
scooter upright. Attach the gas tank with
the two hex bolts. Slide the hose springs
closer to the gas tank and route the hoses so
that they aren't in the way of any moving
parts (chain, wheel, etc.). Also make sure
they are not pinched. 8mm hex wrench
needed.
8. Adjust the brakes by tightening the adjustments at both ends of the brake cable until
the wheel still rolls but the brake works well. See the “Brake Adjustment Guide”
9. Adjust chain. See the “Chain Adjustment Guide”
10. Adjust Carburetor if needed. See the “ Carburetor Adjustment Guide”
11
SEA BEYOND INT’L INC
LOS ANGELES, CALIFORNIA
UNITED STATES OF AMERICA
12