Transcript
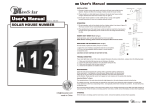
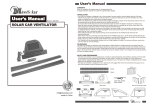
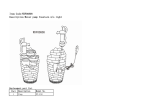
User’s Manual
TECHNICAL DATA
• Size: 320mm (Diameter) x 98mm (Height)
• Solar cell: Two solar cells,150x100x3mm - Peak Power output: 1.3Watt / 7V
• Operating voltage: 6 - 9V
• Fountain Height : Max. 45CM
User’s Manual
Model no.: MS-7402
SOLAR FLOATING FOUNTAIN
WITH PUMP
CAUTION
• This product works only on direct sunlight. Its performance (height of fountain) depends strongly on the strength of
sunlight that shines on its built-in solar cell. It is not designed to work under cloudy weather or at night.
• Prevent this product from floating into shadow, else it could not function properly. A rope and weight could be used in this
case to limit the floating range of the solar floating fountain.
• To avoid possible damage to this unit do not expose the solar cells to direct sunlight until the unit is placed in the
water source.
STORAGE
• Remove fountain sprinkle heads before storing.
• Take care to drain the water from fountain before storing.
• The original box serves as an excellent storage container.
• Store this fountain in a secure place out of direct sun light.
• It is not recommend to store this fountain in an area where the temperature falls below freezing point of 32 degrees.
MAINTENANCE
• Solar cell should be cleaned periodically with a soft cloth to ensure best performance.
• Filter cabinet should be washed with clean water periodically to make sure there is no dirt or debris blocking the flow.
• If the pump impeller becomes stuck, pull off the filter cabinet. Open the impeller cover by unscrewing it, and then clean
the impeller with clean water.
HOW TO USE
• Fountain requires a minimum of 6” of water to work.
• Submerge the solar fountain pump below the water surface, while still keeping the nozzle above the water so as to force
water to flow into the filter cabinet, and allow air to escape from the pumping system.
• Allow the solar fountain pump to operate for a minute before attaching sprinkle head onto the nozzle.
HOW TO REPLACE AN OLD PUMP
• Remove nozzle and sprinkle head from the base.
• Unscrews the pump from the base and remove the old pump by pulling it upwards
• Unscrews the junction cabin and remove the cabin cover.
• Locate the connection of the two wires. (One wire from the old pump, and the other one from base).
The connection is usually protected by an insulated tube and white resin.
• Cut off the connection and discard the old pump
• Cut two pieces of insulate heat shrink tube of 2cm each and slide them onto the two wires (one red, one black)
coming from the base. (One tube for each wire).
• Connect the wires coming from the base to the wires from the new pump with correct polarity. Red wire to red wire and
black wire to black wire
• Cover the connection with insulate heat shrink tube and shrink. A hair dryer is recommended for such purpose.
• It is recommended to soak the connection with silicone to prevent water from seeping into the connection
• Put all the wires back into the junction cabin and secure the cover with screws.
4
• Secure the new pump to the base with screws.
3
5
2
1
7
[email protected]
made in China
1. Solar cell 2. Nozzle 3. Sprinkle heads (Three pieces) 4. Filter cabinet 5. Impeller cover 6. Pump
6