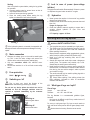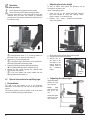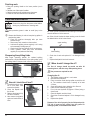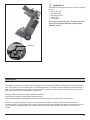
1
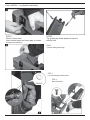
MODELS: LS600V- LS6000 COBRA LOG SPLITTER OWNER’S MANUAL Cobra LS600V - Log Splitter Description 1 2 3 4 5 6 Splitting blade Control arm-left Splitting table Motor On / Off-switch 8 9 Wheel Locking bolt 2 10 11 12 13 14 15 16 17 18 Control arm-right Control handle Clamping claw left Retaining pin Handle Stroke adjustment rod Holding screw Splitting cross Hydraulic valve 20 21 22 23 24 25 Safety label 1 Safety labelcap 2 with dip stick Oil tank Safety label 3 Safety label 4 Clamping claw right Star grip screw Cobra LS600V - Log Splitter Assembley STEP 1: Mount control arms Insert control arms and insert pipe in recess of cross con-nection. STEP2: Tip: grease the metal plates at top and bottom first! STEP3: Push the holding bolt through. STEP 4 Lock the holding bolt at the bottom. STEP 5 Mount the wheels 3 Cobra LS600V - Log Splitter Assembley Mounting the log rest: Depending on the length of the wood to be cleaved, the table can be mounted at three different heights. Locking bolts are available in every installation position. Fit the table into the appropriate mounting angles. Pay attention that the locking bolt is engaged. 4 Do not operate machine before having read the operating instructions, understood all the notes and assembly the machine as described here. Nobody else should be in the working area of the machine other than the operator. Keep other persons or animals out of the danger area (minimum distance 5 m). Keep the instructions in a safe place for future use. Wear hearing protection when working with the machine to protect your hearing. Contents Declaration of Conformity Spare parts / Description of device Assembly Product Inspection Symbols Proper use Residual risks Safe working Transport instructions Positioning Start-up Working with the log splitter Care and maintenance Guarantee Technical data Possible problems Wear face mask when working with the machine to protect the eyes from chips and splinters. 14 2 3 5 5 6 6 6 7 7 7 8 11 12 13 13 Wear safety gloves when working with the machine to protect the hands from chips and splinters. Wear safety shoes when working with the machine to protect the feet from falling logs. Keep your work space tidy! Untidiness may result in accidents. Oil is a fire hazard and can explode. Smoking and open fire are prohibited. Product Inspection Dispose of the old oil properly (local oil disposal point). The old oil must not be poured into the ground or drainage system, or mixed with other waste. Do not remove or modify any protection or safety devices. Caution! Active machine parts! ! ! After unpacking, check the contents of the box That it is complete Check for possible transport damage Always pay full attention to the splitting blade’s movement. Report any damage or missing items to your dealer, supplier or the manufacturer immediately. Complaints made at a later date will not be acknowledged. 1 ready mounted machine unit 1 control arm, right 1 control arm, left 2 wheels Hold the work piece when splitting with the clamping claw. 1 axle 1 bag of accessories 1 operating manual Symbols machine Read the operating and safety instructions thoroughly before commissioning the machine. Caution! Before starting any repair, maintenance or cleaning work, always switch off the motor and remove the plug from the socket. Cutting and crushing risk! Never touch dangerous areas when splitting blade is moving. Symbols machine / packaging Do not dispose of electrical devices as domestic waste. Dispose of devices, accessories and packaging by means of environmentally friendly recycling. According to the European Directive 2002/96/EC on electrical and electronic scrap, electrical devices that are no longer serviceable must be separately collected and brought to a facility for an environmentally compatible recycling. Symbols operating manual Do not remove jammed logs with your hands. L 5 Threatened hazard or hazardous situation. Not observing this instruction can lead to injuries or cause damage to property. Important information on proper handling. Not observing this instruction can lead to faults. User information. This information helps you to use all the functions optimally. Assembly, operation and servicing. Here you are explained exactly what to do. Proper use The log splitter must only be used for splitting logs. Only straight-cut logs are suitable for use with the log splitter. Foreign bodies (nails, wire, concrete etc.) must always be removed from the wood before it is split. The intended usage also includes compliance with the operating, servicing and repair conditions prescribed by the manufacturer and following the safety instructions included in the instructions. Any other use is deemed not to be use as prescribed. The manufacturer is not liable for any type of damage resulting from this: the user bears the sole risk. Unauthorised modifications on the log splitter exclude a liability of the manufacturer for damages of any kind resulting from it. Only persons who are familiarised with the device and informed about possible risks are allowed to prepare, operate and service this device. Repair works may only be carried out by us or by a customer service agent nominated by us. Residual risks Even if used properly, residual risks can exist even if the relevant safety regulations are complied with due to the design determined by the intended purpose. Residual risks can be minimised if the “Safe working” and the “Proper use” as well as the whole of the operating instructions are observed. Observing these instructions, and taking proper care, will reduce the risk of personal injury or damage to the equipment. Failure to observe the safety precautions can lead to injury to the operator or damage to property. Carelessness, failure to comply with the safety regulations and incorrect use can result in injuries to your hands and fingers when the splitting blade is moving. Risk from electricity, by using non-standard electrical connections. Touching live parts of opened electrical components. In addition, in spite of all the precautionary measures taken, non-obvious residual risks can still exist. Safe working Before commissioning this product, read and keep to the following advice. Also observe the preventive regulations of your professional association and the safety provisions applicable in the respective country, in order to protect yourself and others from possible injury. L Pass the safety instructions on to all persons who work with the machine. L Keep these safety instructions in a safe place. Be observant. Attend to what you do. Start working with care. Do not use the device when you are tired or under the influence of drugs, alcohol or medicaments. One moment of carelessness when using the device can result in serious injuries. Make yourself familiar with the equipment before using it, by reading and understanding the operating instructions. Do not use the machine for unsuitable purposes (see “Proper use” and “Working with the log splitter”). Ensure that you have stand in a secure standing position and maintain your balance at all times. Take up a working position which is close to the controls. Never stand on top of the machine. When working with the machine, always wear face mask safety gloves hearing protection safety shoes with steel toe-caps Wear suitable work clothing: do not wear any loose-fitting clothing or jewellery, since these may be caught or trapped by moving parts Within his area of work the operator is responsible for third parties. The machine may not be operated by children or young people under the age of 18. Keep children away form machine. Never operate the machine if other persons are in the immediate vicinity. Never leave the machine unattended. Keep your workplace in an orderly condition! Untidiness can result in accidents. Do not overload the machine! You work better and safer in the given performance range. Only operate the machine with complete and correctly attached safety equipment and do not alter anything on the machine that could impair the safety. Do not modify the machine or parts of it. Do not spray machine with water (this is hazardous due to live components). Do not leave the machine standing in the rain or use when raining. Store the unused machine in a dry locked place away from the reach of children. 6 Switch the machine off and remove the mains plug from the socket when carrying out repair works maintenance and cleaning work checking connecting lines, whether these are knotted or damaged removing faults transporting leaving unattended (even during short interruptions) Check the machine for possible damage Before continuing to use the machine, the protective devices must be inspected to ensure that they work perfectly and with their intended function Check whether the movable parts function perfectly and do not stick or whether the parts are damaged. All parts must be correctly installed and fulfil all conditions to ensure perfect operation of the machine. Damaged guards and parts must be properly repaired or exchanged by a recognized, specialist workshop; insofar as nothing else is stated in the instructions for use. Damaged or illegible safety warning labels should be replaced immediately. Electrical safety Electrical connections must conform to IEC 60245 (H 07 RN-F) with a cable cross-section of at least 230 V ~ 3 x 1.5 mm² for a maximum cable length of up to 10 m Never use the machine with a power supply cable of over 10 m in length. Longer power supply cables will cause a drop in voltage. The motor will not be able to provide its maximum performance and the operation of the machine will be impaired. Plugs and coupler outlets on connection cables must be made of rubber, plasticised PVC or other thermoplastic material of same mechanical stability or be covered with this material. The connector of the connection cable must be splashproof. When running the connection line observe that it does not interfere, is not squeezed, bended and the plug connection does not get wet. Wind off completely the cable when using a cable drum. Do not use the cable for purposes for which it is not meant. Protect the cable against heat, oil and sharp edges. Do not use the cable to pull the plug from the socket. Regularly check the extension cables and replace them if they are damaged. Do not use any defective connection cables. When working outdoors, only use extension cables especially approved and appropriately labelled for outdoor use. Do not set up any provisional electrical connections. Never bypass protective devices or deactivate them. 7 The electrical connection or repairs to electrical parts of the machine must be carried out by a certified electrician or one of our customer service points. Local regulations – especially regarding protective measures – must be observed. Repairs to other parts of the machine must be carried out by the manufacturer or one of his customer service points. Use only original spare parts. Accidents can arise for the user through the use of other spare parts. The manufacturer is not liable for any damage or injury resulting from such action. Transport Instructions Move the splitting blade right down every time before the machine is transported. To transport the machine, grasp the handle and tilt the log splitter slightly towards you. The log splitter can be easily transported in this position. transport belt Make sure that the oil tank cap is securely tightened to prevent oil from leaking during transport. Positioning Ensure that the working area meets the following conditions: no danger of slipping level free of obstacles sufficiently well lit Do not operate the machine in the direct vicinity of gas or petrol pipes or containers, or any other easily inflammable materials. Start-up Check that the machine is completely and correctly assembled. Before using the log splitter, make sure each time that there are no faulty connections (tears, cuts, etc.) Do not use defective power supply cables. there are no damages at the machine all screws are tight check the hydraulic system for any possible leaks the oil level Venting Vent the hydraulic system before putting the log splitter into operation. ! Unscrew venting screw by several turns so that air may escape from the oil tank. ! Leave the screw open during operation. ! Close the venting screw before moving the log splitter, as otherwise oil will leak at this point. L Lock in case of power (zero-voltage initiator) The equipment will switch off automatically if there is a power cut. Repress the green button to switch it on again. L Hydraulics Never operate the machine in the event of any possible danger from hydraulic fluid. Ensure that the machine and working area are clean and free of oil. Danger of slippage or fire! Check the hydraulic reservoir regularly to ensure that it contains enough hydraulic oil (see “Care and maintenance”). Capacity: approx. 4.0 litres Working with the log splitter oil cap Additional SAFETY INSTRUCTIONS L If the hydraulic system is not vented, the trapped air will damage the seals and cause permanent damage to the log splitter. L Mains connection Compare the voltage given on the machine model plate e.g. 230 V with the mains voltage and connect the machine to the relevant and properly earthed plug. Only use connection cables with sufficient crosssections. Connect the machine via a 30 mA fault current safety switch. L Fuse protection 230 V ~ Î 13 A time-lag L Switching on / off Prior to every use, check the function of the disconnection mechanism (by switching on and off). Do not use any device where the switch can not be switched on and off. Damaged switches must be repaired or replaced immediately by the customer service. The log splitter may only be operated by a single person. The machine may only be operated by persons over the age of 18 years, and who have read and understood these operating instructions. Wear protective equipment (safety goggles/mask, gloves, safety shoes) to protect yourself from possible injury. Never try to split logs containing nails, wire or other similar objects. Already split wood and wood chips create a dangerous working area. The operator may stumble, slip or fall. Always keep the working area neat and tidy. Never place the hands on or near any moving parts of the machine when it is switched on. Maintain a safe distance from the log, the ram and the wedge in order to protect your hands from injury. The machine should only be used for splitting logs with a maximum length of 1050 mm. L Check before splitting if the splitting column has been sufficiently lubricated to allow its trouble-free retraction and extension. What type of logs can I split? Size of logs Length: Diameter: max. 1050 mm min. 120 – max. 350 mm Press the green button. The log diameter is a recommended guideline figure, because: thin logs can be difficult to split if they contain knots or if the fibres are too strong. Switching off Do not try to split green logs. Dry logs are much easier to split, and do not cause jams as often as green (damp) wood. Switching on Press the red button. Hardwood tend to bursting: Exercise utmost caution! 8 Operation Two-hand operation Never operate the log splitter with two people. Never block the control handles (clamping claws). 1. Press the green switch on the electric motor. Wait a few moments until the motor has reached its operating revolutions and the required pressure has been built up in the hydraulic pump. L At temperatures below –5° C, let the log splitter run for at least 15 min. in neutral to heat up the oil. 2. Place the log on the log splitter table. L Only split the logs in the direction of the wood fibres. Hold the log tight with the clamping claws. 3. Press both operating handles down simultaneously: Î The splitting blade falls down and splits the log. 4. Release the two control handles, the splitting blade returns to its initial position. L If you only release one control handle, then the splitting blade remains where it is. Special instructions for splitting logs: Preparations: The logs to be split should be cut to the maximum dimensions. Ensure also that the logs are cut straight and square. Place the log properly on the log splitter, so as not to cause any risk of stumbling or falling to the operator. Adjusting the stroke height In case of shorter wood pieces the efficiency can be increased by shortening the return of the splitting cutter. 1. Place the log on the splitting table and press the two control handles to bring the splitting blade down to approx. 2 cm above the log. 2. Release one control handle so that the blade stays in this position. 3. Switch the machine off and disconnect the power. 4. Release the second control handle. 5. Shorten the return path at the rod fitted to the side by fixing the holding screw at the necessary height. Holding screw Adjusting the table height Upper table plate position for logs up to 540 mm Middle table plate position for logs up to 750 mm Lower table plate position for logs up to 1040 mm 9 1. Release the locking bolt. Splitting long wood: 1. Middle or low position of table or base. 2. Remove the splitting cross. 3. Place the log on the splitter’s table. L 2. Pull the table out. Possible malfunction when cleaving logs: The log to be cleaved is not cleaved right through, jams on the cleaving blade and is pulled up during the blade’s return movement. In this case, proceed as follows: 1. Switch off the device. 2. Depending on the log still to be cleaved fix the table plate in the middle or upper position. 3. Switch on the device and continue the splitting operation. Never try to split two logs at once. 3. Use the table in a position that comes close to the log length and secure it with the locking bolt. Adjusting the splitting cross: 1. Loosen star Star grip screw grip screw. 2. Move the splitting cross to the correct position (The star grip screw is Splitting beyond the cross borehole in the splitting blade). 3. Mount star grip screw. Splitting short wood: 1. Upper position of table plate. 2. Place the log on the splitter’s table plate. L Only split the logs in the direction of the wood fibres. 3. Hold the log tight with the clamping claws. Never try to remove or replace the log during the splitting process. L Never try to force the splitting of the log by maintaining the pressure for several seconds. This can lead to damage to the machine. Position the log on the table again and repeat the splitting phase, or put the log on one side. How to release a jammed log? There is a risk of knotted logs getting stuck during the splitting process. 1. Switch machine off and disconnect the power. 2. Do not remove jammed logs with your hands. 3. Carefully move the stuck log with a crowbar backwards and forwards to loosen it. Don´t damage the splitting pillar. Never hammer on the stuck log. Never use a saw to cut the stuck log out of the machine. Do not enlist the aid of a second person - this is a oneman job. 10 Finishing work: ¾ Bring the splitting blade to the lower position (run-in state). ¾ Release one of the control handles. ¾ Switch the machine off and disconnect the power. ¾ Follow the care and maintenance instructions. Care and maintenance Remove the plug from the power socket before starting any maintenance or cleaning work. dip stick Wear protective gloves in order to avoid injury to the hands. L Observe the following in order to keep the log splitter in good working order: Clean the machine thoroughly after you have finished using it. Remove any resin remains on the machine. Lubricate the splitting column regularly or oil it using environmentally friendly spray oil. Check the oil level and change the oil as necessary. Check hydraulic hoses and hose connections regularly for any leaks and firm fitting. Sharpening the splitting blade After longer operating periods, for reduced splitting performance or slight deformation of the cutting edge, grind the splitting blade or sharpen it with a fine file (remove burrs). If the oil level is between the two marking on the dipstick, there is sufficient oil in the reservoir. If the oil level is below the lower marking, more oil should be added with the aid of a clean funnel. Oil dip upper marking stick lower marking 6. Check the oil seal and replace it if it is damaged in any way. 7. Replace the dipstick into the oil reservoir. When should I change the oil? The first oil change should be carried out after 50 operating hours, and then every 500 operating hours. Two persons are required for this. Changing the oil: Sharpen wedges How do I check the oil level? 1. The splitting column must be in run-in state. Now remove the dipstick. 2. Clean the dipstick and the oil seal. 3. Replace the dipstick fully into the oil reservoir. 4. Now remove the dipstick again and read off the oil level. 1. The splitting column must be in run-in state. 2. Now remove the dipstick. 3. Place a container under the log splitter to catch the old oil. The container should have a capacity of at least 4.5 litres. 4. Screw off the drain plug to allow the oil to flow out. 5. Insert the seal and drain plug again. 6. Pour in the new hydraulic oil (approx.1.5 litres) using a clean funnel. 7. Clean the dipstick and the oil seal. 8. Check the oil seal and replace it if it is damaged in any way. 9. Replace the dipstick. Dispose of the old oil properly (local oil disposal point). The old oil must not be poured into the ground or drainage system, or mixed with other waste. 11 L Hydraulic oil We recommend the following hydraulic oils for the hydraulic cylinder: ¾ ¾ ¾ ¾ ¾ Shell Tellus T 22 Aral Vitam Gf 22 BP Energol HLP 22 Mobil DTE 11 or equivalent Do not use any other types of oil. The use of any other type of oil will adversely affect the operation of the hydraulic cylinder. drain plug Guarantee This product is warranted in accordance with legal regulations for a 24 month period effective from the date of purchase by the first user. This product will not be covered if used in a commercial application. This warranty covers all material or production failures, it does not include: defects from normal wear and tear, parts such as, bearings, brushes, cables, brake pad, clutch disc, tyre, wheel, belts, cutter blades, lubricant oils and grease or accessories. Damage or defects resulting from abuse, accidents or alterations, natural fading of painted or plated surfaces, sheet peeling and other natural deterioration. Any damage that occurs from the use of non-genuine Cobra parts will not be covered. We reserve the right to reject any claim where the purchase cannot be verified or when it is clear that the product was not maintained properly. (Clean ventilation slots, carbon brushes and serviced regularly) Expenses incidental to the warranty claim that are not covered. Any damage resulting from operating methods other than those indicated in the owner’s manual will not be covered. 12 Technical data LS600V - LS6000 6N Type Model Splitting force Log length Log diameter Stroke 60 kN (6 t) max. 1050 mm min. 120 mm – max. 300 mm | 500 mm Hydraulic oil (max.) Hydraulic pressure Electric motor performance (power consumption) Power supply 4.5 litres 20 MPa (200 bar) P1 3.0 kW S6 (4 min/6 min) 230 V~ 50 Hz, 13 A time-lag Weight approx. 100 kg Possible problems Problem Possible cause Remedy Logs are not being split The log is not positioned correctly. Reposition the log correctly. properly The log exceeds the maximum dimensions Cut the log to the required dimensions. (insufficient splitting or the wood is too hard for the performance performance). of the machine. Splitting blade does not split log. Sharpen splitting blade, check for burrs or notches. Hydraulic pressure too low. Check the oil level and add more oil if necessary. If the problem cannot be rectified, refer to the manufacturer or other approved service centre. Release rods bent (hydraulic tappet not Arrange for manufacturer or authorised company to adjust the rods. quite pressed in). Incorrect connecting lead (longer than 10 m Use the correct connecting lead. or too small cable cross-section). Splitting column moves Air in the circuit. Check the oil level and add more oil if necessary. unsteadily or with strong Splitting column not sufficiently lubricated or Lubricate splitting column or oil with vibrations. environmentally friendly spray oil. oiled. If the problem cannot be rectified, refer to the manufacturer or other approved service centre. Splitting column does not Hydraulic pump defective. To correct the problem, refer to the manufacturer move in. or other approved service centre. Motor starts, but splitting Motor turns in wrong direction Check the motor direction column does not move in. To correct the problem, refer to the manufacturer or other approved service centre. Motor will not start. No electrical power. Check the fuse. Connection cable defective. Replace the connection cable or have it checked by an electrician. Electric motor defective. To correct the problem, refer to the manufacturer or other approved service centre. 13 14. EC-DECLARATION OF CONFORMITY EC Declaration of Conformity We herewith declare, Cobra Garden Machinery Henton & Chattell Ltd, London Road, Nottingham NG2 3HW UK That the following machine complies with the appropriate basic safety and health requirements of the EC Directive based on its design and type, as brought into circulation by us. In case of alteration of the machine, not agreed upon by us, this declaration will lose its validity Machine Description: Log Splitter Machine Type: LS600V (LS6000) Name of Notified Body TÜV SÜD Industrie Service GmbH Ridlerstraße 57, 80339 München, Deutschland Applicable EC Directives 2006/42/EC 2006/95/EC 2004/108/EC Applicable Harmonized EN 60204-1:2006 + A1 Standards EN 609-1:1999 +A2 ZEK 01.4-08/11.11 EN 55014-1:2006+A1 EN 55014-2:1997+A1+A2 EN 61000-3-2:2006+A1+A2 EN 61000-3-11:2000 Authorized Signature/Date/Place Title of Signatory Name and address of the person authorized to compile the technical file Peter J. Chaloner 27-06-2015 Managing Director Cobra Garden Machinery Henton & Chattell Ltd, London Road, Nottingham NG2 3HW United Kingdom 14