1
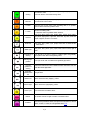
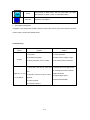
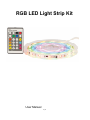
RGB LED Light Strip Kit
User Manual
1/4
Please read this manual carefully before using this controller.
Instructions for safety
Making sure you use the product perfectly and safely, please observe the instructions and warning
on this manual. Operate cautiously and read these instructions carefully.
1. For installation, try to avoid strong magnetic fields and high-pressure areas.
2. Ensure that the wire is connected correctly and firmly in order to avoid short-circuit damage to parts
and posing a fire hazard.
3. Please install controller in a well-ventilated place to ensure that the ambient temperature is moderate.
4. Before using this product, please check the DC power and voltage meet the product technical
requirements; positive and negative polarity is defined consistent to the product.
5. Prohibit live wiring, check to confirm wiring is correct, if no short-circuit, then power!
Specifications
Input power: DC12V
Output signal: SPI signal
Max load current: 5A
Drive IC number: 20—100pcs
Output power: 60W (12V)
(2)Descriptions for panel and remote controller keys:
Icon
Name of keys
Description
Key in the static mode increases or decreases the LED brightness
and IC number.
up/down
Keys in a dynamic mode increase / decrease speed.
OFF/ON
IC set
Opening
Turn on or off the LED’s
Enter the IC configuration mode, press this key all the lights bright
white
Static red, green, blue, yellow, green, purple, white Monochromatic
water by the middle of the left / right push effect.
2/4
Closing
The static mode of red, green, blue, yellow, green, purple, white
monochrome water
From both sides to the middle closing effect.
Colour
selection
Red, green, blue, yellow, cyan, purple, white seven kinds of
monochromatic colour select.
3 colour
Press this key to red, green, blue circulating flash, in a dynamic
mode for flicker selection gradient colour.
7 colour
16colour
Press this key for red, green, blue, yellow, cyan, purple, white
rainbow circulating flash
In a dynamic mode for gradient flicker selection.
Red, green, blue, yellow, cyan, purple, white, orange, deep yellow,
light yellow, light green, Light blue, dark blue, sky blue, blue and
purple, magenta, choice of 16 colours
Water left
Red, green, blue, yellow, cyan, purple, white color of eachk left the
water effect.
Water right
Red, green, blue, yellow, cyan, purple, white colour of each, right of
water.
Left gradient of
shining
From the left to the right of each IC 3 flashes lights and gradually
light up all IC after all the extinguishing effect.
Shining right
gradient
From right to left each IC3 flashes and gradually light effect.
Left total
gradient of
shining
From left to right each IC has 3 flashes lit after quenching, lit by out
all IC after all the light effect.
Right full
gradient flash
out
From right to left each IC has 3 flashes lit , lit by out all IC after all
the light effect.
Meteor left
Meteor across the left ( dripping ) effect.
Meteor right
Meteor across the right( driping ) effect.
water cycle
Around the water circulation effect.
Meteor
Gradient
The meteor from left to right to create a circulation effect.
Press this key transition effects, and press the CS button to choose
colour, 3 colour, 7 Colour,16 color gradient effect.重试
3/4
Flicker
Automatic
Press this key to flicker effect, and CS, press button can select
monochrome, tri-colour,7 colour, 16 colour flicker effect.
All patterns of circulation.
4. Key sequence description
Any pattern color changes are needed to enter the static mode, choose a good colour after the choice of
mode in order to achieve the desired results.
Troubleshooting
Failure
Analysis
Solution
1. No power.
1. Check the power
2. Reversed the polarity.
2. Make sure the polarity is right.
3. Wrong connection or poor contact.
3. Re-check the wire connection.
1. Input wire is too long to cause wire
1. Shorten wire or use loop circuit.
No light
2. Calculate the current, and then
loss.
replace thick wire.
Brightness of LED
2. Diameter of wire is too thin to cause
is not consistent
wire loss.
3. Replace larger power.
4.Add a power amplifier
3. Power overload.
4. Controller overload.
4/4