1
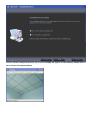
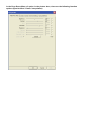
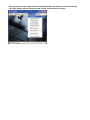
USB 2.0
WIRELESS WEBCAM
User Manual
DA-71814
Introduction
Thank you for using the wireless camera of a new generation. It can be of avail once it is inserted. It is the
ideal product for real-time wireless image transmission. Its appearance is exquisite and it is portable; both
the definition and the transmission speed are high. The camera is also equipped with built-in microphone,
which enables others to hear your voice when you are surfing online. Its wireless feature simplifies the
communication between you and your friends/relatives in remote places.
Graphic presentation:
Transmitting terminal
Receiving terminal
1 - Take photos, press Key/Code-matching key
2 - Power switch
3 - USB Interface for charging
4 - Power indicator light/Indication of charging/Indication of code-matching
5 - Microphone
6 - Receiving terminal inserted into computer
7 - Operation indicator light /Code-matching indicator light
8 - Code-matching key
Features
•
Digital 2.4GHZ, high-quality image compression
•
Wireless ideal distance 3M-5M
•
Working current about 80mA
•
Built-in battery 600mA/3.7V
•
It can work for about 6 hours after it is fully charged
•
COMS sensor, 300, 000 Pixels (640X480)
•
USB interface for charging
•
Built-in MIC.
•
Support XP/VISTA / 7 System, it can be of avail once it is inserted.
•
Support MSN/QQ/SKYPE Video Communication
•
Frame rate: 320X240, it can reach about 10 frames within 5m,
640X480, it can reach about 7 frames within 5m.
•
Support snapshot function
•
Adjustable of brightness, contrast and saturation is available
•
Software interpolation 5M (2560x1920)
System requirements
* PC or laptop with USB interface.
* Pentium 200 or higher CPU.
* Windows XP/VISTA System Software.
* Free space of over 20MB.
* CD—ROM Driver.
* Usable memory of over 32MB.
* Support DIRECTX VGA Display Card.
Code-matching
When conducting code-matching, insert USB receiver into the computer. At this moment, the red light
is on. Please press the key of the receiving terminal and release it until the red light of the receiving
terminal flickers. At the moment, switch on the power supply for the transmitting terminal, the red light
is on. Please press the key of the transmitting terminal until the red light of the receiving terminal stops
flickering. It indicates the code-matching is finished. At this moment, it is feasible to use CamApp to
open the image (CamApp is available only after the driver is installed). The red light of the receiving
terminal and the transmitting terminal will flicker for 5 times each second after the image is opened. If
code-matching for a second time is initialized, please operate following the same code-matching
method.
Charging
When it is in charging status, the green light of the USB wireless webcam is on. The green light of the
webcam will be off after the charging is completed. When voltage of the battery is lower than the
working voltage, the flickering of the red light will be extremely fast (about 20 times each second). At
this time please give the charging cable to the camera. When it is to be charged, only by inserting the
USB power cord into another side of the computer, the charging of the camera will begin. The time for
charging shall cover about 3 hours. It can work for 6 hours after one charging is completed.
Driver program installation
Please insert the driver cd in your cd rom drive “Drive/ Application”, the system will
automatically start the CD. Install the required files for your operating system. (Below is an
example of WINDOWS XP)
Choose Finish in the picture above, the icon of CamApp will appear on the desktop. Double-click it
as is shown in the picture below
In the Drop Down Menu of option in the picture above, there are the following function
options (Special effect / Frame / Interpolation)
Taking photos in static state under the Drop Down Menu of capture in the picture below
can reach 20 M. However, the photo has neither special effect nor frame.