1
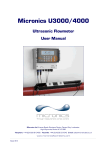
F89078VI-S/M
Dishwasher
Lave-vaisselle
User manual
Manuel d’instructions
PERFEKT IN FORM UND FUNKTION
CONTENTS
EN
CONTENTS
1
INTRODUCTION ........................................................................................................................ 5
2
DESCRIPTION AND USE OF THE CONTROLS.................................................................. 7
2.1
Upper panel................................................................................................................................. 7
2.2
Setting the washing program and switching on and off ............................................ 8
2.2.1
Switching on .............................................................................................................................11
2.2.2
Selecting and starting the program .................................................................................11
2.2.3
End of program ........................................................................................................................12
2.2.4
Interrupting a program .........................................................................................................12
2.2.5
Changing the current program ..........................................................................................12
2.2.6
Canceling the current program..........................................................................................13
2.2.7
Options .......................................................................................................................................13
2.2.8
Switching off .............................................................................................................................15
2.3
Additional features .................................................................................................................15
2.3.1
Adjusting the water softener ..............................................................................................15
3
ENERGY SAVING AND ENVIRONMENTAL RESPECT ..................................................17
3.1
Reducing the consumption of detergent and respecting the environment.....17
4
REMOVING THE DISHES .......................................................................................................18
5
TROUBLESHOOTING .............................................................................................................19
Rev 0.0
3
EN
4
Rev 0.0
INTRODUCTION
1
EN
INTRODUCTION
Thank you for choosing one of our products. To use this dishwasher correctly and safely, please read this manual carefully. The manual is divided
into sections giving you a step-by-step guide to all your appliance’s functions. The texts are easy to understand and are complete with detailed
illustrations. This user-friendly manual will provide answers to all your
questions about use of the dishwasher.
Before using this dishwasher, carefully read chapter 2 “Use and safety warnings” of the attached general manual.
For any other information about use and maintenance of the dishwasher,
read the enclosed general manual carefully.
This manual comprises the following sections:
INTRODUCTION: general information about the manual.
USER INSTRUCTIONS: advice on using the washing programs and information about all the dishwasher functions.
Nomenclature of figures and tables:
The progressive number of each figure is shown in the bottom right-hand
corner of the relative box. An example of a progressive number is “Fig.
4-01”, where the first number (4) indicates the section to which the figure
belongs, while the second number (01) indicates the progressive number
of the figure in section 4 (Fig. 4-01 is the first figure in section 4). The tables
are numbered in the same way, bearing in mind that “Tab.” is used instead
of “Fig.” (e.g.: Tab. 4-01 is the first table in section 4). If a table occupies
more than one page, a letter is added after the progressive number (e.g.:
“Tab. 4-01a”, Tab. 4-01b”).
Rev 0.0
5
INTRODUCTION
EN
Symbols used in this manual (see tab. 1-01)
DANGER. This symbol highlights information and warnings which, if not
observed, may compromise personal safety or damage the appliance.
This symbol highlights general information and warnings.
Tab. 1-01
6
Rev 0.0
USER INSTRUCTIONS
2
DESCRIPTION OF THE CONTROLS
2.1
Upper panel
EN
All the dishwasher controls are grouped on the upper panel (see fig. 2-01). The dishwasher can only be switched on, programmed, switched off, etc. with the door
open.
A brief description (see tab. 2-01) of the various controls on the upper panel is
given below.
FIG. 2-01
Rev 0.0
7
USER INSTRUCTIONS
EN
1
2
3
4
5
6
7
8
9
10
11
12
On/off button
Press to power the appliance.
Program indicator lights
These show which program is selected and whether there are any faults
(Troubleshooting).
Program selection button
Press in sequence to select the required program.
Add salt indicator light (only fitted on some models)
Shows the appliance has run out of salt.
Add rinse aid
(only fitted on some models)
Shows the appliance has run out of rinse aid.
Supplementary program button
Press to select one of the five supplementary programs (see table).
Supplementary program indicator light
Shows that one of the five supplementary programs will be run (see table).
Sanitation indicator light
Shows that the function is active.
Half-load wash button (only fitted on some models)
Press to select the half-load wash option.
Half-load indicator lights (only fitted on some models)
One of the lights shines to show that the half-load wash function has been selected in
the upper or lower rack.
Program delay button
(only fitted on some models)
Press to delay the start of the program up to 9 hours.
Display (only fitted on some models)
Tab. 2-01
2.2
Setting the washing program and switching on
and off
The dishwasher is equipped with a control panel (see fig. 2-02) which is used to
program the appliance and switch it on and off.
FIG. 2-02
8
Rev 0.0
USER INSTRUCTIONS
EN
To select the most suitable program for the dishes to wash, consult the following
table which specifies the most appropriate type of washing sequence depending
on the kind of dishes and how dirty they are (see tabs. 2-02a and 2-02b).
PROGRAM NUMBER AND DISHES AND
SYMBOL
CUTLERY
1
2
DISH
WARMING
CRYSTAL
AUTO SUPER
WASH
3
ETL SANITATION
LISTED
4
NORMAL
EXTREME
WASH
5
ETL SANITATION
LISTED
PROGRAM
SEQUENCE
Pans and
Rinse at 69°C
dishes to rinse
(156.2°F) Dry.
and dry
Wash at 45°C
(113°F)
Moderately Cold rinse.
dirty
Rinse at 69°C
(156.2°F)
Dry.
Cold pre-wash
(Depending of
the type of dirty)
Moderately
Wash at 65°C
dirty, including
(149°F).
dried-on
Cold rinse.
residue
Hot rinse at 70°C
(158°F).
Dry.
Cold pre-wash.
Wash at 55°C
(131°F).
Moderately
Cold rinse.
dirty
Rinse at 68°C
(154.4°F).
Dry.
Pre-wash at 45°C
(113°F).
Very dirty pans
Wash at 70°C
and dishes,
(158°F)
including
2 cold rinses
dried-on
Rinse at 70°C
residue
(158°F)
Dry.
TIME
MINUTES
(2)
CONSUMPTION
WATER ENERGY
(1)
kWh (2)
50’
3.9 l
1,03 gal.
0.64
70’
10.8 l
2.85 gal.
0,6
11-15 l
115’-130’ 2.91-3.96
gal.
1-1.2
112’
14,8 l
3.91 gal.
0.8
122’
18,3 l
4.83 gal.
1.12
Tab. 2-02a
Rev 0.0
9
USER INSTRUCTIONS
EN
PROGRAM NUMBER AND
SYMBOL
6
RINSE
7
SHORT
8
AUTO
DELICATE
9
ECONOMY
10
HEAVY
WASH
DISHES AND
CUTLERY
PROGRAM
SEQUENCE
Pans and dishes
waiting to be Cold pre-wash
washed
Wash at 38°C
(136.40°F)
Slightly dirty Cold rinse.
Rinse at 58°C
(136.4°F).
Cold pre-wash
(Depending of
the type of dirty)
Wash
Wash at 55°C
immediately (131°F).
after use
Cold rinse.
Hot rinse at 69°C
(156.2°F).
Dry.
Wash at 55°C
(131°F).
Wash
Cold rinse.
immediately
Rinse at 69°C
after use
(156.2°F).
Dry.
Wash at 70°C
Moderately dirty (158°F)
pans and dishes, 2 cold rinses.
including dried- Rinse at 70°C
on residue
(158°F)
Dry.
TIME
MINUTES
(2)
CONSUMPTION
WATER ENERGY
(1)
kWh (2)
16’
3.9 l
1.03 gal.
0.03
37’
10.6 l
2.8 gal.
0.38
105’-120’
11-15 l
2.91-3.96
gal.
0.8-1
123’
11,9 l
3.14 gal.
0.9
102’
15.1 l
3.99 gal.
1,0
Tab. 2-02b
(1) Average water consumption with the softener set to level 0 (zero).
Any other setting will increase water consumption till 2.5 l (0.66 gal.) / cycles with setting 5.
(2) The cycle times listed in the use and care manual are based on normal soil loads and 120°F (49°C)
incoming water and will vary based on your actual conditions.
- Only “AUTO SUPER WASH” and “EXTREME WASH” programs conforms to NSF std 184 and are certified
by INTERTEK with the ETL SANITATION LISTED.
- When the “Sanitized” light shine it means that the dishwasher and its contents have been sanitized
according to the requirements of the National Sanitation Foundation (NSF).
- When the “AUTO PROGRAMMES” are selected, the dishwasher recognizes the type of dirt and automatically adjusts the washing parameters as appropriate.
10
Rev 0.0
USER INSTRUCTIONS
EN
Only run the soak program with half loads.
To run programs 6, 7, 8, 9, 10 (see tab. 2-02b), select the required standard program (see programs 1, 2, 3, 4, 5 in tab. 2-02a) and then press the supplementary
program button (ref. 6 fig. 2-02).
After using the above tables to choose the most suitable washing cycle, program
the appliance.
Before starting a washing program, make sure that:
• The water supply tap is open.
• There is regenerating salt in the water softener tank (to add salt,
see the instructions in the general manual).
• The correct amount of detergent has been added to the dispenser (to add detergent, see the instructions in the general manual).
• The spray arms are able to rotate freely and without obstruction.
• The racks have been correctly loaded (see the instructions in the
general manual).
• The dishwasher door is securely closed.
2.2.1
Switching on
Press the on/off button (ref. 1 fig. 2-02) to start the dishwasher. Then wait for one
of the program indicator lights to turn on (ref. 2 fig. 2-02).
Rev 0.0
11
USER INSTRUCTIONS
EN
2.2.2
Selecting and starting the program
• Press the program selection button (ref. 3 fig. 2-02) several times until the indicator light corresponding to the required program turns on (ref. 2 fig. 2-02);
• if required, press the relative buttons to select any complementary functions
(e.g.: “half-load”, “program delay”; see para 2.2.7 “options”);
• close the door; the program will start after about 2 seconds and the relative
indicator light will flash throughout the cycle (program¬ running signal).
If the door of the dishwasher has not been closed or has been incorrectly
closed, the washing cycle will not begin.
SUPPLEMENTARY PROGRAMS
The supplementary program button (ref. 6 fig. 2-02) adds five extra programs to
the ones that can be directly selected with the program selection button.
Press the button (the indicator light turns on) after selecting the “main” program
(see 1, 2, 3, 4, 5 in tab. 2-02a).
As the function is memorized, press the button again (the indicator light turns
off ) if you wish to run one of the 5 main programs for the next cycle.
2.2.3
End of program
The end of the program is signaled by a short beep. Additionally the indicator
light of the normal and strong programs (marked “end”) flash.
2.2.4
Interrupting a program
To interrupt the current program simply open the door of the dishwasher; to restart the program, simply close the door again. The program restarts from where
it was interrupted.
2.2.5
Changing the current program
To change the current program, simply open the door of the dishwasher and select the new program. Close the door to run the new program automatically.
12
Rev 0.0
USER INSTRUCTIONS
2.2.6
EN
Canceling the current program
• To cancel the current program, open the door and press and hold down the
program selection button (ref. 3 fig. 2-02) for a few seconds until the indicator
lights of the fourth and fifth programs turn on (ref. pr. 4, pr. 5 fig. 2-03).
• Close the door again.
• After about 1 minute, the dishwasher terminates the cycle and the indicator
lights of the fourth and fifth programs (ref. pr. 4, pr. 5 fig. 2-03) start flashing.
pr. 4
pr. 5
FIG. 2-03
2.2.7
Options
HALF-LOAD
(available for all programs except soak)
This option is particularly suitable for reduced loads and saves on water and electricity.
Before selecting the half-load wash option, open the dishwasher door and choose the required washing program (see para 2.2 “Setting the washing program and
switching on and off ”).
The half-load wash cycle can be selected in two different ways using the halfload wash button (ref. 9 fig. 2-02):
• press the button once to select washing in the upper rack. This is confirmed
by the relative indicator light (ref. 10a fig. 2-02);
• press the button twice to select washing in the lower rack. This is confirmed
by the relative indicator light (ref. 10b fig. 2-02);
• press the button three times to return to the standard full load condition (washing in both racks, both indicator lights off ).
When washing in just the lower rack is selected, the cutlery basket can be separated and just half used.
Rev 0.0
13
USER INSTRUCTIONS
EN
PROGRAM DELAY
(available for all programs except soak)
The “Program delay” function delays the beginning of the washing program up
to 9 hours from the moment in which programming takes place. This makes it
possible to use the dishwasher at a certain time of day.
Before programming a delay, open the door of the dishwasher, select the required washing program (see para 2.2 “Setting the washing program and switching
on and off ”). Select the day by pressing the Program delay button (ref. 11 fig.
2-02); each time you press the button, the display increases the delay before the
appliance starts by 1 hour.
14
Rev 0.0
USER INSTRUCTIONS
2.2.8
EN
Switching off
At the end of the program, the dishwasher emits a short beep and the indicator
lights of the fourth and fifth program (ref. pr. 4, pr. 5 fig. 2-04) flash.
Turn off the appliance by opening the door and pressing the on/off button (ref.
1 fig. 2-02).
pr. 4
pr. 5
FIG. 2-04
2.3
Additional functions
2.3.1
Adjusting the water softener
N.B.: a different washing program from soak must be used to make the
following adjustment.
Press and hold down the program delay button (ref. 12 fig. 2-05) until the preset
value appears followed by a dot (normally 3.). Release the button and then press
it again and again until the required value is displayed, as indicated in the table
(see tab. 2-03).
The 6 possible adjustment levels will appear in this sequence:
3., 4., 5., 0., 1., 2..
When the required value appears on the display, release the button; after 5 seconds the appliance automatically reverts to the program delay and the adjustment
is set to the chosen value.
Rev 0.0
15
USER INSTRUCTIONS
EN
N.B.: the display indicates the water hardness adjustment and the program delay. A dot (.) after the number means that the water hardness
adjustment is being displayed. If no dot (.) appears, the program delay
is being displayed.
FIG. 2-05
Water hardness table (see tab. 2-03)
WATER HARDNESS
French degrees (°F)
American degrees
grains/galls
SETTING
German degrees (°D)
0-4
0-7
0 - 4.5
0.
5 - 15
8 - 25
4.6 - 14.5
1.
16 - 23
26 - 40
14.6 - 23.5
2.
24 - 31
41 - 60
23.6 - 35
3.
32 - 47
61 - 80
35.1 - 46.5
4.
48 - 58
81 - 100
46.6 - 58.5
5.
Tab. 2-03
Contact your local water board for information on the hardness of your water
supply.
If it is necessary to open the door during the washing cycle, the program
will be interrupted, the relative indicator light will continue to flash and
a beep will indicate that the cycle has not terminated. Wait for about 1
minute before closing the door and continuing with the program. When
the door closes, the program will start from where it was interrupted. This
operation should be performed only if necessary as it could cause irregular program performance.
16
Rev 0.0
USER INSTRUCTIONS
3
EN
ENERGY SAVING AND ENVIRONMENTAL
RESPECT
•
•
•
•
•
Always try to run the dishwasher fully loaded.
Do not wash the dishes under a running tap.
Use the most suitable washing program for each type of load.
Do not pre-rinse.
If available, connect the dishwasher to a hot water system with a temperature
of up to 60°C (140°F).
• When possible, skip the drying cycle by opening the door after washing: the
air and the residue heat will dry the dishes to perfection.
3.1
Reducing the consumption of detergent and
respecting the environment
The phosphates contained in dishwasher detergents are harmful to the environment. To avoid using excessive amounts of detergent and to save on electricity:
• Separate the more delicate items from those that are more resistant to aggressive detergents and high temperatures;
• Do not pour the detergent directly onto the dishes.
Rev 0.0
17
USER INSTRUCTIONS
EN
4
REMOVING THE DISHES
At the end of the washing program, wait at least 20 minute before removing the dishes in order to allow them to cool. To prevent any water
droplets on the upper rack from falling onto the dishes in the lower rack,
empty the lower rack first and then the upper one.
18
Rev 0.0
USER INSTRUCTIONS
5
EN
TROUBLESHOOTING
The dishwasher can to signal a number of malfunctions by turning on various
indicator lights, as described below (see following table):
FAULT
E1
E2
E3
E4
E5
DESCRIPTION
Acquastop failure
The anti-flooding system has tripped (only for models
fitted with this feature). Activates in case of water leaks.
Contact the technical assistance service.
Safety level
The system limiting the water level in the dishwasher
has tripped. Interrupt the current program. Switch off
the dishwasher, switch it back on again, program a new
cycle and press start. If the problem persists, contact the
technical assistance service.
Water heating malfunction
The water is not heated or is incorrectly heated. Repeat
the washing program; if the problem persists, contact the
technical assistance service.
Water temperature monitoring malfunction
Interrupt the current program. Switch off the dishwasher,
switch it back on again, program a new cycle and press
start. If the problem persists, contact the technical
assistance service.
Water intake malfunction
The appliance does not take in water or does so
incorrectly. Make sure the water connections are correct,
that the water supply tap is open and that the filter is not
clogged. If the problem persists, contact the technical
assistance service.
Tab. 5-01a
Rev 0.0
19
USER INSTRUCTIONS
EN
FAULT
E6
E7
E8
E9
DESCRIPTION
Water pump-out malfunction
The appliance does not pump out the water or does so
incorrectly. Make sure the drain hose is not kinked or
crushed and that the siphon and filters are not clogged.
If the problem persists, contact the technical assistance
service.
Turbine flow-regulator malfunction
(only for models fitted with this feature)
The appliance is unable to precisely measure the quantity
of incoming water. Interrupt the current program and
switch off the dishwasher. Switch it back on again,
program a new cycle and press start. If the problem
persists, contact the technical assistance service.
Alternate washing system malfunction
Interrupt the current program and switch off the
dishwasher. Switch it back on again, program a new
cycle and press start. If the problem persists, contact the
technical assistance service.
Water intake system malfunction
Contact the technical assistance service.
Tab. 5-01b
Light off
Light on
Light flashing
If an alarm situation occurs, the dishwasher interrupts the current program and
signals the fault.
• Alarms E1, E2, E3, E4, E8, E9 immediately terminate the current program.
• Alarms E5, E6 interrupt the current program and, after the problem has been
eliminated, resume the cycle.
• Alarm E7 is displayed at the end of the cycle which, however, is completed
given that it does not jeopardize the operation of the dishwasher.
To “reset” an alarm:
• open or close the door, or switch the appliance on and back off again. At this
point, the dishwasher can be programmed again.
If the fault persists, contact the Authorized Technical Assistance Service.
20
Rev 0.0