1
DocBook to LaTeX Publishing
i
DocBook to LaTeX Publishing
User Manual
Ref A1 Ed. 08
DocBook to LaTeX Publishing
ii
COLLABORATORS
TITLE :
REFERENCE :
DocBook to LaTeX Publishing
Ref A1
ACTION
NAME
DATE
SIGNATURE
WRITTEN BY
Benoît Guillon
6 August 2015
REVIEWED BY
Andreas Hoenen
6 August 2015
REVISION HISTORY
NUMBER
DATE
DESCRIPTION
NAME
01
2009/05/05
The manual does not include the change history
anymore. The change history is now in the
release note. The XSL Parameters are now
described as reference entries.
B. Guillon
02
2009/06/21
Add a section about the new set support, and a
section about how to extend the verbatim
rendering.
B. Guillon
03
2011/07/03
Add a section about the new HTML table support,
and a section about the PyPI distribution.
B. Guillon
04
2012/04/10
Update documentation for release 0.3.3.
B. Guillon
05
2012/06/03
Update documentation for release 0.3.4.
B. Guillon
06
2014/05/26
Update documentation for release 0.3.5.
B. Guillon
07
2015/05/15
Update documentation for release 0.3.6: add the
ability to use a texpost python plugin, and new
index capabilities.
B. Guillon
08
2015/08/06
Update documentation for release 0.3.7: add
section Section 4.5.
B. Guillon
DocBook to LaTeX Publishing
iii
DocBook to LaTeX Publishing
iv
Contents
1
2
3
Documentation
1
1.1
1
Reference . . . . . . . . . . . . . . . . . . . . . . . . . . . . . . . . . . . . . . . . . . . . . . . . . . . . . . .
Introduction
2
2.1
What about DB2LaTeX? . . . . . . . . . . . . . . . . . . . . . . . . . . . . . . . . . . . . . . . . . . . . . . .
2
2.2
Features . . . . . . . . . . . . . . . . . . . . . . . . . . . . . . . . . . . . . . . . . . . . . . . . . . . . . . . .
2
2.3
Version . . . . . . . . . . . . . . . . . . . . . . . . . . . . . . . . . . . . . . . . . . . . . . . . . . . . . . . .
3
2.4
Change History . . . . . . . . . . . . . . . . . . . . . . . . . . . . . . . . . . . . . . . . . . . . . . . . . . . .
3
2.5
Publishing Principles . . . . . . . . . . . . . . . . . . . . . . . . . . . . . . . . . . . . . . . . . . . . . . . . .
3
2.5.1
Backend Drivers . . . . . . . . . . . . . . . . . . . . . . . . . . . . . . . . . . . . . . . . . . . . . . .
4
2.5.2
XSL Stylesheets . . . . . . . . . . . . . . . . . . . . . . . . . . . . . . . . . . . . . . . . . . . . . . .
4
2.5.3
Python Post Processing . . . . . . . . . . . . . . . . . . . . . . . . . . . . . . . . . . . . . . . . . . . .
4
2.5.4
LaTeX Style Package . . . . . . . . . . . . . . . . . . . . . . . . . . . . . . . . . . . . . . . . . . . . .
4
Installing the Package
5
3.1
Content . . . . . . . . . . . . . . . . . . . . . . . . . . . . . . . . . . . . . . . . . . . . . . . . . . . . . . . .
5
3.2
Installing on Unix like Systems . . . . . . . . . . . . . . . . . . . . . . . . . . . . . . . . . . . . . . . . . . . .
5
3.2.1
Dblatex Packages . . . . . . . . . . . . . . . . . . . . . . . . . . . . . . . . . . . . . . . . . . . . . . .
5
3.2.2
Dependencies . . . . . . . . . . . . . . . . . . . . . . . . . . . . . . . . . . . . . . . . . . . . . . . . .
6
3.2.3
Installation . . . . . . . . . . . . . . . . . . . . . . . . . . . . . . . . . . . . . . . . . . . . . . . . . .
6
3.2.3.1
Installing the dependencies . . . . . . . . . . . . . . . . . . . . . . . . . . . . . . . . . . . .
6
3.2.3.2
Installing from the source tarball . . . . . . . . . . . . . . . . . . . . . . . . . . . . . . . . .
6
3.2.3.3
Installing from the Python Egg . . . . . . . . . . . . . . . . . . . . . . . . . . . . . . . . . .
7
Installing on Windows . . . . . . . . . . . . . . . . . . . . . . . . . . . . . . . . . . . . . . . . . . . . . . . .
7
3.3.1
Dependencies . . . . . . . . . . . . . . . . . . . . . . . . . . . . . . . . . . . . . . . . . . . . . . . . .
7
3.3.2
Installation . . . . . . . . . . . . . . . . . . . . . . . . . . . . . . . . . . . . . . . . . . . . . . . . . .
7
3.3.2.1
Installing xsltproc . . . . . . . . . . . . . . . . . . . . . . . . . . . . . . . . . . . . . . . . .
7
3.3.2.2
Installing MiKTeX . . . . . . . . . . . . . . . . . . . . . . . . . . . . . . . . . . . . . . . . .
7
3.3.2.3
Installing dblatex . . . . . . . . . . . . . . . . . . . . . . . . . . . . . . . . . . . . . . . . .
8
3.3
DocBook to LaTeX Publishing
v
4
Using dblatex
9
4.1
Reference . . . . . . . . . . . . . . . . . . . . . . . . . . . . . . . . . . . . . . . . . . . . . . . . . . . . . . .
9
dblatex . . . . . . . . . . . . . . . . . . . . . . . . . . . . . . . . . . . . . . . . . . . . . . . . . . . . . . . . .
9
4.2
4.3
Output Formatting Style . . . . . . . . . . . . . . . . . . . . . . . . . . . . . . . . . . . . . . . . . . . . . . . 12
4.2.1
How it works . . . . . . . . . . . . . . . . . . . . . . . . . . . . . . . . . . . . . . . . . . . . . . . . . 12
4.2.2
Adding a New Formatting Style . . . . . . . . . . . . . . . . . . . . . . . . . . . . . . . . . . . . . . . 13
Publishing Outputs . . . . . . . . . . . . . . . . . . . . . . . . . . . . . . . . . . . . . . . . . . . . . . . . . . 13
4.3.1
Publishing a single document . . . . . . . . . . . . . . . . . . . . . . . . . . . . . . . . . . . . . . . . 13
4.3.2
Publishing a Set of Books . . . . . . . . . . . . . . . . . . . . . . . . . . . . . . . . . . . . . . . . . . 14
4.4
Global Page Setup . . . . . . . . . . . . . . . . . . . . . . . . . . . . . . . . . . . . . . . . . . . . . . . . . . . 15
4.5
Chapter and Section numbering . . . . . . . . . . . . . . . . . . . . . . . . . . . . . . . . . . . . . . . . . . . . 16
4.6
4.7
4.5.1
Depth of Section numbering and Table Of Content . . . . . . . . . . . . . . . . . . . . . . . . . . . . . 16
4.5.2
Using the latex style for section numbering . . . . . . . . . . . . . . . . . . . . . . . . . . . . . . . . . 17
4.5.3
Using the label attribute . . . . . . . . . . . . . . . . . . . . . . . . . . . . . . . . . . . . . . . . . . 18
Figure Inclusion . . . . . . . . . . . . . . . . . . . . . . . . . . . . . . . . . . . . . . . . . . . . . . . . . . . 18
4.6.1
Presentation . . . . . . . . . . . . . . . . . . . . . . . . . . . . . . . . . . . . . . . . . . . . . . . . . 18
4.6.2
Converting on the fly
4.6.3
Paths Lookup . . . . . . . . . . . . . . . . . . . . . . . . . . . . . . . . . . . . . . . . . . . . . . . . 19
. . . . . . . . . . . . . . . . . . . . . . . . . . . . . . . . . . . . . . . . . . . . 19
Creating Tables . . . . . . . . . . . . . . . . . . . . . . . . . . . . . . . . . . . . . . . . . . . . . . . . . . . . 20
4.7.1
Limitations . . . . . . . . . . . . . . . . . . . . . . . . . . . . . . . . . . . . . . . . . . . . . . . . . . 20
4.7.2
Table Width . . . . . . . . . . . . . . . . . . . . . . . . . . . . . . . . . . . . . . . . . . . . . . . . . . 20
4.7.3
Tables without colwidth . . . . . . . . . . . . . . . . . . . . . . . . . . . . . . . . . . . . . . . . . . . 20
4.7.4
Tables with mixed colspec . . . . . . . . . . . . . . . . . . . . . . . . . . . . . . . . . . . . . . . . . . 21
4.7.5
Tables with proportional and fixed colwidth . . . . . . . . . . . . . . . . . . . . . . . . . . . . . . . . . 21
4.7.6
Tables with fixed colwidths . . . . . . . . . . . . . . . . . . . . . . . . . . . . . . . . . . . . . . . . . . 22
4.7.7
Automatic Column Width . . . . . . . . . . . . . . . . . . . . . . . . . . . . . . . . . . . . . . . . . . 22
4.7.7.1
Global Setting . . . . . . . . . . . . . . . . . . . . . . . . . . . . . . . . . . . . . . . . . . . 22
4.7.7.2
Local Setting . . . . . . . . . . . . . . . . . . . . . . . . . . . . . . . . . . . . . . . . . . . . 23
4.7.8
Informal Table LaTeX Styles . . . . . . . . . . . . . . . . . . . . . . . . . . . . . . . . . . . . . . . . . 24
4.7.9
Tables with morerows . . . . . . . . . . . . . . . . . . . . . . . . . . . . . . . . . . . . . . . . . . . . 25
4.7.10 Landscape tables . . . . . . . . . . . . . . . . . . . . . . . . . . . . . . . . . . . . . . . . . . . . . . . 25
4.7.11 Smaller tables . . . . . . . . . . . . . . . . . . . . . . . . . . . . . . . . . . . . . . . . . . . . . . . . . 27
4.7.12 Coloured tables . . . . . . . . . . . . . . . . . . . . . . . . . . . . . . . . . . . . . . . . . . . . . . . . 27
4.7.13 HTML Tables . . . . . . . . . . . . . . . . . . . . . . . . . . . . . . . . . . . . . . . . . . . . . . . . . 28
4.8
Writing Mathematics . . . . . . . . . . . . . . . . . . . . . . . . . . . . . . . . . . . . . . . . . . . . . . . . . 30
4.8.1
Writing LaTeX Mathematical Equations . . . . . . . . . . . . . . . . . . . . . . . . . . . . . . . . . . . 30
4.8.1.1
Presentation . . . . . . . . . . . . . . . . . . . . . . . . . . . . . . . . . . . . . . . . . . . . 30
4.8.1.2
Implementation choice . . . . . . . . . . . . . . . . . . . . . . . . . . . . . . . . . . . . . . 30
4.8.1.3
Compatibility . . . . . . . . . . . . . . . . . . . . . . . . . . . . . . . . . . . . . . . . . . . 30
DocBook to LaTeX Publishing
4.8.1.4
4.8.2
4.9
vi
Examples . . . . . . . . . . . . . . . . . . . . . . . . . . . . . . . . . . . . . . . . . . . . . 30
Writing MathML equations . . . . . . . . . . . . . . . . . . . . . . . . . . . . . . . . . . . . . . . . . 32
Extending the Verbatim Rendering . . . . . . . . . . . . . . . . . . . . . . . . . . . . . . . . . . . . . . . . . . 32
4.9.1
Dblatex Specific Options . . . . . . . . . . . . . . . . . . . . . . . . . . . . . . . . . . . . . . . . . . . 32
4.9.2
Scaling Feature . . . . . . . . . . . . . . . . . . . . . . . . . . . . . . . . . . . . . . . . . . . . . . . . 32
4.9.3
Formatting embedded elements . . . . . . . . . . . . . . . . . . . . . . . . . . . . . . . . . . . . . . . 33
4.9.4
Creating a new Verbatim Environment . . . . . . . . . . . . . . . . . . . . . . . . . . . . . . . . . . . . 34
4.10 Creating an Index . . . . . . . . . . . . . . . . . . . . . . . . . . . . . . . . . . . . . . . . . . . . . . . . . . . 35
4.10.1 Internationalized Indexes . . . . . . . . . . . . . . . . . . . . . . . . . . . . . . . . . . . . . . . . . . . 35
4.10.1.1 Indexing Tools . . . . . . . . . . . . . . . . . . . . . . . . . . . . . . . . . . . . . . . . . . . 35
4.10.1.2 Index Sorting . . . . . . . . . . . . . . . . . . . . . . . . . . . . . . . . . . . . . . . . . . . 36
4.11 Writing a Bibliography . . . . . . . . . . . . . . . . . . . . . . . . . . . . . . . . . . . . . . . . . . . . . . . . 36
4.11.1 Using Bibliography Entries . . . . . . . . . . . . . . . . . . . . . . . . . . . . . . . . . . . . . . . . . . 36
4.11.2 Using BibTeX Databases . . . . . . . . . . . . . . . . . . . . . . . . . . . . . . . . . . . . . . . . . . . 37
4.11.3 Natbib Citations . . . . . . . . . . . . . . . . . . . . . . . . . . . . . . . . . . . . . . . . . . . . . . . 38
4.12 Document Revisions . . . . . . . . . . . . . . . . . . . . . . . . . . . . . . . . . . . . . . . . . . . . . . . . . 38
4.13 Locale Support . . . . . . . . . . . . . . . . . . . . . . . . . . . . . . . . . . . . . . . . . . . . . . . . . . . . 39
4.13.1 Document Encoding . . . . . . . . . . . . . . . . . . . . . . . . . . . . . . . . . . . . . . . . . . . . . 39
4.13.2 Babel Languages . . . . . . . . . . . . . . . . . . . . . . . . . . . . . . . . . . . . . . . . . . . . . . . 39
4.13.3 CJK Languages . . . . . . . . . . . . . . . . . . . . . . . . . . . . . . . . . . . . . . . . . . . . . . . . 39
4.13.3.1 Korean Support . . . . . . . . . . . . . . . . . . . . . . . . . . . . . . . . . . . . . . . . . . 39
4.13.4 Mixing the languages . . . . . . . . . . . . . . . . . . . . . . . . . . . . . . . . . . . . . . . . . . . . . 39
4.14 Using XRefsyle and Olinks . . . . . . . . . . . . . . . . . . . . . . . . . . . . . . . . . . . . . . . . . . . . . . 39
4.14.1 Specific xrefstyle for ulink . . . . . . . . . . . . . . . . . . . . . . . . . . . . . . . . . . . . . . . . . 40
5
Customization
41
5.1
Using XSL Parameters . . . . . . . . . . . . . . . . . . . . . . . . . . . . . . . . . . . . . . . . . . . . . . . . 41
5.2
Setting Command line Parameters . . . . . . . . . . . . . . . . . . . . . . . . . . . . . . . . . . . . . . . . . . 41
5.3
XSL User Stylesheet . . . . . . . . . . . . . . . . . . . . . . . . . . . . . . . . . . . . . . . . . . . . . . . . . 41
5.4
5.5
5.3.1
Changing the XSL parameter values . . . . . . . . . . . . . . . . . . . . . . . . . . . . . . . . . . . . . 42
5.3.2
Overriding some templates . . . . . . . . . . . . . . . . . . . . . . . . . . . . . . . . . . . . . . . . . . 43
Customized LaTeX style . . . . . . . . . . . . . . . . . . . . . . . . . . . . . . . . . . . . . . . . . . . . . . . 43
5.4.1
Reusing an existing LaTeX style . . . . . . . . . . . . . . . . . . . . . . . . . . . . . . . . . . . . . . . 43
5.4.2
Package options . . . . . . . . . . . . . . . . . . . . . . . . . . . . . . . . . . . . . . . . . . . . . . . 44
5.4.3
Needed packages . . . . . . . . . . . . . . . . . . . . . . . . . . . . . . . . . . . . . . . . . . . . . . . 44
5.4.4
DocBook interface . . . . . . . . . . . . . . . . . . . . . . . . . . . . . . . . . . . . . . . . . . . . . . 44
5.4.5
Debugging your Style . . . . . . . . . . . . . . . . . . . . . . . . . . . . . . . . . . . . . . . . . . . . 45
Latex post process script . . . . . . . . . . . . . . . . . . . . . . . . . . . . . . . . . . . . . . . . . . . . . . . 46
5.5.1
Post latex compilations . . . . . . . . . . . . . . . . . . . . . . . . . . . . . . . . . . . . . . . . . . . . 46
DocBook to LaTeX Publishing
5.5.2
5.6
5.7
6
7
vii
Post processing with a Python Plugin . . . . . . . . . . . . . . . . . . . . . . . . . . . . . . . . . . . . 46
Dblatex Configuration File . . . . . . . . . . . . . . . . . . . . . . . . . . . . . . . . . . . . . . . . . . . . . . 47
5.6.1
Configuration File Format . . . . . . . . . . . . . . . . . . . . . . . . . . . . . . . . . . . . . . . . . . 47
5.6.2
Configuration Paths . . . . . . . . . . . . . . . . . . . . . . . . . . . . . . . . . . . . . . . . . . . . . . 48
Customization Precedence . . . . . . . . . . . . . . . . . . . . . . . . . . . . . . . . . . . . . . . . . . . . . . 48
FAQ
50
6.1
My images are too big. What can I do? . . . . . . . . . . . . . . . . . . . . . . . . . . . . . . . . . . . . . . . . 50
6.2
How can I have the PDF fit to height by default? . . . . . . . . . . . . . . . . . . . . . . . . . . . . . . . . . . . 50
6.3
How can I have all the PDF hyperlinks in blue color? . . . . . . . . . . . . . . . . . . . . . . . . . . . . . . . . 50
6.4
How can I remove that stupid float rules? . . . . . . . . . . . . . . . . . . . . . . . . . . . . . . . . . . . . . . 51
6.5
My long tables don’t split in several pages. Why? . . . . . . . . . . . . . . . . . . . . . . . . . . . . . . . . . . 51
6.6
I cannot put a table in an example. . . . . . . . . . . . . . . . . . . . . . . . . . . . . . . . . . . . . . . . . . . 51
6.7
I cannot compile my cyrillic document. Why? . . . . . . . . . . . . . . . . . . . . . . . . . . . . . . . . . . . . 51
Thanks
52
7.1
Sponsors . . . . . . . . . . . . . . . . . . . . . . . . . . . . . . . . . . . . . . . . . . . . . . . . . . . . . . . . 52
7.2
Contributors . . . . . . . . . . . . . . . . . . . . . . . . . . . . . . . . . . . . . . . . . . . . . . . . . . . . . . 52
7.3
Pioners . . . . . . . . . . . . . . . . . . . . . . . . . . . . . . . . . . . . . . . . . . . . . . . . . . . . . . . . 52
A Dblatex XSL Parameter Reference
53
A.1 Admonitions . . . . . . . . . . . . . . . . . . . . . . . . . . . . . . . . . . . . . . . . . . . . . . . . . . . . . 53
figure.caution . . . . . . . . . . . . . . . . . . . . . . . . . . . . . . . . . . . . . . . . . . . . . . . . . . . . . 53
figure.important . . . . . . . . . . . . . . . . . . . . . . . . . . . . . . . . . . . . . . . . . . . . . . . . . . . . 53
figure.note . . . . . . . . . . . . . . . . . . . . . . . . . . . . . . . . . . . . . . . . . . . . . . . . . . . . . . . 54
figure.tip . . . . . . . . . . . . . . . . . . . . . . . . . . . . . . . . . . . . . . . . . . . . . . . . . . . . . . . . 54
figure.warning . . . . . . . . . . . . . . . . . . . . . . . . . . . . . . . . . . . . . . . . . . . . . . . . . . . . . 54
A.2 Callouts . . . . . . . . . . . . . . . . . . . . . . . . . . . . . . . . . . . . . . . . . . . . . . . . . . . . . . . . 54
callout.linkends.hot . . . . . . . . . . . . . . . . . . . . . . . . . . . . . . . . . . . . . . . . . . . . . . . . . . 54
calloutlist.style . . . . . . . . . . . . . . . . . . . . . . . . . . . . . . . . . . . . . . . . . . . . . . . . . . . . 55
callout.markup.circled . . . . . . . . . . . . . . . . . . . . . . . . . . . . . . . . . . . . . . . . . . . . . . . . 55
co.linkends.show . . . . . . . . . . . . . . . . . . . . . . . . . . . . . . . . . . . . . . . . . . . . . . . . . . . 55
imageobjectco.hide . . . . . . . . . . . . . . . . . . . . . . . . . . . . . . . . . . . . . . . . . . . . . . . . . . 55
A.3 ToC/LoT/Index Generation . . . . . . . . . . . . . . . . . . . . . . . . . . . . . . . . . . . . . . . . . . . . . . 56
doc.lot.show . . . . . . . . . . . . . . . . . . . . . . . . . . . . . . . . . . . . . . . . . . . . . . . . . . . . . . 56
doc.toc.show . . . . . . . . . . . . . . . . . . . . . . . . . . . . . . . . . . . . . . . . . . . . . . . . . . . . . 56
titleabbrev.in.toc . . . . . . . . . . . . . . . . . . . . . . . . . . . . . . . . . . . . . . . . . . . . . . . . . . . . 56
toc.section.depth . . . . . . . . . . . . . . . . . . . . . . . . . . . . . . . . . . . . . . . . . . . . . . . . . . . 57
bibliography.tocdepth . . . . . . . . . . . . . . . . . . . . . . . . . . . . . . . . . . . . . . . . . . . . . . . . . 57
colophon.tocdepth . . . . . . . . . . . . . . . . . . . . . . . . . . . . . . . . . . . . . . . . . . . . . . . . . . . 57
DocBook to LaTeX Publishing
viii
dedication.tocdepth . . . . . . . . . . . . . . . . . . . . . . . . . . . . . . . . . . . . . . . . . . . . . . . . . . 58
preface.tocdepth . . . . . . . . . . . . . . . . . . . . . . . . . . . . . . . . . . . . . . . . . . . . . . . . . . . . 58
glossary.tocdepth . . . . . . . . . . . . . . . . . . . . . . . . . . . . . . . . . . . . . . . . . . . . . . . . . . . 58
index.tocdepth . . . . . . . . . . . . . . . . . . . . . . . . . . . . . . . . . . . . . . . . . . . . . . . . . . . . . 59
latex.index.tool . . . . . . . . . . . . . . . . . . . . . . . . . . . . . . . . . . . . . . . . . . . . . . . . . . . . 59
latex.index.language . . . . . . . . . . . . . . . . . . . . . . . . . . . . . . . . . . . . . . . . . . . . . . . . . 60
refentry.tocdepth . . . . . . . . . . . . . . . . . . . . . . . . . . . . . . . . . . . . . . . . . . . . . . . . . . . 60
A.4 Processor Extensions . . . . . . . . . . . . . . . . . . . . . . . . . . . . . . . . . . . . . . . . . . . . . . . . . 60
alt.use . . . . . . . . . . . . . . . . . . . . . . . . . . . . . . . . . . . . . . . . . . . . . . . . . . . . . . . . . 60
tex.math.in.alt . . . . . . . . . . . . . . . . . . . . . . . . . . . . . . . . . . . . . . . . . . . . . . . . . . . . . 61
A.5 Automatic labelling . . . . . . . . . . . . . . . . . . . . . . . . . . . . . . . . . . . . . . . . . . . . . . . . . . 61
bibliography.numbered . . . . . . . . . . . . . . . . . . . . . . . . . . . . . . . . . . . . . . . . . . . . . . . . 61
glossary.numbered . . . . . . . . . . . . . . . . . . . . . . . . . . . . . . . . . . . . . . . . . . . . . . . . . . 61
index.numbered . . . . . . . . . . . . . . . . . . . . . . . . . . . . . . . . . . . . . . . . . . . . . . . . . . . . 62
refentry.numbered . . . . . . . . . . . . . . . . . . . . . . . . . . . . . . . . . . . . . . . . . . . . . . . . . . . 62
A.6 Meta/*Info . . . . . . . . . . . . . . . . . . . . . . . . . . . . . . . . . . . . . . . . . . . . . . . . . . . . . . 63
doc.pdfcreator.show . . . . . . . . . . . . . . . . . . . . . . . . . . . . . . . . . . . . . . . . . . . . . . . . . . 63
make.single.year.ranges . . . . . . . . . . . . . . . . . . . . . . . . . . . . . . . . . . . . . . . . . . . . . . . . 63
make.year.ranges . . . . . . . . . . . . . . . . . . . . . . . . . . . . . . . . . . . . . . . . . . . . . . . . . . . 63
A.7 Reference Pages . . . . . . . . . . . . . . . . . . . . . . . . . . . . . . . . . . . . . . . . . . . . . . . . . . . . 64
funcsynopsis.decoration . . . . . . . . . . . . . . . . . . . . . . . . . . . . . . . . . . . . . . . . . . . . . . . . 64
funcsynopsis.style . . . . . . . . . . . . . . . . . . . . . . . . . . . . . . . . . . . . . . . . . . . . . . . . . . . 64
function.parens . . . . . . . . . . . . . . . . . . . . . . . . . . . . . . . . . . . . . . . . . . . . . . . . . . . . 64
refclass.suppress . . . . . . . . . . . . . . . . . . . . . . . . . . . . . . . . . . . . . . . . . . . . . . . . . . . 64
refentry.generate.name . . . . . . . . . . . . . . . . . . . . . . . . . . . . . . . . . . . . . . . . . . . . . . . . 65
refentry.xref.manvolnum . . . . . . . . . . . . . . . . . . . . . . . . . . . . . . . . . . . . . . . . . . . . . . . 65
A.8 Tables . . . . . . . . . . . . . . . . . . . . . . . . . . . . . . . . . . . . . . . . . . . . . . . . . . . . . . . . . 65
newtbl.autowidth . . . . . . . . . . . . . . . . . . . . . . . . . . . . . . . . . . . . . . . . . . . . . . . . . . . 65
newtbl.bgcolor.thead . . . . . . . . . . . . . . . . . . . . . . . . . . . . . . . . . . . . . . . . . . . . . . . . . 66
newtbl.default.colsep . . . . . . . . . . . . . . . . . . . . . . . . . . . . . . . . . . . . . . . . . . . . . . . . . 66
newtbl.default.rowsep . . . . . . . . . . . . . . . . . . . . . . . . . . . . . . . . . . . . . . . . . . . . . . . . . 66
newtbl.format.tbody . . . . . . . . . . . . . . . . . . . . . . . . . . . . . . . . . . . . . . . . . . . . . . . . . . 66
newtbl.format.tfoot . . . . . . . . . . . . . . . . . . . . . . . . . . . . . . . . . . . . . . . . . . . . . . . . . . 67
newtbl.format.thead . . . . . . . . . . . . . . . . . . . . . . . . . . . . . . . . . . . . . . . . . . . . . . . . . . 67
newtbl.use.hhline . . . . . . . . . . . . . . . . . . . . . . . . . . . . . . . . . . . . . . . . . . . . . . . . . . . 67
table.default.position . . . . . . . . . . . . . . . . . . . . . . . . . . . . . . . . . . . . . . . . . . . . . . . . . 68
table.default.tabstyle . . . . . . . . . . . . . . . . . . . . . . . . . . . . . . . . . . . . . . . . . . . . . . . . . 68
table.in.float . . . . . . . . . . . . . . . . . . . . . . . . . . . . . . . . . . . . . . . . . . . . . . . . . . . . . . 68
table.title.top . . . . . . . . . . . . . . . . . . . . . . . . . . . . . . . . . . . . . . . . . . . . . . . . . . . . . 69
DocBook to LaTeX Publishing
ix
default.table.rules . . . . . . . . . . . . . . . . . . . . . . . . . . . . . . . . . . . . . . . . . . . . . . . . . . . 69
default.table.width . . . . . . . . . . . . . . . . . . . . . . . . . . . . . . . . . . . . . . . . . . . . . . . . . . 70
A.9 Linking . . . . . . . . . . . . . . . . . . . . . . . . . . . . . . . . . . . . . . . . . . . . . . . . . . . . . . . . 70
latex.hyperparam . . . . . . . . . . . . . . . . . . . . . . . . . . . . . . . . . . . . . . . . . . . . . . . . . . . 70
Olink Parameters . . . . . . . . . . . . . . . . . . . . . . . . . . . . . . . . . . . . . . . . . . . . . . . . . . . 70
A.10 Cross References . . . . . . . . . . . . . . . . . . . . . . . . . . . . . . . . . . . . . . . . . . . . . . . . . . . 71
insert.xref.page.number . . . . . . . . . . . . . . . . . . . . . . . . . . . . . . . . . . . . . . . . . . . . . . . . 71
xref.hypermarkup . . . . . . . . . . . . . . . . . . . . . . . . . . . . . . . . . . . . . . . . . . . . . . . . . . . 72
A.11 Lists . . . . . . . . . . . . . . . . . . . . . . . . . . . . . . . . . . . . . . . . . . . . . . . . . . . . . . . . . . 72
term.breakline . . . . . . . . . . . . . . . . . . . . . . . . . . . . . . . . . . . . . . . . . . . . . . . . . . . . . 72
variablelist.term.separator . . . . . . . . . . . . . . . . . . . . . . . . . . . . . . . . . . . . . . . . . . . . . . . 73
A.12 QAndASet . . . . . . . . . . . . . . . . . . . . . . . . . . . . . . . . . . . . . . . . . . . . . . . . . . . . . . . 73
qanda.defaultlabel . . . . . . . . . . . . . . . . . . . . . . . . . . . . . . . . . . . . . . . . . . . . . . . . . . . 73
A.13 Bibliography . . . . . . . . . . . . . . . . . . . . . . . . . . . . . . . . . . . . . . . . . . . . . . . . . . . . . 73
biblioentry.item.separator . . . . . . . . . . . . . . . . . . . . . . . . . . . . . . . . . . . . . . . . . . . . . . . 73
biblioentry.numbered . . . . . . . . . . . . . . . . . . . . . . . . . . . . . . . . . . . . . . . . . . . . . . . . . 74
citation.default.style . . . . . . . . . . . . . . . . . . . . . . . . . . . . . . . . . . . . . . . . . . . . . . . . . . 74
citation.natbib.options . . . . . . . . . . . . . . . . . . . . . . . . . . . . . . . . . . . . . . . . . . . . . . . . . 74
citation.natbib.use . . . . . . . . . . . . . . . . . . . . . . . . . . . . . . . . . . . . . . . . . . . . . . . . . . . 74
latex.bibfiles . . . . . . . . . . . . . . . . . . . . . . . . . . . . . . . . . . . . . . . . . . . . . . . . . . . . . . 75
latex.biblio.output . . . . . . . . . . . . . . . . . . . . . . . . . . . . . . . . . . . . . . . . . . . . . . . . . . . 75
latex.biblio.style . . . . . . . . . . . . . . . . . . . . . . . . . . . . . . . . . . . . . . . . . . . . . . . . . . . . 75
latex.bibwidelabel . . . . . . . . . . . . . . . . . . . . . . . . . . . . . . . . . . . . . . . . . . . . . . . . . . . 75
A.14 Glossary . . . . . . . . . . . . . . . . . . . . . . . . . . . . . . . . . . . . . . . . . . . . . . . . . . . . . . . . 76
glossterm.auto.link . . . . . . . . . . . . . . . . . . . . . . . . . . . . . . . . . . . . . . . . . . . . . . . . . . 76
A.15 Miscellaneous . . . . . . . . . . . . . . . . . . . . . . . . . . . . . . . . . . . . . . . . . . . . . . . . . . . . . 76
annotation.support . . . . . . . . . . . . . . . . . . . . . . . . . . . . . . . . . . . . . . . . . . . . . . . . . . 76
beginpage.as.pagebreak . . . . . . . . . . . . . . . . . . . . . . . . . . . . . . . . . . . . . . . . . . . . . . . . 76
doc.section.depth . . . . . . . . . . . . . . . . . . . . . . . . . . . . . . . . . . . . . . . . . . . . . . . . . . . 77
equation.default.position . . . . . . . . . . . . . . . . . . . . . . . . . . . . . . . . . . . . . . . . . . . . . . . 77
example.default.position . . . . . . . . . . . . . . . . . . . . . . . . . . . . . . . . . . . . . . . . . . . . . . . 77
example.float.type . . . . . . . . . . . . . . . . . . . . . . . . . . . . . . . . . . . . . . . . . . . . . . . . . . . 77
figure.anchor.top . . . . . . . . . . . . . . . . . . . . . . . . . . . . . . . . . . . . . . . . . . . . . . . . . . . 78
figure.default.position . . . . . . . . . . . . . . . . . . . . . . . . . . . . . . . . . . . . . . . . . . . . . . . . . 78
figure.title.top . . . . . . . . . . . . . . . . . . . . . . . . . . . . . . . . . . . . . . . . . . . . . . . . . . . . . 79
filename.as.url . . . . . . . . . . . . . . . . . . . . . . . . . . . . . . . . . . . . . . . . . . . . . . . . . . . . . 79
hyphenation.format . . . . . . . . . . . . . . . . . . . . . . . . . . . . . . . . . . . . . . . . . . . . . . . . . . 79
literal.layout.options . . . . . . . . . . . . . . . . . . . . . . . . . . . . . . . . . . . . . . . . . . . . . . . . . 80
literal.lines.showall . . . . . . . . . . . . . . . . . . . . . . . . . . . . . . . . . . . . . . . . . . . . . . . . . . 80
DocBook to LaTeX Publishing
x
literal.width.ignore . . . . . . . . . . . . . . . . . . . . . . . . . . . . . . . . . . . . . . . . . . . . . . . . . . 80
literal.class . . . . . . . . . . . . . . . . . . . . . . . . . . . . . . . . . . . . . . . . . . . . . . . . . . . . . . 81
literal.role . . . . . . . . . . . . . . . . . . . . . . . . . . . . . . . . . . . . . . . . . . . . . . . . . . . . . . . 81
literal.environment . . . . . . . . . . . . . . . . . . . . . . . . . . . . . . . . . . . . . . . . . . . . . . . . . . 81
literal.extensions . . . . . . . . . . . . . . . . . . . . . . . . . . . . . . . . . . . . . . . . . . . . . . . . . . . 82
linenumbering.scope . . . . . . . . . . . . . . . . . . . . . . . . . . . . . . . . . . . . . . . . . . . . . . . . . 82
linenumbering.default . . . . . . . . . . . . . . . . . . . . . . . . . . . . . . . . . . . . . . . . . . . . . . . . . 83
linenumbering.everyNth . . . . . . . . . . . . . . . . . . . . . . . . . . . . . . . . . . . . . . . . . . . . . . . 83
mediaobject.caption.style . . . . . . . . . . . . . . . . . . . . . . . . . . . . . . . . . . . . . . . . . . . . . . . 83
monoseq.hyphenation . . . . . . . . . . . . . . . . . . . . . . . . . . . . . . . . . . . . . . . . . . . . . . . . . 83
monoseq.small . . . . . . . . . . . . . . . . . . . . . . . . . . . . . . . . . . . . . . . . . . . . . . . . . . . . 84
pdf.annot.options . . . . . . . . . . . . . . . . . . . . . . . . . . . . . . . . . . . . . . . . . . . . . . . . . . . 84
seg.item.separator . . . . . . . . . . . . . . . . . . . . . . . . . . . . . . . . . . . . . . . . . . . . . . . . . . . 85
show.comments . . . . . . . . . . . . . . . . . . . . . . . . . . . . . . . . . . . . . . . . . . . . . . . . . . . . 85
texlive.version . . . . . . . . . . . . . . . . . . . . . . . . . . . . . . . . . . . . . . . . . . . . . . . . . . . . . 85
ulink.footnotes . . . . . . . . . . . . . . . . . . . . . . . . . . . . . . . . . . . . . . . . . . . . . . . . . . . . 85
ulink.show . . . . . . . . . . . . . . . . . . . . . . . . . . . . . . . . . . . . . . . . . . . . . . . . . . . . . . . 86
xref.with.number.and.title . . . . . . . . . . . . . . . . . . . . . . . . . . . . . . . . . . . . . . . . . . . . . . . 86
A.16 Graphics . . . . . . . . . . . . . . . . . . . . . . . . . . . . . . . . . . . . . . . . . . . . . . . . . . . . . . . . 87
imagedata.boxed . . . . . . . . . . . . . . . . . . . . . . . . . . . . . . . . . . . . . . . . . . . . . . . . . . . 87
imagedata.default.scale . . . . . . . . . . . . . . . . . . . . . . . . . . . . . . . . . . . . . . . . . . . . . . . . 87
imagedata.file.check . . . . . . . . . . . . . . . . . . . . . . . . . . . . . . . . . . . . . . . . . . . . . . . . . 88
keep.relative.image.uris . . . . . . . . . . . . . . . . . . . . . . . . . . . . . . . . . . . . . . . . . . . . . . . . 88
A.17 Chuncking . . . . . . . . . . . . . . . . . . . . . . . . . . . . . . . . . . . . . . . . . . . . . . . . . . . . . . . 88
set.book.num . . . . . . . . . . . . . . . . . . . . . . . . . . . . . . . . . . . . . . . . . . . . . . . . . . . . . 88
use.id.as.filename . . . . . . . . . . . . . . . . . . . . . . . . . . . . . . . . . . . . . . . . . . . . . . . . . . . 88
A.18 Pagination and General Styles . . . . . . . . . . . . . . . . . . . . . . . . . . . . . . . . . . . . . . . . . . . . 89
page.height . . . . . . . . . . . . . . . . . . . . . . . . . . . . . . . . . . . . . . . . . . . . . . . . . . . . . . 89
page.margin.bottom . . . . . . . . . . . . . . . . . . . . . . . . . . . . . . . . . . . . . . . . . . . . . . . . . . 89
page.margin.inner . . . . . . . . . . . . . . . . . . . . . . . . . . . . . . . . . . . . . . . . . . . . . . . . . . . 89
page.margin.outer . . . . . . . . . . . . . . . . . . . . . . . . . . . . . . . . . . . . . . . . . . . . . . . . . . . 90
page.margin.top . . . . . . . . . . . . . . . . . . . . . . . . . . . . . . . . . . . . . . . . . . . . . . . . . . . . 90
page.width . . . . . . . . . . . . . . . . . . . . . . . . . . . . . . . . . . . . . . . . . . . . . . . . . . . . . . . 90
paper.type . . . . . . . . . . . . . . . . . . . . . . . . . . . . . . . . . . . . . . . . . . . . . . . . . . . . . . . 91
geometry.options . . . . . . . . . . . . . . . . . . . . . . . . . . . . . . . . . . . . . . . . . . . . . . . . . . . 91
doc.alignment . . . . . . . . . . . . . . . . . . . . . . . . . . . . . . . . . . . . . . . . . . . . . . . . . . . . . 91
doc.collab.show . . . . . . . . . . . . . . . . . . . . . . . . . . . . . . . . . . . . . . . . . . . . . . . . . . . . 92
doc.layout . . . . . . . . . . . . . . . . . . . . . . . . . . . . . . . . . . . . . . . . . . . . . . . . . . . . . . . 92
doc.publisher.show . . . . . . . . . . . . . . . . . . . . . . . . . . . . . . . . . . . . . . . . . . . . . . . . . . 92
DocBook to LaTeX Publishing
xi
draft.mode . . . . . . . . . . . . . . . . . . . . . . . . . . . . . . . . . . . . . . . . . . . . . . . . . . . . . . . 92
draft.watermark . . . . . . . . . . . . . . . . . . . . . . . . . . . . . . . . . . . . . . . . . . . . . . . . . . . . 93
latex.engine.options . . . . . . . . . . . . . . . . . . . . . . . . . . . . . . . . . . . . . . . . . . . . . . . . . . 93
latex.class.article . . . . . . . . . . . . . . . . . . . . . . . . . . . . . . . . . . . . . . . . . . . . . . . . . . . 93
latex.class.book . . . . . . . . . . . . . . . . . . . . . . . . . . . . . . . . . . . . . . . . . . . . . . . . . . . . 94
latex.class.options . . . . . . . . . . . . . . . . . . . . . . . . . . . . . . . . . . . . . . . . . . . . . . . . . . . 94
latex.encoding . . . . . . . . . . . . . . . . . . . . . . . . . . . . . . . . . . . . . . . . . . . . . . . . . . . . . 94
latex.unicode.use . . . . . . . . . . . . . . . . . . . . . . . . . . . . . . . . . . . . . . . . . . . . . . . . . . . 95
latex.output.revhistory . . . . . . . . . . . . . . . . . . . . . . . . . . . . . . . . . . . . . . . . . . . . . . . . 95
A.19 Font Families . . . . . . . . . . . . . . . . . . . . . . . . . . . . . . . . . . . . . . . . . . . . . . . . . . . . . 95
body.font.family . . . . . . . . . . . . . . . . . . . . . . . . . . . . . . . . . . . . . . . . . . . . . . . . . . . . 95
cjk.font . . . . . . . . . . . . . . . . . . . . . . . . . . . . . . . . . . . . . . . . . . . . . . . . . . . . . . . . 95
monospace.font.family . . . . . . . . . . . . . . . . . . . . . . . . . . . . . . . . . . . . . . . . . . . . . . . . 96
sans.font.family . . . . . . . . . . . . . . . . . . . . . . . . . . . . . . . . . . . . . . . . . . . . . . . . . . . . 96
xetex.font . . . . . . . . . . . . . . . . . . . . . . . . . . . . . . . . . . . . . . . . . . . . . . . . . . . . . . . 96
A.20 Localization . . . . . . . . . . . . . . . . . . . . . . . . . . . . . . . . . . . . . . . . . . . . . . . . . . . . . . 97
korean.package . . . . . . . . . . . . . . . . . . . . . . . . . . . . . . . . . . . . . . . . . . . . . . . . . . . . 97
latex.babel.language . . . . . . . . . . . . . . . . . . . . . . . . . . . . . . . . . . . . . . . . . . . . . . . . . 97
latex.babel.use . . . . . . . . . . . . . . . . . . . . . . . . . . . . . . . . . . . . . . . . . . . . . . . . . . . . . 98
A.21 Prepress . . . . . . . . . . . . . . . . . . . . . . . . . . . . . . . . . . . . . . . . . . . . . . . . . . . . . . . . 98
crop.marks . . . . . . . . . . . . . . . . . . . . . . . . . . . . . . . . . . . . . . . . . . . . . . . . . . . . . . 98
crop.paper.type . . . . . . . . . . . . . . . . . . . . . . . . . . . . . . . . . . . . . . . . . . . . . . . . . . . . 98
crop.page.width . . . . . . . . . . . . . . . . . . . . . . . . . . . . . . . . . . . . . . . . . . . . . . . . . . . . 99
crop.page.height . . . . . . . . . . . . . . . . . . . . . . . . . . . . . . . . . . . . . . . . . . . . . . . . . . . . 99
crop.mode . . . . . . . . . . . . . . . . . . . . . . . . . . . . . . . . . . . . . . . . . . . . . . . . . . . . . . . 99
crop.options . . . . . . . . . . . . . . . . . . . . . . . . . . . . . . . . . . . . . . . . . . . . . . . . . . . . . . 100
8
Index
101
DocBook to LaTeX Publishing
xii
List of Figures
2.1
Transforming Process . . . . . . . . . . . . . . . . . . . . . . . . . . . . . . . . . . . . . . . . . . . . . . . . .
3
4.1
Parameter Lengths used for Page Setup . . . . . . . . . . . . . . . . . . . . . . . . . . . . . . . . . . . . . . . 16
DocBook to LaTeX Publishing
xiii
List of Tables
4.1
An HTML Table . . . . . . . . . . . . . . . . . . . . . . . . . . . . . . . . . . . . . . . . . . . . . . . . . . . 29
DocBook to LaTeX Publishing
xiv
List of Examples
4.1
4.2
4.3
4.4
4.5
4.6
4.7
4.8
4.9
4.10
4.11
4.12
4.13
5.1
5.2
5.3
5.4
5.5
A.1
Choosing the DB2LaTeX style . . . .
Figure inclusion . . . . . . . . . . . .
Figure conversion . . . . . . . . . . .
Figures lookup . . . . . . . . . . . .
Equation taken from TDG . . . . . .
Inlined Equation . . . . . . . . . . . .
Equation in a block . . . . . . . . . .
Equation in a float . . . . . . . . . . .
Equation without a title . . . . . . . .
Index Entry . . . . . . . . . . . . . .
XSL Index Language Setup . . . . . .
A Bibliography . . . . . . . . . . . .
Bibliography using BibTeX databases
Overriding templates . . . . . . . . .
Reused LaTeX style . . . . . . . . . .
Texpost Python Plugin Example . . .
User Manual Configuration File . . .
Customization Precedence . . . . . .
Configuring with latex.hyperparam . .
.
.
.
.
.
.
.
.
.
.
.
.
.
.
.
.
.
.
.
.
.
.
.
.
.
.
.
.
.
.
.
.
.
.
.
.
.
.
.
.
.
.
.
.
.
.
.
.
.
.
.
.
.
.
.
.
.
.
.
.
.
.
.
.
.
.
.
.
.
.
.
.
.
.
.
.
.
.
.
.
.
.
.
.
.
.
.
.
.
.
.
.
.
.
.
.
.
.
.
.
.
.
.
.
.
.
.
.
.
.
.
.
.
.
.
.
.
.
.
.
.
.
.
.
.
.
.
.
.
.
.
.
.
.
.
.
.
.
.
.
.
.
.
.
.
.
.
.
.
.
.
.
.
.
.
.
.
.
.
.
.
.
.
.
.
.
.
.
.
.
.
.
.
.
.
.
.
.
.
.
.
.
.
.
.
.
.
.
.
.
.
.
.
.
.
.
.
.
.
.
.
.
.
.
.
.
.
.
.
.
.
.
.
.
.
.
.
.
.
.
.
.
.
.
.
.
.
.
.
.
.
.
.
.
.
.
.
.
.
.
.
.
.
.
.
.
.
.
.
.
.
.
.
.
.
.
.
.
.
.
.
.
.
.
.
.
.
.
.
.
.
.
.
.
.
.
.
.
.
.
.
.
.
.
.
.
.
.
.
.
.
.
.
.
.
.
.
.
.
.
.
.
.
.
.
.
.
.
.
.
.
.
.
.
.
.
.
.
.
.
.
.
.
.
.
.
.
.
.
.
.
.
.
.
.
.
.
.
.
.
.
.
.
.
.
.
.
.
.
.
.
.
.
.
.
.
.
.
.
.
.
.
.
.
.
.
.
.
.
.
.
.
.
.
.
.
.
.
.
.
.
.
.
.
.
.
.
.
.
.
.
.
.
.
.
.
.
.
.
.
.
.
.
.
.
.
.
.
.
.
.
.
.
.
.
.
.
.
.
.
.
.
.
.
.
.
.
.
.
.
.
.
.
.
.
.
.
.
.
.
.
.
.
.
.
.
.
.
.
.
.
.
.
.
.
.
.
.
.
.
.
.
.
.
.
.
.
.
.
.
.
.
.
.
.
.
.
.
.
.
.
.
.
.
.
.
.
.
.
.
.
.
.
.
.
.
.
.
.
.
.
.
.
.
.
.
.
.
.
.
.
.
.
.
.
.
.
.
.
.
.
.
.
.
.
.
.
.
.
.
.
.
.
.
.
.
.
.
.
.
.
.
.
.
.
.
.
.
.
.
.
.
.
.
.
.
.
.
.
.
.
.
.
.
.
.
.
.
.
.
.
.
.
.
.
.
.
.
.
.
.
.
.
.
.
.
.
.
.
.
.
.
.
.
.
.
.
.
.
.
.
.
.
.
.
.
.
.
.
.
.
.
.
.
.
.
.
.
.
.
.
.
.
.
.
.
.
.
.
.
.
.
.
.
.
.
.
.
.
.
.
.
.
.
.
.
.
.
.
.
.
.
.
.
.
.
.
.
.
.
.
.
.
.
.
.
.
.
.
.
.
.
.
.
.
.
.
.
.
.
.
.
.
.
.
.
.
.
.
.
.
.
.
.
.
.
.
.
.
.
.
.
.
.
.
.
.
.
.
.
.
.
.
.
.
.
.
.
.
.
.
.
.
.
.
.
.
.
.
.
.
.
.
.
.
.
.
.
.
.
.
.
.
.
.
.
.
.
.
.
.
.
.
.
.
.
.
.
.
.
12
19
19
19
30
31
31
31
31
35
36
37
38
43
44
46
48
48
70
DocBook to LaTeX Publishing
1 / 102
Chapter 1
Documentation
1.1
[TDG]
Reference
Norman Walsh and Leonard Muellner, DocBook: The Definitive Guide, Copyright © 1999, 2000, 2001 O’Reilly
& Associates, Inc., 156592-580-7, O’Reilly.
DocBook to LaTeX Publishing
2 / 102
Chapter 2
Introduction
2.1
What about DB2LaTeX?
Dblatex started as a DB2LaTeX clone, but since then many things have changed and new features have been added or (hopefully)
improved. Now, the portion of shared code is small if any, and the dblatex purpose is different from DB2LaTeX on these points:
• The project is end-user oriented, that is, it tries to hide as much as possible the latex compiling stuff by providing a single clean
script to produce directly DVI, PostScript and PDF output.
• The actual output rendering is done not only by the XSL stylesheets transformation, but also by a dedicated LaTeX package.
The goal is to allow a deep LaTeX customisation without changing the XSL stylesheets.
• Post-processing is done by Python, to make publication faster, convert the images if needed, and do the whole compilation.
2.2
Features
With dblatex you can:
• transform a DocBook XML/SGML book or article to pure LaTeX,
• compile the temporary LaTeX file with latex, pdflatex, or xelatex to produce DVI, PostScript and PDF files,
• publish a set of books,
• convert on the fly the figures included in the document,
• have cross references with hot links,
• olink to other documents built with dblatex,
• write complex tables,
• write several bibliographies,
• reuse BibTeX bibliographies,
• use callouts on program listings or on images,
• create an index with makeindex or xindy,
• write mathematical equations in LaTeX,
• write mathematical equations in MathML,
DocBook to LaTeX Publishing
3 / 102
• have revision bars,
• customise the output rendering with an XSL configuration file,
• use your own LaTeX style package.
2.3
Version
This manual is for dblatex version 0.3.7.
2.4
Change History
See the Release Notes in Release Notes for dblatex to have the dblatex change history.
2.5
Publishing Principles
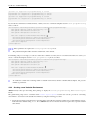
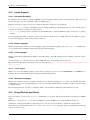
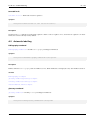
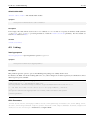
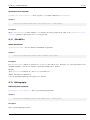
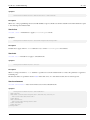
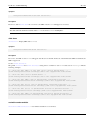
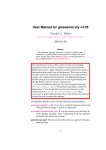
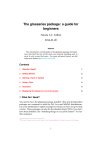
Dblatex transforms a DocBook XML/SGML document to LaTeX. Once transformed into LaTeX, standard LaTeX tools are used
to produce DVI, Postcript or PDF files.
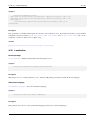
Figure 2.1 explains the process applied. It shows the tools used and the steps. The emphasized tools are provided by the package.
.sgml
dblatex
osx
.xml
xsltproc
XSL Stylesheets
.rtex
texclean
.tex
pdflatex
xelatex
latex
makeindex
bibtex
.pdf
.dvi
dvips
−b pdftex
−b xetex
.ps
ps2pdf
.pdf
−b dvips
Figure 2.1: Transforming Process
LaTeX Package
DocBook to LaTeX Publishing
2.5.1
4 / 102
Backend Drivers
The main script supports the following LaTeX backend drivers:
dvips
The driver calls latex, and produces DVI, Postscript and at the end PDF files. Latex natively accepts only EPS graphics.
The drawback is that converting to PDF can take a while.
pdftex
The driver calls pdflatex, to directly produce PDF files. The conversion is fast, the file size is smaller. Pdflatex natively
accepts PDF, PNG, JPEG, and TIFF graphics.
xetex
The driver calls xelatex, to directly produce PDF files through the XeTeX engine. This engine natively supports UTF-8
which improves multilingual support.
2.5.2
XSL Stylesheets
The XSL stylesheets located under xsl/ are used to transform from XML to “raw” LaTeX. The main file is latex_book_
fast.xsl, that includes the other stylesheets of the directory.
2.5.3
Python Post Processing
Actually the XSL stylesheets does not produce valid LaTeX. The reason is that some DocBook processing is too complex or too
time-consuming for XSL transforming. Besides, some extra actions need sometimes to be done such like figure conversion. Here
are the main actions done by Python Post processing:
• Transform the entities to valid LaTeX characters (e.g. is transformed to ’~’). Python is suited and performant for this
task.
• Convert the figures to be compatible with the backend driver. See Section 4.6 for more detail.
• Force some hyphenation in tables or for typed words.
• Do the whole LaTeX compilation sequence thanks to the rubber compilation engine.
2.5.4
LaTeX Style Package
Once valid LaTeX is available, the LaTeX style package (docbook.sty) under latex/style/ is used to customize the output
rendering. It includes the other files of the directory. You can also provide your own LaTeX style (cf. Chapter 5).
DocBook to LaTeX Publishing
5 / 102
Chapter 3
Installing the Package
3.1
Content
The package contains the following:
docs/
Contains the files of this document.
latex/
Contains all the latex stuff: LaTeX style files, logos, and scripts to compile the LaTeX output.
scripts/
Several scripts, including the main script of the package.
xsl/
XSL stylesheets.
tests/
Test files.
3.2
3.2.1
Installing on Unix like Systems
Dblatex Packages
Dblatex is packaged for these Systems or Distributions:
• Linux Debian, Ubuntu,
• Linux OpenSUSE (RPM), Linux Fedora (RPM),
• FreeBSD, NetBSD,
• Mac OS X (Fink).
If you are installing on one of these distributions, follow their recommended way of installation, and you can safely ignore the
next sections that give details for installing dblatex from the source tarball.
DocBook to LaTeX Publishing
3.2.2
6 / 102
Dependencies
To work, the following items must be available:
• An XSLT. xsltproc is the default XSLT used, but one can also use 4suite or saxon.
• The XML DocBook DTD.
• A recent LaTeX distribution. The configure script checks that the needed latex packages are available.
• Python >= 2.4.
3.2.3
Installation
3.2.3.1
Installing the dependencies
To use the package, install properly the dependencies:
1. Install Python if necessary.
2. Install LaTeX.
3. Install the XSLT. By default xsltproc is used.
4. Install the XML DocBook DTD.
5. Create a catalog file, that defines where to find the DTD. Here is an example:
PUBLIC "-//OASIS//DTD DocBook XML V4.1.2//EN"
"file:///usr/local/share/xml/docbook/dtd/4.1.2/docbookx.dtd"
If the XML Gnome tools are available, it’s a good idea to create an XML catalog by using xmlcatalog such like this:
% xmlcatalog --noout --create mycatalog
% xmlcatalog --noout --add ’public’ ’-//OASIS//DTD DocBook XML V4.1.2//EN’ \
’file://path/to/4.1.2/docbookx.dtd’ mycatalog
6. Add the catalog path to the SGML_CATALOG_FILES variable:
export SGML_CATALOG_FILES=$SGML_CATALOG_FILES:/path/to/mycatalog
You can skip this step if you configure the dblatex installation with the --catalogs option.
3.2.3.2
Installing from the source tarball
The steps to follow are the following:
1. Untar the ball. For a bzipped release, do as follow:
% tar xvfj dblatex-x.x.x.tar.bz2
For a gzipped release, do as follow:
% tar xvfz dblatex-x.x.x.tar.gz
2. Install the package. The installation script preliminary checks the dependencies. In the example, the dblatex script is
installed under /usr/local/bin and the other files are installed under /usr/local/share/dblatex. Besides,
the --catalogs option tells where to find the catalogs.
% cd dblatex-x.x.x
% python ./setup.py install --prefix=/usr/local --catalogs=/path/to/mycatalog
DocBook to LaTeX Publishing
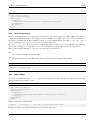
3.2.3.3
7 / 102
Installing from the Python Egg
Since version 0.3.2 dblatex is distributed as a Python Egg in the Python Package Index (PyPI). It requires to have easy_install
installed.
The procedure to follow is:
1. Call simply easy_install:
% easy_install dblatex
Searching for dblatex
Reading http://pypi.python.org/simple/dblatex/
Reading http://dblatex.sf.net
Best match: dblatex 0.3.1.1
Downloading http://pypi.python.org/packages/2.5/d/dblatex/dblatex-0.3.1.1-py2.5.egg#md5 ←=8520d596e473ff544eb9dcdc5175d7ae
Processing dblatex-0.3.1.1-py2.5.egg
creating /path/to/dblatex-0.3.1.1-py2.5.egg
Extracting dblatex-0.3.1.1-py2.5.egg to /path/to
Adding dblatex 0.3.1.1 to easy-install.pth file
Installing dblatex script to /path/to
Installed /path/to/dblatex-0.3.1.1-py2.5.egg
That’s it!
3.3
Installing on Windows
The following packages to install and the procedure is for a native Windows installation. If you want to use dblatex via Cygwin
instead, you should consider it like a unix like install.
3.3.1
Dependencies
The following applications are required:
• An XSLT. xsltproc is the default XSLT used, but one can also use 4suite.
• The XML DocBook DTD.
• MiKTeX > 2.5.
• Python >= 2.4.
3.3.2
Installation
3.3.2.1
Installing xsltproc
You can download the binaries and getting the installation instructions from: http://www.zlatkovic.com/libxml.
en.html.
3.3.2.2
Installing MiKTeX
Install the minimal distribution, and add the following packages: changebar, colortbl, fancybox, fancyhdr, fancyvrb, listings,
overpics, rotating, subfigure, titlesec, bibtopic, enumitem, eepic, lm, lastpage, helvetic, times, symbol, courier, footmisc, ifxetex,
pdfpages, wasysym.
DocBook to LaTeX Publishing
3.3.2.3
Installing dblatex
From the unpacked package directory just type:
python setup.py install
If the Python directory is C:\Python25 you can now try dblatex by typing:
python C:\Python25\Scripts\dblatex file.xml
8 / 102
DocBook to LaTeX Publishing
9 / 102
Chapter 4
Using dblatex
4.1
Reference
dblatex
dblatex — convert DocBook to LaTeX, DVI, PostScript, and PDF
Synopsis
dblatex [options] {file | -}
Description
dblatex is a program that transforms your SGML/XML DocBook documents to DVI, PostScript or PDF by translating them into
pure LaTeX as a first process. MathML 2.0 markups are supported, too.
Options
A summary of options is included below.
-h, --help
Show a help message and exit.
-b backend , --backend=backend
Backend driver to use: pdftex (default), dvips, or xetex . See also Section 2.5.1.
-B, --no-batch
All the tex output is printed.
-c config , -S config , --config=config
Configuration file. A configuration file can be used to group all the options and customizations to apply. See Section 5.6.
-d, --debug
Debug mode: Keep the temporary directory in which dblatex actually works. Section 5.4.5 explains how you can use it.
-D, --dump
Dump the error stack when an error occurs (debug purpose).
-e indexstyle, --indexstyle indexstyle
Index style file to pass to makeindex instead of the dblatex default index style.
DocBook to LaTeX Publishing
10 / 102
-f figure_format, --fig-format=figure_format
Input figure format: fig , eps. Used when not deduced from figure file extension. See also Section 4.6.2.
-F input_format, --input-format=input_format
Input file format: sgml, xml (default).
-i texinputs, --texinputs texinputs
Path added to TEXINPUTS
-I figure_path, --fig-path=figure_path
Additional lookup path of the figures. See Section 4.6.3.
-l bst_path, --bst-path=bst_path
Additional lookup path of the BibTeX styles. See Section 4.11.2.
-L bib_path, --bib-path=bib_path
Additional lookup path of the BibTeX databases. See Section 4.11.2.
-m xslt, --xslt=xslt
XSLT engine to use. The available engines are: xsltproc (default), 4xslt, saxon.
-o output, --output=output
Output filename. When not specified, the input filename is used, with the suffix of the output format. The option is ignored
if several books are chunked from a set. In this case the -O option is applied instead.
-O output_dir , --output-dir=output_dir
Output directory of the books built from a set. When not specified, the current working directory is used instead. The
option is ignored if a single document is outputed, and the -o is taken into account.
-p xsl_user , --xsl-user=xsl_user
An XSL user stylesheet to use. Several user stylesheets can be specified, but the option order is meaningful: a user
stylesheet takes precedence over previously defined user stylesheets. See Section 5.1.
-P param =value , --param=param =value
Set an XSL parameter from command line. See Section 5.2.
-q, --quiet
Less verbose, showing only TeX output messages and error messages.
-r script, --texpost=script
Script called at the very end of the tex compilation. Its role is to modify the tex file or one of the compilation files before
the last round. See Section 5.5.
-s latex_style, --texstyle=latex_style
Latex style to apply. It can be a package name, or directly a latex package path. A package name must be without a
directory path and without the ’.sty’ extension. On the contrary, a full latex package path can contain a directory path, but
must ends with the ’.sty’ extension. See Section 5.4.
-t format, --type=format
Output format. Available formats: tex , dvi, ps, pdf (default).
--dvi
DVI output. Equivalent to -tdvi.
--pdf
PDF output. Equivalent to -tpdf.
--ps
PostScript output. Equivalent to -tps.
-T style, --style=style
Output style, predefined are: db2latex , simple, native (default). See Section 4.2.
DocBook to LaTeX Publishing
11 / 102
-v, --version
Display the dblatex version.
-V, --verbose
Verbose mode, showing the running commands
-x xslt_options, --xslt-opts=xslt_options
Arguments directly passed to the XSLT engine
-X, --no-external
Disable the external text file support. This support is needed for callouts on external files referenced by textdata or
imagedata, but it can be disabled if the document does not contain such callouts. Disabling this support can improve
the processing performance for big documents.
Files and Directories
$HOME/.dblatex/
User configuration directory.
/etc/dblatex/
System-wide configuration directory.
The predefined output styles are located in the installed package directory.
Environment Variables
DBLATEX_CONFIG_FILES
Extra configuration directories that may contain some dblatex configuration files.
Examples
To produce myfile.pdf from myfile.xml:
dblatex myfile.xml
To set some XSL parameters from the command line:
dblatex -P latex.babel.language=de myfile.xml
To use the db2latex output style:
dblatex -T db2latex myfile.xml
To apply your own latex style:
dblatex -s mystyle myfile.xml
dblatex -s /path/to/mystyle.sty myfile.xml
To pass extra arguments to the XSLT engine:
dblatex -x "--path /path/to/load/entity" myfile.xml
To use dblatex and profiling:
xsltproc --param profile.attribute "’output’" \
--param profile.value "’pdf’" \
/path/to/profiling/profile.xsl \
myfile.xml | dblatex -o myfile.pdf -
To build a set of books:
dblatex -O /path/to/chunk/dir -Pset.book.num=all myfile.xml
DocBook to LaTeX Publishing
4.2
12 / 102
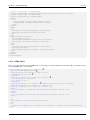
Output Formatting Style
The output rendering done by dblatex can be widely customized like explained in Chapter 5. By default several rendering styles
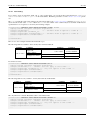
are provided, that one can choose by using the option -T (see Example 4.1). The available styles are:
native
The rendering uses the default LaTeX stylesheets. It is the style used by default if dblatex has been configured without
using the option --style.
simple
The rendering is very close to original latex rendering. The wrapper around the default latex packages is very thin.
db2latex
The rendering tries to be as close as possible to the DB2LaTeX formatting.
Example 4.1 Choosing the DB2LaTeX style
dblatex -T db2latex file.xml
4.2.1
How it works
The rendering style stuff is under the latex/ directory. You can see the XSL stylesheets under xsl/ as the way to produce
latex with as little as possible docbook specific things (even if a large amount of latex packages are used to do the work). Then,
it’s up to LaTeX stylesheets to format the document as you wish.
The organization under latex/ is as follow:
contrib
Contains the non-default available LaTeX stylesheets (simple and db2latex).
graphics
Default graphics used in the admonitions (e.g. warning). These graphics are used by the default output formatting.
scripts
Scripts used to compile with latex or pdflatex.
specs
Contains all the specification files describing the available styles. A specification file must have the extension .specs to be
detected as a style description, and its basename is the name of the style. For example the style db2latex is described by
the specification file db2latex.specs.
When dblatex is executed with no parameter, the usage is displayed. In particular, the list of the available styles is given,
like this:
$ dblatex
dblatex [options] file.{sgml|xml}
Options:
-t {pdf|ps|dvi|tex|xml}: output format
...
-T style
: available latex styles (db2latex, native, simple)
The list is built by scanning the specs files found under specs/. The spec file syntax is described in Section 5.6.
style
Default LaTeX stylesheets.
DocBook to LaTeX Publishing
4.2.2
13 / 102
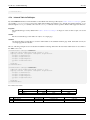
Adding a New Formatting Style
To add a new formatting style, do the following steps:
1. Let’s create the style directores that will contain all the specific data. We choose to put them under the default dblatex user
configuration directory.
$ mkdir -p $HOME/.dblatex/mystyle/latex
$ mkdir -p $HOME/.dblatex/mystyle/xsl
Note that you could choose another configuration directory (see Section 5.6.2 for more details).
2. Create the latex stylesheets you need. It must define the expected DocBook interface and include some core definitions
from the default latex stylesheets (cf. Section 5.4). Create also your XSL stylesheet if necessary.
3. Put these files under the appropriate directories:
$ mv mytexstyle.sty $HOME/.dblatex/mystyle/latex/.
$ mv param.xsl $HOME/.dblatex/mystyle/xsl/.
4. Create a configuration file under the directory $HOME/.dblatex. The specification file must point to the new latex
stylesheet, and give the specific parameters. Example:
$ cat $HOME/.dblatex/mystyle.conf
#
# Dblatex config file for my new style.
# Note that the directories are relative to mystyle.conf
#
TexInputs: mystyle/latex//
TexStyle: mytexstyle
XslParam: mystyle/param.xsl
Options:
-f fig
5. That’s it. Try to compile your document with your style, and check the output.
$ dblatex -T mystyle file.xml
4.3
4.3.1
Publishing Outputs
Publishing a single document
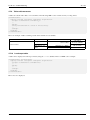
The default publishing document units are: article and book. The output file name is optionnaly specified by the -o option.
You can also publish an article or book subset, i.e. you can run dblatex on an XML input whose root element is a chapter, a
section, or anything else. In this case, dblatex wraps the root element in an article or in a book and print out a warning.
The output subset does not contain any front matter data found in an article or in a book (cover page, revision history, etc.), but
it can contain some back matter materials like an index.
$ dblatex subset.xml
Build the book set list...
Build the listings...
XSLT stylesheets DocBook - LaTeX 2e (0.2.11)
===================================================
Warning: the root element is not an article nor a book
Warning: element section(sec-subset) wrapped with article
Build subset.pdf
...
DocBook to LaTeX Publishing
4.3.2
14 / 102
Publishing a Set of Books
When the document root element is a set, and when set.book.num is set to ’all’, dblatex ouputs a file per book contained
in the set (and in the nested sets). In this case the -o option is ignored, and only the -O option is taken into account to specify
the output directory that will contain the generated files.
Instead of building all the books, the user can publish a single book from the set, by setting the set.book.num parameter to the
absolute position of the book in the set(s). By default set.book.num is set to 1 to publish only the first book.
The output file names are the book identifiers when use.id.as.filename is non zero, and when an identifier exists. If one of
the two conditions are not met, the filename pattern is "book<position in set> ".
Example: given the following set:
<?xml version="1.0" encoding="UTF-8"?>
<!-- setfile.xml. An example of set. All the books have an @id except one -->
<!DOCTYPE set PUBLIC "-//OASIS//DTD DocBook XML V4.4//EN"
"http://www.oasis-open.org/docbook/xml/4.4/docbookx.dtd">
<set lang="en" id="a_set" xmlns:xi="http://www.w3.org/2001/XInclude">
<title>Set Title</title>
<set>
<xi:include href="book1.xml"/>
<!-- book #1 -->
<xi:include href="book2.xml"/>
<!-- book #2 -->
<xi:include href="book3.xml"/>
<!-- book #3 -->
</set>
<set>
<set>
<xi:include href="bookA.xml"/> <!-- book #4 -->
<xi:include href="bookB.xml"/> <!-- book #5 -->
</set>
<set>
<xi:include href="bookC.xml"/> <!-- book #6 -->
</set>
</set>
<set>
<xi:include href="book4.xml"/>
<!-- book #7 -->
<!-- The following book, at 8th position in the sets, has no @id -->
<xi:include href="book5.xml"/>
<!-- book #8 -->
<xi:include href="book6.xml"/>
<!-- book #9 -->
</set>
</set>
Publishing this set produces 9 books in the pdfdir directory:
$ dblatex -O./pdfdir -Pset.book.num=all -Puse.id.as.filename=1 setfile.xml
Build the book set list...
Build the listings...
XSLT stylesheets DocBook - LaTeX 2e (0.2.11)
===================================================
Output all the books from the set
Writing sec1-mybook.rtex for book(sec1-mybook)
Writing sec2-mybook.rtex for book(sec2-mybook)
Writing sec3-mybook.rtex for book(sec3-mybook)
Writing secA-mybook.rtex for book(secA-mybook)
Writing book8.rtex for book
Writing secC-mybook.rtex for book(secC-mybook)
Writing sec4-mybook.rtex for book(sec4-mybook)
Writing sec5-mybook.rtex for book(sec5-mybook)
Writing sec6-mybook.rtex for book(sec6-mybook)
...
Files successfully built in ’/path/to/set/pdfdir’:
DocBook to LaTeX Publishing
15 / 102
sec1-mybook.pdf
sec2-mybook.pdf
sec3-mybook.pdf
sec4-mybook.pdf
book8.pdf
sec6-mybook.pdf
secA-mybook.pdf
secB-mybook.pdf
secC-mybook.pdf
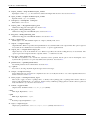
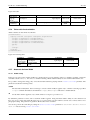
4.4
Global Page Setup
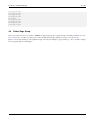
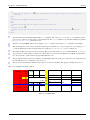
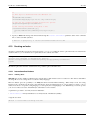
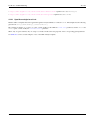
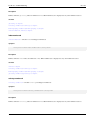
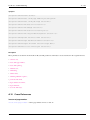
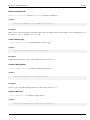
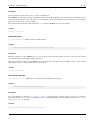
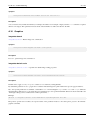
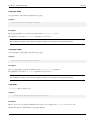
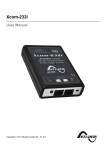
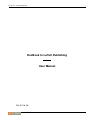
Since version 0.3.3 the user can specify to dblatex the global page layout to apply, through some XSL parameters (see Section A.18). It is also possible to produce pre-press layouts with physical pages having some crops (see Section A.21).
Figure 4.1 shows the meaning of each parameter length. Of course the example is a page with crops, only to be able to display
the crop lengths with the other lengths.
DocBook to LaTeX Publishing
16 / 102
crop.page.width
"pagesetup" − 2012/4/10 − 22:46 − page 1 − #1
page.margin.top
1 Page Example
page.margin.outer
bla bla bla bla bla bla bla bla bla bla bla bla bla bla bla bla bla bla
bla bla bla bla bla bla bla bla bla bla bla bla bla bla bla bla bla bla
bla bla bla bla bla bla bla bla bla bla bla bla bla bla bla bla bla bla
bla bla bla bla bla bla bla bla bla bla bla bla bla bla bla bla bla bla
bla bla bla bla bla bla bla bla bla bla bla bla bla bla bla bla bla bla
bla bla bla bla bla bla bla bla bla bla bla bla bla bla bla bla bla bla
bla bla bla bla bla bla bla bla bla bla bla bla bla bla bla bla bla bla
bla bla bla bla bla bla bla bla bla bla bla bla bla bla bla bla bla bla
bla bla bla bla bla bla bla bla bla bla bla bla bla bla bla bla bla bla
bla bla bla bla bla bla bla bla bla bla bla bla bla bla bla bla bla bla
bla bla bla bla bla bla bla bla bla bla bla bla bla bla bla bla bla bla
bla bla bla bla bla bla bla bla bla bla bla bla bla bla bla bla bla bla
bla bla bla bla bla bla bla bla bla bla bla bla bla bla bla bla bla bla
bla bla bla bla bla bla bla bla bla bla bla bla bla bla bla bla bla bla
bla bla bla bla bla bla bla bla bla bla bla bla bla bla bla bla bla bla
bla bla bla bla bla bla bla bla bla bla bla bla bla bla bla bla bla bla
bla bla bla bla bla bla bla bla bla bla bla bla bla bla bla bla bla bla
bla bla bla bla bla bla bla bla bla bla bla bla bla bla bla bla bla bla
bla bla bla bla bla bla bla bla bla bla bla bla bla bla bla bla bla bla
bla bla bla bla bla bla bla bla bla bla bla bla bla bla bla bla bla bla
bla bla bla bla bla bla bla bla bla bla bla bla bla bla bla bla bla bla
bla bla bla bla bla bla bla bla bla bla bla bla bla bla bla bla bla bla
bla bla bla bla bla bla bla bla bla bla bla bla bla bla bla bla bla bla
bla bla bla bla bla bla bla bla bla bla bla bla bla bla bla bla bla bla
bla bla bla bla bla bla bla bla bla bla bla bla bla bla bla bla bla bla
bla bla bla bla bla bla bla bla bla bla bla bla bla bla bla bla bla bla
bla bla bla bla bla bla bla bla bla bla bla bla bla bla bla bla bla bla
crop.page.height
page.magin.inner
page.height
1 Page Example
1
page.margin.bottom
page.width
Figure 4.1: Parameter Lengths used for Page Setup
Warning
The native dblatex style still contains some hard-coded lengths to format the revhistory table. You should then
disable the revision history display.
4.5
4.5.1
Chapter and Section numbering
Depth of Section numbering and Table Of Content
Dblatex relies on latex to automatically compute the chapter and section numbers. It also relies on latex to produce the headings
with these numbers, and to produce the Table Of Content containing these entries.
DocBook to LaTeX Publishing
17 / 102
Some specific sections like preface, colophon, or dedication are not numbered because they are displayed in front and
back matters, but they can be listed in the TOC if the related parameters are set (dedication.tocdepth, preface.tocdepth,
colophon.tocdepth).
More generally you can configure the depth of the chapter and section numbering with the parameter doc.section.depth,
and the depth of the entries in the TOC with the parameter toc.section.depth .
Note however that an unumbered section becomes an informal component, and therefore you can only link to such a section by
using a specific xrefstyle because their label built with the automatic number does not exist anymore. The other drawback is that
all the sections included in an unnumbered section or chapter are unnumbered.
4.5.2
Using the latex style for section numbering
A well customized latex style can be a powerfull yet versatile alternative to the use of section and/or TOC depth parameter. With
some latex packages you can easily format the headings to remove the numbers, or transform them. See Section 5.4 to know how
to use your own latex style with dblatex.
The benefit of this method is that you can fully control how the titles must be displayed, you do not have to play with latex
counters to have the right depth, and the sections do not lost their formal number label.
The following example shows how you can customize the chapter title by using the latex package titlesec, and shows how
to remove the chapter label in the Table Of Content with the package titletoc. Look in particular in the listing where text is
emphasized.
\usepackage{titlesec}
%% Example 1: Redefines the heading to remove the chapter label
%% The 2nd parameter only contains \filcenter without any label
\titleformat{\chapter}[block]
{\filcenter\huge}{\filcenter}{20pt}{\Huge}
%% Example 2: Put the chapter number in word
%% The title of the first chapter is then displayed like this:
%% "Chapter One <chapter title>"
\newcommand\makeletterof[1]{%
\ifthenelse{\equal{#1}{1}}{ONE}{%
\ifthenelse{\equal{#1}{2}}{TWO}{%
\ifthenelse{\equal{#1}{3}}{THREE}{%
\ifthenelse{\equal{#1}{4}}{FOUR}{%
\ifthenelse{\equal{#1}{5}}{FIVE}{%
\ifthenelse{\equal{#1}{6}}{SIX}{%
\ifthenelse{\equal{#1}{7}}{SEVEN}{%
\ifthenelse{\equal{#1}{8}}{EIGHT}{%
\ifthenelse{\equal{#1}{9}}{NINE}{%
\ifthenelse{\equal{#1}{10}}{TEN}{%
\ifthenelse{\equal{#1}{11}}{ELEVEN}{%
\ifthenelse{\equal{#1}{12}}{TWELVE}{%
#1}}}}}}}}}}}}}
\titleformat{\chapter}[block]
{\filcenter\ttfamily\huge}%
{\filcenter\MakeUppercase{\chaptertitlename} \makeletterof{\thechapter}}{20pt}{\Huge}
%% Make TOC entries for chapters without label
\usepackage{titletoc}
\titlecontents{chapter} %
[1.5em] %
{\addvspace{1em plus 0pt}\bfseries} %
{\hspace{-1.3em}} % no number, remove room reserved for it
{\hspace{-1.3em}} %
DocBook to LaTeX Publishing
18 / 102
{\hfill \contentspage} %
[\addvspace {0pt}]
4.5.3
Using the label attribute
If you need to mix numbered and not numbered chapters, the numbering depth parameters will not help. The latex style will not
easily detect that for some chapters the number should be displayed and for others it should not.
To mix numbered and unnumbered chapters you can use a label with an empty string for the chapters that must not be numbered,
as shown by the example below.
<chapter id="intro" label=""><title>Introduction</title>
<!-- This chapter must be displayed with no number, like a preface -->
</chapter>
<chapter id="before" label=""><title>Pre-requisite</title>
<!-- This chapter must be displayed with no number, like a preface -->
</chapter>
<chapter id="chap1"><title>First chapter</title>
<!-- First numbered chapter -->
</chapter>
...
<chapter id="after" label=""><title>Conclusion</title>
<!-- This chapter must be displayed with no number, like a colophon -->
</chapter>
...
You can also set a label to a specific integer to force a section counter. In this case there is no more automatic numbering. The
automatic numbering then applies to the following sections that increment the counter set for this section if there is no label.
<chapter id="intro" label="2"><title>Introduction</title>
<!-- This chapter is forced to have number 2 (it should be 1) -->
<section id="s1" label="3"><title>Section 2.3</title>
<!-- This section is forced to have number 3 (it should be 1) -->
<section id="s11" label="4"><title>Section 2.3.4</title>
<!-- This section is forced to have number 4 (it should be 1) -->
</section>
</section>
</chapter>
4.6
4.6.1
Figure Inclusion
Presentation
The expected format of the included figures depends on the backend driver used:
dvips:
EPS format is required.
pdftex:
PDF or PNG format is required.
In order to be able to use both backends, it is wise to not write the suffix of the file that references the figure. The suffix will be
deduced from the backend used.
The figures must either already exists in the expected format, or must be able to be converted on the fly.
DocBook to LaTeX Publishing
19 / 102
Example 4.2 Figure inclusion
<figure id="fig-exemple1">
<title>Components</title>
<mediaobject>
<imageobject>
<imagedata fileref="path/figure1" align="center" scale="70">
</imageobject>
</mediaobject>
</figure>
4.6.2
Converting on the fly
When it is needed dblatex tries to automatically convert the figures to the expected format (i.e. EPS or PDF). The principle is
to detect the original figure format from the suffix of the fileref attribute. If no suffix is given, the tool checks if a file whose
basename is conformant with the fileref attribute and with one of the predefined suffixes exists (that is, ".eps", ".fig", ".pdf", or
".png"). If such a file exists, conversion is done from the original format found.
The option -f fig_format allows to specify the default included figures format (fig_format), that will be used when automatic format scanning gives no result. Then, the tool converts the figures from the specified format to the expected one.
If the specified format is unknown, no conversion is done. The supported formats are:
fig:
native format of the figures produced by XFig.
eps:
Encapsulated PostScript format. This format shall be specified only when using the pdftex backend.
Example 4.3 Figure conversion
The following command compiles a document that contains figures produced with XFig.
% dblatex -f fig mydoc.sgml
4.6.3
Paths Lookup
You can use and cumulate the option -I path to specify where the figures are. The given paths can be absolute or relative. The
paths are added to the document root path.
Example 4.4 Figures lookup
This example shows how figure lookup is done. Let’s consider this document source:
<figure id="fig-example1">
<title>Composants</title>
<mediaobject>
<imageobject>
<imagedata fileref="rep1/rep2/figure1" align="center" scale="70">
</imageobject>
</mediaobject>
</figure>
And the document is compiled like this:
% dblatex -I /another/path -I /last/case /initial/path/document.sgml
The figure1 lookup is done in the following directories, in respect of the order:
DocBook to LaTeX Publishing
20 / 102
• /initial/path/rep1/rep2 ;
• /another/path/rep1/rep2 ;
• /last/case/rep1/rep2.
4.7
Creating Tables
DocBook tables can be quite complex, but dblatex should be able to drive most of cases thanks to the excellent newtbl implementation by David Hedley completely written in XSL.
Here is what is supported:
• Columns without specified widths (colspec without colwidth attribute) have the same size.
• A table width is always equal to the page width, if at least one column doesn’t contain a fixed width attribute (e.g. colwidth=“12cm”).
• Fixed column widths are supported (e.g. colwidth=“10cm”). The unit can be whatever is understood by latex (e.g. cm, em, in,
pt).
• Proportional column widths are supported (e.g. colwidth= “5*”). Combination of fixed and proportional width is supported
too (e.g. colwidth=“5*+10cm”).
• The morerows attribute of a table entry (entry element) is supported.
• The namest and nameend attributes of a table entry (entry element) are supported. It is possible to have a cell spanned on
several columns.
• The orient table attribute is supported (portrait and landscape).
• It is possible to have missing cell entries in a table.
4.7.1
Limitations
Currently the following things are known to fail with tables:
• Program listings and screens cannot be embedded in tables. Some other verbatim environments like litterallayout are allowed.
• Footnotes in table cells can fail, especially if the footnote contains several paragraphs. Moreover they are lost is a float like a
table.
4.7.2
Table Width
A table width is explicit when all the columns have a fixed size. In this case it is the sum of the colum widths. In the other cases
(columns with no colwidth or proportional columns widths) the total table width is deduced by dblatex as follow: it looks for
the Processing Instruction <?dblatex table-with="width" ?> first, then the @width attribute, the default.table.
width parameter, and finally use the page width.
A table width can be expressed as:
• A valid length (e.g. 15cm),
• A percentage of the page width (e.g. 75%),
• A keyword telling to apply an automatic column width (e.g. autowidth.all). See Section 4.7.7 for more details.
4.7.3
Tables without colwidth
When none of the colspec elements contains the colwidth attribute, all the columns have the same size, and the table width
is fixed to the maximum available size. Several examples of these tables are given.
DocBook to LaTeX Publishing
21 / 102
Column 1
left aligned
no specified width, so it takes all the page
Column 1
left aligned
no specified width
Column 1
left aligned
no specified width
4.7.4
Column 2
centered cell
idem
Column 2
left aligned
idem
Column 3
right aligned
idem
Column 4
centered cell
idem
Column 5
centered
idem
Tables with mixed colspec
A table can have colspec elements containing colwidth attribute mixed with colspec elements without colwidth.
Here is an XML source example:
<informaltable>
<tgroup cols="5" colsep="1" rowsep="1" align="left">
<colspec colname="c1"/>
<colspec align="left" colwidth="4cm"/>
<colspec align="right" colwidth="5cm"/>
<colspec align="center"/>
<colspec align="center" colwidth="3cm"/>
<tbody>
...
</tbody>
</tgroup>
</informaltable>
It is rendered like this:
Column 1
left aligned
(tgroup
order)
no specified
width
4.7.5
Column 2
left aligned
4 cm column width
Column 3
Column 4
Column 5
right aligned
centered
cell
in the centre
5 cm column width
no width
3 cm column width
Tables with proportional and fixed colwidth
Proportional column widths are supported. Here is an example:
<informaltable>
<tgroup cols="5" colsep="1" rowsep="1" align="left">
<colspec colname="c1" colwidth="*"/>
<colspec align="left" colwidth="2*"/>
<colspec align="right" colwidth="3*"/>
<colspec align="center"/>
<colspec align="center" colwidth="3cm"/>
<tbody>
...
</tbody>
</tgroup>
</informaltable>
DocBook to LaTeX Publishing
22 / 102
It gives this table:
Column 1
left aligned
(tgroup
level)
proportional
column (*)
4.7.6
Column 2
Column 3
left aligned
proportional column (2*)
Column 4
Column 5
right aligned
centered cell
in the centre
proportional column (3*)
no specified
width
3 cm column width
Tables with fixed colwidths
All the columns can have fixed size, like this:
<informaltable>
<tgroup cols="4" colsep="1" rowsep="1" align="left">
<colspec colname="c1" colwidth="2cm"/>
<colspec align="left" colwidth="2.5cm"/>
<colspec align="right" colwidth="5cm"/>
<colspec align="center" colwidth="3cm"/>
<tbody>
...
</tbody>
</tgroup>
</informaltable>
It gives the following table:
Column 1
left aligned
(tgroup level)
2 cm column
width
Column 2
left aligned
2,5 cm column
width
4.7.7
Automatic Column Width
4.7.7.1
Global Setting
Column 3
right aligned
5 cm column width
Column 4
centered cell
4 cm column width
In the previous sections the columns widths are computed from a proportional basis, when no colwidth is specified or when the
colwidths contain a star ("*"). Of course, a colwidth containing a fixed width incidently sets the column width with this size.
It is possible to change this sizing policy of not-fixed-width columns by playing with the newtbl.autowidth parameter. The
parameter can take the following values:
default
The automatic width (that is, latex is in charge to size the column width) is applied only to columns not having a specified
colspec colwidth. It includes both undefined colspec, and colspec without the colwidth attribute.
all
the automatic width is applied to any column, whatever a colspec is provided or not.
By default the parameter is unset, and no automatic width is applied. Using automatic width is handy in some situations but
there is no more control if the tables fit in the page or not, since in this case the column is as wide as its content, with no more
paragraph breaking. The parameter is global for all the tables in the document.
You can also perform the same thing by setting the default.table.width parameter to autowidth.default or autow
idth.all instead of using newtbl.autowidth.
DocBook to LaTeX Publishing
4.7.7.2
23 / 102
Local Setting
If you want to apply an automatic width only to some specific tables you can put the Processing Instruction <?dblatex
table-with="autowidth.scope" ?> in the related tables. The PI has precedence over the newtbl.autowidth parameter.
The scope can take the same values and have the same effects than for the newtbl.autowidth parameter (default or all)
and it can take another value: column. When set to column, the number of the columns subject to automatic width must be
specified after a colon separator, as shown by the following example:
<informaltable><?dblatex table-width="autowidth.column: 1 3"?>
<tgroup cols="4" colsep="1" rowsep="1" align="left">
<colspec colname="c1"/>
<!-- automatic width is applied to column #1 -->
<colspec align="left" colwidth="*"/>
<colspec align="right" colwidth="5cm"/> <!-- automatic width is applied to column #3 -->
<colspec align="center" colwidth="3cm"/>
...
</informaltable>
Here are two other examples with the all and default scopes:
The following table has columns 1 and 2 sized by latex with autowidth.all:
Column 1
Column 3
Column 2
simple cell
cell on 4 lines
cell on 2 lines
cell in column 2
left aligned on 2 lines
cell in line 3, column 3
4 cm column width
Column 4
cell without
morerow attribute
cell on 2 lines
last cell in column 4
It is written as follow:
<informaltable><?dblatex table-width="autowidth.all"?>
<tgroup cols="4" colsep="1" rowsep="1" align="left">
<colspec colname="c1"/> <!-- ’default’ and ’all’ apply on this column -->
<colspec align="left" colwidth="*"/> <!-- only ’all’ applies on this column -->
<colspec align="right" colwidth="5cm"/>
<colspec align="center" colwidth="3cm"/>
...
</informaltable>
The following table has only columns 1 sized by latex with autowidth.default:
Column 1
Column 2
simple cell
cell on 4 lines
Column 3
cell on 2 lines
cell in column 2
left aligned on 2 lines
cell in line 3, column 3
4 cm column width
Column 4
cell without
morerow attribute
cell on 2 lines
last cell in column 4
The only difference is that the PI attribute value is autowidth.default:
<informaltable><?dblatex table-width="autowidth.default"?>
<tgroup cols="4" colsep="1" rowsep="1" align="left">
<colspec colname="c1"/> <!-- ’default’ and ’all’ apply on this column -->
<colspec align="left" colwidth="*"/> <!-- only ’all’ applies on this column -->
<colspec align="right" colwidth="5cm"/>
<colspec align="center" colwidth="3cm"/>
...
DocBook to LaTeX Publishing
24 / 102
</informaltable>
4.7.8
Informal Table LaTeX Styles
By default dblatex translates an informal table to the LaTeX environment specified by the table.default.tabstyle parameter (usually longtable), but you can specify which Latex tabular environment to use, globally through the parameter, or per
table through the tabstyle attribute. Of course the tabstyle attribute value is specific to dblatex. The supported values are:
longtable
The default table type used by dblatex when table.default.tabstyle is empty, in order to be able to split over several
pages.
tabular
The most usual table type. Such table can only be on a single page.
tabularx
An advanced table type that allows to stretch column widths to the available remained page width. Such table can only be
on a single page like for "tabular".
The two following examples show how tabular and tabularx rendering differ when the automatic width feature is used. Here is
the XML source code:
<informaltable tabstyle="tabular">
<?dblatex table-width="autowitdh.column: 1 3"?>
<tgroup cols="5" colsep="1" rowsep="1" align="left">
<colspec colname="c1"/>
<colspec align="left"/>
<colspec align="right"/>
<colspec align="center"/>
...
</tgroup>
</informaltable>
<informaltable tabstyle="tabularx">
<?dblatex table-width="autowitdh.column: 1 3"?>
<tgroup cols="5" colsep="1" rowsep="1" align="left">
<colspec colname="c1"/>
<colspec align="left"/>
<colspec align="right"/>
<colspec align="center"/>
...
</tgroup>
</informaltable>
It is rendered as follow:
C1
A
B
C1
A
B
Column 2
left aligned
idem
Column 2
left aligned
idem
Column 3
right aligned
idem
Column 3
right aligned
idem
Column 4
centered cell
idem
Column 4
centered cell
idem
Column 5
centered
idem
Column 5
centered
idem
DocBook to LaTeX Publishing
4.7.9
25 / 102
Tables with morerows
A table can contain entries that cover several lines. The following XML source contains an entry covering 4 lines:
<informaltable>
<tgroup cols="4" colsep="1" rowsep="1" align="left">
<colspec colname="c1" colwidth="*"/>
...
<tbody>
<entry morerows="3">it covers 4 lines</entry>
...
</tbody>
</tgroup>
</informaltable>
Here is an example of table containing several entries with morerows attribute:
Column 1
Column 2
simple cell
cell on 4 lines
4.7.10
cell in column 2
left aligned on 2
lines
Column 3
cell on 2 lines
cell in line 3, column 3
4 cm column width
Column 4
cell without
morerow attribute
cell on 2 lines
last cell in column 4
Landscape tables
A table can be displayed in a lanscape format by using the orient attribute. Here is an XML source example:
<informaltable orient="land">
<tgroup cols="5" colsep="1" rowsep="1" align="left">
<colspec colname="c1" colwidth="*"/>
...
<tbody>
...
</tbody>
</tgroup>
</informaltable>
Here is how it is displayed.
Column 1
left aligned
no specified width
Column 2
left aligned
idem
Column 3
right aligned
idem
Column 4
centered cell
idem
Column 5
centered
idem
DocBook to LaTeX Publishing
26 / 102
DocBook to LaTeX Publishing
4.7.11
27 / 102
Smaller tables
For big tables it can be usefull to have smaller text, so that the table is not too large or too long and it can be displayed within a
page. It is possible to specify smaller table text by using the role attribute of the elements table or informaltable.
The values and the “role” dedicated to this attribute are specific to dblatex, but it is compliant with the DocBook specification
because in general the role attribute purpose is never defined.
The available text size definitions supported by role are directly taken from LaTeX:
• small,
• footnotesize,
• scriptsize,
• tiny.
Here are examples for each size.
Column 1
left aligned
no specified width
Column 2
left aligned
idem
Column 3
right aligned
idem
Column 4
centered cell
idem
Column 5
centered
idem
Column 1
left aligned
no specified width
Column 2
left aligned
idem
Column 3
right aligned
idem
Column 4
centered cell
idem
Column 5
centered
idem
Column 1
left aligned
no specified width
Column 2
left aligned
idem
Column 3
right aligned
idem
Column 4
centered cell
idem
Column 5
centered
idem
Column 1
Column 2
Column 4
centered cell
idem
Column 5
centered
idem
left aligned
no specified width
4.7.12
Column 3
left aligned
idem
right aligned
idem
Coloured tables
You can color all the table by setting its bgcolor attribute.
You can also color only some cells by using the Processing Instruction <?dblatex bgcolor="color"?>. The PI can
apply to columns when put in a colspec, to rows when put at the beginning of a row, or to cells when put in a entry.
The entry colour has precedence over the row colour, that has precedence over the column colour, that has precedence over the
table colour.
The color can be expressed in hexadecimal notation like for HTML (e.g. #C0C0C0) or in a syntax understood by the colortbl
latex package.
Here is an example.
Column 1
yellow
blue row
yellow
Column 2
green column
red cell
green column
This table is coded like this:
<informaltable id="tbl-color" bgcolor="{yellow}">
<tgroup cols="4" colsep="1" rowsep="1" align="left">
Column 3
yellow
blue row
yellow
Column 4
yellow
blue row
gray
DocBook to LaTeX Publishing
28 / 102
<colspec colname="c1" colwidth="2cm"/>
<colspec align="left" colwidth="2.5cm"><?dblatex bgcolor="#00FF00"?></colspec>
<colspec align="right" colwidth="5cm"/>
<colspec align="center" colwidth="3cm"/>
<thead>
<row>
<entry>Column 1</entry><entry>Column 2</entry>
<entry>Column 3</entry><entry>Column 4</entry>
</row>
</thead>
<tbody>
<row>
<entry>yellow</entry><entry>green column</entry>
<entry>yellow</entry><entry>yellow</entry>
</row>
<row>
<?dblatex bgcolor="{blue}"?>
<entry>blue row</entry>
<entry><?dblatex bgcolor="{red}"?>red cell</entry>
<entry>blue row</entry><entry>blue row</entry>
</row>
<row>
<entry>yellow</entry><entry>green column</entry>
<entry>yellow</entry>
<entry><?dblatex bgcolor="[gray]{0.8}"?>gray</entry>
</row>
</tbody>
</tgroup>
</informaltable>
4.7.13
HTML Tables
Since version 0.3.2 dblatex supports HTML tables. Some features are handled differently from CALS tables as illustrated by the
following HTML table source example:
<table border="1" width="100%" rules="all" 1v>
<caption>An HTML Table</caption> 2v
<colgroup span="2" valign="top" align="right"/>
<?dblatex bgcolor="red"?> 3v
</colgroup>
<colgroup valign="bottom" align="left" width="5%" 4v>
<col align="right" span="2"/>
<col valign="top"/>
</colgroup>
<colgroup bgcolor="yellow" width="0*" 5v><?dblatex bgcolor="yellow"?></colgroup>
<colgroup valign="bottom" align="left" width="15%"/>
<colgroup valign="bottom" align="left" width="10%"/>
<thead>
<tr> <td width="10%">Head A1</td><td>Head B1</td><td>Head C1</td> </tr>
</thead>
<tfoot>
<tr> <td width="10%">Foot A1</td><td>Foot B1</td><td>Foot C1</td> </tr>
</tfoot>
<tr>
<td width="10%">A1</td><td>B1</td><td>C1</td>
</tr>
<tr>
<td>A2</td><td bgcolor="yellow">B2</td><td colspan="3" rowspan="3">C-E2</td><td>F2</td>
</tr>
DocBook to LaTeX Publishing
29 / 102
<tr>
<td>A3</td><td width="25.3" 6v>B3</td><td>F3</td><td rowspan="2">G3</td><td rowspan="3"> ←H3</td>
</tr>
<tr>
<td>A4</td><td>B4</td><td>F4</td><td>G4</td>
</tr>
<tr>
<td>A5</td><td>B5</td><td width="5%">C5</td><td>D5</td>
</tr>
<tr bgcolor="blue" 7v>
<td>A6</td><td>B6</td><td>C6</td><td>D6</td><td>E6</td><td bgcolor="green" 7v>F6</td>
</tr>
</table>
v
1
v
2
v
3
v
4
v
5
v
6
v
7
The cell borders are specified through the table rules attribute, and not by any rowsep and colsep attributes. Therefore it is not possible to set the borders of an individual cell. If no rules attribute is provided the default setup defined
by default.table.rules parameter is used.
The title of a formal HTML table is set through the caption element, because the title element is not available.
The cell background colors can be set directly with the bgcolor attribute in row (for an entire row color setting), th, or
td, but the dblatex bgcolor Processing Instruction is required in colgroup or col to set a column color.
The relative widths can be expressed as a percentage. The proportional syntax (e.g. "3*") is still available in colgroups.
To specify that a column must be as wide as its content, there is no need to use the dblatex autowidth Processing Instruction. You just need to set the related colgroup width attribute to "0*".
The fixed widths must be expressed as numbers, and the implicit unit is the point ("pt"). You cannot set a width expressed
in a unit like inchs ("in"), centimeters ("cm") and so on.
The closest enclosing element attribute has precedence over ancestor attributes. This applies to background color too.
This source example is rendered as follow:
Head A1
A1
A2
A3
A4
A5
A6
Foot A1
Head
B1
B1
B2
B3
B4
B5
B6
Foot
B1
Head
C1
C1
C5
C6
Foot
C1
D5
D6
C-E2
E6
F2
F3
F4
G4
G3
F6
Table 4.1: An HTML Table
H3
DocBook to LaTeX Publishing
4.8
30 / 102
Writing Mathematics
4.8.1
Writing LaTeX Mathematical Equations
4.8.1.1
Presentation
DocBook doesn’t define elements for writing mathematical equations. Only few elements exist that tell how equation should be
displayed (inlined, block):
• inlineequation tells that the equation is inlined,
• informalequation tells that the equation is displayed as a block, without a title.
• equation tells that the equation is displayed as a block, with or without a title.
These tags include a graphic (graphic or mediaobject) or an alternative text equation, as shown by the example.
Example 4.5 Equation taken from TDG
<equation><title>Last Theorem of Fermat</title>
<alt>x^n + y^n ≠ z^n ∀ n ≠ 2</alt>
<graphic fileref="figures/fermat"></graphic>
</equation>
4.8.1.2
Implementation choice
The principle is to use only the alt element. If initially alt contains actually the text to print, it is chosen to use this element
to embed LaTeX mathematical equations. This choice has the following advantages:
• The translation done by dblatex is really easy, since the equation is already written in LaTeX.
• LaTeX is one of the best word processor to render mathematical formulas.
• One doesn’t need to write the equations in MathML.
• This method isn’t specific to this tool (see the following section).
Besides, the implementation is as light as possible. This is why it is up to the writer to properly use the mathematical delimiters
($, \(, \), \[, \]). By this way the writer fully controls how he writes equations.
4.8.1.3
Compatibility
This implementation is not contradictory nor specific. In particular, the DBTeXMath proposal to extend the DSSSL stylesheets
used by jade follows the same approach, and is integrated in the Norman Walsh XSL stylesheets.
4.8.1.4
Examples
The following examples show how to write the equations.
DocBook to LaTeX Publishing
31 / 102
Example 4.6 Inlined Equation
The formula C = α + βY γ + ε is inlined in the paragraph. Its XML source is:
<para>The formula
<inlineequation id="eg-inlineequation">
<alt>$C = \alpha + \beta Y^{\gamma} + \epsilon$</alt>
<graphic fileref="figures/eq1"/>
</inlineequation>
is inlined in the paragraph. Its XML source is:</para>
Example 4.7 Equation in a block
The following formula:
C = α + βY γ + ε
is displayed in a separate block. The XML source is:
<para>The following formula:
<informalequation>
<alt>\[C = \alpha + \beta Y^{\gamma} + \epsilon\]</alt>
<graphic fileref="figures/eq1"/>
</informalequation>
is displayed in a separate block. The XML source is:</para>
Example 4.8 Equation in a float
The formula Equation 4.1 below:
C = α + βY γ + ε
E QUATION 4.1: Simple Formula
is displayed in a block with a title. Its XML source is:
<?xml version="1.0" encoding="iso-8859-1"?>
<!DOCTYPE para PUBLIC "-//OASIS//DTD DocBook XML V4.4//EN"
"http://www.oasis-open.org/docbook/xml/4.4/docbookx.dtd">
<para>The formula <xref linkend="eq-with-title"/> below:
<equation id="eq-with-title">
<title>Simple Formula</title>
<alt>\[C = \alpha + \beta Y^{\gamma} + \epsilon\]</alt>
<graphic fileref="figures/eq1"/>
</equation>
is displayed in a block with a title. Its XML source is:</para>
Example 4.9 Equation without a title
The formula 4.1 below:
C = α + βY γ + ε
is displayed as a latex equation with its own equation numbering. Its XML source is:
<?xml version="1.0" encoding="iso-8859-1"?>
<!DOCTYPE para PUBLIC "-//OASIS//DTD DocBook XML V4.4//EN"
(4.1)
DocBook to LaTeX Publishing
32 / 102
"http://www.oasis-open.org/docbook/xml/4.4/docbookx.dtd">
<para>The formula <xref linkend="eq-with-no-title"/> below:
<equation id="eq-with-no-title">
<alt>C = \alpha + \beta Y^{\gamma} + \epsilon</alt>
<graphic fileref="figures/eq4"/>
</equation>
is displayed as a latex equation with its own equation numbering.
Its XML source is:</para>
4.8.2
Writing MathML equations
You can write MathML equations in a DocBook based document, by using the MathML Module for DocBook XML instead of
the DocBook DTD.
dblatex now translates the MathML equations to latex by using the excellent stylesheets of the XSLT MathML Library by Vasil
Yaroshevich. A large amount of tests from the W3C MathML Test Suite 2.0 is supported (657 of 712 tests). The test file used to
validate the MathML stylesheets is provided in the package.
4.9
Extending the Verbatim Rendering
4.9.1
Dblatex Specific Options
There are few attributes or options specific to dblatex to render verbatim blocks:
• The role attribute of screen, programlisting, and literallayout can take the following special values:
wrap
The verbatim lines can break and wrap when they are longer than the available width. It is the default behaviour.
overflow
The verbatim lines never break and go into the margin when they are too long.
scale
The verbatim block is automatically scaled so that the longest line or specified column count fits in the available page
width. See Section 4.9.2.
• The parameter literal.role can be used to set the default role to apply. By default the value is an empty string.
• The parameter literal.class can be used to set the default literallayout class when no class attribute is given. By
default the value is monospaced.
4.9.2
Scaling Feature
The user can scale the verbatim block so that the longest line fits in the available page width, or so that the page contains at least
a specified width expressed in columns.
The scaling feature is enabled when the parameter literal.extensions is set as follow:
scale
The scaling is performed only when the role attribute is set to "scale", or when the role attribute is not set and the
parameter literal.role is set to "scale".
scale.by.width
The scaling is performed when the role attribute or literal.role is properly set, or when the attribute width is set.
When width is set the block is scaled so that the specified width fits in the page width.
DocBook to LaTeX Publishing
33 / 102
Here are some listing examples with several attribute combinations producing or not the scaling. In these examples the parameter
literal.extensions is set to "scale.by.width".
<programlisting width="110">
The listing is scaled and lines are wrapped after 110 characters. Check yourself:
123456789 123456789 123456789 123456789 123456789 123456789 123456789 123456789 123456789 123456789 1234567
9 123456789
0
1
2
3
4
5
6
7
8
9
10 ←11
←-
</programlisting>
<programlisting width="110" role="overflow">
There is no scaling because the role has precedence over the width attribute:
123456789 123456789 123456789 123456789 123456789 123456789 123456789 123456789 123456789 123456789 1
0
1
2
3
4
5
6
7
8
9
1
11
</programlisting>
<programlisting role="scale">
The listing is scaled to display the longest line with no break:
123456789 123456789 123456789 123456789 123456789 123456789 123456789 123456789 123456789 123456789 1234567 9 123456789
0
1
2
3
4
5
6
7
8
9
10
11
</programlisting>
<programlisting width="110" role="scale">
The listing is scaled to fit up to 110 columns, and the lines are wrapped. In this case role is redundant
because @width automatically produces scaling.
←-
123456789 123456789 123456789 123456789 123456789 123456789 123456789 123456789 123456789 123456789 1234567
9 123456789
0
1
2
3
4
5
6
7
8
9
10 ←11
←-
</programlisting>
4.9.3
Formatting embedded elements
The programlisting and screen environments are supported by dblatex, but the implementation is rather conservative, that is, most
of the elements embedded in such environments are not rendered like in normal environment (e.g. bold, enphasis, etc.). Only the
contained text is printed out. For the elements whose rendering is lost, dblatex prints out a warning message.
For example, let’s compile the following programlisting fragment:
<programlisting>
zone <replaceable>zone_name</replaceable>
<optional><replaceable>class</replaceable></optional> {
type delegation-only;
};
</programlisting>
dblatex warns that the optional and replaceable elements are not supported (i.e. not rendered) in the programlisting:
$ dblatex progfrag.xml
Build the book set list...
Build the listings...
XSLT stylesheets DocBook - LaTeX 2e (devel)
===================================================
Warning: the root element is not an article nor a book
Warning: programlisting wrapped with article
replaceable not supported in programlisting or screen
DocBook to LaTeX Publishing
optional not supported in
replaceable not supported
replaceable not supported
optional not supported in
replaceable not supported
...
34 / 102
programlisting or
in programlisting
in programlisting
programlisting or
in programlisting
screen
or screen
or screen
screen
or screen
If you want those elements be formatted in bold, or italic you need to override the templates used in latex.programlisting
mode, as follow:
<xsl:template
<xsl:param
<xsl:param
<xsl:param
match="replaceable|optional" mode="latex.programlisting">
name="co-tagin" select="’<:’"/> 1v
2v
name="rnode" select="/"/>
3v
name="probe" select="0"/>
<xsl:call-template name="verbatim.boldseq"> 4v
<xsl:with-param name="co-tagin" select="$co-tagin"/>
<xsl:with-param name="rnode" select="$rnode"/>
<xsl:with-param name="probe" select="$probe"/>
</xsl:call-template>
</xsl:template>
v, 2v, 3v These parameters are required in latex.programlisting mode.
1
v
The predefined template makes bold the verbatim text of the element.
4
If formatting setup is not enough, you can also render these elements as if they were in a normal environment. To do this, you
need to override the templates used in latex.programlisting mode, as follow:
<xsl:template
<xsl:param
<xsl:param
<xsl:param
match="replaceable|optional" mode="latex.programlisting">
name="co-tagin" select="’<:’"/>
name="rnode" select="/"/>
name="probe" select="0"/>
<xsl:call-template name="verbatim.embed"> 1v
<xsl:with-param name="co-tagin" select="$co-tagin"/>
<xsl:with-param name="rnode" select="$rnode"/>
<xsl:with-param name="probe" select="$probe"/>
</xsl:call-template>
</xsl:template>
v
To enable the normal mode rendering within a verbatim environment, call the verbatim.embed template, and pass the
mandatory parameters.
1
4.9.4
Creating a new Verbatim Environment
dblatex heavily relies upon the listing latex package to display the screen, programlisting, and literallayout
blocks.
The global listing setup can be overwritten with literal.layout.options but the user can also provide its own listing
environment to use instead of the default environment, by using the following procedure:
1. Create the new listing environment in a customized latex style, like the following example. It is required that the environment name starts with the string "lst". If not, dblatex raises an error because it cannot recognize it as a special verbatim
environment.
DocBook to LaTeX Publishing
35 / 102
%%
%% This style is derivated from the db2latex one
%%
\NeedsTeXFormat{LaTeX2e}
\ProvidesPackage{mystyle}[2012/02/03 My DocBook Style]
%% Just use the original package and pass the options
\RequirePackageWithOptions{db2latex}
%% New listing environment doing what I want
\lstnewenvironment{lstblock}[1][]
{\lstset{numbers=left,numberstyle=\tiny,float,#1}}
{}
2. Specify to dblatex the listing environment name through the literal.environment parameter, either on the command
line or with a user XSL stylesheet.
$ dblatex -s mystyle.sty -P literal.environment=lstblock file.xml
4.10
Creating an Index
An index is automatically generated if some index entries (indexterm), telling the terms to put in the index, are written in the
document. The keyword elements are not printed but are also added to the index.
Example 4.10 Index Entry
<para>In this paragraph is described the function
<function>strcpy</function><indexterm><primary>strcpy</primary></indexterm>.
</para>
The index is put at the end of the document. It is not possible to put it somewhere else.
4.10.1
Internationalized Indexes
4.10.1.1
Indexing Tools
Makeindex is used by default to build the index. It works fine for latin charset but it is not suited for other charsets and UTF-8
encoding. Moreover its sorting rule is not suited for many languages.
Therefore dblatex gives the possibility to use xindy that allows internationalized indexing. When xindy is used, the sorting
language used is deduced from the Docbook document lang. If the document lang has no correspondance for xindy, or if you
want to force the use of a specific sorting language, you can specify the sorting language to use. With Xindy you can also provide
your own sort rules, but see the official Xindy documentation for more details.
A parameter is provided to use xindy instead of makeindex:
• latex.index.tool=xindy tells dblatex to use xindy instead of makeindex (default).
A typical use is then:
dblatex -P latex.index.tool=xindy file.xml
DocBook to LaTeX Publishing
4.10.1.2
36 / 102
Index Sorting
Makeindex has very few methods to change its index sorting rules, except the -g and -L options which are not very hepfull in
a DocBook context. On the contrary xindy can sort the index according to a specific language.
When xindy is used as index tool, dblatex passes to xindy through the xindy -L option the language name corresponding to
the lang attribute of the document. If the document has no language or if xindy does not support the document language, the
default sorting is applied. In this case you can use the following parameter:
• latex.index.language specifies the language used to sort the indexes. Currently this parameter is relevant only for xindy.
The language set must be known by xindy (see the xindy documentation). When not set (or empty) the sorting language to
apply is deduced from the document lang.
The parameter can be used like any other like this:
dblatex -P latex.index.language=german-din file.xml
But it can also be used through an XSL configuration file to provide new mapping rules between ISO lang codes and known
xindy languages, or override the current mapping done by dblatex as shown in Example 4.11.
Example 4.11 XSL Index Language Setup
By default dblatex maps the de lang code to the language named german-din, and has no correspondance to map cy (Welsh)
or eu (Basque). The following setup provides a mapping for these cases:
<xsl:param name="latex.index.tool">xindy</xsl:param>
<xsl:param name="latex.index.language">
<xsl:variable name="lang">
<xsl:call-template name="l10n.language">
<xsl:with-param name="target" select="(/set|/book|/article)[1]"/>
<xsl:with-param name="xref-context" select="true()"/>
</xsl:call-template>
</xsl:variable>
<!-- Define Xindy lang to use in specific cases -->
<xsl:choose>
<xsl:when test="$lang=’de’">german-duden</xsl:when>
<xsl:when test="$lang=’cy’">english</xsl:when>
<xsl:when test="$lang=’eu’">french</xsl:when>
</xsl:choose>
</xsl:param>
4.11
Writing a Bibliography
A bibliography (bibliography) can be written and put anywhere in the document. It appears as a chapter or a section and is
composed by several divisions (bibliodiv) displayed as sections or subsections.
4.11.1
Using Bibliography Entries
The writer selects information that describes each bibliography entry (biblioentry), and chooses the presentation order. The
titles and authors are displayed first.
DocBook to LaTeX Publishing
37 / 102
Example 4.12 A Bibliography
<bibliography><title>Bibliography Example</title>
<bibliodiv><title>References</title>
<biblioentry>
<title>Document title</title>
<author><firstname>J.</firstname><surname>Doe</surname></author>
<pubsnumber>DEX000567325</pubsnumber>
</biblioentry>
</bibliodiv>
<bibliodiv><title>White papers</title>
<biblioentry>
<title>Technical notes</title>
<authorgroup>
<author><firstname>J.</firstname><surname>Doe</surname></author>
<author><firstname>R.</firstname><surname>Marion</surname></author>
</authorgroup>
<pubsnumber>DEX000704520</pubsnumber>
</biblioentry>
</bibliodiv>
</bibliography>
4.11.2
Using BibTeX Databases
Instead of writing the bibliographic materials in DocBook you can reuse some already available BibTeX databases. Of course,
this feature is specific to dblatex, that will automatically call bibtex if some bibtex databases are used.
To do so, write a bibliodiv containing an empty bibliomixed element having a bibtex processing instruction specifying
the databases to use and the style to apply.
More precisely here are the attributes supported by the bibtex PI:
bibfiles
This attribute is mandatory and specifies the databases to use. The databases are separated by commas, and must not
contain the file suffix (.bib). The bibfiles paths must be absolute or relative to the base directory of the document. You
can also add some bibfile paths by using the -L option.
bibstyle
Optional attribute specifying the bibliographic style to apply for rendering the databases. You can also change globally the
style to apply with the latex.biblio.style.
The actual style file used by bibtex is searched in the default paths, but some extra paths can be added by using the -l
option.
mode
Optional print mode. The available values are:
all
Print all the entries contained in the databases.
cited
Print only the entries cited in the document.
notcited
Print only the entries not cited in the document.
When the attribute is not used, the latex.biblio.output parameter is used as print mode. By default the print mode is
set to ’all’.
Some bibliodivs embedding bibliographic entries can be mixed with some bibliodivs using BibTeX databases, as shown
by Example 4.13.
DocBook to LaTeX Publishing
38 / 102
Example 4.13 Bibliography using BibTeX databases
<bibliography><title>Bibliography Example</title>
<bibliodiv><title>References</title>
<biblioentry>
<title>Document Title</title>
<author><firstname>J.</firstname><surname>Doe</surname></author>
<pubsnumber>DEX000567325</pubsnumber>
</biblioentry>
</bibliodiv>
<bibliodiv><title>Bibtex References</title>
<bibliomixed><?bibtex bibfiles="bib/latex-bib" bibstyle="alpha"?></bibliomixed>
</bibliodiv>
<bibliodiv><title>Cited Bibtex References</title>
<bibliomixed><?bibtex bibfiles="bib/database1,bib/database2"
bibstyle="plain"
mode="cited"?></bibliomixed>
</bibliodiv>
</bibliography>
4.11.3
Natbib Citations
You can apply natbib citation styles by playing with the citation role attribute, or with a dblatex processing instruction. The
natbib use is enabled only when the citation.natbib.use paramater is set to 1; if not (default) the role attribute or PI are
not taken into account even if present. The natbib package can be loaded with user specific options by setting the citation.
natbib.options parameter.
When using the role attribute, simply type the natbib citation command to apply. When using the dblatex PI, put the natbib
command in the citestyle attribute.
If you need to put some square brackets "[ ]" in the citation texts, enclose the whole text with "{ }" to protect them (as you would
do in latex).
Here are some examples:
<para>
<citation role="\citep[see][chap. #2]">texbook</citation>
<citation role="\citep[see][{[chap. #2]}]">texbook</citation>
<citation><?dblatex citestyle="\citep[see][chap. #2]"?>texbook</citation>
<citation>texbook</citation>
</para>
You can use a global natib citation style with the citation.default.style parameter. By default the parameter is empty,
and therefor is not used.
4.12
Document Revisions
The attribute revisionflag is usefull to identify the changes between two revisions of a document. This information is
managed by dblatex, that adds revision bars in the margin of the paragraphs changed, such like in this paragraph.
Adding the revision flags can be manual, but its is tedious and error prone. The diffmk tool by Norman Walsh can do the work
for you. See http://www.sagehill.net/docbookxsl/Changebars.html for more details about how to use it.
Note
With old changebar packages the revision bars only appear when using the "dvips" driver. This limitation has been fixed with
changebar greater or equal to v3.5c.
DocBook to LaTeX Publishing
4.13
Locale Support
4.13.1
Document Encoding
39 / 102
By default the latex document produced by dblatex is encoded in latin1, that fits well for roman-characters. This said, a real
international support involves some kind of Unicode (UTF8) support.
In dblatex, the Unicode support is done by two methods that can be selected by some parameters:
• latex.unicode.use=1 asks for including the unicode package (initially provided by Passivetex) in order to handle many of
the unicode characters in a latin1 encoded document.
• latex.encoding =utf8 produces a document encoded in UTF8, that is compiled in UTF8. It requires to have the ucs package
installed.
In some languages like Chinese, Japanese or Korean, the latex document must be in UTF8. Therefore, the UTF8 encoding is
forced for these languages whatever the parameter values are.
4.13.2
Babel Languages
Dblatex should be able to handle most of the languages supported by the babel package. Just set the lang=lang attribute in the
root document element and dblatex will load the appropriate babel language.
4.13.3
CJK Languages
Dblatex can handle the CJK languages thanks to the CJK package. The CJK package must be installed to have this support
available.
As said in Section 4.13.1 the latex file is encoded in UTF8. Moreover, the Cyberbit fonts are then used.
The install of the CJK package and Cyberbit fonts are well described at: http://kile.sourceforge.net/Documentation/
html/cjk.html.
4.13.3.1
Korean Support
Dblatex does not use the HLatex package to drive Korean documents. It does not use the hmakeindex nor the hbibtex tool.
Currently, Korean is handled like Chinese and Japanese with the CJK package.
4.13.4
Mixing the languages
Dblatex cannot handle correctly a document containing several elements with different lang values. In particular, if the main
document lang is not one of the CJK language, a portion of text written in CJK will not be handled correctly and it can result in
a compilation crash.
Even if the langs mixed do not end to a compilation failure, only the main document lang will be taken into account.
4.14
Using XRefsyle and Olinks
Since version 0.2.7 you can use the xrefstyle attribute like you would do with the DocBook Project stylesheets for HTML
output.
Furthermore, you can also use olinks. Note that Olinking is used in the PDF version of this manual, in Section 2.4.
Actually, the common DocBook Project stylesheets version 1.72 are now used by dblatex to handle all of these features.
These features are fully described in the DocBook XSL: The Complete Guide book by Bob Stayton. In particular, the following
sections cover these topics:
DocBook to LaTeX Publishing
40 / 102
• http://www.sagehill.net/docbookxsl/CustomXrefs.html explains how to use xrefstyle.
• http://www.sagehill.net/docbookxsl/Olinking.html explains how to use olinks.
4.14.1
Specific xrefstyle for ulink
Dblatex defines a template that can be applied through the xrefstyle attribute to format an ulink. The template has the following
general form: url[.{show|hide}][.{after|infoot}]
The principle is that the show and hide parts override locally for this ulink the ulink.show parameter, and the after and
infoot parts override locally the ulink.footnotes parameter.
When only one part is defined, only one setup is overriden, and the other setup depends on the corresponding global parameter.
See ulink.show to have several examples of use of the ulink xrefstyle template.
DocBook to LaTeX Publishing
41 / 102
Chapter 5
Customization
The transformation process (and thus the output rendering) can be heavily customized by:
• using some configuration parameters either in a configuration stylesheet or directly from the command line,
• using some customized stylesheets,
• using a customized LaTeX style package.
• using a LaTeX post process script or plugin.
All these customization methods can be used independently and in exceptional cases, but it can also be combined and registered
in a master configuration file, called a specification file (cf. Section 5.6) to create a new tool dedicated to your needs.
5.1
Using XSL Parameters
The PDF rendering can be customised by using some XSL configuration parameters. Appendix A contains the reference documentation of the available user-configurable parameters.
5.2
Setting Command line Parameters
You can set some XSL parameters directly from the command line without creating a configuration parameter stylesheet, with
the -P parameter=value option.
The following example set the latex.hyperparam parameter value:
dblatex -P latex.hyperparam=colorlinks,linkcolor=blue myfile.xml
5.3
XSL User Stylesheet
You can provide your own XSL stylesheet to set some of the XSL parameters, and/or to override some of the dblatex XSL
templates. The user stylesheet is specified by using the option -p custom.xsl.
DocBook to LaTeX Publishing
5.3.1
42 / 102
Changing the XSL parameter values
The parameters can be stored in a user defined XSL stylesheet. An example of configuration stylesheet is given with this manual:
<?xml version=’1.0’ encoding="iso-8859-1"?>
<xsl:stylesheet xmlns:xsl="http://www.w3.org/1999/XSL/Transform" version=’1.0’>
<!-- Target Database set by the command line
<xsl:param name="target.database.document">olinkdb.xml</xsl:param>
-->
<!-- Use the Bob Stayton’s Tip related to olinking -->
<xsl:param name="current.docid" select="/*/@id"/>
<!-- Use the literal scaling feature -->
<xsl:param name="literal.extensions">scale.by.width</xsl:param>
<!-- We want the TOC links in the titles, and in blue. -->
<xsl:param name="latex.hyperparam">colorlinks,linkcolor=blue,pdfstartview=FitH</xsl:param>
<!-- Put the dblatex logo -->
<xsl:param name="doc.publisher.show">1</xsl:param>
<!-- Show the list of examples too -->
<xsl:param name="doc.lot.show">figure,table,example</xsl:param>
<!-- DocBook like description -->
<xsl:param name="term.breakline">1</xsl:param>
<!-- Manpage titles not numbered -->
<xsl:param name="refentry.numbered">0</xsl:param>
<xsl:template match="parameter">
<xsl:variable name="name" select="."/>
<xsl:variable name="target" select="key(’id’,$name)[1]"/>
<xsl:choose>
<xsl:when test="count($target) > 0">
<!-- Hot link to the parameter refentry -->
<xsl:call-template name="hyperlink.markup">
<xsl:with-param name="linkend" select="$name"/>
<xsl:with-param name="text">
<xsl:apply-imports/>
</xsl:with-param>
</xsl:call-template>
<!-- Index entry for this parameter -->
<xsl:text>\index{Parameters!</xsl:text>
<xsl:value-of select="$name"/>
<xsl:text>}</xsl:text>
</xsl:when>
<xsl:otherwise>
<!-<xsl:message>No reference for parameter: ’<xsl:value-of
select="$name"/>’</xsl:message>
-->
<xsl:apply-imports/>
</xsl:otherwise>
</xsl:choose>
</xsl:template>
</xsl:stylesheet>
DocBook to LaTeX Publishing
5.3.2
43 / 102
Overriding some templates
You can directly put the overriding templates in your XSL stylesheet, but do not try to import the default dblatex stylesheets in it:
it is automatically done by the tool. So, just focus on the template to override and dblatex will ensure that your definitions will
get precedence over the dblatex ones.
You can of course split your templates in several files, and import each of them in the main user stylesheet by calling xsl:
import.
Example 5.1 Overriding templates
<?xml version=’1.0’ encoding="iso-8859-1"?>
<xsl:stylesheet xmlns:xsl="http://www.w3.org/1999/XSL/Transform" version=’1.0’>
<!-- Let’s import our own XSL to override the default behaviour. -->
<xsl:import href="mystyle.xsl"/>
<!-- Let’s patch directly a template here -->
<xsl:template match="article" mode="docinfo">
<xsl:apply-imports/>
<xsl:text>\let\mymacro=\DBKrelease</xsl:text>
</xsl:template>
</xsl:stylesheet>
5.4
Customized LaTeX style
The actual output rendering is done by the latex style package used, and not by the XSL stylesheets whose role is only to translate
to latex. Users can provide their own LaTeX style file, in respect of some rules:
• The LaTeX style package preamble must support all the options that the XSL stylesheets can pass to the package.
• Some packages must be used to make all the thing work.
• The docbook interface must be defined: the XSL stylesheets register some elements information in LaTeX commands. These
commands or macro are the only ones specific to DocBook that are explicitely used by the XSL stylesheets. Other specific
macros are used but are not intended to be changed by the user. These hidden macros are defined in the dbk_core latex package.
The latex style file to use is specified by using the option --texstyle latex_style. An example of a simple LaTeX
DocBook style is provided in the package.
The --texstyle latex_style option accepts a package name (no path and no .sty extension) or a full style file path. If
a full path is used, the filename must ends with .sty.
# Give a package name and assume its path is already in TEXINPUTS
dblatex --texstyle=mystyle file.xml
# Give the full package path. The TEXINPUTS is then updated by dblatex
dblatex --texstyle=./mystyle.sty file.xml
5.4.1
Reusing an existing LaTeX style
You can either create your latex style from scratch, in respect of the interfaces described in the following sections, or you can
simply reuse an already existing style and override what you want. The latter method is easier for small things to change.
Here is an example of a style package reusing the default docbook style:
DocBook to LaTeX Publishing
44 / 102
Example 5.2 Reused LaTeX style
%%
%% This style is derivated from the docbook one
%%
\NeedsTeXFormat{LaTeX2e}
\ProvidesPackage{mystyle}[2007/04/04 My DocBook Style]
%% Just use the original package and pass the options
\RequirePackageWithOptions{docbook}
%% Redefine the paragraph layout
\setlength\parskip{\medskipamount}
\setlength\parindent{5pt}
%% Redefine some french settings
\babelsetup{fr}{%
\catcode‘\\T1\guillemotleft =\active
\catcode‘\\T1\guillemotright =\active
\def\T1\guillemotleft {u\og\ignorespaces}
\def\T1\guillemotright {v\unskip\fg}
}
5.4.2
Package options
A compliant LaTeX style package supports the following options. The options are provided by the XSL stylesheets according to
the document attributes.
Option
hyperlink, nohyperlink
article, book
5.4.3
Role
Indicates if links in the document are provided or not
The document is an article or a book
Needed packages
A LaTeX style package must at least include the following packages.
Package
dbk_core
5.4.4
Description
Core LaTeX definitions and macros needed for DocBook
DocBook interface
All the latex commands beginning with DBK are related to elements under bookinfo or articleinfo.
Command
\DBKreference
\DBKsite
\DBKcopyright
\DBKdate
\DBKedition
\DBKpubdate
\DBKsubtitle
\DBKreleaseinfo
Description
mapped to pubsnumber
mapped to address
mapped to copyright
mapped to date
mapped to edition
mapped to pubdate
mapped to subtitle
mapped to releaseinfo
DocBook to LaTeX Publishing
Command
\DBKlegalnotice
\DBKlegalblock
\DBKindexation
\DBKindtable
\DBKinditem
\DBKrevtable
float example
float dbequation
5.4.5
45 / 102
Description
environment mapped to a legalnotice. The legal
notices are all put into the \DBKlegalblock command. It is
up to the latex stylesheet to decide where to put it in the
document.
wrapper command for the \DBKlegalnotice environments,
used by the latex stylesheet to decide where to put the legal
notices in the document.
This command contains the othercredit information
translated to latex by the XSL. This command must be
placed where the othercredit shall appear in the document.
This environnement must be defined by the user to render
the othercredit list. It can be displayed as a table,
listitem, description list, or anything that suits your need.
This is an othercredit item.
This environnement must be defined by the user to render
the revhistory table. Untill now it is not really possible
to customize it, since it must be a table with four columns,
each column for a revhistory piece of information.
This float is expected to be defined, and is mapped to
example. It is not defined by default by the dbk_core
package to allow the user to define its rendering (ruled or
not, etc.)
This float is expected to be defined, and is mapped to
equation. It is not defined by default by the dbk_core
package to allow the user to define its rendering (ruled or
not, etc.)
Debugging your Style
It is not surprising if your first dblatex compilation fails with a fresh LaTeX style. So, how to debug it when used with dblatex?
The following steps can help you:
1. Compile your file in the debug mode (option -d). When the compilation is done, the temporary working directory will not
be removed.
$ dblatex --texstyle=./mystyle.sty -d file.xml
...
/tmp/tpub-ben-99629 is not removed
2. Go under the building temporary directory, and set the environment with the file env_tex.
$ cd /tmp/tpub-ben-99629
$ . env_tex
3. Compile the temporary latex file produced by the XSL stylesheets. Its name has the suffix "_tmp.tex".
$ pdflatex file_tmp.tex
$ [ many outputs here ]
4. Now latex stops when it encounters an error so that you can debug your stylesheet.
DocBook to LaTeX Publishing
5.5
46 / 102
Latex post process script
Extra user actions can be processed on the latex file produced by the XSL stylesheets or on its temporary working files produced
by the latex compilation.
For instance, in the documents I write the cover page must display the number of pages of the document, but written in full letters
(e.g. 23 is written “twenty three”). The latex post process script is then helpfull, and in this particular case it patches the .aux file.
The post process script is called just before the last latex compilation, and takes one parameter, the latex file compiled by the
tool.
5.5.1
Post latex compilations
The latex compilations done once the script is called depend on the return code of the script:
• When the return code is 0, dblatex continues the compilation as many times as necessary.
• When the return code is 1, no more compilation is done by dblatex. This case is useful if the script needs to control precisely
the number of compilation to apply. It is up to the script to perform the expected compilations.
To do so, the script can retrieve in the LATEX environment variable the actual compiler used by dblatex.
• When the return code is another value, an error is raised to signal a failed post process script execution.
5.5.2
Post processing with a Python Plugin
You can use a python plugin instead of a script by prefixing the plugin name with the string "plugin:". When using a plugin
you must not put the python suffix in the plugin name. If the plugin is in one of the Python system directories, or in the current
directory where you call dblatex, or in one of the directories of the PYTHONPATH environment variable, you don’t need to
specify a directory location. Otherwise put the plugin directory path before the plugin name.
Here are several plugin call examples:
# The texpost.py module is in one of the python paths
dblatex -r plugin:texpost file.xml
# The texpost.py module location is specified with an absolute path
dblatex -r plugin:/path/to/texpost file.xml
# The texpost.py module is specified through a relative path from current dir
dblatex -r plugin:relative/path/from/current/dir/texpost file.xml
The plugin must contain a main entry point. Dblatex will pass the following parameters to the entry point: latex_file to
specify the latex file to post process, and stdout to specify the output stream to use to be consistent with the dblatex verbosity.
Example 5.3 Texpost Python Plugin Example
import sys
import os
def main(latex_file, stdout):
"""
Texpost Plugin Entry point
"""
# Let’s find out the backend used
tex_engine = os.environ["LATEX"]
# Let’s log something
print >>stdout, "Plugin called on ’%s’ file" % (latex_file)
DocBook to LaTeX Publishing
47 / 102
# Open the latex file and parse it
texfile = open(latex_file)
...
# Now decide if a new compilation must occur
if has_changed:
sys.exit(0)
else:
sys.exit(1)
5.6
Dblatex Configuration File
A master configuration file, also called a specification file, can be used to list all the customizations and options to apply. Such a
file is passed by using the option -S config_file.
5.6.1
Configuration File Format
The format of the file is the following:
• Every comment starts with a “#”, and is ignored.
• The file must contain one parameter by line.
• The format of a parameter is the following:
<keyword>: <value>
• Every parameter is mapped to an option that can be passed to dblatex.
• An unknown parameter is silently ignored (the whole line is dropped).
• The parameters defining a path (a file or a directory) can take absolute or relative paths. A relative path must be defined from
the specification file itself. For instance, a specification file under /the/spec/directory/ with a parameter describing
the file ../where/this/file/is/myfile points to /the/spec/where/this/file/is/myfile.
The following table lists the supported parameters and the corresponding command line option.
Keyword
Value
Corresponding option
TexInputs
Directories
--texinputs
TexStyle
Latex package name
--texstyle
TexPost
Script file name
--texpost
XslParam
Parameter file name
-p
FigInputs
Directories
-I
Options
Command line options
None
Description
Defines extra path to add to
TEXINPUTS
Defines the LaTeX style
package to use.
Defines the LaTeX post
process script to use.
Defines the parameter file to
use.
Defines the extra figures
path.
Lists command options to
use by default when using
the tool. The options
specified by the parameter
are directly passed to
dblatex
DocBook to LaTeX Publishing
48 / 102
Here is the specification file used for this manual.
Example 5.4 User Manual Configuration File
#
# Configuration file for dblatex documentation (manual, release notes)
#
TexInputs: ../latex//
PdfInputs: ../latex/graphics
TexStyle: docbook
XslParam: manual.xsl
Options:
-b pdftex
5.6.2
Configuration Paths
By default dblatex tries to find the configuration files in the following paths, in respect of the order:
1. The current directory
2. $HOME/.dblatex
3. /etc/dblatex
4. The dblatex package configuration directories.
You can add some extra paths where to look for by setting the DBLATEX_CONFIG_FILES environment variable. The paths are
separated by ":" in Unix like systems, and by ";" on Windows. These paths are used only when nothing is found in the default
paths.
5.7
Customization Precedence
All the customization queries are translated to the corresponding command line options. Thus, using several customization
methods can be unconsistent because each of them override the same option with another value.
For instance, you can specify the use of a specification file in which it is said to use a latex style (parameter TexStyle) and
explicitely use the --texstyle command line option. So, what is the behaviour?
The options order is the following:
• If a specification file is used (-S option), the options are set to the specification file parameters.
• The options explicitely passed override the specification file setting, whatever is the position of the options (i.e. before or after
the -S option).
• If an option is passed several times, this is the last occurence that is used.
Example 5.5 Customization Precedence
Let’s consider the specification file containing the following parameters:
XslParam: file3.xsl
Options: -b pdftex
TexStyle: mystyle1
And now the command line:
dblatex -b dvips -p file1.xsl -p file2.xsl -S file.specs -s mystyle2 mydoc.xml
The setting used is the following:
DocBook to LaTeX Publishing
• “-b dvips” overrides “-b pdftex” set by the spec file.
• “-p file2.xsl” overrides “-p file1.xsl” since it is defined after, and overrides “file3.xsl” set by the spec file.
• “-s mystyle2” override “mystyle1” set by the spec file.
49 / 102
DocBook to LaTeX Publishing
50 / 102
Chapter 6
FAQ
The purpose of this mini FAQ is to give some tips about how customizing or tweaking the PDF output.
6.1
My images are too big. What can I do?
When an image is included via imagedata with no scaling attributes (e.g, width, height, contentwidth) it is its natural size that
is used.
One can change individually the size of an imagedata by defining its attributes (see [TDG] for more details). One can also use
the parameter imagedata.default.scale to apply a systematic scaling rule on every image that has no explicit attribute.
The parameter imagedata.default.scale can take:
• The default predefined value "pagebound": the image natural size is used, up to the page boundaries. That is, if an image
natural width is greater than the page width its size is proportionally reduced so that it is contained in the page. The same
control is done for height.
• Any combination of valid \includegraphics options. For example
imagedata.default.scale=scale=40%
The scale 40% is applied on the images.
imagedata.default.scale=width=40%,height=3in
This example is weird but shows that several options can be used. In this case the image width is 40% of the page width,
and the height is fixed to 3 inches. The risk to have an anamorphous result is very high here.
6.2
How can I have the PDF fit to height by default?
The behaviour of the PDF file when opened by a reader like Acrobat Reader can be customized with the parameter latex.hyperparam.
See the section called “Description” for more details about this parameter.
To answer precisely to the question, set the parameter with the option "pdfstartview=FitV".
6.3
How can I have all the PDF hyperlinks in blue color?
Same answer than for the previous question.
For this particular case, set the parameter with the options "linktocpage,colorlinks,linkcolor=blue,citecolor=blue,urlcolor=blue".
DocBook to LaTeX Publishing
6.4
51 / 102
How can I remove that stupid float rules?
If you wonder about this, you propably use the db2latex style. To remove the rules, you need to patch the db2latex.sty. You can:
• Simply remove the floatstyle definition for the floats for which you don’t want the rules.
• Explicitely use the plain floatstyle. Note that using this explicit style does not allow to change the float title position anymore.
The plain style always put the title at the bottom of the float.
6.5
My long tables don’t split in several pages. Why?
A formal table (table element) is put in a float, so that it can have a numbered caption and placed by tex at the best place. The
limitation is that a float cannot split over several pages.
For long tables that need to split, use informaltable instead.
6.6
I cannot put a table in an example.
A formal table (table element) is put in a float, and cannot be put in another float like an example. You can use an informal
table instead.
6.7
I cannot compile my cyrillic document. Why?
A document using some characters different from the roman alphabet may face some troubles, because latex natively handles
only latin1 encoding.
Try the different unicode supports provided by dblatex:
• Use the XeTeX backend, a new tex engine that natively supports Unicode characters: dblatex -b xetex file.xml.
• Ask for using the latex unicode support by setting the latex.encoding =utf8 parameter: dblatex -P latex.encod
ing=utf8 file.xml.
• Use the Passivetex extensions by setting the latex.unicode.use=1 parameter: dblatex -P latex.unicode.use=
1 file.xml.
See Section 4.13.1 for more details.
DocBook to LaTeX Publishing
52 / 102
Chapter 7
Thanks
7.1
Sponsors
Thanks to the companies that sponsored dblatex at a time or another:
company
7.2
1,
and the Raphael Hertzog’s
2.
Contributors
Thanks to Andreas Hoenen who packages and maintains dblatex for Debian, provides patches and so on.
Thanks also to other contributors: David Hedley (newtbl implementor), and Nicolas Pernetty (Windows port).
7.3
Pioners
Thanks to the people who contributed to the project at its early age: Jean-Yves Le Ruyet, precursory and hard-working user,
Julien Ducourthial for his precious help, Vincent Hottier who asked for the embedded LaTeX equations support.
Special thanks to the KDE documentation team (especially Philip Rodrigues), Michael Smith (from the DocBook Project), and
Kai Brommann, for their feedbacks, encouragements, and advice. They were the first people who believed in this project and
boosted dblatex.
1 http://www.froglogic.com/
2 http://www.freexian.com/
DocBook to LaTeX Publishing
53 / 102
Appendix A
Dblatex XSL Parameter Reference
This is reference documentation for all user-configurable parameters in the dblatex XSL stylesheets.
The organization of the reference entries mimics the FO Parameter Reference for people familiar with the DocBook Project
documentation.
A.1
Admonitions
figure.caution
figure.caution — Figure to use to render a caution block.
Synopsis
<xsl:param name="figure.caution">warning</xsl:param>
Description
Figure to use to render a caution block. This parameter is added to allow new latex styles to use their own figures in admonitions.
figure.important
figure.important — Figure to use to render a important block
Synopsis
<xsl:param name="figure.important">warning</xsl:param>
Description
Figure to use to render a important block. This parameter is added to allow new latex styles to use their own figures in
admonitions.
DocBook to LaTeX Publishing
54 / 102
figure.note
figure.note — Figure to use to render a note block
Synopsis
<xsl:param name="figure.note"/>
Description
Figure to use to render a note block. This parameter is added to allow new latex styles to use their own figures in admonitions.
figure.tip
figure.tip — Figure to use to render a tip block
Synopsis
<xsl:param name="figure.tip"/>
Description
Figure to use to render a tip block. This parameter is added to allow new latex styles to use their own figures in admonitions.
figure.warning
figure.warning — Figure to use to render a warning block
Synopsis
<xsl:param name="figure.warning">warning</xsl:param>
Description
Figure to use to render a warning block. This parameter is added to allow new latex styles to use their own figures in admonitions.
A.2
Callouts
callout.linkends.hot
callout.linkends.hot — Hot links callout items
Synopsis
<xsl:param name="callout.linkends.hot" select="’1’"/>
DocBook to LaTeX Publishing
55 / 102
Description
The callouts referenced in a callout list are hot links if the parameter is set to 1. Then, the references are in red such like any
other cross-reference link in the document.
calloutlist.style
calloutlist.style — Callout list style to apply
Synopsis
<xsl:param name="calloutlist.style" select="’leftmargin=1cm,style=sameline’"/>
Description
Defines how the callout list items are displayed. The value must be some valid enumitem description list options.
callout.markup.circled
callout.markup.circled — Use black circles for numbering the callout items?
Synopsis
<xsl:param name="callout.markup.circled" select="’1’"/>
Description
Set to 1 the callouts references in a calloutlist are white numbers in black circles, like the markups in the listing (or
graphic). Set to 0 the references are simple numbers.
co.linkends.show
co.linkends.show — Show the references to calloutlist items next to the markup
Synopsis
<xsl:param name="co.linkends.show" select="’1’"/>
Description
Next to a callout markup the links to the corresponding calloutlist items are shown when the parameter is set to 1. Set to 0 the
links are not shown.
imageobjectco.hide
imageobjectco.hide — Hide the callout markups on the image
DocBook to LaTeX Publishing
56 / 102
Synopsis
<xsl:param name="imageobjectco.hide" select="0"/>
Description
When set to 1 the callout numbered circles are not drawn on the image. Only the anchors are put, allowing callout list items to
jump at the referenced position on the image. The purpose of this parameter is to allow the use of images that already contain
the callout numbers (like for GIMP manual).
A.3
ToC/LoT/Index Generation
doc.lot.show
doc.lot.show — Specifies the Lists of Titles to display
Synopsis
<xsl:param name="doc.lot.show">figure,table</xsl:param>
Description
Specifies which Lists of Titles should be printed after the Table of Content. The value is a comma separated list of the LoTs to
show. The supported LoTs are "figure", "table", "equation", and "example". The list order represents the LoTs order in the output
document.
doc.toc.show
doc.toc.show — Print the Table Of Contents
Synopsis
<xsl:param name="doc.toc.show">1</xsl:param>
Description
Print the table of contents when set to 1.
titleabbrev.in.toc
titleabbrev.in.toc — Should titleabbrev be put in the TOC instead of title?
Synopsis
<xsl:param name="titleabbrev.in.toc">1</xsl:param>
DocBook to LaTeX Publishing
57 / 102
Description
Set to 1 the titleabbrev content is put in the TOC instead of the title.
toc.section.depth
toc.section.depth — How deep should recursive sections appear in the TOC?
Synopsis
<xsl:param name="toc.section.depth">5</xsl:param>
Description
Depth of the TOC. Used to set the latex tocdepth counter.
bibliography.tocdepth
bibliography.tocdepth — How bibliography section and subsections appear in TOC
Synopsis
<xsl:param name="bibliography.tocdepth">5</xsl:param>
Description
Same than preface.tocdepth for bibliography sections. Meaningful only when bibliography.numbered is set to 0.
See Also
bibliography.numbered .
refentry.numbered , refentry.tocdepth.
glossary.numbered , glossary.tocdepth.
index.numbered , index.tocdepth.
colophon.tocdepth
colophon.tocdepth — How colophon section and subsections appear in TOC
Synopsis
<xsl:param name="colophon.tocdepth">0</xsl:param>
DocBook to LaTeX Publishing
58 / 102
Description
Same than preface.tocdepth for colophon sections.
dedication.tocdepth
dedication.tocdepth — How dedication section and subsections appear in TOC
Synopsis
<xsl:param name="dedication.tocdepth">0</xsl:param>
Description
Same than preface.tocdepth for dedication sections.
preface.tocdepth
preface.tocdepth — How preface section and subsections appear in TOC
Synopsis
<xsl:param name="preface.tocdepth">0</xsl:param>
Description
When greater than 0, the preface headings appear in the TOC. The parameter value define the preface section depth appearing in
the TOC and in the bookmarks. If set to 0, none of the sections are put in the TOC. If set to 1, only the chapter level appears in the
TOC and bookmarks, and so on. When the parameter is negative, it behaves like with 0, but it uses the previous implementation
(use of unnumbered sections, that is, with latex heading commands ending with ’*’).
glossary.tocdepth
glossary.tocdepth — How glossary section and subsections appear in TOC
Synopsis
<xsl:param name="glossary.tocdepth">5</xsl:param>
Description
Same than preface.tocdepth for glossary sections. Meaningful only when glossary.numbered is set to 0.
DocBook to LaTeX Publishing
59 / 102
See Also
glossary.numbered .
refentry.numbered , refentry.tocdepth.
bibliography.numbered , bibliography.tocdepth.
index.numbered , index.tocdepth.
index.tocdepth
index.tocdepth — How index section and subsections appear in TOC
Synopsis
<xsl:param name="index.tocdepth">5</xsl:param>
Description
Same than preface.tocdepth for index sections. Meaningful only when index.numbered is set to 0.
See Also
index.numbered .
refentry.numbered , refentry.tocdepth.
bibliography.numbered , bibliography.tocdepth.
glossary.numbered , glossary.tocdepth.
latex.index.tool
latex.index.tool — Define the tool to use to build an index
Synopsis
<xsl:param name="latex.index.tool"/>
Description
This parameter defines the LaTeX compatible index tool to use to build the document index. When empty the default tool used
is makeindex. Currenty xindy is the only other tool supported by dblatex. Read Section 4.10 for more information about index
building.
See Also
latex.index.language.
DocBook to LaTeX Publishing
60 / 102
latex.index.language
latex.index.language — Force the language to use for index sorting
Synopsis
<xsl:param name="latex.index.language"/>
Description
This parameter forces the use of the specified index language whatever the document language is. The index language is used by
some index tools like xindy that builds and sorts the index list. Read Section 4.10 for more information about index building.
See Also
latex.index.tool.
refentry.tocdepth
refentry.tocdepth — How refentry section and subsections appear in TOC
Synopsis
<xsl:param name="refentry.tocdepth">5</xsl:param>
Description
Same than preface.tocdepth for refentry sections. Meaningful only when refentry.numbered is set to 0.
A.4
Processor Extensions
alt.use
alt.use — Always use alt to display equations
Synopsis
<xsl:param name="alt.use" select="0"/>
Description
When an (informal) equation contains both alt and another element (graphic, etc.), and when tex.math.in.alt is not set to
’latex’, the alt element is not used to display the equation since it is considered as a fallback element. Set alt.use to force the
use of alt as default rendering element even when tex.math.in.alt is not set to ’latex’.
DocBook to LaTeX Publishing
61 / 102
tex.math.in.alt
tex.math.in.alt — TeX notation used for equations
Synopsis
<xsl:param name="tex.math.in.alt" select="’latex’"/>
Description
Specifies if the alt element in an (informal) equation contains some tex equation. If so, and if the tex equation is in ’latex’
format, the content is directly used by dblatex.
A.5
Automatic labelling
bibliography.numbered
bibliography.numbered — Should bibliography headings be numbered?
Synopsis
<xsl:param name="bibliography.numbered">1</xsl:param>
Description
Defines either the bibliography titles are numbered or not. When numbered, it is displayed as any other numbered section.
See Also
bibliography.tocdepth.
glossary.numbered , glossary.tocdepth.
refentry.numbered , refentry.tocdepth.
index.numbered , index.tocdepth.
glossary.numbered
glossary.numbered — Should glossary headings be numbered?
Synopsis
<xsl:param name="glossary.numbered">1</xsl:param>
DocBook to LaTeX Publishing
62 / 102
Description
Defines either the glossary titles are numbered or not. When numbered, it is displayed as any other numbered section.
See Also
glossary.tocdepth.
refentry.numbered , refentry.tocdepth.
bibliography.numbered , bibliography.tocdepth.
index.numbered , index.tocdepth.
index.numbered
index.numbered — Should index headings be numbered?
Synopsis
<xsl:param name="index.numbered">1</xsl:param>
Description
Defines either the index titles are numbered or not. When numbered, it is displayed as any other numbered section.
See Also
index.tocdepth.
refentry.numbered , refentry.tocdepth.
bibliography.numbered , bibliography.tocdepth.
glossary.numbered , glossary.tocdepth.
refentry.numbered
refentry.numbered — Should refentry headings be numbered?
Synopsis
<xsl:param name="refentry.numbered">1</xsl:param>
Description
Defines either the refentry titles are numbered or not. When numbered, it is displayed as any other numbered section.
DocBook to LaTeX Publishing
63 / 102
See Also
refentry.tocdepth.
glossary.numbered , glossary.tocdepth.
bibliography.numbered , bibliography.tocdepth.
index.numbered , index.tocdepth.
A.6
Meta/*Info
doc.pdfcreator.show
doc.pdfcreator.show — Set the PDF metadata Creator field
Synopsis
<xsl:param name="doc.pdfcreator.show">1</xsl:param>
Description
Fill the Creator field of the PDF document information section with "DBLaTeX-<version>" if the parameter is set to 1. Set to 0
this field is keep untouched.
make.single.year.ranges
make.single.year.ranges — Print single-year ranges (e.g., 1998-1999)
Synopsis
<xsl:param name="make.single.year.ranges" select="0"/>
Description
If non-zero, year ranges that span a single year will be printed in range notation (1998-1999) instead of discrete notation (1998,
1999). Parameter taken from the DocBook XSL stylesheets.
make.year.ranges
make.year.ranges — Collate copyright years into ranges?
Synopsis
<xsl:param name="make.year.ranges" select="0"/>
Description
If non-zero, copyright years will be collated into ranges. Parameter taken from the DocBook XSL stylesheets.
DocBook to LaTeX Publishing
A.7
64 / 102
Reference Pages
funcsynopsis.decoration
funcsynopsis.decoration — Decorate elements of a funcsynopsis?
Synopsis
<xsl:param name="funcsynopsis.decoration" select="1"/>
Description
If non-zero, elements of the funcsynopsis will be decorated (e.g. rendered as bold or italic text). The decoration is controlled
by templates that can be redefined in a customization layer.
This parameter is taken from the DocBook Project XSL parameters.
funcsynopsis.style
funcsynopsis.style — What style of funcsynopsis should be generated?
Synopsis
<xsl:param name="funcsynopsis.style">ansi</xsl:param>
Description
If funcsynopsis.style is ansi, ANSI-style function synopses are generated for a funcsynopsis, otherwise K&R-style
function synopses are generated.
This parameter is taken from the DocBook Project XSL parameters.
function.parens
function.parens — Generate parens after a function?
Synopsis
<xsl:param name="function.parens">0</xsl:param>
Description
If non-zero, the formatting of a function element will include generated parentheses.
This parameter is taken from the DocBook Project XSL parameters.
refclass.suppress
refclass.suppress — Suppress display of refclass contents?
DocBook to LaTeX Publishing
Synopsis
<xsl:param name="refclass.suppress" select="0"/>
Description
Parameter taken from the DocBook Project.
See refclass.suppress.
refentry.generate.name
refentry.generate.name — Output NAME header before refnames?
Synopsis
<xsl:param name="refentry.generate.name" select="0"/>
Description
If non-zero, a "NAME" section title is output before the list of refnames.
refentry.xref.manvolnum
refentry.xref.manvolnum — Output manvolnum as part of refentry cross-reference?
Synopsis
<xsl:param name="refentry.xref.manvolnum" select="’1’"/>
Description
if non-zero, the manvolnum is used when cross-referencing refentrys, either with xref or citerefentry.
A.8
Tables
newtbl.autowidth
newtbl.autowidth — Table column widths sized by latex
Synopsis
<xsl:param name="newtbl.autowidth"/>
65 / 102
DocBook to LaTeX Publishing
Description
Defines if the table column widths must be automatically sized by latex. See Section 4.7.7.1.
newtbl.bgcolor.thead
newtbl.bgcolor.thead — Background color of the thead rows
Synopsis
<xsl:param name="newtbl.bgcolor.thead"/>
Description
Background color of the thead rows.
newtbl.default.colsep
newtbl.default.colsep — By default draw a vertical line between columns
Synopsis
<xsl:param name="newtbl.default.colsep" select="’1’"/>
Description
Set to 1, print the column separators when no colspec attribute is specified.
newtbl.default.rowsep
newtbl.default.rowsep — By default draw a horizontal line between rows
Synopsis
<xsl:param name="newtbl.default.rowsep" select="’1’"/>
Description
Set to 1, print the row separators when no rowspec attribute is specified.
newtbl.format.tbody
newtbl.format.tbody — LaTeX formatting for body table cells
66 / 102
DocBook to LaTeX Publishing
67 / 102
Synopsis
<xsl:param name="newtbl.format.tbody"/>
Description
LaTeX formatting for body table cells.
newtbl.format.tfoot
newtbl.format.tfoot — LaTeX formatting for foot table cells
Synopsis
<xsl:param name="newtbl.format.tfoot"/>
Description
LaTeX formatting for foot table cells.
newtbl.format.thead
newtbl.format.thead — LaTeX formatting for head table cells
Synopsis
<xsl:param name="newtbl.format.thead">\bfseries%
</xsl:param>
Description
LaTeX formatting for head table cells.
newtbl.use.hhline
newtbl.use.hhline — Draw the horizontal lines with the hhline package
Synopsis
<xsl:param name="newtbl.use.hhline" select="’0’"/>
Description
Set to 1, use the hhline package to draw the table row separators instead of cline. Using hhline seems more suited for
colored tables.
DocBook to LaTeX Publishing
68 / 102
table.default.position
table.default.position — Default table float placement policy
Synopsis
<xsl:param name="table.default.position" select="’[htbp]’"/>
Description
Default table float placement algorithm to apply. The default parameter value is [htbp] meaning that latex tries to place the table
where it occurs first (h, here), then at the top of the page (t), at the bottom of the page (b), and finally on the next page (p).
table.default.tabstyle
table.default.tabstyle — Default table style to apply
Synopsis
<xsl:param name="table.default.tabstyle"/>
Description
The parameter applies only for informaltables that do not have a tabstyle attribute. With dblatex its role is to specify
the latex table environment to use, so the set value must be a valid latex environment. The supported values are:
longtable
The default table type used by dblatex, in order to be able to split over several pages. When the parameter is empty and no
tabstyle attribute is defined, it is the applied value.
tabular
The most usual table type. Such table can only be on a single page.
tabularx
An advanced table type that allows to stretch column widths to the available remained page width. Such table can only be
on a single page.
table.in.float
table.in.float — Use or emulate a float to display a formal table?
Synopsis
<xsl:param name="table.in.float" select="’1’"/>
DocBook to LaTeX Publishing
69 / 102
Description
Set to 0 the formal tables are no more put in table floats. They are displayed with the longtable package, allowing to have formal
tables covering several pages (which is not possible with floats). The limitation is that the title must necessarily be on the top of
the table.
table.title.top
table.title.top — Title on top of the table float
Synopsis
<xsl:param name="table.title.top" select="’0’"/>
Description
Set to 1 the table float title position is above the table. Set to 0 the title is under the table. Meaningless when the table is not in
a float (see table.in.float).
default.table.rules
default.table.rules — The default column and row rules for tables using HTML markup
Synopsis
<xsl:param name="default.table.rules">none</xsl:param>
Description
Tables using HTML markup elements can use an attribute named rules on the table or informaltable element to specify
whether column and row border rules should be displayed. This parameter lets you specify a global default style for all HTML
tables that don’t otherwise have that attribute.
These are the supported values:
all
Rules will appear between all rows and columns.
rows
Rules will appear between rows only.
cols
Rules will appear between columns only.
groups
Rules will appear between row groups (thead, tfoot, tbody). No support for rules between column groups yet.
none
No rules. This is the default value.
The border after the last row and the border after the last column are not affected by this setting. Those borders are controlled by
the frame attribute on the table element.
DocBook to LaTeX Publishing
70 / 102
default.table.width
default.table.width — The default width of tables
Synopsis
<xsl:param name="default.table.width"/>
Description
If non-empty, this value will be used for the width attribute on tables that do not specify an alternate width (with the
<?dblatex table-width?> processing instruction, or with the newtbl.autowidth parameter). For more details see
Section 4.7.2 and Section 4.7.7.
See Also
newtbl.autowidth.
A.9
Linking
latex.hyperparam
latex.hyperparam — Options/parameters passed to hyperref
Synopsis
<xsl:param name="latex.hyperparam"/>
Description
This parameter gives the options to pass to the LaTeX hyperref package. No validity check is done.
For instance, the Table of Content rendering (link color, etc.) can be changed. Look at the hyperref.sty documentation to know
all the hyperref options available.
Example A.1 Configuring with latex.hyperparam
<?xml version=’1.0’ encoding="iso-8859-1"?>
<xsl:stylesheet xmlns:xsl="http://www.w3.org/1999/XSL/Transform" version=’1.0’>
<!-- We want TOC links in the titles (not in the page numbers), and blue.
-->
<xsl:param name="latex.hyperparam">colorlinks,linkcolor=blue</xsl:param>
</xsl:stylesheet>
Olink Parameters
current.docid , insert.olink.page.number , insert.olink.pdf.frag , olink.base.uri, olink.debug , olink.
doctitle, olink.lang.fallback.sequence, prefer.internal.olink , target.database.document, targets.fil
ename, use.local.olink.style — Parameters to configure Olinks
DocBook to LaTeX Publishing
71 / 102
Synopsis
<xsl:param name="current.docid"/>
<xsl:param name="insert.olink.page.number">yes</xsl:param>
<xsl:param name="insert.olink.pdf.frag" select="1"/>
<xsl:param name="olink.base.uri" select="’’"/>
<xsl:param name="olink.debug" select="0"/>
<xsl:param name="olink.doctitle" select="’yes’"/>
<xsl:param name="olink.lang.fallback.sequence" select="’’"/>
<xsl:param name="prefer.internal.olink" select="0"/>
<xsl:param name="target.database.document" select="’’"/>
<xsl:param name="targets.filename" select="’target.db’"/>
<xsl:param name="use.local.olink.style" select="0"/>
Description
These parameters are taken from the DocBook Project XSL parameters and must be used as described in the original reference:
• current.docid,
• insert.olink.page.number,
• insert.olink.pdf.frag,
• olink.base.uri,
• olink.debug,
• olink.doctitle,
• olink.lang.fallback.sequence,
• prefer.internal.olink,
• target.database.document,
• targets.filename,
• use.local.olink.style,
A.10
Cross References
insert.xref.page.number
insert.xref.page.number — Turns page numbers in xrefs on and off
DocBook to LaTeX Publishing
72 / 102
Synopsis
<xsl:param name="insert.xref.page.number">no</xsl:param>
Description
The value of this parameter determines if cross references (xrefs) in printed output will include page number citations. It has
three possible values.
no
No page number references will be generated.
yes
Page number references will be generated for all xref elements. The style of page reference may be changed if an
xrefstyle attribute is used.
maybe
Page number references will not be generated for an xref element unless it has an xrefstyle attribute whose value
specifies a page reference.
xref.hypermarkup
xref.hypermarkup — Wrap the entire the xref markups with an hyperlink?
Synopsis
<xsl:param name="xref.hypermarkup" select="0"/>
Description
When set to 1, the whole cross reference markup produced for an xref is converted to an hyperlink.
When not set, the default latex hyperlinking is done, that usually means that only the reference numbers are hot.
A.11
Lists
term.breakline
term.breakline — Put the term description on the next line?
Synopsis
<xsl:param name="term.breakline">0</xsl:param>
Description
Set to 1 the item following a term in a variable list is put on the next line.
DocBook to LaTeX Publishing
73 / 102
variablelist.term.separator
variablelist.term.separator — Text to separate terms within a multi-term varlistentry
Synopsis
<xsl:param name="variablelist.term.separator">, </xsl:param>
Description
When a varlistentry contains multiple term elements, the string specified in the value of the variablelist.term.
separator parameter is placed after each term except the last.
A.12
QAndASet
qanda.defaultlabel
qanda.defaultlabel — Sets the default for defaultlabel on QandASet.
Synopsis
<xsl:param name="qanda.defaultlabel">number</xsl:param>
Description
If no defaultlabel attribute is specified on a qandaset, this value is used. It must be one of the legal values for the
defaultlabel attribute, one from none, number or qanda. The default value is ’number’.
Meaning
qanda - questions are labeled “Q:” and answers are labeled “A:”.
number - The entries are enumerated.
none - No distinguishing label precedes Questions or Answers.
A.13
Bibliography
biblioentry.item.separator
biblioentry.item.separator — Text to separate bibliography entries
Synopsis
<xsl:param name="biblioentry.item.separator">, </xsl:param>
Description
Text to separate bibliography entries.
DocBook to LaTeX Publishing
74 / 102
biblioentry.numbered
biblioentry.numbered — Should biblioentry item labels be numbered?
Synopsis
<xsl:param name="biblioentry.numbered" select="0"/>
Description
When non-zero, the reference labels of the bibliography entries are numbers instead of label strings, even if explicit labels are set
through an xreflabel attribute or an abbrev tag.
citation.default.style
citation.default.style — Default natbib citation style to apply
Synopsis
<xsl:param name="citation.default.style"/>
Description
Default natbib citation style to apply when natbib is used. See Section 4.11.3.
citation.natbib.options
citation.natbib.options — Specifies the natbib package options
Synopsis
<xsl:param name="citation.natbib.options"/>
Description
Options to pass to the natbib package when it is loaded. See also Section 4.11.3.
citation.natbib.use
citation.natbib.use — Use natbib to display citations
Synopsis
<xsl:param name="citation.natbib.use" select="’0’"/>
DocBook to LaTeX Publishing
75 / 102
Description
Load the natbib package, and allows the use of natbib citation styles. The package is loaded if the parameter is set to 1. See
Section 4.11.3.
latex.bibfiles
latex.bibfiles — Defines the default BibTeX database to use
Synopsis
<xsl:param name="latex.bibfiles">’’</xsl:param>
Description
Defines the default BibTeX database to use. Used when the bibtex PI does not have a "bibfiles" attribute. See Section 4.11.2 for
more details.
latex.biblio.output
latex.biblio.output — Defines how the BibTeX bibliographic entries are printed out
Synopsis
<xsl:param name="latex.biblio.output">all</xsl:param>
Description
Defines how the BibTeX bibliographic entries are printed out. The available values are defined in Section 4.11.2.
latex.biblio.style
latex.biblio.style — Default BibTeX style to apply
Synopsis
<xsl:param name="latex.biblio.style"/>
Description
Defines the default BibTeX style to apply. Meaningful when not empty, only for the used bibtex databases. See Section 4.11.2.
latex.bibwidelabel
latex.bibwidelabel — Template of the widest bibliography label
DocBook to LaTeX Publishing
76 / 102
Synopsis
<xsl:param name="latex.bibwidelabel">WIDELABEL</xsl:param>
Description
The environment bibliography accepts a parameter that indicates the widest label, which is used to correctly format the bibliography output. The value of this parameter is output inside the \begin{thebibliography[]} LaTeX command.
A.14
Glossary
glossterm.auto.link
glossterm.auto.link — Generate links from glossterm to glossentry automatically?
Synopsis
<xsl:param name="glossterm.auto.link" select="0"/>
Description
When set to 1, the glossterms in the document are linked to their definition in the glossary.
A.15
Miscellaneous
annotation.support
annotation.support — Enable the annotation support
Synopsis
<xsl:param name="annotation.support" select="’0’"/>
Description
Set to 1 the experimental DocBook 5 annotation support is enabled.
beginpage.as.pagebreak
beginpage.as.pagebreak — Force a page break when set to 1. Otherwise beginpage does nothing.
Synopsis
<xsl:param name="beginpage.as.pagebreak" select="1"/>
DocBook to LaTeX Publishing
77 / 102
Description
The legacy behaviour of dblatex is that it inserts a page break when beginpage appears. You can keep this behaviour by setting
this parameter to 1 (default value) or inhibit it by setting to 0.
doc.section.depth
doc.section.depth — Depth of the section numbering
Synopsis
<xsl:param name="doc.section.depth">5</xsl:param>
Description
Depth of the section numbering. Used to set the latex secnumdepth counter.
equation.default.position
equation.default.position — Default equation float placement to apply
Synopsis
<xsl:param name="equation.default.position">[H]</xsl:param>
Description
Default equation float placement algorithm to apply. See figure.default.position for more details about how to use latex float
specifications.
example.default.position
example.default.position — Default example float placement to apply
Synopsis
<xsl:param name="example.default.position">[H]</xsl:param>
Description
Default example float placement algorithm to apply. See figure.default.position for more details about how to use latex float
specifications.
example.float.type
example.float.type — Select the type of float for example elements
DocBook to LaTeX Publishing
78 / 102
Synopsis
<xsl:param name="example.float.type">none</xsl:param>
Description
Selects the type of float for example elements.
• If example.float.type is “none”, then no float is used. It may be usefull when the example must be displayed exactly
where it is defined or when it must cover several pages.
• If example.float.type is "float”, then the float environment is used. The actual float placement is computed by latex
according to the floatstyle attribute if specified, or according to the example.default.position parameter.
See Also
example.default.position.
figure.default.position.
figure.anchor.top
figure.anchor.top — Cross reference anchor on top of the figure float
Synopsis
<xsl:param name="figure.anchor.top" select="$figure.title.top"/>
Description
By default the anchor of a formal figure is where the figure title appears. It means that a link to the figure points after the image
when the title is below the image, and at the top of the image when the title is on the top. This parameter allows to put the anchor
at the top of the image even if the title is below the figure.
Note that it is not possible to have the anchor below the image if the title is on the top.
See Also
figure.title.top
figure.default.position
figure.default.position — Figure float placement policy
Synopsis
<xsl:param name="figure.default.position">[htbp]</xsl:param>
DocBook to LaTeX Publishing
79 / 102
Description
Default figure float placement algorithm to apply. The default parameter value is [htbp] meaning that latex tries to place the
figure where it occurs first (h, here), then at the top of the page (t), at the bottom of the page (b), and finally on the next page (p).
figure.title.top
figure.title.top — Title on top of the figure float
Synopsis
<xsl:param name="figure.title.top">0</xsl:param>
Description
Set to 1 the figure float title position is above the image. Set to 0 the title is under the image.
filename.as.url
filename.as.url — Hyphenate a filename like if is was an URL
Synopsis
<xsl:param name="filename.as.url">1</xsl:param>
Description
Set to 1 the filenames are handled as URLs, with the same hyphenation rules. Set to 0 the filename hyphenation is forced
for each character.
hyphenation.format
hyphenation.format — Predefined formats to hyphenate
Synopsis
<xsl:param name="hyphenation.format">monoseq,sansseq</xsl:param>
Description
This parameter replaces the parameter monoseq.hyphenation and its role is more general. It contains a comma separated list
of the predefined inline formats that must be agressively hyphenated. It means that all the elements rendered with these formats
are then hyphenated.
The predefined formats that can be hyphenated when contained in the list are:
DocBook to LaTeX Publishing
80 / 102
monoseq
Monospaced font.
sansseq
Sans serif like font.
boldmonoseq
Bold monospaced font.
italicmonoseq
Italic monospaced font.
If one wants no hyphenation at all, he must set the parameter to "nohyphen". In this case dblatex tries to avoid overfull boxes
(words in the margins) but keeps the words splittable only on their natural hyphenation points which can end up to no hyphenation
at all for literal words like URLs or technical terms.
See Also
monoseq.hyphenation
literal.layout.options
literal.layout.options — Override the options passed to the listing package
Synopsis
<xsl:param name="literal.layout.options"/>
Description
Overwrite the default options passed to the \lstset command.
literal.lines.showall
literal.lines.showall — Show the last empty lines in the literal environments?
Synopsis
<xsl:param name="literal.lines.showall">1</xsl:param>
Description
Set to 1, all the lines in a verbatim environment like programlisting or screen are printed, even if they are empty. Set to 0, the last
empty lines are not printed. It is set to 1 by default.
literal.width.ignore
literal.width.ignore — Ignore the literal environment width attribute
DocBook to LaTeX Publishing
81 / 102
Synopsis
<xsl:param name="literal.width.ignore">0</xsl:param>
Description
When set to 1 the programlisting and screen width attribute is ignored. In this case all the verbatim environment widths are equal
to the enclosing environment width.
literal.class
literal.class — Default class to apply to literallayout blocks
Synopsis
<xsl:param name="literal.class">monospaced</xsl:param>
Description
Default class to apply when no class attribute is set, to render literallayout environments.
literal.role
literal.role — Default role to apply to verbatim blocks
Synopsis
<xsl:param name="literal.role"/>
Description
When not empty and when no role attribute is specified for a block verbatim block to render, this parameter is applied as
formatting role.
The allowed values are specified in Section 4.9.1. If the value is not one of the allowed value, the role is then ignored.
literal.environment
literal.environment — Latex environment used to format verbatim blocks
Synopsis
<xsl:param name="literal.environment">
<xsl:choose>
<xsl:when test="contains($literal.extensions,’scale’)">
<xsl:text>lstcode</xsl:text>
</xsl:when>
<xsl:otherwise>
<xsl:text>lstlisting</xsl:text>
</xsl:otherwise>
</xsl:choose>
</xsl:param>
DocBook to LaTeX Publishing
82 / 102
Description
It specifies the Latex environment to use to render a verbatim block.
Since dblatex uses the listings package capabilities to handle the DocBook attributes, the specified environment must have the
same capabilities if written from scratch, but it is recommended to just extend the listings environment with you own listings
extension. See Section 4.9.4 for more details.
The specified environment name must starts with "lst". Otherwise dblatex raises an error and exits.
See Also
literal.extensions.
literal.extensions
literal.extensions — Enable extended verbatim features
Synopsis
<xsl:param name="literal.extensions">0</xsl:param>
Description
When this parameter is empty, dblatex only uses options supported by the listings package, in order to ensure that any verbatim
environment built upon this standard package will work.
When this parameter contains "scale", dblatex uses additionnal options handled only by the dblatex version of the verbatim
environment to provide scaling capabilities (see Section 4.9.2).
See Also
literal.environment.
linenumbering.scope
linenumbering.scope — Templates on which the global linenumbering setup applies
Synopsis
<xsl:param name="linenumbering.scope"/>
Description
List of the templates for which the linenumbering.default parameter applies. The list separator is a space. For example,
when the parameter is set to "screen programlisting", the two other linenumbering parameters will have effects only on screen
and programlisting templates.
See Also
linenumbering.default, linenumbering.everyNth.
DocBook to LaTeX Publishing
83 / 102
linenumbering.default
linenumbering.default — Default linenumbering setup for literal environments
Synopsis
<xsl:param name="linenumbering.default"/>
Description
This parameter defines the default linenumbering setup to apply to the templates listed in linenumbering.scope that do not
have a linenumbering attribute.
The parameter value must be consistent and therefore compliant to the values allowed for the linenumbering attribute.
See Also
linenumbering.scope, linenumbering.everyNth.
linenumbering.everyNth
linenumbering.everyNth — Indicate which lines should be numbered
Synopsis
<xsl:param name="linenumbering.everyNth"/>
Description
If line numbering is enabled, everyNth line will be numbered. Note that numbering is one based, not zero based.
mediaobject.caption.style
mediaobject.caption.style — Font style of the mediaobject caption text
Synopsis
<xsl:param name="mediaobject.caption.style">\slshape</xsl:param>
Description
Font style of the mediaobject caption text. Its value can be any valid latex font style command combinations. By default this
parameter put the caption text to italics.
monoseq.hyphenation
monoseq.hyphenation — Specifies one of the supported monoseq hyphenation policy
DocBook to LaTeX Publishing
84 / 102
Synopsis
<xsl:param name="monoseq.hyphenation">1</xsl:param>
Description
This parameter is obsoleted in version 0.3.4 and has no more effect. It has been replaced by the hyphenation.format.
Its role was: when set to 1, aggressively hyphenates the inlined element rendered with monoseq fonts. When set to 0, let latex
do as default. When set to ’nohyphen’, dblatex tries to avoid overfull boxes (words in the margins) but keeps the monoseq words
not splittable.
See Also
hyphenation.format
monoseq.small
monoseq.small — Use a smaller font to render monoseq portions of text
Synopsis
<xsl:param name="monoseq.small">0</xsl:param>
Description
When set to 1, choose a smaller font to the element rendered with monoseq fonts.
Tip
If you use the XeTeX backend you do not need to use this parameter. Instead, you can configure the monospaced font used
with a scale option as follow, through the parameter xetex.font or via a user latex style:
\setmonofont[Scale=MatchLowercase]{DejaVu Sans Mono}
pdf.annot.options
pdf.annot.options — PDF text annotations rendering options
Synopsis
<xsl:param name="pdf.annot.options"/>
Description
Options to change how the PDF text annotations should look. The supported options are width, height, depth. The options must
be comma separated like: width=5cm,depth=10cm.
DocBook to LaTeX Publishing
85 / 102
seg.item.separator
seg.item.separator — Separator to use between several segitems
Synopsis
<xsl:param name="seg.item.separator">, </xsl:param>
Description
Defines the separator to use between several segitems.
show.comments
show.comments — Display remark elements?
Synopsis
<xsl:param name="show.comments" select="1"/>
Description
If non-zero, comments will be displayed, otherwise they are suppressed. Comments here refers to the remark element (which
was called comment prior to DocBook 4.0), not XML comments (<-- like this -->) which are unavailable.
Note
Dblatex uses the PDF Text Annotations capabilities to handle comments and remarks.
texlive.version
texlive.version — Version of the installed Tex Live Distribution
Synopsis
<xsl:param name="texlive.version">2007-10</xsl:param>
Description
The version number is used to adapt the tex output. For instance the URL output depends on the url package behaviour that
differs from one release to another.
ulink.footnotes
ulink.footnotes — Generate footnotes for ulinks?
DocBook to LaTeX Publishing
86 / 102
Synopsis
<xsl:param name="ulink.footnotes" select="0"/>
Description
If non-zero, and if ulink.show also is non-zero, the URL of each ulink will appear as a footnote.
Dblatex Limitation
The URL cannot be shown in a footnote if the ulinks are in list terms or heading titles.
ulink.show
ulink.show — Display URLs after ulinks?
Synopsis
<xsl:param name="ulink.show" select="0"/>
Description
If non-zero, the URL of each ulink will appear after the text of the link. If the text of the link and the URL are identical, the
URL is suppressed.
See also ulink.footnotes.
The global ulink.show and ulink.footnotes setting can be overriden for each ulink that uses an xrefstyle like the
following examples:
<!-- show ’Hot Text [URL]’ or ’Hot Text (foot)’ even if $ulink.show=0 -->
<ulink xrefstyle="url.show" url="http://www.a.site.org/path">Hot Text</ulink>
<!-- show ’Hot Text’ even if $ulink.show=1 -->
<ulink xrefstyle="url.hide" url="http://us3.a.site.org/path">Hot Text</ulink>
<!-- show ’Hot Text [URL]’ even if $ulink.show=0 and $ulink.footnotes=1 -->
<ulink xrefstyle="url.show.after" url="http://www.a.site.org/path">Hot Text</ulink>
<!-- show ’Hot Text (foot)’ even if $ulink.show=0 and $ulink.footnotes=0 -->
<ulink xrefstyle="url.show.infoot" url="http://www.a.site.org/path">Hot Text</ulink>
<!-- show ’Hot Text (foot)’ if $ulink.show=1 and even if $ulink.footnotes=0 -->
<ulink xrefstyle="url.infoot" url="http://www.a.site.org/path">Hot Text</ulink>
<!-- show ’Hot Text [URL]’ if $ulink.show=1 and even if $ulink.footnotes=1 -->
<ulink xrefstyle="url.after" url="http://www.a.site.org/path">Hot Text</ulink>
xref.with.number.and.title
xref.with.number.and.title — Use number and title in cross references
DocBook to LaTeX Publishing
87 / 102
Synopsis
<xsl:param name="xref.with.number.and.title" select="0"/>
Description
A cross reference may include the number (for example, the number of an example or figure) and the title which is a required
child of some targets. This parameter inserts both the relevant number as well as the title into the link.
A.16
Graphics
imagedata.boxed
imagedata.boxed — Put the images into a framed box
Synopsis
<xsl:param name="imagedata.boxed">0</xsl:param>
Description
If set to 1, put the images into a framed box.
imagedata.default.scale
imagedata.default.scale — Specifies the default image scaling properties
Synopsis
<xsl:param name="imagedata.default.scale">pagebound</xsl:param>
Description
Default scale to apply to every imagedata that does not contain any scaling attribute.
By default this parameter is set to `pagebound` so that the included images keep their natural size up to the page boundaries.
Two other special parameters are available: ’maxwidth=width’ and ’maxheight=height’ where width and height define the
maximum image dimensions, i.e. the image keeps its natural size up to the specified maximum dimension. Both ’maxwidth’ and
’maxheight’ settings can be combined in a comma separated list.
Example:
dblatex -P imagedata.default.scale=maxwidth=10cm,maxheight=8cm file.xml
Except these special reserved values, the expected value of the parameter must be some valid options passed to the \includegraphics command.
DocBook to LaTeX Publishing
88 / 102
imagedata.file.check
imagedata.file.check — Make the latex compilation robust to missing images
Synopsis
<xsl:param name="imagedata.file.check">1</xsl:param>
Description
When set to 1 some tex code is added to ensure that latex compilation does not fail when the referenced imagedata file does not
exist.
keep.relative.image.uris
keep.relative.image.uris — Should image URIs be resolved against xml:base?
Synopsis
<xsl:param name="keep.relative.image.uris" select="0"/>
Description
If non-zero, relative URIs (in, for example fileref attributes) will be used in the generated output. Otherwise, the URIs will
be made absolute with respect to the base URI.
Note that the stylesheets calculate (and use) the absolute form for some purposes, this only applies to the resulting output.
A.17
Chuncking
set.book.num
set.book.num — Select a single book or all the books to compile from a set
Synopsis
<xsl:param name="set.book.num">1</xsl:param>
Description
When the document root element is a set this parameter can be used to select the book to print, or to publish all the books
contained in the set when the value is "all". dblatex can only chunk the set in several books, and is not able to publish several
books in a single file.
See Section 4.3.2 for more details.
use.id.as.filename
use.id.as.filename — Use ID value of chunk elements as the filename?
DocBook to LaTeX Publishing
89 / 102
Synopsis
<xsl:param name="use.id.as.filename" select="0"/>
Description
If use.id.as.filename is non-zero, the filename of chunk elements that have IDs will be derived from the ID value.
This parameter is used only when chuncking occurs, that is, when a set of books is published.
A.18
Pagination and General Styles
page.height
page.height — The height of the physical page
Synopsis
<xsl:param name="page.height"/>
Description
The page height is generally calculated from the paper.type parameter.
page.margin.bottom
page.margin.bottom — The bottom margin of the page
Synopsis
<xsl:param name="page.margin.bottom"/>
Description
The bottom page margin is the distance from the bottom of the body including the footer to the physical bottom of the page.
When empty the used latex style layout applies.
page.margin.inner
page.margin.inner — The inner page margin
Synopsis
<xsl:param name="page.margin.inner"/>
DocBook to LaTeX Publishing
90 / 102
Description
The inner page margin is the distance from bound edge of the page to the first column of text.
The inner page margin is the distance from bound edge of the page to the outer edge of the first column of text.
In left-to-right text direction, this is the left margin of recto (front side) pages. For single-sided output, it is the left margin of all
pages.
In right-to-left text direction, this is the right margin of recto pages. For single-sided output, this is the right margin of all pages.
page.margin.outer
page.margin.outer — The outer page margin
Synopsis
<xsl:param name="page.margin.outer"/>
Description
The outer page margin is the distance from non-bound edge of the page to the outer edge of the last column of text.
In left-to-right text direction, this is the right margin of recto (front side) pages. For single-sided output, it is the right margin of
all pages.
In right-to-left text direction, this is the left margin of recto pages. For single-sided output, this is the left margin of all pages.
page.margin.top
page.margin.top — The top margin of the page
Synopsis
<xsl:param name="page.margin.top"/>
Description
The top page margin is the distance from the physical top of the page to the top of the body including the header.
page.width
page.width — The width of the physical page
Synopsis
<xsl:param name="page.width"/>
DocBook to LaTeX Publishing
91 / 102
Description
The page width does not need to be specified when paper.type is set.
paper.type
paper.type — Select the paper type
Synopsis
<xsl:param name="paper.type"/>
Description
The paper type is a convenient way to specify the paper size. The list of known paper sizes includes USletter and most of the A,
B, and C sizes.
When the parameter is empty, the default layout of the latex style used is applied.
When not empty, the value is directly passed to the latex geometry package, and therefore it must be a valid value understood by
this package.
geometry.options
geometry.options — Raw options to pass to the geometry package
Synopsis
<xsl:param name="geometry.options"/>
Description
The content of this parameter is directly passed as options to the latex geometry package, when the page layout setup is customized by the user. Page layout customization is done through setting one or more of the pagination parameters (see below). If
geometry.options is set but none of the other parameters is set, nothing is passed to geometry because the package is loaded
only when the layout is not the default one.
See Also
page.height, page.margin.bottom, page.margin.inner , page.margin.outer , page.margin.top, page.width,
paper.type.
doc.alignment
doc.alignment — Specifies the text alignement of the document
Synopsis
<xsl:param name="doc.alignment"/>
DocBook to LaTeX Publishing
92 / 102
Description
Defines the text alignment for the whole document. The valid values are: "left", "center", "right", "justify". An empty string is
equivalent to "justify".
doc.collab.show
doc.collab.show — Print the document collaborators (authors, etc.) in a table
Synopsis
<xsl:param name="doc.collab.show">1</xsl:param>
Description
Show the collaborators (authors, contributors) defined in the document information block.
doc.layout
doc.layout — Specifies the overall document layout.
Synopsis
<xsl:param name="doc.layout">coverpage toc frontmatter mainmatter index </xsl:param>
Description
The parameter configures the overall document layout, i.e. it specifies if the document must contain a coverpage, some TOC/LOTs,
a frontmatter layout (for metadata/preface/dedication rendering), an index section, etc.
See also the doc.lot.show and doc.toc.show parameters to specify the content of the TOC/LOTs.
doc.publisher.show
doc.publisher.show — Print the dblatex logo on the cover page?
Synopsis
<xsl:param name="doc.publisher.show">0</xsl:param>
Description
Print the dblatex logo on the cover page for the native docbook style if the parameter is set to 1.
draft.mode
draft.mode — Select draft mode
DocBook to LaTeX Publishing
93 / 102
Synopsis
<xsl:param name="draft.mode">maybe</xsl:param>
Description
Print releaseinfo in a framed box in the header, when the parameter is set to ’yes’. The releaseinfo is ignored if the
parameter is set to ’no’, or if the releaseinfo content is empty. When the parameter is set to ’maybe’, the draft mode is deduced
from the status attribute of the root element if set to ’draft’.
draft.watermark
draft.watermark — Print a Watermak on each page in draft mode?
Synopsis
<xsl:param name="draft.watermark">1</xsl:param>
Description
Print the draft text (that is, "DRAFT") as a watermark on each page, if the document is in draft mode and if the parameter is set
to ’1’.
latex.engine.options
latex.engine.options — Extra arguments to pass to the TeX engine
Synopsis
<xsl:param name="latex.engine.options"/>
Description
This parameter enables to pass some options or extra arguments to the TeX engine used to compile the latex file built by dblatex.
This can be usefull to tweak the PDF generation to meet some specific needs that cannot be set through latex commands. The
following example asks to xelatex to produce PDF version 1.3 and to embed all the fonts in the PDF file:
$ dblatex -b xetex -V -P latex.engine.options="-output-driver=’xdvipdfmx -V3 -E’" file.xml
[...]
xelatex -output-driver=xdvipdfmx -V3 -E -interaction=batchmode file.tex
[...]
xelatex -output-driver=xdvipdfmx -V3 -E -interaction=batchmode file.tex
[...]
latex.class.article
latex.class.article — LaTeX document class to use for article documents
DocBook to LaTeX Publishing
94 / 102
Synopsis
<xsl:param name="latex.class.article">article</xsl:param>
Description
This parameter sets the document class to use for article documents.
latex.class.book
latex.class.book — LaTeX document class to use for book documents
Synopsis
<xsl:param name="latex.class.book">report</xsl:param>
Description
This parameter sets the document class to use for book documents.
latex.class.options
latex.class.options — Options passed to the \documentclass command
Synopsis
<xsl:param name="latex.class.options"/>
Description
Options passed to the \documentclass command.
latex.encoding
latex.encoding — Encoding of the latex document to produce
Synopsis
<xsl:param name="latex.encoding">latin1</xsl:param>
Description
Encoding of the latex document to produce. The supported values are: "latin1" and "utf8". See Section 4.13.1 for more details
about how to use it.
DocBook to LaTeX Publishing
95 / 102
latex.unicode.use
latex.unicode.use — Use passivetex unicode support?
Synopsis
<xsl:param name="latex.unicode.use">0</xsl:param>
Description
Set to 1 the passivetex unicode support is included, allowing to handle a wider range of Unicode characters (like cyrillic).
latex.output.revhistory
latex.output.revhistory — Print the revhistory table?
Synopsis
<xsl:param name="latex.output.revhistory">1</xsl:param>
Description
The revhistory data are formatted as a table of the revisions if the parameter is non-zero. If the parameter is zero all the
revhistory data are skipped.
A.19
Font Families
body.font.family
body.font.family — The default font family for body text
Synopsis
<xsl:param name="body.font.family">DejaVu Serif</xsl:param>
Description
The body font family is the default font used for text in the page body.
Currently this parameter is taken into account only when the xetex backend is used, through the xetex.font.
See Also
xetex.font
cjk.font
cjk.font — Fonts to use in CJK environments
DocBook to LaTeX Publishing
Synopsis
<xsl:param name="cjk.font">cyberbit</xsl:param>
Description
Fonts to use in CJK environments (i.e. for Chinese, Japanese or Korean documents handled by the CJK package).
monospace.font.family
monospace.font.family — The default font family for monospace environments
Synopsis
<xsl:param name="monospace.font.family">DejaVu Sans Mono</xsl:param>
Description
The monospace font family is used for verbatim environments (program listings, screens, etc.).
Currently this parameter is taken into account only when the xetex backend is used, through the xetex.font.
See Also
xetex.font
sans.font.family
sans.font.family — The default sans-serif font family
Synopsis
<xsl:param name="sans.font.family">DejaVu Sans</xsl:param>
Description
The default sans-serif font family.
Currently this parameter is taken into account only when the xetex backend is used, through the xetex.font.
See Also
xetex.font
xetex.font
xetex.font — Specifies the fonts that XeTeX must use
96 / 102
DocBook to LaTeX Publishing
97 / 102
Synopsis
<xsl:param name="xetex.font">
<xsl:value-of select="concat(’\setmainfont{’,$body.font.family,’} ’)"/>
<xsl:value-of select="concat(’\setsansfont{’,$sans.font.family,’} ’)"/>
<xsl:value-of
select="concat(’\setmonofont{’,$monospace.font.family,’} ’)"/>
</xsl:param>
Description
Font specification for XeTeX. Meaningful only when the xetex backend is used. By default the parameter sets the XeTeX
configuration from the parameters body.font.family , sans.font.family , and monospace.font.family but you can
completely override it to define a more complex setup.
See Also
body.font.family , sans.font.family , monospace.font.family
A.20
Localization
korean.package
korean.package — Package included when Korean language is used
Synopsis
<xsl:param name="korean.package">CJK</xsl:param>
Description
When lang is set to ’ko’ and the parameter is set to ’CJK’ the CJK package is included to handle the Korean language.
latex.babel.language
latex.babel.language — Force the loaded babel language
Synopsis
<xsl:param name="latex.babel.language"/>
Description
This parameter forces the use of the specified babel language whatever the document language is.
DocBook to LaTeX Publishing
98 / 102
latex.babel.use
latex.babel.use — Disable the use of babel, whatever the document language is
Synopsis
<xsl:param name="latex.babel.use">1</xsl:param>
Description
Set to 1 the babel package corresponding to the document language is included. Set to 0 no babel package is included whatever
the document language is.
A.21
Prepress
crop.marks
crop.marks — Output crop marks?
Synopsis
<xsl:param name="crop.marks" select="0"/>
Description
If non-zero, crop marks will be added to each page. Crop marks are produced with the latex crop package.
crop.paper.type
crop.paper.type — Select the paper type for paper with crops
Synopsis
<xsl:param name="crop.paper.type"/>
Description
The paper type is a convenient way to specify the paper size. The list of known paper sizes includes USletter and most of the A,
B, and C sizes.
This parameter gives the paper type of the physical page containing crops and the usefull page. The crop paper type is valid only
if the overall size actually contains the usefull page whose sizes are defined with the page layout parameters.
The crop paper type is used only if crop.marks parameter is not set to zero.
Note
The usefull page is always centered in the crop page, and there is no parameter to change this behaviour.
DocBook to LaTeX Publishing
crop.page.width
crop.page.width — The width of the physical crop page
Synopsis
<xsl:param name="crop.page.width"/>
Description
The crop page width does not need to be specified when crop.paper.type is set.
The parameter is used only if crop.marks parameter is not set to zero.
Note
The usefull page is always centered in the crop page, and there is no parameter to change this behaviour.
crop.page.height
crop.page.height — The height of the physical crop page
Synopsis
<xsl:param name="crop.page.height"/>
Description
The crop page height is generally calculated from the crop.paper.type parameter.
The parameter is used only if crop.marks parameter is not set to zero.
Note
The usefull page is always centered in the crop page, and there is no parameter to change this behaviour.
crop.mode
crop.mode — How to display crops
Synopsis
<xsl:param name="crop.mode" select="’cam’"/>
Description
Mode to pass to the crop package defining the form of the crops to display when crop.marks is not set to zero.
The allowed values are detailed in the crop package manual.
99 / 102
DocBook to LaTeX Publishing
crop.options
crop.options — Raw options passed to the crop package
Synopsis
<xsl:param name="crop.options"/>
Description
Options directly passed to the crop package when crop marks are asked with the crop.marks set to non-zero.
100 / 102
DocBook to LaTeX Publishing
101 / 102
Chapter 8
Index
P
Parameters, 53
alt.use, 60
annotation.support, 76
beginpage.as.pagebreak, 76
biblioentry.item.separator, 73
biblioentry.numbered, 74
bibliography.numbered, 57, 59, 61–63
bibliography.tocdepth, 57, 59, 61–63
body.font.family, 95, 97
callout.linkends.hot, 54
callout.markup.circled, 55
calloutlist.style, 55
citation.default.style, 38, 74
citation.natbib.options, 38, 74
citation.natbib.use, 38, 74
cjk.font, 95
co.linkends.show, 55
colophon.tocdepth, 17, 57
crop.marks, 98–100
crop.mode, 99
crop.options, 100
crop.paper.type, 99
dedication.tocdepth, 17, 58
default.table.rules, 29, 69
default.table.width, 20, 22, 70
doc.alignment, 91
doc.collab.show, 92
doc.layout, 92
doc.lot.show, 56, 92
doc.pdfcreator.show, 63
doc.publisher.show, 92
doc.section.depth, 17, 77
doc.toc.show, 56, 92
draft.mode, 92
draft.watermark, 93
equation.default.position, 77
example.default.position, 77, 78
example.float.type, 77, 78
figure.anchor.top, 78
figure.caution, 53
figure.default.position, 78
figure.important, 53
figure.note, 54
figure.tip, 54
figure.title.top, 78, 79
figure.warning, 54
filename.as.url, 79
funcsynopsis.decoration, 64
funcsynopsis.style, 64
function.parens, 64
geometry.options, 91
glossary.numbered, 57–59, 61–63
glossary.tocdepth, 57–59, 61–63
glossterm.auto.link, 76
hyphenation.format, 79, 84
imagedata.boxed, 87
imagedata.default.scale, 87
imagedata.file.check, 88
imageobjectco.hide, 55
index.numbered, 57, 59, 61–63
index.tocdepth, 57, 59, 61–63
insert.xref.page.number, 71
keep.relative.image.uris, 88
korean.package, 97
latex.babel.language, 97
latex.babel.use, 98
latex.bibfiles, 75
latex.biblio.output, 37, 75
latex.biblio.style, 37, 75
latex.bibwidelabel, 75
latex.class.article, 93
latex.class.book, 94
latex.class.options, 94
latex.encoding, 39, 51, 94
latex.engine.options, 93
latex.hyperparam, 70
latex.index.language, 36, 59, 60
latex.index.tool, 35, 59, 60
latex.output.revhistory, 95
latex.unicode.use, 39, 51, 95
linenumbering.default, 82, 83
linenumbering.everyNth, 82, 83
linenumbering.scope, 82, 83
literal.class, 32, 81
literal.environment, 35, 81, 82
DocBook to LaTeX Publishing
literal.extensions, 32, 33, 82
literal.layout.options, 34, 80
literal.lines.showall, 80
literal.role, 32, 81
literal.width.ignore, 80
make.single.year.ranges, 63
make.year.ranges, 63
mediaobject.caption.style, 83
monoseq.hyphenation, 79, 80, 83
monoseq.small, 84
monospace.font.family, 96, 97
newtbl.autowidth, 22, 23, 65, 70
newtbl.bgcolor.thead, 66
newtbl.default.colsep, 66
newtbl.default.rowsep, 66
newtbl.format.tbody, 66
newtbl.format.tfoot, 67
newtbl.format.thead, 67
newtbl.use.hhline, 67
page.height, 91
page.margin.bottom, 91
page.margin.inner, 91
page.margin.outer, 91
page.margin.top, 91
page.width, 91
paper.type, 89, 91
pdf.annot.options, 84
preface.tocdepth, 17, 57–60
qanda.defaultlabel, 73
refclass.suppress, 64
refentry.generate.name, 65
refentry.numbered, 57, 59–62
refentry.tocdepth, 57, 59–63
refentry.xref.manvolnum, 65
sans.font.family, 96, 97
seg.item.separator, 85
set.book.num, 14, 88
show.comments, 85
table.default.position, 68
table.default.tabstyle, 24, 68
table.in.float, 68, 69
table.title.top, 69
term.breakline, 72
tex.math.in.alt, 60, 61
texlive.version, 85
titleabbrev.in.toc, 56
toc.section.depth, 17, 57
ulink.footnotes, 40, 85, 86
ulink.show, 40, 86
use.id.as.filename, 14, 88, 89
variablelist.term.separator, 73
xetex.font, 84, 95, 96
xref.hypermarkup, 72
xref.with.number.and.title, 86
102 / 102