1
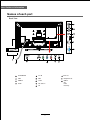
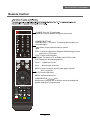
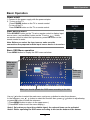
KALED32SMTWA
USER MANUAL
Contents
Contents
Safety Precautions
Power Supply..................................................................................................................................................... 1
Installation......................................................................................................................................................... 2
Use and Maintenance....................................................................................................................................... 3
Important Safety Instructions ............................................................................................................................ 4-5
User Guidance Information
Names of each part(Front View) / Accessories ................................................................................................. 6
Names of each part(Back View) ........................................................................................................................ 7
Remote control .................................................................................................................................................. 8-9
Basic Operation
Basic Operation ................................................................................................................................................. 10
OSD Menu
1. CHANNEL Menu ........................................................................................................................................... 11-12
2. PICTURE Menu ............................................................................................................................................ 13
3. SOUND Menu ............................................................................................................................................... 14
4. TIMER Menu ................................................................................................................................................. 15
5. OPTION Menu ............................................................................................................................................... 16
6. LOCK Menu ................................................................................................................................................... 17
Multimedia Operation
Multimedia Operation ........................................................................................................................................ 18-20
Smart TV
Smart TV .......................................................................................................................................................... 21-35
Maintenance and Service
Trouble shooting ............................................................................................................................................... 36
Specifications ................................................................................................................................................... 37
Safety Precautions
Power Supply
1
Safety Precautions
Installation
2
Safety Precautions
Use and Maintenance
3
Safety Precautions
Important Safety Instructions
4
Safety Precautions
Important Safety Instructions
5
User Guidance Information
Names of each part
Front View
SOURCE
MENU
CH+
CHVOL+
VOLPOWER
SOURCE: Display the input source menu.
MENU: Display/exit the OSD menu.
CH+/-: Scan through channels.
VOL+/-: Adjust the volume.
POWER: Turn on/standby the TV set.
Remote Control
6
User Guidance Information
Names of each part
Back View
10
8
2
2
USB
7
6
3
USB2
USB3
SD card
Recovery
RJ45
12
11
5
4
9
1
10 Coax out
1
AC POWER IN
5
2
USB
6
3
HDMI1/2
7
Video
4
YPbPr
8
R/L audio in
9
RF
PC -IN
VGA
7
11
Headphone out
12
USB1/2
SD
RJ45
Recovery
User Guidance Information
Remote Control
SOURCE
POWER: Turn the TV on/standby.
SOURCE: Press to display the input source menu.
NUMBER BUTTONS
Press 0-9 and -/-- to select a TV channel directly when you
are watching TV.
Return to the previous channel viewed.
LIST
EPG
PVR
TV/Radio
FAV
EPG: To show the Electronic Program Guide during no-menu
state only in DTV mode.
PVR: To start record function.
TV/Radio: To switch to TV or Radio state in DTV mode.
FAV: Display the favorite program list.
VOL+/- : Adjust the volume.
CH+/- : Scan through channels.
MUTE: Press to mute the sound, press again or press
VOL+ to unmute.
EXIT: Exit the OSD menu.
MENU: System setup menu.
CURSOR KEYS
OK
Allows you to navigate the on-screen menus and adjust the
system settings to your preference.
Rec.list
ASPECT
NICAM/A2
SUBTITLE
AUDIO
ABC/123 NOTIFICATION
8
User Guidance Information
Remote Control
SOURCE
Buttons for Android
LIST
EPG
PVR
TV/Radio
FAV
SLEEP: Standby timer.
PICTURE: Select the picture mode.
SOUND: Select the sound mode.
DISPLAY : Means information, to display brief information
concerning the current channel or disc you are watching.
Rec.list: Display the record list.
NICAM/A2: TV Nicam/A2 select.
TV/TXT: Turn off/on the Teletext display.
HOLD: Hold or carry on the current subpage.
SUBPAGE: Press to enter subpages, press again to cancel.
INDEX: Go to index.
SIZE: Press to see top half of page double size,
Press again to see the bottom
half of page double size. Press again for normal size.
REVEAL: Reveal any hidden text.
Color Buttons: Short cuts-follow the coloured links in the text.
: Switch to keypad/mouse or remote control.
ABC/123: Switch to digital numbers or letters.
Rec.list
SUBTITLE: Turn on/off the subtitle display in DTV mode.
AUDIO: Change the audio language in DTV mode.
ASPECT
NICAM/A2
SUBTITLE
ABC/123 NOTIFICATION
AUDIO
ASPECT: Cycles among screen display modes.
Repeat: Repeat playing the title or chapter.
: Play/Pause program.
: Stop program.
: Fast reverse.
: Fast forward.
: Previous chapter.
: Next chapter.
9
Basic Operation
Basic Operation
Power on/off
1. Connect to the power supply with the power adaptor.
2. -To turn on the TV
Press POWER button on the TV or remote control.
-To turn off theTV
Press POWER button on the TV or remote control.
ATV
DTV
Input Source select
Media
Press SOURCE button on the TV set or remote control to display input
source menu, and use CH+/- button on the TV set or
button
on remote control to select the input source, press OK button on the
remote control to enter.
Note: Before you select the input source, make sure the
connections are prepared and the input source device is turned on.
AV
PC
Component
Smart TV
HDMI1
HDMI2
Basic OSD Menu operation
Press MENU button to display the OSD menu as below:
Main menu
CHANNEL
PICTURE
SOUND
TIME
LOCK
SETUP
Submenu
(PICTURE
menu for
example)
Hint---you should operate the OSD menu according to the hint.
Use
/
button to select the main menu, and press
button to enter the submenu.
button to select the function item, press / button to adjust/setup,
In the submenu, use
/
or press OK button to enter the submenu.
* (Press MENU button to return to the upper menu.)
* (Press EXIT button to exit the menu display.)
Note1: Only when you input the suitable signal, the relevant items can be activated
Note2: Please operating the OSD menu according to hint on the bottom of the banner.
10
OSD Menu
OSD Menu
1. CHANNEL menu
ATV Manual Tuning
DTV Manual Tuning
Description
Auto Tuning
Press OK button to enter the hint menu, and Press
/
button to select the Tune Type, then press button, and use
/ / / button to select the Country for the TV, then
press OK button to start auto tuning.
DTV Manual Tuning
Press OK button to enter the DTV Manual Tuning menu,
select a DTV channel, and press OK button to start searching.
ATV Manual Tuning
Press OK button to enter the ATV Manual Tuning menu.
Current CH: Select a Channel for storing the programme.
Color System: Select from PAL ,AUTO and SECAM.
Sound System: Select from L, BG, DK
Search: Press / button to manual search.
Fine Tune: Press / button to fine-tune.
AFC: Automatic Frequency control ON/OFF.
11
OSD Menu
OSD Menu
Programme Edit
Press OK button to enter the Programme Edit menu as the following picture.
FAV
Delete: Select a channel and press RED button, the Program will be delete.
Rename: Select an ATV channel and press the GREEN button to change the name of the
channel by
/ / / buttons.
and
Move: Select an ATV channel and press YELLOW button, then you can use
buttons to change the position of the program, press YELLOW again to confirm the change.
Press menu to exit and it will automatically save the current set.
Skip: Select a channel and press the BLUE button to label the channel, as long as the channel
has a skip label it will be skipped when searching through the channels with the CH+/- buttons.
Signal Information
Display the digital TV-signal information (DTV mode only).
12
OSD Menu
OSD Menu
2. PICTURE menu
Description
Picture Mode: Choose from Dynamic, Standard, Mild and Personal.
Note: Contrast, Brightness, Color Tint and sharpness are only available and can be adjusted
in the Personal mode option in the Picture Mode Settings.
Contrast: Controls the difference between the brightest and darkest regions of the picture.
Brightness: Controls the overall brightness of the picture.
Color: Control the color.
Sharpness: Increase this setting to see crisp edges in the picture; decrease it for soft edges.
Tint: Controls the tint ( NTSC mode only).
Color Temperature: Choose from Medium, Cool, User and Warm.
Noise Reduction: Choose interference noise modes form Off, Low, Middle, High and Default.
13
OSD Menu
OSD Menu
3. SOUND menu
Description
Sound Mode: Allows you to select among: Standard, Music, Movie, Sports and Personal.
Treble(Can be adjusted when the sound mode is Personal) : Controls the relative intensity of
higher pitched sounds.
Bass (Can be adjusted when the sound mode is set to Personal) : Controls the relative intensity of
lower pitched sounds.
Balance: To adjust the balance of the left and right sound track, or turn off the volume of the
left and right sound track.
Auto Volume: Control the volume of the programme automatically when you turn on the function
by selecting “On”.
SPDIF MODE: Select the spdif mode.
AD Switch: Turn on/off the AD switch.
14
OSD Menu
OSD Menu
4. TIME menu
Description
Clock: Display the time.
Time Zone: Allows you to select the time zone.
Sleep Timer: Allows you to setup the sleep timer among: 10min, 20min, 30min, 60min, 90min,
120min,180min, 240min and off.
Auto Standby : According to the latest ERP regulation, this unit will switch off itself automatically
if no change in status within the last 4 hours of operation.
OSD Timer: Allows you to select the time for OSD menu displays on the screen.
15
OSD Menu
OSD Menu
5. LOCK menu
Description
Lock System: Turn on/off the Lock System function.
Note: You should enter the code to operate the menu. (Original code is 0000)
Set Password: Set pin code. If the Pin code has been changed you must enter the present
code.
New : Enter the new password.
Confirm: Enter the new password.
Block Program: You must enter the password to view channels that have been locked. Use
and
buttons to select the channel and press the GREEN button on the remote control to
lock the channel.
Parental Guidance: Allows you to select the Parental Guidance mode.
Key Lock: Lock the buttons on the TV set when you turn on the function.
16
OSD Menu
OSD Menu
6. SETUP menu
Software update(USB)
Description
OSD Language: Allows you to select menu language.
TT Language: Allows you to select teletext language.
Hearing Impaired: Turn on/off the Hearing Impaired function.
Aspect Ratio: Choose from 4:3, 16:9, Zoom1, Zoom2, Just Scan.
Blue Screen: Turn on/off the blue screen function when there’s no signal.
First Time Installation: Display the First Time Installation menu.
Restore Factory Default: Press OK button to restore factory default.
17
Multimedia Operation
Multimedia Operation
Basic Operation
1). Press the SOURCE button on the remote control to display the input source menu, select Media
source by the /
buttons, and press OK button to enter the Multimedia menu seen below.
Hints and informations of USB device
ATV
DTV
Media
AV
PC
Component
Smart TV
HDMI1
HDMI2
MAINS MENU: PHOTO MUSIC MOVIE TEXT
2). Select the file type (mains menu) you want to view, and insert USB device, you will find the
name of the device display on the screen.
3). Press
/
button to select the USB device, and press OK button to enter.
Return to
previous menu
Information
Preview
EXIT
EXIT
Press /
/
/
buttons to select and the OK button to activate the file or open folder. Press
OK button to play the files in full screen mode. When in full screen mode press the OK button to
show the option menu on the bottom of the screen or press
stop button to return to files.
Note: You can press RED button on the file to delete the file.
18
Multimedia Operation
Multimedia Operation
1. Photo
Photo viewing
Press / button to select the option on the menu, and press OK button to change.
Pause: Play/pause the photo view.
Prev./Next: View the previous/next photo.
Stop: Stop the photo view.
Repeat: Select the repeat mode from Repeat All, Repeat 1, Repeat None.
Music: Play/Pause the music.
Playlist: Display the playlist on the screen and play the file by
/
button and OK button, you can
press button to select “CANCEL”, and press OK button to cancel the list displaying.
Info: Display the information of the file.
Rotate: Rotate the photo clockwise/counterclockwise.
Zoom Out/In: Zoom out/in the photo.
Move View: Move the photo in Zoom in mode.
2. Music
Play music
Press / button to select the option on the menu, and press OK button to change.
Pause: Play/pause the music.
FB/FF: Fast backward/fast forward.
Prev./Next: Play the previous/next file.
Stop: Stop the music.
Repeat: Select the repeat mode from Repeat All, Repeat 1, Repeat None.
Mute: Mute the sound.
Playlist: Display the playlist on the screen and play the file by / button and OK button, you can
press button to select “CANCEL”, and press OK button to cancel the list displaying.
Info: Display the information of the file.
Goto Time: Play the music from the time you set.
19
Multimedia Operation
Multimedia Operation
3. Movie
Play movies
Press / button to select the option on the menu, and press OK button to change.
Pause: Play/pause the music.
FB/FF: Fast backward/fast forward.
Prev./Next: Play the previous/next file.
Stop: Stop the music.
Repeat: Select the repeat mode from Repeat All, Repeat 1, Repeat None.
Set A-B: Select and play the preferable part of the file by setting A and B at the beginning and end.
Press OK button to cancel.
Playlist: Display the playlist on the screen.
Info: Display the information of the movie.
Slow Forward: Play the movies at slow speed, press
button to cancel.
Step Forward: Step quickly through the movie by using this option
Goto Time: Program the movie form the time you set.
Zoom out/in: Zoom out/in the movie screen.
Aspect Ratio: Select the aspect ratio of the screen display.
Move View: Move the photo in Zoom in mode.
4. Text
View text
Press / button to select the option on the menu, and press OK button to change.
Previous/Next page: Turn to previous/next page of the text.
Prev./Next: Turn to previous/next file.
Stop: Stop auto turning pages.
Music: Play/pause the music programme.
Playlist: Display the playlist on the screen.
Info: Display the information of the text.
20
Smart TV
Smart TV
1. Install Wizard
WELCOME PAGE
when you turn on the TV and first switch to SMART TV channel
INSTALLATION WIZARD
Choose your language:
21
Smart TV
Smart TV
Choose your network (wireless or Ethernet network),and then follow the steps setting the network:
Configuration Result:
22
Smart TV
Smart TV
MAIN LAUNCHER
Press the arrow buttons
to select the icon and 'ENTER'the sub-screen:
FUNCTION
DESCRIPTION
The AppManager lets you launch
selected applications, such as
Weather, Calendar ,News
The Browser allows you enjoy your
time on surfing Internet and searching
for information
The Video/Audio/Picture Player lets
you enjoy all of your videos, music
and pictures from system memory or
storage devices.
The Video/Audio/Picture tab will show
a table of previews of your media files
The Settings screen contains most of
the customizing and configuration
options, such as language, aspect
ratio, date and time and network
23
Smart TV
Smart TV
LAUNCHER INTRODUCTION
1
3
2
Area
EXAMPLE
DESCRIPTION
1
Show time and calendar.
You can set time/date/time
zone in settings
2
List the most used 6 apps
You can set two widgets as:
News, Google search bar,
weather, etc.
3
24
Smart TV
Smart TV
MEDIA PLAYER
The “Picture”, “Music” and “Video” are the media player for local storage. You can play media from a USB stick,
SD-CARD etc.
Video
Music
Picture
Music player
25
Smart TV
Smart TV
Music player
Picture player
The following table shows the codec or format the product can play (more detail at general outline):
Type
Format
Video (Upper to 1080P)
H.264 (AVI, TS, M2TS, MOV, WMV, MP4, FLV)
DIVX (AVI)
MPEG1, MPEG2,MPEG4 (RM, VOB, MPG, MPEG,
TS, M2TS)
VC1
WMV
Audio
MP3
WMA
AAC
OGG
WAV
M4A
Picture (Resolution < 20M)
BMP
JPG/JPEG
GIF
PNG
26
Smart TV
Smart TV
BROWSER
You will use the following key:
Arrow buttons:
Select and confirm to choose or enter
Menu Key:
Call out the Browser’s menu, include forward, edit bookmark, refresh etc.
Back key:
Back to the last page
Search key :
Call out the search bar for searching or input new web address.
PG +/
PG-:
You can use the keys to browse up/ down the web page.
27
Smart TV
Smart TV
APPLICATIONS
Install from USB/SD card
1.
2.
3.
4.
5.
Open the “File Manager”.
Choose your USB or any other mass storage’s folder.
Find your application, and select it.
Press the install button.
You can find the application in “App manager” after installation.
Install from Browser
1. Open the Browser.
2. Press search key and input your website address.
3. Download an APK file if there is a link for download this file (*Before download, you must have your SD
card in the card slot).
4. You can find the file in you SD card folder.
5. Install it use “File manager”.
Install from ApkInstaller
1.
2.
3.
4.
Open the ApkInstaller.
Find the icon of the application, and enter it.
Press the install button.
You can find the application in “App manager” after installation.
Install from Google Play
1. Activationof Google Play
Go to ”Settings ” . Then go to ”Application”and activate ”Google market setting”.
Press “ HOME”
2. From home go to App Manager. Click on APP named MARKET.
The following pop up message will appear:
“ You must add an account the device to continue, Do you want to add one now ?”.
Select “YES”.
Add Google account and press “NEXT”.
Now to choices: Don’t have Google account - Create
Already have Google account- Sign in
If you don’t have an account, you need to create one. Please follow the instructions.
It is normally easier to create an account from a computer.
If you have a Google account, choose Sign in.
28
Smart TV
Smart TV
Enter your User name & password and login
Info will come that your account now is linked to this television
Then press finish setup.
You will see waiting circle say LOADING
Sometimes when Google is very busy you may see the waiting circle for very long time
It most of the time is ok to press “return “ and then click on APP Market
Then new popup message will appear ask you to accept terms from Google.
Press “accept” to continue.
Now App Market will open .
You will after some time receive more popups to accept the new terms / conditions
For Google Play after accepting this Market APP will change Google play App
Copy and move files
1.
2.
3.
4.
Open “filebrowser” in APPS collection.
Change “select/open mode” to “select mode”.
Select file
Press menu on remote control or click “show Edit dialog” icon on top of screen ,then you
can make selection to move and copy files.
NOTE: You can read “help” in filebrowser app for reference..
Remove Applications
1. Enter SETTINGS
2. Enter "Applications--Manage applications"
3. Find the application you want to remove in tab "All"
4. Enter the icon and press "Uninstall"
5. Press "OK" to confirm uninstall
SETTINGS
29
Smart TV
Smart TV
Setup settings
Brief description
Wireless & networks
Check to turn on Wi-Fi so you can connect to Wi-Fi networks
Check to receive an alert when an open Wi-Fi network
becomes available
Opens a dialog where you can add a Wi-Fi network by entering
its SSID (the name it broadcasts) and security type
Applications
Compatibility Mode
Manage applications
Running services
Storage use
Ethernet
Check to turn on Ethernet so you can connect to Ethernet
networks
Reset to factory defaults
Storage settings
Language & Keyboard
This will erase all data from your device’s internal storage
To also clear music, pictures, and other data, the SD card needs
to be erased
Total space
Available space
Erase USB storage
Available space of internal storage
Select language
User dictionary
Android keyboard
Virtual Keyboard
Your SMART TV System has built-in virtual English keyboard
So if you want keyboard layout to include Scandinavian Characters
then go to Google play and install the free app Scandinavian Keyboard
External Keyboard
If you have installed external keyboard to your system and then change your default language
then you must unplug and re-connect the USB to activate your change ( Re-Boot system also
works )
System updates
Updating system
About module
Status
Model number
Android version
Baseband version
Kernel version
Build number
Wi-Fi IP address
Wi-Fi MAC address
30
Smart TV
Smart TV
EXCEPTION HANDLING
Systems restore
If the Smart TV cannot start successfully, please proceed as follows:
*Please read carefully before operation!
1.
Unplug your storage devices, such as: SD card, USB sticks, mobile HDD etc.
2.
Unplug the power supply
3.
Press the RECOVERY button , then plug in the power, release the RECOVERY button
until you see the screen as follow
4.
Use Up/Down buttons to choose “wipe data/factory reset” and enter it
5.
Use Up/Down buttons to choose “Yes -- delete all user data” and enter it
(*Warning!: It will delete all of user’s information after confirmation )
31
Smart TV
Smart TV
6.
Use Up/Down buttons to choose “reboot system now” and enter it, the product will reboot after confirmation
7.
The product will enter the system successfully
32
Smart TV
Smart TV
General Outline
OS
ARM
Frequency
RAM
ROM
Android 4.0
ARM Cortex A9
Up to 1GHz
1G DDR3
Built-in 4GB NAND Flash
I/R remote signal receiver input x1
I/O
SD slot(support up to 32GB) x1
USB 2.0 input x2
Networking
Built-in WIFI
Language
Swedish, English, German, Spanish, Arabic, Chinese, Japanese,
French, Russian ETC.
Display
Specs
Media
Format
Aspect Ratio : 16:9
Resolution: 720p
Video Formats: Full-format 1080P HD video decoding play
Supported Video decoding: MPEG 1, MPEG 2,MPEG4, H.264, H.263,
VC-1, RV30/40,
Supported Audio decoding: PCM, LPCM, MP3, AAC, MPEG Audio,
WM
Music format: WMA,MP3,WAV,AAC
Feature
Picture format: JPG,GIF,BMP,PNG
FTI(First Time Installation )
Screen keyboard or support USB keyboard, wireless keyboard and
mouse
Video, music, picture player
File manager
ApkInstaller
Email, Gmail and etc.
Support kinds of third-party softwares
Support Adobe Flash player
33
Maintenance and Service
Trouble shooting
Do not use other functions that are not mentioned in this user’s manual.
In case a problem occurs with your TV, please take the following steps first.
If you still have the problem, turn the power off and contact Kogan customer support.
Problem
Action
The screen does not appear.
Is the power plug pulled out? Insert the power plug.
Press the power button of the remote control.
The screen appears too
slowly after the power is turned on.
This problem occurs for a brief time in the process of
image elimination processing in order to hide temporary screen noise
that occurs when the power is turned on. But if the screen does not
come after 1 minute contact the Kogan Customer Suport service
center.
Screen is too bright or too dark.
Perform brightness adjustment or Contrast adjustment.
Screen is too large or too small.
Adjust the screen size.
Stripes appear on the screen
and it shakes.
Stop using wireless telephones, hair driers and electric drills.
The screen does not move.
Screen appears, Voice is not heard
Press the PAUSE button. Check if the Pause button is pressed on
external equipment.
1. Press the "MUTE"button.
2. Increase the sound level by pressing volume adjustment button.
3. Check if sound terminal of external input is connected properly.
4. Check if audio cables are connected properly.
5. Select and check the other input.
If the sound still does not work and the other channels are the
same after you have done as the above, contact the Kogan
customer support service center.
Remote control does not work
1. Check if main power is On.
2. Check that the batteries of the remote controller were loaded
properly.
3. Check to see if any obstacle exists between the TV and
the remote control , then remove it, if any.
4. If the batteries have no power, replace them with two new
batteries.
This TV is for household use and registered as harmless on electromagnetic waves.
Therefore, you can use it in every location as well as residential areas.
34
Maintenance and Service
Specifications
Techincal Specifications
TV
TVSystem
Screen size
Resolution
Aerial input
Power Consumption
PAL BG/DK/I SECAM BG/DK
32"(diagonal)
1366 x 768 pixels (RGB)
(unbalanced)
75
12V 5A 60 W
35
Manufactured under license from Dolby Laboratories.
"Dolby" and the double-D symbol are trademarks of Dolby Laboratories.