1
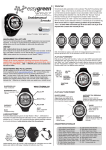
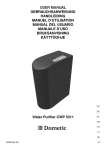
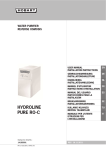
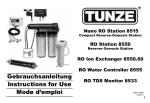
USER INSTRUCTIONS
Confidence
WATER PURIFIER
REVERSE OSMOSIS
RO 400
EN
DE
FR
ES
IT
8229016-28
SE
PRODUCT DESCRIPTION
EN
1. Bracket for reject water hose
2. Reject water hose
3. Hose clips (2)
4. Hose for feed water
5. Angle bracket for purified water hose
6. Filter spanner
7. Information decal
8. Purified water hose
9. Purfied water tap
10. Indicator lights
11. Filter container I
12. Base plate
13. Filter container II
14. Control panel
ES
1.
2.
3.
4.
5.
DE
1. Knickschutzbogen für Abwasserschlauch
2. Abwasserschlauch
3. Schlauchschellen (2)
4. Zulaufschlauch
5. Knickschutzbogen für Reinwasserschlauch
6. Filterschlüssel
7. Informationsschild
8. Reinwasserschlauch
9. Reinwasserhahn
10. Anzeigeleuchten
11. Filterbehälter I
12. Bodenplatte
13. Filterbehälter II
14. Kontrolltafel
IT
1. Supporto tubo acqua reflua
2. Tubo di scarico dell’acqua reflua nella
tubazione fognaria
3. Fascetta stringitubo (2)
4. Tubo acqua di alimentazione
5. Gomito per tubo acqua trattata
6. Chiave speciale per filtri
7. Etichetta informative autoadhesiva
8. Tubo acqua trattata
9. Rubinetto acqua trattata
10. Spie
11. Contenitore filtro I
12. Piastra di base
13. Contenitore filtro II
14. Pannello di comando
FR
1. Étrier pour tuyau d’évacuation des eaux
usées
2. Tuyau d’évacuation des eaux usées
3. Attache pour tuyau (2)
4. Tuyau d’amenée de l’eau
5. Raccord coudé pour tuyau de sortie de l’eau
purifiée
6. Clé pour installation des filtres
7. Fiche d’information auto-adhésive
8. Tuyau de sortie de l’eau purifiée
9. Robinet pour l’eau purifiée
10. Voyants d'indication
11. Compartiment filtre I
12. Socle
13. Compartiment filtre II
14. Tableau de commande
SE
1. Hållare för avloppsslang
2. Avloppsslang
3. Slangklämma (2)
4. Tilloppsslang
5. Vinkelhållare för renvattenslang
6. Filternyckel
7. Informationsdekal
8. Renvattenslang
9. Renvattenkran
10. Indikeringslampor
11. Filterbehållare I
12. Bottenplatta
13. Filterbehållare II
14. Kontrollpanel
2
Abrazadera de la manguera de desagüe
Manguera de desagüe
Abrazaderas para manguera (2)
Manguera del agua de alimentación
Escuadra para la manguera de agua
purificada
6. Llave de tuercas del filtro
7. Adhesivo informativo
8. Manguera de agua purificada
9. Grifo del agua purificada
10. Pilotos indicadores
11. Portafiltros I
12. Base
13. Portafiltros II
14. Panel de Control
PRODUCT DESCRIPTION
9
10
1
2
8
3
4
14
7
53
6
13
12
11
3
Confidence RO 400
EN
THANK YOU for entrusting us to supply your new water purifier, which we hope will provide you with many years of
trouble-free use.
To avoid problems, it is important for you to read through the user instructions and carefully to follow the “Safety
information” and the “Installation” instructions. Everybody using the water purifier should be familiar with how to operate
it and its safety features.
The manual should be kept and stay with the water purifier if it is ever moved or changes owners, so that everyone
who uses the appliance can read about the various functions and safety instructions.
The manual’s English instructions begin on page 5.
DE
VIELEN DANK, dass Sie unseren Wasseraufbereiter gewählt haben. Wir hoffen, dass Sie viele Jahre Freude an dem Gerät
haben werden.
Um Probleme zu vermeiden, ist es wichtig, diese Gebrauchsanweisung aufmerksam zu lesen und die Anweisungen und
Informationen der „Sicherheitshinweise“ und der „Installationsanleitung“ zu beachten. Alle, die den Wasseraufbereiter
benutzen, sollten mit seiner Bedienung vertraut sein und wissen, was in einem Störungsfall zu tun ist.
Dieses Handbuch ist immer bei dem Wasseraufbereiter aufzubewahren. Geben Sie diese Unterlagen im Falle eines
Verkaufs an den neuen Besitzer weiter.
Die deutschen Bedienungsanweisungen dieses Handbuchs beginnen auf Seite 27.
FR
MERCI de nous faire confiance en optant pour votre nouveau purificateur d’eau qui, nous l’espérons, vous servira sans
défaillance et vous donnera satisfaction pendant de nombreuses années.
Afin d’éviter tout problème, ne manquez pas de lire la section intitulée « Sécurité », ni de vous conformer scrupuleusement
aux instructions d’« installation ». Quiconque utilise le purificateur devra en connaître le maniement et les dispositifs de
sécurité.
Conserver avec soin le présent manuel d’instructions et veiller à ce qu’il accompagne le purificateur en cas de
déplacement ou de vente de ce dernier, de façon à ce que tout utilisateur puisse à tout moment consulter le manuel
d’instructions complet et les instructions de sécurité.
Le manuel d’instructions en français commence à la page 49.
ES
GRACIAS por confiar en nosotros al adquirir su nuevo purificador de agua del que esperamos que disfrute por muchos
años sin ningún tipo de problema.
Para evitar problemas, es importante que lea el manual de instrucciones y que siga con atención la “Información sobre
seguridad” y las instrucciones de “Instalación”. Cualquier persona que utilice el purificador de agua deberá estar
familiarizada con el funcionamiento y las advertencias de seguridad.
Conserve el manual próximo al purificador de agua, incluso si se coloca en otro sitio o cambia de propietario, para
que quien lo utilice pueda conocer las distintas funciones y las instrucciones de seguridad.
El manual de instrucciones en español comienza en la página 71.
IT
GRAZIE per la fiducia che ci avete accordato acquistando questo nuovo depuratore d'acqua. Siamo certi che potrete
contare sul suo perfetto funzionamento per molti anni.
Per evitare problemi, è importante che l'utente legga attentamente le seguenti istruzioni, prestando particolare attenzione
ai capitoli «Informazioni sulla sicurezza» e «Installazione». Chiunque utilizza un depuratore dovrebbe conoscere le
modalità di funzionamento e le caratteristiche di sicurezza di tale apparecchio.
Conservare il presente manuale assieme al depuratore. Se l'apparecchio viene spostato o ceduto a un altro
proprietario, l'utente deve sempre avere la possibilità di consultare la documentazione relativa alle varie funzioni e
alle istruzioni di sicurezza.
Le istruzioni in italiano del manuale iniziano a pagina 93.
SE
TACK för att vi fick förtroendet att leverera din nya vattenrenare som vi hoppas du ska få många års bekymmersfri
användning av. För att undvika problem är det viktigt att du läser igenom bruksanvisningen och noga följer
säkerhetsinformationen och installationsanvisningarna. Alla som använder vattenrenaren ska vara väl förtrogna med
användningssättet och säkerhetsdetaljerna.
Spara bruksanvisningen och låt den följa med vattenrenaren vid flytt eller ägarbyte, så att alla som använder
vattenrenaren kan läsa om funktionerna och säkerhetsdetaljerna.
Bruksanvisningens svenska instruktion börjar på sida 115.
4
CONTENTS
For the user
For the installer
GENERAL VIEW OF THE APPLIANCE 2-3 TECHNICAL DATA
19-20
CONTENTS
5 INSTALLATION
INFORMATION
6 Where to install the water purifier ..................21
21-25
Unpacking......................................................21
Consumables/accessories ..............................6
Recycling of materials ....................................6
A brief glossary................................................6
7-8
SAFETY INFORMATION
Concerning the use of the water purifier ........8
Concerning installation and service ................8
Child safety ......................................................8
9
USING THE WATER PURIFIER
Apply the information panel ..........................21
Electrical and plumbing connections ............22
To fit the tap for purified water ......................22
Connecting the reject water hose ..................23
Connecting the feed water hose ....................23
Connecting up the appliance ........................24
The flushing procedure..................................25
Calibration ....................................................25
Moving the water purifier ..............................25
To draw purified water......................................9
10-15
MAINTENANCE
Replacing the filters..................................10-11
Descaling..................................................12-13
Disinfection ....................................................13
Preparing the water purifier for storage
and protecting it against freezing ..................14
To clean the grid ............................................15
REGULAR CARE OF WATER PURIFIER
15
Points to remember ......................................15
IF THE WATER PURIFIER STOPS
WORKING
16-18
Trouble-shooting table ..............................16-17
To adjust the tap ............................................18
Service and spare parts ................................18
Guidelines for using the user instructions
The following symbols in the text will help you to read the user instructions:
Safety information
Environment information
Step-by-step instructions
Tips and information
5
INFORMATION
Consumables/accessories
Item
Filter inserts:
Filter I (particle filter)
Filter II (carbon filter)
Descaling/cleaning agent
for Water Purifiers
Preservative and Antifreeze
liquid for Water Purifiers
Sound absorbing carpet
Installation pack
Connector for dishwashers
(level-control type only)
Item no.
Part no. 919 24 00-82
Part no. 919 24 00-83
Part no. 150 72 07-01
Part no. 150 72 06-02
Part no. 919 24 09-03
Part no. 919 24 09-04
Part no. 919 24 09-02
Accessories and consumables can be ordered from your
dealer. When ordering, please quote the relevant part
number from the list above.
Recycling of materials
The materials used in 80% of the plastic and rubber components of this product and its packaging are identified by
symbols to assist the process of recycling and disposal. The
materials are marked according to international standards.
The cardboard parts of the packaging are made from recycled paper and should be deposited at a suitable recycling
point.
A BRIEF GLOSSARY
6
Reverse osmosis
The purification of water by forcing it under pressure through a semipermeable membrane. The
membrane is impermeable to impurities, but permeable to water. This is the principle upon which the
water purifier is based. This form of purification
does not rely on chemicals.
Membrane
The membrane made of semipermeable material
used in the water purifier to purify water by reverse
osmosis.
Filters
Used to separate out material before the water
reaches the membrane, prolonging the life of the
membrane:
grid (a coarse filter)
particle filter (Filter I )
carbon filter (Filter II )
SAFETY INFORMATION
The Confidence RO 400 is a very safe appliance, but even so it is important that everyone using it should
be thoroughly familiar with the way it works and its safety features. To prevent mishaps and problems you
should read the “Safety Information” on these pages, and carefully follow the instructions in the
“Installation” section. Take care of this manual and make sure that it accompanies the water purifier if it is
moved or sold.
• The water purifier may only be installed with the
accompanying tap. The water purifier must not be connected so as to supply all the taps in the property with
water. There is a risk of corrosion in water pipes and
water-heaters. Neither may the water purifier be
installed in connection with valves, switches or tanks.
Any faults that arise in a water purifier that has been
incorrectly installed are not covered by the guarantee.
• Check that the water you intend to purify meets the
requirements listed under “Requirements of feed
water”, in the section “Technical data”.
• When the water purifier is brand-new, the purified water
must not be consumed until after the calibration and
flushing procedures have been completed.
• Calibration of the water purifier should only be carried
out:
– the first time that the water purifier is used
– if the appliance is moved to a different place (locality)
where the water quality is different
– after the membrane has been replaced
• When the membrane contains the special products for
storage or descaling, it will have to be cleaned by following the “Flushing procedure” before the water from
the water purifier may be used again.
• The water produced by the appliance may only be consumed if Purification Level indicator II or III on the
control panel comes on. A green indicator light on the
tap will come on at the same time.
• If the feed water supply to the appliance is unfit for consumption, have the purified water from the appliance
tested after installation. You should subsequently have
the purified water tested once a year, or if any change in
its taste or smell occurs, to ensure that the water purifier
is functioning well.
If the result is unsatisfactory, do not drink the water.
Contact your dealer.
• If any leakage arises, turn off the supply of water to the
appliance immediately and disconnect the appliance
from the electrical supply by removing the electrical
plug from the wall socket, or if necessary, removing the
relevant fuse
• If the water purifier is to be disconnected from water
and electricity for an extended period (1 week), it
should be stored as described in “Preparing the water
purifier for storage and protecting it from freezing”.
This also provides protection against freezing.
• Do not attempt to modify or otherwise alter the water
purifier in any way. Doing so could result in personal
injury and/or damage to property which would not be
covered by any warranty.
• Once every month you should check that the connections are all watertight. Leakages outside the appliance
cannot be detected by the appliance's leakage protection
system.
• If the water purifier is malfunctioning, it should be isolated from the electrical supply by removing the electrical plug from its socket. If this is not possible, remove
the relevant fuse or switch off the circuit breaker at the
electrical distribution board (consumer unit).
• At the end of the appliance's useful life, disconnect the
electrical plug from the power supply, then cut the electrical lead at the point where it enters the appliance.
Make quite sure that children will not be able to play
with the severed lead.
To find out how best to dispose of the appliance, contact your dealer or the local authority.
7
SAFETY INFORMATION
Concerning the use of the water purifier
Concerning installation and service
• The water purifier is designed to produce the quantity
of water normally required for cooking, drinks, washing
dishes and general household duties.
• The water purifier must be connected to an earthed
electrical supply. We recommend use of a plug-in connection to a wall socket, since certain procedures such as
replacing filters and preparing the appliance for storage
if it will not be used for a time require the power supply
to be disconnected, then reconnected. Using an electrical plug also makes it easier to move the appliance.
• The appliance needs to remain connected to the water
and electrical supplies so that its automatic flushing system can work. The appliance will carry out flushing
automatically every 12 hours (approximately).
• The appliance must not be operated without the filters
being in place (except during the descaling or storage
procedures). Doing so can cause serious damage.
• If the appliance is to have fixed wiring to the electrical
supply, this work must be carried out by a qualified tradesman. Installation work which has not been carried out
properly can result in serious personal injury and/or damage to property which are not covered by any warranty.
• If the tap is left on for longer than 20 minutes the water
purifier will shut down automatically. The appliance is
designed to do this mainly to maximise the service life
of the membrane. To restart the appliance, follow the
instructions in the “Trouble-shooting table”.
• Any plumbing work required should be carried out by a
qualified tradesman. If you do any of the installation
work yourself, you must check the regulations which
apply to this and comply with them.
• The top of the water purifier should not be used as a
place for storing anything.
• It is important that the water purifier should be installed
in the upright (standing) position.
• Do not use the water from the appliance in aluminium
saucepans etc., on account of the risk of corrosion,
which would also cause increased levels of aluminium in
the water.
• Make sure that hoses and leads do not get crushed or
otherwise damaged when the water purifier is being
moved, e.g. during installation or cleaning.
• The appliance will flush automatically after water is
drawn from it and also whenever the electrical supply is
reconnected. See “To draw purified water”.
• The water purifier must not be plumbed in to supply
the entire dwelling with water, since this could cause
corrosion inside water pipes and hot water heaters. For
the same reason, no tap should be used for drawing the
water from the appliance other than the one supplied or
one recommended by your dealer.
Child safety
• Never leave packaging material lying around so that
children can play with it.
• Do not let children play with the water purifier.
8
USING THE WATER PURIFIER
Once the water purifier has been installed and calibrated according to the “Installation” instructions, it is
ready for use.
The water purifier has an electronic control system which makes it easy for you to use. Normally you will
only need to remember a few points:
• To replace Filters I and II once or twice a year, or when the indicators on the front panel show they
need replacing.
• To descale the water purifier at the intervals recommended.
To draw purified water
The water purifier produces purified water when the tap is moved
to either of the “On” positions shown in Fig. B.
When the tap lever is moved to Position 1, the tap will
stay on (hands-free) at maximum flow until the lever is
moved back manually to the “Off” position.
The lever has to be pressed and held when Position 2 is
used (also maximum flow).
The indicator lights on the tap show the current water
quality:
green light: optimum water purification level
red light: unacceptable water purification level
B
1 On
Off
2 On
If the water purifier has not been used for a time, it may
take up to 60 seconds before the optimum water purification level is reached, as shown by lights on the tap and
control panel.
The water purifier has automatic features designed to optimise the service life of the membrane:
• Just after you draw water each time, the appliance will
switch to flushing mode automatically, to clean the
membrane. The length of this flushing will vary (5 to 90
seconds) according to how long the tap was open.
If the tap is left on for longer than 20 minutes, the appliance will shut down automatically. To restart it, follow the
instructions in the “Trouble-shooting table”.
• The appliance will switch automatically to flushing
mode for a brief period once every 12 hours (approximately), provided the water and power supplies are connected. This periodic flushing takes place no matter
when the appliance was last used.
When using the water purifier, it is sensible to fill a jug
with drinking water while it is operating. Try to avoid
starting it working just to fill a single glass at a time.
This helps save water, because each time the appliance
purifies water, a certain amount is lost (via the reject
water outlet) before the optimum purification level is
reached, and the water purifier also switches to flushing
mode after it is used.
9
MAINTENANCE
Replacing the filters
It is important to replace the filters as soon as they need replacing, since their main function is to protect the membrane. Check
for any signs of leaks just after you have replaced them and again
after you have used the appliance a few more times.
TO REPLACE FILTER I
Replace filter I when the indicator lamp for filter I comes on.
1 Make sure that the tap for purified water is turned off
and that the appliance is not flushing.
2 Disconnect the electrical plug. Open the front cover
(in front of the two filters) as shown in the illustration.
3 Pull the filter containers outwards as far as they will
come.
4 Use the filter spanner to undo the container to the left
marked I. Bear in mind that the container will be full
of water and that some water may spill!
5 Mop up any water inside the base of the appliance.
6 Remove the old filter.
7 Clean the filter container with water and a brush.
8 Put the new filter in place, with the I label pointing
upwards. Make sure that the sealing ring is in place in
the grooves of the filter container.
9 Refit and tighten the container using the filter spanner.
Tighten the filter container so that the dot is somewhere between the two outermost white lines.
10 Slide the filter containers back into the appliance.
11 Close the front cover and reconnect the electrical plug.
Flushing will take place automatically.
This completes the procedure for replacing filter I, and the
water purifier is ready for use again.
TO REPLACE FILTER II
Replace filter II when the indicator lamp for filter II comes on,
and when you notice a three-second delay before the motor
starts up each time you turn on the tap.
1-11 Work through the 11 steps in the instructions for
replacing filter I, but remove container II instead
(on the right), and replace the filter in that.
12
For filter II you have to finish by resetting the
appliance. Make sure that the tap (purified water) is
turned off and the electrical supply is connected.
Then press the Calibration button on the control
panel, and keep it pressed inwards until the pattern
of indicator lights for filter II has gone out (takes
about five seconds).
This completes the procedure for replacing filter II , and the
water purifier is ready for use again.
10
MAINTENANCE
11
MAINTENANCE
Descaling
In time, the substances which the appliance removes from your
drinking water tend to clog the membrane and will eventually
reduce the flow of pure water from the tap. To prolong the service life of the membrane, it has to be descaled periodically.
FREQUENCY OF DESCALING
When you notice that the flow rate from the tap has decreased,
you need to follow the descaling procedure below. The time
schedule for how often you will need to do this will depend on
your particular water supply, especially on its levels of calcium
(“hardness", see table, right), iron, manganese and possibly silicon, as well as of microorganisms.
Even with regular descaling, the maximum flow of purified
water from the appliance will decrease gradually on account of
the normal properties of the membrane. When you notice
that,despite descaling, the flow is about half of what it was when
the membrane was new, it is time to replace the membrane.
You should descale your water purifier:
• when the flow of water from the tap has decreased
• at the intervals recommended in the table (right)
The correct descaling product for this appliance can be ordered
from your dealer (see “Optional accessories and consumables”).
1 Disconnect the electrical plug, then plug it back in
again to make the appliance switch to flushing mode.
2 Make sure that the tap for purified water is turned off
and that the appliance has finished flushing. Leave the
electrical supply to the appliance on.
3 Undo filter container II as described under
“Replacing the filters”, steps 3–7.
4 Measure 250 ml (corresponds to 200 grams) of the
descaling agent into the container. Fill the container
almost to the top with lukewarm water (20 – 40 °C).
Stir until the powder has dissolved, see Fig. A.
5 Screw the container into place with the aid of the filter spanner.
6 Turn on the tap for purified water and let the water
purifier operate for 45 seconds.
12
Frequency of
descaling
-7
every 6 months
50 - 100
- 14
every 3 months
100 - 140
- 20
every month
- 50
Descaling the appliance takes about ten hours, during which
time you will not be able to use the appliance.
The descaling product must be kept out of the reach
of children.
Wash your hands after using it.
Hardness
°d
Calcium Ca2+ &
magnesium Mg2+
mg/l
A
MAINTENANCE
7 While the tap is still on (open), disconnect the electrical plug, see Fig. B. Then turn off the tap. Now
leave the water purifier like this for about 10 hours
(e.g. over night).
8 At the end of the 10 hours, undo the container.
Discard its contents and rinse it with water.
9 Put the filter back in the container and follow steps
8–11 as described under “Replacing the filters”
(except that you put back the filter which has already
been used).
10 Work through all the steps of the “Flushing procedure”
This completes the descaling procedure. The water purifier is ready for normal use again.
B
Disinfection
If the appliance has not been used for a time (several days),
there may be a build-up of microorganisms on the membrane
and the water may develop a certain odour. If this is the case,
it is advisable to disinfect the water purifier, and change filters
I and II.
The disinfectant, sodium hypochlorite 3.5%, odourless, can be
bought from supermarkets or from the chemist. The water has
to be odourless after the disinfection.
The disinfectant must be kept out of the reach
of children.
1 Disconnect the electrical plug, then plug it back in
again to make the appliance switch to flushing mode.
2 Undo filter container II as described under
“Replacing the filters”, steps 3–7. Discard the filter.
3 Fill the container three-quarters full of lukewarm
water, and add 25 ml of the correct disinfectant, see
Fig. C.
4 Screw the container (containing the solution) back
onto the appliance with the aid of the filter spanner.
5 Turn on the tap for purified water and let the water
purifier operate for 45 seconds.
6 While the tap is still on (open), disconnect the electrical plug, see Fig. B. Then turn off the tap and leave
the water purifier like this for about 30 minutes.
7 Restart the water purifier by reconnecting the electrical plug to the wall socket, let it flush automatically.
8 Undo the filter containers and insert a new filter II.
Also change filter I according to “Replacing the filters”.
9 Refit the front cover.
10 Work through all the steps of the full “Flushing procedure”.
C
13
MAINTENANCE
Preparing the water purifier for storage and protecting it from freezing
A
The water purifier should be put into storage if:
- it is to be disconnected from water and electricity for an extended
period (1 week or more).
- it is not going to be used for a period longer than four months.
You can choose between two ways of mixing the storage fluid
depending on the desired protection against freezing:
- 2 litres of storage fluid + 4 litres of water provide protection against
freezing down to –15°C.
- 3 litres of storage fluid + 3 litres of water provide protection against
freezing down to –30°C.
The correct product (“Preservative and Antifreeze Liquid”) can be
ordered from your dealer (see“Consumables and accessories ”).
This product must be kept out of the reach of children.
1 Close the valve on the water supply pipe. Disconnect the
electrical plug and the hose for feed water. See Fig. A.
2 Undo both filter containers as described under “Replacing
the filters”, steps 3–6. Remove the two filter inserts and
discard them (should not be kept for re-use). Empty the
water from the containers.
3 Reinstall the empty filter containers back in their normal
places. Make sure that each sealing ring is in place in the
groove on the top edge of each container.
4 Mix the “Preservative and Antifreeze Liquid” with water in
a bucket, dosage, see above.
5 Put the end of the hose (feed water) into the mixture.
Make sure that the end of the feed water hose remains
beneath the surface throughout, see Fig. B.
6 Connect the electrical plug again. The water purifier will
now automatically pump the mixture inside the appliance.
After 40 seconds, disconnect the electrical plug. Repeat
this step until all the mixture has been drawn up.
Disconnect the electrical plug. Leave the tap open and disconnect the inlet hose and the pure water hose from the
water purifier. Disconnect the pure water hose by pressing
in the grey ring on the connection and pulling out the
hose, see fig. C.
You have now prepared the water purifier for storage. It can be
left in this state for up to nine months.
When the water purifier is to be brought back into use
you must:
• stand it somewhere where the temperature is above +5 °C
for at least 48 hours.
• Work through all the steps of the full “Flushing procedure”, to remove the preservative.
• Install new filters I and II, see “Replacing the filters”.
14
B
C
MAINTENANCE
D
To clean the grid
The grid (a coarse filter) is designed to intercept large particles and is located inside the connection for the feed
water on the appliance. If the indicator lamp for filter I
shows that the intake pressure is too low, the reason may
be that the grid is clogged.
1 Turn off the tap for purified water. Disconnect
the appliance from the electrical supply.
2 Close the valve on the water supply pipe.
3 Undo the feed water hose connector on the
appliance.
4 Use suitable pliers to grip and remove the grid
(Fig. D).
5 Clean the grid and run water through it before
putting it back inside the connector.
6 Reconnect the feed water hose to the appliance.
7 Open the valve on the cold water supply pipe
and check that there are no leaks.
8 Connect the appliance to the electrical supply
again. It will flush automatically.
REGULAR CARE OF WATER PURIFIER
Listed below are the things you need to remember in the regular care of your water purifier.
The points are listed in the order of frequency, starting with daily checks.
Points to remember
• Check the indicator lights every day, in case there is
some state or function which needs attention.
• The everyday care of the water purifier consists basically of keeping it clean. The outside of the appliance
should be cleaned with a damp cloth only. Do not
use a wet cloth and do not pour water over it for
cleaning. Do not use any cleaning agents.
• Once a month check that all connections to the appliance are properly secured and watertight. Wipe dry
any condensation which may have accumulated inside
the appliance base. Leakages outside the appliance cannot be detected by the appliance's leakage protection
system.
• The appliance needs to be descaled at regular intervals. The frequency depends on the hardness of the
water supply and its microbial content.
• Be sure to replace the filters as soon as necessary. The
life of these filters is determined by (amongst other
factors) the levels of impurities in your water supply.
If the water supply has been classified as unfit for
drinking, the water from the appliance should be
tested once per year.
• After replacing filters leave the discarded filter insert
to drain for a few minutes. These filters can be discarded in your ordinary household refuse, since they
do not contain any substances which are hazardous
to the environment.
15
IF THE WATER PURIFIER STOPS WORKING
Trouble-shooting table
To protect both the user and the appliance itself from incorrect use, the water purifier has built-in warning
(alarm) devices which cause it to stop working under certain conditions. The table below lists these warnings and their probable causes.
The indicator lights have three statuses:
Light off
Light on
Light flashing
SYMPTOMS
wandering
16
POSSIBLE CAUSE
ACTION TO TAKE
Time to replace filter or clean the grid.
• There is time before the water purifier experiences an
emergency stop.
Prepare to replace filter I and to clean the grid.
The feed water’s pressure is too low, i.e.
less than 1.5 bar (150 kPa)
• Check the feed pressure. If necessary, increase the pressure to 1.5-10 bar (150-1000 kPa)
Warning that filter I or II is blocked.
• Check that there is nothing inside the filter containers
which could be blocking the flow.
• If necessary replace filter I or II.
Warning of blockage in grid.
• Check the grid. See the section “To clean the grid”.
Warning of leakage/condensation inside
the base under the filter containers.
• Check that all connections are watertight.
• If there is water inside the base, wipe it dry
(tilt appliance forward if necessary).
The intake water pressure is too low, i.e.
less than 1.5 bar (150 kPa).
• A booster pump to increase the pressure to the water
purifier can solve this problem.
• Check all the factors which can affect water pressure
(water supply, grid, special filters).
Warning that filter II needs replacing.
• Replace filter II . See “Replacing the filters”.
Warning of reduced water quality.
• If the appliance is new and has never been calibrated:
calibrate the appliance (see “Calibration”).
• Restart the water purifier (by disconnecting then reconnecting the electricity) so that the appliance switches to
flushing mode. Repeat this procedure two or more
times.
Warning that the tap has been on for
more than 20 minutes without a pause,
and that the appliance has shut down
automatically as a result.
• Turn off the tap and leave the water purifier undisturbed for at least 30 minutes.
• Restart the appliance by disconnecting and then reconnecting the electricity.
• After automatic flushing the water purifier will be ready
for use again.
Warning that calibration has been started,
but not completed correctly (probably
because the tap has been turned off before
the full 10 minutes).
• Restart the appliance by disconnecting and then reconnecting the electricity to start flushing mode.
• Recalibrate the water purifier, see “Calibration”.
Warning of error in water quality meter.
• Restart the appliance by disconnecting and then reconnecting the electricity to start flushing mode. Wait for
two hours. Turn on the tap, wait for 2 minutes.
IF THE WATER PURIFIER STOPS WORKING
SYMPTOMS
POSSIBLE CAUSE
ACTION TO TAKE
Low water flow
The membrane may be clogged.
• Descale the appliance. See “Descaling”.
The appliance starts
working on its own
(briefly, without tap
being turned on).
The hose for purified water is not pressed
all the way home at the connection on the
appliance. Alternatively there may be a
leak at the connection of hose to tap, or
the hose for this tap may have been shortened (cut) incorrectly.
• Check all connections.
• Check that both ends of the hose for purified
water are cut straight and clean, and not
deformed. Should be round, not oval in shape.
The tap is leaking, which causes the water
purifier to respond constantly to the loss
of pressure. The adjusting screw in the tap
may need adjustment, or washers in the
tap may be damaged.
• Adjust the adjusting screw on the tap, see
“To adjust the tap”.
The flow of water from
the appliance is uneven
or jerky.
If the temperature is higher than 30 °C,
the flow rate will increase to a level higher
than the tap can handle. The adjusting
screw on the tap needs adjusting.
• Adjust the adjusting screw on the tap, see
“To adjust the tap”.
Odour
When the purifier is not in use (with the
electricity disconnected) and there is biological growth in the water, or unpleasant
odour can occur.
• Work through all the steps of the full
“Flushing ” procedure.
If the appliance has shut down automatically, it will have to be restarted by disconnecting then reconnecting the electricity.
If a problem persists even after you have tried to trace it and correct it using the trouble-shooting table, contact your dealer.
17
IF THE WATER PURIFIER STOPS WORKING
To adjust the tap
1 Disconnect the electrical plug.
2 Pull the main tap pipe straight upwards as illustrated
(Fig. A.)
3 Press and slide the tap lever across the top of the hole
for the main tap pipe (Fig. B).
4 Adjust the screw (Fig. C).
C1 If the flow from the tap is uneven or jerky
Turn the adjusting screw one half turn clockwise.
C2 If the appliance starts working on its own
Turn the adjusting screw one half turn anticlockwise.
5 Refit first the lever, then the main tap pipe. Check
that the seals/washers on the main tap pipe are in
good condition.
6 Reconnect the electrical plug and let the water purifier
flush automatically.
7 Test the appliance. If the problem persists, adjust the
screw further.
A
B
Service and spare parts
If a fault arises, first work through the trouble-shooting table
“If the water purifier stops working”, and make quite sure that
it is not a problem which you can put right yourself.
If you have to call out a service engineer to remedy one of the
problems in this table, you risk having to pay for the service call
yourself. The same applies to faults caused by use of the appliance for purposes other than those for which it was intended.
If you have tried everything relevant described in the table, and
still cannot get your water purifier to work, then it is time to call
service. Service using genuine spare parts is available via your
dealer.
C
Before calling service, it is a good idea to make a note of some
appliance details. Look for the data plate on the rear of the
appliance (similar to the one shown in Fig. D), which will have
all the details you need for the water purifier. You can record
them here:
TYPE: . . . . . . . . . . . . . . . . . . . . . . . . . . . . . . . . . . .
MOD: . . . . . . . . . . . . . . . . . . . . . . . . . . . . . . . . . . .
PROD. NO.: . . . . . . . . . . . . . . . . . . . . . . . . . . . . . .
SER. NO.: . . . . . . . . . . . . . . . . . . . . . . . . . . . . . . . .
Purchase date: . . . . . . . . . . . . . . . . . . . . . . . . . . . . .
18
D
TECHNICAL DATA
Dimensions
height 466 mm
depth 460 mm (395 mm without hand-grip and hoses)
width 225 mm
Weight
29 kg when supplied
33 kg when filled with water
Capacity (water temp. 15 °C)
3.1 (±0.4) litres/minute
Water efficiency
approx. 80 % at constant flow
approx. 50 - 75 % including flushing
Electrical supply
230 V, 50 Hz, 10 A, earthed socket
Total power consumption
530 W
Operation period
20 minutes
Sound level when installed in under-sink cupboard
< 60 dB(A)
Environmental specifications
air temperature
relative humidity
2 - 43 °C
25 – 95 %
Requirements regarding feed water to the water
purifier:
Chemical requirements:
conductivity
/salt
/chloride
<200 mS/m
<1500 mg/l
<900 mg/l
cloudiness
turbidity
slight/ distinct*
< 1 FNU
pH
4 - 10
}
calcium: Ca2+
magnesium: Mg2+
/hardness
<140 mg/l
iron: Fe2+
iron: Fe3+
<5 mg/l*
<0.3 mg/l *
manganese: Mn
COD-Mn: O2
<0.8 mg/l*
<10 mg/l
<20 °d
* higher values require an extra prefilter
Microbiological requirements
Heterotrophic bacteria (48 hour test count)
Coliform bacteria
E.coli
1000/ml
1000/100 ml
100/100 ml
Water flow
Domestic water supply pressure
Water temperature
>10 l/min
150 - 1000 kPa (1.5 - 10 bar)
2 - 40 °C
19
TECHNICAL DATA
Examples of rejection for substances which may be present in water
INORGANIC SUBSTANCES
-turbidity (cloudiness)
-colour
Cations/Metals
-sodium
-potassium
-calcium (hardness)
-aluminium
-iron
-manganese
Cations/Heavy metals
-copper
-lead
-zinc
-mercury
-cadmium
-chrome
-nickel
Anions
-fluoride
-chloride
-nitrate
-sulphate
ORGANIC SUBSTANCES
Hydrocarbons
-heptane, octane, decane etc.
-benzene, toluene, xylene, ethyl benzene etc.
- diesel oil
Polyaromatic hydrocarbons
-PAH
Chlorinated hydrocarbons
-Compounds which can form when water is chlorinated
Trihalomethanes
-trichloromethane
-bromodichloromethane, dibromochloromethane, tribromomethane
Pesticides
-PCB
MICROORGANISMS
-heterotrophic bacteria (48 hr test)
-coliform bacteria, E.coli
%
>99
>99
>96
>97
>99
>99
>99
>99
>99
>99
>99
>99
>99
>98
>99
>99
>98
>97
>97
>98
>99
>99
>99
>99
>60
>99
>99
>99
>99
Notes:
The values for the inorganic substances were measured in a sample of water which was taken after two minutes’ operation at a flow of 4.4 litres per minute, 80 % recovery and a challenge water with a salt content of 800 mg per litre at a
temperature of 20 °C. Test laboratory: VVL, Stockholm (Sweden).
The values for the organic substances were measured in a sample which was taken after two minutes’ operation at a flow
of 2.8 litres per minute, 80 % recovery and a challenge water to which was added each relevant substance to a concentration which is 100 times higher than the lowest detectable quantity at a temperature of 10°C. Test laboratory: AnalyCen,
Lidköping (Sweden).
Microbiological testing was carried out under a range of operating conditions with a challenge water containing a very
great number of microorganisms. The water samples were collected weekly after operating times of 20 and 40 seconds
and 1, 2, 6, 12 and 18 minutes. Test laboratory: SVELAB, Jönköping (Sweden).
20
INSTALLATION
You should read the section entitled “Safety Information” before starting work on the actual installation of
the water purifier.
Unpacking
If the appliance has been damaged during transportation,
you should immediately notify the company responsible
for delivering it.
Take hold of the rear hand-grip and the front edge of the
water purifier and carefully lift the appliance out. The
appliance can be damaged if it is lifted in any other way.
Check the water purifier for any signs of damage and check
that no accessories are missing. If you do discover any
damage, faults or that anything is missing, you should
report this to the seller immediately. Never leave packaging material in a place where children may play with it.
A
Where to install the water purifier
This water purifier can be installed in several different
ways. We will describe the most suitable of these. No matter which method you choose, there are certain points
which you should be careful to observe:
• The water purifier must be installed in the upright position.
• The area where it is installed must have access to a cold
water supply, a normal domestic waste pipe (drain) and
an earthed electrical supply.
• It must be easy to inspect the control panel on the
appliance.
• There must be enough space for the front cover to be
opened and for good access to the filter containers.
• When choosing the site, make sure there will be adequate ventilation all around the appliance. There must
be a gap of 20 mm between the sides of the water purifier and any adjacent fitments or walls. The connection
points of the water purifier allow you to route hoses
and cables in any direction out from the appliance. The
dimensions required for the installation site are shown
in Fig. A. When installing the appliance, make quite
sure that none of the service connections get crushed.
B
The water purifier may only be installed with the
accompanying tap. The water purifier must not
be connected so as to supply all the taps in the
property with water. There is a risk of corrosion
in water pipes and water-heaters. Neither may
the water purifier be installed in connection with
valves, switches or tanks. Any faults that arise in a
water purifier that has been incorrectly installed
are not covered by the guarantee.
Apply the information panel
In the box of accessories you will find a sheet of
self-adhesive information panels in several languages. Select the language required and apply
the printed panel to the part of the appliance
shown in Fig. B.
21
INSTALLATION
Electrical and plumbing connections
The illustration reproduced in Fig. C is also to be found on
the rear of the appliance, to show how the various connections
should be made.
The water purifier is connected to the cold water supply (temperature range 2-40 °C) via a polyethylene feed hose (3). The
cold water pipe should have a valve easily accessible for shutting off the supply, see Fig. D. If the appliance is being connected to new pipes or pipes which have been out of use for
some time, the water should be allowed to run for a while
before you connect the hose. This will prevent the appliance
intake filter (referred to here as the “grid”) from getting
blocked by sand or rust. The appliance has two outward water
hoses. The purified water is taken via the purified water hose
(1) to a separate tap, while the reject water is connected
directly to a waste pipe via the reject water hose (2).
C
1
2
3
D
The water purifier must be connected to an earthed electrical
supply (230 V, 50 Hz, 10 A). We recommend use of a plug-in
connection to a wall socket, since certain procedures such as
replacing filters and preparing the appliance for storage if it
will not be used for a time require the power supply to be disconnected, then reconnected. Using an electrical plug also
makes it easier to move the appliance.
To fit the tap for purified water
Avoid cutting the hose for purified water, even if it is too
long. If it must be cut, do so with a very sharp knife, such as a
Stanley knife, making sure that the cut is straight and clean,
and that the hose is not deformed by cutting, see Fig. E. It is
important to observe these points to ensure that the connection will be fully watertight. Install the two hose inserts, one
at each end of the hose for purified water.
E
1 Mark the centre of the place where the purified
water tap is to be installed. Make sure that there is
enough room below the worktop for the purified
water hose to be attached beneath this point.
2 Drill a 16 mm hole.
3 Remove the small section of protective tubing and
install the main tap pipe on the tap assembly. Install
the whole tap on the worktop/sink bench as shown
in Fig. F1. The worktop or bench must be no
thicker than 35 mm. Screw the quick connector fitting onto the main thread protruding from the bottom of the tap assembly. Then press the end of the
purified water hose all the way home into this quick
connector, as far as the line marked on the hose
(about 17 mm), see Fig. F2.
F1
F2
22
INSTALLATION
Connecting the reject water hose
The reject water hose (for discharge of water to a household
waste pipe) can be extended up to 4 metres. The smallest internal diameter is 13 mm. The bracket (supplied) should be secured
at a height of at least 50 mm and a maximum of 500 mm above
the top of the appliance.
A
Connection to a waste pipe with a trap can be made if
the trap has an entry point of the type used for a dishwasher discharge. If there is only one entry point and
this is already in use, the connector unit will need to
be changed, and one with two entry points used
instead. The reject connector from the water purifier
should be before the drain. The reject water hose
needs to be routed in a curve up the underside of the
worktop or sink bench. Fix the hose securely in place
as shown in Fig. A, using one of the hose clips and
the bracket supplied.
Connecting the feed water hose
Make sure that the black washers are in place when
securing the connectors at both ends of this hose.
Screw the straight end of the feed water hose onto the
shut-off valve(see Fig. B).
If the 3/4" hose connection does not fit, it can be
changed to a 1/2" connection using the adapter supplied. Put the black washer in the adapter and screw
the adapter onto the shut-off valve for feed water.
Screw the feed water hose onto the adapter.
B
23
INSTALLATION
Connecting up the appliance
Before moving the water purifier into its permanent place,
connect the three hoses to the appliance as shown in Fig. C.
C
Connect the purified water hose from the purified
water tap to the appliance. Press this end of the hose
all the way home, as far as the line marked on it
(about 17 mm). Use the elbow (supplied) if space is
restricted behind the appliance.
Connect the end of the reject water hose (the one
with the bend) to the appliance, and secure it with
one of the hose clips supplied. Next screw the feed
water hose onto the appliance. Open the valve, to
check that the hose is fully watertight. Connect the
cable for the indicator lights on the tap, then move
the appliance carefully into its permanent location.
Connect the electrical plug to the wall socket (Fig. D).
The appliance will now start working (flushing). The
appliance carries out this flushing operation every
time it is reconnected to the power supply.
No water from the appliance should be consumed
until you have followed the full “Flushing procedure”.
After installing and testing the appliance, turn on the appliance's drinking water tap and check that all the connections
are watertight. If any coupling is leaking, disconnect the electrical plug, then further tighten the hose clip or nut. Connect
the appliance to the power supply again. When the appliance
has been installed for one week, tighten the connections for
the reject water and feed water hoses again.
A leakage as small as just a few drops of water at one
end of the purified water hose is enough to start the
water purifier working (when it is not needed).
Leakages outside the actual appliance cannot be
detected by its leakage protection system.
Unless specifically stated otherwise in these instructions, the shut-off valve should be left in the open
position for the water purifier`s protection system to
function.
24
D
INSTALLATION
The flushing procedure
You have to work through the steps of the flushing procedure when the water purifier:
• is brand-new and has never been used before
• is being brought back into use after having been
stored using the Preservative/Antifreeze liquid
• has been cleaned, to wash away the cleaning agent
• has been fitted with a new membrane
No water from the appliance should be consumed until you have completed the full
“Flushing procedure”.
To calibrate the water purifier:
1 Turn on the tap for purified water. Leaving the
tap running, you must now – within 10 seconds
– press the calibration button (see Fig. A) and
then keep it pressed until the indicator lights for
Purification Levels I and II come on and then go
out. Then release the button.
A
First check:
-
that the drinking water tap is turned off
that the shut-off valve on the cold water pipe for
the feed water is open
- that there are no leaks at the connection
between domestic water supply and appliance
- that the reject water and purified water hoses are
connected, with no leaks
- that the filter containers are properly tightened
1 Remove the electrical plug from the wall socket.
2 Connect the electrical plug to the wall socket
again. The water purifier will now switch automatically to flushing mode.
3 When it stops, pull out the electrical plug, then
plug it back in to make the appliance go through
another flushing cycle.
4 Repeat step 3, so the appliance goes through a
third flushing cycle.
5 Turn on the purified water tap, and leave it running for ten minutes. Then turn the tap off. The
appliance will switch automatically to flushing
mode again.
... when the appliance is brand-new, or when the membrane has just been replaced:
6 Follow the calibration procedure described below.
... when just flushing:
6 Repeat step 5 above.
The water purifier will now be ready for use!
Calibration
The water purifier needs to be calibrated specifically for
your water supply, to ensure the correct purification level.
Calibration should only be carried out when:
• the water purifier is new and has never been used
before
• the quality of the water supply has changed for
some reason, such as if you move the appliance
to a different locality
• the membrane has just been replaced
The water produced by the appliance during the
calibration procedure must not be consumed!
If any of the Purification Level lights I-III
stay on (lit), check the five points under the
heading “First check:” in the section “The
flushing procedure”, then start the calibration procedure again from the beginning.
2 Allow the appliance to go on producing purified
water for at least 10 minutes. The lights for
Purification Levels I and II will now flash once
and the current water quality level will be displayed when the light for Purification Level III
comes on and remains lit, indicating the highest
purification level.
If the lights for Purification Levels I, II and
III flash intermittently in sequence, this
means that calibration has not been carried
out properly. If so, start again from step 1 of
this “Calibration” procedure.
3 Turn off the tap for drinking water. The appliance will switch to flushing mode, then stop
automatically.
The water purifier will now be ready for use!
Moving the water purifier
If you move the water purifier to a different location, you
must observe the following points:
• Close the shut-off valve on the cold water supply
pipe.
• Disconnect the electrical plug from the socket.
• Always transport the appliance in its normal
upright position.
• To re-install it, follow the original installation
instructions.
• The appliance will only need to be recalibrated if
the water supply is of a different quality, or if the
membrane has been replaced.
If the appliance is to be stored without being
used for longer than 4 months, see section
“Preparing the water purifier for storage”.
25
26
5
4
25
3C
*
3B
3
2
5A
21
8
22
6
1
10
12
13
15
14
20
17
19
18
24D
24F
24I
24E
24L
24B
24
24J
24C
24D
24G
24H
24K
NOTE!
* Endast
i vissa modeller /
24A
*
*
L5A00014
In certain models only.
Pos 999 har ej visats i bild / is not shown in the picture
* 3B
1
2
3
4
6C
6
8
7
7
10
14
9
41
6B
6A
15
11A
18
5
151
17
16
40
18
27
14
12
11
28
14
11
29
22B 150
22
26
20
20 21
23
14
133
132
14
31
33
24
25
9
131
34
34B *
140
13
110 *
111 *
100
36
30
120 *
NOTE!
* Endast
i vissa modeller /
In certain models only.
37
35
37
39
38
38
L5B00015
SPARE PART LIST FOR RO 400C PRODUCT NO 919 24 01-17
Position in
picture
INSIDE
1
2
3
3B
4
5
6
6A
6B
6C
7
8
9
10
11
11A
12
13
14
15
16
17
18
20
21
22
22B
23
24
25
26
27
28
29
30
31
33
34
35
36
37
38
39
40
41
100
110
111
120
131
132
133
140
150
151
Description
Frame
Cushion
Driving belt
Dust protection
Driving wheel motor
Holder motor
Driving wheel pump
Insulation ring
Protection pump
Spring
Bracket
Valve flush 50 %
Pressure sensor
Valve pressure regulating
Connection T
Connection angle
Conductivity sensor
Snapper
PE hose, 3/8", 2000 mm
Capacitor
Adaptor
Motor, 230 V
O-ring, 11.3x2.4
O-ring, 19.2x3.0
Membrane service kit
Gable upper
Loop wheel
Gable lower
Spring
Cup
Valve inlet
Locking piece
Locking ring
O-ring, 169.3x5.7
Hose
Retainer cable
Insulation plate
Circuit board RO 400C
Filter, Particle
Lid, prefilter
O-ring 83.0x3.0
Container filter
Filter, Carbon
PE hose, 1/4", 2000 mm
Connection straight 1/4"
Spring slide bar
LED tap
Plastic washer LED tap
Connection LED tap
Valve check/outlet
Valve accumulator
Nut
Pressure vessel
Pump cpl
Plug
Article no
RO 400C, 230 V
150 71 24-00/4
150 71 26-00/9
150 70 83-00/2
150 72 18-00/4
150 73 61-00/2
150 70 15-01/2
150 70 16-00/2
150 72 37-00/4
150 72 99-00/4
150 70 19-01/4
150 70 48-00/5
150 70 47-03/1
150 75 00-00/5
150 72 73-80/1
150 71 78-00/0
150 70 43-00/6
150 70 54-80/5
150 71 22-00/8
150 71 00-85/5
150 70 17-00/0
150 70 56-00/8
150 72 93-03/1
150 70 70-09/0
150 70 70-10/8
150 71 89-00/7
150 73 60-00/4
150 70 35-00/2
150 70 39-00/4
150 70 40-00/2
150 70 41-00/0
150 70 76-00/6
150 71 44-00/2
150 70 10-00/5
150 70 70-12/4
150 73 14-00/1
150 72 66-00/3
150 72 92-00/9
150 72 88-04/9
919 24 00-82/9
150 71 81-80/6
150 70 70-11/6
150 70 03-00/0
919 24 00-83/7
150 70 21-81/2
150 72 14-00/3
150 72 27-00/5
150 72 89-00/5
150 72 96-00/0
150 72 94-80/7
150 71 79-80/0
150 72 61-80/6
150 71 71-00/5
150 70 12-00/1
150 73 63-01/6
150 73 11-00/7
SPARE PART LIST FOR RO 400C PRODUCT NO 919 24 01-17
Position in
picture
CABINET
1
2
3
3B
4
5
5A
6
8
10
12
13
14
15
17
18
19
20
21
22
24
24A
24A
24A
24B
24C
24D
24E
24F
24G
24H
24I
24J
24K
24L
25
Not in picture
Not in picture
Not in picture
Not in picture
VALVE RO 400CV
1
2
3
4
5
6
Description
Article no
RO 400C, 230 V
Cabinet
Handle
Cable clamp
Protection power cord
Power cord
Lid
Sealing
Lead through
Panel Electrolux
Disturbance protection
Slide bar
Flap Electrolux
Bottom plate
Bracket
Floater
Housing floater
Micro switch
Protection hood micro switch
Bellow
Terminal block
Installation kit
User manual, German, RO 400
User manual, English, RO 400
User manual, RO 400CV
PE hose 3/8", 2000 mm
Bracket, 3/8" slang
Hose inserts
Drain hose
Inlet hose
Adapter
Gasket
Gasket
Faucet, cpl
Connection faucet
Filter hook
Protection, plastic, outlet
Preservative, 1 litre
Cleaning/descaling agent, 200 gram
Tape, 33 m x 50 mm
Grease o-ring
150 70 91-01/3
150 72 34-00/1
150 44 05-00/0
150 72 44-00/0
150 64 10-00/8
150 73 62-01/8
150 70 92-00/3
150 70 80-00/8
150 72 33-81/3
150 71 73-00/1
150 71 28-00/5
150 72 32-81/5
150 70 64-00/2
150 71 37-00/6
150 36 43-00/7
150 36 44-01/3
150 72 86-00/1
150 71 18-00/6
150 71 95-00/4
150 71 76-00/4
150 71 63-18/4
822 90 16-07/9
822 90 16-13/7
822 90 16-16/0
150 71 00-85/5
150 70 68-00/3
150 72 69-00/7
150 73 66-00/1
150 38 85-00/4
124 06 81-00
124 06 82-00/3
124 01 51-02/5
150 70 59-81/2
150 73 65-00/3
150 70 45-00/1
150 72 31-00/7
150 72 06-02/5
150 72 07-01/5
150 71 16-00/0
150 72 17-01/4
Valve magnetic
Timer head
Distance
Holder
Connection
Holder airgap
150 73 54-00/7
150 73 53-00/9
150 73 47-00/1
150 73 35-00/6
150 73 34-00/9
150 73 45-00/5