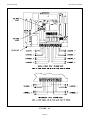
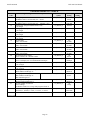
1
PACIFIC RESEARCH
PET-820
REMOTE MONITORING AND CONTROL
USER MANUAL
This manual contains information proprietary to Pacific Research and is provided for the operation and
maintenance of the equipment described. This manual is not to be reproduced or used for any other
purpose without written authorization.
Revised 05.01.99
Pacific Research
PET-820 User Manual
TABLE OF CONTENTS
SYSTEM OVERVIEW ............................................................................................... PAGE 4
1.0
SYSTEM OVERVIEW ............................................................................................... PAGE 6
1.1
1.2
1.3
1.4
1.5
2.0
BENCH TESTING ...................................................................................................... PAGE 8
2.1
2.2
2.2.1
2.3
2.4
2.5
3.0
Factory default settings and programming parameters
Programming loop circuit configurations
Control and Programming
RAM and Real Time Clock option
Analog option
Unpacking the PET-820
Start up procedure
Analog input option startup procedure
Establishing communication
Operate procedure
Programming procedure
OPERATE ................................................................................................................. PAGE 11
3.1
3.2
3.2.1
3.2.2
3.2.3
3.2.4
3.2.5
3.2.6
3.2.7
3.2.8
3.2.9
3.3
3.4
3.5
3.6
3.7
3.8
3.9
3.9.1
3.9.2
3.9.3
3.9.4
3.9.5
3.9.6
3.9.7
3.9.8
3.9.9
3.9.10
3.9.11
3.9.12
3.9.13
3.9.14
3.9.15
Printed Circuit Board indicators
Keypad Display panel (optional)
Power indicator
Communicate indicator
Ready indicator
Arm indicator
Alarm indicator
Monitor indicator
Relay indicator
Low Battery indicator
Keypad time out timer
Operating command format
Telemetry read back
Password
Key Code
Valid data types
Operating command code examples
Operating command codes
End communication
Arm/Disarm
Read back loop circuit status
Read back alarm status
Loop circuit ON/OFF
Loop monitor ON/OFF
Reserved for future use
Reserved for future use
Reserved for future use
Relay and Digital output control
Read analog input value
Read analog integrate value
Read analog high (maximum) value
Read analog low (minimum) value
Read analog scaled value
Page 1
Pacific Research
4.0
PET-820 User Manual
PROGRAMMING .................................................................................................... PAGE 19
4.1
4.2
4.3
4.3.1
4.4
4.5
4.5.1
4.5.2
4.5.3
4.5.4
4.5.5
4.5.6
4.5.7
4.5.8
4.5.9
4.5.10
4.5.11
4.5.12
4.5.12.1
4.5.13
4.5.14
4.5.15
4.5.16
4.5.17
4.5.18
4.5.19
4.5.20
4.5.21
4.5.22
4.5.23
4.5.24
4.5.25
4.5.26
4.5.27
4.5.28
4.5.29
4.5.30
4.5.31
4.5.32
4.5.33
4.5.34
4.5.35
4.5.36
4.5.37
4.5.38
4.5.39
4.5.40
4.5.41
4.5.42
4.5.43
4.5.44
4.5.45
4.5.52
4.5.53
4.5.54
4.6
Programming command format
Program Authorization Code
Valid data
Data types used
Examples of programming
Programming command codes
Set loop response time
Change program authorization code
Change operate key code
Change password
Change unit address
Arm delay
Communication delay before dialing
Alarm relay output cutoff time
Alarm delay
Password attempt errors
Communication dial attempts
Change telephone number
Configure for pager access
Select speech message buffer for update
Change message buffer data
Select sign message
Set ring counter
Select message delay
Alarm message repeat
Change loop configuration, Select active state
Change loop configuration, Select alarm delay
Change loop configuration, Select alarm relay output
Change loop configuration, Select phone access
Change loop configuration, Select response time
Change loop configuration, Select alarm message
Change loop configuration, Select monitor output
Eight telephone number log
Delete telephone number form log
Set day of week, RTC option
Alarm communication
Programming and control communication
Radio interface enable
Local ARM/DISARM control, enable
Loop 8, ARM/DISARM control, enable
Disable password requirement
Enable pulsing alarm relay output
Select DTMF/DIAL PULSE mode
Set time, RTC option
Set date, RTC option
Select serial port BAUD RATE
Reserved for future use
Reserved for future use
Reserved for future use
Reserved for future use
Serial port status enable
Initialization of speech data, RAM option required
System EEPROM initialization
Change direct byte in EEPROM
Demonstrate speech library
Analog input option, programming commands
Page 2
Pacific Research
4.6.1
4.6.2
4.6.3
4.6.4
4.6.5
4.6.6
4.6.7
4.6.8
4.6.9
4.6.10
4.6.11
4.6.12
4.6.12.1
4.6.12.2
4.6.12.3
4.6.12.4
4.6.12.5
4.6.12.6
5.0
Planning the installation
Installation considerations
Mounting
To wall mount
To mount on concrete or mortar walls
Connections
Analog input connections
Programming changes
General system testing
Calibration, analog input option
TROUBLESHOOTING ............................................................................................ PAGE 54
7.1
8.0
Speech communication protocol
Sign on message
Control and programming mode
Alarm mode
Dial and communication delays
DTMF communication protocol
Serial communication protocol
Serial command mode
Serial status mode
Radio interface protocol
Telephone company information
Telephone company requirements
Malfunction of equipment
Serial port
INSTALLATION ...................................................................................................... PAGE 47
6.1
6.2
6.3
6.3.1
6.3.2
6.4
6.4.1
6.5
6.6
6.7
7.0
Reset analog high and low values
Set analog high and low alarm setpoints
Set analog input integrate rate
Enable analog input for alarm output
Enable analog input for alarm relay output
Select telephone number access for each analog input alarm
Select analog alarm message
Select alarm delay for analog input
Select ADC mode, digital / differential ended input
Select ADC mode, high / low range
Analog to digital converter initialization
Analog scaling (Engineering units)
Set offset values
Set factorial values
Set decimal point position
Set decimal point round off
Enable sign for analog scaled values
Change speech identifier for analog scaled voltages
COMMUNICATION ................................................................................................ PAGE 43
5.1
5.1.1
5.1.2
5.1.3
5.1.4
5.2
5.3
5.3.1
5.3.2
5.4
5.5
5.5.1
5.5.2
5.6
6.0
PET-820 User Manual
Analog input option troubleshooting
GLOSSARY ............................................................................................................... PAGE 55
Page 3
Pacific Research
PET-820 User Manual
9.0
GLOSSARY AND WARRANTY ............................................................................. PAGE 57
10.0
OPERATE COMMAND TABLE ............................................................................. PAGE 58
11.0
PROGRAMMING COMMAND TABLE ................................................................ PAGE 59
12.0
SYSTEM SPEECH LIBRARY ................................................................................. PAGE 64
13.0
MISCELLANEOUS INFORMATION .................................................................... PAGE 71
Page 4
Pacific Research
PET-820 User Manual
INTRODUCTION
The PET-820 (Personal Electronic Technician) represents the latest technological advances in the remote monitoring
industry. The PET-820 utilizes a microprocessor design combining all control and communication electronics on a single
printed circuit board. This type of design enables the PET-820 to deliver superior and competitive performance. All program
options are stored in a NON-VOLATILE EEPROM (Electrically Erasable Programmable Read Only Memory), which
maintains its data even with the power disconnected. This EEPROM may be re-programmed by the user in order to change
the system characteristics with no additional equipment required for programming. The PET's microprocessor and power
supply is constantly monitored by a "WATCHDOG TIMER" which maintains the operational integrity of the system. The
PET-820 is easy to set up and use. We recommend that you read sections 1 and 2 of this manual first, to get familiar with the
system and its basic operation. The other sections of this manual provide a thorough explanation of the PET-820's many
Features.
Available to the PET-820, are many other optional features. The operation of these features have been included in this
manual and may not pertain to your application. Some of these options and their features are listed below;
1.
RAM/RTC (Random Access Memory / Real Time Clock) This option is used to enhance the features and
performance of the PET-820. These features include date and time stamp of alarms, increased programmable speech
buffers and a larger telephone number list. This option is also required with the Analog Input option.
2.
BATTERY The battery option will provide operating power for the PET-820 for up to 8 hours without external
power.
3.
KEYPAD/DISPLAY This option gives the user the freedom to operate the PET-820 at the unit without a telephone
line connected.
4.
ANALOG INPUT With this option the PET-820 can be used to monitor analog voltages for alarm conditions. The
eight channel analog input option uses a plus and minus twelve bit integrating type converter. Although this type of
converter is somewhat slow, approx. 30 conversions per second, it has excellent accuracy and noise immunity.
There are various items that are programmable for this option. These items will allow you to customize the analog
option to meet your needs. We recommend that you review all pertinent sections of this manual to get familiar with
the analog option and its basic operation.
Page 5
Pacific Research
PET-820 User Manual
SYSTEM DESCRIPTION
1.0
SYSTEM OVERVIEW
The PET-820 system is shipped from the factory ready for use. It comes pre-programmed with factory basic default settings
that fit most all applications. The system can be re-programmed from a standard telephone or the optional keypad display in
order to meet a variety of needs. All loop circuit alarm characteristics and communication parameters are programmable for
most any applications that may occur.
The PET-820 comes standard with 8 dry contact inputs (loop circuits), one relay output and one digital output. The relay
output is completely programmable as to both alarm and/or control functions.
1.1
FACTORY DEFAULT SETTINGS AND PROGRAMMABLE PARAMETERS
No special tools are required for programming and control of the PET-820. A simple connection to a standard telephone line
is all that is required to communicate with the PET-820 system. Before attempting to program with new characteristics,
review the programming tables provided at the end of the manual. If any of the default settings described in this table do not
meet your installation requirements, you can easily change these settings using a touch-tone telephone or the optional keypad
display panel.
1.2
PROGRAMMING LOOP CIRCUIT CONFIGURATIONS
The PET-820 has 8 loop input circuits that can be defined as normally open contact, normally closed contact or a resistor
supervised contact. Each of the inputs defined as resistor supervised contacts may be wired with a combination of normally
open and normally closed devices. Loop circuit #8 may also be re-programmed to accept a momentary switch closure for
ARM/DISARM control. Refer to the programming section of the manual for more information on this subject. Use the
programming table in "APPENDIX B" to provide additional assistance in planning the loop circuit and system configuration.
1.3
CONTROL AND PROGRAMMING
The PET-820 implements three levels of security. The first level is a Password. When communication is established with
the PET-820 via a telephone, the user must enter a Password in order to continue with operation or programming. The
second level of security is the Key code. The key code is used in conjunction with some command codes to provide
additional security when operating the PET-820. The third level of security is the Program Authorization Code (PAC).
This code is required in order to change or alter any of the configuration data. Without the Password and Program
Authorization Code none of the systems parameters may be altered. The PET-820 provide one additional level of security
for the programming mode. This is a program enable switch that is located in the main circuit board. When this switch is in
the OFF position, the user will not be allowed to access the programming mode. If programming is desired, you must turn
this switch to the NO position.
1.4
RAM and REAL TIME CLOCK OPTION
If your unit has included the RAM/RTC option, you will fine that some of the PET-820's operations are enhanced. These
enhancements include the following.
1.
Increased the number of message buffers from 2 to 16, that can be modified.
2.
Increase the number of telephone numbers form 2 to 10, that can be stored.
3.
Add date and time stamp to the alarm. When alarm message is received, the date and time of the alarm will be
included with the message.
4.
This option is required in order for the analog option to operate.
Page 6
Pacific Research
1.5
PET-820 User Manual
ANALOG OPTION
The analog option is used to monitor analog voltages and initiate an alarm if a voltage goes above or below a preset limit.
This option can monitor up to eight analog voltages. You can scale each of the voltages to engineering units (temperature,
level, pressure, flow). You can also interrogate as to the current voltages or engineering units and the last high or low
readings, when they occurred since the last time you reset the them.
Page 7
Pacific Research
PET-820 User Manual
GETTING STARTED
2.0
BENCH TESTING
The following paragraphs provide a method for becoming familiar with the PET-820 prior to understanding all of its
capabilities and detailed operational characteristics. This test assume you have nothing more then the PET-820, a screw
driver, some wire and a keypad display panel or telephone communication via central office telephone lines or a PBX. You
may also need an adjustable voltage source (0 to 1.5 volts minimum) if your unit has the ANALOG option. The following
steps will take you through hook up, operation and limited programming of the system.
2.1
UNPACKING THE PET-820
Inspect the carton for the following contents and if any of these items are missing or damaged, notify your PET-820 dealer
immediately.
1.
2.
3.
4.
PET-820 user manual
PET-820
Miscellaneous hardware package
Three prong line cord with liquid tight strain relief.
2.2
START UP PROCEDURE
The following is a start up procedure for the PET-820. Default password, key code, and Program Authorization Code are used
in the examples. Refer to figure 6.1 for detailed hook up diagram of the PET-820.
1.
Remove the 2 screws from the lower terminal cover of the PET-820, then remove the cover.
2.
If your PET-820 includes the battery option, connecting the AC power at this time is not necessary. With power
turned off (the left hand switch next to terminals 20, 21, and 22) connect the three prong line cord, black to terminal
20, white to terminal 21 and green to terminal 22 as shown in figure 6.1. It is very important to re-check this
connection before applying power to the unit. You can check the connection by turning off the power switch and
plugging in the cord. With a standard AC voltmeter on the AC scale, check the voltage from terminal 21 and 22,
there should be less than 3 volts AC. If this test fails, then re-check your wiring and/or have an electrician check the
AC outlet for proper wiring.
3.
Connect a telephone line to terminals 13 and 14 or you may use the keypad display. If telephone lines, PBX or
keypad display are not available, refer to the diagram in "APPENDIX D" for information on building a simulated
telephone interface test circuit.
4.
Using a 6" long wire, strip 1/4" at both ends and connect one end to terminal 2.
5.
Turn on the power switch (the left hand switch near terminals 20, 21 and 22). You should observe that the left hand
green LED on the circuit board or the LED labeled operate on the front panel, if keypad option was included, is on
and not flashing. If the LED will not turn on or is flashing, consult the trouble shooting section of this manual for
further information.
Page 8
Pacific Research
PET-820 User Manual
2.2.1 ANALOG INPUT OPTION START UP PROCEDURE
The following is a start up procedure for the PET-820's Analog option. Default password, key code, and Program
Authorization Codes are used in the following examples. Refer to figure 6.2 for detailed electrical hook up diagram for the
analog option. If this section does not apply, go to section 2.3 of the manual.
1.
Follow the bench testing procedures located in SECTION 2.2 before going any further within the following section.
2.
Turn off power to the PET-820 before disassembly and hook up.
3.
Remove the 4 screws from the upper panel and remove the panel. Under this panel is the location of the analog input
board and its terminals.
4.
Using some hook up wire, connect channel 1 of the analog input to an adjustable power source. The channel 1 high
side is terminal 1 of the analog board and ground or return is terminal 2.
5.
Turn on the power and adjust your power source for a known voltage less than 4.095 volts. You can check this
voltage at the terminal of channel 1 input. Establish communication with the PET-820 and send the units password
if required. Now send 631#, the PET-820 will read back the current voltage at this input, in volts.
6.
Review the programming section of this manual to get familiar with all of the characteristics prior to making any
changes in the units operation.
2.3
ESTABLISHING COMMUNICATION
The following are three different methods for establishing communication with the PET-820. These methods vary due to the
type of communication interface that you may used. Review each method to determine which applies to your condition and
also understand how the other methods work, as they may apply in future applications.
1.
If the PET-820 is connected to a standard telephone line or PBX and a second line or station extension is available to
communicate with the system, Dial the telephone number at which the PET-820 is connected to. After 4 rings the
unit should answer the call with a sign on message "P E T Eight Twenty" or the Time and Date if the real time
clock option has been included. Before you can continue further, you must now enter the password. The default
password is 60321# the read back telemetry should then say
"Pass O K". You now are ready to send control commands to the PET-820. Refer to paragraph 2.4 for continued
operation.
2.
If the keypad display option included with your PET-820, you will immediately be ready to send control commands
without entering a password. You should continue to section 2.4 of the manual.
3.
If the PET-820 is connected to the simulated telephone test circuit as described in "APPENDIX D" of the manual.
Then, in order to establish communication in this configuration, pick up the telephone receiver that is connected to
the simulated interface and enter the password 60321#. The PET-820 should then respond with the sign on message
"P E T Eight Twenty" or the time and date if the real time clock option has been included. Once this
communication has been established you may continue with section 2.4 of this manual.
Page 9
Pacific Research
2.4
PET-820 User Manual
OPERATE PROCEDURE
Rather than using examples of all commands, you will only ARM the PET-820. This is done by issuing the command code
01, the default key code 11, the data which will be 1 for arm and #, [01 11 1 #]. The read back telemetry will say "ON". You
may now disconnect the communication by sending [00 #], the read back telemetry will say "Good-by Telephone Call
Complete". At this point the system is now armed and ready to use. Before continuing we suggest that you re-establish
communication via the method that was pre-described and issue the disarm command [01 11 0 #] as described in the operate
section of this manual. Unfortunately at this point you have not programmed a telephone number or other pertinent
information in order for the PET-820 to respond to an alarm properly.
2.5
PROGRAMMING PROCEDURE
Reestablish communication with the PET-820 as described in paragraph 2.3. Once the password has been sent, you are ready
to access programming you must enter the program authorization code, the default program authorization code is [61 987654
#]. If the PET-820 responds with "P A C switch is off" this means that the circuit board programming switch is currently in
the off position. Without disconnecting or turning off power, change the circuit board programming switch (the right hand
switch located next to terminal 23) to the ON position and re-issue the program authorization code. The PET-820 should
then respond with "P A C O K" you are now ready to change the operating characteristics of the PET-820.
The first item that you will attempt to do is programming a telephone number, this will enable the PET-820 to call with an
alarm message. Using program command code 22, you enter [22 telephone number and ##]. The PET-820 should then read
back the telephone number that you just programmed. If you wish to recheck this number, you can enter [22 #] and the
PET-820 will then read back the number.
Once you have completed this task, re-arm the PET-820 using the command code [01 11 1 #] the PET-820 will respond with
"ON". Then issue [00 #] to end the telephone communication. Now the PET-820 is armed and waiting for a change to one
of the loop circuit inputs. You should be able to identify this conditions from the right hand status LED, located between
terminals 12 and 13, first flashing red and green indicating arm delay, then flashing red at a slower rate indicating armed. If
you take the loose end of the wire that you connected to the terminal 2 and short it to terminal 1, you should notice that the
LED status indicator is flashing at a faster rate or is steadily on. After the alarm time delay the PET-820 will then call the
telephone number that you just programmed and read back the pre-programmed message associated with that alarm input.
Once the PET-820 has established communication and you have received this message at least one time you may disarm the
system by entering the password as pre-described [60 321 #] and disarm command [01 11 0 #]. The PET-820 will then
respond with "OFF". Then you may enter [00 #] to terminate the communication.
We have now reviewed some basic operations of the PET-820 and you should review sections 3.0 OPERATING and 4.0
PROGRAMMING. Get familiar with the different operating and programming commands that are available for your use.
Page 10
Pacific Research
PET-820 User Manual
OPERATING INSTRUCTIONS
3.0
OPERATING
The operating commands are the principle means for the user to control the PET-820's basic operations. These functions
typically do not change the characteristics of the system but only turn on, off, or interrogate conditions of the system. The
operating commands can be issued either from a telephone or by the optional local keypad display.
3.1
PRINTED CIRCUIT BOARD INDICATORS
There are two LED or indicators located inside of the terminal cover. These LED's are used for monitoring the status of the
PET-820. The left indicator, (green LED), indicates the operation of the PET-820. If this LED is flashing it is indicating that
the PET-820 is no longer operating. This may occur due to low battery voltage or certain types of hardware or software
failures. If this LED continues to flash see the trouble shooting section of this manual in order to determine the problem.
The LED on the right indicates the operating mode of the PET-820. This is a two color indicator, red and green, and is used
to display the status mode of the system. Reference the following table as to the modes that this LED may display. Also note
that the LED will flash red upon receiving a ring signal from the telephone line.
COLOR
FLASH RATE
DESCRIPTION
None
Green
Green
None
Steady
Fast flash
Grn/Red
Red
Red
Red
Slow flash
Slow flash
Fast flash
Steady
One or more loop circuits are set, the unit is not ready to arm.
All loop circuits are clear and the unit is ready to arm.
One or more inputs are turned off but all other loop circuits are clear and the unit
is ready to arm.
Unit is in ARM delay mode (user exit delay).
Unit is in ARM mode.
Unit is in ALARM mode.
Unit is in communication mode, off hook.
3.2
KEYPAD DISPLAY PANEL (OPTIONAL)
The keypad/display can offer additional operating and programming flexibility. It also provides for a local voice telemetry
and detail display of system status. All aspects of the keypad display are identical to operating the unit by telephone, except
that the system password is not required.
3.2.1 POWER INDICATOR
This indicates the correct operation of the PET-820. The PET-820 includes hardware which will monitor this operating
integrity of the software and hardware. When a failure is detected the monitor hardware will attempt to restart the PET's
program. If the program cannot be restarted successfully, this indicator will go out.
3.2.2 COMMUNICATE INDICATOR
This indicator has two functions. First, it will identify when the PET-820 is off hook (connected to the telephone line).
Second, it will indicate when an incoming call is ringing the PET-820. In the ringing mode the indicator will flash once for
each ring.
Page 11
Pacific Research
PET-820 User Manual
3.2.3 READY INDICATOR
This indicator is used to identify the condition of the loop circuit inputs. Use the following table to identify the ready
indicator mode.
FLASH RATE
DESCRIPTION
None/Off
Steady
Fast flash
One or more loop circuits are set, the unit is not ready to arm.
All loop circuits are clear and the unit is ready to arm.
One or more inputs are turned off but all other loop circuits are clear and the unit is ready to arm.
3.2.4 ARM INDICATOR
This indicates when the system is in the arm mode waiting to detect and process an alarm.
3.2.5 ALARM INDICATOR
This indicator is used to identify that an alarm is in process or has occurred. Once the PET-820 has detected an alarm, the
alarm indicator will remain lit until the alarm has been reset.
3.2.6 MONITOR INDICATOR
This will indicate when the PET-820's monitoring mode is on. See section 3.9.6 for additional details regarding the monitor
mode.
3.2.7 RELAY INDICATOR
This will indicate when the users programming relay is energized.
3.2.8 LOW BATTERY INDICATOR
This indicator signals when the battery voltage drops below 8.5 volts. In this error condition, the PET-820 will no longer
operate. If the PET-820 is being operated on 115 VAC and there is a low voltage condition this indicator will also light.
3.2.9 KEYPAD TIME OUT TIMER
The local keypad time out timer is used to reset the Program Authorization Code after 5 minutes of no activity. This reset
function is announced when it occurs.
EXAMPLE: "P A C time out"
The timer will also reset the command input operation if no activity is detected for 30 seconds. This is announced when it
occurs.
EXAMPLE: "KB time out" (KeyBoard)
Page 12
Pacific Research
3.3
PET-820 User Manual
OPERATING COMMAND FORMAT
All operating commands contain four parts. The first part [Command Code] defines the function that is to be executed. The
second part [Key Code] is used as a security function within the operating command codes. The third part [User Data] is the
new information that replaces the previous information in the appropriate command code memory location. The data
information is not always required. Refer to each command for details. The fourth part [#] identifies the end of the command
string. This works in the same manner as the ENTER key on a computer keyboard. The following is an example of a typical
operating command:
COMMAND SYNTAX: [Command Code] [ Key Code] <User Data> #
The user data may be optional or required in
certain commands.
Throughout this section the following punctuation will be used to identify the syntax of all command codes.
WHERE:
3.4
#
*
[ ]
<>
= Enter (end of data string).
= Clear (start command over again).
= Prompts user for missing parameters.
= Prompts user for optional parameters.
TELEMETRY READ BACK
Once the user has issued an operating command, the PET-820 will read back the current condition of that operation in
standard English speech. You can also read back the current condition of any command code data by not entering the user
data. Examples of this are shown in the command read back syntax.
3.5
PASSWORD
The password is an individualized code that enables you to gain access to the system. The system will respond in standard
English speech when the password is excepted. A password is required in order to issue any of the following commands.
First, in applications where telephone communication has been established through the PET-820 via the local telephone port
and when the system has not answered the original call, the password can be used to force the PET-820 to establish
communication and disconnect the auxiliary telephone port. The default password code is 321 and can be changed through
programming. Once this code is changed, the default code will no longer work (reference the programming section of this
manual for further details on changing the password code). When attempting to send a password, the PET-820 keeps track of
the number of times that the wrong password is sent and will terminate the telephone call if this count exceeds the maximum
number errors allowed (see the programming section for more details in changing this counter).
COMMAND CODE:
COMMAND SYNTAX:
WHERE:
EXAMPLE:
DEFAULT:
3.6
60
60 [Password] #
Password = Current password code
60 321 # = Will enable the system to except additional commands.
60 321 #
KEY CODE
Once a password has been issued, the user is ready to operate the system. All operating commands require a key code in
order to operate properly. The purpose of the key code is to maintain a second level of security for system access. Like the
password, the key code is also programmable and may be changed at any time.
DEFAULT KEY CODE: 11
Page 13
Pacific Research
3.7
PET-820 User Manual
VALID DATA TYPES
Most all operating command codes only require values of zero (0) through 9 or Zero (0) and Non Zero values. In some
commands where the data is optional or when the data is left off, either a read back of the command data occurs or a toggle of
the function occurs. Example, toggle from ON to OFF or from OFF to ON.
DATA TYPE EXAMPLES: 0 through 9
Zero (0) or Non Zero (1 through 9), which is used for ON/OFF or
ENABLE/DISABLE functions
3.8
OPERATING COMMAND CODE EXAMPLES
The most likely used command code will probably be ARM/DISARM. As an example of this command, send the password,
then arm the system by sending [01 11 1 #]. The first "01" is the ARM/DISARM command code, the next item "11" is the
key code, the third item "1" is the data which identifies that you want to arm the system and the last item "#" is the end of
string or enter key. If the command was correctly entered and executed the PET-820 will read back the new current condition
"ON". If you only wanted to interrogate the current arm condition you would send [01 11 #] (command code, key code and
enter key) and the PET-820 would respond with it's current condition "ON" or "OFF".
3.9
OPERATE COMMAND CODES
The following sections will detail each of the operating command codes to show syntax and examples of data values.
3.9.1 END COMMUNICATION
This command is used to terminate the communication with the PET-820. It will also reset the password and/or program
authorization mode so that the user is not required to reset those functions prior to issuing an end communication command.
If you wish not to issue an end communication command, you can hang up the phone and after a 3 minute period of no
communication (commands), the PET-820 will disconnect itself. If the "end communication" command is issued, the
disconnection will be identified with the message. "Good-bye, telephone call complete"
COMMAND CODE:
COMMAND SYNTAX:
EXAMPLE:
READ BACK:
00
00 #
00 # = Ends communication
"Good-bye, telephone call complete" = end communication
"Telephone call timed out" = no communication for 3 minutes
Page 14
Pacific Research
PET-820 User Manual
3.9.2 ARM/DISARM
This command is used to arm and disarm the PET-820. Once an alarm occurs and the PET-820 has called a pre-programmed
telephone number, the user must issue the disarm command in order to stop the PET-820 from issuing the alarm status and
re-calling the telephone number again. To arm the PET-820 all inputs must be in the normal or clear condition. If the input
is not in a clear condition when the arm command is issued the PET-820 will identify the error. The error must be corrected
or the input must be turned off in order to arm the PET-820. When using the "Arm/Disarm" command, the ON/OFF
(Zero/Non Zero) information is not required. If it is not used, an arm condition will change to disarm or the disarm condition
will change to arm.
The analog input alarm mode is armed and disarmed in conjunction with the standard digital input alarm mode Once an
analog alarm occurs the PET-820 will not respond to the digital inputs and the analog alarm itself will respond in the same
manner as it does for the digital input. If you wish to only operate the PET-820 using analog alarms, you will need to disable
all unused digital input (reference the programming command code 30 for this operation).
COMMAND CODE:
COMMAND SYNTAX:
READ BACK SYNTAX:
WHERE:
01
01 [key Code] <ON/OFF> #
01 #
Key Code = reference current key code
ON/OFF = Zero (0) or Non Zero (1-9)
EXAMPLE: 01 11 1 = Turns the Arm mode ON
01 11 # = Toggle the Arm from ON to OFF condition
01 # = Read back the current Arm condition
3.9.3 READ BACK LOOP STATUS
This command may be used to interrogate each of the input loop circuits current status or the current status of all input loops
circuits. The read back dialogue will indicate "Set" if a loop circuit is a non-normal condition. The dialogue for a normal
loop circuit condition will be "Clear". When using this command, if you leave out the loop information all 8 loops will be
interrogated.
COMMAND CODE: 02
COMMAND SYNTAX: 02 [Key Code] <Loop> #
WHERE: Key Code = Reference current key code
Loop = 1 through 8
EXAMPLE: 02 11 3 # = Read back current condition of loop circuit 3
02 11 # = Read back current condition of all eight loop circuits
3.9.4 READ BACK LAST ALARM STATUS
This command may be used to read back the systems most recent alarm. If your system was ordered with the RAM/RTC
option, the read back of the alarm status will also include a date and time stamp of when the alarm occurred. This command
operates the same for both digital and analog inputs. The read back of an analog alarm status will always include a Date and
Time stamp due to fact that the RAM/RTC option is required.
COMMAND CODE:
COMMAND SYNTAX:
WHERE:
EXAMPLE:
03
03 [Key Code] #
Key Code = Reference current key code
03 11 # = Read back most recent alarm
Page 15
Pacific Research
PET-820 User Manual
3.9.5 LOOP CIRCUIT ON/OFF
This command may be used to turn ON or OFF any of the 8 loop circuits without effecting the monitoring capability. This
command can be effective in disabling an input that has generated an alarm, in order to allow you to re-establish the "ARM"
mode without that input generating a new alarm.
COMMAND CODE:
COMMAND SYNTAX:
READ BACK SYNTAX:
WHERE:
04
04 [Key Code] [Loop] [ON/OFF] #
04 [Loop] #
Key Code = Reference current key code
Loop = 1 through 8
ON/OFF = Zero (0) or Non Zero (1-9)
EXAMPLE: 04 11 1 0 # = Turn off loop 1 so that it will not generate an alarm
04 11 1 1 # = Turn on loop 1 and allow it to generate an alarm
3.9.6 LOOP MONITOR ON/OFF COMMAND
Any of the 8 loops may be programmed to operate the relay or digital output for the purpose of monitoring the loop circuit's
input activity. Issuing a loop monitor ON command will enable any loop circuit that has been defined to operate either the
relay or digital output to do so (reference the programming section of this manual for more information on configuration of
the monitor function). This function will operate independent of the ARM/DISARM function, including, the turning loop
circuits off.
COMMAND CODE:
COMMAND SYNTAX:
READ BACK SYNTAX:
WHERE:
05
05 [Key Code] <ON/OFF> #
05 #
Key Code = reference current key code.
ON/OFF = Zero (0) or Non Zero (1-9)
EXAMPLE: 05 11 # = Toggle loop monitor function to opposite mode
05 11 0 # = Turn loop monitor function off
3.9.7 RESERVED FOR FUTURE USE
COMMAND CODE: 06
3.9.8 RESERVED FOR FUTURE USE
COMMAND CODE: 07
3.9.9 RESERVED FOR FUTURE USE
COMMAND CODE: 08
Page 16
Pacific Research
PET-820 User Manual
3.9.10 RELAY AND DIGITAL OUTPUT CONTROL
This command allows the user to directly control the operation of the relay or digital output. This function may be used to
control a remote application (turning off/on equipment). Keep in mind that the control of the relay is also shared by the
monitor and alarm function. If you wish to solely use the relay as a remote control you must disable the monitor and the alarm
functions from operating the relay.
COMMAND CODE: 09
COMMAND SYNTAX: 09 [Key Code] [Relay/Digital] [ON/OFF] #
WHERE: Key Code = Reference current key code
Relay = Zero (0)
Digital = Non Zero (1-9)
ON/OFF = Zero (0) or Non Zero
EXAMPLE: 09 11 0 1 # = Energize (turn on) the relay
09 11 1 0 # = Turn off the digital output
3.9.11 READ ANALOG INPUT VALUE
This command is used to directly read the current analog input voltage at the analog to digital converter, prior to any
integrating or scaling of the voltage.
COMMAND CODE:
SYNTAX:
WHERE:
EXAMPLE:
62
62 [Input] #
Input = 1 through 8
62 1 # = Read analog input channel number 1
62 4 # = Read analog input channel number 4
3.9.12 READ ANALOG INTEGRATE VALUE
This command is used to read the current analog voltage after the integrator. (The integrator is a math routine which
averages the last predetermined number of readings from the analog to digital converter.
COMMAND CODE:
SYNTAX:
WHERE:
EXAMPLE:
63
63 [Input] #
Input = 1 through 8.
63 1 # = Read analog integrate value input channel number 1.
63 2 # = Read analog integrate value input channel number 2.
3.9.13 READ ANALOG HIGH (MAXIMUM) VALUE
This command reads the maximum analog voltage which occurred since the last time it was reset. The maximum voltage
will also include the time and date at which it occurred. This feature monitors all analog inputs at all times. When you are
ready to start recording the maximum voltage you will need to reset this feature using programming command code 66.
COMMAND CODE:
SYNTAX:
WHERE:
EXAMPLE:
64
64 [Input] #
Input = 1 through 8
64 1 # = Read analog high value, input channel number 1
64 3 # = Read analog high value, input channel number 3
Page 17
Pacific Research
PET-820 User Manual
3.9.14 READ ANALOG LOW (MINIMUM) VALUE
This command reads the minimum analog voltage which occurred since the last time it was reset. The minimum voltage will
also include the time and date at which it occurred. This feature monitors all analog inputs at all times, so when you are
ready to start recording the minimum voltage you will need to reset this feature using programming command code 66.
COMMAND CODE:
SYNTAX:
WHERE:
EXAMPLE:
65
65 [Input] #
Input = 1 through 8
65 1 # = Read analog low value, input channel number 1
65 8 # = Read analog low value, input channel number 8
3.9.15 READ ANALOG SCALED VALUE
This command may be used to read a scaled value of an analog input. This feature can be useful for reading an analog
voltage as PSI, FEET, TEMPERATURE, Etc. (For more information on setting up the scaling for an analog input, refer to
section 4.6.12 of this manual).
COMMAND CODE:
SYNTAX:
WHERE:
EXAMPLE:
67
67 [Input] #
Input = 1 through 8
67 1 # = Read scaled analog value input channel number 1
67 4 # = Read scaled analog value input channel number 4
Page 18
Pacific Research
PET-820 User Manual
PROGRAMMING INSTRUCTIONS
4.0
PROGRAMMING
Programming is the principle means for the user to configure with a computer based system. The PET-820's operation
enables the user to tell the system what to do and how to do it. This programming dose not require special tools and can be
done either by telephone or by the optional keypad/display panel.
4.1
PROGRAMMING COMMAND FORMAT
All programming commands have 3 parts. The first part, COMMAND CODE, defines the function that is to be modified.
The second part, USER DATA, is the new information that replaces the previous information in that program command code
memory location. The third part, "#", identifies the end of a command string. The "#" works in the same manner as the
ENTER key on a computer keyboard. To only read back data you simply enter the command code without data and "#".
SYNTAX: [Command Code] [User Data] #
WHERE: # = Enter, end of data string
[ ] = Prompts user for missing parameters or data
<> = Optional parameters or data
When entering data and a mistake is noted prior to finishing the command, the "*" can be used to Clear the command and
start over again. The "*" key can also be used to stop speech.
4.2
PROGRAM AUTHORIZATION CODE
Before entering the program authorization code, the front panel switch for programming must be in the "ON" position or the
PET-820 will not accept any programming commands. This switch allows the user a level of security where changes to the
operating characteristics may completely disabled. Once programming has been completed and no other changes are desired,
this switch should be returned to the off position. The Program Authorization Code consists of the command code digit 61,
followed by the authorization data [987654] and "#". Entering the program authorization code places the PET-820 into the
user programming mode. Before you can enter the program authorization code you must first enter the password. The
default program authorization code is [987654] and can be changed. Once this code is changed the default code will no
longer work. In order to execute the program authorization code you must have the password activated and the unit in the
disarm mode.
SYNTAX: 61 [authorization data] #
EXAMPLE: 61 987654 # = Enables the PET-820 for programming
DEFAULT: 61987654
4.3
VALID DATA
When you are programming data with values 000 through 255, you must include leading zeros with their values. You must
also use leading zeros for 2 digit values.
EXAMPLE: To program 1 into a 3 digit value, you must enter 001 or to program 10, you must enter 010.
Page 19
Pacific Research
PET-820 User Manual
4.3.1 DATA TYPES USED
Some data values have maximum values and if you exceed these values the command will be aborted. As an example, if a
given command data values range form 00 to 15 and you enter a single digit value or a value larger than 15 the command
will abort and data will not be updated.
EXAMPLE: 0 through 9
00 through 99 (or 00 through XX)
000 through 255
Zero (0) or non-zero (1 through 9) for ON/OFF or Enable/Disable functions
4.4
EXAMPLE OF PROGRAMMING
As an example of programming we will review changing the systems password. After you establish communication with the
PET-820, you must first execute the current password and program authorization code. Now you are ready to change the
password by sending [14 28774 #], the first "14" is the change password command code, next "28774" is the new password
data. This can be any value from 0 through 9 and any number of digits from 1 to 6 and the last item, "#", is the end of a
string or enter key. If the command was correctly entered and data correctly updated the PET-820 will read back the new
password data. Now, if you only send [14 #], command code and enter, the PET-820 will respond with the current password
data.
4.5
PROGRAM COMMANDS
The following sections will detail each of the program command codes to show syntax, examples and the default data values.
The programming commands for the Analog option have been separated and will follow at the end of this section for better
clarification.
4.5.1 SET LOOP RESPONSE TIME
The loop response time is used to denounce each of the loop circuit inputs. A large response can be used to eliminate some
noise and interference. Each of the loop circuits can be programmed for either one of two loop response times. Each of the
response times are programmed in 40 millisecond increments. The fastest response time of 40 milliseconds with a data value
of 001 and up to 10.2 seconds with a data value of 255. A data value larger than 255 will abort the command.
COMMAND CODE: 10 = Loop response timer 1
11 = Loop response timer 2
PROGRAM SYNTAX: [Command Code] [Data] #
READ BACK SYNTAX: [Command Code] #
WHERE: Command Code = 10 or 11
Data = 001 through 255, in 40 milliseconds increments
EXAMPLE: 10 131 # = Sets loop response timer 1 for 5.24 seconds
11 025 # = Sets loop response timer 2 for 1.0 seconds
DEFAULT: Loop Response timer 1 = 001 (40 milliseconds)
Loop Response timer 2 = 025 (1 sec.)
Page 20
Pacific Research
PET-820 User Manual
4.5.2 CHANGE PROGRAM AUTHORIZATION CODE
Changing the PROGRAM AUTHORIZATION CODE consist of the command code value "12" followed by the new program
authorization code 1 to 6 digits. Any amount of digits may be used within the range of 1 to 6. Each digit with a value of 0
through 9. The default authorization code "987654" can be changed. Once this code is changed the default code will no
longer work.
COMMAND CODE:
PROGRAM SYNTAX:
READ BACK SYNTAX:
WHERE:
EXAMPLE:
DEFAULT:
12
12 [Data] #
12 #
Data = 1 through 6 digits, each digit may be a value of 0 through 9
12 123321 # = Changes the existing authorization code to "123321"
987654
4.5.3 CHANGE OPERATE KEY CODE
Changing the OPERATE KEY CODE consist of the command code value "13", followed by the new key code of 1 to 6 digits.
Any amount of digits may be used within the range of 1 to 6. Each digit with a value of 0 through 9. The default key code of
11 can be changed but once this code is changed, the default code will no longer work.
COMMAND CODE:
PROGRAM SYNTAX:
READ BACK SYNTAX:
WHERE:
EXAMPLE:
DEFAULT:
13
13 [Data] #
13 #
Data = 1 through 6 digits, each digit may be a value of 0 through 9
13 1441 # = Changes the existing operate key code to "1441"
11
4.5.4 CHANGE PASSWORD
Changing the PASSWORD consist of the command code value "14", followed by the new PASSWORD of 1 to 6 digits. Any
amount of digits may be used within the range of 1 to 6. Each digit with a value of 0 through 9. The default password "321"
can be changed but once this code is changed, the default code will no longer work.
COMMAND CODE:
PROGRAM SYNTAX:
READ BACK SYNTAX:
WHERE:
EXAMPLE:
DEFAULT:
14
14 [Data] #
14 #
Data = 1 through 6 digits, each digit may be a value of 0 through 9
14 5551 # = Changes the existing Password to "5551"
321
4.5.5 CHANGE UNIT ADDRESS
This is a 1 to 4 digit value that may be programmed in order to identify the location of the PET-820 that generated the alarm.
The speech command word 007 may be included into one of the message buffers to speak the unit address or identify the
source of an alarm.
COMMAND CODE:
PROGRAM SYNTAX:
READ BACK SYNTAX:
WHERE:
EXAMPLE:
DEFAULT:
15
15 [Data] #
15 #
Data = 1 through 4 digits, each digit may be a value of 0 through 9
15 1221 # = Change the existing Unit Address to "1221"
0000
Page 21
Pacific Research
PET-820 User Manual
4.5.6 ARM DELAY
In applications where the PET-820 is used to monitor exit or entrance doors the ARM DELAY may be used to provide a
delay after the unit has received an arm command. This allows a person to exit a building before the unit is armed.
COMMAND CODE:
PROGRAM SYNTAX:
READ BACK SYNTAX:
WHERE:
EXAMPLE:
DEFAULT:
16
16 [Data] #
16 #
Data = 000 to 255 seconds, 256 through 999 is invalid data and will abort the command
16 30 # = Set the alarm delay for 30 seconds
15 seconds
4.5.7 COMMUNICATION DELAY BEFORE DIALING
This feature allows the user to delay for a time of 2 to 255 seconds before dialing in which to abort the transmission of an
alarm. Note that values of 0 and 1 entered into this command will generate a minimum of 2 seconds. The dial delay is also
used as a delay between each of the dial attempts.
COMMAND CODE:
PROGRAM SYNTAX:
READ BACK SYNTAX:
WHERE:
EXAMPLE:
DEFAULT:
17
17 [Data] #
17 #
Data = 000 to 255 seconds, 256 through 999 is invalid data and will abort the command
17 30 # = Sets the dial delay to 30 seconds
5 seconds
4.5.8 ALARM RELAY OUTPUT CUTOFF TIME
On alarm conditions that operates the relay, an automatic cutoff timer may be programmed to turn off the relay after the
cutoff time has elapsed. A "000" may be programmed for no alarm relay cutoff.
COMMAND CODE:
PROGRAM SYNTAX:
READ BACK SYNTAX:
WHERE:
18
18 [Data] #
18 #
Data = 000 to 255 minutes, 000 will disable the alarm relay cutoff function
256 through 999 is invalid data and will abort the command
EXAMPLE: 18 30 # = The alarm relay will turn off after 30 minutes
DEFAULT: 30 minutes
4.5.9 ALARM DELAY
Once an alarm condition has occurred, the alarm delay time may be programmed in order to allow the user adequate time to
locally disarm the unit. The unit will not attempt to establish communication or operate the relay until the alarm delay has
timed out.
COMMAND CODE:
PROGRAM SYNTAX:
READ BACK SYNTAX:
WHERE:
19
19 [Data] #
19 #
Data = 000 to 255 seconds, 000 will disable the alarm relay cutoff function
256 through 999 is invalid data and will abort the command
EXAMPLE: 19 45 # = Sets the alarm delay to 45 seconds
DEFAULT: 15 seconds
Page 22
Pacific Research
PET-820 User Manual
4.5.10 PASSWORD ATTEMPT ERRORS
When communication has been established, a counter will keep track of the number of times an incorrect password has been
sent. If the counter value exceeds the maximum allowed errors programmed, the PET-820 will hang up and require the user
to re-establish communication. This setting can be used to limit unauthorized access of the system.
COMMAND CODE:
PROGRAM SYNTAX:
READ BACK SYNTAX:
WHERE:
EXAMPLE:
DEFAULT:
20
20 [Data] #
20 #
Data = 00 through 15, 00 will disable the password error attempt counter
20 03 # = Sets the password error attempt to 3
2 Attempts
4.5.11 COMMUNICATION DIAL ATTEMPTS
The communication dial attempt value determines the number of times the PET-820 will attempt to dial the preprogrammed
telephone number before giving up. Each time all programmed telephone numbers are tried, the dial attempt counter will be
reduce by 1. This means that if two or more telephone numbers are programmed and the desired attempts for each number is
5, then a value of 5 must be programmed.
COMMAND CODE:
PROGRAM SYNTAX:
READ BACK SYNTAX:
WHERE:
EXAMPLE:
DEFAULT:
21
21 [Data] #
21 #
Data = 00 through 15, 00 = disables the dialer
21 03 # = Sets the dial counter to 3 attempts
8 Attempts
Page 23
Pacific Research
PET-820 User Manual
4.5.12 CHANGE TELEPHONE NUMBER
The PET-820 is capable of dialing a 32 digit telephone number. This number can also include special characters for the
purpose of waiting for a second dial tone, switching to dial pulse or touch tone at any point in the number being dialed. In
order to provide a method of programming these special characters, the PET-820 requires that a double "enter" (##) is used to
identify the end of the string. Note that the telephone number programming commands are the only commands that use the
double enter (##). When programming pulse/tone select use command code 46 to define the initial start condition for dial
pulse or tone dialing. After the first digit use 7# or 8# to change the mode of dialing. The PET-820 also provides a pause or
wait character for the purpose of waiting for a second dial tone when using a PBX or some long distance carriers. This wait
is only 3/4 of a second and in some application you may require 3 or 4 waits in order to produce a longer pause. If that is the
case, just string them together (9#9#9#). Each special character occupies the same room as a standard digit and may be
programmed into any position of the telephone number.
COMMAND CODE: 22 = Telephone number 1
23 = Telephone number 2
PROGRAM SYNTAX: [Command code] [Data] ##
READ BACK SYNTAX: [Command code] #
WHERE: Data = Telephone number, 1 through 32 digits, each digit 0 through 9 and the following
special characters
4# = * or clear
6# = # or enter
7# = dial Pulse select
8# = touch Tone select
9# = Wait or pause 750 mS
## = Enter, end of string
EXAMPLE: 22 5555555 ## = Telephone number, 555-5555
22 9 9# 7145551234 ## = Telephone number, 9 (Wait 750mS) 714-555-1234
DEFAULT: No telephone numbers stored
4.5.12.1
CONFIGURE FOR PAGER ACCESS
Most paging systems require you to dial a telephone number and send a pager ID or access number. Operating the PET-820
within this format can be accomplished by separating the telephone number and the pager access number with one or more
pauses. Test your paging system by measuring the time delay from the end of the telephone number to when the paging
system requires the access number. You may want to add one additional pause to assure that enough time is allowed.
This type of configuration will tend not to require an alarm message. If a message was included because an another telephone
number required the message, this type of configuration should not effect the paging system operation.
4.5.13 SELECT SPEECH MESSAGE BUFFER FOR UPDATE
The PET-820 comes standard with two message buffers that can be updated. This is message buffer 00 and 01. If the RAM
option has been included then all 16 message buffers may be updated. This command is used to select the desired buffer in
which to update and can be used to interrogate each of the message buffers. This command should always be issued prior to
changing data in any of the speech message buffers.
COMMAND CODE:
PROGRAM SYNTAX:
READ BACK SYNTAX:
WHERE:
EXAMPLE:
DEFAULT:
24
24 [data] #
24 [data] #
Data = 00 through 15
24 02 # = Selects message buffer 2
00 if a value is not previously entered after the program mode is enabled
Page 24
Pacific Research
PET-820 User Manual
4.5.14 CHANGE SPEECH MESSAGE BUFFER DATA
This command is used to alter the data in the pre-selected speech message buffer. Once the speech message buffer has been
selected using command code "24", the word pointer is reset to 00. Each time a word is entered into the buffer the pointer
will be incremented by one. You may also force the word pointer to any position, 00 through 15. The next word that is
entered will be at the next position location. Reference "APPENDIX C" for detailed word list and programming tables.
Each word in the speech library has a word address associated to it. The word address is the number that is used when
programming the required word. Each word is programmed into the message buffer one at a time. The speech library is also
separated into two parts, a low word group and a high word group. The low word group starts at word address 016 and ends
at address 255. The high word group also starts at 016 and ends at address 255 except that each word is different. When
selecting the high or low word group the speech command word 014 or 015 must be programmed. Keep in mind that each
time a speech buffer begins, it starts by using the low word group, so a 014 does not need to be programmed as the initial
word group select. The speech command words 000 through 015 may be used regardless to whether the low word group or
the high word group has been selected. It is also recommended that all messages start with 750 millisecond pause, speech
command word 001 and end with an end of message speech command word 000. If the end of message command word is
missing the speech may continue on into the next buffer, unless this condition is desired. The message buffer programming
tables included in the "APPENDIX C" may also be used in planning and assist in the programming of the message buffers.
COMMAND CODE:
PROGRAM SYNTAX:
READ BACK SYNTAX:
WHERE:
25
25 <Word Address> [Word Data] #
25 #
Word Address = 00 through 15
Word Data
= 000 through 255, reference "APPENDIX C"
EXAMPLE: Reference "APPENDIX C"
DEFAULT MESSAGE BUFFER DATA:
MB 00 =
MB 01 =
MB 02 =
MB 03 =
MB 04 =
MB 05 =
MB 06 =
MB 07 =
MB 08 =
MB 09 =
MB 10 =
MB 11 =
MB 12 =
MB 13 =
MB 14 =
MB 15 =
"D C power is off"
"(009) from unit (007)"
"P E T eight twenty"
"(009) the time is (002) (014) on (003)"
"Warning change machine is out of change"
"Smoke alert at unit (007)"
"Machine (007) is off line"
"Danger area temperature is below freezing"
"Zone (006) alert at unit (007)"
"Intruder alert intruder alert at zone (006)"
"Fire alert fire alert"
"Warning high level"
"Danger low pressure error"
"Warning over temperature error"
"Danger over pressure error"
"Warning power is off"
MB = Message Buffer
( ) = Speech Command Word
Page 25
Pacific Research
PET-820 User Manual
4.5.15 SELECT SIGN ON MESSAGE
The sign on message is the message that is sent when the user calls the PET-820 and establishes telephone communication.
Any one of the 16 speech buffers may be assigned as the sign on message.
COMMAND CODE:
PROGRAM SYNTAX:
READ BACK SYNTAX:
WHERE:
EXAMPLE:
DEFAULT:
26
26 [Data] #
26 #
Data = 00 through 15
26 06 # = Sets message buffer 6 as the sign on message
Message buffer 02
Message buffer 03 when RAM / RTC option has been installed
4.5.16 SET RING COUNTER
The ring counter value determines the number of rings before the PET-820 will answer the telephone. If a value of 00 is
programmed into this counter, the PET-820 will not answer the call unless the program enable switch is on, then the
PET-820 will wait 15 rings before it answers the call.
COMMAND CODE:
PROGRAM SYNTAX:
READ BACK SYNTAX:
WHERE:
EXAMPLE:
27
27 [Data] #
27 #
Data = 00 through 15 rings, 00 = disable
27 04 # = Set the ring counter for 10 rings
27 00 # = Disables the ring counter
DEFAULT: 04 Rings
4.5.17 SELECT MESSAGE DELAY
Once the PET-820 has finished dialing a telephone number, it will delay for a pre-programmed time before it begins sending
the first speech message. This delay is designed to allow time for the telephone company to complete the connection and for
the user to answer the telephone. If the PET-820 has been programmed to repeat the message several times, it should not be a
problem if a short delay was selected and the user missed part of the first message.
COMMAND CODE:
PROGRAM SYNTAX:
READ BACK SYNTAX:
WHERE:
28
28 [Data] #
28 #
Data = 0 through 3,
0 = No delay before alarm first message
1 = Delay 5 sec. before first message
2 = Delay 15 sec. before first message
3 = Delay 30 sec. before first message
EXAMPLE: 27 2 # = Delay 15 seconds before first alarm message
DEFAULT: 1, Delay 5 seconds
Page 26
Pacific Research
PET-820 User Manual
4.5.18 ALARM MESSAGE REPEAT
This function allows you to define the number of times the alarm message is repeated when the PET-820 makes its telephone
call.
COMMAND CODE:
PROGRAM SYNTAX:
READ BACK SYNTAX:
WHERE:
EXAMPLE:
DEFAULT:
29
29#
29#
Data = 00 through 15, 00 = disables messages
21 08 # = The alarm message will repeat 8 times
10 message repeats
4.5.19 CHANGE LOOP CONFIGURATION, SELECT ACTIVE STATE
Each of the 8 loop circuits can be assigned 1 of 4 normal active states. A loop that has been assigned 0 (disabled) will be
completely ignored in all applications, including monitoring function. If the loop is assigned normally open or normally
closed as the condition, then no additional external components are required in the loop for proper operation. If a loop is
assigned as a resistor supervised loop, then a 2.2K ohm resistor is required in series with the loop. Reference the installation
section of this manual for additional information on connecting the PET-820 to different loop circuit conditions.
COMMAND CODE:
PROGRAM SYNTAX:
READ BACK SYNTAX:
WHERE:
30
30 [Loop] [Data] #
30 [Loop] #
Loop = 1 through 8, this identifies the loop for change
Data = 0 through 3,
0 = Disable loop
1 = Normally closed loop
2 = Normally open loop
3 = Resistor supervised loop
EXAMPLE: 30 1 1 # = Sets loop circuit 1 for a normally closed contact
DEFAULT: All loops = 2, normally open contact
4.5.20 CHANGE LOOP CONFIGURATION, SELECT ALARM DELAY
Once the PET-820 has detected a change in input activity, the system will begin to initiate the alarm function. An input can
include an alarm delay to allow the user to turn off the alarm prior to that alarm function being stored permanently and
communication being established. When no alarm delay has been selected and once the system has detected a change in the
input status, the alarm is recorded and communication will then begin.
COMMAND CODE:
PROGRAM SYNTAX:
READ BACK SYNTAX:
WHERE:
31
31 [Loop] [Data] #
31 [Loop] #
Loop = 1 through 8, this identifies the loop for change
Data = Zero (0) or Non Zero (1-9),
Zero = No alarm delay (instant)
Non Zero = enables alarm delay
EXAMPLE: 31 3 1 # = Enable loop #3 for alarm delay
DEFAULT: All loops = 0
Page 27
Pacific Research
PET-820 User Manual
4.5.21 CHANGE LOOP CONFIGURATION, SELECT ALARM RELAY OUTPUT
Each of the loop circuits can be configured in a manner to energize the alarm relay once the alarm has been detected. This
feature may be used to operate a siren or flashing lamp to identify the alarm condition. Note that the alarm relay is also
shared with the monitoring and relay output control function. Any one of these other functions can also effect the operation of
the relay.
COMMAND CODE:
PROGRAM SYNTAX:
READ BACK SYNTAX:
WHERE:
32
32 [Loop] [Data] #
32 [Loop] #
Loop = 1 through 8, this identifies the loop for change
Data = Zero (0) or Non Zero (1-9),
Zero = no relay output
Non zero = enables relay output
EXAMPLE: 32 3 1 # = Set loop #3 for alarm relay output
DEFAULT: Loop 1 = Non Zero
Loop 2 through 8 = 0
4.5.22 CHANGE LOOP CONFIGURATION, SELECT PHONE ACCESS
Once a loop circuit alarm condition has been detected, the program checks to determine which telephone number to call in
association to that input. The PET-820 may be programmed to call #1, #2, both, eight number telephone log or all 10
telephone numbers if desired. The eight number telephone log is only active when the optional RAM/RTC option has been
installed.
COMMAND CODE:
PROGRAM SYNTAX:
READ BACK SYNTAX:
WHERE:
33
33 [Loop] [Data] #
33 [Loop] #
Loop = 1 through 8, this identifies the loop for change
Data = 0 through 7,
0 = no alarm output to telephone
1 = dial telephone #1
2 = dial telephone #2
3 = dial telephone #1 and #2
4 = dial telephone number from eight number log
5 = dial telephone #1 and eight number log
6 = dial telephone #2 and eight number log
7 = dial telephone #1, #2 and eight number log
EXAMPLE: 33 1 5 # = Loop circuit 1 will dial telephone #1 and log
33 2 1 # = Loop circuit 2 will dial telephone #1
33 3 7 # = Loop circuit 3 will dial all telephone numbers
DEFAULT: All loops = 1
Page 28
Pacific Research
PET-820 User Manual
4.5.23 CHANGE LOOP CONFIGURATION, SELECT RESPONSE TIME
Each loop circuit can be programmed to use one of two different response times. The response time is used to ignore a
momentary change in contact closure that is undesirable. It is recommended that no less than 40 milliseconds response time
is used. In an applications where an unwanted contact closure may occur for one to two seconds and you do not want to
detect this closure as an alarm. A three seconds response delay may be programmed for that input and all contact closures
that occur for less than 3 seconds will be ignored as an alarm.
COMMAND CODE:
PROGRAM SYNTAX:
READ BACK SYNTAX:
WHERE:
34
34 [Loop] [Data] #
34 [Loop] #
Loop = 1 through 8, identifies the loop for change
Data = 0 or non zero, 0 = response time #1, non zero = response time #2
EXAMPLE: 34 1 2 # = Selects response time #2 for loop circuit #1
DEFAULT: All loops = 0
4.5.24 CHANGE LOOP CONFIGURATION, SELECT ALARM MESSAGE
Once an alarm has occurred and the PET-820 has established telephone communication with the user, the PET-820 will read
back 1 of 16 different messages. The message that is read back corresponds to the message number that has been
programmed for the loop circuit that generated the alarm. Each of the 8 loop circuits may be programmed to read back
anyone of the 16 different messages during the alarm condition.
COMMAND CODE:
PROGRAM SYNTAX:
READ BACK SYNTAX:
WHERE:
35
35 [Loop] [Data] #
35 [Loop] #
Loop = 1 through 8, this identifies the loop for change
Data = 00 through 15, identifies the message buffer to speak during an alarm communication
EXAMPLE: 35 2 03 # = Loop circuit will speak message buffer 03 during an alarm
DEFAULT: Loop circuit 1 = Message buffer 08
Loop circuit 2 = Message buffer 09
Loop circuit 3 = Message buffer 10
Loop circuit 4 = Message buffer 11
Loop circuit 5 = Message buffer 12
Loop circuit 6 = Message buffer 13
Loop circuit 7 = Message buffer 14
Loop circuit 8 = Message buffer 15
4.5.25 LOOP CONFIGURATION, SELECT MONITOR OUTPUT
When the alarm monitor function has been turned on, any of the 8 loop circuits that have been programmed to output to the
relay or digital output will do so when that loop circuit is abnormal. Note that both the relay and digital outputs share other
functions and when using this feature the user should consider how it might affect other features that also operate the relay or
digital outputs.
COMMAND CODE:
PROGRAM SYNTAX:
READ BACK SYNTAX:
WHERE:
36
36 [Loop] [Data] #
36 [Loop] #
Loop = 1 through 8, this identifies the loop for change
Data = 0 through 3,
0 = no output
1 = relay output
2 = digital output 3 = both output
EXAMPLE: 36 3 02 # = Enable loop #3 for digital output
DEFAULT: All loops = 0
Page 29
Pacific Research
PET-820 User Manual
4.5.26 EIGHT NUMBER TELEPHONE LOG
When the optional RAM/RTC is installed, the PET-820 is capable of dialing an additional 8 telephone numbers with up to 31
digits each. This allows for up to ten (10) different numbers to be dialed during an alarm. This eight number telephone log
operates differently than the standard 2 telephone numbers. When this log is selected the PET-820 will look up and dial each
and every number that has been programmed into the log. The log positions that don't have a number programmed, will get
skipped. Each of these numbers can also include special characters for the purpose of waiting for a second dial tone,
switching to dial pulse or touch tone at any point in the number being dialed. To provide a method of programming these
special characters, the PET-820 requires that a double enter (##) is used to identify the end of the string. Note that the
telephone number programming commands are the only commands that use the double enter (##). When programming the
initial pulse/tone select, use command code 46 to define this start condition. After the first digit then use 7# or 8# to change
the mode of dialing. The PET-820 also provides a pause or wait character for the purpose of waiting for a second dial tone
when using a PBX or some long distance carriers. This wait is only 3/4 of a second and in some applications you may require
3 or 4 waits in order to produce a longer pause, in this case just string them together (9#9#9#). Each special character
occupies the same room as a standard digit and may be programmed into any position except for the last position of the
telephone number.
COMMAND CODE:
PROGRAM SYNTAX:
READ BACK SYNTAX:
WHERE:
37
37 [Log position][Data] ##
37 [Log position] #
Log position = Telephone log number, 1 through 8
Data = Telephone number 1 through 31 digits, each digit 0 through 9
4# = * or clear
6# = # or enter
7# = dial pulse select
8# = touch tone select
9# = wait or pause 750 mS
## = enter, end of string
EXAMPLE: 37 1 5555555 ## = Telephone log position 1, telephone number 555-5555
37 3 9 9# 7145551234## = Telephone log position 3 telephone number, 9 (wait 750mS)
telephone number 714-555-1234
DEFAULT: No telephone numbers stored
4.5.27 DELETE TELEPHONE NUMBER FROM LOG
This command is used to delete a telephone number that has been programmed into the EIGHT NUMBER TELEPHONE
LOG. The PET-820 looks at each position in the log to determine valid telephone data from dialing. Once a position in the
log has been programmed with a telephone number, the only way to remove that number from the log is to delete it.
However, a telephone number dose not have to be deleted in order to change it.
COMMAND CODE: 38
PROGRAM SYNTAX: 38 [Log position]#
READ BACK SYNTAX: 38#
WHERE: Log position = 1 through 8, telephone log position
EXAMPLE:38 2 # = Delete telephone number from log position 2
Page 30
Pacific Research
PET-820 User Manual
4.5.28 SET DAY OF WEEK, RTC OPTION
If your PET-820 has included the Real Time Clock option, the day of week can be adjusted using this command:
COMMAND CODE:
PROGRAM SYNTAX:
READ BACK SYNTAX:
WHERE:
39
39 [Data] #
39#
Data = 1 through 7,
1 = Sunday
3 = Tuesday
5 = Thursday
7 = Saturday
EXAMPLE: 39 3 # = Set the day for Tuesday
DEFAULT: Current day
2 = Monday
4 = Wednesday
6 = Friday
4.5.29 ALARM COMMUNICATION
This feature allows the user to define what type of communications will be used during the alarm condition. DTMF
communication should only be selected in applications that will communicate with the remote control panel.
COMMAND CODE:
PROGRAM SYNTAX:
READ BACK SYNTAX:
WHERE:
40
40 [Data] #
40 #
Data = 0 through 3,
0 = None
2 = Speech
EXAMPLE: 40 2 # = Communicates using speech
DEFAULT: 2
1 = DTMF
3 = Modem
4.5.30 PROGRAMMING AND CONTROL COMMUNICATION
This feature allows the user to define what type of communications will be used during the programming and control modes
of the system. DTMF communication should only be selected in applications that will communicate with the remote control
panel.
COMMAND CODE:
PROGRAM SYNTAX:
READ BACK SYNTAX:
WHERE:
41
41 [Data] #
41 #
Data = 0 through 3,
0 = None
2 = Speech
EXAMPLE: 41 2 # = Communicates using speech
DEFAULT: 2
1 = DTMF
3 = Modem
4.5.31 RADIO INTERFACE ENABLE
When this feature is selected it enables a protocol to allow the system to communicate via a two way radio. Reference the
installation section of this manual for more information on interfacing with a two way radio. In most applications where
telephone interface is desired this function should be disabled.
COMMAND CODE:
PROGRAM SYNTAX:
READ BACK SYNTAX:
WHERE:
EXAMPLE:
DEFAULT:
42
42 [Data] #
42 #
Data = Zero (0) or Non Zero (1-9), 0 = Telephone interface
42 0 # = Enables the telephone interface
0
Page 31
Pacific Research
PET-820 User Manual
4.5.32 LOCAL ARM/DISARM CONTROL
This feature allows the user to add a local ARM/DISARM switch for arm and disarm control. Reference the installation
section of this manual for additional information on wiring of the local ARM/DISARM switch. When this function is
enabled, a momentary contact closure or change in contact status will arm or disarm the system.
COMMAND CODE:
PROGRAM SYNTAX:
READ BACK SYNTAX:
WHERE:
EXAMPLE:
DEFAULT:
43
43 [Data] #
43 #
Data = Zero (0) or Non Zero (1-9), 0 = disable front panel control
43 0 # = Disable local ARM/DISARM control
1
4.5.33 ENABLE LOOP 8, ARM/DISARM CONTROL
Loop circuit #8 may be redefined as an ARM/DISARM control. When this function is enabled, a momentary contact closure
or change in contact status will arm or disarm the system. If this feature is enabled, the PET-820 will output a signal to the
digital output terminal, similar to the front panel status indicator. This output may then be connected to a LED or a small
lamp in order to indicate the PET-820's status.
COMMAND CODE:
PROGRAM SYNTAX:
READ BACK SYNTAX:
WHERE:
EXAMPLE:
DEFAULT:
44
44 [Data] #
44 #
Data = Zero (0) or Non Zero (1-9), 0 = Disable loop 8 control
44 1 # = Enable loop circuit 8 control
0
4.5.34 DISABLE PASSWORD REQUIREMENT
This function allows the user to disable the password requirement for controlling and programming. However, it does not
defeat the ability to activate the system by sending a password. It only effects the requirement of a password during an alarm
condition or when the PET-820 has answered the telephone via ringing.
COMMAND CODE:
PROGRAM SYNTAX:
READ BACK SYNTAX:
WHERE:
EXAMPLE:
DEFAULT:
45
45 [Data] #
45 #
Data = Zero (0) or Non Zero (1-9), 0 = password required
45 1 # = Disables the requirement for the password
0
4.5.35 ENABLE PULSING ALARM RELAY OUTPUT
The PET-820 may be programmed to pulse the alarm relay output upon an alarm condition.
COMMAND CODE:
PROGRAM SYNTAX:
READ BACK SYNTAX:
WHERE:
EXAMPLE:
46
46 [Data] #
46 #
Data = Zero (0) or Non Zero (1-9), 0 = no pulse, Non Zero = pulse
46 0 # = Set for no pulsing relay
46 1 # = Set for pulsing relay output
DEFAULT: 0 = No pulsing
Page 32
Pacific Research
PET-820 User Manual
4.5.36 SELECT DTMF/DIAL PULSE MODE
This feature allows the user to select the initial mode in which a telephone is dialed. In areas where DTMF dialing is not
accessible, dial pulse dialing may be used in order to dial telephone numbers.
COMMAND CODE:
PROGRAM SYNTAX:
READ BACK SYNTAX:
WHERE:
EXAMPLE:
DEFAULT:
47
47 [Data] #
47 #
Data = Zero (0) or Non Zero (1-9), 0 = DTMF, Non Zero = dial pulse
47 1 # = Select dial pulse mode
0
4.5.37 SET TIME, RTC OPTION
If your PET-820 has included the real time clock option, the clock may be adjusted via this command. When programming
the current time, hour and minutes must include leading zeros and A.M./P.M. must be defined. If missing data or incorrect
data is included, the command is aborted and the current time is not adjusted.
COMMAND CODE:
PROGRAM SYNTAX:
READ BACK SYNTAX:
WHERE:
EXAMPLE:
48
48 [Data] #
48 #
Data Format = HH MM A/P (HH = Hours, MM = Minutes, 0 = A.M. / 1 = P.M.)
48 11 30 1 # = Sets the time to 11:30 P.M
48 02 59 0 # = Sets the time to 2:59 A.M
DEFAULT: Current time
4.5.38 SET DATE, RTC OPTION
If your PET-820 has included the real time clock option, the date may be adjusted via this command. When programming the
current date, month, day and year must include leading zeros. If missing data or incorrect data is included, the command is
aborted and the current date is not adjusted. The RAM/RTC option will announce the date with day of the week and month
as a word not a number (for day of the week command refer to code #39).
COMMAND CODE:
READ BACK SYNTAX:
PROGRAM SYNTAX:
WHERE:
EXAMPLE:
49
49 #
49 [Data] #
Data Format = MM DD YY (MM = Month, DD = Day, YY = Year)
49 12 12 90 # = Set the date to the 12th month, 12th day, year of 90
49 03 04 91 # = Sets the calendar to the 3rd, month, 4th day, year of 91
3-5-92 will be announced as "Thursday, March 5th , 92"
DEFAULT: Current date
Page 33
Pacific Research
PET-820 User Manual
4.5.39 SERIAL PORT BAUD RATE
If your PET-820 has included a serial port, you may use this command to select the desired baud rate. Once the command is
issued the baud is instantly changed.
COMMAND CODE:
PROGRAM SYNTAX:
READ BACK SYNTAX:
WHERE:
50
50 [Data] #
50 #
Data = 1 through 6;
1 = 300 baud
,
4 = 2400 baud
EXAMPLE: 50 3 # = Set to 1200 baud
DEFAULT: 6 = 9600 baud
2 = 600 baud
5 = 4800 baud
3 = 1200 baud
6 = 9600 baud
4.5.40 RESERVED FOR FUTURE USE
COMMAND CODE: 51
4.5.41 RESERVED FOR FUTURE USE
COMMAND CODE: 52
4.5.42 RESERVED FOR FUTURE USE
COMMAND CODE: 53
4.5.43 RESERVED FOR FUTURE USE
COMMAND CODE: 54
4.5.44 SERIAL PORT STATUS ENABLE
If your PET-820 has included the RS-232 serial port, you can connect it to a terminal, PC with terminal emulator software or
printer and enable the status mode. The PET-820 will then output status information on internal operations. This can be
valuable for monitoring system operation and debugging.
COMMAND CODE:
PROGRAM SYNTAX:
READ BACK SYNTAX:
WHERE:
EXAMPLE:
DEFAULT:
55
55 [ON/OFF] #
50 #
ON/OFF = Zero (0) or Non Zero (1-9), 0 = Off
55 1 # = Turn on status mode
0 = OFF
4.5.45 INITIALIZATION OF SPEECH DATA, RAM OPTION REQUIRED
This command will return all data in the 16 speech message buffers back to the original factory default settings. All data
subsequently stored or changed will be lost.
COMMAND CODE: 80
PROGRAM SYNTAX: 80 #
Page 34
Pacific Research
PET-820 User Manual
4.5.46 SYSTEM EEPROM INITIALIZATION
This command will re-initialize all of the systems characteristics to the original factory default settings. CAUTION! When
using this command any changes or new characteristics that have been stored will be lost including passwords, key code and
program authorization codes. In order to operate this command the user must include the unit serial number. This is a 8 digit
number that is identified on top of the program EPROM and on the circuit board. The program authorization is not required
to execute this command so caution should be taken in identifying it to unqualified users the unit serial number and use of
this command.
COMMAND CODE: 81
PROGRAM SYNTAX: 81 [Serial No.]
4.5.47 CHANGE DIRECT BYTE IN EEPROM
This command allows the user to change direct bytes in the EEPROM for purpose of debugging and solving certain types of
problems. Care should be taken in using this command because it is not necessary for normal programming operations.
Please refer to the EEPROM address chart located in APPENDIX-D of this manual when implementing this command.
COMMAND CODE:
PROGRAM SYNTAX:
READ BACK SYNTAX:
WHERE:
82
82 [Address] [Data] #
82 [Address] #
Address = 3 digit value, decimal
Data = 3 digits value, decimal
EXAMPLE: 82 001 025 # = Change address byte address 001 to 025
4.5.48 DEMONSTRATE SPEECH LIBRARY
This command may be used for purpose of demonstrating all words in the speech library. The library contains over 390
words. The program authorization code is not required to execute this command.
COMMAND CODE: 83
PROGRAM SYNTAX: 83 #
4.6
ANALOG INPUT OPTION, PROGRAMMING COMMANDS
The programming commands for the analog option work in the same manner as the standard programming commands.
These commands provide two main function types. First, are commands that are used to configure the analog converter and
how it operates. Second, are commands that are used to set up scaling factors for each of the inputs.
In most all of the analog commands, data is referred to as ADC values plus and minus 0000 through 4095. This is the total
range of the analog converter. These are the counts of the analog converter and each count in the high scale equals 1
millivolt. In other words, an analog count of 1000 would be 1000 millivolts or 1.000 volts. In the low scale each count
equals 100 microvolts, an analog count of 1000 in this scale would equal 1000 microvolts or 0.1000 volts.
Page 35
Pacific Research
PET-820 User Manual
4.6.1 RESET ANALOG HIGH AND LOW VALUES
This command is used to reset the analog values in the high and low (maximum and minimum) register. Each channel can be
independently reset so not to effect other channels that may be currently recording their values. When you reset a channel, the
current analog voltage is recorded along with the time and date. Then, these registers will be updated each time a new analog
value exceeds a value currently stored in the register.
COMMAND CODE:
PROGRAM SYNTAX:
WHERE:
EXAMPLE:
66
66 [Input] #
Input = 1 through 8
66 1 # = Reset analog input #1 high and low values to current values
4.6.2 SET ANALOG HIGH AND LOW ALARM SETPOINT
Both the high and low alarm setpoints are used to define a window or group of voltages that are considered to be acceptable.
Any voltage measurement that is outside of this window will generate an alarm in the same manner as the digital switch
input alarm.
These commands are used to set up the upper and lower voltage limits that will not generate an alarm condition. Once these
limits are set for a given channel and that channel is enabled to generate an alarm. If a voltage exceeds this upper or lower
limit, the unit will initiate an alarm in the same manner as it does for the digital switch input alarm. When programming
these limits, you may use any value, positive or negative, as either limit. The data used is the ADC value in millivolts or 100
microvolts depending on the analog scale selected. Setting the setpoint to a value larger than 4095 will cause that limit to be
ignored by the program.
COMMAND CODE: 70 = Upper limit
71 = Lower limit
PROGRAM SYNTAX: [Command code] [Input] [Sign] [Data] #
READ BACK SYNTAX: [Command code] [Input] #
WHERE: Input = 1 through 8
Sign = Zero or Non Zero, Zero = negative, Non Zero = positive
Data = 0000 through 4096, the analog converter value
4095 is the maximum converter value and 4096 is the converters over range value
Setting the limit to 4096 will disable that alarm limit
EXAMPLE: 70 1 1 2000 # = Set analog input number 1 high alarm setpoint to +2.000 volts
or +0.2000 volts, depending on the range selected
DEFAULT: All upper limits, analog inputs = +4096
All lower limits, analog inputs = -4096
Page 36
Pacific Research
PET-820 User Manual
4.6.3 SET ANALOG INPUT INTEGRATE RATE
The integrate rate is used to filter each of the analog inputs so that a momentary large change in analog voltage will be
averaged with prior readings. A large integrate rate can be used to eliminate some noise and interference. Each analog input
can be programmed to a different rate of 1 through 8. This number is the number of prior readings of the ADC that are
averaged together. The output value of the integrate routine is then used by the minimum and maximum value register and
the analog alarm functions.
COMMAND CODE:
PROGRAM SYNTAX:
READ BACK SYNTAX:
WHERE:
72
72 [Input] [Data] #
72 [Input] #
Input = 1 though 8
Data = 1 through 8
EXAMPLE: 72 1 4 # = Analog channel number 1 will integrate the last four readings
DEFAULT: All inputs = 4
4.6.4 ENABLE ANALOG INPUT FOR ALARM OUTPUT
With this command you can define which of the analog inputs will be used by the alarm function. This command can also be
effective in disabling an input that is currently generating an alarm, allowing you to reestablish the arm mode without that
input generating a new alarm.
COMMAND CODE:
PROGRAM SYNTAX:
READ BACK SYNTAX:
WHERE:
73
73 [Input] [Data] #
73 [Input] #
Input = 1 through 8
Data = Zero (0) or Non Zero (1-9), Zero = disable input for alarm output
EXAMPLE: 73 1 1 # = Enable input number 1 for alarm output
73 2 0 # = Disable input number 2 for alarm output
DEFAULT: All inputs = 0
4.6.5 ENABLE ANALOG INPUT FOR ALARM RELAY OUTPUT
Each of the analog inputs can be configured in a manner to energize the alarm relay, once the alarm has been detected. This
feature may be used to operate a siren or flashing lamp to identify the alarm condition. Note that the alarm relay is also
shared with the monitoring and relay output control function. Anyone of these other functions can also effect the operation of
the relay.
COMMAND CODE:
PROGRAM SYNTAX:
READ BACK SYNTAX:
WHERE:
74
74 [Input] [Data] #
74 [Input] #
Input = 1 through 8
Data = Zero (0) or Non Zero (1-9), Zero = disable input for alarm relay output
EXAMPLE: 74 1 1 # = Enable input number 1 for alarm relay output
74 2 0 # = Disable input number 2 for alarm relay output
DEFAULT: All inputs = 0
Page 37
Pacific Research
PET-820 User Manual
4.6.6 SELECT TELEPHONE NUMBER ACCESS FOR EACH ANALOG INPUT ALARM
Once an analog input alarm condition has been detected, the program checks to determine which telephone number to call in
association to that alarm. The PET-820 may be programmed to call telephone #1, #2, both, eight number telephone log, or
all 10 telephone numbers if desired. The eight number telephone log is only active when the optional RAM/RTC option has
been installed.
COMMAND CODE:
PROGRAM SYNTAX:
READ BACK SYNTAX:
WHERE:
75
75 [Input] [Data] #
75 [Input] #
Input = 1 through 8, this identifies the input to change
Data = 0 through 7,
0 = No alarm output to telephone
1 = Dial telephone #1
2 = Dial telephone #2
3 = Dial both telephone #
4 = dial telephone number from eight number log
5 = dial telephone #1 and eight number log
6 = dial telephone #2 and eight number log
7 = dial telephone #1, #2 and eight number log
EXAMPLE: 75 1 5 # = Loop circuit 1 will dial telephone #1 and log
75 2 1 # = Loop circuit 2 will dial telephone #1
DEFAULT: All inputs = 1
4.6.7 SELECT ANALOG ALARM MESSAGE
Once an alarm has occurred and the PET-820 has established telephone communication with the user, the PET-820
will read back 1 of 16 different messages. The message that is read back corresponds to the message number that has been
programmed for that analog input. Each of the 8 analog inputs may be programmed to read back anyone of the 16 different
messages.
COMMAND CODE:
PROGRAM SYNTAX:
READ BACK SYNTAX:
WHERE:
76
76 [Input] [Data] #
76 [Input] #
Input = 1 through 8, this identifies the input for change
Data = 00 through 15, identifies the message buffer to speak during an alarm communication
EXAMPLE: 76 2 03 # = Analog input number 2 will speak message buffer 03 during an alarm
DEFAULT: All inputs = 00
4.6.8 SELECT ALARM DELAY FOR ANALOG INPUT
Once the PET-820 has detected an alarm condition at an analog input, the system will begin to initiate the alarm mode. A
giving input can include an alarm delay in order to allow the user to turn off the alarm prior to that alarm condition being
stored permanently and communication being established. When no alarm delay has been selected and once the system has
detected an alarm condition, the alarm is immediately recorded and communication will then begin.
COMMAND CODE:
PROGRAM SYNTAX:
READ BACK SYNTAX:
WHERE:
77
77 [Input] [Data] #
77 [Input] #
Input = 1 through 8, this identifies the input for change
Data = Zero (0) or Non Zero (1-9),
Zero = No alarm delay (instant)
Non Zero = Enables alarm delay
EXAMPLE: 77 3 1 # = Enable analog input #3 for alarm delay
DEFAULT: All inputs = 0
Page 38
Pacific Research
PET-820 User Manual
4.6.9 SELECT ADC MODE, SINGLE / DIFFERENTIAL ENDED INPUT
This feature allows the analog inputs to be used in a differential mode. Keep in mind that neither of the high or low input
signals should exceed 5.50 volts in reference to ground. (Refer to Figure 5.1 in this manual for information on connecting
signals for the differential mode).
At this point we advise not to use the differential mode because it has not been completely tested. This mode will be tested
and updated prior to the next software release.
COMMAND CODE:
PROGRAM SYNTAX:
READ BACK SYNTAX:
WHERE:
EXAMPLE:
DEFAULT:
78
78 [Data] #
78 #
Data = Zero or non zero, Zero = Single ended mode, Non Zero = Differential mode
78 1 # = Select differential ended input mode
0, Single ended
4.6.10 SELECT ADC MODE, HIGH / LOW RANGE
This feature allows you to select a voltage range to use for all input of the analog option. The high range is +/-4.095 volts in
1 millivolt increments and the low range is +/-0.4095 volts in 100 microvolt increments. Regardless of which range that is
used, do not supply an analog voltage greater than 5.50 volts to any of the inputs.
COMMAND CODE:
PROGRAM SYNTAX:
READ BACK SYNTAX:
WHERE:
79
79 [Data] #
79 #
Data = Zero (0) or Non Zero (1-9),
Zero = Low range +/- 0.4095 volts
Non Zero = High range +/- 4.095 volts
EXAMPLE: 79 1 # = Select low range
DEFAULT: 1, High range
4.6.11 ANALOG TO DIGITAL CONVERTER INITIALIZATION
This command will reinitialize only the systems characteristics relating to the analog input option. The reset values are the
original factory default settings. Caution when using this command, any changes to the operation of the analog input option
or new characteristics that have been stored will be lost. In order to operate this command the user must include the unit
serial number. This is a 8 digit number that is identified on top of the program EPROM and on the back side of the circuit
board. The program authorization is not required to execute this command. Caution should be taken in identifying to
unqualified users the unit serial number and use of this command.
COMMAND CODE: 84
PROGRAM SYNTAX: 84 [Serial No.]
4.6.12 ANALOG SCALING (ENGINEERING UNITS)
This feature has been provided for the purpose of scaling an analog input value to engineering units or some meaningful data
for the user. As an example, an output from a pressure transducer may range from 0 to 1.00 volt indicating 0 to 200.0 PSI.
By properly setting the factorial, decimal point position, round off point, and identifier the PET-820 will now read this value
as "Zero point Zero P S I" through "Two hundred point zero P S I". The following commands in this sub section may be used
to set up engineering units to fit your application.
Page 39
Pacific Research
4.6.12.1
PET-820 User Manual
SET OFFSET VALUES
This command may be used to add or subtract a value or voltage from the analog to digital converter in order to set a zero
point for your scaled reading. We recommend that when setting this value, you establish an analog input voltage that
represents a zero value within your scale. Using command code 63 to read the current analog voltage, add or subtract an
equal value from this reading to set a zero value (the offset will only effect command code 67, the scaled value). When
programming the offset, you may use any ADC value in millivolts or 100 microvolt depending on the analog scale selected.
COMMAND CODE:
PROGRAM SYNTAX:
READ BACK SYNTAX:
WHERE:
56
56 [Input] [Sign] [Data] #
56 [Input] #
Input = 1 through 8
Sign = Zero or Non Zero,
Zero = negative (subtract), Non Zero = positive (add)
Data = 0000 through 4095, the analog converter value
EXAMPLE: 56 1 0 2000 # = Subtract 2000 from the ADC value input #1, 2.000 volts
or 0.2000 volts depending on the range selected
DEFAULT: All inputs = 0000
4.6.12.2
SET FACTORIAL VALUES
A factorial value is a positive integer that is multiplied with the ADC value in order to setup a volts per scaled unit. You then
use the decimal point position command in order to create a decimal value of this integer. The equation that is performed in
software is:
ADC VALUE: (ADC+OS) * FACT = RESULT, THEN DECIMAL ADJUST
ADC = Analog to Digital Converter value
OS = OFFSET
FACT = FACTORIAL
As an example, if the transducer that you had connected to the analog board had an output of 2.500 volts which represented
300.0 scaled units and assuming that 0.0 volts represented 0.0 scaled units. We would normally multiply the 2.500 volts by
120 in order to get 300.0 scaled units. With the PET-820, you must first convert your analog voltage to the correct ADC
count, in this case 2500, and multiply that value by 1200 (which is the same as 120.0). The result will be an integer of
3,000,000 or 300.0000 if the decimal point was 4 places to the left. Now to place your decimal point in the proper position,
you count the total number of digits right of the decimal point that were used in the original values. In this case 2.500 used 3
and 120.0 used 1 for a total of 4 which is programmed at the next command code (decimal point position). If you had chosen
a factorial value of 0120 than a value of 3 would have been programmed for the decimal point position, except this would
have left one less digit right of the decimal point in your result. The following table provides examples of different values
that can be used to solve the appropriate conditions.
------ Analog voltage -----Zero scale
Full scale
ADC
value
ADC
range
Offset
value
Fact.
value
D.P.
pos.
+0.1010 +0.3010 3010
LOW
-0.000
+1.225
-0.000
+1.225
-2.335
-3.335
-0110
1225
1225
3335
0862
HIGH
HIGH
HIGH
5
+0000
+0000
+2335
2
0816
0816
0770
+25.00
6
2
4
1
4
3
Page 40
Round
off
Full scale
units
+1.00
+100.0
-77.000
Pacific Research
PET-820 User Manual
The following list are items to consider while you are setting up values for the purpose of scaling.
1.
Use the offset value to set a zero point, remember that if your span was 2.000 volts (-1.000V to +1.000V) and you
want to offset the -1.000V to 0.000V. Adding 1.000V to the ADC value will still have a span of 2.000 volts
(0.000V to +2.000V).
2.
Pay attention to high and low range mode of the ADC, this will effect the decimal point position.
3.
To divide an ADC value, use a factorial value less than one. This is done by increasing the decimal point position so
that the factorial value becomes a 0.XXXX value.
4.
If the sign identifier is disabled, keep in mind that -0.1 and +0.1 will now appear to have the same value "zero point
one".
COMMAND CODE:
PROGRAM SYNTAX:
READ BACK SYNTAX:
WHERE:
57
57 [Input] [Data] #
57 [Input] #
Input = 1 through 8
Data = 0000 through 2047
EXAMPLE: 57 1 1200 # = Multiply analog input #1 value by 1200
DEFAULT: All inputs = 1000
4.6.12.3
SET DECIMAL POINT POSITION
The decimal point position is used to convert the scaled integer value to a decimal value. When the PET-820 multiplies the
ADC and factorial values, the result is returned as an integer. To convert this integer to a decimal value you must define the
decimal point position. This is done by counting the total number of digits right of the decimal point that were used in the
ADC and factorial values. (For more detailed information on this procedure, please refer to section 4.6.12.2 Set Factorial
Values).
COMMAND CODE:
PROGRAM SYNTAX:
READ BACK SYNTAX:
WHERE:
58
58 [Input] [Data] #
58 [Input] #
Input = 1 through 8
Data = 0 through 7
EXAMPLE: 58 1 4 # = Set the decimal point position 4 digits to the left
ADC + offset = 0345 (0.345), decimal point position = 3
Factorial = 0255 (25.5), decimal point position = 1
Then 0345 X 0255 = 87975 with a decimal point position of 4 the result would be 8.7975
DEFAULT: All inputs = 6
Page 41
Pacific Research
4.6.12.4
PET-820 User Manual
SET DECIMAL POINT ROUND OFF
The decimal point round off is used to define the number of digits right of the decimal point that will be used when reading
the scaled analog units.
COMMAND CODE:
PROGRAM SYNTAX:
READ BACK SYNTAX:
WHERE:
59
59 [Input] [Data] #
59 [Input] #
Input = 1 through 8
Data = 0 through 7
EXAMPLE: 59 1 2 # = Set the decimal point value to round off input #1
two positions right of the decimal point
DEFAULT: All inputs = 3
4.6.12.5
ENABLE SIGN FOR ANALOG SCALED VALUES
This command allows you to enable the positive or negative sign for use in the analog scaled values. If the sign is disabled,
the word "positive" or "negative" will not be spoken as part of the scaled analog value.
COMMAND CODE:
PROGRAM SYNTAX:
READ BACK SYNTAX:
WHERE:
68
68 [Input] [Data] #
68 [Input] #
Input = 1 through 8
Data = Zero (0) or Non Zero (1-9), Zero = disable, Non Zero = enable
EXAMPLE: 68 1 0 # = Disable the sign information for scaled analog input #1
DEFAULT: All inputs = Non Zero, Enable
4.6.12.6
CHANGE SPEECH IDENTIFIER FOR ANALOG SCALED VOLTAGES
The identifier is a group of one to four words that can be added to the end of the scaled analog value to identify the type of
units being measured. An example would be, PSI, Fahrenheit, Celsius, Feet, Volts, Watts, Etc. The identifier is programmed
as a single group of words, which is not in the same manner that you would program the speech message buffer. The
identifier does not require an end character or a pause.
COMMAND CODE:
PROGRAM SYNTAX:
READ BACK SYNTAX:
WHERE:
69
69 [Input] [Word] <Word> <Word> <Word> #
69 [Input] #
Input = 1 through 8
Word = 000 through 255
EXAMPLE: 69 1 064 062 059 # = The identifier for input #1 is "R P M"
69 1 111 126 # = The identifier for input #1 is "Degrees Fahrenheit"
DEFAULT: All inputs = 245 "VOLTS"
Page 42
Pacific Research
PET-820 User Manual
COMMUNICATION
5.0
COMMUNICATION
The PET-820 is equipped with the latest technology in digital speech synthesis capable of reporting a different alarm
condition for each loop circuit. The PET-820 can dial up to ten different 32 digit telephone numbers using either rotary dial
pulse or touch-tone dialing.
Multiple PET-820s can be connected to a single telephone line or twisted pair of wires. The access to only one of the units is
then done by issuing the designated unit's Password. It should be noted that telephone and ringing voltages are not required
in order to operate the unit.
This section includes a detailed description of the communication programmable features and operations. Reference
SECTION 4.0 and APPENDIX B for a full listing of the communication programming commands.
5.1
SPEECH COMMUNICATION PROTOCOL
The PET-820's speech synthesizer is the principal means for the PET-820 to communicate with the user. This
communication occurs during the command mode, programming mode and alarm mode. In the command and programming
mode, speech is used to respond to the data input sent by the user. In the alarm mode, speech is used to identify the source of
the alarm. The following is a brief description of what you should expect when communicating with the PET-820.
5.1.1 SIGN ON MESSAGE
After the PET-820 has counted the pre-programmed number of rings, it will pick up the receiver (Off Hook) and respond with
the appropriate pre-programmed message "P E T eight twenty" or, if RAM / RTC option has been installed, the message will
be "Good Morning/afternoon/evening the time is (current time) on (current date)". These messages are programmable,
reference SECTION 4.0 for more information on changing this message.
5.1.2 CONTROL AND PROGRAMMING MODE
When the proper command is sent for controlling and programming the PET-820, a voice response (referred as READ BACK
in this manual) of the current or most recently changed date will occur. When the format or data within a command is
incorrect, the PET-820 will not respond, this was done as not to encourage unauthorized use of the system. Reference
SECTIONS 3.0 and 4.0 for more information on the READ BACK format.
5.1.3 ALARM MODE
Once the PET-820 has been armed and an alarm condition occurs, the PET-820 will go OFF HOOK and dial the
preprogrammed telephone number. When the dialing is finished there will be a pause before the first message is sent. The
PET-820 will repeat this message for the preprogrammed number of times before it gives up and hangs up the phone. This
delay and message repeat should allow the user enough time to identify the message and disarm the unit. All of the
parameters and messages described here-in are programmable, reference SECTION 4.0 for more information on
programming these parameters.
Page 43
Pacific Research
PET-820 User Manual
5.1.4 DIAL AND COMMUNICATION DELAYS
The PET-820 allows for delays before going OFF HOOK, dialing a telephone number and begins communication of the alarm
message. These delays are designed to allow time for disabling the PET-820, dial tone, telephone network connection and
ringing. Each of these delays are programmable, reference SECTION 4.0 for more information on programming these
parameters.
5.2
DTMF COMMUNICATION PROTOCOL
The DTMF protocol was designed for use with the Remote Control Panel, details of this protocol are listed in the User
Manual for this unit. For more information on the Remote Control Panel, you should contact your local dealer or Pacific
Research.
5.3
SERIAL COMMUNICATION PROTOCOL
If the PET-820 includes the optional RS-232
serial port, you can connect the system to a
terminal or printer to be used in configuring
the system or monitor status information.
For additional information on connecting
the serial port, refer to figure-5.1. The
serial port connector uses the same pin
assignment standards as a PC, using a
standard serial printer cable should be
adequate in most all applications. If you
plan on building your own cable, note that
for most all application the only connections
that are required are TX Data, RX Data and
Ground.
FIGURE - 5.1
Page 44
Pacific Research
PET-820 User Manual
5.3.1 SERIAL COMMAND MODE
The serial command mode operates much in the same manner as the Touch-Tone command mode when entering data. Refer
to sections 3 and 4 for detailed operations. When a terminal is first connected to the PET-820, the system in not in the
command mode. To enter into the command mode, use ^C (Control+C). To exit the command mode use the Escape key.
When the command mode is entered the PET-820 will return with a sign-on message and a prompt to enter a command. All
serial command use a two digit number, the same as used for the Touch-Tone commands. The main difference is that you
only enter the two digit command and the PET-820 will prompt you for data. The serial command mode will also respond to
two letters commands. Rather than detailing each of these commands, if you enter the command "HP" (Help).
The PET-820 will list all of the two letter command and there descriptions
5.3.2 SERIAL STATUS MODE
The serial status mode, when enabled by command "55" will set the PET-820 to output status information with date and time.
This information can be used the determine the internal operation of the system. This information can be valuable for
monitoring system operation and debugging. When the serial command mode is enabled, the status mode will temporarily
disable. Once the command mode is ended the status mode will re-enable.
5.4
RADIO INTERFACE PROTOCOL
The radio interface works in the same manner as the telephone interface except that the PET-820 provides for a Push To Talk
(PTT) and Carrier Operated Switch (COS) signals to operate a standard 2-WAY radio. Instead of a telephone ring signal, the
user is required to send the Password in order to gain access into the system. When this protocol is selected, do not connect to
a telephone line except to make changes in programming if required. The PET-820 is not set up to communicate over both
telephone and radio at one time. But you can still use the telephone communication for programming, when the radio is not
in use. The main difference is that when an alarm is detected the unit will not try to sent the alarm via the telephone but only
the radio. However when the telephone mode is selected the PET-820 will operate the PTT any time there is a speech
message to send. For additional information on wiring this feature refer to figure 6.4.
The PTT and COS input/output are both 5 volt logic levels. The PTT goes high (+5 volt out) when the PET-820 wants to key
the radio transmitter, this output is capable of driving 1 mA load. The COS is active (+5 volt in) when a signal is present on
the radio receiver. The COS signal is only required when you don't want the PET-820 to transmit when the radio receiver
has detected an active signal.
5.5
TELEPHONE COMPANY INFORMATION
In compliance with the requirements of Part 68 of the FCC Rules and Regulations for connection of a terminal system (this
device is classified as terminal system) to the telephone network and for your convenience, the following information is
presented.
The telephone company may make changes to it's communication facilities, equipment, operations or procedures, where such
action is reasonable and required in it's business and is not consistent with the rules and regulations in FCC Part 68 of the
FCC Rules and Regulations. If such change can be expected to render the PET-820 incompatible with the telephone company
facilities, the telephone company shall give it's customers adequate notice to make modifications to maintain uninterrupted
service.
Page 45
Pacific Research
PET-820 User Manual
5.5.1 TELEPHONE COMPANY REQUIREMENTS
All connections to the telephone network must be made through standard plugs and standard telephone company jacks, or
equivalent, in such a manner as to allow for easy and immediate disconnection of the terminal equipment. If the PET-820 is
unplugged from the jack, this should not interrupt any other equipment still connected to the telephone network. Before
connecting the PET-820 to the telephone network, the telephone company must be notified for the installation of an Universal
Service Order Code (USOC) RJ38X jack. See figure 6.3 for correct wiring of the RJ38X jack.
The FCC prohibits customer provided terminal equipment to be connected to party lines or to be used in conjunction with
coin telephone service.
5.5.2 MALFUNCTION OF EQUIPMENT
In the unlikely event that the PET-820 should ever fail to operate properly, it should be disconnected from the RJ38X jack to
determine if the problem is with the telephone network or with the PET-820. If a problem is found with the PET-820, leave it
disconnected until repaired or replaced.
Page 46
Pacific Research
PET-820 User Manual
EQUIPMENT INSTALLATION
6.0
INSTALLATION
The PET-820 was designed for wall mount installation. The enclosure is water resistance and provides conduit connections
for the wiring. This section will detail all necessary connection and mounting precautions.
6.1
PLANNING THE INSTALLATION
The first step in the installation is planning the job. Programming can be minimized by analyzing the job requirements and
comparing these with the factory default settings. Use "APPENDIX B" to aide in the system design. Use this guide to decide
what characteristics you want for each loop circuit and how the overall system shall respond. Before making connections,
draw a rough sketch of the individual circuits and how they may operate.
6.2
INSTALLATION CONSIDERATIONS
Avoid installing the PET-820 in the following places. Doing so may result in malfunction or noise to the system.
1.
In direct sunlight and hot, cold or humid places. The temperature range should be from 32 degrees Fahrenheit to
110 degrees Fahrenheit.
2.
Sulfuric gases produced in areas where there are thermal springs, etc. may damage the equipment or contacts.
3.
Places in which shock or vibration are frequent or strong.
4.
Near high frequency electronic welders.
5.
Near radio broadcast antennas.
6.
Install at least 8 ft. from radios and televisions.
6.3
MOUNTING
The wall where the PET-820 is to be mounted, must be able to support the weight of the PET-820. If screws other than the
ones supplied are used, make sure to use the same size screws as supplied with the system.
Three mounting holes are provided in the PET-820 enclosure. Top center has a sealing plug provided. The lower two holes
are isolated for improved sealing.
6.3.1 TO WALL MOUNT
1.
Place the template (included in "Appendix-D") on the wall and mark the three screw positions.
2.
Install the top middle screw so that the head is 1/16" to 1/8" from the wall.
3.
Remove the terminal cover, this is the lower cover that is held on by two screws. Hook the PET-820 on the first
screw already installed.
4.
Finish mounting the PET-820, using the lower two holes on the left and right side of the terminal compartment.
Page 47
Pacific Research
PET-820 User Manual
6.3.2 TO MOUNT ON CONCRETE OR MORTAR WALLS
1.
Place the template (included in "Appendix-D") on the wall and mark the three screw positions.
2.
Drill three holes and drive the anchor plugs (included) with a hammer, flush to the wall.
3.
Install the top middle screw into the anchor plug so that the head is 1/16" to 1/8" from the wall.
4.
Remove the terminal cover, this is the lower cover that is held on by two screws. Hook the PET-820 on the first
screw already installed.
4.
Finish mounting the PET-820, using the lower two holes on the left and right side of the terminal compartment.
6.4
CONNECTIONS
There are six 1/2" conduit knockouts, three on the bottom and three on the back, provided in the PET-820 enclosure. Before
punching out these knockouts, you should remove the front panel and circuit board or boards from the enclosure as not to
damage them. The main circuit board will rotate out of the enclosure without force. Make sure the enclosure is on a flat and
solid surface. Using a punch and hammer tap on the inside edges of the knockout plug until it is removed. Once this is done
the circuit board and panel may be replaced.
When connecting conduit to the PET-820 enclosure, use only U.L. LISTED or recognized conduit hubs that have a minimum
of NEMA 12 type rating, same as the enclosure. Conduit hubs must be connected to the conduit before being connected to the
enclosure.
Refer to figure 6.1 for additional information on connections.
1.
Attach an earth ground wire minimum 18 gauge to the PET-820 terminal 22. Although a ground terminal is
provided on the three prong line cord, a direct connection to a ground rod is preferred. Do not use conduit, gas or
water pipe. A good earth is required in order for transient protection to be effective.
2.
Direct wire or connect the three prong line cord white wire (NEUTRAL) to terminals 21 and the black wire (LINE)
to terminal 20, do not plug in the line cord or connect AC power at this time.
3.
Turn the power switch off. The switch is located behind terminal 20, 21, and 22.
4.
If 12VDC operation is intended, make sure the power switch is off and connect the positive battery terminal to the
PET-820 terminal 23 and the negative battery terminal to PET-820 terminal 24.
5.
Connect the telephone line, loop circuits and relay contacts as required per your installation planning.
6.
Verify that the program enable switch, right of the power switch is off.
7.
Connect AC power or plug in three prong line cord.
8.
Turn on the power switch.
Page 48
Pacific Research
PET-820 User Manual
6.4.1 ANALOG INPUT CONNECTIONS
The following section outlines connections that are importation to the analog option. If your unit dose not contain this
option, skip to section 6.5 . The maximum voltage that to be applied to any one of the analog inputs should not exceed
±5.50 volts. Make sure that the your voltage source can not go beyond these limits. Refer to figure 6.2 for additional
information on connections.
1.
Turn off the power switch.
2.
Connect analog signal to their appropriate input channels.
3.
Connect all un-used analog inputs to ground. The ground terminals are 2, 5, 8, and 11.
4.
Make sure that all analog signals that you have connected, can not swing beyond +/-5.50 volts.
5.
Turn on the power switch and you are now ready to use the analog input option.
6.5
PROGRAMMING CHANGES
Using your installation planning and the tables in "APPENDIX B". Establish contact with the PET-820, send the password
and program authorization code. By using the programming tables located in "APPENDIX B", go through each of the items
that require changes and make them accordingly.
6.6
GENERAL SYSTEM TESTING
1.
Once programming has been completed, re-establish communication with the PET-820 and arm the system. If an
error message occurs, the message will identify the loop circuit in which the error occurs. Trouble shoot your
connections in order to delete the error. Re-arm the PET-820 and end communication with the PET-820.
2.
Force an alarm condition, by shorting or opening the appropriate loop circuit as required to simulate an alarm
condition.
3.
Check for the end result of the alarm, whether it has been a telephone that has been dialed or relay contact that
closes. Either way, confirm that the system responded according to your programming plans.
Page 49
Pacific Research
6.7
PET-820 User Manual
CALIBRATION, ANALOG INPUT OPTION
Calibration adjustments to the analog input option are done via the two potentiometers located on the analog board (reference
Figure 6.2 for information on the location of these two adjustments). In order to make these adjustments, you will need a
precision voltage source or an adjustable voltage source and a volt meter with a minimum of 4 1/2 digits of resolution.
First we will check and adjust the low range, then repeat the same procedure for the high range using a higher voltage.
1.
Disconnect all analog signals that are connected to the analog board and connect your voltage source, channel 1 of
the analog board. Turn power to the PET-820 on and make sure the unit is not armed.
2.
Set the precision voltage source to +0.4000 volts. Other lower voltages may be used, but try to use the highest voltage
to +0.4000 volts as possible. If you don't have a precision voltage source, than set the adjustable voltage source to
+0.4000 volts using your volt meter.
3.
Set the PET-820's ADC mode to low range using programming command code "790#"
4.
Using command code 621#, read the analog voltage at channel 1 and adjust R13, low range adjust shown in Figure
6.2 until the unit speaks the same voltage that is being applied to the input.
5.
Now you are ready to adjust the high range. Re-adjust the voltage source to +4.000 volts or as close as you can.
6.
Set the PET-820 ADC mode to high range using programming command code "791#".
7.
Using command code 621#, read the analog voltage at channel 1 and adjust R11, high range adjust shown in Figure
6.2 until the unit speaks the same voltage that is being applied to the input.
8.
Re-set the PET-820's ADC mode to the original range and re-connect all of the analog signals. This completes the
procedure
Page 50
Pacific Research
PET-820 User Manual
FIGURE - 6.1
Page 51
Pacific Research
PET-820 User Manual
FIGURE - 6.2
Page 52
Pacific Research
PET-820 User Manual
FIGURE - 6.3
FIGURE - 6.4
Page 53
Pacific Research
PET-820 User Manual
TROUBLESHOOTING
7.0
STANDARD TROUBLESHOOTING
This section provides procedures to solve some common problems that may occur with the PET-820.
PROBLEM
SOLUTION
Operate LED flashing
The program is not running, this will occur because of low AC line voltage or low battery
voltage, the PET-820 should operate down to 90 Volts AC. If the unit has adequate voltage,
there may be some type of hardware failure.
The unit is not recognizing the Password that is being sent, this can occur because of an error in
sending the Password or the system Password was accidentally changed. In order to get to a
known Password the system EEPROM will need to be re-initialized, see programming command
code "81". When initializing the EEPROM all prior changes to the system characteristic will be
lost.
The connection to the telephone line may be to the wrong terminals, reference the installation
section of manual.
Unit answer, Dose not
except the Password
Unit detect ring, tries to
answer and then
communication is lost
Unit dose not answer.
Unit dose not respond to
an alarm input.
Alarm or sign on
message confusing or
incorrect.
Unit responds to false
alarms.
7.1
Make sure that the status LED is flashing red during ringing, if not then check the telephone
connections. Make sure that the program switch is on and wait for a minimum of 16 rings.
Once the unit has answered then check the ring counter value, program command code "27",
and reset to a desired value.
One of the inputs may be turned off or improperly configured, check there status, operate
command code "04". Also check there configuration, programming command codes "30"
through "36".
This may occur due to the message assignments or bad data in the RAM. First check the
messages and their assignments, programming command codes "24" through "26". If the
message data is bad, you can reset to the factory default data by using programming code "80".
Re-evaluate the loop response timer values and the type sensor that are connected to each loop,
you may try to increases the loop response time in order to ignore unwanted contact closures.
ANALOG INPUT OPTION TROUBLESHOOTING
This section provides procedures to solve some common problems that may occur with the PET-820.
PROBLEM
SOLUTION
Unit does not respond to
an alarm input.
Alarm or sign on
message confusing or
incorrect.
Unit responds to false.
One of the inputs may be turned off or improperly configured. Check their status with
programming command codes "70" through "77".
This may occur due to the message assignments or bad data in the RAM. First, check the
messages and their assignments (programming command codes "24", "26", and "76"). If the
message data is bad, you can reset to the factory default data by using programming code "80".
Re-evaluate the integrate rate values and the type of sensors that are connected to each input, you
may try to increases the integrate rate in order to ignore unwanted noise.
Page 54
Pacific Research
PET-820 User Manual
GLOSSARY AND WARRANTY REPAIR
8.0
GLOSSARY
ADC: Analog to Digital Converter, this is a device or circuit that converts an analog voltage to a digital number.
ANALOG: A voltage that has multiple or dynamic levels with in a given range.
CLEAR: Aborts a function before it is completed, to allow the user to start over again.
DEFAULTS: Pre-set values that define the system characteristics. A default is the value that the unit is set to when
supplied from the factory.
DIFFERENTIAL ENDED: A signal where neither side of the connection may be at zero volts. The equipment typically
will measure the voltage between the two connections and not ground.
DIAL PULSE: Used by older telephone system for dialing. This is a method where the hook switch is pulsed on and off.
These pulses are then counted by the telephone to determine the telephone number being dialed.
DISABLED: Turned off or not active.
DTMF: Dual Tone Multi Frequency. Used by telephone systems for dialing, also referred to as Touch-Tone.
EEPROM: A special type of non-volatile memory that retains its programming information without power.
ENABLED: Turned on or active.
ENTER: Identifies the end of a string of digits for entry of information.
INITIALIZE: To set up the minimum data requirement for the system.
INTEGRATE: A method of filtering an analog voltage where a quick change on the input of the integrator results in a
slower change on its output.
KEY CODE: A programmable code that is used with a command code to provide security of the command codes.
LOOP CIRCUIT: A circuit that may have normally open or normally closed, or a combination of both types of contacts
that identify a failure or change in the operating status of the equipment or process in which you wish to monitor.
LOOP RESPONSE TIME: The amount of time that a loop circuit has to remain violated in order to cause an alarm.
NEXT DATA: Information that is used to program or change the operating characteristics of the system.
OFF HOOK: When a telephone receiver is picked up or removed from the hook switch, this is termed as off hook.
ON HOOK: When a telephone receiver is hung up or returned to the hook switch, this is termed as on hook.
OPERATE COMMAND CODE: An instruction that tells the system to perform a function.
PASSWORD: A system access code that is used to secure access to all functions of the PET 820.
Page 55
Pacific Research
PET-820 User Manual
PROGRAM AUTHORIZATION CODE: A programmable code that allows access to programming or changing
characteristics of the system.
PROGRAM COMMAND CODE: A code that identifies the feature or function in which you wish to alter.
RAM: Random Access Memory. This is a type of computer memory that is used to store both temporary and long term
data. In the PET-820, this memory is battery backed which means that when the power is removed the, the system will still
retain its data.
READ BACK: A voice response from the PET-820 due to an operation from the user.
RTC: Real Time Clock. This is a hardware function separate form the microprocessor which keeps track of time and date.
Time and date could tracked by the microprocessor, but power would have to be maintain on the system in order not to lose
time. In the PET-820, the RTC is powered by a battery so that the time and date will not be loss.
SINGLE ENDED: A signal where one side of the connection is at zero volts and can be connected to ground. The
equipment will measure the other connection's voltage in reference to ground or zero volts.
SYNTHESIZED SPEECH: A method of generating synthetic speech, typically from some type of computer or
microprocessor.
TOGGLE: To change state, turns on if off or turns off if on.
TOUCH TONE: Used by telephone systems for dialing a telephone number.
Page 56
Pacific Research
PET-820 User Manual
LIMITED WARRANTY
PACIFIC RESEARCH will repair this product with new or rebuilt parts free of charge in the United States for a period of 1
year from the date of the original purchase, in the event of a defect in the material or workmanship.
This warranty is extended only to the original purchaser. A purchase receipt or other proof of date of original purchase will be
required before warranty performance is rendered. This warranty only covers failures due to defects in materials or
workmanship which occurs during normal use. It does not cover damage which occurs in shipment or failures which are
caused by products not supplied by PACIFIC RESEARCH or failures which result from an accident, misuse, abuse, neglect,
mishandling, misapplication, alteration, faulty installation, modification, or serviced by anyone other than PACIFIC
RESEARCH or authorized service centers of PACIFIC RESEARCH or damage that is attributed to ACTS OF GOD.
If a problem with the product develops during the warranty period, you may contact your dealer. If the problem is not
handled to your satisfaction, you may contact us in writing at:
PACIFIC RESEARCH
3050 Estepa Dr.
Cameron Park, CA 95682
Customer Service Dept.
Tel: 916.672.9053
Fax: 916.672.8749
email: [email protected]
fttp://www.pacres.com
LIMITS AND EXCLUSION
There is no other expressed warranty except as listed above. PACIFIC RESEARCH is not liable for indirect incidental or
consequential damages in connection with the use of this product including but not limited to, any cost or expense of
providing substitute equipment or services during period of malfunction or non-use and or, any destruction to and or loss of
property or bodily injury.
This warranty gives you specific legal rights and you may have other rights which vary from state to state.
Page 57
Pacific Research
PET-820 User Manual
OPERATE COMMAND TABLE
Command
Code
60
61
00
01
Command Description
Password
See programming table for default values
Program Authorization Code (PAC)
See programming table for default values
End telephone communication
61 [PROGRAM AUTH] #
00 #
06
Arm / Disarm system
Data = 0 (Disarm), 1 (Arm), None (Toggle)
Read back loop circuit status
Loop = 1 through 8
Read Back last alarm status
Date and time is included if RAM/RTC has been installed
Turn loop ON/OFF for alarm output
Loop = 1 through 8, Data = Zero (Off) / Non Zero (On)
Monitor mode ON / OFF
Data = Zero (Off) / Non Zero (On)
N/A
07
N/A
08
N/A
09
Relay and digital output control
R/D = 0 (Relay) / 1 (Digital), Data = Zero (Off) / Non Zero (On)
ADC OPTION: Read ADC input value directly
Input = 1 through 8
ADC OPTION: Read ADC integrated value
Input = 1 through 8
ADC OPTION: Read high (maximum) value
Input = 1 through 8
ADC OPTION: Read low (minimum) value
Input = 1 through 8
ADC OPTION: Read analog scaled value
Input = 1 through 8
02
03
04
05
62
63
64
65
67
#
*
[ ]
< >
=
=
=
=
Command
Syntax
60 [PASSWORD] #
ENTER, END OF COMMAND STRING
CLEAR, START COMMAND OVER AGAIN
PROMPTS USER FOR MISSING PARAMETERS
PROMPTS USER FOR OPTIONAL PARAMETERS
Page 58
01 [KEY CODE] <DATA> #
02 [KEY CODE] <LOOP> #
03 [KEY CODE] #
04 [KEY CODE] [LOOP] [DATA] #
05 [KEY CODE] <DATA> #
09 [KEY CODE] [R/D] [DATA] #
62 [INPUT] #
63 [INPUT] #
64 [INPUT] #
65 [INPUT] #
67 [INPUT] #
Pacific Research
PET-820 User Manual
PROGRAMMING TABLE
Command
Code
10
11
12
13
14
15
16
17
18
19
20
21
22
23
24
25
26
27
28
29
Programming Command Description
Command
Syntax
10 [DATA] #
Set loop response time #1
40 Milliseconds to 10.2 Seconds, 001 = 40 mS
Set loop response time #2
11 [DATA] #
40 Milliseconds to 10.2 Seconds, 025 = 1000 mS (1 Sec)
Change PAC (Program Authorization Code)
12 [DATA] #
1 to 6 Digits
Change Operate Key Code
13 [DATA] #
1 to 6 Digits
Change Password
14 [DATA] #
1 to 6 Digits
Change unit address
15 [DATA] #
1 to 4 Digits
Set arm delay
16 [DATA] #
000 to 255 Seconds
Set telephone dial delay after alarm
17 [DATA] #
000 to 255 Seconds
Set alarm cutoff
18 [DATA] #
000 to 255 Seconds
Set alarm delay
19 [DATA] #
000 to 255 Seconds
Set password error counter
20 [DATA] #
00 to 15 Errors, 00 = Disable counter
Set communication dial attempts
21 [DATA] #
00 to 15 Attempts, 00 = No communication attempts
Set telephone number 1
22 [DATA] #
1 to 32 Digits
Set telephone number 2
23 [DATA] #
1 to 32 Digits
Select speech message buffer to update
24 [DATA] #
Buffer address 00 through 15
Change speech message data
25 <WORD ADDRESS> [WORD] #
Word Address 00 through 15
Word 000 through 255
Select sign on message
26 [DATA] #
Message buffer 00 through 15
Set ring counter for off hook
27 [DATA] #
00 to 15 Rings
00=Disable counter or 15 rings with program switch on
Select alarm message delay
28 [DATA] #
Select 0 to 3, 0=None, 1=5 Sec., 2=15 Sec., 3=30 Sec.
Reserved for future use
Revised 10/13/92
Page 59
Factory
Setting
001
40 mS
025
1000 mS
987654
11
321
0000
015
Seconds
005
Seconds
030
Seconds
015
Seconds
02
Errors
08
Attempts
None
None
00
Buffer 0
See Section
4.4.15
02
Buffer 2
04
Rings
1
5 Seconds
New
Setting
Pacific Research
PET-820 User Manual
PROGRAMMING TABLE
Command
Code
30
31
32
33
34
35
36
Programming Command Description
LOOP CONFIGURATION: Input normal state
Select 0 to 3
0=Disable input
1=Normaly Closed,
2=Normaly Open
3=Resistor Supervised
LOOP CONFIGURATION: Select alarm delay
ZERO or NON-ZERO, 0=No delay, 1=Alarm delay
LOOP CONFIGURATION: Alarm relay output
ZERO or NON-ZERO, 0=No delay, 1=Alarm delay
LOOP CONFIGURATION: Telephone number access
Select 0 to 7
0=None
1=Number 1
2=Number 2
3=Number 1 and 2,
4=8 Number log
5=Number 1 and log
6=Number 2 and log
7=Number 1, 2 and log
LOOP CONFIGURATION: Select response time
ZERO or NON-ZERO
0=Response time 1, 1=Response time 2
LOOP CONFIGURATION: Select alarm message
Message buffer 00 through 15
LOOP CONFIGURATION: Select monitor output
Select 0 to 3
0=No access
1=Relay output
2=Digital output
3=Both outputs
Command
Syntax
30 [LOOP] [DATA] #
Factory
Setting
2
N.O.
31 [LOOP] [DATA] #
0
No delay
0
No delay
1
32 [LOOP] [DATA] #
33 [LOOP] [DATA] #
34 [LOOP] [DATA] #
35 [LOOP] [DATA] #
0
Response
time 1
08-15
36 [LOOP] [DATA] #
0
New
Setting
LOOP CONFIGURATION PROGRAMMING TABLE
Command
Code
30
Programming Command
Description
Input normal state
1
2
3
New Loop settings
4
5
6
7
8
Factory
Setting
2
31
Select alarm delay
0
32
Alarm relay output
0
33
Telephone number access
1
34
Select response time
0
35
Select alarm message
08-15
36
Select monitor output
0
Revised 10/13/92
Page 60
Pacific Research
PET-820 User Manual
PROGRAMMING TABLE
Command
Code
37
38
39
40
41
42
43
44
45
46
47
48
49
50
51
52
53
54
55
56
57
58
59
Programming Command Description
Set telephone number into eight number log, RAM option
Select log position 1 through 8
Telephone number 1 to 32 digit
Delete number from eight number log, Ram option
Select log position 1 through 8
Set day of week, RTC option
Select 1 to 7, 1=Sunday, 2=Monday, 3=Tuesday
4=Wednesday, 5=Thrusday, 6=Friday, 7=Satderday
Alarm communication type
Select 0 to 3, 0=None, 1=DTMF, 2=Speech, 4=Modem
Program communication
Select 0 to 3, 0=None, 1=DTMF, 2=Speech, 4=Modem
Radio interface enable
ZERO or NON-ZERO, 0=Telephone, 1=Radio
Enable local ARM/DISARM control
ZERO or NON-ZERO, 0=Disable, 1=Enable
Enable loop input 8, ARM/DISARM control
ZERO or NON-ZERO, 0=Disable, 1=Enable
Disable PassWord requirement
ZERO or NON-ZERO, 0=PW Required, 1=PW Disable
Enable pulsing alarm relay output
ZERO or NON-ZERO, 0=No pulsing, 1=Pulsing
Set telephone dial mode, DTMF/Dial Pulse
ZERO or NON-ZERO, 0=DTMF, 1=Dial Pulse
Set time, RTC option
Data format = HH MM A/P, 0=AM, 1=PM
Set date, RTC option
Date format = MM DD YY
Serial port baud rate
Select 1 to 6
1=300, 2=600, 3=1200, 4=2400, 5=4800, 6=9600
Reserved for future use
Reserved for future use
Reserved for future use
Reserved for future use
Serial port status output
ZERO or NON-ZERO, 0=Disable 1=Enable
ANALOG SCALING: Set ADC offset values
Select input 1 through 8
Select sign ZERO or NON-ZERO, 0-Neg, 1=Pos
Data = 0000 through 4095, ADC value
ANALOG SCALING: Set ADC factorial values
Select input 1 through 8
Data = 0000 through 2047
ANALOG SCALING: Set decimal point position
Select input 1 through 8
Data = 0 through 7, digits right of decimal point
ANALOG SCALING: Set decimal point round off value
Select input 1 through 8
Data = 0 through 7, digits right of decimal point
Revised 10/13/92
Page 61
Command
Syntax
37 [POS] [DATA] #
Factory
Setting
None
38 [POS] #
None
39 [DATA] #
Current
Day
40 [DATA] #
2
Speech
2
Speech
0
Telephone
1
Enable
0
Disable
0
Required
0
No pulsing
0
DTMF
Current
Time
Current
Date
6
9600
Baud
41 [DATA] #
42 [DATA] #
43 [DATA] #
44 [DATA] #
45 [DATA] #
46 [DATA] #
47 [DATA] #
48 [DATA] #
49 [DATA] #
50 [DATA] #
55 [DATA] #
56 [INPUT]
[SIGN] [DATA] #
0
Disable
0000
No offset
57 [INPUT]
[DATA] #
1000
58 [INPUT]
[DATA] #
6
59 [INPUT]
[DATA] #
3
New
Setting
Pacific Research
PET-820 User Manual
PROGRAMMING TABLE
Command
Code
60
61
62 - 65
66
67
68
69
70
71
72
73
74
75
76
77
78
79
80
81
82
83
84
Programming Command Description
Reserved for future use
Reserved for future use
See OPERATE COMMAND TABLE
ADC OPTION: Reset analog high and low values
Select input 1 through 8
See OPERATE COMMAND TABLE
ANALOG SCALING: Enable sign for analog scaled
values
Select input 1 through 8, Non Zero = Enable
ANALOG SCALING: Change speech identifier for analog
scaled values
Select input 1 through 8
Word = 000 through 255, String 1 to 4 words together.
ADC OPTION: Set upper analog alarm limit
Select input 1 through 8, Sign = Zero (neg)/Non Zero(pos)
Data = 0000 through 4096, ADC value
ADC OPTION: Set lower analog alarm limit
Select input 1 through 8, Sign = Zero (neg)/Non Zero(pos)
Data = 0000 through 4096, ADC value
ADC OPTION: Set input integrate rate
Data = 1 through 8
ADC OPTION: Enable input to trigger alarm
Select input 1-8, Data = Zero (disable)/Non Zero (enable)
ADC OPTION: Enable input to trigger alarm relay output
Select input 1-8, Data = Zero (disable)/Non Zero (enable)
ADC OPTION: Telephone number access
Select 0 to 7
0=None
1=Number 1
2=Number 2
3=Number 1 and 2,
4=8 Number log
5=Number 1 and log
6=Number 2 and log
7=Number 1, 2 and log
ADC OPTION: Select analog alarm message
Select input 1-8, Data = 00-15 (message buffer)
ADC OPTION: Select alarm delay for analog alarm
Select input 1-8, Data = Zero (no delay)/Non Zero (delay)
ADC OPTION: Select single/differential ended input
Data = Zero (single)/Non Zero (diff.)
ADC OPTION: Set analog high / low range
Select input 1-8, Data = Zero (low)/Non Zero (high)
Initialization of speech data, RAM/RTC Option
System EEPROM Initialization, This command does not
require Password of Program Authorization Code
Change direct byte in EEPROM
Address and data require 3 digit values
Demonstrate all words in speech library
ADC OPTION: Initialization ADC
Revised 12/14/94
Page 62
Command
Syntax
Factory
Setting
66 [INPUT] #
None
68 [INPUT]
[DATA] #
0
Enable
69 [INPUT]
[WORD]
<WORD>
<WORD>
<WORD> #
70 [INPUT]
[SIGN] [DATA] #
245
"Volts"
71 [INPUT]
[SIGN] [DATA] #
72 [INPUT]
[DATA] #
73 [INPUT]
[DATA] #
74 [INPUT]
[DATA] #
75 [INPUT]
[DATA] #
76 [INPUT]
[DATA] #
77 [INPUT]
[DATA] #
78 [DATA] #
79 [DATA] #
80 #
81 [SER. NO.] #
82 [ADDRESS]
[DATA] #
83 #
84 [SER. NO.] #
+4096
Limit
disabled
-4096
Limit
disabled
4
Readings
0
Disable
0
Disable
1
None
00
Message
0
No delay
0
Single end
1
High range
None
None
N/A
None
None
New
Setting
Pacific Research
PET-820 User Manual
ADC OPTION PROGRAMMING TABLE
Command
Code
56
70
Programming Command
Description
ANALOG SCALING:
ADC offset values
ANALOG SCALING:
ADC factorial values
ANALOG SCALING:
Decimal point position
ANALOG SCALING:
Decimal point round off value
ANALOG SCALING:
Enable sign for analog scaled values
ANALOG SCALING:
Speech identifier for scaled values
Upper analog alarm limit
71
Lower analog alarm limit
72
Input integrate rate
4
73
Enable input to trigger alarm
0
74
Enable input to trigger alarm relay
0
75
Telephone number access
1
76
Select analog alarm message
00
77
Select alarm delay for analog alarm
0
78
Select single/differential ended input
0
79
Set analog high / low range
1
57
58
59
68
69
1
2
3
New Analog settings
4
5
6
7
8
Factory
Setting
0000
1000
6
3
0
245
"VOLTS"
+4096
-4096
Revised 10/13/92
Page 63
Pacific Research
PET-820 User Manual
SPEECH LIBRARY
If your application requires words that are not listed in this manual, additional words and custom words are available from
the factory. Please contact the factory for more information on supplemental words.
The following include a full list of all words that are currently supplied with the PET-820 and a Speech Message Buffer
Programming Tables have been provided to assist you in setting up the system messages.
When setting up a message buffer, the message should start with a 750 mS pause (WORD ADDRESS 001) however this
pause is not required. The message buffer must always end with a End of Message (WORD ADDRESS 000). Each message
buffer is only 16 words long but if longer messages are required, then you can string message buffers together by not using an
end of message command word until the last buffer.
(1)
(1)
(1)
(1)
SPEECH COMMAND WORD
END OF MESSAGE
750 mS PAUSE
SPEAK TIME (HH:MM AM/PM)
SPEAK DATE (MM-DD-YY)
SPEAK BCD DATA, SUPPRESS LEADING ZERO (HTM)
SPEAK HEX DATA, NEXT BYTE = START POSITION
SPEAK ALARM STATUS LOOP NUMBER
SPEAK SYSTEM ADDRESS
SPEAK FROM INT RAM, 4 WORDS MAX (SP_BUFF)
GOOD MORNING/AFTERNOON/EVENING
N/A
SPEAK ALARM STATUS, ANALOG VOLTAGE
N/A
NULL WORD, USE TO CLEAR WORD OR FILL SPACE
SELECT SPEECH LIB, LOW WORD GROUP
SELECT SPEECH LIB, HIGH WORD GROUP
WORD
ADDRESS
000
001
002
003
004
005
006
007
008
009
010
011
012
013
014
015
These speech command words are typically used by the program and serve no practical use for user programmable
speech.
LOW WORD GROUP
WORD
ADDRESS
ZERO
016
ONE
017
TWO
018
THREE
019
FOUR
020
FIVE
021
SIX
022
SEVEN
023
EIGHT
024
NINE
025
TEN
026
ELEVEN
027
TWELVE
028
THIRTEEN
029
FOURTEEN
030
FIFTEEN
031
LOW WORD GROUP
WORD
ADDRESS
SIXTEEN
032
SEVENTEEN
033
EIGHTEEN
034
NINETEEN
035
TWENTY
036
THIRTY
037
FORTY
038
FIFTY
039
SIXTY
040
SEVENTY
041
EIGHTY
042
NINETY
043
HUNDRED
044
THOUSAND
045
MILLION
046
A
047
Page 64
LOW WORD GROUP
WORD
ADDRESS
B
048
C
049
D
050
E
051
F
052
G
053
H
054
I
055
J
056
K
057
L
058
M
059
N
060
O
061
P
062
Q
063
Pacific Research
LOW WORD GROUP
WORD
ADDRESS
R
064
S
065
T
066
U
067
V
068
W
069
X
070
Y
071
Z
072
ABORT
073
ABOVE
074
ADJUST
075
AIR
076
ALERT
077
ALL
078
AMPS
079
AND
080
ANSWER
081
AREA
082
AT
083
AUTOMATIC
084
BASE
085
BELOW
086
BREAK
087
BUTTON
088
BY
089
CALIBRATE
090
CALL
091
CANCEL
092
CAUTION
093
CELSIUS
094
CENTER
095
CHANGE
096
CHECK
097
CIRCUIT
098
CLEAR
099
CLOCK
100
CLOSED
101
COMPLETE
102
CONNECT
103
CONTACT
104
CONTROL
105
CURRENT
106
CYCLE
107
DANGER
108
DAYS
109
DECREASE
110
DEGREES
111
DEVICE
112
PET-820 User Manual
LOW WORD GROUP
WORD
ADDRESS
DIRECTION
113
DISPLAY
114
DOOR
115
DOWN
116
EAST
117
EMERGENCY
118
ENGINE
119
ENTER
120
EQUAL
121
ERROR
122
EVACUATE
123
EXIT
124
FAIL
125
FAHRENHEIT
126
FAST
127
FEET
128
FINAL
129
FIRE
130
FLOW
131
FOR
132
FREQUENCY
133
FROM
134
FUEL
135
FULL
136
GALLONS
137
GATE
138
GAUGE
139
GET
140
GO
141
GREEN
142
GROUND
143
HAVE
144
HEAVY
145
HERTZ
146
HIGH
147
HOLD
148
HOUR
149
HOURS
150
ICE
151
IDENTIFY
152
IN
153
INCH
154
INFORMATION
155
INSPECTOR
156
INTRUDER
157
IS
158
KEY
159
KILO
160
LEFT
161
Page 65
LOW WORD GROUP
WORD
ADDRESS
LEVEL
162
LIGHT
163
LINE
164
LIST
165
LONG
166
LOW
167
LOWER
168
MACHINE
169
MANUAL
170
MEASURE
171
MEGA
172
METER
173
MICRO
174
MILLI
175
MINUS
176
MINUTES
177
MODERATE
178
MOTOR
179
MOVE
180
NEGATIVE
181
NORTH
182
NOT
183
NUMBER
184
OF
185
OFF
186
OHMS
187
OIL
188
ON
189
OPEN
190
OPERATOR
191
OUT
192
OVER
193
PASS
194
PERCENT
195
PICO
196
PLEASE
197
PLUS
198
POINT
199
POSITION
200
POWER
201
PRESS
202
PRESSURE
203
PROBE
204
PULL
205
PUMPS
206
PUSH
207
RAIN
208
RANGE
209
READY
210
Pacific Research
PET-820 User Manual
LOW WORD GROUP
WORD
RED
REPAIR
REPEAT
RIGHT
SAFE
SECONDS
SECURITY
SELECT
SET
SERVICE
SHUT
SLOW
SMOKE
SOUTH
SPEED
STALL
START
STOP
SWITCH
TELEPHONE
TEMPERATURE
TERMINAL
TEST
THE
TIME
TIMER
TOOL
TURN
UNDER
UNIT
UP
USE (NOUN)
VALVE
VERIFY
VOLTS
WAIT
WARNING
WATTS
WEATHER
WEST
WRONG
YELLOW
YOU
ZONE
PAUSE (time)
ADDRESS
211
212
213
214
215
216
217
218
219
220
221
222
223
224
225
226
227
228
229
230
231
232
233
234
235
236
237
238
239
240
241
242
243
244
245
246
247
248
249
250
251
252
253
254
255
HIGH WORD GROUP
FEMALE VOICE
WORD
ADDRESS
THE
016
TIME
017
IS
018
AM
019
PM
020
OH
021
O'CLOCK
022
ONE
023
TWO
024
THREE
025
FOUR
026
FIVE
027
SIX
028
SEVEN
029
EIGHT
030
NINE
031
TEN
032
ELEVEN
033
TWELVE
034
THIRTEEN
035
FOURTEEN
036
FIFTEEN
037
SIXTEEN
038
SEVENTEEN
039
EIGHTEEN
040
NINETEEN
041
TWENTY
042
THIRTY
043
FORTY
044
FIFTY
045
GOOD
046
MORNING
047
AFTERNOON
048
EVENING
049
Page 66
HIGH WORD GROUP
WORD
ELECTRICIAN
FIELD
FREEZING
GREENWICH
GUSTING TO
INCREASING
LESS THAN
MEAN
MORE THAN
NEAR
NEW
OTHER
RADIO
PASSED
RATE
RELEASE
REAR
SEVERE
SIDE
TRUE
WHISKEY
WIND
VICTOR
ABOUT
ACKNOWLEDGE
APRIL
AS
AUGUST
AUTO
AUXILIARY
BATTERY
BIG
BUSY
CALLING
CLEARANCE
CODE
COME
CRANE
DATE
DAY
DECEMBER
DIALING
DIVIDED
ER
ESTIMATED
FEBRUARY
FRIDAY
FRONT
GEAR
ADDRESS
050
051
052
053
054
055
056
057
058
059
060
061
062
063
064
065
066
067
068
069
070
071
072
073
074
075
076
077
078
079
080
081
082
083
084
085
086
087
088
089
090
091
092
093
094
095
096
097
098
Pacific Research
HIGH WORD GROUP
WORD
ADDRESS
GOOD-BYE
099
HELLO
100
HELP
101
HOME
102
IF
103
IMMEDIATELY
104
ING
105
INSTRUMENTS
106
IT
107
JANUARY
108
JULY
109
JUNE
110
LINK
111
MARCH
112
MAY
113
ME
114
MESSAGES
115
MOBILE
116
MONDAY
117
MONTH
118
NET
119
NEXT
120
NIGHT
121
OCTOBER
122
PAGE
123
PATCH
124
POLICE
125
PRIORITY
126
RECEIVE
127
REMOTE
128
REPEATER
129
ROAD
130
PET-820 User Manual
HIGH WORD GROUP
WORD
ADDRESS
SS
(SOUND)
SATURDAY
132
SEPTEMBER
133
SHORT
134
SUNDAY
135
SYSTEM
136
THEE
137
THIS
138
THURSDAY
139
TODAY
140
TOMORROW
141
TONIGHT
142
TRANSMIT
143
TUESDAY
144
UNTIL
145
VACUUM
146
WEDNESDAY
147
WEEK
148
WELCOME
149
WHITE
150
WITH
151
YESTERDAY
152
NOVEMBER
153
SEYMOUR
154
WASTE
155
WATER
156
TREATMENT
157
PLANT
158
ALARM
159
CONDITION
160
EXIST
161
SEWAGE
162
Page 67
HIGH WORD GROUP
WORD
ADDRESS
UTILITY
163
Baldwinsville
164
Batavia
165
Burlington
166
Cooper
167
Crescent
168
Ellenburg
169
Fairport
170
False
171
Finchville
172
Intake
173
Lewiston
174
Money Point
175
Oneida
176
Overlook
177
Plattsburg
178
Switchyard
179
Talcottville
180
Transition
181
Wellsite
182
Wilson
183
Pacific Research
PET-820 User Manual
SPEECH MESSAGE BUFFER PROGRAMMING TABLE
BUFFER
ADDRESS
00
SPEECH WORD DATA
WORD 00 WORD 01
WORD 02
WORD 03
WORD 04
WORD 05
WORD 06
WORD 07
WORD 09
WORD 10
WORD 11
WORD 12
WORD 13
WORD 14
WORD 15
WORD 01
WORD 02
WORD 03
WORD 04
WORD 05
WORD 06
WORD 07
WORD 09
WORD 10
WORD 11
WORD 12
WORD 13
WORD 14
WORD 15
WORD 01
WORD 02
WORD 03
WORD 04
WORD 05
WORD 06
WORD 07
WORD 09
WORD 10
WORD 11
WORD 12
WORD 13
WORD 14
WORD 15
WORD 01
WORD 02
WORD 03
WORD 04
WORD 05
WORD 06
WORD 07
WORD 09
WORD 10
WORD 11
WORD 12
WORD 13
WORD 14
WORD 15
WORD 01
WORD 02
WORD 03
WORD 04
WORD 05
WORD 06
WORD 07
WORD 09
WORD 10
WORD 11
WORD 12
WORD 13
WORD 14
WORD 15
WORD 01
WORD 02
WORD 03
WORD 04
WORD 05
WORD 06
WORD 07
WORD 09
WORD 10
WORD 11
WORD 12
WORD 13
WORD 14
WORD 15
WORD
WORD ADDRESS
WORD 08
WORD
WORD ADDRESS
01
WORD 00
WORD
WORD ADDRESS
WORD 08
WORD
WORD ADDRESS
02
WORD 00
WORD
WORD ADDRESS
WORD 08
WORD
WORD ADDRESS
03
WORD 00
WORD
WORD ADDRESS
WORD 08
WORD
WORD ADDRESS
04
WORD 00
WORD
WORD ADDRESS
WORD 08
WORD
WORD ADDRESS
05
WORD 00
WORD
WORD ADDRESS
WORD 08
WORD
WORD ADDRESS
Page 68
Pacific Research
PET-820 User Manual
SPEECH MESSAGE BUFFER PROGRAMMING TABLE
BUFFER
ADDRESS
06
SPEECH WORD DATA
WORD 00 WORD 01
WORD 02
WORD 03
WORD 04
WORD 05
WORD 06
WORD 07
WORD 09
WORD 10
WORD 11
WORD 12
WORD 13
WORD 14
WORD 15
WORD 01
WORD 02
WORD 03
WORD 04
WORD 05
WORD 06
WORD 07
WORD 09
WORD 10
WORD 11
WORD 12
WORD 13
WORD 14
WORD 15
WORD 01
WORD 02
WORD 03
WORD 04
WORD 05
WORD 06
WORD 07
WORD 09
WORD 10
WORD 11
WORD 12
WORD 13
WORD 14
WORD 15
WORD 01
WORD 02
WORD 03
WORD 04
WORD 05
WORD 06
WORD 07
WORD 09
WORD 10
WORD 11
WORD 12
WORD 13
WORD 14
WORD 15
WORD 01
WORD 02
WORD 03
WORD 04
WORD 05
WORD 06
WORD 07
WORD 09
WORD 10
WORD 11
WORD 12
WORD 13
WORD 14
WORD 15
WORD 01
WORD 02
WORD 03
WORD 04
WORD 05
WORD 06
WORD 07
WORD 09
WORD 10
WORD 11
WORD 12
WORD 13
WORD 14
WORD 15
WORD
WORD ADDRESS
WORD 08
WORD
WORD ADDRESS
07
WORD 00
WORD
WORD ADDRESS
WORD 08
WORD
WORD ADDRESS
08
WORD 00
WORD
WORD ADDRESS
WORD 08
WORD
WORD ADDRESS
09
WORD 00
WORD
WORD ADDRESS
WORD 08
WORD
WORD ADDRESS
10
WORD 00
WORD
WORD ADDRESS
WORD 08
WORD
WORD ADDRESS
11
WORD 00
WORD
WORD ADDRESS
WORD 08
WORD
WORD ADDRESS
Page 69
Pacific Research
PET-820 User Manual
SPEECH MESSAGE BUFFER PROGRAMMING TABLE
BUFFER
ADDRESS
12
SPEECH WORD DATA
WORD 00 WORD 01
WORD 02
WORD 03
WORD 04
WORD 05
WORD 06
WORD 07
WORD 09
WORD 10
WORD 11
WORD 12
WORD 13
WORD 14
WORD 15
WORD 01
WORD 02
WORD 03
WORD 04
WORD 05
WORD 06
WORD 07
WORD 09
WORD 10
WORD 11
WORD 12
WORD 13
WORD 14
WORD 15
WORD 01
WORD 02
WORD 03
WORD 04
WORD 05
WORD 06
WORD 07
WORD 09
WORD 10
WORD 11
WORD 12
WORD 13
WORD 14
WORD 15
WORD 01
WORD 02
WORD 03
WORD 04
WORD 05
WORD 06
WORD 07
WORD 09
WORD 10
WORD 11
WORD 12
WORD 13
WORD 14
WORD 15
WORD 01
WORD 02
WORD 03
WORD 04
WORD 05
WORD 06
WORD 07
WORD 09
WORD 10
WORD 11
WORD 12
WORD 13
WORD 14
WORD 15
WORD 01
WORD 02
WORD 03
WORD 04
WORD 05
WORD 06
WORD 07
WORD 09
WORD 10
WORD 11
WORD 12
WORD 13
WORD 14
WORD 15
WORD
WORD ADDRESS
WORD 08
WORD
WORD ADDRESS
13
WORD 00
WORD
WORD ADDRESS
WORD 08
WORD
WORD ADDRESS
14
WORD 00
WORD
WORD ADDRESS
WORD 08
WORD
WORD ADDRESS
15
WORD 00
WORD
WORD ADDRESS
WORD 08
WORD
WORD ADDRESS
SPARE
WORD 00
WORD
WORD ADDRESS
WORD 08
WORD
WORD ADDRESS
SPARE
WORD 00
WORD
WORD ADDRESS
WORD 08
WORD
WORD ADDRESS
Page 70
Pacific Research
PET-820 User Manual
EEPROM PROGRAMMING DATA TABLE
ADDRESS
000
001
002
003
004
005
006
007
008
009
010
011
012
013
014
015
016
017
018
019
020
021
022
023
024
025
026
027
028
029
030
031
032
033
034
035
036
DEFAULT DATA
001
025
150 (98 HEX)
118 (76 HEX)
084 (54 HEX)
050 (32 HEX)
031 (1F HEX)
255 (FF HEX)
017 (11 HEX)
255 (FF HEX)
255 (FF HEX)
000 (00 HEX)
000 (00 HEX)
162 (10100010B)
000 (00000000B)
067 (01000011B)
130 (10000010B)
024 (18 HEX)
130 (10000010B)
025 (19 HEX)
130 (10000010B)
026 (1A HEX)
130 (10000010B)
027 (1B HEX)
130 (10000010B)
028 (1C HEX)
130 (10000010B)
029 (1D HEX)
130 (10000010B)
030 (1E HEX)
130 (10000010B)
031 (1F HEX)
015
015
005
030
066 (42 HEX)
037
038
039-054
055-070
071-086
008
255 (FF HEX)
ALL 255 (FF HEX)
ALL 255 (FF HEX)
001, 050, 049, 201, 158, 186, 000, 000,
000, 000, 000, 000, 000, 000, 000, 000
001, 009, 014, 134, 240, 007, 000, 000,
000, 000, 000, 000, 000, 000, 000, 000
000 (00 HEX)
006
010
255 (11111111B)
ALL 255 (FF HEX)
087-102
103
104
105
106
107-127
DESCRIPTION
LOOP RESPONSE 1, 40 mS
LOOP RESPONSE 2, 1000mS (1 Second)
PROGRAM AUTHORIZATION CODE
987654 (STORED IN BCD)
PASSWORD 321 (STORED IN BCD)
KEY CODE 11 (STORED IN BCD)
THE PET's ADDRESS (ID)
0000 (STORED IN BCD)
SYSTEM CONFIGURATION BYTE 1
SYSTEM CONFIGURATION BYTE 2
SYSTEM CONFIGURATION BYTE 3
LOOP 1 DEFINITION, LOW BYTE
LOOP 1 DEFINITION, HIGH BYTE
LOOP 2 DEFINITION, LOW BYTE
LOOP 2 DEFINITION, HIGH BYTE
LOOP 3 DEFINITION, LOW BYTE
LOOP 3 DEFINITION, HIGH BYTE
LOOP 4 DEFINITION, LOW BYTE
LOOP 4 DEFINITION, HIGH BYTE
LOOP 5 DEFINITION, LOW BYTE
LOOP 5 DEFINITION, HIGH BYTE
LOOP 6 DEFINITION, LOW BYTE
LOOP 6 DEFINITION, HIGH BYTE
LOOP 7 DEFINITION, LOW BYTE
LOOP 7 DEFINITION, HIGH BYTE
LOOP 8 DEFINITION, LOW BYTE
LOOP 8 DEFINITION, HIGH BYTE
ARM DELAY 15 SECONDS, 0-255 SECONDS
ALARM DELAY 15 SECONDS, 0-255 SECONDS
DIAL DELAY 5 SECONDS, 0-255 SECONDS
ALARM RELAY CUTOFF 30 MIN., 0=NO CUTOFF
RING COUNT, 0 = DISABLE DET. (HIGH NIBBLE)
PASSWORD ERROR COUNTER (LOW NIBBLE)
DIAL ATTEMPTS 8, 0 = DISABLE DIALER
MODEM CONFIGURATION
TELEPHONE NUMBER 1
TELEPHONE NUMBER 2
SPEECH MESSAGE BUFFER #1
"DC POWER IS OFF"
SPEECH MESSAGE BUFFER #2
"(009) FROM UNIT (007)"
END OF SPEECH BUFFER
SERIAL CONFIGURATION BYTE, 9600 BAUD
ALARM MESSAGE COUNT
SYSTEM CONFIGURATION BYTE 4
UNUSED
Page 71
Pacific Research
PET-820 User Manual
SYSTEM CONFIGURATION BYTE 1
BIT NO.
76543210
76543210
76543210
76543210
76543210
76543210
76543210
76543210
TOTAL VALUE
BYTE
ADDRESS
1
2
4
8
16
32
64
128
DEFAULT DESCRIPTION
BYTE
ADDER
1
2
4
8
16
32
64
128
DEFAULT DESCRIPTION
BYTE
ADDER
1
2
4
8
16
32
64
128
DEFAULT DESCRIPTION
0
2
0
0
0
32
0
128
162
NEW EEPROM FLAG
LOCAL ARM/DISARM ENABLE
LOOP 8 EXTERNAL ARM/DISARM CONTROL
ENABLE DIAL PULSE
PROGRAM COMMUNICATION SELECT, 2 BITS
ALARM COMMUNICATION SELECT, 2 BITS
SYSTEM CONFIGURATION BYTE 2
BIT NO.
76543210
76543210
76543210
76543210
76543210
76543210
76543210
76543210
TOTAL VALUE
0
0
4
0
0
0
0
0
004
ARM/DISARM
ALARM FLAG
ERASE DISABLE, INTERNAL FUNCTION
LOOP MONITOR ON/OFF
RADIO INTERFACE ENABLE
PULSING ALARM RELAY ENABLE
SYSTEM STATUS ENABLE
N/A
SYSTEM CONFIGURATION BYTE 3
BIT NO.
76543210
76543210
76543210
76543210
76543210
76543210
76543210
76543210
TOTAL VALUE
0
2
0
0
0
0
64
0
066
SYSTEM SIGN ON MESSAGE, FIRST 4 BITS
PASSWORD DISABLE FLAG
ADC ENABLE
ALARM MESSAGE DELAY SELECT, 2 BITS
SYSTEM CONFIGURATION BYTE 4
BIT NO.
76543210
76543210
76543210
76543210
76543210
76543210
76543210
76543210
TOTAL VALUE
BYTE
ADDER
1
2
4
8
16
32
64
128
DEFAULT DESCRIPTION
0
0
0
0
0
0
0
0
000
TELEPHONE DIRECTORY ENABLE
N/A
N/A
N/A
N/A
N/A
N/A
N/A
Page 72
Pacific Research
PET-820 User Manual
LOOP DEFINITION, LOW BYTE
BIT NO.
76543210
76543210
76543210
76543210
76543210
76543210
76543210
76543210
TOTAL VALUE
BYTE
ADDER
1
2
4
8
16
32
64
128
DEFAULT DESCRIPTION
BYTE
ADDER
1
2
4
8
16
32
64
128
DEFAULT DESCRIPTION
0
2
0
0
0
0
0
128
130
LOOP TYPE B0, 0 = DISABLE, 1 = N.C. CONTACT
LOOP TYPE B1, 2 = N.O. CONTACT, 3 = SUPERVISED
ALARM DELAY, 0 = INSTANT / 1 = DELAY
ALARM RELAY OUTPUT ENABLE, 0 = DISABLE / 1 = ENABLE
MONITOR TO RELAY OUTPUT ENABLE
MONITOR TO DIGITAL OUTPUT ENABLE
LOOP RESPONSE SELECT, 0 = RESPONSE 1, 1 = RESPONSE
LOOP ALARM ENABLE
LOOP DEFINITION, HIGH BYTE
BIT NO.
76543210
76543210
76543210
76543210
76543210
76543210
76543210
76543210
TOTAL VALUE
0
0
0
8
16
0
0
0
024
ALARM MESSAGE SELECT, FIRST 4 BITS
08-15, 08 = LOOP CIRCUIT 1
TELEPHONE NUMBER 1 ENABLE
TELEPHONE NUMBER 2 ENABLE
TELEPHONE NUMBER 8 ENABLE
EXAMPLE OF LOOP CIRCUIT 1
Page 73