1
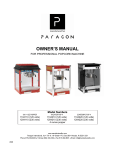
user manual
ty
r o y a l eri
s
Popcorn Carts
es
www.CarnivalKingSupplies.com
www.CarnivalKingSupplies.com
popcorn carts
.
|••• [email protected]
for 4 oz. & 8 oz. poppers
General Safety Precautions
1. This manual will outline safety warnings and precautions, and assembly. The warnings and instructions reviewed
in this manual cannot cover all possible conditions and situations that may occur. Factors such as caution and
common sense cannot be built into this product and it is trusted the operator will follow these measures.
2. This cart must never be modified and should only be used for its intended purpose.
3. Use a protective covering for the cart when long-term storage is planned.
4. Avoid using outdoors. In the circumstance that the cart is used outdoors, ensure it is protected from rain and water.
5. When cleaning, do not use abrasive chemical or materials as you will damage the cart’s surface.
4 oz. Popcorn Cart Specs
Unit Dimensions
27 5/8”L x 19”D x 36 5/8”H
Rear Wheels
16”
8 oz. Popcorn Cart Specs
Unit Dimensions
30”L x 21”D x 36”H
Rear Wheels
18”
Cart Parts List
A. Main unit (1) (sold separately)
B. Popping pot (1) (sold separately)
C. Working platform (1)
D. Hand rail (1)
E. Square pole (2)
F. Long stand (1)
G. Short stand (1)
H. Wheel axle (1)
I. Wheels (2)
J. Storage cabinet (1)
K. Parts box which includes
a. Package A (plated bolts/nuts/washers [8 each])
b. Package B (bolts/washers [8 each])
c. Package C (metal sleeves/nuts with round cap/
washers [2 each])
d. Package D (wrench [2])
3
www.CarnivalKingSupplies.com
popcorn carts
.
|••• [email protected]
for 4 oz. & 8 oz. poppers
Cart Assembly
1. Connect the long stand (F) and the 2 piece square pole (E) together using the bolts and washers from Package B.
2. Connect the result of Step 1 with the short stand (G) by using the bolts and washers of Package B.
3. Attach the axle (H) into the short stand (G). Mount wheels (I) on the ends of the axle (H). Secure the wheels by
using the contents of Package C. Place washers on each side of the wheels (I) and then put on the round cap nuts
and secure with the wrenches provided in Package D.
4. Turn the storage cabinet (J) upside down. Attach the short and long stands onto the bottom of the cabinet (J) and
secure by bolts from Package B.
5. Turn the secured unit to its upright position. Using the nuts and bolts with washers from Package A, attach the
handrail (D) onto the left side of the cart and the working platform (C) on the right side.
To Install Main Unit on Cart (sold separately)
1. Set the main unit (A) on the top side of the storage cabinet (J).
2. Hook the pot (B) onto the main unit’s hanger. If done correctly, its roller bar should be on the door side of the
machine.
3. Take the power plug from the main unit’s (A) ceiling and connect it with the socket on the bottom of the pot (B).
4. Inside the storage cabinet (J), release the two spring shafts underneath the main unit (A). Secure the main unit to
the storage base.
**For operating, cleaning and maintenance instructions, please see the popper manual.
4