1
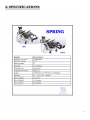
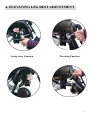
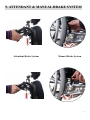
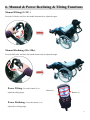
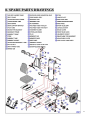
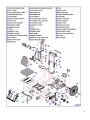
USERS HW1 MANUAL HW1P HEARTWAY MEDICAL PRODUCTS CO., LTD. Part no: 70030169 1 TABLE OF CONTENTS 1. 2. 3. 4. 5. 6. 7. 8. 9. INTRODUCTION & SAFETY … . . . . . . . . . . . . . . … . … … … … … … … … . … … 3 SPECIFICATIONS………………………………………………………….……….4 HEAD REST, ARM REST & PUSH HANDLE ADJUSTM………………..…..5 ELEVATING REST ADJUSTMEN ….………………………...…..………6 ATTENDANT & MANUAL BRAKE SYSTEM…………………..….……………7 MANUAL & POWER RECLINING & TILTING FUNCION..….………………8 BATTERY CHARGING GUIDE……………………………………………………….11 SPARE PARTS DRAWINGS…………………………………………………….12 MAINTENANCE…………………………………………………………………….14 2 1. INTRODUCTION & SAFETY Welcome to Heartway Medical Products Co., Ltd. We truly appreciate your new purchase order on our model HW1/HW1P. We are confident that this design features will provide you with the conveniences you expect during your daily activities. Once you understand how to safely operate this product for the first time, its safety and performance will give you years of trouble free operation and service. WARNING: Do not operate this product without first reading and understanding the warnings, cautions, and instructions in this manual. If you are unable to understand the warnings, cautions, and instructions, contact with our authorized dealer before attempting to use this equipment – otherwise injury or damage may result. Read and follow all instructions, warnings, and notes in this manual before attempting to operate this product for the first time. In addition, your safety depends upon you, as well as your provider, caretaker, or healthcare professional in using good judgement. If you experience any problems with your wheelchair that you are unable to resolve, or if you do not feel capable of safety following any of the instructions and/or recommendations contained in this manual, please contact our authorized dealer for assistance. 3 2. SPECIFICATIONS 4 3. HEAD REST, ARM REST & PUSH HANDLE ADJUSTMENT Headrest Angle Adjustment Armrest Height Adjustment Headrest Height Adjustment Push Handle Adjustment 5 4. ELEVATING LEG REST ADJUSTMENT Swing Away Function Elevating Function 6 5. ATTENDANT & MANUAL BRAKE SYSTEM Attendant Brake System Manual Brake System 7 6. Manual & Power Reclining & Tilting Functions Manual Tilting(-5°~25° ) Press the LH-brake and force the handle downwards to adjust the angle. Manual Reclining (90°~120°)– Press the RH-brake and force the handle downwards to adjust the angle. Power Tilting– Press the button (2) to Button (1) adjust the tilting angle. Button (2) Power Reclining– Press the button (1) to adjust the reclining angle. 8 7. SEALED LEAD ACID BATTERIES USER’S GUILD 7.1 - Battery Specification: 7.2 - Battery Power Depletion Chart: Storage Temperature/Time/Capacity Table 9 7.3 - Battery Charging Guide: Remove the connector covers from a battery box to insert DC IN socket indicated at the left side of LAK B box, and then plug in power cord. The CPU in the control will automatically detect the battery capacity. If the power capacity is insufficient, it will automatically charge. When fully charged, it will automatically disconnect charging circuit. Charging method: With constant voltage 2.4~2.5 v/cell, initial current is below 0.4cA to charge 5 ~ 8 hours. Charging voltage: charging voltage 14.4 ~15 .0V (at 25℃(77℉)) for the cycling use floating voltage 13.5 ~13.8 V (at 25 ℃(77℉)) for the standby use. Open-circuited voltage for fully charged batteries is greater than 12 .9V 7.4 – Battery Notice Batteries will discharge in storage by itself to reduce the capacity. Therefore, they must be stored at a place with low temperature, dryness, no direct sunlight or fire. During the storage period, batteries should be recharged once every months (a place where the environmental temperature is below 25℃).The environmental temperature starts from 25℃ with an increase of 10℃. The recharge interval will shorten 1 2/, and the speed of self discharge will increase 2 times. The battery capacity can't recover when long-term stored under discharge. Stored batteries must be recharged before using (The first charging time needs about 5 ~8 hours.). Batteries should be used as early as possible. First in/first out criteria should be followed. Batteries will gradually deteriorate in storage. The battery capacity can't recover under the long-term storage even by recharging. Avoid overcharge as much as possible, and charge soon after discharging. When battery voltage drops, the machine can't be driven. If there is some capacity left, batteries should be immediately charged after used. If not immediately charged, batteries will degrade early, leading to lead acidification. When the insufficient power level sounds, please immediately charge batteries to avoid permanent damage. 10 7.5 Charging the batteries: The batteries of the power Tilting and Reclining functions have to be charged on a regular basis. Together with the control unit the batteries are place at a separate box beneath the seat. If the batteries are stored, pay heed to a dry and cool environment, to decelerate the natural discharge process during storage. If the batteries are stored for a long time period, ensure that they are charged once a month, to prevent damaging. After the charging process is done, make sure that the recharger cable is attached safely, without dragging on the floor or getting into the wheels. Warning! Make sure that there is no one sitting in the wheelchair while charging. Plug the recharger cable into the power socket. A green LED will show readiness for load. It is possible to charge the batteries over night, the recharger will automatically disconnect charging circuit, when fully loaded Please plug out the recharger cable, after the charging process is done. 7.6 Monitoring the state of charge The state of charge is shown by the three LED’s on the remote control. You can see the state of charge while using the Power Tilting and Reclining functions. Green – Fully charged. Yellow – Charging is advised. Red – Charging is required 11 8. SPARE PARTS DRAWINGS 12 13 9 .MAINTENANCE Maintenance is an important part of wheelchair ownership. There are two types of maintenance: preventive (routine) and corrective. Preventive maintenance enables you to help extend the life of your wheelchair by catching potential problems before it becomes necessary to correct them. Corrective maintenance is what you must do when your wheelchair needs immediate repair. Preventive maintenance In addition to your pre-ride checks, you can pay particular attention to your drive wheels and the overall appearance of your wheelchair. Keep your wheelchair clean. This will help prevent dirt and other contaminants from getting into places where it doesn’t belong, like the drive wheel bearings, the frame hinges or the caster bearings. Drive wheel and caster bearings are sealed and do not require lubrication. We recommend you follow the following maintenance checks: ● Ensure that all parts are securely fastened to your wheelchair ● Check for proper tire inflation ● Check for drive tire and caster tire wear. If they are worn excessively, then replace them. If they appear to have worn unevenly, then contact your authorized dealer before replacing them. ● Check the park brakes. After several months of use, you may find it necessary to adjust the park brake so that they lock securely when engaged. Please see the adjustment section for reference of park brake adjustment methods. ● Check the caster wheel free swivel To keep your wheelchair clean, use a damp cloth and wipe down. Don’t use a hose. This could force moisture into the caster swivel or the drive wheel hub. Always use soapy water on the seat and dry it thoroughly before using. Corrective maintenance If you feel that your wheelchair’s performance has degraded or is not operating correctly, contact our authorized dealer. All components should be provides by our authorized dealers while the unit is still under warranty. We do not recommend that you remove any parts and send them back for repair without first contacting our authorized dealer. 14