1
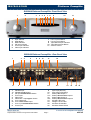
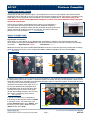
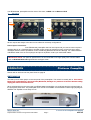
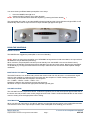
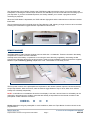
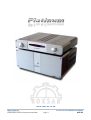
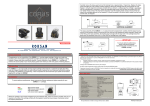
PR15B
Dual Mono Precision Preamplifier
USER MANUAL
ROKSAN
AUDIO
LIMITED
6 N ORTHFIELD INDU STR IAL ESTATE
B E RESF O R D A VENU E
A L PER TON
M ID D L E SEX H A0 1 N W
ENG L A N D
TEL.
FAX.
+44 (0)208 900 6801
+44 (0)208 900 6802
+44 (0)208 900 0734
www.roksan.co.uk
email [email protected]
P l a t i n u m Preamplifier
INTRODUCTION
Congratulations on your purchase of the ROKSAN P l a t i n u m PR15B Preamplifier. This preamplifier is
designed and manufactured to the highest specification and rigorously tested to offer you unsurpassed
performance for many years of trouble-free pleasure.
Your P l a t i n u m preamplifier is at the heart of your hi-fi system. Correct installation, set-up and operation of
this preamplifier and its partnering equipment will have a profound influence on the sonic performance of the
entire system.
Please read the contents of this manual thoroughly. It will help you to understand your hi-fi equipment better and
enhance your listening pleasure.
This manual is divided into the following sections:
•
•
•
•
•
•
•
•
•
•
Safety Instructions (accompanying card)
Introduction
Cautions
Installation
Setup
Operation
Troubleshooting
Guarantee
Specifications
Notes
UNPACKING
Included in the packing of your P l a t i n u m preamplifier you will find:
•
•
•
One mains lead fitted with the correct mains power plug for your country
One P l a t i n u m system remote handset and batteries (x2 AAA size & 2mm A/F Allen Key)
One information pack and warranty card
After removing these items please retain all packing materials. Correct packing is necessary for transportation of
your preamplifier.
MAINTENANCE
After disconnecting the preamplifier from the mains supply, the cabinet and front panel may be cleaned with a
lightly dampened soft cloth. Avoid using abrasives or solvents.
EU DIRECTIVES
This product is designed to comply with the legal provisions of EU Directives 89/3336/EC and 72/23/EC. The
standards which have been applied are those which were in force at the time of the introduction of this product.
This product bears the CE mark.
This product is compliant to EN 60065.
This product must be earthed. Please ensure that other equipment connected to it is earthed according to the
manufacturer’s instructions.
P l a t i n u m Preamplifier User Manual
Roksan Audio ltd
CLASSIFICATION: General Use
All specifications are liable to change without notice. E&OE
Version 1.03
Page 2
ENGLISH
P l a t i n u m Preamplifier
CAUTIONS
AC MAINS SUPPLY
Your P l a t i n u m preamplifier is set to operate from a fixed supply voltage which is marked on a label next to
the mains input plug. Before connecting the mains lead please check that your mains supply corresponds to this
label as below:
230V Products
115V Products
100V Products
Voltage Range:
Voltage Range:
Voltage Range:
220V – 240V
100V – 120V
90V – 110V
The mains lead supplied with this product has an IEC mains socket which plugs into the IEC connector on the
unit’s rear panel. The other end is normally attached to the appropriate mains plug for your country. In the UK
this is the standard UK13A plug.
This plug should ordinarily not be removed from the lead. If you do remove it, please dispose of it safely so that it
cannot be plugged into a mains socket whilst in a potentially dangerous condition. We suggest that you obtain
from your dealer a complete replacement lead.
Should you move to another area where either the mains voltage or the mains plugs are different from those as
supplied with your preamplifier, please contact the appointed ROKSAN distributor for assistance.
Please observe correct mains polarity at all times.
The preamplifier mains fuses are located on the rear panel next to the IEC mains connector. These must only be
replaced by the fuse type and rating as described on the fuse rating label on the rear panel of the unit.
If the equipment is likely to be unused for some time, unplug it from the mains supply.
GENERAL CAUTIONS
FCC WARNING
This equipment may generate or use Radio Frequency energy. The user may lose the right to operate this
equipment if unauthorised modifications are made.
INTERFERENCE
Properly installed, this unit should not cause harmful interference to radio communications, There is, however, no
guarantee that such interference will not occur in a specific installation. If interference arises (which you can
determine by switching the unit off and on) you could try to remedy this problem by the following:
•
•
•
•
Re-orient or re-locate the receiving antenna
Increase the distance between the preamplifier and receiver
Connect the unit to a different mains circuit from that of the receiver
Consult your ROKSAN appointed dealer or an experienced Radio/TV technician for help and advice
LOCATION
Your P l a t i n u m preamplifier should be located in a well ventilated area and kept away from sources of heat,
dust, humidity and direct sunlight.
The preamplifier may be positioned either as a free standing unit or alongside another audio/video product.
Never place the preamplifier on carpet or any surface likely to hinder normal ventilation.
Never allow liquids or other objects to fall into the unit.
This unit contains no user serviceable parts.
Do Not remove any panels or attempt to service it yourself. Unauthorised servicing will void the
warranty.
P l a t i n u m Preamplifier User Manual
Roksan Audio ltd
CLASSIFICATION: General Use
All specifications are liable to change without notice. E&OE
Version 1.03
Page 3
ENGLISH
P l a t i n u m Preamplifier
INSTALLATION
ROKSAN Platinum Preamplifier- Front Panel View
1
1
2
3
4
5
6
2
3
4
5
Input Selector
Mode Button
Mode Indicator
CD Input Indicator
Tuner Input Indicator
Video Input Indicator
6
7
8
7
8
9
10
11
9
10
11
Line 1 Input Indicator
Line 2 Input Indicator
Tape Monitor/Input Indicator
Tape Monitor/Input Button
Volume Control
ROKSAN Platinum Preamplifier - Rear Panel View
1
1A
1
1A
2
3
4
5
6
6A
7
8
3
2
4
6
8
5
6A
7
CD RCA Input
CD Balanced XLR Input
CD Input RCA/MUTE/XLR Switch
Tuner Input
Video Input
Video/Line 1 Input Bypass Switch
Line 1 RCA Input
Line 1 Balanced XLR Input
Line 1 Input RCA/MUTE/XLR Switch
Line 2 Input
9
10
11
12
11A
12A
9
10
11
11A
12
12A
13
14
15
16
14
15 16
Tape Input (Record)
Tape Output (Playback)
Preamp RCA Output 1
Preamp Balanced XLR Output 1
Preamp RCA Output 2
Preamp Balanced XLR Output 2
AC Mains IEC Inlet
Voltage & Fuse Label
AC Mains Fuseholder
AC Mains Power Switch
P l a t i n u m Preamplifier User Manual
Roksan Audio ltd
CLASSIFICATION: General Use
All specifications are liable to change without notice. E&OE
13
Version 1.03
Page 4
ENGLISH
P l a t i n u m Preamplifier
SETUP
CONNECTING MAINS POWER
Please refer to rear panel view on Page 4. The moulded IEC connector of the supplied mains lead should be
plugged into the socket (13) on the rear of the unit first and then plugged into the mains supply. The Mains power
switch (16) is on the rear panel of the preamplifier. This switch is normally left on. If the unit is likely to be
unattended for a period of time (Week-end, Holidays etc.) switch it off and for absolute safety unplug the
mains lead from the wall.
Choose a non-resonant, rigid shelf/structure to place your preamplifier on
(e.g. dedicated High quality equipment stand with adequate ventilation).
The P l a t i n u m preamplifier utilises specially designed decoupling feet which
reduce mechanical vibrations reaching the internals. This feature enhances
performance of the preamplifier. ***
See opposite:
SIGNAL CONNECTIONS
Signal Input connections:
There are 5 Line Level Inputs on your P l a t i n u m preamplifier in addition to the Tape Monitor/Input (6).
All the inputs accept single-ended RCA Phono Connectors and should be connected according to the standard
convention
Right Channel – Red ;
Left Channel – White
CD & Line 1 Inputs also accommodate Balanced XLR connectors. These two inputs are provided with a selector
switch at the back and can be set to single-ended (RCA) or Balanced (XLR) or be Disconnected (Mute).
***
See below:
RCA
XLR
XLR
RCA
In addition either Video or Line 1 Inputs can be set as Bypass. In this mode the selected Input will not go through
the preamplifier’s gain/volume section, instead the signal is connected directly to the Preamplifier outputs. This is
particularly useful when integrating your Audio/Visual system with your main Hi-Fi system. In this mode the L & R
‘-outs’ from your surround sound processor
should be connected to either Video or Line 1
input of your P l a t i n u m preamplifier and
XLR
the BYPASS switch is set to that input. Now
RCA
whenever that input is selecte,d the signal
will just pass straight through to the Pre Outs
with volume controlled by the processor.
***
See opposite:
If you do not require such a combination,
then simply set the BYPASS switch to NORM.
In the figure shown, the Video Input is set
Bypass (BYPASS Switch set to VIDEO). And
the Line 1 Input is used in Balanced mode
(INPUT Switch set to XLR).
VIDEO
P l a t i n u m Preamplifier User Manual
Roksan Audio ltd
CLASSIFICATION: General Use
All specifications are liable to change without notice. E&OE
XLR
Version 1.03
Page 5
ENGLISH
Your P l a t i n u m preamplifier has four sets of Pre Outs; x2 RCA and x2 Balanced XLR.
***
See below:
RCA
XLR
All four outputs are always active and can be utilised in multi-amp configurations.
Phono Input Connections:
Your P l a t i n u m preamplifier has line level inputs and you cannot connect a phono
cartridge directly to it. ROKSAN Phono Amplifier range accept conventional moving coil and moving magnet
cartridges and has custom equalisation for the outstanding ROKSAN Shiraz MC cartridge. For a demonstration
of ROKSAN state of the art record players and phono amplifiers contact your authorised retailer.
IMPORTANT NOTE: For optimum performance it is recommended to use high quality inter-connect cables
such as ROKSAN HDC-02A high definition analogue Cable.
P l a t i n u m Preamplifier
OPERATION
Please refer to the front and rear panel views on page 4.
SWITCHING ON
The Mains power switch (16) is on the rear panel of the preamplifier. This switch is normally left on. If the unit is
likely to be unattended for a period of time (Week-end, Holidays etc.) switch it off and for absolute safety
unplug the mains lead from the wall.
When switched ON from the rear panel your P l a t i n u m preamplifier runs a self-test and the indicator lights on
the front panel pulse twice. The preamplifier then reverts to STANDBY and the MODE indicator light (3) will glow
GREEN. The amplifier is now ready for use.
P l a t i n u m Preamplifier User Manual
Roksan Audio ltd
CLASSIFICATION: General Use
All specifications are liable to change without notice. E&OE
Version 1.03
Page 6
ENGLISH
You can activate your P l a t i n u m preamplifier in two ways:
1
Press the MODE button (2) once.
2
Rotate the INPUT selector (1) in either direction.
NOTE: The remote handset will activate the amplifier by pressing the Power button (
).
The preamplifier will ‘wake up’ and the MODE indicator light (3) and the Volume indicator will glow RED. It will
automatically select the CD input and the CD input indicator light (4) will also glow.
USING THE CONTROLS
MODE CONTROL
The MODE button toggles the preamplifier in and out of Standby.
NOTE: When you bring the preamplifier out of STANDBY having switched it ON at the Mains, the input selector
will default to CD (as described previously).
When, however, the preamplifier has been put into Standby from the MODE or the remote Power button ( ),
bringing it out of Standby will restore previously selected input, tape and mute values. Bringing the preamplifier
out of Standby by moving the INPUT Selector one step in either direction also leaves these amplifier settings
unaffected.
INPUT SELECTOR SWITCH
The INPUT Selector is an endless rotary switch that moves round one click at a time. It connects each signal
source to the amplifier by rotating through the Inputs with the exception of TAPE. Rotating the Selector
continuously clockwise will select inputs in this sequence:
CD – TUNER – VIDEO – LINE1 – LINE2 – CD - …
Rotating the Selector anti-clockwise reverses the sequence.
Whenever an input is selected the appropriate indicator light will glow.
VOLUME CONTROL
The VOLUME Control is a precision device. It follows a logarithmic law so that its response approximates that of
the human ear and provides more control (range) at lower levels. There is an illuminated indicator on the volume
control to clearly show the appropriate volume setting.
TAPE MONITOR
When you select an input source, the INPUT Selector connects the selected source to the preamplifier and also
connects this source to the Tape Output Sockets of the Preamplifier thus enabling you to record.
P l a t i n u m Preamplifier User Manual
Roksan Audio ltd
CLASSIFICATION: General Use
All specifications are liable to change without notice. E&OE
Version 1.03
Page 7
ENGLISH
The Tape Monitor is an override. Pressing the TAPE Button (10) connects the output of your tape deck to the
Preamplifier, overriding the selected input. However, the selected input is left connected to the recording input of
your tape deck. If you have a suitable tape deck, this facility enables you to record a programme whilst
monitoring its playback.
When the TAPE Button is depressed, the TAPE Indicator light glows and the selected source Indicator remains
illuminated.
The input selector remains functional when the Tape Monitor is ON, allowing a range of sources to be recorded.
Pressing the TAPE Button toggles between Tape Monitor ON and OFF.
REMOTE HANDSET
The P l a t i n u m System Remote Handset uses two AAA size 1.5V batteries. These are housed in the battery
compartment on bottom end of the handset.
Carefully remove the battery compartment cover using the 2mm Allen Key supplied by unscrewing the M3
Counter-sunk Stainless Steel Screw as shown below. Gently pull out the Battery Holder and insert the supplied
batteries in place observing polarity. Replace the cover. The handset is now ready for use.
1
2
3
The front panel controls of the preamplifier are replicated on the remote handset. Inputs are accessed directly
except Tape Monitor, Mute and Power, were the buttons toggle between Tape In & out, Mute On & Off and
Preamp On & Standby respectively.
NOTE: In Multi Room or Installations where the front display is not seen, remote Power On & Standby can be
achieved by programming two ‘hidden’ codes that are already incorporated into the internal controller of the
preamplifier. These codes are as follows:
POWER ON:
POWER OFF:
99
99
66
66
20
21
Please note when using the preamplifier in such installations, Mute and Tape Monitor functions should not be
programmed in.
P l a t i n u m Preamplifier User Manual
Roksan Audio ltd
CLASSIFICATION: General Use
All specifications are liable to change without notice. E&OE
Version 1.03
Page 8
ENGLISH
Direct Access Buttons
POWER
MUTE
TAPE
INPUT
VOLUME
NOTE:
Button ( ) puts the amplifier In and Out of Standby.
Button toggles between normal and lowered output level (-20dB).
Button toggles between Tape In & Out.
Buttons select the designated Input directly.
Buttons (±) adjust the output volume level (Up & Down).
Mute function is particularly useful when you need the volume temporarily lowered; for example
when answering the phone.
When the preamplifier is set to Mute, the MODE indicator on the front panel display will change to Amber.
***
See below:
P l a t i n u m Preamplifier User Manual
Roksan Audio ltd
CLASSIFICATION: General Use
All specifications are liable to change without notice. E&OE
Version 1.03
Page 9
ENGLISH
P l a t i n u m Preamplifier
TROUBLESHOOTING
If you suspect that your ROKSAN P l a t i n u m preamplifier is not operating properly, you should check all the
connections carefully. Phono plugs and XLR connectors should be fully inserted- a frequent cause of problems is
that connectors do not make proper contact. Below are some commonly encountered problems with suggestions
for possible cure. The list is not exhaustive: If you have any unresolved problems, please consult your appointed
ROKSAN dealer or distributor.
SYMPTOM
LIKELY CAUSE
SUGGESTED REMEDY
No power
AC Mains lead not inserted properly
Unit not switched on at rear panel
IEC mains inlet fuses blown
No output on one or both
channels
Amplifier in stand-by mode (MODE light
GREEN)
Ensure AC Mains lead is fully inserted
Switch unit on at rear panel
Replace with identical fuse type and
rating and try again (only once)
Press MODE button to set amplifier in
operational mode (MODE light RED)
Missing or bad input signal connection
Check all input connections
Wrong input selected
Input switch incorrectly set
Select correct input, ascertain source is
working
Check & set Input switch (RCA or XLR)
Tape Monitor selected
Deselect Tape Monitor
Amplifier set in MUTE position
Deselect MUTE (check volume setting
first)
No volume control on Video
or Line 1 input
Bypass switch incorrectly set
Check & set Bypass switch (RCA or
XLR)
Hum from speakers
Incorrect Grounding
Check Mains polarity and grounding on
all connected equipment
Change the interconnect cables
Very low sound output
Poor choice of interconnect cables
P l a t i n u m Preamplifier
GUARANTEE
There are no user-serviceable parts inside your P l a t i n u m preamplifier. If a fault should develop, refer any
servicing to your appointed ROKSAN dealer, distributor or approved service agent.
Your ROKSAN P l a t i n u m preamplifier is guaranteed against any defect in materials and workmanship for a
period of two years from the date of purchase.
This guarantee only becomes effective if the warranty card is validated by the ROKSAN retailer from whom the
equipment was purchased and returned to ROKSAN within 28 days of purchase.
This guarantee excludes:
1. Damage caused due to accident, missuse, neglect and incorrect installation, adjustment or repair.
2. Liability for damage or loss during transit from the retailer or purchaser to ROKSAN or its authorised
distributor for the purposes of repair or inspection.
Carriage costs to ROKSAN shall be borne by the consignor.
All claims under this guarantee must be made through an authorised ROKSAN retailer.
If equipment returned for repair to ROKSAN is found on inspection to comply with the product specification
ROKSAN reserves the right to make a charge for examination and return carriage.
Unauthorised servicing will void this guarantee.
P l a t i n u m Preamplifier User Manual
Roksan Audio ltd
CLASSIFICATION: General Use
All specifications are liable to change without notice. E&OE
Version 1.03
Page 10
ENGLISH
P l a t i n u m Preamplifier
SPECIFICATION
Line Inputs
5 RCA plus Tape
CD & LINE1 inputs switch-able to XLR Balanced
VIDEO & LINE1 inputs selectable for By-passed
47 kΩ
Input Impedance
Tape, Preamplifier (x2 RCA & x2 XLR Balanced)
Outputs
350VA Ultra Low Noise Shielded Toroidal Transformer
12 Regulated Supply Rails
Power Supply
-3dB, <0.5Hz – 110kHz
Frequency response
9.3dB Preamplifier
Gain
<0.0015% 1kHz, <0.009% 20kHz, <0.015% 30kHz
Harmonic Distortion
Noise
20 – 20kHz A-weighted <-95dB
Noise
1kHz A-weighted <-105dB
20 – 20kHz <-90dB
UNWEIGHTED Hum & Noise
100V – 120V 50Hz / 60Hz
220V – 240V 50Hz / 60Hz
(via Mains inlet filter)
Power Source
< 40 W
Power Consumption
Dimension
432 x 390 x 80 (W x D x H) mm
432 x 390 x 95 (including feet)
Weight
15 Kg
P l a t i n u m Preamplifier
NOTES
P l a t i n u m Dual Mono Precision Preamplifier
Purchase Date
ROKSAN Retailer
Serial Number
Year
Month
Day
Name
Location
Please keep a record for future reference
P l a t i n u m Preamplifier User Manual
Roksan Audio ltd
CLASSIFICATION: General Use
All specifications are liable to change without notice. E&OE
Version 1.03
Page 11
ENGLISH
www.roksan.co.uk
P l a t i n u m Preamplifier User Manual
Roksan Audio ltd
CLASSIFICATION: General Use
All specifications are liable to change without notice. E&OE
Version 1.03
Page 12
ENGLISH