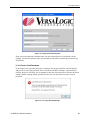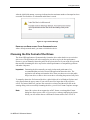
1
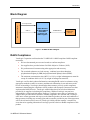
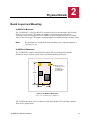
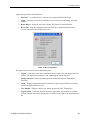
Reference Manual DOC. REV. 12/31/2013 VL-MPEu-K1 Encrypted Memory Mini PCIe Module WWW.VERSALOGIC.COM 12100 SW Tualatin Road Tualatin, OR 97062-7341 (503) 747-2261 Fax (971) 224-4708 Copyright © 2013 VersaLogic Corp. All rights reserved. Notice: Although every effort has been made to ensure this document is error-free, VersaLogic makes no representations or warranties with respect to this product and specifically disclaims any implied warranties of merchantability or fitness for any particular purpose. VersaLogic reserves the right to revise this product and associated documentation at any time without obligation to notify anyone of such changes. VL-MPEu-K1 Reference Manual ii Product Revision Notes Revsion 1.00 – Commercial release. Support The VL-MPEu-K1 support page, at http://www.versalogic.com/private/mpeuk1support.asp, contains additional information and resources for this product including: Reference Manual (PDF format) Data sheets and manufacturers’ links for chips used in this product Photograph of the circuit board This is a private page for VL-MPEu-K1 users that can be accessed only by entering this address directly. It cannot be reached from the VersaLogic homepage. The VersaTech KnowledgeBase is an invaluable resource for resolving technical issues with your VersaLogic product. VersaTech KnowledgeBase VL-MPEu-K1 Reference Manual iii Contents Introduction ................................................................................................................... 5 Description.......................................................................................................................... 5 Features and Construction ..................................................................................... 5 Technical Specifications ..................................................................................................... 5 Block Diagram .................................................................................................................... 6 RoHS Compliance .............................................................................................................. 6 About RoHS........................................................................................................... 7 Warnings ............................................................................................................................. 7 Data Loss ............................................................................................................... 7 Electrostatic Discharge .......................................................................................... 7 Handling Care ........................................................................................................ 7 Technical Support ............................................................................................................... 8 Repair Service........................................................................................................ 8 Physical Details ............................................................................................................. 9 Board Layout and Mounting ............................................................................................... 9 VL-MPEu-K1 Mounting........................................................................................ 9 VL-MPEu-K1 Dimensions .................................................................................... 9 Encryption Device ....................................................................................................... 10 Encryption Device Features .............................................................................................. 10 Connecting the Drive ........................................................................................................ 11 Setting the Password and Resizing Drives .......................................................... 12 Using the SecureUSB Application ...................................................................... 14 Resizing the Drives .............................................................................................. 16 Using the Drive ................................................................................................................. 17 Unlocking the Drive ............................................................................................ 17 Changing the Password........................................................................................ 17 If You Forget Your Password .............................................................................. 18 Resetting the Drive after a Failed Password Attack ............................................ 19 Choosing the File Format of the Drives ........................................................................... 19 VL-MPEu-K1 Reference Manual iv Introduction 1 Description FEATURES AND CONSTRUCTION The VL-MPEu-K1 is an extremely small and rugged encrypted memory module based on the industry-standard Mini PCIe module format. It enables embedded systems to use hardware AES encryption/decryption to secure data. Its features include: Encrypted flash memory 8 or 32 GB on-board capacity 256-bit AES Encryption 7 to 48 character password Password attack protection Industrial temperature range operation MIL-STD-202G shock/vibe RoHS-compliant The VL-MPEu-K1 features high reliability design and construction. VL-MPEu-K1 boards are subjected to 100% functional testing and are backed by a limited two-year warranty. Careful parts sourcing and US-based technical support ensure the highest possible quality, reliability, service, and product longevity for this exceptional board. Technical Specifications Specifications are subject to change without notification. Board Size: 30.00 mm x 50.95 mm (Mini PCIe standard) Storage Temperature: -40° to +85°C Operating Temperature: -40° to +85°C Power Requirements: 3.3V @ 0.3W (supplied from the Mini PCIe socket) Mini PCIe Signal Type: USB 2.0 Software: Compatible with Windows XP and Win 7 Weight: VL-MPEu-K1E: 0.009 lbs (0.004 kg) Encryption: AES 256 integrated cryptographic engine VL-MPEu-K1 Reference Manual 5 Introduction Block Diagram Mini PCIe Connector +3.3V Input Power USB 2.0 SMSC SEC2410 Hi-Speed USB 2.0 Flash Media Controller with AES Encryption MultiMedia Port eMMC Flash Memory Figure 1. VL-MPEu-K1 Block Diagram RoHS Compliance VersaLogic Corporation confirms that the VL-MPEu-K1 is RoHS compliant. RoHS compliant means that: We have documented processes and records to confirm compliance. Our suppliers have provided written Verifiable Objective Evidence (VOE). We perform material content testing when appropriate and necessary. The restricted substances are lead, mercury, cadmium, hexavalent chromium, polybrominated biphenyls (PBB) and polybrominated diphenyl ethers (PBDE). The maximum concentration value (MCV) is 0.1% by weight in homogeneous materials except for cadmium which is 0.01% by weight in homogenous materials. VersaLogic certifies that it gathered information concerning RoHS restrictive substances using appropriate methods to ensure its accuracy and that such information is true and correct to the best of its knowledge. VersaLogic acknowledges that customers will rely on this compliance statement in determining the compliance of their products with European Union state laws that implement the RoHS Directive. VersaLogic acknowledges that it has relied on information provided by its suppliers in declaring this compliance, and that VersaLogic may not have independently verified such information. However, VersaLogic agrees that, at a minimum, its suppliers have provided written assurance of RoHS compliance. If a customer and VersaLogic enter into a written agreement with respect to the identified product, the terms and conditions of that agreement, including any warranty rights and/or remedies provided as part of that agreement, will be the sole and exclusive source of VersaLogic liability and the customer’s remedies for issues that arise regarding information VersaLogic provides relative to RoHS compliance of this product. VL-MPEu-K1 Reference Manual 6 Introduction ABOUT ROHS In 2003, the European Union issued Directive 2002/95/EC regarding the Restriction of the use of certain Hazardous Substances (RoHS) in electrical and electronic equipment. The RoHS directive requires producers of electrical and electronic equipment to reduce to acceptable levels the presence of six environmentally sensitive substances: lead, mercury, cadmium, hexavalent chromium, and the presence of polybrominated biphenyls (PBB) and polybrominated diphenyl ethers (PBDE) flame retardants, in certain electrical and electronic products sold in the European Union (EU) beginning July 1, 2006. VersaLogic Corp. is committed to supporting customers with high-quality products and services meeting the European Union’s RoHS directive. Warnings DATA LOSS Warning! Using this device improperly can lead to the loss of all data stored on the public and/or private drives. If you resize the drives, all data on both the private and public drives will be erased. When you resize drives, you should back up all data on the flash drive before proceeding. Warning! If you lose your password, data on the private drive will be inaccessible. ELECTROSTATIC DISCHARGE Warning! Electrostatic discharge (ESD) can damage circuit boards, disk drives, and other components. The circuit board must only be handled at an ESD workstation. If an approved station is not available, some measure of protection can be provided by wearing a grounded antistatic wrist strap. Keep all plastic away from the board, and do not slide the board over any surface. After removing the board from its protective wrapper, place the board on a grounded, static-free surface, component side up. Use an antistatic foam pad if available. The board should also be protected inside a closed metallic antistatic envelope during shipment or storage. Note: The exterior coating on some metallic antistatic bags is sufficiently conductive to cause excessive battery drain if the bag comes in contact with the bottom side of the board. HANDLING CARE Warning! Care must be taken when handling the board not to touch the exposed circuitry with your fingers. VL-MPEu-K1 Reference Manual 7 Introduction Technical Support If you are unable to solve a problem after reading this manual, please visit the VL-MPEu-K1 product support page below. This page provides links to component datasheets and device drivers. VL-MPEu-K1 Support Page The VersaTech KnowledgeBase contains a wealth of technical information about VersaLogic products, along with product advisories. Click the link below to see all KnowledgeBase articles related to the VL-MPEu-K1. VersaTech KnowledgeBase If you have further questions, contact VersaLogic Technical Support at (503) 747-2261. VersaLogic support engineers are also available via e-mail at [email protected]. REPAIR SERVICE If your product requires service, you must obtain a Returned Material Authorization (RMA) number by calling (503) 747-2261. Please provide the following information: Your name, the name of your company, your phone number, and e-mail address The name of a technician or engineer that can be contacted if any questions arise Quantity of items being returned The model and serial number (barcode) of each item A detailed description of the problem Steps you have taken to resolve or recreate the problem The return shipping address Warranty Repair All parts and labor charges are covered, including return shipping charges for UPS Ground delivery to United States addresses. Non-warranty Repair All approved non-warranty repairs are subject to diagnosis and labor charges, parts charges, and return shipping fees. Please specify the shipping method you prefer and provide a purchase order number for invoicing the repair. Note: VL-MPEu-K1 Reference Manual Please mark the RMA number clearly on the outside of the box before returning. 8 Physical Details 2 Board Layout and Mounting VL-MPEU-K1 MOUNTING The VL-MPEu-K1 is a full size Mini PCIe card and needs to be mounted into a full size Mini PCIe site. On VersaLogic CPU boards, the module is secured using two nylon screws. VersaLogic offers 2 mm nylon screws (VL-HDW-110) and 2.5 mm nylon screws (VL-HDW108). On non-VersaLogic CPU boards, mounting might be accomplished using a latching system. Note: Be careful not to over tighten the nylon mounting screws. Optimum tightness is 1 lbf·in (0.1 N·m). VL-MPEU-K1 DIMENSIONS The VL-MPEu-K1 complies with Mini PCIe module (full size) dimensional standards. Dimensions are given below to help with pre-production planning and layout. Mount with two 2.5 mm or 2.0 mm nylon screws (VL-HDW-108 or VL-HDW-110) 50.95 30.00 Figure 2. VL-MPEu-K1 Dimensions (Not to scale. All dimensions in millimeters.) The VL-MPEu-K1 has no user I/O connectors aside from the Mini PCIe card edge connector. There are no jumper blocks. VL-MPEu-K1 Reference Manual 9 Encryption Device 3 The VL-MPEu-K1 uses SMSC TrustSpan™ technology that enables digital systems to securely communicate, process, and store information. The soldered-on multimedia card (eMMC) is a flash memory device with a managed interface. The eMMC can be configured for both encrypted and non-encrypted storage. The non-encrypted memory block may be used as a system boot device if desired. Warning! Using this device improperly can lead to the loss of all data stored on the public and/or private drives. If you resize the drives, all data on both the private and public drives will be erased. When you resize drives, you should back up all data on the flash drive before proceeding. Warning! If you lose your password, data on the private drive will be inaccessible. Encryption Device Features The key features of the VL-MPEu-K1 encryption technology are listed below. Hardware AES Encryption – The Advanced Encryption Standard (AES) is an industry standard technology used to protect documents. The VL-MPEu-K1 includes a high performance AES hardware engine to encrypt and decrypt data as it is transferred to and from the private flash drive. Because the encryption keys are only used within the AES hardware engine, they are never accessible to host software, including malware running at the highest privilege levels. Additionally, keys are never transferred across the USB interface, protecting against hardware-based man-in-the-middle attacks. Read-Only Drive with Secure Applications – The encryption applications are readonly. This prevents malware from tampering with or replacing the applications with counterfeit applications designed to compromise the confidentiality of the data in the private drive. Password Attack Protection – The most common type of attack is password guessing. The attacker can use a dictionary of commonly used passwords with an automated program to try thousands of different passwords in rapid succession. The VL-MPEu-K1 can defend against these attacks by limiting the number of incorrect password attempts. After 10 incorrect password attempts, the private drive encryption key is destroyed, preventing any access to the data on the private drive. The password is also reset. While data on the private drive is effectively destroyed in this way, the drive can be re-used. Public and Private Drives – The flash storage contains two sections; the public and private drive. The public drive provides read/write access and allows documents to be shared without a password. The private drive is password protected and AES encrypted to prevent unauthorized access. VL-MPEu-K1 Reference Manual 10 Encryption Device Configurable Drive Sizes – The percentage of space allocated to the public and private drives can be configured using the SecureUSB application. The module is shipped with the following approximate default drive sizes: 32 GB Model Read-only CD drive Public drive: Private drive: 45.5 MB 7.32 GB 22.9 GB 8 GB Model Read-only CD drive Public drive: Private drive: 45.5 MB 1.75 GB 5.26 GB Connecting the Drive After connecting the VL-MPEu-K1 to the host computer, a CD Drive will appear in Windows Explorer. This CD Drive contains the drive management utility named SecureUSB.exe. You will also see a public drive, which is ready for use. The private secure drive will not appear until you assign a password to the device. Figure 3. CD Drive and Public Drive in Windows Explorer Depending on your computer’s configuration, the AutoPlay pop-up might appear for the public drive. Access to this drive is not protected and does not require a password. Files placed there are visible to the public. This AutoPlay pop-up can be dismissed or used to open Windows Explorer to access the files on the drive. Figure 4. AutoPlay Pop-up for Public Drive A CD-ROM AutoPlay notification might also appear. It is recommended that you check the “Always do this for software and games” option, and then click Run SecureUSB.exe. VL-MPEu-K1 Reference Manual 11 Encryption Device Figure 5. AutoPlay Pop-up for CD Drive If either of these pop-ups does not appear, double-click the SecureUSB application to run it. You can access the public drive from Windows Explorer. When the SecureUSB application opens, it will prompt you to enter a password and hint to set up the drive for first use. SETTING THE PASSWORD AND RESIZING DRIVES 1. Choosing a Password The security of the drive depends on the strength of the password chosen. The password must be at least 7 characters (alphanumeric characters only, no special characters or spaces, case sensitive) with at least one number and one letter. (The default password is ‘default’.) The password may contain up to 48 characters. A long password provides more security than a short password. The password can be more easily remembered by using familiar word sequences or phrases. Use an online password strength checker to ensure that you are using a strong password. Strong password and hint example: 2BOrNot2B3389 Hint: ShakespeareQuote plus part of childhood phone number. VL-MPEu-K1 Reference Manual 12 Encryption Device Figure 6. SecureUSB Application Setup 2. Password Hint This password hint is shown whenever an attempt is made to unlock the drive with the wrong password. The password hint should mean something to you, but not someone else. Never use the actual password as the password hint. 3. Limit Password Retry Attempts With this option checked, the drive will count consecutive failed login attempts. When the count reaches 10, the drive will destroy the encryption keys used to access the data on the private drive and reset the drive to factory settings and default password (“default”). All data on the private drive will be permanently lost. You will need to go through the setup process to use the private drive again. With this option unchecked, the drive will allow an unlimited number of failed login attempts. Uncheck this option if you want to prevent an attacker from resetting your drive by entering 10 bad passwords. If you uncheck this option and forget your password, all data on the private drive will be inaccessible to you. In either case, a strong password should always be used. 4. Resize Drives You can choose how much space to allocate for the public and private drives. The total drive space is fixed (8 or 32 GB), which is divided between the two drives. When you resize the drives, both drives must be formatted. All data on both drives are lost. It is better to resize the drive before using the drive or storing anything on the drive. (See Resizing the Drives for more information.) VL-MPEu-K1 Reference Manual 13 Encryption Device USING THE SECUREUSB APPLICATION After successful setup or login, the SecureUSB application will appear as an icon in the system tray. The lock icon shows whether the drive is locked or unlocked. Figure 7. SecureUSB System Tray Icon - Locked and Unlocked (Far Left) Double click the icon to launch the application: Figure 8. SecureUSB Application Home Screen Or right click the icon to access a shortcut menu: Figure 9. SecureUSB System Tray Menu VL-MPEu-K1 Reference Manual 14 Encryption Device Application options are described below. Password – To unlock the drive, enter the correct password and click Login. Login – Opens the private drive and enables access to the resize and change password features. Resize Drives – Opens the resize drive dialog. This feature is described below. Device Info – Displays information about the flash drive, application and firmware versions, and total and individual drive sizes. Figure 10. Device Information The right-click menu contains these additional options: Logout – Closes the private drive and disables access to the resize and change password features. The application continues to run, monitoring the state of the drive. Change Password – Opens the change password dialog described in Changing the Password. About – Displays information about the flash drive, application and firmware versions, and total and individual drive sizes. User Manual – Displays a device user manual prepared by PNY Technologies. Logout & Exit – Locks the drive and closes the application. This function is available from the shortcut menu or by clicking the close button on the right of the application title bar. VL-MPEu-K1 Reference Manual 15 Encryption Device RESIZING THE DRIVES The relative sizes of the public and private portions of the drive can be changed. Selecting the Resize Drives option opens the Change Drive Size dialog box. Warning! Resizing the drives erases all data on both the public and private drive. It is recommended that you perform this process only on a new flash drive. Or, if you perform this operation on a drive with data, back up all data on the flash drive before proceeding. Figure 11. Change Drive Size Dialog Box Use the slider control to select how much space to allocate to each drive. If desired, you can make the entire drive secure by sliding the control all the way to the left. This assigns all the space to the private drive. The public drive will no longer appear when you plug in the drive. By sliding the control all the way to the right, you can make the entire drive public. If you change your mind later, you can use this feature at any time to restore the public or private drive. However, any time you resize the drives, you will lose any data stored on the drives. Changes are not initiated until you click OK. Click Cancel to abort the changes and close the dialog. If you choose to proceed with the resize procedure, a pop-up box appears warning that all data on both the public and private drive will be erased. Make sure all of your data is safely backed up to another location. Figure 12. Resize Warning VL-MPEu-K1 Reference Manual 16 Encryption Device Select Yes to confirm. This will format both the public and private drives. A progress bar appears, followed by a notification that the drives were successfully resized and formatted. Click OK to dismiss the notification and the format progress indicator. Figure 13. Format Progress Indicator and Complete Message Using the Drive UNLOCKING THE DRIVE You must enter the correct password and press the Login button to gain access to the private drive and the other security functions, such as changing your password. If you press the Login button without entering a password, you will be prompted to enter a password. The application will not attempt to unlock the drive using a blank password. (Pressing login with a blank password does not count as a login attempt and does not count as a password retry attempt.) Enter the same password used during device initialization. The password is masked on-screen to protect from onlookers. After a successful login, the private drive is unlocked and you are given the option to Logout and lock the private drive or Change Password. Exiting from the SecureUSB application will lock the drive and prevent access to the private partition. After a successful login, the private drive is unlocked and visible in Windows Explorer. Important: After a successful login, the application will minimize itself and be present in the notification area of the task bar. Double-click the icon to re-launch the application, or right-click the icon to open the quick launch menu. CHANGING THE PASSWORD The device must be unlocked before you can access the change password feature. Enter your current password and click Change Password. VL-MPEu-K1 Reference Manual 17 Encryption Device Figure 14. Change Password Dialog Box Enter your current password, and then enter your new password twice to confirm the correct spelling. You have the option to enter a password hint, and enable or disable the password retry limit feature. IF YOU FORGET YOUR PASSWORD If you forget or mis-type your password, a warning with your password hint will be displayed, and you can re-enter your password. If the “Limit Password Retry Attempts” option has been checked, the device will allow you 10 attempts to enter the correct password. After the 9th failed attempt, another warning informs you that you have just one more chance to enter a correct password. Figure 15. Last Login Attempt Message VL-MPEu-K1 Reference Manual 18 Encryption Device After the 10th failed attempt, a message indicates that the maximum number of attempts has been exceeded. The flash drive is reformatted and all data is erased. Figure 16. Login Failure Message RESETTING THE DRIVE AFTER A FAILED PASSWORD ATTACK After a failed password attack, you must re-initialize the device. Choosing the File Format of the Drives The SecureUSB application will automatically format the drives when the drives are resized or after a reset. The application will select settings for your drive to give the best performance. However, you can manually format the public or the private drive to fit your needs. Keep in mind that manually formatting the drive may lead to reduced performance or compatibility problems with other computers. Important: Formatting the drive manually can result in decreased performance. It is recommended that you let the SecureUSB application format the drive. The application will attempt to format the drive when you choose to resize the public and private drives or after a device reset due to exceeding the password retry limit. To manually choose the file format of the drive, right click the drive in Windows Explorer and select Format from the pop-up menu. If you need to store files larger than 4 GB, select the exFAT file format. Make sure you have the correct drive selected, and then click OK on the warning dialog. After successfully formatting the drive, you will see Format Complete message. Note: Some OS versions do not support the exFAT format, even though the Format dialog box allows you to select it. If you receive a message indicating the format failed, you will need to choose a different file format such as FAT or FAT32. VL-MPEu-K1 Reference Manual 19