1
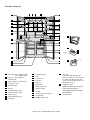
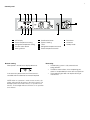
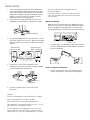
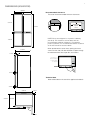
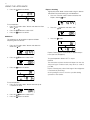
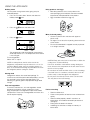
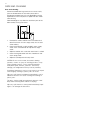
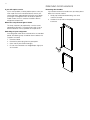
User manual
Four Door Refrigerator EQE6207SD
EQE6807SD
2
WE’RE THINKING OF YOU
hank you for purchasing an Electrolux appliance.
T
You’ve chosen a product that brings with it decades
of professional experience and innovation. Ingenious
and stylish, it has been designed with you in mind.
So whenever you use it, you can be safe in the
knowledge that you’ll get great results every time.
Welcome to Electrolux.
BEFORE USING YOUR APPLIANCE
efore you use the refrigerator, we recommend that you
B
read through the whole user manual which provides
the description of the refrigerator and its functions. To
avoid the risks that are always present when you use an
electrical appliance, it is important that the refrigerator is
installed correctly and that you read the safety instructions
carefully to avoid misuse and hazards.
For future reference, please store this booklet in a
safe place.
Contents
3
Important safety instructions
4
Description of your appliance
6
Installation
7
Dimensions
9
Controlling temperature
9
Timer
9
Door alarm
10 Child lock
10 Express freezing
11 Holiday mode
11 Storing food
12 Care and cleaning
13 Troubleshooting
14 Removing door handles
15 Warranty
CONDITIONS OF USE
This appliance is intended to be used in household and
similar applications such as:
• Staff kitchen areas in shops, offices and
other working environments
• Farm houses
• By clients in hotels, motels and other residential
type environments
• Bed and breakfast type environments
• Catering and similar non-retail applications
BEFORE YOU CALL
Please ensure you read the instruction manual fully before
you call for service, or a full service fee could be applicable.
Record model and serial
number here:
Model:
Serial No:
LEGEND
Warning! This symbol indicates information concerning your
personal safety.
Caution!
This symbol indicates information on how to avoid
damaging the refrigerator.
Important!
This symbol indicates tips and information about use of
the refrigerator.
ENVIRONMENT!
This symbol indicates tips and information about
economical and ecological use of the refrigerator.
3
safety information
lease read the user manual carefully and store in a handy
P
place for later reference. Pass the user manual on to
possible new owners of the refrigerator.
Read the following carefully to avoid damage or injury.
Put the appliance in a dry place, avoiding areas of
high moisture or humidity.
Don’t put the appliance in frosty or unprotected
areas, for example in a garage or on a verandah.
Don’t put the appliance in direct sunlight.
This symbol indicates never to do this
Don’t put the appliance near stoves, fires or heaters.
This symbol indicates always do this
When transporting and installing the refrigerator,
care should be taken to ensure that no parts of the
refrigerating circuit are damaged.
Warning!
• If pressurised aerosol containers bear the word
‘flammable’ and/or a small flame symbol, do not
store them inside any refrigerator. If you do so you
may cause an explosion.
• W
hen you dispose of refrigerators and freezers,
remove any doors. Children can suffocate if they get
trapped inside.
• T
his refrigerator contains insulation formed with
flammable blowing gases. Avoid safety hazards by
carefully disposing of this appliance.
• D
on’t use a steam cleaner. If live components come
into contact with condensing steam, they may
short-circuit or cause an electric shock.
Warning!
This appliance can be used by children
aged from 8 years and above and persons with reduced physical,
sensory or mental capabilities or lack of experience and knowledge if
they have been given supervision or instruction concerning use of the appliance in a safe way and understand the hazards involved. Children shall
not play with the appliance.
Cleaning and user maintenance shall
not be made by children without supervision.
Warning!
The appliance must be plugged into its own
dedicated 220-240V, 50Hz AC electrical outlet.
Ensure that the electric outlet is properly earthed to
ground. Consult a qualified electrician if you
are unsure.
Do not use an extension cord or adapter plug.
If the power cord is damaged, it must be replaced by the manufacturer, its service agent or similarly qualified persons in order to avoid a hazard.
Unplug the appliance before cleaning and before
changing the light bulb to avoid electric shock.
Never unplug the appliance by pulling on the power
cord. Always grip the plug firmly, and pull straight out
of the receptacle to prevent damaging the power cord.
Choose a location that is not too cold - the
temperature should be above 10°C.
Do not store explosive substances such as aerosol
cans with a flammable propellant in this appliance.
Do not damage the refrigerant circuit.
Keep ventilation openings in the appliance enclosure
or in the built-in structure clear of obstruction.
When correctly installed, your appliance should:
• have adequate clearance to the back and sides for
air circulation (refer to page 7).
• be aligned to the surrounding cupboards.
Warning!
It is important to use your refrigerator safely. This
means you need to supervise young children and infirm
persons when they use it. You need to make sure that
young children do not play with the refrigerator. Follow
the tips below:
Never let children play with the refrigerator.
Never store fizzy drinks in the freezer compartment.
Never try to repair the refrigerator yourself.
Never use electric heaters or dryers to defrost the
freezer because you can receive an electric shock.
Never use electrical appliances inside the food
storage compartments of the refrigerator, unless they
are of the type recommended by the manufacturer.
Do not use mechanical devices or other means to
accelerate the defrosting process other than those
recommended by the manufacturer.
Warning!
R600a refrigerant warning
This appliance contains flammable R600a refrigerant.
Avoid safety hazards by carefully installing, handling,
servicing and disposing of this appliance.
• Ensure that the tubing of the refrigerant circuit is
not damaged during transportation and installation.
• Leaking refrigerant may cause eye injuries or ignite.
• The room for installing the appliance must be at
least 1m3 per 8g of refrigerant. The amount of
refrigerant in the appliance can be found on the
rating plate inside the appliance.
• It is hazardous for anyone other than an authorised
Service Person to service this appliance
In Queensland, the authorized Service Person
MUST hold a Gas Work Authorisation for
hydrocarbon refrigerants, to carry out servicing or
repairs which involve the removal of covers.
4
Four-door refrigerator
22
12
11
23
12
22
13
14
1
2
1a
1
15
16
24
3
17
4
18
19
5
25
6
20
5
21
18
6
7
7
22
22
8
8
9
9
Partition
20
Lever
10
1 Door bins (3 pcs EQE6807SD)
(2 pcs EQE6207SD)
1a Door bin - Only applies to
EQE6807DS
2 Adjustable glass shelf (2 pcs)
3 Fixed glass shelf
4 Bottle bin (left)
5 Crisper
6 Freezer drawer (small)
7 Freezer drawer (large)
8 Rollers (4 pcs)
9 Adjustable feet (2 pcs)
10 Kickplate
11 Aluminium panel
23 Eco sign:
12 Light
With the refrigerator door left
open, the lamp will slowly change
its colour from blue to orange. It
shows that the temperature in the
refrigerator is rising
24 Deodorising unit
NOTE: Deodorising unit cannot
remove all of the odours
thoroughly. Wrap the food with
strong odours.
25 Control panel
13 Dairy bin lid
Dairy bin
15 Egg tray
16 Egg pocket
17 Deli compartment
18 Bottle bin (right)
19 Crisper
20 Twist ice and serve (2 pcs)
21 Ice cube box
22 Magnetic door seals
14 Features may vary depending on the model.
5
Control panel
1
7
8
9
2
3
5
Function
Select
6
13
1
2
3
4
5
12
11
10
LCD display
Freezer temperature setting
Refrigerator temperature setting
Function select button
Setting selector
4
6
Confirmation button
7 Express freezing
8 Timer
9 Refrigerator temperature control
10 Freezer temperature control
Default setting
When power is turned on the display defaults to:
In the event of a power failure, the Timer feature is
cancelled and will need to be re-entered if required.
NOTE: When no operation is made for 30 seconds, the
display will automatically return to the initial content. The
backlight will become dark if there is no operation for 3
minutes. The backlight will turn off if there is no operation
for 6 minutes.
11 Door alarm
Child lock
13 Holiday mode
12 Defrosting
• T
he defrosting system is fully automatic and
energy efficient.
• The defrost water collects in the evaporating pan,
where it is evaporated by the heat of the compressor.
• The evaporating pan does not require cleaning or
maintenance.
6
Installation
1.To ensure adequate ventilation for your refrigerator, it
is recommended to provide space of 60mm on both
sides and at the back, and space of 90mm above the
refrigerator. Insufficient spacing will decrease cooling
efficiency, increase energy consumption and may
reduce the life of the unit (see page 7).
2.Using the two front adjustable feet, ensure that the
refrigerator is positioned firmly and level on the floor.
the unit to sag over time causing the doors to
become misaligned.
If the mains power is switched on when the door is
open, the door alarm will sound. Close the door to
stop the alarm.
When transporting
Wipe up water in the evaporating pan. Before wiping up
the water, wait more than 1 hour after pulling out the plug
because refrigeration cycle equipment is extremely hot.
(The evaporating pan is located at the rear of the product.)
Adjustable feet
3.Using the adjustable feet, raise the front of the unit so it
leans back slightly, this will assist in door closing. Make
final adjustments to ensure that the doors are correctly
aligned.
When the left
door is raised
When the right
door is raised
Lower the foot
at right side*
Evaporation pan
• U
sing the rollers, it is possible to move back and forth.
Carry the refrigerator by the holding devices located on
the rear and bottom.
Lower the foot
at left side*
*Until the adjustable foot on the
other side is slightly off ground.
4.Remove the 4 screws from the bottom of the
refrigerator and use these to fit the kickplate (supplied
inside the refrigerator compartment).
Before using your refrigerator
• C
lean the inside parts with a cloth soaked in warm
water. If soapy water is used, wipe it off thoroughly.
Screw
(4 screws)
Screw
Kickplate
5.Connect the power plug to a 240 volt 10 amp
powerpoint.
NOTES:
Position your refrigerator so that the plug is accessible.
Keep your refrigerator out of direct sunlight.
Do not place next to a heat generating appliance.
his refrigerator is designed for indoor use only – do not
T
place the unit on an unsealed surface.
o avoid vibration and misalignment of the doors, the
T
unit must be level. Place the unit on a solid flat surface.
Uneven floors eg. slate, tiles and floorboards, can cause
7
dimensions (EQE6207SD)
818mm
890mm
200mm
Recommended clearances
442mm
12mm
These are the recommended minimum clearances.
60mm
877mm
90mm 102mm
90mm 102mm
1720mm
60mm
60mm
60mm
Recommended
60mm
Recommended
airspace
airspace
CABINET
CABINET
DOORS
DOORS
50mm
60mm
90mm 102mm
60mm
728mm
890mm
442mm
12mm
325mm
When positioned in a corner
area, spacing 325mm
of at least
325mm on the sides will allow the doors to open enough
to enable removal of the crisper bins and shelves.
818mm
200mm
12mm
877mm
13mm
890mm
1720mm
818mm
Recommended
NOTE: Doors are designed to sit proud of cabinetry airspace
(not flush). The clearances shown above are the
CABINET
recommended minimum
clearances. For optimum
818mm
DOORS
product operation,
it is recommended that the clearance
200mm
at40mm
the rear should not exceed 75mm.
Front face of
bench aligned
to front edge
of cabinet
325mm
50mm
685mm
50mm
728mm
90°
Technical data
40mm
Refer
to data label on the rear of the appliance for details.
1120mm
40mm
13mm
890mm
818mm
685mm
90°
1120mm
60
8
dimensions (EQE6807SD)
818mm
890mm
200mm
Recommended clearances
442mm
12mm
These are the recommended minimum clearances.
60mm
90mm
102mm
102mm
Minimum
recommended
airspace
60mm
1830mm
60mm
CABINET
50mm
Minimum
recommended
airspace
CABINET
DOORS
90mm
DOORS
60mm
60mm
Minimum
recommended
NOTE: Doors are designed to sit proud of cabinetry airspace
102mm
728mm
(not flush). The clearances shown above are the
CABINET
recommended minimum
clearances. For optimum
818mm
product operation,
it is recommended that the clearance DOORS
200mm
at40mm
the rear should not exceed 75mm.
890mm
442mm
12mm
When positioned
in a corner area, spacing of at least
325mm
325mm
325mm on the sides will allow the
doors to open enough
to enable removal of the crisper bins and shelves.
818mm
200mm
12mm
987mm
13mm
890mm
1830mm
818mm
60mm
90mm
60mm
987mm
Front face of
bench aligned
to front edge
of cabinet
325mm
50mm
685mm
50mm
728mm
90°
Technical data
40mm
Refer
to data label on the rear of the appliance for details.
1120mm
40mm
13mm
890mm
818mm
685mm
90°
1120mm
9
USING THE APPLIANCE
The refrigerator controls its temperature automatically.
However, if needed, adjust the temperature as follows.
Refrigerator compartment
1.Press the “Function select” button and select the
Refrigerator temperature setting icon.
2.Press the /
temperature (
3. Press the
button to select the desired
to increase,
to decrease).
Timer
The timer can be set for up to 99 minutes and 30 seconds,
in intervals of 30 seconds.
1.Press the “Function select” button and select the
Timer
icon. The previous timer entry is displayed.
2.Press the / button to select the time ( to
increase,
to decrease). Hold the button down to set
the timer more quickly.
button to confirm.
3.Press the
button to confirm.
The timer will start. The countdown will begin.
When the set time is reached, the end tone will sound
(for about 30 seconds).
Adjustable between 0° and 6°C in steps of 0.5°.
Important!
For normal operation, the fridge temperature should be
set to 3°C. Adjust higher or lower to suit your needs.
To stop the end tone, press
Freezer compartment
1.Press the “Function select” button and select the
Freezer temperature setting icon.
2.Press the /
temperature (
button to select the desired
to increase,
to decrease).
To cancel the timer
1.Press the “Function select” button and select
the Timer
icon.
2.Press the
button.
Door alarm
3. Press the
button to confirm.
Adjustable between -13° and -21°C in steps of 0.5°.
Important!
For normal operation, the freezer temperature should
be set to -18°C. Adjust higher or lower to suit your
needs.
An alarm will sound momentarily if a door is left open for
approximately 1 minute (60 seconds). If a door is left open
for 3 minutes, the alarm will sound continuously.
To cancel operation
1.Press the “Function select” button and select the Door
Alarm icon.
2.Press the
/
button to select “OFF”.
10
USING THE APPLIANCE
3.Press the
button to confirm.
Express freezing
High-quality frozen foods can be made using this feature.
Convenient for home-freezing of small food items.
1.Press the “Function select” button and select the
Express freezing icon.
To start operation
1Press the “Function select” button and select the Door
Alarm icon.
2Press the / button to select “ON”.
3Press the
button to confirm.
Child lock
The child lock can be turned on to prevent children
tampering with the controls.
2. Press the
/
button and select “ON”.
3. Press the
button.
1.Press the “Function select” button and select the
Child Lock icon.
Express Freezing ends automatically in approximately 2
hours (the icon disappears).
2.Press the
/
3.Press the
button to select “ON”.
button to confirm.
To cancel operation: Select “OFF” in step 2.
Notes:
The time taken to freeze the item will depend on the size,
shape and type. For best results, keep items as small as
possible.
Express Freezing may take a little longer if the refrigerator
is automatically defrosting.
void opening the door as much as possible during
A
operation of this feature.
To cancel operation
1.Press the “Function select” button continuously for
2 seconds or more.
2.Press the
3.Press the
/
button to select “OFF”.
button to confirm.
11
USING THE APPLIANCE
Dairy products and eggs
Holiday mode
Use this power saving feature when going away for
extended periods.
1.Press the “Function select” button and select the
Holiday mode
icon.
2. Press the
/
• M
ost dairy products have a use by date on the
outer packaging which indicates the recommended
temperature and expected life of the product.
• Eggs should be stored in the egg tray.
button and select “ON”.
Meat, fish and poultry
3. Press the
button.
The temperature inside the refrigerator compartment
will be adjusted to 10°C. The temperature in the freezer
is not changed.
To cancel operation
Select “OFF” in step 2.
Note: In Holiday Mode, the life of the food in the
refrigerator compartment may be reduced to 1/2 or 1/3
of normal. Before going away for extended periods of
time, we recommend removing all perishable foods from
the refrigerator, before setting this feature.
Storing food
Refrigeration reduces the rate of food spoilage. To
maximise the shelf life of perishable food products, ensure
that the food is of the freshest possible quality. The
following is a general guide to help promote longer food
storage.
• P
lace on a plate or dish and cover with paper or
plastic wrap.
• For larger cuts of meat, fish or poultry, place to the rear
of the shelves.
• Ensure all cooked food is wrapped securely or placed
in an airtight container.
NOTES: Evenly place the food on the shelves to allow the
cooling air to circulate efficiently.
Hot foods should be cooled before storing. Storing hot
foods increases the temperature in the unit and increases
the risk of food spoilage.
Do not block the outlet and inlet of the cool air circulating
circuit with foods or containers; otherwise the foods will
not be evenly cooled throughout the refrigerator.
Do not place food directly in front of the cold air outlet.
This may lead to the food freezing.
Fruit and vegetables
To minimise moisture loss, fruit and vegetables should
be loosely enclosed in a plastic material (e.g. wrap,
bags) and placed in the Vegetable crisper or the Chilled
compartment. Those fruits and vegetables with thick skins
do not require wrapping.
For best freezing
• Food should be fresh.
• Freeze small quantities of food at a time to freeze them
quickly.
• Food should be properly stored in containers or
freezer bags. Air should be removed if possible and
seal tightly.
• Evenly place the food in the freezer.
• Label bags or containers to keep an inventory of
frozen food.
12
CARE AND CLEANING
Care and cleaning
Some household cleaning chemicals can cause cracks,
splits or discolouration on the inside surface of the
refrigerator and door liner. Only use diluted dishwashing
liquid and ensure that all plastic is wiped with fresh water
after cleaning.
Alkaline detergents may affect the aluminium parts of the
door handle, causing it to tarnish.
1.Remove the shelves and bins from the cabinet and
door. Wash them in warm soapy water; rinse in clean
water and dry.
2.Clean the inside with a cloth soaked in warm soapy
water. Then use cold water to wipe off the soapy
water.
3. Wipe the exterior with a soft cloth each time it is soiled.
4.Clean the magnetic door seal with a toothbrush and
warm soapy water.
5. Wipe the control panel with a dry cloth.
Notes: Do not use hot water, household cleaning
powders, creams or spray-on cleaning products or any
other cleaning products such as mineral turpentine,
methylated spirits, thinners, petrol etc. These may
damage your refrigerator and may void any warranty.
If undiluted detergent is used or soapy water is not wiped
off thoroughly, cracking of plastic parts can result.
ipe any spills from the refrigerator immediately, acid or
W
alkaline in the food can cause cracking and staining of
plastic parts.
he glass shelves weigh approximately 3kg each. Hold
T
firmly when removing from cabinet or carrying.
Wipe any spills from the control panel immediately, liquid
ingress can damage the electronics.
13
Troubleshooting
If you think something may be wrong with your refrigerator,
you can carry out some easy checks before calling for
service. You may locate the problem, sparing yourself from
inconvenience and saving time and money.
If there are
odours
inside the
refrigerator
Some foods produce odours.
CAUTION!
The glass shelves weigh approximately 3kg each.
Hold firmly when removing from the cabinet or when
carrying.
CAUTION!
Problem
Solution
When your
appliance is
not operating
Check that the power cord is plugged into
the power outlet properly and that the outlet
is switched ‘ON’.
Some containers and wrapping can cause
odours.
Ask yourself if the odour started about the
same time you started storing something
unusual.
When
the motor
seems to run
more than
expected
Try running another appliance from the
power outlet. If no power is coming from the
outlet you may have blown a fuse or tripped
a circuit of your household power supply.
• Are controls set too cold? See “Controlling
temperature”.
• Have large amounts of warm food just
recently been stored? Summer, festive
seasons and holidays usually mean a lot
more work for your refrigerator.
It is normal for the freezer fan NOT to
operate during the automatic defrost cycle,
or for a short time after the refrigerator is
switched on.
Modern refrigerators/freezers with
increased storage capacity use high
speed compressors. These can provide a
seemingly high level of sound which is quite
normal. Normal operational sounds include:
• Occasional gurgling, similar to water
boiling.
• Air flow noise (air circulates because of a
small fan).
• If the day is hot or the room is very warm,
the refrigerator will need to run more than
normal.
• The refrigerator will run more that normal
just after you install it or when it has been
turned off for a long time.
If the
temperature
in the
refrigerator is
too warm
Other strange sounds may mean that you
need to check and take action. For example,
noises may mean that:
You may have kept the door open too long
or too frequently.
Food containers or packaging may be
holding a door open.
If the
temperature
in the
refrigerator is
too cold
• Bottles are badly placed and rattling.
• There are vibrations from an object on top
of or behind or beside the refrigerator.
• The back of the refrigerator cabinet is
touching the wall.
Remember it is quite normal for noise to
seem louder just after the refrigerator starts
operating.
Refer to “Controlling temperature”.
Increase the temperature to avoid high
energy consumption.
• The cabinet is not level.
• The floor is uneven or weak.
Check that the refrigerator has enough
clearance at the sides, back and top. Refer
to the installation instructions at the front of
this booklet.
Refer to “Controlling temperature”.
• A popping noise heard during automatic
defrost.
• A clicking noise heard just before
the compressor starts (this is merely
the automatic switching action of
the temperature control, turning the
compressor on or off).
Your new refrigerator provides you with large
capacities in both the refrigerator section
and the separate freezer. It is normal for the
motor to operate frequently. However, to
keep operation to a minimum, check the
following:
• Are doors kept open too long or too often?
Try adjusting the temperature control to a
slightly “colder” position.
When there
is refrigerator
noise
The interior may need cleaning.
If heavy
frosting
occurs in the
freezer
Make sure you fully close the freezer and
fridge doors. If the doors are left partly
open a heavy frost will coat the inside of the
freezer. If a frost develops, remove it. Take
care to properly close the doors and the
frost will not reoccur.
If water
droplets
form on the
aluminium
panel
This is normal as the panel is cooled from
the rear, therefore indirectly cooling the
refrigerator compartment. It is normal for
water droplets to form on this panel under
humid weather conditions.
14
removing door handles
If you still require service
If you have a problem, and the problem persists after you
have made the checks mentioned above, contact your
nearest Electrolux approved Service Centre or the dealer
you bought the refrigerator from. Be ready to quote the
model number, which is stated on the label inside the
refrigerator compartment.
When the compartment light is blown
The lamp should only be replaced by a service centre
approved by Electrolux. The compartment light is not to
be removed other than by qualified service personnel.
Switching off your refrigerator
If the refrigerator needs to be switched off for an extended
period, the following steps should be taken to reduce the
symptoms of mould:
1. Remove all food.
2. Remove the power plug from the powerpoint.
3. Clean and dry the interior thoroughly.
4.Ensure that all the doors are wedged open slightly for
air circulation.
Removing door handles
If you need to remove the handles from your door, please
follow the instructions below:
1. Simply tap handle from below being sure not to
scratch the handle.
2. Handle will unclip and can be pulled up and out
to remove.
15
Warranty
FOR SALES IN AUSTRALIA AND NEW ZEALAND
APPLIANCE: REFRIGERATION
This document sets out the terms and conditions of the product
warranties for Electrolux Appliances. It is an important document.
Please keep it with your proof of purchase documents in a safe place
for future reference should you require service for your Appliance.
1. In this warranty:
(a) ‘acceptable quality’ as referred to in clause 10 of this warranty has
the same meaning referred to in the ACL;
(b) ‘ACL’ means Schedule 2 to the Competition and Consumer Act 2010;
(c) ‘Appliance’ means any Electrolux product purchased by you and
accompanied by this document;
(d) ‘ASC’ means Electrolux authorised service centres;
(e) ‘Electrolux’ means Electrolux Home Products Pty Ltd of 163
O’Riordan Street, Mascot NSW 2020, ABN 51 004 762 341 in
respect of Appliances purchased in Australia and Electrolux (NZ)
Limited (collectively ‘Electrolux’) of 3-5 Niall Burgess Road, Mount
Wellington, in respect of Appliances purchased in New Zealand;
(f) ‘major failure’ as referred to in clause 10 of this warranty has the
same meaning referred to in the ACL and includes a situation when
an Appliance cannot be repaired or it is uneconomic for Electrolux,
at its discretion, to repair an Appliance during the Warranty Period;
(g) ‘Warranty Period’ means the Appliance is warranted against
manufacturing defects in Australia and New Zealand for 24 months
and for the Appliance’s compressor, condenser, evaporator and drier,
an additional 36 months parts only warranty applies, following the
date of original purchase of the Appliance;
(h) ‘you’ means the purchaser of the Appliance not having purchased
the Appliance for re-sale, and ‘your’ has a corresponding meaning.
2. This warranty only applies to Appliances purchased and used in Australia
or New Zealand and used in normal domestic applications and is in
addition to (and does not exclude, restrict, or modify in any way) any
non-excludable statutory warranties in Australia or New Zealand.
3. During the Warranty Period Electrolux or its ASC will, at no extra charge
if your Appliance is readily accessible for service, without special
equipment and subject to these terms and conditions, repair or replace
any parts which it considers to be defective. Electrolux or its ASC may
use remanufactured parts to repair your Appliance. You agree that
any replaced Appliances or parts become the property of Electrolux.
This warranty does not apply to light globes, batteries, filters or similar
perishable parts.
4. Parts and Appliances not supplied by Electrolux are not covered by
this warranty.
5. To the extent permitted by law, you will bear the cost of transportation,
travel and delivery of the Appliance to and from Electrolux or its ASC. If
you reside outside of the service area, you will bear the cost of:
(a) travel of an authorised representative;
(b) transportation and delivery of the Appliance to and from Electrolux
or its ASC.
In all instances, unless the Appliance is transported by Electrolux or an
Electrolux authorised representative, the Appliance is transported at the
owner’s cost and risk while in transit to and from Electrolux or its ASC.
6. Proof of purchase is required before you can make a claim under
this warranty.
7. You may not make a claim under this warranty unless the defect claimed
is due to faulty or defective parts or workmanship. Electrolux is not liable
in the following situations (which are not exhaustive):
(a) the Appliance is damaged by:
(i) accident
(ii) misuse or abuse, including failure to properly maintain or service
(iii) normal wear and tear
(iv) power surges, electrical storm damage or incorrect power supply
(v) incomplete or improper installation
(vi) incorrect, improper or inappropriate operation
(vii) insect or vermin infestation
(viii) failure to comply with any additional instructions supplied with
the Appliance;
(b) the Appliance is modified without authority from Electrolux in writing;
(c) the Appliance’s serial number or warranty seal has been removed
or defaced;
(d) the Appliance was serviced or repaired by anyone other than
Electrolux, an authorised repairer or ASC.
8. This warranty, the contract to which it relates and the relationship
between you and Electrolux are governed by the law applicable where
the Appliance was purchased. Where the Appliance was purchased in
New Zealand for commercial purposes the Consumer Guarantee Act
does not apply.
9. To the extent permitted by law and subject to your non-excludable
statutory rights and warranties, Electrolux excludes all warranties and
liabilities (other than as contained in this document) including liability for
any loss or damage whether direct or indirect arising from your purchase,
use or non use of the Appliance.
10. For Appliances and services provided by Electrolux in Australia,
the Appliances come with a guarantee by Electrolux that cannot be
excluded under the ACL. You are entitled to a replacement or refund
for a major failure and for compensation for any other reasonably
foreseeable loss or damage. You are also entitled to have the Appliance
repaired or replaced if the Appliance fails to be of acceptable quality and
the failure does not amount to a major failure.
The benefits to you given by this warranty are in addition to your other
rights and remedies under a law in relation to the Appliances or services
to which the warranty relates.
11. At all times during the Warranty Period, Electrolux shall, at its discretion,
determine whether repair, replacement or refund will apply if an
Appliance has a valid warranty claim applicable to it.
12. For Appliances and services provided by Electrolux in New Zealand,
the Appliances come with a guarantee by Electrolux pursuant to the
provisions of the Consumer Guarantees Act, the Sale of Goods Act and
the Fair Trading Act.
13. To enquire about claiming under this warranty, please follow these steps:
(a) carefully check the operating instructions, user manual and the terms
of this warranty;
(b) have the model and serial number of the Appliance available;
(c) have the proof of purchase (e.g. an invoice) available;
(d) telephone the numbers shown below.
14. You accept that if you make a warranty claim, Electrolux and its ASC
may exchange information in relation to you to enable Electrolux to meet
its obligations under this warranty.
Important Notice
Before calling for service, please ensure that the steps listed in clause 13 above have been followed.
FOR SERVICE
or to find the address of your nearest
state service centre in Australia
PlEASE CAll 13 13 49
For the cost of a local call (Australia only)
FOR SERVICE
or to find the address of your nearest
authorised service centre in New Zealand
FREE CAll 0800 10 66 10
(New Zealand only)
GFR_Warr_Aug13
SERVICE AUSTRAlIA
ELECTROLUX HOME PRODUCTS
www.electrolux.com.au
SERVICE NEW ZEAlAND
ELECTROLUX (NZ) Limited
www.electrolux.co.nz
FOR SPARE PARTS
or to find the address of your nearest
state spare parts centre in Australia
PlEASE CAll 13 13 50
For the cost of a local call (Australia only)
FOR SPARE PARTS
or to find the address of your nearest
state spare parts centre in New Zealand
FREE CAll 0800 10 66 20
(New Zealand only)
16
Electrolux Home Products Australia
telephone: 1300 363 640
fax:
1800 350 067
email:[email protected]
web:www.electrolux.com.au
Electrolux Home Products New Zealand
telephone: 0800 234 234
fax:
0800 363 600
email:[email protected]
web:www.electrolux.co.nz
The Thoughtful Design Innovator.
Do you remember the last time you opened a gift that made you say
“Oh! How did you know? That’s exactly what I wanted!” That’s the kind
of feeling that the designers at Electrolux seek to evoke in everyone who
chooses or uses one of our products. We devote time, knowledge, and
a great deal of thought to anticipating and creating the kind of appliances
that our customers really need and want.
This kind of thoughtful care means innovating with insight. Not design for design’s
sake, but design for the user’s sake. For us, thoughtful design means making
appliances easier to use and tasks more enjoyable to perform, freeing our
customers to experience that ultimate 21st century luxury, ease of mind. Our aim
is to make this ease of mind more available to more people in more parts of their
everyday lives, all over the world. So when we say we’re thinking
of you, you know we mean just that.
The “Thinking of you” promise from Electrolux goes beyond meeting the needs of
today’s consumers. It also means we’re committed to making appliances safe for
the environment—now and for future generations.
Electrolux. Thinking of you.
Share more of our thinking at www.electrolux.com.au or www.electrolux.co.nz
P/No. 808727401
SC part code TINS-B571CBRZ
© 2014 Electrolux Home Products Pty Ltd.
ABN 51 004 762 341
EMAN_4DOORFRI_Jan14