1
Wintal® Digital Living
CONTENTS PREFACE···
2
2
SAFETY PRECAUTIONS ·· ···· ····· ·······
3
FRONT, BACK, CONNEXIONS OF LCD ... ......... .......... ~- ...... - .............. .. .. .... .. 3 4
TV INSTALLATION GUlDE ...................... .. ...... ...................- ............... ........ . .. 4 5
..... ............ "'~~- ...................... ......... .... :2 •............... ..... ·4 4.1
CONNECTING ANTENNAS DRAWIN<
4.2
VIDEO INPUTDRAWfNG
4.3
S-VIDEO INPUT DRAWING .......... ·
4.4
YPbPr INPUT DRAWING
............... .....
4 .5
YCbCr INPUT DRAWING
.. - ............... ) 4.6
PC INPUT DRAWING .... ..
4.7
HDMI INPUT DRAWING
j ..
·4
4
~
•... •·.... .. .. .. 5 ............ :; .....
CONFIGURATION OFTHE LCD .. ...... ........ ..... - ........ - . -....,.. ~
(, 5.1
PICTURE SETTING
5.2
SOUND SETTING
5.3
TV CHANNEL SEARCH
5.4
FUNCTION SETTING .. .... .. .. ·
7
6
REMOTE CONTROL INSTRUCTIONS·
II 7
REMOTE CONTROLS SETUP 7.1
BATTERY US AGE CAUTION
8
ACCESSORIES
9
TROUBLESHOOTING AND ADVI CF ..... , ....
10
SPECIFICATIONS .. ·
(,
,..
-1U".~!-···':·--:.'""".""..
......"~;.. __ ........,.;._~ ..f.".'.;..
-'III
...... ()
•••• ••
7
'I Ii I II 11 1
PREFACE
3
Thank you for bu yin g thi s LCD TV! Please reud Ihi, manua l Ihoro ughly befo re o peratin g Ihe lll11nihlL
Make sure the mo nito r was no t da maged in transit. Sho uld th e mo nitor is d amage d, do no t in stall it '-I lid
co ntact yo ur dea ler. C heck Ihat you have alilhe acc"ssorics acco rei ing 10 Ihe mode l.
2
FRONT, BACK, CONNEXIONS OF Le n
Front View
AV/Tv
SAFETY PRECAUTIONS
"6
tim
Df@
Q
5l
2'(
"i!,\/- i 1 .•~
~
// 1
~~
o
- PROG
DO
+ -
VOL
+
/S TANn oy
DO
Put the monitor on a stahle slIrfucc.
Do not use the moni tor w ith o th (;r~ lix:nio ll ' Ik lll tho,l." pm vit 'n l 01 . . lI i~~(;Sll'd by th e
man ufacturer. Do not place any materi al on th e mon itor. Do not block or cove r the vemil ation openings oil th e 1IIII III h
II
If you have a wa ll mount. check Ihal il is sleady
4
- I
]-
Power source
The moni tor m ust be pluggcJ w ith a te nsion sOll n.:.c (11 H rtll IOV oltuI -' 1I1()(I 11 ,/ .
Rear View
Connection cables
HIII'I, \ '{" \I
Pow er cord and ca bles must be properl y TI Hll v d HmI prll l '·... II ·d Hi 1911"'\ \' 11 1 !)t'oplc from slepping
on them and causing the moni to r 10
I ~l".
·Do
-+1..~
.• _
!' ~
HDM. INPUT
Heating sources and humidity
PC '"PUT
Keep (he moni tor dry ;..mel aw ay fro m hUllIid ity.
Keep the mo nitor a way fro m hl: <lt ...nun::es
C 12V INPUT
-j. .~
·<1
.~ I
YPbP,; YCbe, INPUT .~0 I Cleaning and maintenance
Un plu g the monitor be fo re c h:~anin g it. I)p 1I1 1! 11'-('
O nly clean the monilOr with a soft anu d ry ~ I ulh
" I"i' l lh 0 1
11111111 1.. If!
\'h:..11I
Ihe monito r.
S- VI OEO INPUT.....\.81 .•
®~ I
~
MENU
o
In c ase of troubl eshooting , does not u ...c "'1':11 1; 11;1t"1 , n! li r:' lil ll ll l h n',l" l' llgH ~'> ICd by th e
manufact urer. Usin g inade quate spare P;IrI '. U I IL Irl ld I" ..1, 11r11 IlI tL k... hlif1 t"' ih; uits fi re o r
other inc iden ts.
AUDIO R/L
INPUTj~!
PC AUCIO INPUT
D!~I
0; 1
Departure in holidays
Un plug th e LCD duri ng li ghting storms
2
(II
",111:11 II IIU·I d
1111
IlotlJ,' I"
JU RI" .. l lil1l C' .
vIDeo INPUT
RF INPUT
I~D
II-{
4
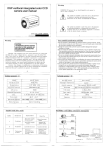
TV INSTALLATION GUIDE
4.1 CONNECTING
4.4 YPbPr INPUT ORA WING
. ,
ANTENNAS DRA WING
~
4.5 Y( 'h(. ',· INI' UT I'RAWING
R
f',~~
. o,
II
l
~~
LA SE:R DISC
!'-"- ':·. Ji
J
®.
® ~ II
I If , ,,~f'~'~~A
L-____________________________~
P~ UG
To ensure good picture and sound. TV iullcnna sy.~tL' ll l need!>. hI I'll' II h Ldkd Ill!: ,ull \..: llna !\y'Il:1l1 ~'s shown
Can be sourced from TV cqu ipml.:111 shops. whic h will 1'[\)\ uk ' ,I ' t "' ''. 1 101 I.- lIrn.;I.: 1 in sl.dlation and
connection. After installation , insert th e.: 75-ohll1 an tenlla plu g illill Ih\' ,11l1'-' 11I11! ilU.·' ~ . I ~ ,how n. In case of
signal o r closed circuit TV.
4.3 S -V IJHo:O IN l'l l' f DRAWING
4.2 AV VIDEO INPUT ORA WING
.
h
q:
l.ASER O '$C~
J
8>~
®~
•
~g
® !f ~"--T-O A-U-IO-OutP-t<R/L)
d- -- u~
DI~
Ii
l§>iY
1/
~~
• z
@.
oi
(j)~
o
z
•
(iJ~
To Video Output
D~~
O~o
•
®~
•
.:
®.
~8
®.JII-I--T-O--AU d-iO----~
Out.ut ( R/ L)
To A ucU o O u lpul ( R/ U
.
~g
Dg~
0: 4
4.71111 '\ 111 " 1' 1 l ' Il IC \\\1 ,(:
H
•K
~
't'i
®~
(I)~
0:·
0:
e·
. ·•A
<:'<1>.1II
Dft~1
4.6 PC (VGA) INPUT ORA WING
I'
l
0_
'--
:R
~
,~
:~
®.
To YPbPr Output
o~
POWER PLUG O F
ANTEN NA AM PLIF IER ~•
®~
To VGA
Output
~
I~
r---- =
To Audio Output ( R / L )
1
.
5
5.1
CONFIGURATION OF THE LCD
PICTURE SETTING
Pres~ <S YS MENU > key, Lhen pr" $~ '" ke y unlillh" s~lc,'n displays as below,
a) Pr ess ~ and enter I'i c.t urc Se t ting MCIIII, l' I'l' ~s .. ii ' '" 1(l'Y " nd on l e r I'icwr e /.lode,
Br i g h t. n~ s:..; ~ Conln.lsl, Sa Lu l'H t iorl, SIH t llHlPS,S, IIwl .
b) Pre ss ... 01' ~ key to acc ess a nd ud.1lls 1 l' I l'IIII" 11",1, ('(lnn"I , So l' t , Vivid, User),
Brightness, C,, "l nls t , Sat u" ;] 1 iOll, Slianllw", 11110 '
5.2
b) Press .. or '" key to selec t exact me nu setling.
c) Press .. or '" key to se lect <A uto Tune> <Mallual Tu",' >pr I " '" I un~ II,,,nll 10 a,ljllst Ihe TV.
d ) Pres> .. or '" key to access < skip> to On or off Ihe ch:IIII,,'1
c) Press .. or '" key 10 access < Color sys> to choos~ the co lUl " .. tr u,I!',\ 1 ~ I \ 1\ /\1 . 1\ ' " 0 ),
f) Pre~~ .. or '" key to access < sound sys> to c h,,",,: tl ,,' It II II ,II ~ ",,"101 ., ",·tllf It /(;, U/K. 1, ULL,
A uto).
g) Press .. o r '" key to acccss < Channel Swap> to s wap Iii" ,·Ii.IIII,,' 1
* Notice: The Channel SH'OP /tllle/ioll is (Ivai/able/or .\OIIU ' I 111/111111 ,
For thefirsllime use the TV. please choose the corn'l 'I ,\lIl11td " ,t , ,,, oI{0 1mllt, \I t, , (/tal. choose th e
a ulo tune to start searching the TV channel.
*
SOUND SETTING
SA
Pres~ <SYS M ENU> key,
I
hen pre ,;s '" key uOIillln: 'CI,\,": II d"I' I " )'~
a) (Ir c~ s .... . and then enter Sound Setti ng Menu . Pn' ",!-' ... or .. ~"\
,IS
I II C III ,' 1 '\flll iid
Mode. Volume, Bass. Treble. Balance,
b) Pre", ... or ~ Key 10 access "nu aujusl Sounu Mmk(NoIIIIHI, Nt"" ~ f" \I~' , 1,,·1'). Volullle, Bass,
Treble, Balance,
5,3
TV CHANNEL SEARCH
Press <SYS MENU > ke y, t hen press '" key ul1Iillh", ,'<'l'eC'" d l' pL, y' '" bell ,\\',
a) Press ~ key 10 acce~~ AUlo Tune - Manual Tunc · Fine '1'11111 S ~' 'i ' S,,"nd SYS - Sound System
Channel Swap menu sw ing,
6
FUNCTION SETTING
hd " w, ,I,
Press <SYS M ENU> key, Lhen prc~' '" key unti l the ' n,',' 11
~ , and then enter funct ion Setting Menu. Pr"" .. ",I '"
and T i mer. TTX l.i.lflKUilllC, Rese t.
b) Pre's "' o r ~ key Lo a c (;Cs s < Blue Bade> to "d,iu : t ilt, "
clP r e s ~ "' o r~k e y Lo "ccps s < Timer> to "dju sl t l ... j 'lI
d) I'r cs , "' or ~ key Lo I1 Cc()Ss <1TX Lang uage> III fItl lu
0) f'r ess "' or ~ key Lo a ccCs,s <Reset> 10 I) H .. k t n 1/11 till
* A()/ /r'C: Ihc funcl i on of C. Cap ion IInrl ", u'n l nil}
ill P.. cs~
II I L11l II.II~,
5.5
6
ADVANCE SETTING
REMOTE CONTROL INSTRUCTIONS
Press <SYS MENU> key, then press ~ key
a) Press ~ key to enter ADVANCE Selling MCJlll . Prc" ... tlr ~ kuy to enter Scale, 3D NR, Color Temp.
b) Prcss ~ or ~ key 10 access and adjust Sc<de( III:') ,.·! :J), '11 ) :-IR(High, Mid, orr, Low), Color
Tem p( Normal, User, Warm, Cool ).
0-
, 5) -
-
) )'---G:I
{)dl~-'-- '
8
1
SLEEP: Automatic Switch off
2
M UT E: Sound
3
POWER : Standby button
4
5
MODE: TV/CV BS/S-VIDEOIYPbPrl YCbCr
1 mode
Number keys
12
6
7
SYS MENU : System setting menu button
I.l
-1--: Access to sevcr" 1 numhen; program
~witch
II
off
\I
" II II ~'
l' l ~ hll ( ttlll'~~=
1111
10
l)
II
III /1 ( 1111 · \ 1''-
nil" \,tlli
I ll{), A udtt'
II
.,
,I
7
REMOTE CONTROLS SETUP
9
I: Open the cover
2: In sert the su pplied "AA" size batteries. make sun; correcl (1olarilies as pe r "+"and
mark on the batteries are correct
3: Replace the battery cover.
TROUBLESHOOTING AND ADVICE
Before calling our SAS centre, please check if you can .' Illn' 1111: 1r<llIhlcshooting by
yourself.
Troubleshooting 7.1
Battery Usage Caution:
No signa l To prevenl battery leakage that which may resull in injury or damage 10 Ihe remote:
I . In stall all batteries correctly. and as marked on lhl' n." 1I1olc cull lro i.
2. Do not mi x batteries: (OLD and NEW or C ARBON alld ALKALINE . etc .)
3. Re move batteries when the remote is not used I'M a IOlll,! time .
No color shades Stain show o n (he sc reen .
Cm
Pl ease c heck lha t all cable> allu
AdjuSi th e co ntra$(. the (
May be result from a li ghting , ip",,1
cJeclric.tI dl: \'I";&:'
Do ubl e or multiple
display image
Snow on the screen
The remole control doe s
not work
"Zip " mad e no ise on TV
May be the result of an ekct ri c,,1 "',,'
an d G' II UC,," II inti
The cahles or til l! all ll'II,1!I
Please
ch~(:k
the Imll \,'lu'!
Check th at [he IR o f Ihe n: lIl() h~
Eve n if th e di splay ima Re
II XUI IIIII p i
Make su re (hat
YCIII h :IV~: lI ul rU t ..., Iii
ACCESSORIES
I. ACIDC Power Adapter
2. One Remote Control
3 .Two Batteries 1.5V
4. One User Ma nual
5 . A V Cable
10
II
hf ll l
li l I1H III. t, II! 11/1
Ulld
IJI IIL'I"
rl'lilillq
uri . Ill flll IIlh", '1 '"f. Cl li ll pllin
r I/ ,ull ..
""( II H'
I iIlUI
tllil
I',
Jth.j.'~' (
d If l
,dl f lllll l'1J1 huM. II
t;. IlI il V l plll(
h~
Iiflll· flu lI .., 111 ) 11 1 ,111
'W' ll' .lIl ,
"I
-
11'1 11111 (' (, 1
8
pl lli,.,til lll
.lIld IIll' IHWhIIW....
('( II
"C(>I"O.:('I, It.
cover
No sound
.1
'.1 \1 1' 1 11/ 1(', II ~
t
hi l l/IIII III 1111
I' IIi·
I PI HI t hl
10
SPECIFICATIONS Screen Size
19 Inch
Display Type
LCD TFT TV
Screen Ratio
16:10
Resolution(Pixel)
1440*900
Brightness
300 cd I m2
Color
24 bit
Contrast Rat io
500: I
Power
DCI2V.=5A
Power consumpti o n
60W
TV System
PAll NTSC
I
--
Video Input Format
PALl NTSC
Antc nnu Input
Standard unl enll<l socke t 7',£'l
Audio Output
LlR3W+ JW
VGA Input
640"480/60[{z
PC
(),?
VIDEO
1.0 Vp - p, 75n;
S-VIDEO
Y: 1.0Vp - p
YPbPr
I Vp - p
Audio LIR
200mVp - p
HDMI
640*480/60H, •
VP- P
1024 "768/6())-!Z
80( )* 6()()/()()H 7,
75 n
8815
RCA
C:(),286 Vp - p
75D.
Input
Net Weight
Net
Dim ension~
75 D.
RCA
(MAX
3.0Vp - p)
RCA
BOO" lo00/nO H" . )024· 768/60l-Jz
5.2kg
50()(L) * 18S(D)*4 16(H )111 rn
The manual is only for your reference, any change to the design and
specification will not be advised.
12