1
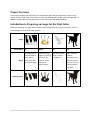
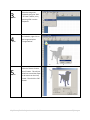
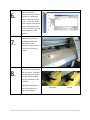
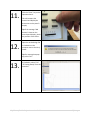
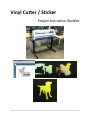
Vinyl Cutter / Sticker Project Instruction Booklet Vinyl Cutter / Sticker Project Instruction Booklet 1|P a ge This page was intentionally left blank. Vinyl Cutter / Sticker Project Instruction Booklet 2|P a ge Project Overview In this project students will learn how to use the following tools and shop materials to create a vinyl transfer (sticker): vinyl cutter, vinyl adhesive, small vinyl weeding tools, transfer tape, vinyl squeegee. In addition, students will learn the importance of shop cleanliness and safety procedures. Introduction to Preparing an Image for the Vinyl Cutter Make sure the design is a single colour and will work for the purpose of cutting out a sticker. Here are some examples of what will and will not work: Image Will It Work? No Greyscale photos turn into blobs of black, and no Why? longer looks like the original image. Maybe No Yes Colour drawings might cut well as a silhouette, but often no longer look like the original image. Thin lines turn out to be a mess of mangled cuts. Black and white drawing silhouettes work the best because they are only one colour and have less detail. Resulting Sticker Vinyl Cutter / Sticker Project Instruction Booklet 3|P a ge Step-By-Step Instructions 1. Find an image on the internet, or design an original drawing own using graphic editing software like “Corel Draw” or “Corel PhotoPaint” or “Adobe PhotoShop.” Tip: A search for “black and white clipart silhouette” will turn up several useful images on the internet. Tip: To successfully include words, be sure there are only one or two words, and that the letters are large. 2. Copy the image. Vinyl Cutter / Sticker Project Instruction Booklet 4|P a ge 3. 4. 5. Paste the image into CutStudio using the “Edit” “Paste” feature, or by pressing CTRL-V on the keyboard. In CutStudio, right-click on the image and select “Image Outline.” Click the “Extract Contour Lines” button. This will put blue lines around the shape to be cut out on the Vinyl Cutter. Then click the “OK” button. Vinyl Cutter / Sticker Project Instruction Booklet 5|P a ge 6. 7. 8. Save the CutStudio document to the H:\ drive and give it a meaningful name. Do this by clicking “File” -> “Save As”, being sure to select the H:\ drive, typing a descriptive name in the “File name” box, and then clicking the “Save” button. When the Vinyl Cutter is available, and with the permission of the instructor, take a piece or a roll of vinyl to the Vinyl Cutter. Load the vinyl material into the vinyl cutter, and adjust the Movable Pinch Rollers using the Sheet Loading Levers on the back of the machine. Tip: Squeeze the back of the levers together to adjust their position. Vinyl Cutter / Sticker Project Instruction Booklet Adjustable Locked 6|P a ge 9. Be sure that: a) the Sheet Loading Levers are completely within the grey Grit marks indicated on the front (top) of the machine, and that the rollers are locked in place; b) the vinyl material will cover the Sheet Sensor on the front (bottom) of the machine. 10. Select either “Roll” or “Piece” on the Operation Panel using the down arrow cursor. Vinyl Cutter / Sticker Project Instruction Booklet 7|P a ge 11. Click the “Enter” key on the Operation Panel. This will measure the material and display the dimensions on the panel’s display. Tip: If the message “Bad Position” shows on the control panel display, check the position of the rollers. 12. Open the sticker design file in CutStudio on the computer next to the Vinyl Cutter. Tip: If a message box pops up, select “Yes.” 13. In CutStudio, select “File” “Cutting Setup” from the menu bar. Vinyl Cutter / Sticker Project Instruction Booklet 8|P a ge 14. 15. Ensure “Roland GX-300” is selected as the current printer, and click the “Properties” button. Click the “Get from Machine” button. This will bring the dimensions of the material loaded in the Vinyl Cutter to CutStudio. Click the “OK” button. Vinyl Cutter / Sticker Project Instruction Booklet 9|P a ge 16. 17. 18. Click the OK button on this screen too. Click the “Cutting” button to cut out the sticker. Another way to do this is to click “File” “Cutting”. Ensure the “Roalnd GX300” printer is selected, and click the “OK” button. Vinyl Cutter / Sticker Project Instruction Booklet 10 | P a g e 19. 20. 21. The project will cut on the Vinyl Cutter. Safety Tip: Keep all fingers, hair, clothing, jewelry, and anything else away from the machine while it is cutting. The tool carriage and blade can move very quickly. When completed, push the down arrow cursor on the Operation Panel until the finished sticker moves completely clear of the tool carriage. Push and hold the “Sheet Cut” button on the console. This cuts a straight line across the piece of material using the Separating Knife. Vinyl Cutter / Sticker Project Instruction Booklet 11 | P a g e 22. 23. After the material has been cut, remove it from the Vinyl Cutter. Peel away the unwanted vinyl from the sticker shape. This is called “weeding.” Tip: Some weeding tools may be required for finer details or thin pieces. 24. Throw any excess weeded material into the waste bucket. Vinyl Cutter / Sticker Project Instruction Booklet 12 | P a g e 25. Cut an appropriate sized amount of transfer tape for the sticker. Tip: If the sticker is large, more than one piece of transfer tape may be required to completely cover the sticker. 26. Apply the transfer tape to the sticker, and use a vinyl squeegee or straight edge to ensure it has no wrinkles or air bubbles Tip: The transfer tape should be firmly attached to the sticker, but may not stick well to the smooth backing. 27. Cut out the sticker with the transfer tape on it. Vinyl Cutter / Sticker Project Instruction Booklet 13 | P a g e 28. 29. 30. Peel the entire sticker off of the smooth backing. Tip: All shapes should remain in place, stuck to the transfer tape. Before applying the sticker, clean the surface with mild dish soap and water and allowing the surface to dry. Apply the finished sticker to its final intended surface. Tip: Use the squeegee or a flat edge to ensure there are no air bubbles or wrinkles in the sticker. Vinyl Cutter / Sticker Project Instruction Booklet 14 | P a g e 31. 32. Peel off the transfer tape. The sticker is made of semipermanent vinyl adhesive, and if applied properly is designed to lasts indoors or outdoors for several years. Vinyl Cutter / Sticker Project Instruction Booklet 15 | P a g e Note: the user manual for the Roland GX-300 can be found at: http://support.rolanddga.com/docs/Documents/departments/Technical%20Services/Manuals%20and%20Guides/GX-500_USE_EN_R4.pdf Vinyl Cutter: Front View Vinyl Cutter / Sticker Project Instruction Booklet Vinyl Cutter: Rear View 16 | P a g e