1
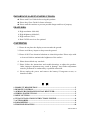
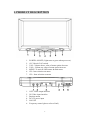
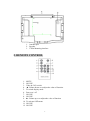
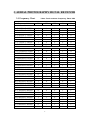
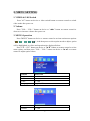
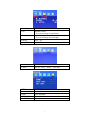
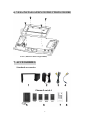
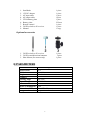
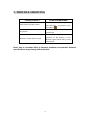
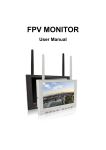
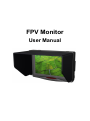
FPV Monitor User Manual IMPORTANT SAFETY INSTRUCTIONS: Please read User Guide before using this product. Please keep User Guide for future reference. Please read the cautions to prevent possible danger and loss of property. FEATURES: High resolution: 800×480; High brightness: 400cd/㎡; High contrast: 500:1; Dual 5.8GHz receivers for optional. CAUTIONS: 1. Please do not place the display screen towards the ground. 2. Please avoid heavy impact or drop onto the ground. 3. Please do NOT use chemical solutions to clean this product. Please wipe with a clean soft cloth to maintain the brightness of the surface. 4. Please do not block any vent hole. 5. Please follow the instructions and trouble-shootings to adjust the product. Other improper adjustment may result in damage. Any further adjustment must be performed or conducted by a qualified technician. 6. Please unplug the power and remove the battery if long-term no-use, or thunder weather. 目 录 1. PRODUCT DESCRIPTION ................................................................................... 2 2. REMOTE CONTROL............................................................................................. 3 3. AERIAL PHOTOGRAPHY SIGNAL RECEIVER .............................................. 4 4. WIRING INSTRUCTIONS .................................................................................... 5 5. MENU SETTING..................................................................................................... 6 6. VESA INSTALLATION INSTRUCTIONS FIGURE .......................................... 8 7. ACCESSORIES........................................................................................................ 8 8. PARAMETERS ........................................................................................................ 9 9. TROUBLE SHOOTING ....................................................................................... 10 YP-01140315 1 1. PRODUCT DESCRIPTION 1. 2. 3. 4. 5. 6. 7. POWER: ON/OFF (Light turns to green when power on). AV: Video & 5.8G switch. VOL-: Volume down; value of menu option decrease. VOL+: Volume up; value of menu option increase. MENU: To activate OSD menu & main menu. CH-: Item selection on menu. CH+: Item selection on menu. 1. 2. 3. 4. 5. 6. OUT: Video output interface IN: Video input interface Bracket mount DC12V power input NO USE Frequency control (please refer to Part3) 2 1. Antenna port 2. Speaker 3. VESA Mounting interface 2. REMOTE CONTROL 1. 2. 3. 4. 5. 6. 7. 8. 9. 10. 11. 12. MUTE NO USE Video & 5.8G switch ◄: Volume down or to adjust the value of function To switch display mode Power on / off NO USE NO USE ►: Volume up or to adjust the value of function To activate OSD menu NO USE NO USE 3 3. AERIAL PHOTOGRAPHY SIGNAL RECEIVER 3-1 Frequency Chart * Note: Dual receivers frequency: Band 3&4 0: ON; 1:OFF Frequency / L.O. CS1 B1:5.865GHz/5.385GHz B2:5.845GHz/5.365GHz B3:5.825GHz/5.345GHz B4:5.805GHz/5.325GHz B5:5.785GHz/5.305GHz B6:5.765GHz/5.285GHz B7:5.745GHz/5.265GHz B8:5.725GHz/5.245GHz 1 0 1 0 1 0 1 0 C1:5.733GHz/5.253GHz C2:5.752GHz/5.272GHz C3:5.771GHz/5.291GHz C4:5.790GHz/5.310GHz C5:5.809GHz/5.329GHz C6:5.828GHz/5.348GHz C7:5.847GHz/5.367GHz C8:5.866GHz/5.386GHz 0 1 0 1 0 1 0 1 D1:5.705GHz/5.225GHz D2:5.685GHz/5.205GHz D3:5.665GHz/5.185GHz D4:5.645GHz/5.165GHz D5:5.885GHz/5.405GHz D6:5.905GHz/5.425GHz D7:5.925GHz/5.445GHz D8:5.945GHz/5.465GHz 0 1 0 1 0 1 0 1 A1:5.740GHz/5.260GHz A2:5.760GHz/5.280GHz A3:5.780GHz/5.300GHz A4:5.800GHz/5.320GHz A5:5.820GHz/5.340GHz A6:5.840GHz/5.360GHz A7:5.860GHz/5.380GHz 0 1 0 1 0 1 0 CS2 Band 1 1 1 0 0 1 1 0 0 Band 2 0 0 1 1 0 0 1 1 Band 3 0 0 1 1 0 0 1 1 Band 4 0 0 1 1 0 0 1 4 CS3 S1 S2 1 1 1 1 0 0 0 0 0 0 0 0 0 0 0 0 0 0 0 0 0 0 0 0 0 0 0 0 1 1 1 1 1 1 1 1 1 1 1 1 0 0 0 0 0 0 0 0 0 0 0 0 1 1 1 1 0 0 0 0 0 0 0 0 1 1 1 1 1 1 1 1 0 0 0 0 1 1 1 1 1 1 1 1 1 1 1 1 1 1 1 1 1 3-2 Frequency Control Demo 3-3 Radio signal receiving antenna 1. Connected to the wireless receiving antenna port. 2. When a product with wireless module connected with antenna, and then connecting with flying camera system, you can receive the sound and image signals. 4. WIRING INSTRUCTIONS 4-1 Video output cable 1. 2. 3. Video output interface. Yellow: video 1 output plug. White: video 2 output plug. 4-2 Video input cable 1. 2. 3. Video input interface. Yellow: video 1 input plug. White: video 2 input plug. 5 5. MENU SETTING 1. VIDEO & 5.8G Switch Press “AV” button on device or video switch button on remote control to switch video mode after power on. 2. Volume Press “VOL- / VOL+” button on device or “◄/►” button on remote control to decrease or increase volume after power on. 3. MENU Operation Press “MENU” button on device or remote control to activate main menu options ( 、 、 、 、 ); And then press to select option needs to adjust, option will be highlighted as yellow and operation tips displayed below. Press “CH- / CH+” button on device or “▲/▼” button on remote control to select menu option, and then press “VOL- / VOL+” button on device or “►/◄” on remote control to adjust option values. ITEMS Brightness Contrast Color Language OPTIONS 0 - 100 0 - 100 0 - 100 English, Chinese ITEMS Volume OPTIONS 0 - 100 6 ITEMS U/D ZOOM S AUTO OPTIONS Normal, Down (To reversal image up and down) Normal, Right (To reversal image left and right) 16:9、4:3 ON, OFF ITEMS C-SYS OPTIONS AUTO、PAL、NTSC、SECAM ITEMS SLEEP TIME OFF-TIME ON-TIME OPTIONS 0 - 240 User-definable User-definable User-definable L/R 7 6. VESA INSTALLATION INSTRUCTIONS FIGURE Screw ( Diameter 4mm×Length 20mm) 7. ACCESSORIES Standard accessories: 8 1. 2. 3. 4. 5. 6. 7. 8. 9. Sun Shade 12V DC adapter AV input cable AV output cable VESA battery plate Battery plate Remote control 5.8GHz wireless AV receiver Manual 1 piece 1 piece 1 piece 1 piece 1 piece 2 Pieces 1 piece 1 piece 1 copy Optional accessories 1. 5.8GHz wireless AV receiver 2. 5.8GHz omnidirectional antenna 3. Shoe Mount (for camera only) 8. PARAMETERS Panel Aspect Ratio Resolution Brightness Contrast Viewing Angle Input Voltage Current Power Consumption Dimension (LWD) Weight 7” LED back light 16:9 800×480 400cd/m² 500:1 140°/120° DC 7~30V 450mA ≤6W 188×127.8×32 (mm) 415g 9 1 piece 1 piece 1 piece 9. TROUBLE SHOOTING CASE(condition) COUNTER MEASURE Only black & white picture Check the contrast, brightness, hue and color are proper or not, and adjust No picture Check power connection. Remote control doesn’t work Check if the battery installed properly or the battery is out. Remote signal interfered by some obstruction. input and Note: due to constant effort to improve products and product features, specifications may change without notice. 10