1
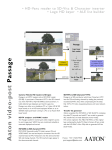
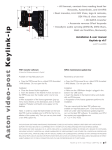
• Using standard slates, digislates, or filmcodes, Indaw on-the-fly
syncs HD & SD video tapes to any fps audio files
• bounces multitrack BWF files to stereo
• regenerates ALE lists
Aaton audio: InDaw-MX
All audio medias are welcome
InDaw made a name for itself by speeding-up image
and sound syncing that video dailies require. InDawMX now converts all the recording forms - analog
tapes, digital tapes, 16/24bit 48/96Ks poly or mono files
from Cantar, Deva, PD-6, Portadrive multitrack field
recorders- into the polyphonic two track 16bit BWF
files that image editors require.
Using the file name FileTags instead of the audio tape
IDs, the conformation of multi track original files to
the CMX EDL out of the editing station becomes an
automatic task.
Audio-sync dedicated
Right after the telecine session InDaw realign the
Keycode in-points and adds its own post-synced
AudioTC to generate clean and complete FLeX/ALE
transfer lists which speed-up NLE digitization. It also
burns Characters and Vitc on off-line copies of the
master video tape. InDaw-MX handles 16 & 24 bit
polyphonic & monophonic BWF files ; UDF, FAT32 &
FAT16, imports up to 8 channels from DVD-Ram and
FireWire hard drives ; is Ethernet networkable and
burns CDR & DVD±Rs.
2
8 toown
mixd
Ultra-fast On-the-Fly audio Post-Sync
As opposed to several seconds on other systems,
InDaw syncs the sound in less than 40ms at the head
of each video take. This allows for uninterrupted postsyncing of a video tapes on both SD and HD tapes.
Whatever the sound and video standards, InDaw
eliminates jitter and glitches: a sound recorded in a PAL
environment can be dubbed on a drop-frame NTSC
video tape!
PostSync sorts wild tracks and records them at the
tail of video tape dailies; their on-location AudioTC is
correlated to the tape VideoTC, and inserted into the
ALE transfer list.
List maker for editing auto-sync
Smart tape-to-disk recorder
InDaw tidies up the many LTC and audio sampling rate
mismatches film/video post engineers encounter. It
eliminates the drift between the DAT sampling clock
and the time-of-day recorded on the LTC track. On
documentary sounds it can add up silent leaders at the
head of the audio files to let the Avid MC ‘group clip’
get the first images of a camera starting nine sec. before
the audio recorder.
InDaw tunes the video take in-points on both Keycode
and VideoTC, adds the AudioTC of the slates, and
creates a rejuvenated and ultra precise ALE transfer
list.
A very useful feature in these HD and SD days: InDaw
converts downconverted PAL transfer lists back to the
HD24 ‘father’ and from there to NTSC ALEs.
Exported to the editing system, these ALE lists ensures
instant auto-sync between images and sounds imported
as BWF audio files.
Automatic accurate Slate-Finder
While monitoring the tape-to-disk transfer, the operator
on-the-fly puts ‘Prelocators’ on slate announces ; he also
keys the scene/take IDs and enters wild-sound tags.
‘SlateFinder’ then detects clapsticks with better than
human precision and stores operator entries showing
on printed reports and in the Avid v.11.n, XPress-DV
v3.5, FCP4 audio bins.
InDaw files are directly read by Lightworks Touch, Avid
v11 and Xpress-DV v3.5, by FCP-4 with Sebskytools,
and by Avid v7 through the AtonXfer bwf to omf
converter.
France +33 4 7642 9550
[email protected]
Audio-post flow-chart
The Aaton ‘Taketags’ (e.g. ST1254) generated by InDaw
ensure automatic conformation between the bounced
16bit files bringing Sc&Tk IDs to the editor on CD-R,
and the 24bit original files carried over to the final mix
on DVD+R.
CMX EDL: snd roll ST1254
Prootols
Titan-3 (1)
1/4” tape
DAT
Disk
Ram
monophonics
16/24 bit
Fairlight
ST1254_1.wav
ST1254_2.wav
ST1254_5.wav
ST1254_8.wav
Sadie
v5.1
Pyramix
v4.2.6
DVD±R
InDaw-MX
ALE w/. Keycode,
VideoTC & AudioTC
CDR
Avid MC v7
Avid v.11
Lightwrks Touch
FinalCutPro v3
AtonXfer
BWF to OMF
Direct import
Sebskytools
ST1254==123a;14R_12==PX.wav
polyphonic 16 bit, 2 track
SD/HD Vtr
Slate synced AES audio
SD-Vitc, HD-Vanc, video
1. Titan-3
http://www.synchroarts.com/
2. AtonXfer
http://labs.aaton.com/
3. Sebskytools
http://www.dharmafilm.com/sebskytools/
InDaw-MX v7.32 user manual 2004 May 4
p.2
Partitions & files
user manual for InDaw-MX v7 (Win2000/RTX5)
and for InDaw-6 v6 (no mix-down) (WinNT/RTX4)
Disks and partitions
The InDaw internal hard drive is delivered with either 5Gb or 706 Mb
partitions (706 Mb is the space needed to burn a 60 min DAT onto a
700Mb CD-Rom). If removable hard drives are used as go between to a
DOS Keylink, format them FAT16. NTFS and FAT32 formatted disks are
handled by Windows-2000 (InDaw and Keylink-IP).
Note: DVD-Ram disks and old CD-R burners are not fast enough in
playback mode to postsync a 4-channel/24 bit file.
Starting Windows
Before switching-on the PC, all external Scsi devices (CD-R burner, DVDRam, removable hard drives etc.) must be ‘on’ and their activity light no
longer blinking. Verify the BIOS is set to boot from the local hard disk
and not from removable disks. Windows Logon is «indaw», password is
«indaw». A double click on the InDaw icon (flower) starts RTX-5 then
InDaw.
Starting InDaw
Click (1) to open the ‘Project manager’, click ‘All projects’ (70) to show
the internal, external and networked drives with their available memory
as well as the folder occupied space. The upper buttons sort the projects
by ascending or descending dates or titles. Click NEW and enter an 8
char. project ID and a title (several projects can be stored on the same
disk partition). Hilite the partition you want to work with, double click it
to create a directory carrying the project ID. You can now either record
AES sounds (see next page), or import audio files (see below).
Importing audio files
As a general rule, avoid to modify a
client’s disk, it is safer to work on a
copy!
Hilite a ‘target’ folder (68) belonging
to a project, click import (67), the
‘xxxx.AA1’ folder name shows on (24).
Click ‘browse’ (22) to select the ‘source’
folder to import. Activate ‘recurse’
(23), to get files from all subfolders
and not only the files stored at the
folder root .
Select the processing parameters:
* ‘replace .wav extension by .bwf
‘(25). To become ‘eatable’ by an
old Avid v7, BWF files should be
OMF converted by the AtonXfer
application which only works on
polyphonic files having a .bwf (not
.wav) extension.
* ‘disinterleave BWF-P files’. Converted
to a set of BWF-M monophonic files,
the original Fostex PD6 polyphonic files
can be bounced to another polyphonic
1
2
4
16 bit stereo file for Avid and FCP editing machines.
* ’desactivate waveform generator’ shortens the import duration but
eliminates the waveform creation which is essential to locate the slates.
Don’t do it.
* ’add presilence’ allows the TLC to cue InDaw on a non existing audio
address during telecine preroll.
* ’TC fps’. The project frame rate must be manually entered if the field
recorder didn’t store it in the bext chunk. This is indicative only, not related
to the audio signal physical references at all.
* ’modify filenames’ (26), the Deva-II ‘zax’ prefixes must be replaced by the
media ID to allow file sorting between files recorded on successive disks.
DO NOT modify Cantar filenames, they already offer ‘garanteed unicity’ (see
Aaton file naming in FAQs page 13).
Exporting, merging & deleting files
To merge files of the same project spread over several partitions, click
[CTRL C] on the hilighted folder and [CTRL V] on the target. If you must
erase sound files to get disk space, do not [Del] the project, it could later
save your day to be able to reimport audio files from CDRs and retrieve
their transfer lists and sync points in the database. To delete some files
only, open the folder (4), select the files and [Del].
ShortCuts
[Ctrl R] resets menus to their default position. [F1] opens a shortcut list
while the mouse pointer is on the video time line or the remote control
window. After loading a project, [F2] shows its allocated size and number
of events.
8
22
23
24
70
25
69
26
68
67
33
InDaw-MX v7.32 user manual 2004 May 4
p.3
Tape to disk recording
Recording Parameters
Click on the ‘pause’ button (15), the ‘recording parameters’ menu
opens:
Source ID (26)
The audio tape identifier entry is mandatory, it shows on (74).
The following parameters are attached to the whole project.
Source type
Should be ‘digital AES’; ‘analog’ is used for factory tests only.
Channels, Rate, Depth
Incoming and internal rates can differ, e.g. a 48.048K sound can be
recorded at 32K to save disk space, a 44.1K CD can be converted
to 48K. Whatever the choice, InDaw always outputs 48Ks/s unless a
different Audio Speed Playback value is selected.
File type
Interleaved (polyphonic) for stereo sounds to Avid; non-interleaved
(monophonic) for sounds going to final mix.
Latency
separate audio files are created by TC discontinuities: sound-recordists
should always select ‘free-run’ instead of ‘record-run’. The latency is the
time taken for the drop-out filter of the playback machine to output
a new TC after a break. To adjust latency, record a tape on which
take N carries a 400Hz and take N+1 a 2kHz tone, copy this tape
on InDaw with different latency values; the right value puts the take
start at the frontier, e.g. 1700ms for a Sony PCM 7040 in ‘wide’ mode,
300ms in ‘narrow’.
Note: It is advisable to permanently jam-sync audiotape recorders to a
TCXO crystal (such as an Aaton GMT) to avoid any drift with ArriCode/
AatonCode recording cameras.
Pre-Silence
adds one to nine seconds of silence at the beginning of each audio file
to let the Avid AutoSync* create non-truncated subclips even if the
sound engineer starts his machine after the cameraman.
* AutoSync puts the take in-point on the first sound-image common
TC, thus if the sound starts rolling
2
after the camera it is impossible to
get access to the first images of a
take!
Nagra4 offset
This ‘audio to TC’ delay must be
entered for 1/4” tape copy only,
80ms is a standard value @19cm/
sec.
End of record
stops the copy of the tape at the
end of an unattended session to
avoid filling the disk with silence.
page shows the waveforms, one minute per line at full magnification
(72). To create one-file-per-take from tapes recorded in record-run
mode, click the ‘record’ button or [right Ctrl + right arrow] on the
fly.
DAT tape
Do NOT connect the deck to any external reference be it house
video or word clock, let InDaw handle the drifts and sample rate / LTC
frequency discrepancies by itself!
1/4” tape
Use an analog to AES external converter, and feed the AES input.
Important notice: Do NOT connect the Nagra nor the A/D converter to any
external reference (see above).
To copy analog 1/4” tapes with no TC, auto-resolve the pilot signal to
an Smpte LTC reference and send that Smpte reference to InDaw.
If there is no LTC time code on a DAT, InDaw provides the TC keyed
by the operator or the PC clock time and date.
Slide the level cursor (11) to the desired warning value, e.g. –18dB;
this cursor can also be used as a precision dB meter by sliding it along
the bargraphs.
Prelocators
To speed-up the slate-finder operations to be done later, hit [Space]
on slate announces; this lays down a ‘prelocator blue triangle’ (70).
Key-in the Sc&Tk IDs in the dialog box. Prelocators identify the
successive takes on ‘record-runTC’ recorded DAT tapes which generate
very long audio files. To allow automatic wild track sorting if need be,
add a ‘w’ prefix to the wild take IDs, e.g. Scene = 45a, Take = w3.
Clicking a line in the ‘prelocator edit’ box allows for its correction
during recording, [enter] to validate or [esc]. Hitting [space] puts the
focus on a new prelocator dialog box; closing this box refocuses the
‘prelocator editing’ box on the editing-in-progress event.
11
12
15
16
74
72
70
26
Tape desk control
To get access to the remote
control of the DAT playback
machine, click on ‘tools’ (2)
then ‘remote’. Run the tape for
ten sec., verify the LTC timecode
appears in (12), rewind and hit the
‘record’ button (16). The audioInDaw-MX v7.32 user manual 2004 May 4
p.4
PreLog
ress &
p
X
d
Avi 11 import
MC v. files and
BWF InDaw’s
y
displa Tk IDs.
Sc&
SlateFinder
Double click a file in the folder list (4) or click blue arrows (8)
to open the successive files of the folder. A mouse left click
in the audio-page plays and stops the sound. The (14) button
forces continuous playback of contiguous files.
[TAB] sends the SlateFinder window over the blue prelocator
triangles entered during recording. A mouse right pressure reopens SlateFinder and allows you to shift/reframe it ; releasing
the pressure opens a zoom window where the slate is autolocated, a mouse right pressure in this (27) window allows the
operator to drag a narrower frame over the slate. He then
can drag the slate mark to a better position in case a slate
rebound fooled the auto-locator. Key in (28) to modify the
‘pre-locator’ entries if need be. The ‘keep’ boxes forward carry
entries into the next slate. You can anytime Edit or Delete
entries by (9). [TAB] makes the SlateFinder jump from one
slate to the next.
Avid composer v10.6 imports BWF files. Wild tracks, handles, and nonselected takes are directly available to the editor. Sc&Tk and comments that
InDaw writes in the BWF <bext> chunk show in the audio import bins.
on successive days. Since most recorders write the date in a
wrong order or no date at all, verify the raw user bits in the file
headers (6). If the user bits are not recorded in the yyyy-mmdd ISO standard, InDaw can’t decypher them; an human only
can guess the date, eg: 1206-9901H is 1999-12-06. Click on
‘calendar’ (5) and enter the correct date which can be applied
to the ‘current file’ or to ‘all following files’. (see also: ‘ignore
date’ in SyncA page 9).
The PreLog report (7) sorted by date & time shows Sc&Tk
IDs. These IDs, recorded in the BWF <bext> chunk, are read
and displayed by Avid MCs v11.
A slate-mark creates a colored slate domain arbitrarily starting
two sec. ahead of the slate, this domain can be extended or
reduced by [CTRL CLICK] tail only, [CTRL CLICK] head only,
[SHIFT CLICK] tail and head.
Reminder : when preloging a tape recorded in record-run TC
mode there is no TC breaks, the slate laydown arbitrarily creates
sc&tk domains but does not split the long audio file itself.
Wild Tracks
When [TAB] lands on a wild
track ‘w’ marked slate, Prelog
lays down a take separator two
second ahead of the ‘w’ mark, like
it does for sync-sounds, but since
the in-point of a wild-track is not
later set by a video-take in-point,
it must be set by hand (see slate
domain extension above).
Note: if the auto locator can’t find
a ‘slatable’ event in a quiet part of
a wild track, you can force a ‘slate
mark’ by a mouse right click in
the (27) lower zoom window.
2
3
4
Undo/Redo
Click on (3) or [CTRL Z] to undo, and [CTRL Y] to redo an
editing command. 10 levels of Undo/Redo are available.
5
6
7
8
9
13
14
22
73
27
28
Shoot-Date Integrity
When auto-syncing files on
an Avid v10.5 or a Keylink
InstaSync, the Date (73) is
mandatory to differentiate
sounds carrying the same TC
InDaw-MX v7.32 user manual 2004 May 4
p.5
PostSync (1 of 5)
2line or 3lineVitc, PostSync tunes the take in-points, adds AudioTc, Sc&Tk and comments to ALE/FLeX lists
going to the editing room.
PostSync is achieved in four steps: setting the VITC / VANC
reading (PostSync-1), creating a video indexed Take-Timeline
(PostSync-2), linking audio events to their correlated video
images (PostSync-3), syncing the tape in one go (PostSync-4).
selected in most cases.
Note: for those who do not use an HD board, it is possible
to shift the VideoTC read on the SD VITC by +/-10 frames.
This allows to generate a ‘N frame forward shifted’ sound to
be recorded on a HD tape of which the SD downconverted
VITC (inserted by Aaton PASSAGE) drives InDaw. This delay
devalidates all other functions, and makes the VITC readings (65)
appear in red as a warning ; for safety it is set to zero each time
a new project is selected.
PostSync-1 Video TC reading
To ensure absolute frame accuracy and lock the AES-out sample
rate to the VTR or house video, all PostSync operations rely
upon the videoTC extracted from the VITC signal by the videoreader board.
The video LTC received from the RS422 (± one frame
precision) is only used to remote-control the VTR, not to sync
the sound.
SD Video-Keyer The keyers (54) insert VITC and
Characters into two analog and two digital channels. If for
some reason the tape must keep the VTR inserted 2LineVITC,
Keylink should have inserted its 3LineVITC on top of these
lines, e.g. 3Line on 13 14 15 whilst 2Line is on 16 18. The
video tape ID which will be Indaw inserted in the Characters
is the InDaw keyed value if Cv & Sa are ‘on’, it will the one
found in the Vitc user bits if Cv&Sa are ‘off ’.
The EE mode (Electronic Editing) of DVCam DSR-2000P should
be ‘off ’ since it makes for a 3 frame delay in the VITC out. The
confidence mode of Digibeta should be ‘off ’ since it makes for a 2
frame delay. If a gray bar hides the VITC area, activate the dynamic
tracking (DT) of Beta-SP VTRs to get the bar out of the VITC area.
[Shift *] or [Shift -] can also be
used on non dynamic tracking
2
3
equiped VTRs.
SD Vitc-Reader In the
(55) menu, select ADX board
then ‘Analog’ or ‘Digital’ as the
syncing source, select manual or
AutoLine selection. In this later
case, because some HD downconverters carry a ‘VITC like’
signal on the upper lines which
prevents the VITC reader to
see the Keylink / Passage keyed
3LineVITC, select line 10 as the
start of automatic-reading .
Note: VideoTC, Keycode and
AudioTC readings (65) should
appear in blue figures with
higher than 80% reading rate.
HD Vanc-Reader In the
(55) menu, select ‘HD board’
and the various (de)accelerated
play speeds in (55a). Since it
carries the film keycode, the
default ‘Film Vanc’ should be
55a
55
54
53
52
51
50
49
InDaw-MX v7.32 user manual 2004 May 4
p.6
PostSync (2 of 5)
PostSync-2: Take Timeline
Turn off the keyboard Num Lock for the numeric keypad to
behave as a VTR controller.
0
Pause
•
Play forward sync speed
–
One shot forward (.5 to 2.5 jog while pressed)
[shift –] Slow forward while pressed (.01 to .1)
+
Shuttle fwd at 4.5x, then 10x to 100x after 2s
*
One shot backwards (.5 to 2.5 jog while pressed)
[shift *] Slow backwards while pressed (.01 to .1)
/
Shuttle bckd 4.5x, then 10x to 100x after 2s.
[F3]
Opens GoTo window to cueVTR on keyedTC
[Ctrl P] EditVTR preroll length
Clicking the red button (21) of the VTR remote control menu
opens the submenu (24) in which ‘Shuttle speed’ is used to
adjust the shuttle commands (71) to operator’s preference.
Using ATN/FLEX telecine list (recommended)
Click on (49) to open the ‘New Video Tape’ menu, then click
[Import tape ID from ATN or FLX], select the video tape ID to
work with, ‘Create a TimeLine?’, answer YES. (The VTR remote
control box (21) shows, it can also be opened by ‘Tools’ (2)).
Provided the video tape carries a TC found on the ATN/FLEX
list, a video time-line made
2
3
of the colorist ‘tabed’ breaks
shows.
These preloaded
breaks considerably speed up
the Postsync operations since
the remote control shuttles
the VTR to any start-of-take
and to any slate by a simple
71
click on the time-line color
frontiers (63), or on the
yellow triangles (62). If there
is 2lineVITC only on the video
tape (i.e. no keycode data in
the VITC), importing the ATN
transfer file (53) makes InDaw
regenerate the transfer list by
inserting the Keycode from
the first image of each take
and by adding the Audio-TC
63
of sync sounds.
Not Using ATN/FLEX
lists
If there is no telecine transfer
list coming with the video
tape, you must create the
video time line yourself. Click on (49) to open the ‘New
Video Tape’ menu, and key-in the new video tape ID, the VTR
remote control (21) shows (also opened by ‘Tools’ (2)).
The video time line is created by keying in-points with
[CTRL F9] while the VTR is parked on the first image of each
take, or entered by sync slate or mute slate linking (see later)
which lay down their own in-points.
Timeline tuning To move an in-point backward, first hit
[F10] to shorten the invaded take, then [F9] to relocate the
start of the following take. To move an out-point into the next
take, hit [F9] to shorten the next take, then [F10].
Note: when importing ATN, the by default audio/video link
points (blue triangles) show at the start of takes, it is thus
impossible to move the in-points down these triangles; you
must first delink [F11] then relink the take with its own slate to
shorten it down the original in-point.
OK/NG takes A take can be marked as NG (hatched)
and back to OK (solid color) by keying [Ctrl G] or clicking the
happy face while the white play-stick is in the take’s colored
area.
5
21
24
62
34
55
54
53
52
51
50
49
48
47
42
InDaw-MX v7.32 user manual 2004 May 4
p.7
livers
e
d
c
n
o
PostSyC 24’ ALE t s
m
l
‘FilmT nc 24fps fi 25.
y
L
auto-sered to PA
transf
PostSync (3 of 5)
PostSync-3: Video/Audio Linking
Clapsticks VTR stopped on a slate, [F5] opens the slate finder,
double click the corresponding slate line (to edit it key [ALT E]
(47); ‘select&link’ by [F12] or click on (48), a yellow triangle (62)
shows; to unlink, key [F11]; to correct the ‘Sc/Tk & Comments’,
key [SHIFT F12]). To make the sound follow the video playstick,
activate the CatchV (52) button. [SPACE-BAR] (de)activates
CatchV; the operator can thus go back and forth between
PostSync and PreLog for slate tuning or forgotten slate creation in
the audio waveforms panel. The Create & Link button (34) is used
to directly add these slates in the editing slate box (28).
enter or edit the labroll ID. The following events will show the
same ID carried from one to the other.
PostSync Tips:
*re-edit a linked slate, shuttle the VTR to the slate by
clicking over its yellow triangle, unlink it by [F11] or delete by [DEL],
(uncatch Cv), key [ALT E] (47) and link again by [F12].
*lay down and link a slate, stop the VTR on the slate,
Vitc lines must be blue, zoom over the wave form of the slate, the
Scene/Take box opens ; key the Sc/Tk IDs and press [ALT+F12]
or the [Create & Link] button (34). The slate mark shows on the
wave form and is linked to the current Video-TC.
Digislates click [F6], key-in the time & date showing on the
slate, the playstick lands on the corresponding sound, link it by
[F12]. If there is an AUDIO-TC stored on the VITC line3, it can also
be automatically entered by clicking the ‘grab from VITC’ field.
*test a just-synced slate, first activate the audio insert
button A1 or D1 etc. in the remote control menu then make
a [RIGHT CLICK] over the yellow triangle: video and sound are
played two sec. either side of the slate. [CTRL RIGHT CLICK]
records the test to allow for closest verification. by jogging the Vtr.
To jog the VTR at low speed, click on the –0.1 or +0.1 fields (23).
Reminder: the [<] [>] keys help fine-tune the sync point by frame
quarters up to 8 frames.
AatonCode In this mode there is no need to perform imageto-sound links, they already exist and are recorded on line 3 of
the 3LineVITC. The operator only has to shuttle through the take
colored domains, fine tune their ins and outs, enter by [SHIFT F12]
some ‘Sc/Tk & Comments’ which will appear in the rejuvenated
ATN & ALE lists and in the BWF <bext> chunk that Avid v10.6
and v11 read and display.
*undos & redos, click on (3) or [CTRL Z] to Undo, and
[CTRLY] to Redo editing commands. 10 level depth.
Mute Takes If there is no slate/no sound during a video
take, [CTRL F12] creates a take in-point and makes a link to a
‘Time 00, Day 01’ non existing
2
3
5
sound. This allows the system
to catch the keycode from
the 3lineVITC and let the list
manager incorporate mute
takes in the ATN. Since there is
no need in this case to listen to
the clapper announce, the take
in-point starts from the keying
(not two seconds ahead like
synced takes).
Labroll ID The audio
prelog operations happen at
a time correlated Labroll IDs
are not yet known. These IDs,
entered at telecine level, are
exported to InDaw through
ATN or FLeX lists. But if for
some reason VITC is used only,
there is no trace of Labroll ID, be
it 3Line Vitc even. After syncing
a video event, the operator
must press [Shift F12] to
open ‘Sc/Tk & Comments’, and
7
21
23
28
66
65
64
63
62
34
55
54
53
52
51
50
48
47
42
InDaw-MX v7.32 user manual 2004 May 4
p.8
PostSync (4 of 5)
4-FollowSync
Once all video takes are linked, click [I/O ENTRIES] (50) to
set the recording in/out entries of the remote control menu
(20). Select the VTR audio channels and key [REC AUDIO].
Verify the VTR’s VITC is correctly read: (65) readings must be
blue. The camera-fps is stored in the 3LineVITC line2, but
if 2lineVITC is recorded only, manually select STD (1/1) or
24@25 or [email protected] (to sync a 25fps shot film to NTSC). The
Indaw video-synced sample rate converter eliminates the clicks
on the vari-speeded audio directly recorded on digital VTRs.
CatchV (52) is used to on the fly sync Slated links. The audio
disk chases the Audio TC trough the [F12] entered links to the
video-TC found on the HD FilmVANC, or on line 1 of the SD
VITC (be it 2Line or 3LineVITC).
SyncA (51) is used to on-the-fly sync AatonCode or
digislate synced video tapes. The audio disk instantly chases
the Aatoncode audio-TC Keylink recorded on line 3 of the
3LINEVITC. If there is a discrepancy between the 3LINEVITC
date coming from the film and the disk recorded audio date,
syncing is impossible; correct
2
3
5
the date in ‘calendar’, see
Prelog (5), or click «ignore
audio date» in the VITC
setting box (55).
quarters, [LOCAL] applies to one file, [ALL FILES FWD]
to the following ones. This is to be used to sync digislates
which often show a two frame delayed LED display. Entering a
progressively increased offset and applying it to all files forward
is used to compensate the drifting clocks of audio recorders vs
smart digislates.
5-Wild Track sorting
The wild track separators arbitrarily laid down by PreLog two
second ahead of the w-slates should be re-positioned (with
[ctrl+mouse click] in the colored space underneath the audio
waves), before starting the wild track recording on the video
tape at the end of the audio-synced takes. Park the VTR on
the out-point, click [BUILD WILD LIST] (42) which sorts the
w-slated takes to be linked to the VideoTC. If the tape is not
pre-tracked, hit [ASSEMBLE].
7
13
20
SyncV (51) makes the
video timecoded sound
chase the VideoTC of
2LINEVITC tape. To be used
to sync DV tapes carrying
the same video TC as their
audio recorder companion.
25
26
28
SyncA & CatchV can
both be activated to sync a
video tape on which some
takes are AatonCoded and
some other are clapstick
linked.
66
65
62
Audio offset In both
SyncA & SyncV, the offset
window shows h:m:s:fr. &
1/4. [ALT +] [ALT –] move
the AudioTC by frame
55
54
53
52
51
42
InDaw-MX v7.32 user manual 2004 May 4
p.9
PostSync (5 of 5)
6-Rejuvenated transfer lists
Click (7), the (66) menu opens. Activation of ‘Selected events
only’ and ‘View’ shows the selected event list. Click ‘Copy etc.’
to generate NNN.ALE and NNNSEL.ALE lists ; the SEL suffix
identifies the list in which the NG marked takes don’t show.
SEL files are stored alongwith non-SEL files in case the editor
later wants to later digitize the NG takes anyway.
To archive ALE lists stored on C:, open the InDaw directory,
select the tape #, and make a copy.
If the Avid editor imports the BWF audio files from a DVD
or CDR, and then performs autosync between the ALE linked
sounds and images (no use of VTR audio tracks A1 A2), the
Indaw operator should select ‘V only’ when generating the
ALEs. If the editor wants to use the synced sound of the video
tape, the Indaw operator should deliver VA1A2 ALEs.
stereo files for BWF-P compliant Avid MC and FCP editing
machines. The project ID of the converted files is the original
one where an [@] replaces the last [a] figure (that is why the
project ID can only accept 7 characters instead of 8, plus a
default [a]). A [Mix] sign is added to the project title itself. The
crosspad (26) is a reminder of the routing made in the (25)
panel.
An explanation about the Aaton unique FileTag naming system
is on page 13.
10- CD-R, DVD±R burners, DVD-Ram recorders
Open ‘Tools’ (2) and follow the on screen instructions.
The list of supported DVD/CD burners is on www.aaton.com/
indaw/devlist.txt/ If your burner is not in the list you can use
an independant burner-driver such as Gear. Exemple: select
[DVD-Ram], click [Create], select the format (e.g. ISO UDF),
drag and drop the files, click [settings], then [write]..
Note: InDaw uses its own drivers to control DVD±R burners (e.g. a universal DVD±R /-RAM LG GSA 4081B), but
since DVD±R drivers are not able to handle DVD-RAM disks,
don’t forget to install the Windows DVD-RAM driver delivered with the unit you buy.
7-HD/SD converted lists (HD option only)
Click the magic wang cassette box (50), the (65) menu opens.
Here you can select the ATN made while PostSyncing the
downconverted SDI-25fps PAL transfer and convert it to its
HD-24 ‘father’, then re-importing this HD-24 ATN, convert it
again into a downconverted NTSC-30 ATN and ALE.
Note: to get a 24fps ATN from an HD Keylink transfer it should
2
3
5
be made from the AAH not
the AAS AatonRoot.
8- AES on-the-fly
Mixdown from 8 to N
tracks
The control panel (20)
mixes eight monophonic
files into one to four AESout.
Each track can be weighted
-3dB -6dB -12dB and
selected pairs can be MS
decoded into AB. To apply
a given file mixdown to
several other files, open
‘Apply to selected files’, then
hilite the sharing files and
click OK.
9- File to File bounce
from 8 to 2 tracks
A file-to-file mix (25) can
be performed to convert
‘Monophonic’ files into 16bit
interleaved
‘Polyphonic’
7
13
20
25
26
27
28
29
66
65
62
55
54
53
52
51
50
44
43
42
InDaw-MX v7.32 user manual 2004 May 4
p.10
the slaved ‘Playback’
option
Playback option
The ‘Slaved to RS422’ mode is opened by Tools (2). InDaw
plays audio files called by their TC from an Avid MC, Akai
D D 1 5 0 0 ,
d a V i n c i
TLC
master.
The
COM1
subD25M socket
should be used
with an active
RS232/422 level
21
translator such
as the Addenda model #RS-2/8, www.addenda.com/ and an
Rx/Tx crossover cable (these items can’t be delivered by Aaton).
Click (21) to activate the slaved mode, [Local] red becomes
[Remote] green.
The Audio Speed Playback menu (22) is opened by the ‘Slaved
to RS422’ selection or by the (13) button. It gives access to
two kind of parameters:
Vari-Speed
Audio files can be played at a different speed from the
recording speed. On the (22a) buttons select the desired
speed: 25@24, [email protected], 24@25, f-1/1000, X2, and click
[play] to test. The ‘internal
output
sample rate’ control box
internal
locked to
shows the frequency
sample rate
induced by the vari-speed
choice, e.g. 50000 for
24@25.
GenLock
Vari-speeded or not, when it comes to record a sound on a
VTR, the AES-out sample rate must be locked to the video
signal –the Genlock selector (22d) must be activated. The
‘output locked to’ control box shows one of the following
messages: [PL]=PAL locked [NL]=NTSC locked (in green).
[PU]=PAL unlocked [NU]=NTSC unlocked (out of range
video, in red). [?U]=trying to lock but video-in not recognized.
[IN]= HD at 24 not genlocked (InDaw uses its internal clock,
in yellow).
Note this display is reactualised after five seconds of playback
only.
Example one: AES transfer to Avid (PAL)
‘Slaved to RS422’ InDaw finds and plays the files w/ the
timecode sent from the Avid RS422 control, and generates AES
sounds at the speed set in the Audio Speed Playback menu
(22). This mode is used to directly transfer Deva recorded
DVD-Ram into the Avid. Since this operation basically is a file
to file transfer (through the InDaw AES rate converters), there
is no need for a genlock (22b) to an external video signal. The
AES-out sample rate is set by the 48000Hz clock of InDaw, the
‘output locked to’ window shows
IN (for int. clock).
The Audio speed setup (22a) is
of great value when it comes to
22a
interleave sounds and images shot
22b
at different speeds, e.g. a 25fps
video tape inserted in a 24fps film
project; explanation: the 24fps film
originated images are accelerated
by the telecine transfer to 25fps;
they are played back at their
original 24fps by the Avid in slow-down mode. Since the DV
or Beta 25fps originated images are under-cranked to 24fps
also, their sounds must accordingly be decelerated prior to
digitization into the Avid. The ‘TC offset for Slave422’ should
be set to zero.
Example two: daVinci TLC telecine syncing
(NTSC).
Slaved to RS422, InDaw syncs the sound to the timecode sent
by the TLC controller, and generates sounds at the fps set in
the ‘audio speed playback’ menu, e.g. click (22c) to make for
a 47950 internal sample rate. The 48000 AES-out must be
genlocked (22d) to the SDI video
signal sent to the ADX board.
If there is no ADX in your InDaw,
an Analog video signal should be
22c
sent to the BNC [15, page 9]
internally connected to the SRC
22d
audio board; don’t forget to load
the signal with a ‘BNC T’ and an
external 75 Ohm termination.
The type of genlocking signal
–Analog or SDI– is selected in the
Audio Speed Playback menu. The ‘output locked to’ window
should show NL (NTSC locked).
For the TLC to call for the audioTC linked to a given Sc&Tk
slate, it should have formerly ingested the Flex/Audio Only list
built by InDaw during the Prelog session. This list correlates
the slates to their audioTC (see (7) and (66) page 7). Three
FLeX are built:
•AR12345678.FLX (full list), •ARSlate12345678.FLX (showing
slated events only), •ARSlateCamSorted12345678.FLX
(showing slated events (including common slates) sorted by
Cam IDs).
InDaw-MX v7.32 user manual 2004 May 4
p.11
HD to SD in sync:
the ‘Passage’ option
Passage is an HDTV Vanc reader, a Vitc
inserter and a Char + Logo keyer.
Passage reads HD VANCs and inserts VITC+Characters in the
SD channels out of HD>SD downconverters in which the 3:2
sequence is synced to the 00 and 05 timecoded images.
e.g. AJA HD10MD2 or Sony F507-D board with v2.53
software; NOT the F507 board and v2.52.
VANC lines are monitored, metadata is extracted, displayed
and sorted in database (dual mode only).
FILM VANC – keycode+audioTC+date+cameraID etc. – and
VIDEO VANC are read and keyed as VITC+Characters into
the SDI and Analog downconverted channels ( Q4 2004 they
will be keyed as characters into the HD channel also).
SD VITC to SD VITC+Character keyer
Passage can be used as an SDI post-burner which keys
VITC+Characters into the SDI and Analog channels by reading
the previously recorded SDI VITC lines, while compensating
for the 16/9 to 4/3 delay that unsqueezing devices and noise
reducers induce.
Passage User Manual
On http://labs.aaton.com/, get the full user manual.
Reminder : The Passage waveform monitor is a full featured
HD analyser, it gives facility engineers access to each pixel
of an HD image with no need to buy an expensive HD
waveform monitor.
The instructions below only apply to the installation of Passage in a
standalone PC, not in an InDaw:
The Aladin purple dongle being out of the USB socket , explore the ‘Windows Passage
Service Upgrade’ CD-R by double clicking the CD-ROM icon in ‘My Computer’. In
the “3.USB DONGLE DRIVER” folder, double click ‘HDD32.EXE’. “Install shield selfextracting exe” [Yes]. “Warning hasp device driver setup” [Yes]. “HASP device driver
status” [Next]. “Setup option” click [Custom] in the menu. “Key search” select (.)
USB only [Next]. “Parallel port mode” automatic selection [Next]. “Computer Type”
IBM [Next]. “Confirm your selection” [Next] [Ok] [Finish].
Passage
VANC reader
Logo keyer
23.98 HD
SD VITC+Char
Software install.
In the “Passage
Version” folder of the
CD-R, double click
psg1nn.exe then click
‘I agree’. To get the
latest version, go to
http://labs.aaton.com/
and download it. Copy
psg1xx.exe on a blank
DOS formatted 1.4Mb
diskette, do not open the
file. Close the Passage
application. Insert the
diskette in the PC A:
drive and click on the
psg1xx.exe icon: the
‘installer verify’ runs
for one minute. After
acceptation of the license
agreement, a pop-up
menu shows Passage as
Maintenance/Update key
Copy pmunnn.exe on a blank DOS formatted 1.4Mb diskette. Do
not open the file. Insert the diskette in the PC A: drive and click
on pmunnn.exe. Acceptation of the license agreement triggers the
installation. Click OK, Passage is ready to work.
HD Vanc
HD board Installation
Open the PC cabinet, plug the HDK-292 and the ADX
boards in the exact position seen on the PC rear views
page 16. Connect the twisted Molex cable between
the HDK and the SRC board as shown in internal
connections page18.
the destination, click on ‘Install’. The Passage icon shows on the
desktop.
N frames
delayed audio
N frames delayed
Keycode
VideoTC
AudioTC
Roll, Sc&Tk etc.
VTR, N frames
downconverter,
or AJA HD10MD2
29.97 SD
VITC & Char.
SDI-Analog keyer
InDaw-MX v7.32 user manual 2004 May 4
p.12
Faqs & Tips (1 of 3)
How does InDaw handle standard slates?
Three steps:
- Tape to disk recording: InDaw non-stop digitizes and reclocks
the tapes, the operator on-the-fly keys a prelocator mark
on each slate, and key-in their Sc&Tk IDs (if the on-location
recorder is set in ‘free-run’ InDaw records each take in a
separate file).
- PreLog: with the [tab] key the operator scrolls the slates,
listens to the Sc & Tk ahead of the slate (high precision located
by the InDaw waveform analyser), and confirms or modifies
the prelocator entered Sc&Tk IDs. They are correlated to the
audio-TC and stored.
- PostSync: High speed shuttling from slate to slate through the
video tape, the operator links the Prelog entered Sc&Tk IDs
which match the ones seen on the video monitor. The slate
immediatly comes in-sync, its audio-TC is attached to the tape
video-TC and recorded in the ATN/ALE transfer list. InDaw’s
seek-time is so short that playing the video tape makes the
audio come in sync from the very first image of each take, it is
thus possible to non-stop dub the audio onto the videotape
and mirror DAT (if need be). The audio CD-R sent to the Avid
station is thus correlated to the video-TC and allows the avid
to perform an instant ‘auto sync’ of all takes.
How to sort and extract Wild Tracks?
The takes which carry the ’w’ takes entered by the Prelog
operator can be sorted and recorded at the end of the
dailies video tape (see the W button), but we recommend
you burn a CD-R for the editor to get permanent access to
all wild tracks: the .BWF files are directly ingested by Avid v11,
but for Avid v7.6 they must be converted to OMF with the
AtonXfer converter that you can download for free on http:
//labs.aaton.com.
Is it still necessary to start the audio recorder
seven seconds before the camera?
Thanks to the faster than two frame seek time of InDaw, there
is no longer a need for audio pre-roll: the tape recorder can
be switched-on while the camera starts rolling. Furthermore
the PreSilence feature adds up to 9 sec of silent leader to let
the Avid ‘group clip’ show the start-of-take images in case the
sound engineer starts his recorder after the camera!
Why DATs are drifting in AatonCode/Arricode
mode?
A DAT recorder drifts when its audio sampler is not synced to
its Smpte clock. The problem becomes very visible when the
Smpte timecode is generated by a TCXO external clock!
By realigning the 48K sampling rate to the recorded Smpte
LTC ‘second’, InDaw totally eliminates this very common drift.
What’s the meaning of the TimeCode separators?
01.02.03:04 is an actually read Audio-TC. 01 02 03:04 is an
extrapolated Audio-TC. 01:02:03:04 is a calculated Audio-TC
from the link point.
How to import BWF files in Avid v7
(AtonXfer) ?
The AtonXfer BWF–>OMF converter ensures the importation of BWF sounds w/. timecode into old Avid v7 film
composers.
This application, made for old Avid v7, runs on Mac v9; it is
available for free on http://softs.aaton.com/
(only InDaw and Cantar recorded files can be handled).
The AtonXfer2 icon should permanently stay on the
Macintosh desktop.
A. CD-Roms carrying the InDaw recorded .bwf files must
first be copied onto one of the Mac hard-drives (most CDR readers are not fast enough to directly feed the AtonXfer
converter).
B. Drag the .bwf files (no .txt, no .idf nor .idw files) onto the
AtonXfer icon. The .bwf to .omf conversion of a two channel,
16 bit file on a Mac G4 machine takes one tenth the audio
real time to complete.
Since the files are first copied to the available physical RAM
for processing, make sure you have more physical RAM than
the file(s) size you are converting. They must fit within the
RAM. Virtual memory will NOT work.
C. Conversion done, import the .omf files into the project
where they will be available for play once parsed under AIFF.
D. To perform a ‘group sync’, copy and paste the ‘Snd-TC’
column into the ‘Auxilliary-TC’ column of the audio bin,
and copy and paste the camera ‘Film TC’ column into the
‘Auxilliary-TC’ column of the image bin.
E. If the Avid shows ‘TC not matching’, verify that the sound
and film dates are identical, not only showing the same day
but the same Year/Month/Day order, e.g. 2004-09-24 (NOT
09 24 04). If not, batch modify the incorrect date column(s).
How to perform audio-video auto-syncs
on Avid v7?
1. The Avid v7 should be a FilmComposer.
2. The files should have been bounced to 16bit, polyphonic,
.bwf extension files; they should have been OMF converted
through AtonXfer.
3. On the Avid, before performing a ‘group sync’, paste the
Snd-TC values into the Aux-TC column in order to match the
film-TC moved in its own Aux-TC column too.
4. Copy the ‘shoot date’ column of the bin into an ‘Aaton date’
column in which wrong date entries can be corrected; place
this column before the ‘Aux-TC’ (where the film-TC is stored),
InDaw-MX v7.32 user manual 2004 May 4
p.13
Faqs & Tips (2 of 3)
key [apple/e] to sort the files by ascending date & time. If the
Avid shows ‘TCs not matching’, verify that sound and film dates
are identical, i.e. carrying the same day and the same Full-Year/
Month/Day syntax, e.g. 2001-09-23. If not, batch modify the
date.
See below the Avid v11 ‘EDL Manager’ settings for Protools/
Titan-3 auto-conforming.
How to perform an AutoConform w/. Avid v11
or v7 EDLs
1. The original monophonic files (tracks) should have been
bounced into one polyphonic stereo file, 16 or 24bit, .wav or
.bwf. The Avid v11 creates an audio bin on the desktop.
Monophonic stereo files should be grouped (synced) before
performing the audio/video sync on an Avid filmcomposer. To
avoid that burden and save time it is recommended to bounce
them into one polyphonic stereo file prior to importing them.
2. Once the sounds are copied from CDR or DVDR to the
hard drive you can instantly auto-sync images and sounds by
importing the InDaw made ALEs which carry the video/audio
sync points. Please apply the ‘3&4’ instructions found in ‘Syncing audio on Avid v7’ above. If the sync operation has not
been ensured by InDaw, slate syncing is done manually in the
standard way.
3. Before editing, the TapeID column which carries the Cantar
TakeTags (CZ7845) should be duplicated and put into the
SoundRoll column of the audio bin.
Later, when it comes to generate the edit list with the EDL
Manager, select SoundRoll instead of Tape as the source, and
select ‘Trunc end’= 8 characters.
4. Important notices: for a film shot at 24fps, select ‘Output24’ even if the film has been transfered in ‘PalVideo’; the EDL
must be CMX 3600 and can only contain 4 audio tracks and
no video.
Titan-3 ‘Cantar rules’
If your Titan-3 software doesn’t feature the Cantar option, it
can be downloaded from
http://www.synchroarts.com/beta/Cantar.tsc
(select Save As...). Put it into the ‘Scan Control’ folder which
is the Titan directory. The option will then appear in the file
selection rules.
The way the ‘Cantar rule’ works is to use the first 6 digits
from the file name and first 6 digits from the ‘sound roll’ name
in the EDL; then to look for a number preceeding the .wav
which identifies the channel. For multi channel files the track
will default to 1 if no track number is found. The Cantar rule
also handles the (-) and (+) identifiers which replace the (_)
on MS and stereo pairs.
How does the Aaton file naming system work?
Cantar and InDaw generate file names made of three parts:
1.TakeTags
A PC 8+3 filename, e.g. ST1254_1.wav carry a six character
‘TakeTag’ (ST1254) which links all the files born from a given
audio take; these ‘never twice the same’ tags are stored in
the ‘one folder per working-day’ system of Cantar. The ‘never
twice the same’ Taketag is automatically generated by Cantar
during the RECORD session, and should never been modified
in the post-prod process since it is the absolute link between
the original files, the bounces and the EDL generated by editing machines.
The first six characters ‘TakeTag’ of the filename ensures error
free tracking between
1. the original mono files (to be later used by Protools, Pyramix
and Sadie),
2. the bounced files used by the editing system, and
3. the ‘source’ names used by the CMX EDL going to the autoconforming system (such as SynchroArts Titan3).
2.Scene Descriptors
Operator keyed descriptors, e.g. Sequence: 123A Scene: 14R
Take: p12, are not used to identify the files, they are embedded as file metadata, and can be modified/corrected at any
time. Operator entered they are error prone, so they are
not used as automatic file sorting identifiers, just as manual
sorting helpers. They are added (between == signs) in the
file names which appear on the computer desktop.
(for MacOS compatibility the longest filename is limited to 31
char.)
ST1254==123B;14R_12==_1.wav
ST1254==123B;14R_12==_8.wav
Note: do not superficially modify a filename by editing the
descriptor on a PC desktop, it is wiser to use InDaw or the
free Majax application to correct the scene and take metadata _inside_ the file.
3.Suffixes
(_N) is the track rank. (-N) designates an MS pair: M is
always on an odd track and S on an even track. An MS pair is
automatically stereo decoded for playback and bounce: M+S
goes to the left, M-S to the right. An (+N) suffix designates a
stereo pair: odd goes to the left, even to the right.
How do you handle the monophonic and polyphonic file shuffle?
First of all it’s very important not to confuse the automatic interleave of monophonic files into a l-o-n-g polyphonic file, and
InDaw-MX v7.32 user manual 2004 May 4
p.14
Faqs & Tips (3 of 3)
the subjective mixdown (bounce) of monophonic file mothers
into a short stereo file daughter. To differentiate mothers and
daughters Cantar, InDaw and Majax work the same way: they
replace the _N suffixes by an AA suffixes in the following way:
1. MixDown of monophonic files into a polyphonic stereo
Performing a mix is not an automatic process and the successive resulting files must be differenciated to be stored. The
Taketags and descriptors remain the same, only the suffix
changes, its first letter flags the origination machine (C for
Cantar, A for Majax, B for Indaw, etc.) the second letter W to
Z identifies the successive mixes.
ST1254==123B;14R_12==AX.wav is a Majax made fourth
try bounce.
This method lets a post-operator propose different bounces
(AU to AZ) without destroying the original (CW) made in
Cantar by the on-location recordist himself.
Note: MS pairs carrying hyphen separators (‘M’ on odd, ‘S’ on
even tracks), are decoded before bounce.
2. Interleaving monophonic files into a polyphonic file
The interleaved file extensions should avoid conflicts with any
of the original file extensions.
When interleaving N monophonic files into a single polyphonic file, the TakeTag and descriptors remain the same and
the suffix becomes P for Polyphonic plus N as an indicator
of the number and lay-out of the monophonic original files
ST1254==123B;14R_12==P8.wav (since interleaving is an
automatic dumb process there is no need to identify the
originator nor the successive performings)
If ST1254_1 to ST1254_8 are the file names of an eight monophonic file group, we get the polyphonic files below:
An odd number is related to the lower rank file number of a
two track interleave, and even number is related to the higher
rank of an all track interleave.
ST1254P1.wav [Poly made of tracks 1 & 2]
ST1254P3.wav [3 & 4]
ST1254P4.wav [1 & 2 & 3 & 4] (1)
ST1254P5.wav [5 & 6]
ST1254P6.wav [1 & 2 & 3 & 4 & 5 & 6] (2)
ST1254P7.wav [7 & 8]
ST1254P8.wav [1 & 2 & 3 & 4 & 5 & 6 & 7 & 8] (3)
ST1254P9.wav [Poly made of tracks 9 & 10 (hexadecimal A)
(1) Poly 4 track from Deva-II
(2) Poly 6 track from PD6
(3) Poly 8 track from Majax
Tips
o. Nagra-D is sensitive to playback LTC mis-settings , e.g.
syncing a 30 fps tape to 29.97 creates LTC breaks. Verify the
LTC numeration is identical to the LTC-out setting, timecode
breaks are not detected otherwise. Nagra-T-audio should be
set in Roller Update ‘ON’ to avoid wild chasing on large TC
holes between breaks.
o. timecode fps turns to [??] during ‘record’ : Check the location
DAT recorder is set in EXTERNAL REC for the TC. Check
the DAT reader is in REC RUN for it to read and generate
the time code from the tape. Do NOT slave the DAT to a
reference (video or word clock), let InDaw handle sample rate
vs LTC discrepancies!
o. switch-off the ‘confidence recording’ mode when recording
sounds on Digibeta VTRs. ‘Confidence’ delays the VITC which
syncs InDaw by two frame late.
o. switch-off the ‘EE’ mode when recording sounds on DVcams
(e.g. DSR-2000P), it delays the VITC by three frames.
o. Syncing InDaw sounds on an Avid FilmComposer
Before performing a ‘group sync’, paste the Snd-TC values into
the Aux-TC column in order to match the film-TC moved in
its own Aux-TC column too. Copy the ‘shoot date’ column
of the bin into an ‘aaton date’ column in which wrong date
entries can be corrected, place this column before the ‘AuxTC’ (where the film-TC is stored), key [apple/e] to sort the
files by ascending date & time.
If the Avid shows ‘TCs not matching’, verify that sound and
film dates are identical, i.e. carrying the same day and the same
Full-Year/Month/Day syntax, e.g. 2001-09-23. If not, batch
modify the date.
InDaw-MX v7.32 user manual 2004 May 4
p.15
Nagra-4
LTC-out
DAT
or
Nagra-D
A-to-D
LTC-in
InDaw
CD/DVD driver
4 AES-in (raw)
Audio board
Break-out Box
4 AES-out (w/Sample Rate converter.)
VANC reader
VITC reader
VTR 1
Video Keyer
VTR 2
Connections (1 of 3)
DVD/CD
burner
External
Connections
Facility must provide
active loudspeakers,
17” VGA monitor.
- -- - -- - - -Keyed SDI & Analog
08:24:12:45
PC chassis
[1] [5] Dongle either a ‘BlueKey‘ on the printer port [1] or a ‘Pink Aladin’
on the lower USB socket [5].
[2] VGA monitor (subD-15F), 17” CRT minimum, or a Flat Screen with
65000 colors or more, 1024x768.
[3] Keyboard and Mouse (mini DIN).
[4] COM2 (subD-9M), to control DAT or VTR (pin2=Tx, 3=Rx, 7=gnd)
use the RS232/422 level translator cable delivered with the PC. which
works for short distance. If you must go through a switcher use an active
RS232/422 translator such as the Addenda model #RS-2/8 (it is not
deliverable by Aaton, please contact www.addenda.com/).
[6] Ethernet (RJ-45) 10-100 base-T. (Through optional ISA board on
Simatic PC-830)
[9] COM1 (subD-25M) for the Slaved-to-422 option. Insert an RS232/
422 translator such as the Addenda model #RS-2/8, www.addenda.com/
and an Rx/Tx crossover cable.
[17] SRC Options (LTC), [18] AES (subD-15F) to the breakout box. The SRC board brings sample rate to an exact 48ks/sec.
extracted from the audio tape LTC track. Only use the audio
tape LTC to let InDaw correct the drift alone, do NOT lock the
playback machine (DAT or Nagra) to a video reference signal !
[19] Firewire Optional board for Indaw-MX only. (replaces the
SCSI board (13) on Simatic PC-830.
16
13
17
18
19
14
Windows-2000
LTC-out
15
11
10
Ri-45
4
3
1
18
13 or
16
5
9
17
6
15
14
2
10
11
6
2
[10 & 11] ADX reader-keyer (subD-3V) for Post-Sync option.
Through subD-3V / 3xBNC expanders, SDI video to the bottom
socket [10], Analog video to the top socket [11].
Note: this board can be replaced by a
simple Analog VITC reader board (no
keyer option) installed in the same 9th
slot, see page16 also.
[13] SCSI-3. When connecting
a Centronic device to the SCSI-3
board, remember that many “Scsi-3
SubD-3V to 3xBNC expander
to Centronic” cables don’t comply
to specs. If at start-up the CD-Rom
burner answer-back is not immediate, get an Aaton 70 500 26 or
a certified cable to bring the proper load on the unused Scsi-3
pins.
[14] HDK (BNC) HD-292 in/out. Delivered with the HD
PostSync option (which works in Indaw-MX only). Note that the
HDK-292 board can be installed in InDaw to run the “Passage”
software also (see page 10).
[15] Analog Genlock (BNC) optional, this video input is used
to directly sync the SRC board to analog video (external 75Ohm
termination needed).
[16] Two analog out (Cinch) At –10dB and non S/N specified,
these audio signals are to be used for monitoring PreSync and
PostSync operations.
Simatic
PC-830
4
10
3
11
1
14
5
19
13
9
15
Windows-2000
IRQ dictated, board placement must be respected for each PC model, see
opposite pictures. Note: current PC is Siemens PC-840.
Windows-2000
Internal Boards
17
18
16
PC-840
9
6
5
4
3
InDaw-MX v7.32 user manual 2004 May 4
2
1
p.16
Connections (2 of 3)
3
1
4
DISK DRIVES
Carrying sound files in and out InDaw can be done by Ethernet,
SAN or physical medias.The screenshot above shows the desktop
icons of a typical PC in which many types of medias and drives
are in use:
Removable Medias (DVD-Ram, DVD+R, CDR)
Reliable and inexpensive the DVD+R technology is currently the
best to physically store and transport audio files.
(1) Internal DVD±R & CDR burner/player. currently a Pioneer
106D connected in slave mode on the HDD ULTRA DMA
ribbon. Disks are either burned with the built-in DVD±T InDaw
software driver, or using a host burner driver such as Gear.
(2) External DVD-Ram, currently a LaCie using a Matsushita
drive. FireWire connected. Following the AES31-1 BroadcastWave
recommendation (BWF), InDaw records the DVD-Ram under
FAT32 format.
(Windows takes about twenty sec. to recognize a DVD-Ram disk,
be patient).
(3) Internal CD-Rom player, currently an Mitsumi, IDE.
Is to be used to play the Cantar recorded mixdown of the day.
Removable Hard Drives, FireWire linked
FireWire is the most reliable way to connect a removable hard
drives to a computer. The advantage over SCSI is the hot plugability (provided the disk is software unmounted before it is
physically disconnected).
(4) External hard drive, currently a LaCie 40 or 60GB. FireWire
connected, Fat32 formatted; used to carry the audio files to a
Keylink-IP working under Windows-2000.
-
2d
2c
Ultra2 HDDs into Ultra160 carriers.
We put bright yellow stickers to warn operators about this
uncompatiblity.
SCSI-3 terminations
When a Rorke removable hard drive and a CD-Rom reader
are both internally connected, the CD-Rom (through a B3/2 Scsi
converter if need be) must be in first position in ‘term off’, then
the Rorke in ‘term on’. If the CD-Rom is connected only, it must be
placed at the end of the flat ribbon in ‘term on’. Be careful when
connecting DVD/R and CR-Rom burners on the same SCSI chain,
most external drives do not come with a built-in Scsi termination,
don’t forget to plug one.
Notes on HDD formatting
Note1: An InDaw-5 (DOS) recorded, FAT16 formatted disk can
be read by all Keylink InstaSync (DOS to Windows-2000).
An InDaw-6 (WindowsNT) recorded disk can be read by a
(DOS) Keylink Instasync provided it is FAT16 formatted (8Gb
maximum) with smaller than 2Gb partitions only.
Note2: If you use Windows-2000 to format a disk under FAT32,
it will be ‘secondary’ partionned, this is not a problem for InDaw
nor Keylink-IP but it can’t be used on Cantar which needs ‘primary’
partionned disks. To get FAT32 primary partitions you must use a
third party software such as ‘Partition Magic’.
unscrew to remove the top lid
Removable Hard Drives, SCSI linked
Preliminary notice: Rorke SCSI carriers and frames were made for
AT/IDE Ultra2, they are now manufactured for ATA/100 Ultra160
only. New carriers and frames are uncompatible with former ones:
an Ultra160 carrier can’t fit into an Ultra2 frame, nor a former
Ultra2 carrier into Ultra160 frame. To expand your HDD fleet
you must buy empty carriers and frames, and install your current
InDaw-MX v7.32 user manual 2004 May 4
p.17
Connections (3 of 3)
AATON Board Installation
If InDaw doesn’t start, verify all boards are correctly plugged,
A ‘Yes’ should appear opposite the board names in ‘About InDaw’.
To open the PC840 cabinet unlock the top cover by unscrewing
the Philips screw on the front panel.
ANALOG + SDI Vitc reader/keyer: ADX-v3 (optional)
A Dual channel Composite/Component keyer for 3LineVitc,
VirtualSlates & Characters, plus a dual channel CCIR601 keyer.
Note: 3line VITC insertion doesn’t update nor modify the 601
signal EDH. If an ADX board is to be carried over from a Siemens
Ri-45 into a PC840, it must be factor y updated to an ADX-v3
board.
DIGITAL AUDIO player: SRC-3
Four AES & two analog (-10dB monitoring) video-synced outputs at
48Ks, 47.952Ks (Dir.to Disk), 46.xxxKs ([email protected]) & 50Ks (24@25).
When installing this board, the analog ‘Video-VTG-In’ must be
connected to the ADX ‘VideoSync Out’, and the ‘HD Odd/Even’
to the ‘Video CCIR-In (twisted Molex cable). The audio disk
loading message is white-on-red if the internal video routing is OK,
it is white-on-blue if it is not.
HIGH DEF reader/keyer: HDK-292 (optional)
SMPTE 292M - 1.5 Gb/s HD Serial Digital Video. SMPTE 274M
(1080/24, 25, 29,97 etc.) and SMPTE 296M (1280/50, 720/59.94)
scans. Indaw-MX reads FILMVANCs to synch sound and HD
video. This board is also used by PASSAGE to read HD VANCs
ahead of downconverters (Snell,Teranex, X-Box, Evertz or HDCam and HD-D5 VTRs). The VANC extracted data is then
inserted by the ADX board in the 3lineVitc and Characters of
the SDI video.
When installing the HDK board, don’t forget to connect the ‘odd/even’
twisted Molex cable as indicated in the drawing below.
VTG
ANALOG Vitc reader:
VITC-3 (optional)
J3 socket
SRC-x
Analog video Vitc reader
only, the VITC-3 reader
Red
is now replaced by the
jumper
ADX
Analog-Digital
reader-keyer; but it’s
still used in cheaper
installations not requiring
VITC-3 reader
character insertion in the
digital domain.
(1) if the VITC-3 reader board is alone, the jumper is plugged to
bring a 75 Ohm termination. (2) if both VTG keyer & VITC-3
reader are installed, the jumper is removed since the VTG
J3
socket ensures the 75 Ohm termination.
SCSI driver: SCSI-3 (special order)
This board is no longer installed in InDaw-MX; Rorke disks being
progressively outmoded by FireWire connected Pocket Drives, it
is now replaced by a FireWire 400MHz board.
1
2
3
HDK-292, Pci
HD ‘Odd/Even’
to SRC ‘Video
CCIR-in’
(twisted Molex
cable)
ADX-v3, Isa
ADX ‘Sync out’
to SRC ‘Video-in’
CD-R
reader:
term ‘off ’
Removable
HDD:
term ‘on’
SRC, Pci
A
B
C
68pin 70 500 27 SCSI-3 ribbon
B3/2 Scsi converter
I
SCSI-3, Pci
D prty ‘on’
term
‘off ’
Toshiba CD-R 70 500 33.
ID5, prty on, term off, PAV off, test off.
Plextor PX-32.
ID5, prty on, term off, test off, block off.
InDaw-MX v7.32 user manual 2004 May 4
p.18
From NT to 2000
Migration from InDaw-6 (NT/RTX-4) to
InDaw-MX (2000/RTX-5),
using an Aaton configured hard drive
containing Windows 2000 & RTX-5
(if necessary, an IMUnnnn and an Aladin USB #nnnn
dongle are delivered too)
A- Preliminaries.
1- Your current customer projects will go away with the
old hard drive, you must first copy the C:\INDAW folder,
in which they are stored, on a removable drive (or floppy
disk) that you will reimpor t qfter Win=2000 installation.
2Switch-off
the PC, remove
the mains cable,
remove
the
cabinet
top
cover. To get
access to and
exchange
the
former
hard
drive (to be sent
back to Aaton),
you
must
Siemens RI-45 PC cabinet rear view.
extract the hard
drive holder by
unscrewing the
five ‘golden’ screws (see pic.) located at the rear of the
cabinet and by unlocking the internal screw (you need a
Tork key but don’t remove that screw!) which prevents
the HD holder to slide away from the rear to the front of
the cabinet. Unplug the hard drive IDE ribbon and pozer
supply cable, remove the disk from the holder and replace
it by the Windows 2000/RTX-5 disk delivered by Aaton.
3- The internal boards must be reshuffled according to the
PC model lay-out shown on page 14 of this manual.
4- If your InDaw was running with a ‘Printer Por t’ blue key
dongle, REMOVE it and plug the ‘USB’ Aladin dongle into
the lower rear USB socket.
B- Setting the IRQs
Star t the computer, and looking at the star t screen press
[F2] to activate the “Setup Utility”.
If you are too slow to react you will trigger the SCSI utility
screen, and that is not the screen you want!
Exit, and immediatly reboot by (CTRL ALT DEL) to AVOID
Windows activation, and try again.
In the “Phoenix BIOS Setup Utility” first press F9 to reset
to the default configuration, then using the <– –> arrows,
go to “ADVANCED”, and with the down arrow select
“PCI configuration” [enter]
PCI IRQ 1 [10]
PCI IRQ 2 [ 5]
PCI IRQ 3 [10]
PCI IRQ 4 [Auto]
[Esc] [Enter] [Yes]
C- Re-install the Back-up Files
Open the Indaw backup drive (see ‘preliminaries’), and
copy your customer projects back to the C: drive.
D- Install disk drivers
If you use external DVD-Ram or DVD+R disks, reinstall
their drivers.
E- Install InDaw version v7.x
Download and install the latest IDW7xx, software from
http://labs.aaton.com/
Install the Maintenance & Update IMUnnnn delivered with
the Aladin dongle.
InDaw is now ready to work under Windows-2000.
NOTE: Migration within a Siemens PC-830
Since three PCI slots are available only, and since there is no builtin ethernet socket in a Siemens PC-830, you can simultaneously
install the following boards only:
a- Audio-SCR + SCSI + Ethernet
b- Audio-SCR + FireWire + Ethernet
d- Audio-SCR + SCSI + HD keyer
e- Audio-SCR + FireWire + HD keyer
InDaw-MX v7.32 user manual 2004 May 4
p.19
From NT to 2000
Migration from Windows-NT/RTX-4
to Windows-2000/RTX-5.
Installation in the PC hard drive itself.
(not recommended operation, better to install a complete disk
already configured at Aaton, see preceding page).
A- Preliminaries. (See PC830 note, end of this chapter).
1- Your current customer projects will be lost by this upgrade,
you must backup the C:\INDAW folder in which they are stored
on a removable drive (D:, E:, etc.) that you will reimpor t when
Windows 2000 is installed.
2- The internal boards must be reshuffled according to the PC
model lay-out shown on page 9 of this manual. If for some
reason (Passage installation) an HDK-292 HD board has been
inser ted before the Windows-2000 migration, REMOVE it. It
will be re-inser ted later during RTX-5 installation.
3- If InDaw runs with an ‘USB’ purple key dongle, REMOVE it
before star ting the PC. If InDaw runs with a ‘Printer Por t’ blue
key dongle, LEAVE it on its socket.
4- At some point during this installation you must have
access to an internet connected PC to get a password from
VenturCom http://suppor t.vci.com/license/licenseform.asp
B- Setting the IRQs
Inser t the WINDOWS 2000 CD-R into the CD-R drive.
Reboot the computer by [Star t]/[Shutdown]. Looking at the
star t screen, be very reactive to swiftly press [F2] to activate
the “Setup Utility”.
Note: if you are too slow to react you will trigger the SCSI
utility screen, that’s not the sceen you want..., the only solution
is to reboot (CTRL ALT DEL) and try again...
Into the “Phoenix BIOS Setup Utility” using <- -> arrows, go
to “BOOT SEQUENCE”, using ver tical arrow select “ATAPI
CDROM DRIVE” and move it to the top with the [+] key then
go to “ADVANCED”, using down arrow select “PCI” [enter]
PCI IRQ 1 [10]
PCI IRQ 2 [ 5]
PCI IRQ 3 [10]
PCI IRQ 4 [Auto]
then [Esc] [Enter] [Yes]
Be very attentive and FAST to react: on the message “Press
any key to boot from CD” press [SPACE BAR] (if you miss this
message please switch off the PC and retry, next time you will
be quicker).
C- WINDOWS 2000 installation
SETUP WINDOWS 2000 [Enter], ‘I agree’ [F8]
Choose the hilited strip C:FAT ...... 2045 [Enter]
‘Continue’ [C]. Using the up arrow, select “Format the par tition
using NTFS file system”, press [F] to format the drive.
Windows is now formating the C: drive, it will install Windows2000 and reboot the computer.
Please leave the CD in the drive and wait.
When the message “Press any key to boot from CD” appears,
DO NOT PRESS any key!
WELCOME TO WINDOWS SETUP WIZARD, WINDOWS
2000 PROFESSIONNAL SETUP
“Regional Settings” [Next], “Personalize your software”
Name : INDAW
Organization : AATON [Next]
Product key: (please key the five windows in UPPER CASE)
[Next] (this product key is available in the pack you received
from Aaton).
“Computer name and Administrator Password”
Computer name: INDAW-XXX (you should consult your
network administrator, this only is an example!).
‘Administrator password’ : paris (LOWER CASE)
‘Confirm password’ :
paris [Next]
“Date and Time settings” [Next]
“Networking settings” (the PC runs for two minutes)
“Typical settings” [Next]
“Wordgroup or Computer Domain”, you must answer [No],
this computer is not on a network, or is on a network without
domain [Next].
The computer installs the above and reboots itself. Leave the
CD in the drive and wait. When the message “Press any key to
boot from CD..” appears, DO NOT PRESS any key.
“Network identification wizard”, ‘User’ : INDAW
‘password’ : indaw (lower case)
‘confirm password’ : indaw [Next] [Finish] [OK]
Remove the “Windows 2000” CD-R and reboot your computer
[star t]/[Shutdown] [OK]. Switch off the PC.
Switch on the PC. Computer is rebooting... Right after the very
star t, and as soon as UMB shows, shor tly press [F2] and release
it for entering ‘Setup Utility’.
In the “PhoenixBIOS Setup Utility” go to “Boot Sequence”. Bring
the “Hard Drive” at the top with the [+] key. [Exit] [Enter]
[YES]
Windows-2000 is now installed.
D- RTX-5 software installation
Put the “Indaw Service Upgrade” Aaton CD-R.
Make a mouse right click on the windows desktop and select
“Proper ties”. “Settings” colors: 16 bits, screen area: 1024 x 768
[Apply]
Explore the CD ‘Indaw Service Upgrade’ by making a double
click on the CD-R icon in “My Computer”.
In the “1.RTX” folder, click on ‘RTX5.1.1aRuntime.exe’
InDaw-MX v7.32 user manual 2004 May 4
p.20
From NT to 2000
“Welcome” [Next], “Software license agreement” [Yes]
“Venturcom RTX 5.1 setup” [Next], “Product registration”,
please enter the PAC Number written on your sticker and your
email address [Next].
WARNING: to the question “Does this computer have a web
access to the internet ?” always answer [NO] since you can’t
install foreign boards or softwares on InDaw.
“Manual registration”. Note the PAC (four sets of characters)
and Machine ID (18 characters) on a piece of paper and keep it
with you while you go to a PC/Mac where you get an internet
connection to the VenturCom website http://suppor t.vci.com/
license/licenseform.asp
Follow the webpage instructions, enter the PAC and Machine ID
into the edit boxes, enter your ‘EXACT’ e-mail address, you will
immediatly receive your license key.
Back to the Indaw station, enter the licence key:
“RTX license key” (RTX-...-...) [Next]
“Choose destination location” [Browse]
change path from ‘files\venturcom\’ to ‘C:\Program Files\VCI\
RTX’, [OK] to create, then [Yes]
“Select a program folder” (accessories show by default) [Next]
“Star t copying files” [Next], “Setup complete” select [ • ] for
‘Yes I want to restar t’ [Finish].
The computer should reboot itself, if it doesn’t, switch it off by
pressing the PC front panel on/off button.
E- RTX and internal boards
[Star t]/[Programs]/[VenturCom Rtx]/[Rtx proper ties]
“Plug and play”. Uncheck [ ] shows filtering list at the bottomleft of the menu. Make a mouse right click on “Multimedia
audio controller”, select “ADD RTX INF Suppor t”. [Apply]
[Ok].
[Star t]/[settings], click on [control panel]/[system], double
click on [hardware]/[device manager]. Go to the yellow
question mark, make a mouse right click on “Multimedia Audio
Controller”, a “Confirm Device Removal’ menu opens. Select
“Uninstall...” [OK]. Reboot the computer by [Star t]/[Shutdown]
Computer is rebooting: ‘RTX installs Multi Media board’.
[Star t]/[Programs]/[VenturCom Rtx]/[Rtx proper ties]
“Plug and play” in “RTX proper ties” make a mouse right click on
“Multimedia Audio Controller” and click “Proper ties”
“Rtx PCI Device Proper ties”. In the “Disposition” pane, select
“Shared” [OK] [Apply]
Switch off the PC by [Start]/[Shutdown] and if applicable,
INSTALL THE HDK CARD (see ‘preliminaries’ page one)
otherwise directly go to the F section.
operations as in E- RTX and Indaw boards) till “Shared” [OK]
[Apply].
G- RTX and external devices
[Star t]/[settings], click on [control panel]/[system], double
click on [hardware]/[device manager], double Click on “Por ts
(COM&LPT)”, make a mouse right click on “Communications
Por t (COM1)”, Select “Disable”. To the question “Disabling this
device ...” [Yes]. Close ‘Device Manager’, ‘System Proper ties’
and ‘Control Panel’. Double click on the CD-ROM icon in
‘My Computer’ then explore the CD Windows 2000 Indaw
Service Upgrade. In the “2.ASPICD” folder double click the
‘ASPIGHT.EXE’, “Aspi drivers for windows installation” opens,
[Next] [Next] [Finish]. Close the pane.
H- Dongle activation (ALADIN purple dongle only)
The dongle still being out of the USB socket (see ‘preliminaries’
page one), explore the ‘Windows 2000 Indaw Service Upgrade’
CD-R by double clicking the CD-ROM icon in ‘My Computer’.
In the “3.USB DONGLE DRIVER” folder, double click
‘HDD32.EXE’. “Install shield self-extracting exe” [Yes]
“Warning hasp device driver setup” [Yes]
“HASP device driver status” [Next]
“Setup option” click [Custom] in the menu
“Key search” select (.) USB only [Next]
“Parallel por t mode” [Next]. “Computer Type” [Next]
“Confirm your selection” [Next] [Ok] [Finish].
Connect the USB ALADIN dongle, the dongle LED shows after
a few seconds, indicating that everything is OK.
Explore the ‘Windows 2000 Indaw Service Upgrade’ by double
clicking the CD-R icon in ‘My Computer’.
In the “4.BEFORE INDAW” folder, double click ‘IFIRST2.EXE’
[Setup]. If need be, if the last the black screen remains in
waiting mode, press [Spacebar], the ‘ifirst’ notepad shows, close
it as well as all opened screens.
I- Re-install the Back-up Files
Open the InDaw backup drive (see ‘preliminaries’),
and copy the projects back to the C: drive: InDaw is now ready
to work under Windows-2000.
Note: if during InDaw first star t-up under Windows-2000
the following warnings “Bad Sor ter IRQ” or “Bad ADX IRQ”
appear, close the InDaw application and immediatly reopen it.
J- Install Indaw version v7.x
Download the most recent InDaw-MX version 7.xx on
http://labs.aaton.com/
F- RTX and the HD board
[Star t]/[Programs]/[VenturCom Rtx]/[Rtx proper ties]
“Plug and play” (etc., etc., please execute the very same
InDaw-MX v7.32 user manual 2004 May 4
p.21