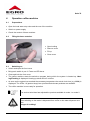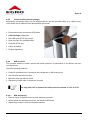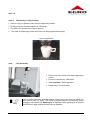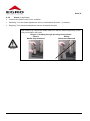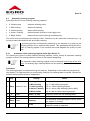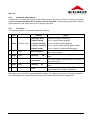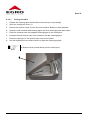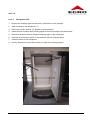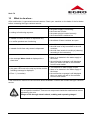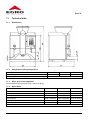
1
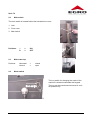
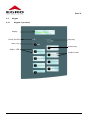
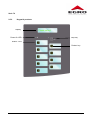
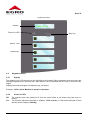
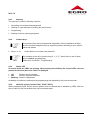
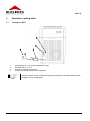
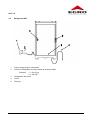
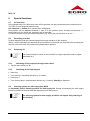
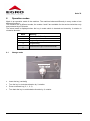
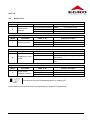
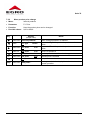
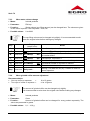
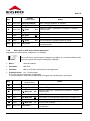
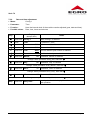
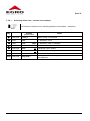
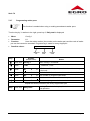
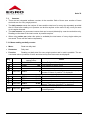
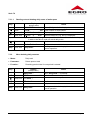
Operating instructions Swiss Egro 70 Series Serie 70 Table of contents 1 Introduction .............................................................................................................. 3 1.1 1.2 1.3 1.4 1.5 1.6 1.7 1.8 1.9 Copyright protection ..................................................................................................................................... 3 Purpose of operating instructions ................................................................................................................ 3 Warranty ...................................................................................................................................................... 3 Symbols ....................................................................................................................................................... 3 Quality assurance ........................................................................................................................................ 4 Conventional use ......................................................................................................................................... 4 User ............................................................................................................................................................. 4 Safety Instructions ....................................................................................................................................... 4 Legal information ......................................................................................................................................... 5 2 Control elements ...................................................................................................... 6 2.1 2.2 2.3 2.4 2.5 2.5.1 2.5.2 2.6 2.6.1 2.6.2 2.6.3 2.6.4 2.6.5 2.6.6 Overall view ................................................................................................................................................. 6 Main switch .................................................................................................................................................. 7 Main water tap ............................................................................................................................................. 7 Mode switch ................................................................................................................................................. 7 Keypad ......................................................................................................................................................... 8 Keypad 15 products ................................................................................................................................. 8 Keypad 9 products ................................................................................................................................... 9 Keypad elements ....................................................................................................................................... 10 Display ................................................................................................................................................... 10 Power On LED ....................................................................................................................................... 10 Stop key ................................................................................................................................................. 11 Product keys .......................................................................................................................................... 11 Status LED ............................................................................................................................................. 11 Shift-Key (only by models 7021, 7025P, 7027P) ................................................................................... 11 3 Operation cooling units ......................................................................................... 12 3.1 3.2 Cooling box KB 3 ....................................................................................................................................... 12 Refrigerator KS7 ........................................................................................................................................ 13 4 Operation coffee machine ..................................................................................... 14 4.1 4.2 4.3 4.4 4.4.1 4.4.2 4.4.3 4.4.4 4.4.5 Preparations............................................................................................................................................... 14 Filling the bean container ........................................................................................................................... 14 Switching on ............................................................................................................................................... 14 Product delivery ......................................................................................................................................... 15 Bean coffee ............................................................................................................................................ 15 Grinded coffee (manual dosage) ........................................................................................................... 16 Milk products .......................................................................................................................................... 16 Tea (hot water)....................................................................................................................................... 17 Steam (if applicable) .............................................................................................................................. 18 5 Special functions .................................................................................................... 19 5.1 5.2 5.3 5.3.1 5.3.2 5.4 Pre-selection .............................................................................................................................................. 19 Cancelling of a task ................................................................................................................................... 19 Switching off............................................................................................................................................... 19 Switching off the machine through main switch ..................................................................................... 19 Switching off through keypad ................................................................................................................. 19 Cleaning system for milk supply line (MSL) ............................................................................................... 19 6 Operation modes .................................................................................................... 20 6.1 6.2 Change mode ............................................................................................................................................ 20 Modes 0 to 3 .............................................................................................................................................. 21 17.04.2012 Page 1 Serie 70 7 Programming.......................................................................................................... 22 7.1 7.2 7.2.1 7.2.2 7.2.3 7.2.4 7.2.5 7.2.6 7.2.7 7.3 7.3.1 7.3.2 7.3.3 Use of product keys for programming........................................................................................................22 Adjustments ...............................................................................................................................................23 Menu key programming coffee or tea ....................................................................................................23 Menu product price change ...................................................................................................................24 Menu water volume change ...................................................................................................................25 Menu grinded coffee amount adjustment ..............................................................................................25 Menu milk or milk foam volume adjustment ..........................................................................................26 Date and time adjustment ......................................................................................................................27 Programming waiter pens ......................................................................................................................29 Counters ....................................................................................................................................................30 Menu reading out daily counter ..............................................................................................................30 Menu deleting daily counters .................................................................................................................31 Menu reading out total counter ..............................................................................................................32 8 Maintenance ........................................................................................................... 33 8.1 8.2 8.3 8.3.1 8.3.2 8.3.3 8.3.4 8.3.5 8.3.6 8.3.7 8.3.8 Daily cleaning .............................................................................................................................................33 Cleaning demand .......................................................................................................................................33 Automatic cleaning program: .....................................................................................................................34 Automatic coffee cleaning program Swiss Egro Series 70 ....................................................................34 Automatic milk cleaning .........................................................................................................................35 Procedure ..............................................................................................................................................35 Manual cleaning of cappuccino heads ...................................................................................................38 Manual cleaning of milk suction hoses and cooling units ......................................................................40 Cleaning of bean container ....................................................................................................................40 Cleaning of waste container, drip grid and drip tray ...............................................................................40 Cleaning of housing ...............................................................................................................................40 9 Service-messages .................................................................................................. 41 9.1 9.1.1 9.2 9.3 Display message waste container full ........................................................................................................41 Removal of waste container...................................................................................................................41 Display message water service .................................................................................................................42 Display message Coffee service................................................................................................................42 10 What to do when... ................................................................................................. 43 11 Technical data ........................................................................................................ 44 11.1 11.2 11.3 11.4 11.5 11.6 11.7 Dimensions ................................................................................................................................................44 Weight and working temperature ...............................................................................................................44 Noise level of the appliance .......................................................................................................................44 Boiler Data .................................................................................................................................................44 Connection values......................................................................................................................................45 Performance data ......................................................................................................................................45 Water connection .......................................................................................................................................45 12 Installation and commissioning............................................................................ 46 12.1 12.2 12.3 12.4 Installation ..................................................................................................................................................46 Water preparation ......................................................................................................................................46 Connection of water drain ..........................................................................................................................47 Electrical connection ..................................................................................................................................47 13 Consumable supplies ............................................................................................ 48 17.04.2012 Page 2 Serie 70 1 Introduction First of all, we thank you for choosing Egro. We are confident that the product you have purchased will meet all your expectations. The coffee system you are about to use is the outcome of extensive research and development. The coffee machine is the most efficient, user-friendly and well designed machine of its kind. This manual outlines the correct use and maintenance and will help you get the best results from your machine. We trust you will find our explanations clear and we may continue to earn your business in the future. 1.1 Copyright protection Egro Suisse AG reserves the right to make any technical changes to products described in these instructions without a prior notice in order to continuously develop and improve the machine. Partial or full photocopying, reproduction or dissemination, translation into foreign languages or transfer into electronic or machine readable format of this documentation is strictly prohibited. © 2011 Egro Suisse AG - All rights reserved. 1.2 Purpose of operating instructions These instructions are specially drawn up for employees operating, servicing, maintaining and repairing the machine. The instructions describe the functions and operation of your machine. All operating persons must carefully read and understand these instructions before starting their work at the machine. Operating instructions should be stored near the machine. A failure-free functioning of the machine is guaranteed provided that all these instructions are followed. In the event of disregard, especially concerning the chapter Important Safety Regulations, the device may present a hazard for operating and servicing personnel. Additionally, damages to the device or surrounding devices may arise. No liability will be accepted for any damage or break down of service caused by disregarding the operating manual. 1.3 Warranty Warranty and ex-gratia payments offered by Egro Suisse AG should be valid provided that your coffee machine is installed and maintained on a regular basis by an Egro service partner. Any changes or installation of components not approved by the producer will terminate the warranty. 1.4 Symbols Different symbols are used in these operating instructions. Meaning of symbols is described below: Danger This symbol is placed at safety instructions of special importance. Following of these instructions is essential. Disregard of instructions may result in injuries to user. It concerns your own safety! This warning symbol is placed at safety instructions of special importance. It means that the relevant instructions should be strictly followed in order to prevent damages to the machine. Attention 17.04.2012 Page 3 Serie 70 Note This symbol is placed to important product notes. It means that they give relevant notes or additional information about the system. 1.5 Quality assurance Egro Suisse AG applies the QA-system based on EN 29001/ISO 9001. 1.6 Conventional use Swiss Egro Series 70 is a fully automatic coffee machine that also can be used in staff kitchen areas in shops, offices and other working environments (i.e. farm houses; by clients in hotels, motels and other residential type environments; bed and breakfast type environments). 1.7 User This appliance is not intended for use by persons (including children) with reduced physical, sensory or mental capabilities, or lack of experience and knowledge, unless they have been given supervision or instruction concerning use of the appliance by a person responsible for their safety. Children should not play with the machine, whether they are supervised or unsupervised. 1.8 Safety Instructions • Don’t leave the packing elements (plastic bags, expanded polystyrene, nails, cardboard, etc.) within the reach of children, as these elements are potential sources of danger. • Do not place heavy items on the packaging. Do not stack more than three items of the same kind. • Keep the packed machine in a dry place, not exposed to environmental elements and in conditions in which the temperature does not go below 5°C. • If liquids inside the machine freeze, leave the coffee machine in a place with a minimum temperature of 20°C for at least 20 minutes before switching it on. • Switch off the appliance and disconnect from power supply before changing accessories or approaching parts that move in use. • Do not leave the machine exposed to environmental elements or place them in damp rooms such as bathrooms. • Install the machine on a water repellent surface (laminate, steel, ceramic, etc.) away from heat sources (oven, cooking stove, fireplace, etc.) and in conditions in which the temperature may not go below 5°C. KEEP WARM. Place on even surface. • The support surface shall be plane, dry, stable and as high that the top surface is more than 150 cm from the floor • Do not obstruct the drain outlet or drip tray and do not cover with cloths, etc. • Only use original spare parts in order to avoid compromising the safety and proper functioning of the machine. • In an emergency, such as fire, unusual noise, overheating, etc., take immediate action, disconnect the power and close water taps. • The coffee machine and the fridge are fixed together by means of two C-brackets screwed to the lateral panels; power off and disconnect devices from the power supply before removing fastenings. • When in doubt, request a detailed diagram of the supplied power from a qualified electrician. • Before connecting the equipment, check if the data on the machine corresponds to your electrical power supply. • The power supply must be provided with the following safety devices: efficient grounding connection; section of conductors suitable for absorption capacity; efficient grounding leakage protection circuit breaker. 17.04.2012 Page 4 Serie 70 • • Should the power cable be damaged, it has to be replaced by the manufacturer or by its technical service or by a person with equivalent qualification, in order to prevent any risks. Adaptors, multiple sockets and / or extensions must not be used. 1.9 Legal information In accordance with the European guidelines for safety and EMC. Treatment of waste from electric / electronic equipment. Dispose of the product in accordance with current local regulations concerning differentiated waste disposal in dedicated waste disposal areas. Do not treat as simple urban waste. For any information please contact the manufacturer at the address specified in the user manual. The product complies with the requirements of the new directives introduced for the environmental safeguard and must be properly disposed of at the end of its life cycle. Improper installation can cause damage to people, animals and things for which the manufacturer cannot be considered responsible. 17.04.2012 Page 5 Serie 70 2 Control elements 2.1 Overall view 1 5 6 2 7 3 4 8 9 11 12 10 Pos. 1 2 3 4 5 6 Element Bean hopper 2 x 1,25 kg Keypad Mode lock Tea dispenser Manual dosage (instant coffee / cleaning tablets) Front cover 17.04.2012 Pos. 7 8 9 10 11 12 Element Steam adjustment valve (option) Waste container Steam dispenser (option) Coffee dispenser Milk dispenser Drip grid Page 6 Serie 70 2.2 Main switch The main switch is located behind the lockable front cover. 1. Lock 1 2. Front cover 3. Main switch Positions: 2.3 = = ON OFF Main water tap Positions: 2.4 I O Horizontal Vertical = = closed open Mode switch The key switch for changing the mode of the machine is located underneath the keypad. The key can be inserted and removed in vertical position only. 17.04.2012 Page 7 Serie 70 2.5 Keypad 2.5.1 Keypad 15 products Display Power On LED Stop key SHIFT-key Product key Status - LED Product name 17.04.2012 Page 8 Serie 70 2.5.2 Keypad 9 products Display Power On LED Stop key Status - LED Product key 17.04.2012 Page 9 Serie 70 Keypad 5 products Display Power On LED Stop key Status - LED Product key 2.6 Keypad elements 2.6.1 Display The display is the LCD-window on the right above the keypad. During operation texts and notes are displayed explaining the process flow. Also failures can be identified with the help of relevant messages. Display texts and messages are displayed e.g. as follows Example: 12:34 o’clock Machine is ready for operation 2.6.2 Power On LED Off: The machine has been switched off from the main switch or the power plug has been removed On: The machine has been switched on (Display: 12:34 o’clock) or it has been switched off from the key switch (Display: Standby) 17.04.2012 Page 10 Serie 70 2.6.3 Stop key The stop key is used for following functions • Cancelling of a product being dispensed • Deleting of a pre-selection or quitting the shift function • Programming • Starting of various cleaning programs 2.6.4 Product keys Note • Keys 1 to 16: Note Every product key can be programmed individually. During installation the Egro service technician assigns every key a specific product according to your requirements and wishes. Coffee drinks or hot water (tea) and shift The symbols on the left of product keys 0, 1, 3, 5, 7 and 9 refer to use of these keys in mode 3 (programming). Please refer to section 7 "Programming". 2.6.5 Status LED In normal mode the LEDs are burning. After pressing the shift key the second LEDs (second product level active) burn and “Shift” is displayed. • • • On: Product can be selected Off: Product cannot be selected Blinking: Product is dispensed Availability of products is determined by programming and adjusted by the service technician. 2.6.6 Shift-Key (only by models 7021, 7025P, 7027P) When pressing the shift key the second product level is reached that is indicated by LEDs. With the stop or shift key the first product level can be reached again. 17.04.2012 Page 11 Serie 70 3 Operation cooling units 3.1 Cooling box KB 3 1 2 3 4 Cooling box On / Off only through power plug Rectifier 230 V 12 V Switch for cooling is arrested! Green LED burns during normal operation Note In order to switch off the cooling box the power plug has to be removed from power supply (or from refrigerator). 17.04.2012 Page 12 Serie 70 3.2 Refrigerator KS7 1 Power supply plug for refrigerator. 2 Switch for refrigerator and cup heater as far as provided Positions: I = On (lit up) 0 = Off (off) 3 Refrigerator door latch 4 Outlet 5 Drip tray 17.04.2012 Page 13 Serie 70 4 Operation coffee machine 4.1 Preparations • Open the local water stop valve and the one of the machine • Switch on power supply • Check the content of bean container 4.2 Filling the bean container • Open locking • Remove cover • Fill up • Close cover 4.3 Switching on • Unlock and open the front cover • Bring main switch in pos. I: Power on LED burns. • Close and lock the front cover. • The coffee machine starts the switch-on program during which the system is heated up. Heating/Flushing is displayed. Heating up takes about 5 minutes. • As soon as the system has reached the necessary temperature the actual clock time (e.g.12:34) is displayed. The LEDs 1-9 (product keys) burn provided that relevant products are available. • The coffee machine is now ready for operation. The service technician has adjusted the products available in mode 1 or mode 2. Note After switching on hot water is dispensed from coffee or hot water dispenser nozzles. Danger of scalding! Danger 17.04.2012 Page 14 Serie 70 4.4 Product delivery Machine is ready for operation when clock time is displayed. In order to obtain a drink (coffee, milk drink or tea) shortly press a relevant product key 4.4.1 Bean coffee • Place a cup(s) under the dispenser nozzle • Shortly press the desired product key • The relevant LED blinks, Your selection / „Espresso“ (product title) is displayed • The beans are grinded, the coffee is brewed • Product dispensing 1 cup of coffee Note 2 cups of coffee 1 jug of coffee Grinding and brewing times vary from product to product. Place cup(s) early under the dispenser nozzle! 17.04.2012 Page 15 Serie 70 4.4.2 Grinded coffee (manual dosage) Alternatively the product keys may be programmed for use with grinded coffee (e.g. caffeine free). Such drinks can be obtained semi-automatically as follows: • Press product key; the relevant LED blinks • Coffee dosage is displayed • Red LED (near STOP key) burns • Open the flap; fill in grinded coffee • Press the STOP key • Coffee is brewed • Product dispensing 4.4.3 Milk products The machine enables to obtain various milk-coffee products. A precondition is a machine with relevant equipment. We differ following products: • Cold milk (available only by machines with refrigerator or IMS cooling box) • Hot milk with and without coffee • Milk foam with and without coffee • Dispensing of milk foam by keystroke (manual) Use only milk (UHT or pasteurised milk) with a fat content of 1,5% to 3,5%. Note 4.4.3.1 Milk dispensing • Place a cup(s) or glasses under the milk dispensing nozzles • Shortly press the desired product key, the relevant LED blinks • Dispensing of cold or hot milk follows as required 17.04.2012 Page 16 Serie 70 4.4.3.2 Dispensing of milk products • Place a cup(s) or glasses under the milk dispensing nozzles • Shortly press the desired product key, LED blinks • The beans are grinded, the coffee is brewed • The order of dispensing of milk and coffee can be programmed variously 1 cup of cappuccino 4.4.4 Tea (hot water) Note • Place a tea cup under the hot water dispensing nozzle • Press the relevant key, LED blinks • Your selection / Tea is displayed • Dispensing of tea (hot water) If tea or steam has been obtained several times it may occur that the coffee machine has to warm up again. The LEDs of relevant keys are not burning. When pressing such product key Warming up is displayed. After warming up is finished the LEDs burn again and the product can be obtained. 17.04.2012 Page 17 Serie 70 4.4.5 Steam (if applicable) • Immerse the steam nozzle in the container • Obtaining: Turn the steam adjustment valve in anticlockwise direction ( ¼ rotation) • Stopping: Turn the steam adjustment valve in clockwise direction When heating up a liquid with steam make sure that the steam-dispensing nozzle is fully immersed in the liquid. Danger of scalding through spouting of hot liquids! Correct Wrong Nozzle fully immersed Nozzle not immersed Danger 17.04.2012 Page 18 Serie 70 5 Special functions 5.1 Pre-selection During dispensing of a coffee drink other coffee products can be pre-selected on the selected level. The LED of a pre-selected product burns. Pre-selection 1 / Coffee (first / second line) is displayed. Pre-selection can be adjusted between 1 and 16 in the product menu, thereby pre-selection = 1 means that only one coffee per keystroke can be selected. For self-service as well as for advance payment (e.g. coins) the pre-selection is set on 1. 5.2 Cancelling of a task Product dispensing can be cancelled anytime through activation of the stop key. When a coffee has been pre-selected the pre-selection is cancelled first and then after pressing the stop key one more time, the product being dispensed is deleted. 5.3 Switching off Note It is recommended to switch off the machine for longer operation pauses (nights, weekends etc.). 5.3.1 Switching off the machine through main switch • Set the main switch on "O". 5.3.2 Switching off through keypad • Insert key • Turn the key in clockwise direction by ¼ rotation • Press key 0 • Turn the key back in anticlockwise direction by ¼ rotation, Standby is displayed 5.4 Cleaning system for milk supply line (MLR) An automatic built-in cleaning system for milk supply line flushes automatically the milk supply lines at a predefined interval after last dispensing of a milk product. Note The cleaning system for milk supply line does not replace daily cleaning of the machine! 17.04.2012 Page 19 Serie 70 6 Operation modes Mode is an operation mode of the machine. The machine behaves differently in every mode or has different functions. The machine has 6 different modes; the modes 4 and 5 are available for the service technician only and protected by a PIN-code: The actual mode is displayed when the key in mode switch is inserted and turned by ¼ rotation in clockwise direction. Mode 0 1 2 3 4 5 6.1 Meaning Switched off / Standby Normal operation Registering / Slot operation Programming Reserved for Egro service technician Change mode • Insert the key (vertically) • Turn the key in clockwise direction by ¼ rotation • Press a relevant key (0, 1, 2, 3) • Turn back the key in anticlockwise direction by ¼ rotation 17.04.2012 Page 20 Serie 70 6.2 Modes 0 to 3 Boiler heating and display light is switched off. The machine is in standby mode Mode Operation What to do Display messages Key in horizontal position Mode ... (up-to-date mode) Switched off / Press key 0: 0 M_0: Standby Standby Key in vertical position Standby The machine is in normal operation mode. Mode Operation What to do Display messages Key in horizontal position Mode ... (up-to-date mode) Press key 1: Normal operation 1 M_1: Normal Key in vertical position 12:34 (up-to-date clock time) The machine is in pay – registering mode. Mode Operation What to do Key in horizontal position Press key 2: Registering- / coin 2 mode Key in vertical position Display message Mode ... (up-to-date mode) M_2: (depending on the registering / coin device) (depending on the registering / coin device) Programming mode: here the parameters can be changed or the counters read off. Mode Operation What to do Display messages Key in horizontal position Mode ... (up-to-date mode) Adjustments / Press key 3: 3 Products Total... Read off counters Key in vertical position 12:34 (up-to-date clock time) Turn back the key after finished adjustment or reading off! Note Please refer to more precise notes on programming in chapter7 Programming. 17.04.2012 Page 21 Serie 70 7 Programming In mode 3 (Programming) the following functions are available for the operator: Counter: • Reading off the daily total data (pieces and amount) • Deleting daily total data • Reading off overall total (pieces and amount) Deleting of counters cannot be undone! Note Adjustments: • Switching between coffee - tea • Product price • Water volume (cup filling amount) • Grinded coffee amount • Milk or milk foam volume (applicable only provided that „Option“ Cappuccino is available) • Date and time. • Waiter pen assignment 7.1 Use of product keys for programming In mode 3 (Programming) the key 0 (STOP as well as product keys 1, 3, 5, 7 and 9 are used for moving in menu tree and insertion of adjustments. On the left of keys the symbols are located that refer to the functions of relevant keys in programming mode. 0 1 3 5 7 9 3 2 10 11 4 5 12 13 6 14 7 15 9 8 16 Meaning of product keys in programming mode Key Symbol Function STOP: Cancelling, annulling, back to the 0 next higher menu level ENTER: Confirmation of displayed value 1 or access to the next lower menu level 3 Back to the previous parameter 5 To the next parameter Raising the blinking value by one unit 7 + Lowering the value of blinking value by one unit 9 − 17.04.2012 Page 22 Serie 70 7.2 Adjustments Note All procedures require selection of mode 3: Turn the key by ¼ rotation in clockwise direction, press key 3, Daily total... is displayed • The following values (parameters) can be adjusted separately for every product. The product can be identified through product number that equals the key number. Products 1 to 9 are coffee, hot water, milk or milk products without shift (p.12). With shift 2 –16. • In following examples the product number 4 is mentioned. • Some parameters require different values for coffee and hot water. Such cases are referred to explicitly. Note Changes in mode 3 will take effect only when the machine is in mode 1 (normal operation) or mode 2 (pay mode) (key in vertical position). 7.2.1 Menu key programming coffee or tea • Menu: Internal products • Parameter: P.1 type (coffee or tea) • Function: Here coffee or tea is programmed Display Key Notes (example values) Press until Internal products Menu "Internal products" is reached Press P.1 type Coffee Parameter (P.1 type) is for product 1: Product number blinks + Press 3 x P.4 type Coffee "Type" for product 4 Press P.4 type Coffee Product type blinks and can be changed now, cursor moves from front to the back. +/- Press until P.4 type Tea Desired product is reached Press P.4 type Tea Desired product is saved Stop Press until Daily total... Leaving: Turn back the key by ¼ rotation to return to normal operation. 17.04.2012 Page 23 Serie 70 7.2.2 Menu product price change • Menu: Internal products • Parameter: P.1 Price • Function: Here the product price can be changed • Possible values: 0,00 to 99,99 Display Key Notes (example values) Press until Internal products Menu "Internal products" is reached Press P.1 type Coffee Parameter "Type" for product 1: product number blinks Press until P.1 price 3.20 Parameter "Price" for product 1: product number blinks + Press 3 x P.4 price 3.20 "Price" for product 4 Press P.4 price 3.20 Product price blinks and can be changed now +/- Press until P.4 price 3.60 Desired price is reached Press P.4 price 3.60 New price is saved Stop Press until Daily total... Leaving: turn back the key by ¼ rotation to return to normal operation. 17.04.2012 Page 24 Serie 70 7.2.3 Menu water volume change • Menu: Internal products • Parameter: FM-Imp. • Function: Water volume (cup filling amount) can be changed here. The values are given in flow meter impulses. 100 FM pulses = ca 0,5 dl • Possible values: Note 0 to 9999 The cup filling volume can be changed only slightly. It is recommended to write down the original value before making any changes. Display Key Notes (example values) Press until Internal products Menu "Internal products" is reached Press P.1 type Parameter "Type" for product 1: product number blinks Press until P.1 FM-Imp 200 Submenu "FM-Impulse", Parameter for product 1. Product number blinks. + Press until P.4 FM-Imp 200 "FM-Impulse" for product 4 Press P.4 FM-Imp 200 Number of impulses blinks and can be changed now +/- Press until P.4 FM-Imp 300 The desired number of impulses is reached Press P.4 FM-Imp 300 The new volume is saved Stop Press until Coffee Daily total... Leaving: Turn back the key by ¼ rotation to return to normal operation. 7.2.4 Menu grinded coffee amount adjustment Recommendation: • One cup coffee or espresso = 8 to 10 grams • Two cups of coffee or espresso = Note 14 to 16 grams The amount of grinded coffee can be changed only slightly. It is recommended to write down the original value before making any changes. • Menu: Internal products • Parameter: Gram • Function: Amount of grinded coffee can be changed for every product separately. The values are presented in grams. • Possible values: 0,1 – 16,0 g 17.04.2012 Page 25 Serie 70 Display Key Notes (example values) Press until Internal products Menu „Internal products" is reached Press P.1 type Parameter "Type" for product 1: product number blinks Press until P.1 gram 8.0 Submenu "Gram", parameter for product 1. Product number blinks. + Press until P.4 gram 8.0 "Gram" for product 4 Press P.4 gram 8.0 The number gram blinks and can be changed now +/- Press until P.4 gram 8.5 The desired number gram is reached Press P.4 gram 8.5 The new amount of grinded coffee is saved Stop Press until Coffee Leaving: turn back the key by ¼ rotation to return to normal operation. Daily total... 7.2.5 Menu milk or milk foam volume adjustment Applicable only when option „Cappuccino“ is available. Note Milk or milk foam volume can be changed only slightly. It is recommended to write down the original value before making any changes. • Menu: Internal products • Parameter: MilkTime • Function: Milk or milk foam volume can be changed here. • Possible values: 0.0 – 99.9 seconds 0.0 by this value no milk foam is dispensed. 0.1 pulse operation: Milk foam is dispensed as long as the relevant button is pressed. Display Key Notes (Example values) Press until Internal products Menu " Internal products" is reached Press P.1 type Parameter "Type" for product 1: product number blinks Press until P.1 MilkTime 6.0 Submenu "MilkTime", parameter for product 1. Product number blinks. + Press until P.4 MilkTime 6.0 "MilkTime" for product 4 Press P.4 MilkTime 6.0 The number of seconds blinks and can be changed now +/- Press until P.4 MilkTime 7.5 The desired number of seconds is reached Press P.4 MilkTime 7.5 The new time is saved Stop Press until Coffee Daily total ... Leaving: turn back the key by ¼ rotation to return to normal operation. 17.04.2012 Page 26 Serie 70 7.2.6 Date and time adjustment • Menu: Config 1 • Parameter: Time • Function: Here the internal clock of the machine can be adjusted (year, date and time). • Possible values: Date, time, hours and minutes Display Key Notes (Example values) Press until Config 1 Menu Config 1 is reached Press Time 1. Submenu „Time" Press Year: 2003 2. Submenu „Year" is reached. Press until Year: 2003 Year number blinks. +/- Press until Year: 2004 Until the desired year number is reached Press Year: 2004 Until the desired year number is saved. Press until Month: 04 Parameter „Month“ is reached Change: same procedure as by year, start with Press until Day: 09 Parameter „Day“ is reached Change: same procedure as by „Month“, start with Press until Hour: 11 Parameter „Hour“ is reached Change: same procedure as by „Day“, start with Press until Min.: 05 Parameter „Minute“ is reached Change: same procedure as by „Hour“, start with Stop Press until Daily total... Leaving: turn back the key by ¼ rotation to return to normal operation. 17.04.2012 Page 27 Serie 70 7.2.6.1 Switching winter time – summer time example This function is carried out for switching between summertime – wintertime. Note Display Key Notes (Example values) Press until Config 1 Menu Config 1 is reached Press Time 1. Submenu „Time" Press Year: 2003 Press until Hour: 11 Parameter „Hour“ is reached Press until Hour: 11 Parameter „Hour“ blinks. +/- Adjust time Hour: 10 The desired time is adjusted Press Hour: 10 The desired time is saved. Stop Press until Daily total ... 2. Submenu „Year" is reached. Leaving: turn back the key by ¼ rotation to return to normal operation. 17.04.2012 Page 28 Serie 70 7.2.7 Programming waiter pens This function is needed when using or making amendments waiter pens. Note Turn the key by ¼ rotation to the right, press key 3, Daily total is displayed • Menu: Config 1 • Parameter: #1 • Function: Here the waiter number (the number on the waiter pen) and the code of waiter pen can be inserted or amended. Programming is made for every single pen. • Possible values: #12 45 Waiter No. 1-32 Waiter Code 45 Program Code Display Key Notes (Example values) Press until Config 1 Menu Config 1 is reached Press Time 1. Submenu „Time" Press #1 0 0 2. Submenu „Waiter pen" is reached. Insert the waiter pen in the lock! +/- Press until #5 0 0 On the left side the relevant waiter number is reached. Press #5 5 0 The number of program code blinks. +/- Press until #5 5 5 Until the middle number of the waiter pen is reached. Press #5 5 5 The desired program code is saved. Repeat the above procedure with every single waiter pen Stop Press until Daily total... Leaving: Turn back the key by ¼ rotation to return to normal operation. 17.04.2012 Page 29 Serie 70 7.3 Counters • There are two integrated software counters in the machine. Both of them save number of items and total sum for every single product. • The daily counter saves the number of items and the total sum for every day separately provided that it is reset after reading out. Operator can do this anytime: at the end of a day, once per week or at irregular intervals. • The total counter is a permanent counter that can be reset (deleted) by a service technician only. Reading out the data of the total counter is possible anytime. • When using waiter pen (when this option is available) the total sums of every single waiter pen are saved. These can be read out separately. 7.3.1 Menu reading out daily counter • Menu: Read out daily total • Parameter: Daily total • Function: Reading out daily total for every single product and in total is possible. The accumulated values (numbers of items and total sums) since last reset are displayed. Display Key Notes (Example values) DAILY TOTAL... Press Press Press + Press until Press Press Press + Press until Stop Press until Menu „Daily total" is displayed TTS K. 184 Total number of items coffee TTS T. 56 Total number of items tea TTS I. * 240 Total number of pieces all products Desired product number (e.g. product 7) is displayed. TTS I.7 8 Number of items of product 7 is displayed. Repeat the described procedure for every single product. TTB K. 662.40 Total sum coffee TTB T. 163.40 Total sum tea TTB I. * 825.80 Total sum all products Desired product number (e.g. product No 7) is disTTB I.7 25.80 played. Total sum of product 7 is displayed. Repeat the described procedure for every single product. Leaving: turn back the key by ¼ rotation to return to Daily total... normal operation. 17.04.2012 Page 30 Serie 70 7.3.1.1 Reading out and deleting daily sums of waiter pens Display Key Notes (Example values) DAILY TOTAL... Press TTS K. Press until # 1 TOT Menu „Daily total...“ is displayed 184 5 0.00 Total number of items coffee Displayed sum waiter No 1 Desired waiter No (e.g. No 5) is displayed + / - Press until # 5 TOT 5 0.00 Repeat the described procedure for every single waiter pen. After that delete the sums of waiter pens in order to be able to read out actual daily sums. Press Waiter.T.delete? Confirm Press Waiter.T.delete? Daily counters are deleted. Daily total... Leaving: turn back the key by ¼ rotation to return to normal operation. Stop Press until 7.3.2 Menu deleting daily counters • Menu: Daily total • Parameter: Delete product total • Function: Resetting product total. A new period is started. Display Key Notes (Example values) Daily total ... Menu „Daily total..." is reached Submenu "Read out daily total" Press TTS K. Press until TT delete ... Submenu "Delete daily total" is reached Press TT delete? Confirm Press TT deleted Daily counters are deleted. Daily total... Leaving: turn back the key by ¼ rotation to return to normal operation. Stop Press until 184 17.04.2012 Page 31 Serie 70 7.3.3 Menu reading out total counter • Menu: Read out daily total • Parameter: Overall total • Function: Reading out overall total for every single product and all together. The accumulated values (number of items and sums) are displayed. Display Key Notes (Example values) Daily total ... Menu „Daily total...“ is reached Menu „Overall total“ is reached Press Overall total Press GTS K. 3520 Press GTS T. 489 Press until GTS I. * 4009 + Press until GTS I.7 259 Press GTB K. 13595.20 Press GTB T. 1418.10 Press GTB I. * 15013.30 + Press until GTB I.7 Stop Press until Total number of items coffee Total number of items tea Total number of pieces all products Desired product number (e.g. product No 7) is displayed. Number of items of displayed product No 7 is displayed. Repeat the described procedure for every single product. Total sum coffee Total sum tea Total sum all product The desired product number (e.g. product No7) is displayed. Total sum for product No 7 is displayed. Repeat the described procedure for every single product. Daily total ... 2789.10 Leaving: turn back the key by ¼ rotation to return to normal operation. 17.04.2012 Page 32 Serie 70 8 Maintenance In order to meet the hygiene requirements of the coffee machine as well as the food regulation the Swiss Egro Series 70 must be cleaned in accordance with the following instruction. 8.1 Daily cleaning The daily cleaning comprises following items: • Coffee cleaning • Milk cleaning • Cleaning of cappuccino nozzles • Bean container • Waste container • Drip grid • Drip tray • Housing • Cooling device 8.2 Cleaning demand The coffee machine Swiss Egro Series 70 requires from its operator daily cleaning provided that the automatic cleaning demand is active. This demand occurs every 24 h if a coffee or milk product has been obtained. You can determine the time after consultation with an Egro service technician. One hour prior to the adjusted time the request Coffee + Milk Cleaning is displayed. Now you have one hour to carry out this procedure. After expiry of this time limit the products will be disabled and can be obtained again after cleaning. This cleaning request can be supported by an acoustic message. Recommendation: We recommend to set the cleaning time to 30 minutes prior to end of operation. E.g. End of operation 24.00 o’clock, cleaning time 23.30 o’clock The cleaning request will be made at 23.30 o’clock. Now you have time, without cancelling operation, to carry out cleaning directly before the end of operation. If cleaning is not carried out due to lack of time it should be made in the morning, otherwise no products will be dispensed. 17.04.2012 Page 33 Serie 70 8.3 Automatic cleaning program: Swiss Egro Series 70 has following cleaning programs: • 0: Cleaning stop stops the cleaning menu • 1: Milk cleaning starts milk cleaning • 2: Coffee cleaning starts coffee cleaning • 3: Autom. Flushing starts automatic flushing of milk supply lines • 4: Milk & Coffee starts milk and coffee cleaning simultaneously The menu items are displayed one after the other. Selection can be made with a relevant key, e.g. the key 4 starts simultaneous milk and coffee cleaning. If a cleaning process is cancelled by switching off the machine or by stop key the cleaning process will be repeated after restart. This guarantees that there will remain no cleaning agents in the machine that could degrade the quality of products. Note 8.3.1 Automatic coffee cleaning program Swiss Egro Series 70 For cleaning the inside of coffee machine (brewing chamber, sieves, hoses) an automatic cleaning program is used. The cleaning tablet is inserted in the manual dosage flap. The automatic coffee cleaning program must be activated once a day at the minimum. For cleaning Egro cleaning tablets can be used only Note Procedure: The cleaning program is activated through the stop key. Depending on the model the procedure differs slightly. For machines with only one brewing chamber one cleaning tablet is needed. Demand for another cleaning tablet becomes inapplicable. Key Display Notes Cleaning 0: Stop Selection through relevant key: 1: Milk cleaning Key 1 = Milk cleaning program 2: Coffee cleaning Key 2 = Coffee cleaning program 3: Autom. Flushing Key 3 = Autom. Milk cleaning system (MSL) 4: Milk & Coffee Key 4 = Milk & Coffee cleaning program Press Insert 1 cl. tab. Request to insert the first cleaning tablet. 3 Stop Press Insert 2 cl. tab. Request to insert the second cleaning tablet. 4 Stop Press Cleaning The automatic cleaning program is active. Duration: approx. 5 minutes. 12:34 Cleaning completed. The time is displayed; the machine is ready for operation. 1 2 5 Stop Press for 5 sec 2 17.04.2012 Page 34 Serie 70 8.3.2 Automatic milk cleaning Components in contact with milk must be cleaned once a day at the minimum. During the flushing program no other functions of the machine can be activated. The cleaning program with cleaning agent cleans the milk supply lines such as pumps and hoses. 8.3.3 Procedure The cleaning program is activated through the stop key. Key 1 2 3 Display Stop Press for 5 sec 1 Press Stop Press 4 5 6 Notes Cleaning 0: Stop Selection through relevant key: 1: Milk cleaning Key 1 = Milk cleaning program 2: Coffee cleaning Key 2 = Coffee cleaning program 3: Autom. Flushing Key 3 = Autom. Milk cleaning system (MSL) 4: Milk & Coffee Key 4 = Milk & Coffee cleaning program Cleaning agent Immerse the milk hose in the container filled with cleaning agent. Cleaning Cleaning is active until the displayed value is zero. 99 Fill in fresh water in the container and immerse the milk hose in it. Fresh water Stop Press Flushing 12:34 99 Flushing is active until the displayed value is zero. Cleaning and flushing is stopped. Time is displayed. Machine is ready for operation. Depending on the model the procedure differs slightly. For machines with only one brewing chamber one cleaning tablet is needed. Demand for another cleaning tablet becomes inapplicable. 17.04.2012 Page 35 Serie 70 8.3.3.1 Cooling box KB 3 1. Prepare the cleaning agent as directed in instructions on the package. 2. Open the cooling box cover (1) 3. Remove the suction hoses (2) from the milk container. Beware of milk splashes! 4. Clean the milk container with cleaning agent and rinse thoroughly with warm water. 5. Place the container with the prepared cleaning agent in the cooling box. 6. Immerse the milk suction hose in the container with the cleaning agent. 7. Close the cooling box. The suction hose must not be folded. 8. Use the keyboard on the coffee machine to start the cleaning program. No fluids must be poured directly into the cooling box. Note 17.04.2012 Page 36 Serie 70 8.3.3.2 Refrigerator KS7 1. Prepare the cleaning agent as directed in instructions on the package. 2. Open the door of the refrigerator (1) 3. Remove the milk container (3). Beware of milk splashes! 4. Clean the milk container with cleaning agent and rinse thoroughly with warm water. 5. Place the container with the prepared cleaning agent in the refrigerator. 6. Immerse all milk suction hoses in the container with the cleaning agent. 7. Close the doors of the refrigerator. 8. Use the keyboard on the coffee machine to start the cleaning program. 17.04.2012 Page 37 Serie 70 8.3.4 Manual cleaning of cappuccino heads 1. Turn the key 2. Open the front cover 3. Pull the bottom front cover forward and then upward to remove it. 4. Push the foam heads from beneath up through the coffee delivery spouts and free them from the delivery assembly 17.04.2012 Page 38 Serie 70 5. Remove the flexible tubing and take apart the foam heads 6. Take the foam heads apart as shown and put them into the cleaning detergent, wash them and rinse them thoroughly with hot water (all parts are dish washer resistant) 7. Place back the milk dispensing nozzles in the dispensing holder and connect the milk and steam hoses as shown in the picture 8. 1. Steam hose 2. Milk hose 3. Air hose 17.04.2012 Page 39 Serie 70 8.3.5 Manual cleaning of milk suction hoses and cooling units External panels, drip grid and drip tray as well as the cooling box with container can be cleaned with regular cleaning agents. Note Storage and dispensing of milk sets highest requirements to hygiene. A first-class quality of drinks can only be achieved when strict cleanliness is kept. The device must be cleaned on a daily basis! Attention The device must never be immersed in water! Do not clean by a water hose, pressure air or steam! Damages to the machine, danger of electric shock or short circuit is possible when installing the machine. 8.3.6 Cleaning of bean container Due to hygiene requirements the bean container and the cover must be cleaned with a regular cleaning agent inside and outside on a daily basis. No solvents, acidic or scraping agents must be used! Note 8.3.7 Cleaning of waste container, drip grid and drip tray Due to hygiene requirements the waste container, drip grid and drip tray must be thoroughly cleaned several times a day with a regular cleaning agent. First of all the milk residues should be fully removed from drip grid and drip tray. No solvents, acidic or scraping agents must be used! Note 8.3.8 Cleaning of housing Due to hygiene requirements the housing must be cleaned once a day with a regular cleaning agent. No solvents, acidic or scraping agents must be used! Note 17.04.2012 Page 40 Serie 70 9 Service-messages The following display messages refer to maintenance activities. 9.1 Display message waste container full The waste container is full. Therefore, all coffee functions are disabled temporarily. Empty and clean the waste container. When pulling out the waste container Container 5 is displayed. The number is counted backwards by seconds. After successful counting the message Container full is reset. The message No container is displayed. The waste container can be inserted only if emptied (danger of congestion). After the waste container is put back the message is deleted. The coffee functions are enabled again. This message does not apply for machines with an integrated waste removal. 9.1.1 Removal of waste container 1. Turn the steam dispenser by 90° to the left or to the right (steam dispensing is disabled) 2. Pull out the waste container and empty, clean and put back the container. The steam dispenser may be hot if steam has been dispensed previously. Danger of scalding! Danger 17.04.2012 Page 41 Serie 70 9.2 Display message water service Possibly the Egro service technician has programmed the maximum water volume that is in accordance with the usage time of softening device. If it is so the message Water service is displayed when switching on the coffee machine and until obtaining the first drink. Please inform your Egro service centre. This message has no impact to the functions of the machine and will be displayed until the service technician resets it. 9.3 Display message Coffee service Possibly the Egro service technician has programmed a maximum number of brewing cycles that is in accordance with the intervals for maintenance of brewing chambers. If it is so the message Coffee service is displayed when switching on the machine and until obtaining the first drink. Please inform your Egro service centre. This message has no impact to the functions of the machine and will be displayed until the service technician resets it. 17.04.2012 Page 42 Serie 70 10 What to do when... Often malfunction is connected external reasons. Check your machine on the basis of the list below before contacting the Egro customer service. When... • nothing is functioning anymore • instead of coffee hot water is dispensed only • no coffee products are functioning • • • • Check whether... ⇒ the power supply is functioning ⇒ the fuses are in order ⇒ the power plug is inserted correctly ⇒ the main switch is switched on ⇒ the bean containers are filled ⇒ the sliders of bean container are open ⇒ the milk container is not empty ⇒ the milk hose is fully immersed in the milk instead of milk foam only steam is dispensed container ⇒ the milk foam nozzle is not dirty d (cleaning according to the instruction) ⇒ the stopcock of water supply is open ⇒ there is no obstacle in the water supply of the message Water check is displayed for a the house short time ⇒ the malfunction message is still displayed when you switch off and on the machine from the main switch ⇒ The stopcock of water supply is open the green LED next to the stop key blinks and the ⇒ there is no obstacle in the water supply of following message is displayed the house ⇒ the malfunction message is still displayed Error ** (*a number) when you switch off and on the machine from the main switch If the malfunction cannot be removed write down the Error** number and contact the Egro customer service. Do not open the machine! There are no components inside the machine that can be adjusted by the user. Danger of life through electric shock, scalding and squeezing danger! Danger 17.04.2012 Page 43 Serie 70 11 Technical data 11.1 Dimensions 11.2 Weight and working temperature Swiss Egro Series 70 Weight (empty) Ambient temperature during operation 11.3 70xx 57 kg 70xxP 57 kg +5 bis +35°C Refrigerator 25 kg Noise level of the appliance The A-weighted sound pressure level is below 70 dB (A) 11.4 Boiler Data Swiss Egro Series 70 Boiler No. 1 Boiler No. 2 *Boiler No. 3 3000 W 3000 W 3000 W Working Pressure 9.5bar / 950 kPa 9.5bar / 950 kPa 1.4bar / 140 kPa Security Valve 11bar / 1100 kPa 11bar / 1100 kPa Test Pressure 24bar / 2400 kPa 24bar / 2400 kPa 24bar / 2400 kPa Heating Power Working Temperature Total Capacitiy 3bar / 300 kPa 95°C 95°C 125°C 1l 1l 1l Boiler No. 3 only in the models of Series 70 P 17.04.2012 Page 44 Serie 70 11.5 Connection values Swiss Egro Series 70 70xx 70xxP Refrigerator 230V~ 400V 3N~ 230V~ 50 – 60 Hz 50 – 60 Hz 50 – 60 Hz Fuse protection 16 A 16 A 10 A Nominal power 3,7 kW 9,7 kW 0,1 kW 70xx 70xxP 2 x 1.25 kg 2 x 1.25 kg Capacity coffee (100 ml) 210 c/h 210 c/h Capacity espresso (40 ml) 300c/h 300 c/h Hot water 30 l/h 55 l/h Coffee-milk drinks (100 ml) 160 c/h 270 c/h Latte Macchiato (300 ml) 70 c/h 120 c/h Power supply 11.6 Performance data Swiss Egro Series 70 Content bean glass 11.7 Water connection Min. pressure of flow 1 bar (15 PSI) 100 kPa Max. static pressure 4 bar (58 PSI) 400 kPa Min. flow rate 5 l/min 17.04.2012 Page 45 Serie 70 12 Installation and commissioning Installation and startup must only be carried out by an Egro service technician or trained Egro representative with due regard to all local installation regulations. Danger 12.1 • • • • • • • • • • • Installation The Swiss Egro Series 70 must not be installed rooms where water hose or high pressure cleaning equipment is used! The distance between the Swiss Egro Series 70 and the nearest wall must be at least 4 cm (air circulation). There must be sufficient space left above the machine to allow the bean hoppers to be filled. Do not install near heat sources, keep enough distance (heat distortion from coverings of devices). Do not close louvers! Place the Swiss Egro Series 70 on a stable basis! Screw feet can adjust unevenness. Make water supply connections A water supply faucet and a non-return valve must be fitted, readily accessible, at the front end (building side) of the water supply tube. Should the water supply tube need to be lengthened, a neutrally coloured web wound pressure tube must be used. The internal diameter of the extension tube must not be smaller than the one supplied on machine. The tubes must be rinsed out before being connected so that no dirt particles get into the Swiss Egro Series 70. It is forbidden to use an old water mains hose as spare part. If water mains hose needs to be replaced, a brand new hose shall be used. Test all connections for leaks. 12.2 Water preparation Note By water hardness of more 5°dKH or. 9°fKH (German or French carbonate hardness degree) water softener must be used. After water softener the residual hardness of water should be approx 5° dKH or 9°fKH. Note Water softeners regenerated by cooking salt are not suitable for coffee machines with steam boiler! Especially connection of such machines to house water softening device should be avoided. No warranty will be assumed for water leading components if these instructions are not followed. Attention 17.04.2012 Page 46 Serie 70 12.3 Connection of water drain • The drain hose should slope towards drain. • The supply and drain hoses must not be deviated or squeezed. 12.4 Electrical connection • A qualified electrician must make all electrical connections. • An electrical switch (mains switch) and / or an electrical socket must be connected, and readily accessible, near the machine. • The electrical mains switch must isolate the Swiss Egro Series 70 completely from the electrical mains supply. The gap between the contacts must be at least 3mm. • For the electricity supply, the data listed on the type plate must be carefully consulted! • If the electrical supply cables to the machine are damaged the manufacturer or his service personnel, or an authorized electrician, to avoid any danger, must replace them. 17.04.2012 Page 47 Serie 70 13 Consumable supplies Note Spare parts and reparation works are delivered and carried out by your Egro service technician only. Consumable supplies can be directly ordered on the basis of the list below. Always indicate the order number! Article Coffee cleaning tablets (box à 100 pcs) Cleaning Liquid (Milkclean) Milk foam head Bean container Cover for bean container Dosage spoon 8g Order No. 005990 055452 100064.001 039325 039083 004775 Egro Suisse AG original spare parts must be used only. Attention 17.04.2012 Page 48 Contacts Ansprechpartner Contacts HEADQUARTERS, PRODUCTION PLANTS and R&D Centers Rancilio Group s.p.a. Viale della Repubblica 40 20015 Villastanza di Parabiago Milano Italy Ph. +39 0331 408 200 Fax +39 0331 551 437 www.ranciliogroup.com [email protected] Egro Suisse AG Bahnhofstrasse 66 5605 Dottikon Switzerland Ph. +41 56 616 95 95 Fax +41 56 616 95 97 www.egrocoffee.com [email protected] WORLDWIDE BRANCH LOCATIONS SPAIN Rancilio Group Espana, s.a. Gran Vía de Carlos III, 84 3ª Edificio Trade 08028 Barcelona Spain Ph. +34 902 884 275 Ph. +34 934 923 414 Fax +34 93 496 57 01 www.ranciliogroup.com [email protected] SWITZERLAND Egro Suisse AG Bahnhofstrasse 66 5605 Dottikon Switzerland Ph. +41 56 616 95 95 Fax +41 56 616 95 97 www.egrosuisse.ch [email protected] PORTUGAL Rancilio Group Portugal Lda Estrada da Falagueira nº 68 E 2700-365 Amadora-Lisboa Portugal Ph. + 351 21 019 10 91 Fax + 351 21 019 10 91 www.ranciliogroup.com [email protected] USA/CANADA Rancilio Group North America Inc. 1340 International Parkway #200 Woodridge, IL 60517 USA Ph. +1 630 427 1703 Fax +1 630 427 1713 www.ranciliogroup.com [email protected] GERMANY Rancilio Group Deutschland GmbH Talstrasse 27 97990 Weikersheim Germany Ph. +49 7934 99 29 30 Fax +49 7934 99 29 330 www.ranciliogroup.de [email protected] SALES REPRESENTATIVE OFFICE ASIA Asian Market Access HK Ltd 601 Tak Woo House 17-19 D’aguilar Street Central Hong Kong Ph. +852 2521 7839 Fax +852 2521 5787 www.ranciliogroup.com 46-900-168 04/2012